WTO4030C - Kitchen appliance WINDMERE - Free user manual and instructions
Find the device manual for free WTO4030C WINDMERE in PDF.
User questions about WTO4030C WINDMERE
0 question about this device. Answer the ones you know or ask your own.
Ask a new question about this device
Download the instructions for your Kitchen appliance in PDF format for free! Find your manual WTO4030C - WINDMERE and take your electronic device back in hand. On this page are published all the documents necessary for the use of your device. WTO4030C by WINDMERE.
USER MANUAL WTO4030C WINDMERE
Accessories/Parts (USA/Canada)
1-800-738-0245
Model Modèle
WTO4030C
IMPORTANT SAFEGUARDS
When using electrical appliances, basic safety precautions should always be followed, including the following:
Read all instructions.
□ Do not touch hot surfaces. Use handles or knobs.
To protect against electrical shock do not immerse cord, plugs or appliance in water or other liquid.
- Close supervision is necessary when any appliance is used by or near children.
- Unplug from outlet when not in use and before cleaning. Allow to cool before putting on or taking off parts.
□ Do not operate any appliance with a damaged cord or plug, or after the appliance malfunctions or has been damaged in any manner. Return appliance to the nearest authorized service facility for examination, repair or adjustment. Or, call the appropriate toll-free number on the cover of this manual.
The use of accessory attachments not recommended by the appliance manufacturer may cause injuries.
Do not use outdoors.
□ Do not let cord hang over edge of table or counter, or touch hot surfaces.
Do not place on or near a hot gas or electric burner, or in a heated oven.
Extreme caution must be used when moving an appliance containing hot oil or other hot liquids.
To disconnect, turn any control to OFF, then remove plug from wall outlet.
□ Do not use appliance for other than intended use.
Use extreme caution when removing tray or disposing of hot grease.
- Do not clean with metal scouring pads. Pieces can break off the pad and touch electrical parts, creating a risk of electric shock.
□ Oversized foods or metal utensils must not be inserted in this appliance, as they may create a fire or risk of electric shock.
A fire may occur if the toaster oven is covered or touching flammable material including curtains, draperies, walls and the like, when in operation. Do not store any item on top of unit when in operation.
Extreme caution should be exercised when using containers constructed of other than metal or glass.
□ Do not store any materials, other than manufacturer's recommended accessories, in this oven when not in use.
□ Do not place any of the following materials in the oven: paper, cardboard and plastic.
□ Do not cover crumb tray or any part of the oven with metal foil. This will cause overheating of the oven.
SAVE THESE INSTRUCTIONS.
This product is for household use only.
POLARIZED PLUG (120V Models Only)
This appliance has a polarized plug (one blade is wider than the other). To reduce the risk of electric shock, this plug is intended to fit into a polarized outlet only one way. If the plug does not fit fully into the outlet, reverse the plug. If it still does not fit, contact a qualified electrician. Do not attempt to modify the plug in any way.
TAMPER-RESISTANT SCREW
Warning: This appliance is equipped with a tamper-resistant screw to prevent removal of the outer cover. To reduce the risk of fire or electric shock, do not attempt to remove the outer cover. There are no user-serviceable parts inside. Repair should be done only by authorized service personnel.
ELECTRICAL CORD
a) A short power-supply cord (or detachable power-supply cord) is to be provided to reduce the risk resulting from becoming entangled in or tripping over a longer cord.
b) Longer detachable power-supply cords or extension cords are available and may be used if care is exercised in their use.
c) If a long detachable power-supply cord or extension cord is used,
1) The marked electrical rating of the detachable power-supply cord or extension cord should be at least as great as the electrical rating of the appliance,
2) If the appliance is of the grounded type, the extension cord should be a grounding-type 3-wire cord, and
3) The longer cord should be arranged so that it will not drape over the countertop or tabletop where it can be pulled on by children or tripped over.
Note: If the power supply cord is damaged, it should be replaced by qualified personnel. In Latin America by, an authorized service center.
Product may vary slightly from what is illustrated.
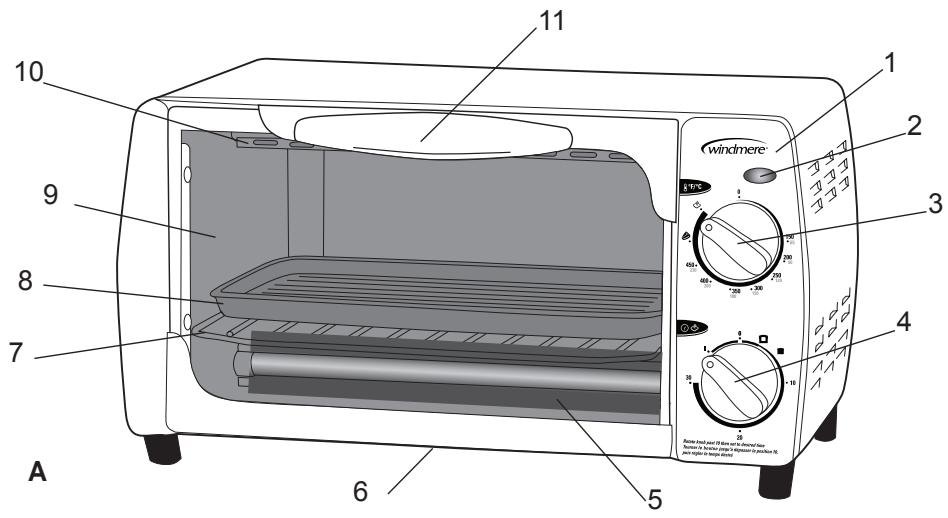
- Control panel
- Power light
† 3. Temperature/function control (Part # WTO4030C-01)
† 4. Timer control (with 30-minute timer) (Part # WTO4030C-02)
5. Bottom heating element
- Drop down crumb tray
† 7. Wire rack (Part # WTO4030C-03)
† 8. Bake pan (Part # WTO4030C-04) -
Glass door
10.Top heating element
11.Handle
† Consumer replaceable/removable parts -
dropdown crumb tray
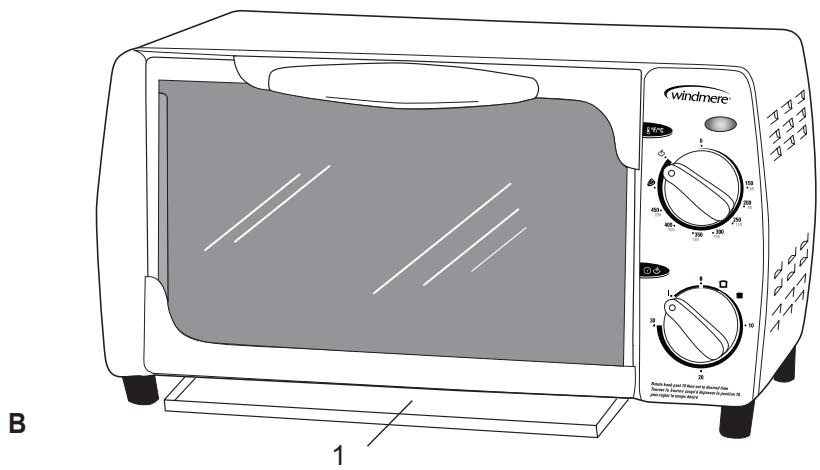
B
† 1. Wire rack (Part # WTO4030C-03)
† 2. Bake pan (Part # WTO4030C-04)
† Consumer replaceable/removable parts
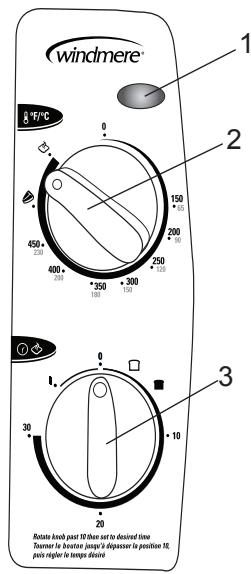
CONTROL PANEL
- Power light
- Temperature/function control
- Timer control (with 30-minute timer)
Important: When making toast or using the TIMER function, always turn the dial past 10 and then turn back or forward to desired setting.
D
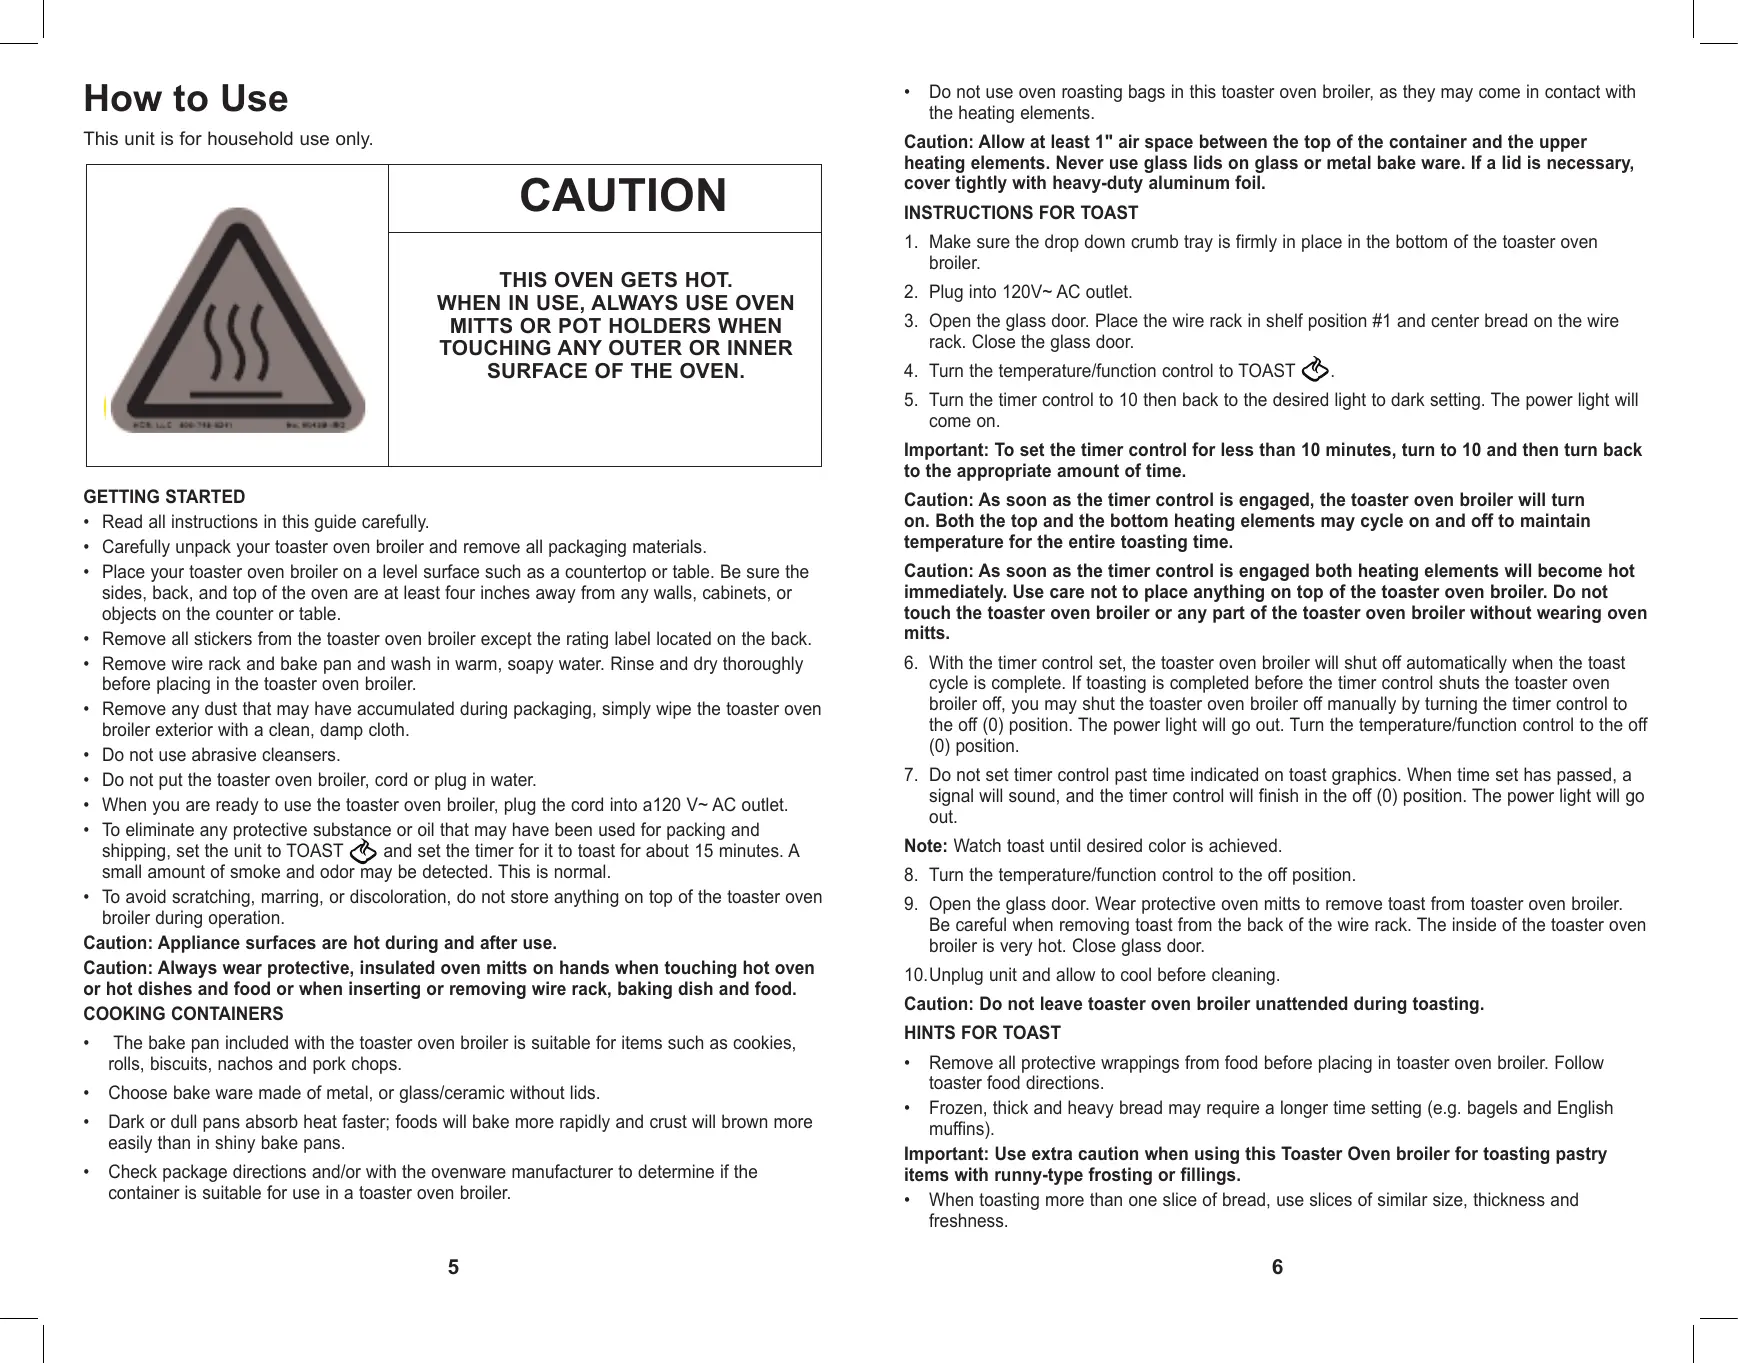
How to Use
This unit is for household use only.
| CAUTION |
| THIS OVEN GETS HOT. WHEN IN USE, ALWAYS USE OVEN MITTS OR POT HOLDERS WHEN TOUCHING ANY OUTER OR INNER SURFACE OF THE OVEN. |
GETTING STARTED
- Read all instructions in this guide carefully.
- Carefully unpack your toaster oven broiler and remove all packaging materials.
- Place your toaster oven broiler on a level surface such as a countertop or table. Be sure the sides, back, and top of the oven are at least four inches away from any walls, cabinets, or objects on the counter or table.
- Remove all stickers from the toaster oven broiler except the rating label located on the back.
- Remove wire rack and bake pan and wash in warm, soapy water. Rinse and dry thoroughly before placing in the toaster oven broiler.
- Remove any dust that may have accumulated during packaging, simply wipe the toaster oven broiler exterior with a clean, damp cloth.
- Do not use abrasive cleansers.
- Do not put the toaster oven broiler, cord or plug in water.
- When you are ready to use the toaster oven broiler, plug the cord into a120 V~ AC outlet.
- To eliminate any protective substance or oil that may have been used for packing and shipping, set the unit to TOAST and set the timer for it to toast for about 15 minutes. A small amount of smoke and odor may be detected. This is normal.
- To avoid scratching, marring, or discoloration, do not store anything on top of the toaster oven broiler during operation.
Caution: Appliance surfaces are hot during and after use.
Caution: Always wear protective, insulated oven mitts on hands when touching hot oven or hot dishes and food or when inserting or removing wire rack, baking dish and food. COOKING CONTAINERS
- The bake pan included with the toaster oven broiler is suitable for items such as cookies, rolls, biscuits, nachos and pork chops.
- Choose bake ware made of metal, or glass/ceramic without lids.
- Dark or dull pans absorb heat faster; foods will bake more rapidly and crust will brown more easily than in shiny bake pans.
-
Check package directions and/or with the ovenware manufacturer to determine if the container is suitable for use in a toaster oven broiler.
-
Do not use oven roasting bags in this toaster oven broiler, as they may come in contact with the heating elements.
Caution: Allow at least 1" air space between the top of the container and the upper heating elements. Never use glass lids on glass or metal bake ware. If a lid is necessary, cover tightly with heavy-duty aluminum foil.
INSTRUCTIONS FOR TOAST
- Make sure the drop down crumb tray is firmly in place in the bottom of the toaster oven broiler.
- Plug into 120V~ AC outlet.
- Open the glass door. Place the wire rack in shelf position #1 and center bread on the wire rack. Close the glass door.
- Turn the temperature/function control to TOAST
- Turn the timer control to 10 then back to the desired light to dark setting. The power light will come on.
Important: To set the timer control for less than 10 minutes, turn to 10 and then turn back to the appropriate amount of time.
Caution: As soon as the timer control is engaged, the toaster oven broiler will turn on. Both the top and the bottom heating elements may cycle on and off to maintain temperature for the entireasting time.
Caution: As soon as the timer control is engaged both heating elements will become hot immediately. Use care not to place anything on top of the toaster oven broiler. Do not touch the toaster oven broiler or any part of the toaster oven broiler without wearing oven mitts.
- With the timer control set, the toaster oven broiler will shut off automatically when the toast cycle is complete. If toasting is completed before the timer control shuts the toaster oven broiler off, you may shut the toaster oven broiler off manually by turning the timer control to the off (0) position. The power light will go out. Turn the temperature/function control to the off (0) position.
- Do not set timer control past time indicated on toast graphics. When time set has passed, a signal will sound, and the timer control will finish in the off (0) position. The power light will go out.
Note: Watch toast until desired color is achieved.
- Turn the temperature/function control to the off position.
-
Open the glass door. Wear protective oven mitts to remove toast from toaster oven broiler. Be careful when removing toast from the back of the wire rack. The inside of the toaster oven broiler is very hot. Close glass door.
-
Unplug unit and allow to cool before cleaning.
Caution: Do not leave toaster oven broiler unattended during toasting.
HINTS FOR TOAST
- Remove all protective wrappings from food before placing in toaster oven broiler. Follow toaster food directions.
- Frozen, thick and heavy bread may require a longer time setting (e.g. bagels and English muffins).
Important: Use extra caution when using this Toaster Oven broiler for toasting pastry items with runny-type frosting or fillings.
-
When toasting more than one slice of bread, use slices of similar size, thickness and freshness.
-
One slice of bread requires a lighter setting than several slices of bread.
- Stale bread, thin bread or sweet bread products, such as tea cakes and fruit loafs, brown much more quickly than ordinary bread so they should be toasted for less time.
- Different breads require different toasting times. Turn timer control dial to the off position and open the glass door to check toast color. Close glass door and reset timer control if more toasting time is needed.
- For best results, clean drop down crumb tray frequently.
INSTRUCTIONS FOR BAKING
- Make sure the drop down crumb tray is firmly in place in the bottom of the toaster oven broiler.
- Plug into 120V AC outlet. Close the glass door.
- Set the temperature/function control to the desired temperature.
- Set the timer for 10 minutes and preheat the toaster oven broiler. After 10 minutes, a signal will sound and the toaster oven broiler will automatically shut off.
- Remove all protective wrappings from food before placing in toaster oven broiler.
- Open the glass door. Place the wire rack into Shelf Position #1 or #2. Use the baking tray or an appropriate baking container and center it on the wire rack. If you would like your food browned top and bottom, place food directly on wire rack and close glass door. Bake according to package or recipe time.
- Turn the timer control to the desired time. The power light will come on.
- To set the timer control for less than 10 minutes, turn to 10 and then turn back to the appropriate amount of time.
Note: As soon as the timer control is engaged, the toaster oven broiler will turn on. Both the top and the bottom heating elements will cycle on and off to maintain temperature for the entire cooking time.
Note: As soon as the timer control is engaged both heating elements will become hot immediately. Use care not to place anything on top of the toaster oven broiler. Do not touch the toaster oven broiler or any part of the toaster oven broiler without wearing oven mitts.
- If the timer control has been set, the toaster oven broiler will shut off automatically when bake is complete. If cooking is completed before the timer control shuts the toaster oven broiler off, you may shut the toaster oven broiler off manually by turning the timer control to the off (0) position. The power light will go out. Turn the temperature/function control to the off (0) position.
- When the bake time is complete, a signal will sound, and the timer control will finish in the off (0) position. The power light will go out.
- Turn the temperature/function control to the off (0) position.
- Open the glass door. Wear protective oven mitts to remove food from toaster oven broiler. The inside of the toaster oven is very hot. Close the glass door.
- Unplug the unit and allow to cool completely before cleaning.
Important: Do not use glass covers on baking pans. If using a glass or glass-ceramic baking container, make sure it is at least 1 inch away from the top heating element.
Caution: Do not leave toaster oven broiler unattended during baking.
HINTS FOR BAKING
- Heavy-duty aluminum foil may be used to cover top of baking container to reduce over browning. Tuck ends of foil closely against edge of pan.
- Place food toward the back of the toaster oven broiler for better browning.
- Food may cook faster than recipe or package time. Check for doneness prior to end of cook time.
- Rotate and turn food over for more even browning halfway through the cooking process.
- To prevent heat loss, avoid opening the glass door excessively.
INSTRUCTIONS FOR BROILING
Note: Only the top heating element will heat when the BROIL 品 function is used.
- Make sure the drop down crumb tray is firmly in place in the bottom of the toaster oven broiler.
- Plug into 120V AC outlet. Close the glass door.
- Remove all protective wrappings from food before placing in toaster oven broiler.
- Place food directly onto the bake pan. Brush food with sauces or oil as desired.
- Open the glass door. Place the wire rack into Shelf Position #1 or #2. Place the bake pan with food into the toaster oven broiler and close the glass door.
- Turn the temperature/function control to BROIL
- Turn the timer control to the desired time.
- To set the timer control for less than 10 minutes, turn to 10 and then turn back to the appropriate amount of time.
Note: As soon as the timer control is engaged, the toaster oven broiler will turn on.
Note: As soon as the timer control is engaged the top heating element will become hot immediately. Use care not to place anything on top of the toaster oven broiler. Do not touch the toaster oven broiler or any part of the toaster oven broiler without wearing oven mitts.
- Broil according to package or recipe time. When broiling food that needs to be cooked on both sides, set the timer control to the time necessary for one side.
- With the timer control set, the toaster oven broiler will shut off automatically when the broiling is complete. If broiling is completed before the timer control shuts the toaster oven broiler off, you may shut the toaster oven broiler off manually by turning the timer control to the off position. The power light will go out. Turn the temperature/function control to the off position.
- When the broiling time is complete, a signal will sound, and the timer control will finish in the off position. The power light will go out.
- Open the glass door. Wear protective oven mitts to carefully slide the bake pan part way out of the toaster oven broiler. Turn the food, slide the bake pan back into the toaster oven broiler and close the toaster oven broiler glass door. Turn the timer control to the desired time.
- When the broiling time is complete, a signal will sound, and the timer control will finish in the off position. The power light will go out.
- Turn the temperature/function control to the off position.
- Open the glass door. Wear protective oven mitts to remove food from toaster oven broiler. Be careful when removing food. The inside of the toaster oven broiler is very hot. Close the glass door.
- Unplug unit and allow to cool completely before cleaning.
Caution: Do not leave toaster oven broiler unattended during broiling.
INSTRUCTIONS FOR TOP BROWNING
Note: To top brown foods, follow the Toast instructions but place the food in the bake pan on the wire rack.
Important: Do not leave toaster oven broiler unattended during top browning.
HINTS FOR TOP BROWNING
- Watch food to avoid over-browning.
- Top brown may be used to top brown bagels (cut side up), English muffins or melt cheese on sandwiches or casseroles.
INSTRUCTIONS FOR KEEP WARM
- Make sure the drop down crumb tray is firmly in place in the bottom of the toaster oven broiler.
- Plug into 120V AC outlet. Close the glass door.
- Remove all protective wrappings from food before placing in toaster oven broiler.
- Open the glass door. Place the wire rack into Shelf Position #1 or #2. Center a baking container or food on the wire rack or use bake pan and close the glass door.
- Set the temperature/function control to 200^ .
- Turn the timer control to the desired time. The power light will come on.
- To set the timer control for less than 10 minutes, turn to 10 and then turn back to the appropriate amount of time.
Caution: As soon as the timer control is engaged, the toaster oven broiler will turn ON. Both the top and the bottom heating elements will cycle on and off to maintain temperature for the entire cooking time.
Caution: As soon as the timer control is engaged both heating elements will become hot immediately. Use care not to place anything on top of the toaster oven broiler. Do not touch the toaster oven broiler or any part of the toaster oven broiler without wearing oven mitts.
- If the timer control has been set, the toaster oven broiler will shut off automatically when keep warm is complete. If keep warm is completed before the timer control shuts the toaster oven broiler off, you may shut the toaster oven broiler off manually by turning the timer control to the off (0) position. The power light will go out. Turn the temperature/function control to the off (0) position.
- When the keep warm time is complete, a signal will sound, and the timer control will finish in the off position. The power light will go out.
- Turn the temperature/function control to the off (0) position.
- Open the glass door. Wear protective oven mitts to remove food from toaster oven broiler. Be careful when removing food. The inside of the toaster oven broiler is very hot. Close the glass door.
- Unplug unit and allow to cool completely before cleaning.
Caution: Do not leave toaster oven broiler unattended during broiling.
HINTS FOR KEEP WARM
Use for short periods of time after food is cooked.
- To heat frozen or cold foods, see INSTRUCTIONS FOR DEFEROST.
INSTRUCTIONS FOR DEFROST
- Remove bake pan and wire rack.
- Plug into 120 V~AC outlet.
- Make sure the drop down crumb tray is firmly in place in the bottom of the toaster oven broiler.
- Open the glass door. Place wire rack in Shelf Position #1 or #2 of toaster oven broiler.
- Center a baking container or food on wire rack or use bake pan and close the glass door.
- Set the temperature/function control to 150^ .
-
Turn the timer control to the desired time. The power light will come on.
-
To set the timer control for less than 10 minutes, turn to 10 and then turn back to the appropriate amount of time.
Caution: As soon as the timer control is engaged, the toaster oven broiler will turn ON. Both the top and the bottom heating elements will cycle on and off to maintain temperature for the entire cooking time.
Caution: As soon as the timer control is engaged both the top and bottom heating elements will become hot immediately. Use care not to place anything on top of the toaster oven broiler. Do not touch the toaster oven broiler or any part of the toaster oven broiler without wearing oven mitts.
- If the timer control has been set, the toaster oven broiler will shut off automatically when defrost is complete. The power light will go out. Turn the temperature/function control to the off (0) position.
- When the defrost time is complete, a signal will sound, and the timer control will finish in the off position. The power light will go out.
- Turn the temperature/function control to the off (0) position.
- Open the glass door. Wear protective oven mitts to remove food from toaster oven broiler. Be careful when removing food. The inside of the toaster oven broiler is very hot. Close the glass door.
- Unplug unit and allow to cool completely before cleaning.
Caution: Do not leave toaster oven broiler unattended during defrosting.
HINTS FOR DEFROST
- Do not use this method for meat, poultry or fish.
- Do not cover food.
- Brush frozen dough with vegetable oil to prevent drying out and remove food to preheat toaster oven broiler before baking.
SPECIAL FEATURES
30-Minute Timer Control
The timer control dial also acts as the toaster oven broiler's ON/Off (I/O) switch. Turn the timer control clockwise to select the appropriate cooking time. If cooking less than 10 minutes, turn timer control to 10 minutes and then turn back to desired cooking time.
When the cooking cycle is completed, a signal will sound and the unit will turn off automatically. If you wish to turn the toaster oven broiler off at any time, manually turn the timer control to the off (0) position. Unplug toaster oven broiler when not in use.
Caution: Do not leave toaster oven broiler unattended during use.
Removable Wire Rack
The wire rack must be used for all cooking and toasting functions. The wire rack is removable for easy cleaning and must be properly re-inserted before use.
Drop Down Crumb Tray
The crumb tray in the bottom of the oven may be opened to clean.
Power Light
When you turn the timer control to the desired time, the power light will be on. The unit will shut off automatically when using the 30-minute timer function. When the cooking cycle is complete the power light will go out.
Bake Pan
For best results use bake pan to bake, broil, defrost, top brown, keep warm and to minimize clean-up due to spills. When broiling, both the bake pan and the wire rack must be used.
Care and Cleaning
This product contains no user serviceable parts. Refer service to qualified service personnel.
- Make sure the temperature/function and timer controls are in the off (0) position and unplug the toaster oven broiler before cleaning.
- Allow toaster oven broiler and accessories to cool completely before cleaning.
- Clean the outside of the toaster oven broiler with a damp cloth and dry thoroughly. A non-abrasive liquid cleaner may be used for stubborn stains. Rinse and dry thoroughly. Do not use metal scouring pads or abrasive cleaners that will scratch the surface.
- Clean the glass door with a cloth or sponge dampened with warm, sudsy water. Dry thoroughly.
- Remove bake pan and wire rack. Wash in soapy water, rinse and dry thoroughly.
- Do not use abrasive cleaners or metal scouring pads to clean bake pan or wire rack. For stubborn stains, clean with a nylon or polyester mesh pad and a mild, nonabrasive cleaner. Rinse and dry thoroughly.
- To clean the drop down crumb tray, tilt oven back. Locate knob on bottom of the oven and push it toward back of oven. This should release the drop down crumb tray. While continuing to tilt the oven, position drop down crumb tray at angle for cleaning. Wipe with a damp cloth to remove crumbs and spills. Always dry the drop down crumb tray thoroughly before closing Holding on to the knob, swing tray back up and secure into position.
Caution: Do not use spray-on or other oven cleaners. Using these types of cleaners may cause electrical damage.
INTERIOR CLEANING
- Always unplug unit and allow to cool completely before cleaning or moving.
- Remove bake pan and wire rack.
- Clean interior with a mild or nonabrasive cleaner and plastic scouring pad after each use to avoid build-up. Do not rub too hard as surface can be scratched.
- Rinse and dry thoroughly before closing the glass door.
EXTERIOR CLEANING
Wipe surfaces with a clean, damp cloth. Do not use abrasive cleaners, as they may scratch the surface.
STORAGE
Unplug unit, allow to cool and clean before storing. Store in its box in a clean, dry place. Never store it while it is hot or still plugged in. Never wrap cord tightly around the appliance. Do not put any stress on the cord where it enters the unit, as it could cause the cord to fray and break.
IMPORTANT CONSIGNES DE SECURITÉ
For service, repair or any questions regarding your appliance, call the appropriate 800 number on the cover of this book. DO NOT return the product to the place of purchase. Also, please DO NOT mail product back to the manufacturer, nor bring it to a service center. You may also want to consult the website listed on the cover of this manual.
One-Year Limited Warranty
(Appplies only in the United States and Canada)
What does it cover?
- Any defect in material or workmanship provided; however, Applica's liability will not exceed the purchase price of the product.
For how long?
- One year after the date of original purchase.
What will we do to help you?
- Provide you with a reasonably similar replacement product that is either new or factory refurbished.
How do you get service?
- Save your receipt as proof of date of sale.
- Check our on-line service site at www.prodprotect.com/applica, or call our toll-free number, 1-800-231-9786, for general warranty service.
- If you need parts or accessories, please call 1-800-738-0245.
What does your warranty not cover?
- Damage from commercial use
- Damage from misuse, abuse or neglect
- Products that have been modified in any way
- Products used or serviced outside the country of purchase
- Glass parts and other accessory items that are packed with the unit
- Shipping and handling costs associated with the replacement of the unit
- Consequential or incidental damages (Please note, however, that some states do not allow the exclusion or limitation of consequential or incidental damages, so this limitation may not apply to you.)
How does state law relate to this warranty?
- This warranty gives you specific legal rights, and you may also have other rights that vary from state to state or province to province.
BESOIN D'AIDE?
Applica Consumer Products, Inc.
Copyright © 2008 Applica Consumer Products, Inc.
Made in People's Republic of China
Printed in People's Republic of China