
M7 - Motherboard GIGABYTE - Free user manual and instructions
Find the device manual for free M7 GIGABYTE in PDF.
| Product type | Gaming mouse |
| Brand | GIGABYTE |
| Model | M7 (M6980X) |
| Sensor | Laser 6000 DPI |
| Polling rate | Up to 1000 Hz (1 ms) |
| Acceleration | 30 G |
| Number of buttons | 9 (7 + 2) customizable |
| Integrated profiles | 3 profiles with color LED (red, green, blue) |
| Internal memory | 8 KB for storing profiles and macros |
| Macro engine | GHOST™, compatible with Windows 98/2000/XP/7 |
| DPI adjustment | 400 to 6000 DPI customizable (3 preset levels: 810, 1620, 3240 DPI) |
| Lighting | RGB LED (7 colors + off) for profile and DPI indicators |
| Power supply | USB port 5 V |
| Approximate dimensions | 125 x 70 x 40 mm |
| Approximate weight | 150 g (without cable) |
| Cable length | 1.8 m |
| System compatibility | Windows 98, 2000, XP, 7 |
| Maintenance | Clean with a soft, dry cloth. Avoid liquids. |
| Safety | Take regular breaks to avoid musculoskeletal disorders. |
Frequently Asked Questions - M7 GIGABYTE
User questions about M7 GIGABYTE
0 question about this device. Answer the ones you know or ask your own.
Ask a new question about this device
Download the instructions for your Motherboard in PDF format for free! Find your manual M7 - GIGABYTE and take your electronic device back in hand. On this page are published all the documents necessary for the use of your device. M7 by GIGABYTE.
USER MANUAL M7 GIGABYTE
All intellectual property rights, including without limitation to copyright and trademark of this work and its derivative works are the property of, or are licensed to, GIGA-BYTE TECHNOLOG CO; LTD. Any unauthorized use is strictly prohibited.

Introduction
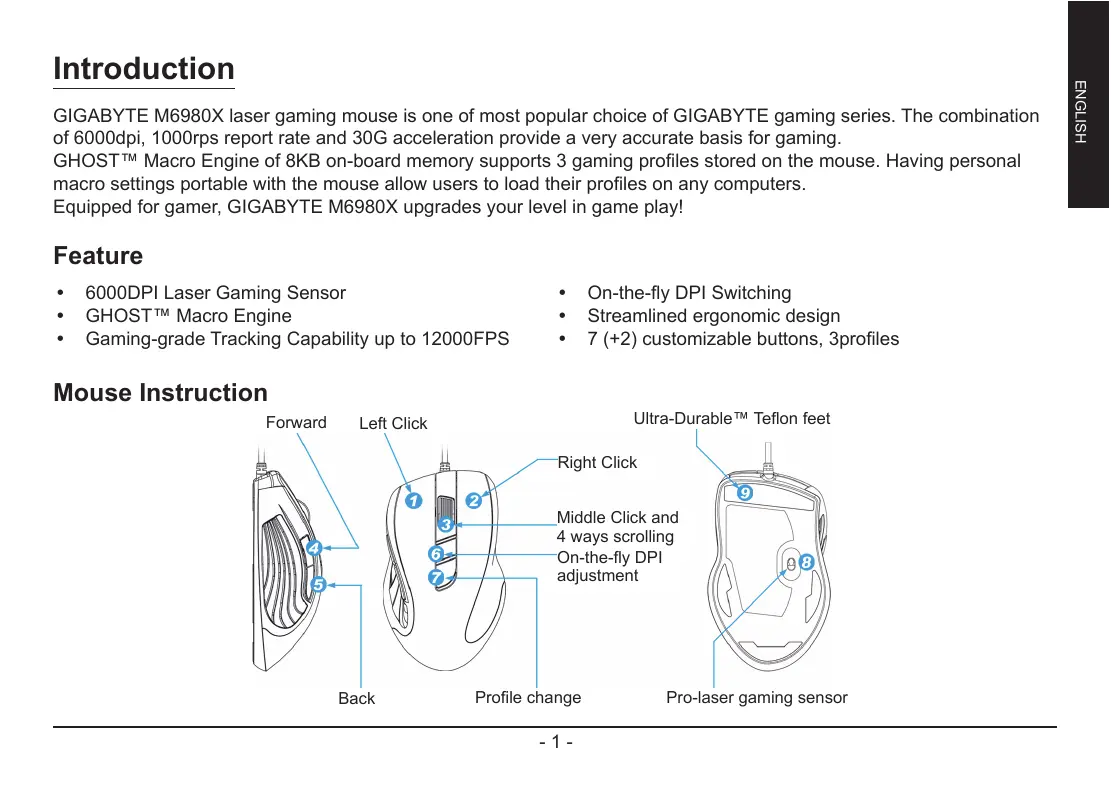
GIGABYTE M6980X laser gaming mouse is one of most popular choice of GIGABYTE gaming series. The combination of 6000dpi, 1000rps report rate and 30G acceleration provide a very accurate basis for gaming.
GHOST™ Macro Engine of 8KB on-board memory supports 3 gaming profiles stored on the mouse. Having personal macro settings portable with the mouse allow users to load their profiles on any computers.
Equipped for gamer, GIGABYTE M6980X upgrades your level in game play!
Feature
6000DPI Laser Gaming Sensor
- GHOST™ Macro Engine
Gaming-grade Tracking Capability up to 12000FPS
- On-the-fly DPI Switching
Streamlined ergonomic design - 7 (+2) customizable buttons, 3profiles
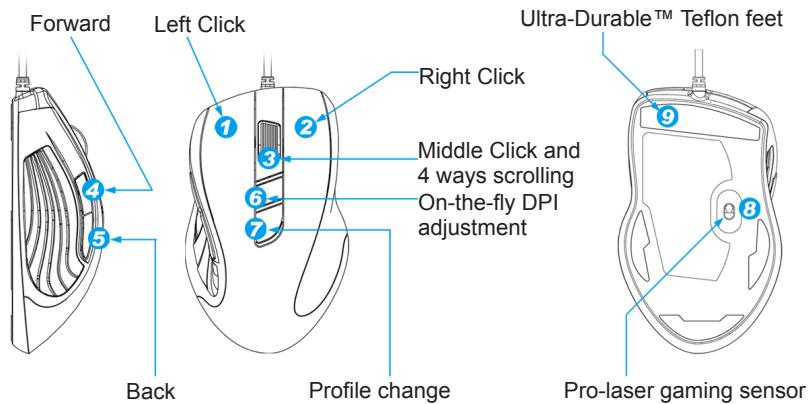
Mouse Instruction
LED display
- DPI indicator
810dpi / 1620dpi / 3240dpi (customizable 400~6000dpi adjustment via GHOST™ Engine)
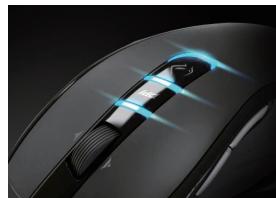
- Profile indicator
Red: Profile1 / Green: Profile2 / Blue: Profile3 (customized color lighting via GHOST™ Engine)
Important information
Long period of repetitive motion using an improperly set-up workplace, or incorrect body posture may be associated with physical discomfort and injury to nerves, tendons and muscles.
GHOST™ Macro Engine
GHOST™ Macro Engine supports Windows 98, Windows 2000, Windows XP, and Windows 7. Install the software to assign buttons and set up your personal profile.
■ BUTTON ASSIGN
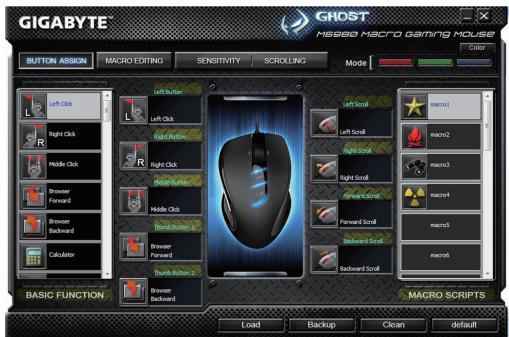
User can assign various functions to buttons from both "BASIC FUNCTION" and "MACRO SCRIPTS". All you have to do is drag the function icon and simply drop to the button you would like to assign. Remember that you may edit each macro script in the "MACRO EDITING" tab.
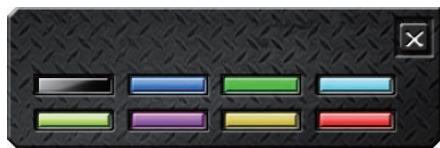
There are three default color LED lights (red/green/blue) on the panel which indicate three different profiles set up by users. Each individual profile can be assigned various settings to 9 customizable buttons. Moreover, you can also change the color of LED light for each profile.
(There are 7 colors and a light-off mode to choose from).
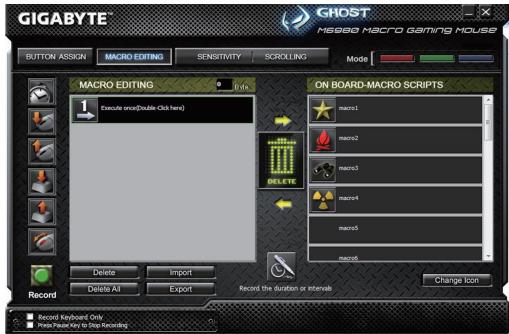
MACRO EDITING

The macro editing tab allows you easily to record all the commands, including key bindings and the press of mouse button. Each single macro also can be imported and exported onto your hard disk for further usage.
Start with:
Step 1 Click "Record the duration or intervals" if you'd like to record intervals between two commands.
Step 2 Double-click "Cycle through selection of action mode" to change the execute mode.
Step 3 Click "Record" to start creating a macro and recording all the keystrokes or mouse commands.
Step 4 Click "Stop" to finish recording this macro when a macro is done.
Step 5 You can also insert additional commands on the "Quick-insert bar" left.
Step 6 After recording a macro, you may drag commands of the macro and drop into "On-board script" to store this macro on the mouse.
Step 7 Double-click on the macro scrip to rename this macro. Moreover, you may also change icon of your personal macro through clicking "change icon".
Step 8 Come back to "Button Assign" tab, the macro you had built would become one application of "Macro scrip" in this tab.
Learn more:
Record the duration or intervals (Time lag)
If this function is marked, it allows you to record the intervals between two commands.
Cycle through selection of action mode
- Execute once:
To execute a macro once. - Loop mode:
Re-pressing to stop: Executing a macro continuously, and re-pressing the assigned button to stop the running macro. - Fire-button mode:
Executing a macro continuously until you release the assigned button.
Export
To export your macro to the PC.
Import
To import a macro to the macro editing in GHOST engine application program.
Re-edit the macro
Dragging the macro script back to macro editing allows you to re-edit this macro.
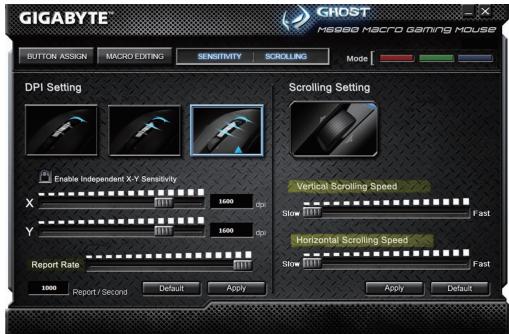
■ SENSITIVITY/ SCROLLING Tab

Sensitivity
As default setting, there are three sensitivity stages: 810, 1620, and 3240DPI (dots per inch). You can set up preferred sensitivity value of three sensitivity stages, then you can simply adjust through on-the-fly switch. Check "set X and Y axis separately" option to adjust X-Y sensitivity levels.
Report rate
The report rate determines the time intervals that your PC retrieves data from your mouse. You can set the report rate to 125Hz (8ms), 250Hz (4ms), 500Hz (2ms), or 1000Hz (1ms) by moving the knob on the slider.
Scrolling
You can adjust vertical & horizontal scroll wheel speed by moving the knob on the slider.
簡介
(MOxHO BbIbpaTbJIIObOu37UBeTeOB).
PeDAkTOp MaKpOcOB
BknaKpaPeakot Makuocob n03Bolraet 3aIncatb B MaKoc PIObIe KOMaHdbI, BKIOUaY KOMbHaCmN HaxaTn KHOPOK Ha KlaBaNAtype NMbIu. OTeNbHbIe MaKocbi MoXHo IMNOpTIpOBaTb IIN 3KcNOpTIpOBaTb Ha JceTkM DnCK DJIY NCIOJb3OBAHnB B 6yduem.
OchOBhble DeiCtBnA:
Iar 1 Haxmte «3aInCb dInTeBHOCTn / INTePbAIOB», ecn XOTnTE 3aNcTaB INTePbAJIb MExDy DByM KOMaHdAmN.
Iar 2 DboHno IeJoc Ha fynKcnn «ZnKnueckn Bbl6op pexmOB» (hnp., Execute once (OndokpaTHo)) MeHreT peXmNcNoJIHeHna.
Iar 3 KhoNka «3aHnCb» co3daet MaKpoc n BkJIOnyaeT 3aNNcB cex Opeaun Ha KnaBnAType n MbIiN.
Iar 4 KhoNka «CtoT» 3aBep7aet 3aIncB makpoc a nocIe erO c0zHaHn.
Iar 5 IaHeJIb «BbICtpaB CbTaBka» TaKKe N03BOJnEeBCTaBNTb DOnONHInTeNbHbIe KOMaHdbl.
Iar 6 Iocne 3aHcN MaKpOca nepeTaunTe KOMaHdbi MaKpOca Ha naneJIb «BcTpoEHbIe cUeHapIN» dIy 3aHcN MaKpOca B IamrMbIuN.
7 700Hn HcHApn MaKpOa n3BnIeT nepeImeHOBaTb MaKpoc. KpOme TOro, ZJIKNyB Ha KNOpKe «CMeHa 3NaUka», MOXHO CmEHNTb 3HaOH KBaUero JINuHoro MaKpOca.
Iar 8 BepHntecb Ha BklaDky «HaCtpoiKa KhoNOK» - Co3daHnBb BamM MaKpOc nOaBNTc CpeDn MaKpOKoMaHd B pa3deJe «MaKpOcbl».
DOnoJIHnTeIbHo:
Pekopd npoDOnKInTeBHoCTN INI INHTepBaJIbI BpeMeHn (BpeM 3aDePxxkN)
YcTaHOBkaФлaxKka 3ToI ΦyHKcIIN («3aIINcBДЛNTeIbHOCrN / INTEpBaIbO (3aIepXKa)») NO3BOJЯET 3aIINcBIBaTb INTEpBaJIbIMexJy DByMk KOMaHdAMN.
Zuknueckn Bb6op pexmOB
- OndokpatHo:
BbInonHeHne MaKpOca Odn pa3.
LInKnueckn:
ДоВТОРОнжати:Цкл用电сьгенперывhoeБынOLнe МAkpocaВПOTьdoВТОрОнжатиHa3HaueHHOнKHONKINДЯ OCTaHOBKNBbIOnHeHnMaKpoca.
- OTOKATNA:
LInKnueckoe HenpepbBHOe BbIOnHeHne MaKpOca BnIObT Do OTKaTHaHa3HaueHHo KHONKn.
3Kcnopt
3KcnpTupOBaHne MaKpOca B KOMNbIbTeP.
Mnopt
IIMnOPT MaKpOca B yTuNITy peJaTnPoBaHnMa KApocB nPorpaMmbl GHOST Engine.
PekaTpoBaHne MaKpoca
BknadaKa YUBCTBNTbHOCtB / NPOKPyTKA
UyBCTBNTeJIbHOCTb
IIO yMOJUHINIO DOCtUHNO TPN IYPOBnIyVBCTBnTeJIbHOCTN:810,1620 n 3240 dpi (TOeK Ha JIOM).OINn H3 trpx yPOBHeIyVBCTBnTeJIbHOCTN MOXHO BbIbpaTb B KaueCTBe OCHOBHoro,A 3aTeM nepeKJIIOuTaB yVBCTBnTeJIbHOCTb B XoJe INpbl. YcTaHOBnTeФJaXOK «Pa3dJIbHO IO OcARM X N Y»ДЯ pa3dJIbHOH NaCTPOnK IYVBCTBnTeJIbHOCTN IO OcARM X N Y.
Yactota OTyETOB
Napametp《UactotaOTeTOB》yCTaHaBnBaet BpeMeHHo INTepBaI cHTbIBaHna DaHHbIX MbII. MoKHO BVb6paTb UactOTy OTeTOB paBHO 125Tc (8Mc), 250Tc (4Mc), 500Tc (2Mc) nIIN 1000Tc (1Mc), nepeMeaJ aON3yHOK Uactota OTeTOB.
Ppokpyka
[ \exists \text{K} ]
- 韓庄:
卡时,
- 哈伊OH-BHIN MOD:
志達成的通行于他,如:
##
SAUGJAR
者去
KRELOG HOST ENIEN EPHLRIEIKI 1F 1
A3KJ
i k

釜戸
- Introduction
- Feature
- LED display
- Important information
- GHOST™ Macro Engine
- ■ BUTTON ASSIGN
- MACRO EDITING
- Start with:
- Learn more:
- Record the duration or intervals (Time lag)
- Cycle through selection of action mode
- Export
- Import
- Re-edit the macro
- ■ SENSITIVITY/ SCROLLING Tab
- Sensitivity
- Report rate
- Scrolling
- 簡介
- PeDAkTOp MaKpOcOB
- OchOBhble DeiCtBnA:
- DOnoJIHnTeIbHo:
- Pekopd npoDOnKInTeBHoCTN INI INHTepBaJIbI BpeMeHn (BpeM 3aDePxxkN)
- Zuknueckn Bb6op pexmOB
- 3Kcnopt
- Mnopt
- PekaTpoBaHne MaKpoca
- BknadaKa YUBCTBNTbHOCtB / NPOKPyTKA
- UyBCTBNTeJIbHOCTb
- Yactota OTyETOB
- Ppokpyka
- ##
- 者去
- A3KJ
- 釜戸
Brand : GIGABYTE
Model : M7
Category : Motherboard