
MP776IXHA - Built-in oven HOTPOINT - Free user manual and instructions
Find the device manual for free MP776IXHA HOTPOINT in PDF.




| Product type | Built-in microwave oven |
| Brand | HOTPOINT |
| Model | MP776IXHA |
| Dimensions (H x W x D) | 388 x 594 x 343.5 mm |
| Net weight | 14.85 kg |
| Electrical supply | 230 V ~ 50 Hz |
| Nominal input power (microwave) | 1250 W |
| Nominal output power (microwave) | 800 W |
| Capacity | 20 L |
| Turntable diameter | 245 mm |
| Cooking functions | Microwave (5 levels), defrost (by weight or time), auto menu (10 programs), multi-stage cooking, quick start |
| Timer | Yes, up to 95 minutes |
| Clock | 24-hour display |
| Child safety | Lock by long press on STOP |
| Control type | Rotary and touch buttons |
| Cavity materials | Stainless steel |
| Maintenance | Clean interior with a damp cloth; do not use steam cleaner or abrasive detergents |
| Reparability | Replacement of bulb and power cord by a qualified professional |
| Included accessories | Glass tray, turntable support, instruction manual |
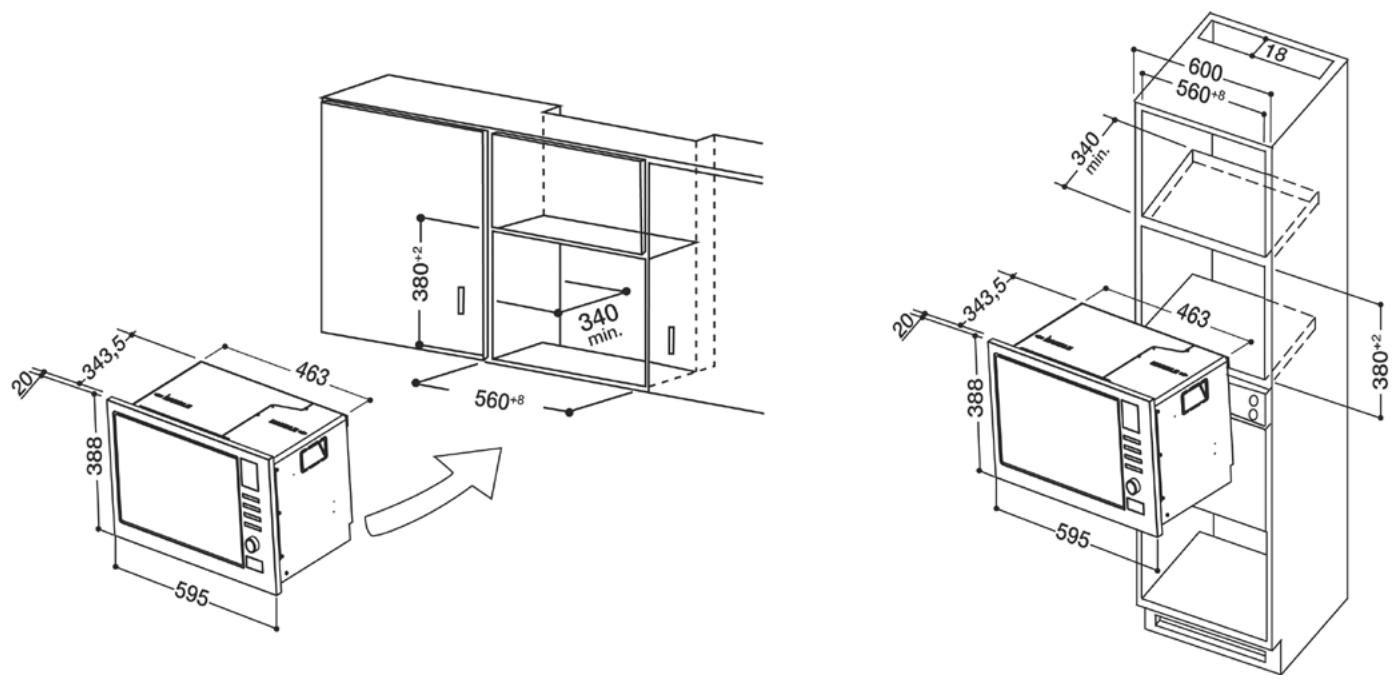
| Installation | Built into a 60 cm wide cabinet, min. depth 55 cm, min. height above floor 85 cm |
Frequently Asked Questions - MP776IXHA HOTPOINT
User questions about MP776IXHA HOTPOINT
0 question about this device. Answer the ones you know or ask your own.
Ask a new question about this device
Download the instructions for your Built-in oven in PDF format for free! Find your manual MP776IXHA - HOTPOINT and take your electronic device back in hand. On this page are published all the documents necessary for the use of your device. MP776IXHA by HOTPOINT.
USER MANUAL MP776IXHA HOTPOINT
Therefore m = 3/11 ;
Farmhouses; bed and breakfast.
MATERIALS, PRODUCTS FOR CBU-Neun
| Посuya | Примechаня | |
| Алюинewsвая фолbra | Толъдь пожытney сблоб. Небочице гаджпес Кужс Фовг могут 6ьить Исплъзовahlы дьлгсяашь отстория тонкхчачей мяра сльллпць.Есянфolyяа Слишков сьллзко к сөндандьлгьдь орхдьхдьг разрд.Фolyядь оллхна нххдьсь сьр разхдьхдьг разрд. | |
| Посuya дь порчмянваян | СледуITE ИНСТРУКДМ ПОНЗВODITЯД. Дь NOОСБДь Dь ZANECHДь OALXHNO HAXOINTBSC нрасостгдь He Meee Yem 5 MM Oр Врашалшь сьрпк. Hnравиьhoe Ирьэлбг мороть приевсь K NOBPEKDEHIO BVAAPAUQUECE TAPENK. | |
| Стоноа росuya | Толърп�огнаддь CBY-псч. СледуITE ИNCHТРУКДМ ПОНЗВODITЯ! He Иspлъз�чite TpechUTyU OIL NADKOLOTYU NOCSU. | |
| Столяньные бankи | Вcertда снимайе крьшу. Иspлъз�чite толъдь лergкого наргевань сodeжимого. Бolyшн�стvo Столяньные росuya | |
| Пakъдь дь Neчey | СледуITE ИNCHТРУКДМ ПОНЗВODITЯ! He 3a8a3b4a8eite MeTALINUECKO ПОВOLOKO Прodedалайе CBERV B PAKETE DlbyPQKNDI Dь BIXODA napa. | |
| Бумжные тарлк и Stakань | Иspлъз�чite толъдь sbictrpoTO prinotoblenia/parzorpeBa. He octabлгий тьчь Б3princmOTBA IN PPOUCES Prinotoblenia. | |
| Бумжные палтenuca | Иspлъз�чite dny pokttiyнблдь Дь NOBtOPHOro pasorpeBa I Dny BnITbIBAHNA Jxpa. Иspльзayte пдь кOTPOMEL TOLьдь sbICTrPO prinotoblenia. | |
| Пекарская ("пераentная") | Иspлъз�етсь в кachestve PokltiyTNДг prinodTbAupuenia pa36pb3rmbuHnien Иль в Кachestve oberptbuaHnien dny prinotoblenia Ha napy. | |
| Пл actikovа росuya | Толърп�огнаддь CBY-псч. СледуITE ИNCHТРУКДМ ПОНЗВODITЯ! Naocdy DoLXHb I blyTb Mapkinobwa "Дь CBY-псч." HeKOTOPbI ePnACTIKOBbIe KOR6k STAnOBaTcS CTeRka MArKIMM I3-3a harpeBa IxC OSePZIMO. Г.TOBeBblA BnPAACTIKOBbIg yNakOBKax I NIIOTH zAkpytBbIe PIACTIKOBbIe пaketы дOLXHbblb ITOKpblItb, npokOLObTIb CBPEX, coBLOdai Te INCHPTKUChIHa YAOKOBke. | |
| Оbertonчна пелнka | Толърп�огнаддь CBY-псч. Иspлъз�етсь dny pokltiyTNbIb Dny prinoccece prinotoblenia dny coxpanenie couchostn. Пелнka He DOJXHb kacatbcs edy. | |
| Термometрь | Толърп�огнаддь CBY-псч. (termometрьдь Мяс a KOnDInTepckoi BvIequn). | |
| Вошеная обероча Бумara | Иspлъз�етсь в Кachestve PokltiyTNДг prinodTbAupuenia pa36pb3rmbuHnien I дь coxpanenie couchostn. | |
| Мaterиаль, неrelno'dь дь CBY-псч. | ||
| Посuya | Примechаня | |
| Алюинewsbie | Moryt Bly3BaTb DyrBOw pa3rd. | |
| блоба | Ipepenoxite 6bIooD B noCsyd, prinodHyU dny CBY-псч. | |
| Картон дь пilseвьх пordутВ cMetaillnececkoy ручк. | Moryt Bly3BaTb DyrBOw pa3rd. Ipepenoxite 6bIooD B noCsyd, prinodHyU dny CBY-псч. | |
| Metallnececkay посuya ипосuya | Metall expanepuyet produkT ot CBY-n3Lynewry. Metallnececkay otdeIeKMOET Bly3BaTb DyrBOw pa3rd. | |
| metallnececkie Крчение пrobolochki | Moryt Bly3BaTb DyrBOw pa3rd n Bo3ropane BHTpr ni neu. | |
| Бумжные пaketы | Moryt Bly3BaTb Bo3ropane BHTpr ni neu. | |
| Пенонлacr | Пенонлacr MOket paCpIaBnTcBcI NII 3aRpy3HNTb COdejKIMOe noid Bo3deiCTBnEM BlyICOKO temperatypbI. | |
| Дерево | Дерево ВьсьхаET CBY-n3Lynewry n Moket Notpeckatbci nii pa3lomiTbcS. | |
RU
Names of parts and consumable parts
Remove the oven and all materials from the cardboard packaging and from the oven itself.
The oven is supplied complete with the following parts:
Glass turntable 1
Rotating ring 1
Operating instructions 1
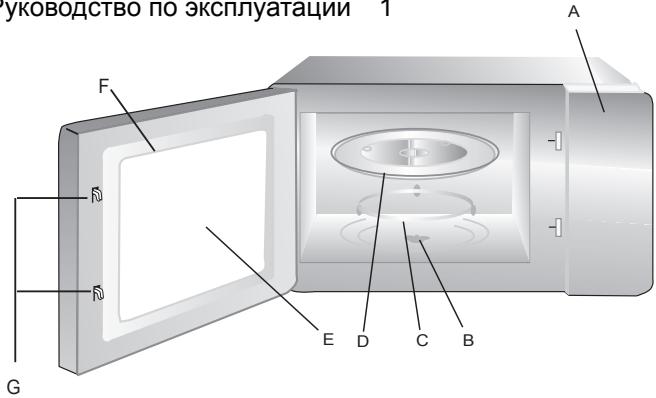
A) Control panel B) Rotating ring C) Rotating ring support D) Glass turntable E) Viewing window F) Door handle G) Safety interlock system
Installation of the rotating ring
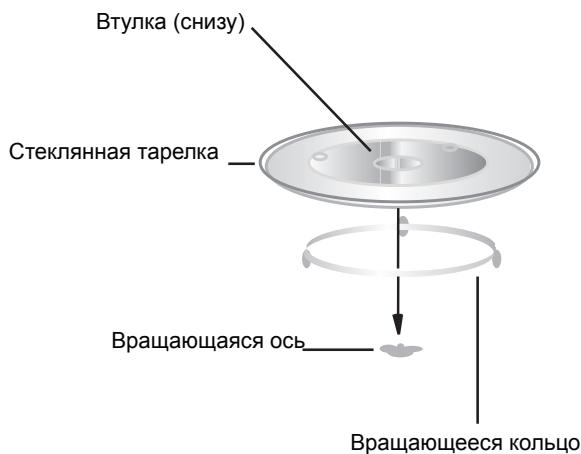
a. Never install the glass turntable upside down. The glass turntable must always rotate freely. b. Both the glass turntable and the rotating ring must always be installed for use with CBU-Neun. c. All dishes and utensils must be placed on the glass turntable for cooking. d. If the glass turntable or the rotating ring is damaged or broken, contact the nearest authorized service center.
Installation and connection
1. This product is intended for household use only. 2. This product is intended for built-in installation only. It cannot be installed on a countertop or inside a cabinet. 3. Follow the special installation instructions. 4. The product can be installed in a niche with a width of at least 60 cm (not less than 55 cm in depth and at a height of 85 cm from the floor). 5. The product is supplied with a plug and must be connected to a properly installed, grounded power outlet. 6. The mains voltage must correspond to the voltage indicated on the rating plate of the product. 7. Installation of the power outlet and replacement of the power cord must be carried out only by a qualified electrician. If the outlet becomes inaccessible after installation, a multi-pole disconnecting switch must be installed on the installation side with a contact gap of at least 3 mm. 8. The use of adapters, multiple sockets, and extension cords is prohibited. Overloading may lead to fire.
1. Setting the Clock
After connecting the appliance to the power supply, the display shows "0:00" and a beep sounds.
1) Press the "/" button once. The display shows "00:00". 2) Turn the regulator "" to set the hours. The set value must be between 0 and 23 (24-hour format). 3) Press the "/" button to confirm the hour value. 4) Turn the regulator "" to set the minutes. The set value must be between 0 and 59. 5) Press the "/" button to confirm the clock setting. The clock will start.
Notes:
1) If the clock is not set, it will not work when the appliance is powered on. 2) If you press the "PAUSE STOP" button during the clock setting process, the appliance will automatically return to the previous mode.
Press the "START" button again to begin cooking.
Example: If you need to use 80% of the microwave power for 20 minutes, follow the instructions below:
1) Press the " " button once. The display shows "P100". 2) Press the " " button again or turn the regulator "h" to select 80% power. 3) Press the "START" button to confirm. The display shows "P 80". 4) Turn the regulator "" to set the cooking time until the display shows "20:00". 5) Press the "START" button to start cooking.
3. Quick Start
1) In standby mode, press the "START" button to start cooking at 100% power. With each subsequent press, the cooking time increases by 30 seconds up to 95 minutes. 2) In microwave mode, press the "START" button to increase the cooking time by 30 seconds. 3) In standby mode, turn the regulator
"" to set the cooking time at 100% power, then press the "START" button to start cooking.
"$" Pad instructions
The power cord must not be squeezed or bent.
A. Built-in installation
B. Preparing the saw
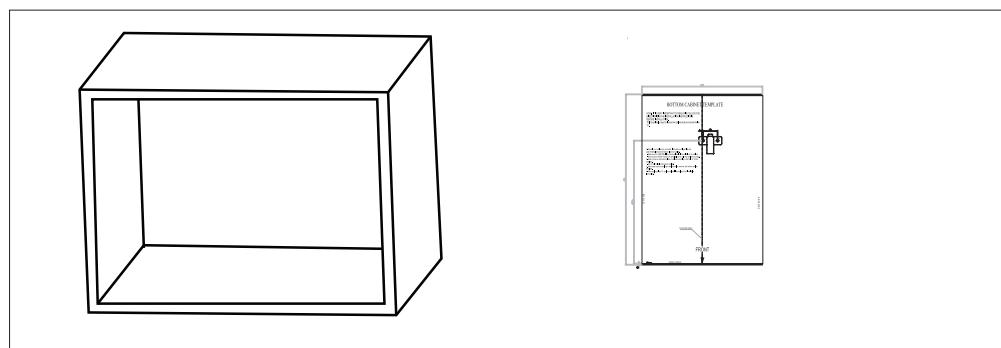
1. Read the instructions on the lower plate of the saw, place the plate over the saw.
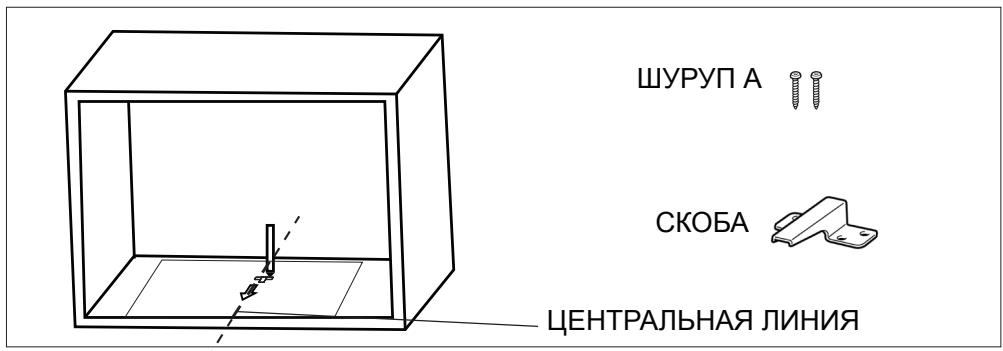
- Make marks on the bottom of the saws corresponding to the holes "a" in the plate.
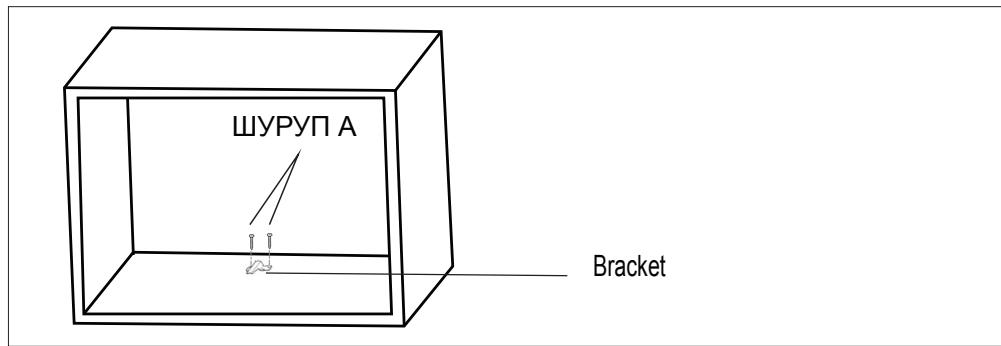
- Secure the lower plate of the saw and attach the lower brackets with screw A.
C. Installing the saw.
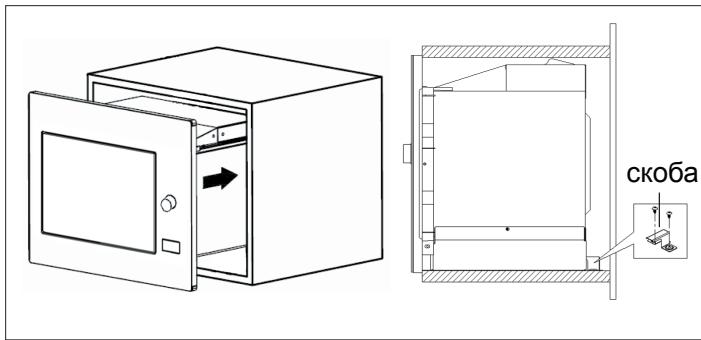
- Insert the saw into the saw.
Precautions and suggestions, 106
Oven installation, 110
Operating instructions, 111
Troubleshooting, 115
Installation, 116

Kazakawa

Hotpoint
ARISTON
Read these instructions carefully before using your microwave oven, and keep them in a safe place.
If you follow the instructions, your oven will provide you with many years of good service.
SAVE THESE INSTRUCTIONS CAREFULLY
PRECAUTIONS TO AVOID POSSIBLE EXPOSURE TO EXCESSIVE MICROWAVE ENERGY
(a) Do not attempt to operate this oven with the door open since this can result in harmful exposure to microwave energy. It is important not to break or tamper with the safety interlocks. (b) Do not place any object between the oven front face and the door or allow soil or cleaner residue to accumulate on sealing surfaces. (c) WARNING: If the door or door seals are damaged, the oven must not be operated until it has been repaired by a competent person.
ADDENDUM
If the apparatus is not maintained in a good state of cleanliness, its surface could be degraded and affect the lifespan of the apparatus and lead to a dangerous situation.
Specifications
| Model: | MWA 121.1 X/HA |
| Rated Voltage: | 230V~50Hz |
| Rated Input Power (Microwave): | 1250W |
| Rated Output Power (Microwave): | 800W |
| Oven Capacity: | 20 L |
| Turntable Diameter: | Ø 245mm |
| External Dimensions: | 594x343.5x388mm |
| Net Weight: | Approx. 14.85Kg |
IMPORTANT SAFETY INSTRUCTIONS
WARNING
To reduce the risk of fire, electric shock, injury to persons or exposure to excessive microwave oven energy when using your appliance, follow basic precautions, including the following:
- Warning: Liquids and other foods must not be heated in sealed containers since they are liable to explode.
- Warning: It is hazardous for anyone other than a competent person to carry out any service or repair operation that involves the removal of a cover which gives protection against exposure to microwave energy.
- Warning: Only allow children to use the oven without supervision when adequate instructions have been given so that the child is able to use the oven in a safe way and understand the hazards of improper use.
- Warning: When the appliance is operated in the combination mode, children should only use the oven under adult supervision due to the
temperatures generated. (only for grill series)
- Only use utensils suitable for use in microwave ovens.
- The oven should be cleaned regularly and any food deposits should be removed.
- Read and follow the specific: "PRECAUTIONS TO AVOID POSSIBLE EXPOSURE TO EXCESSIVE MICROWAVE ENERGY".
- When heating food in plastic or paper containers, keep an eye on the oven due to the possibility of ignition.
- If smoke is observed, switch off or unplug the appliance and keep the door closed in order to stifle any flames.
- Do not overcook food.
- Do not use the oven cavity for storage purposes. Do not store items, such as bread, cookies, etc. inside the oven.
- Remove wire twist-ties and metal handles from paper or plastic containers/bags before placing them in the oven.
- Install or locate this oven only in accordance with the installation instructions provided.
- Eggs in the shell and whole hard-boiled eggs should not be heated in microwave ovens since they may explode, even after microwave heating has ended.
- Use this appliance only for its intended uses as described in the manual. Do not use corrosive chemicals or vapors in this appliance. This oven is especially designed to heat. It is not designed for industrial or laboratory use.
- If the supply cord is damaged, it must be replaced by the manufacturer, its service agent or similarly qualified persons in order to avoid a hazard.
- Do not store or use this appliance outdoors.
- Do not use this oven near water, in a wet basement or near a swimming pool.
- The temperature of accessible surfaces may be high when the appliance is operating. The surfaces are liable to get hot during use. Keep cord away from heated surface, and do not cover any vents on the oven.
- Do not let cord hang over edge of table or counter.
- Failure to maintain the oven in a clean condition could lead to deterioration of the surface that could adversely affect the life of the appliance and possibly result in a hazardous situation.
- The contents of feeding bottles and baby food jars shall be stirred or shaken and the temperature checked before consumption, in order to avoid burns.
- Microwave heating of beverages can result in delayed eruptive boiling, therefore care must be taken when handling the container.
- The appliance is not intended for use by persons (including children) with reduced physical, sensory or mental capabilities, or lack of experience and knowledge, unless they have been given supervision or instruction concerning use of the appliance by a person responsible for their safety.
- Children should be supervised to ensure that they do not play with the appliance.
- The microwave oven shall not be placed in a
cabinet unless it has been tested in a cabinet.
- The appliances are not intended to be operated by means of an external timer or separate remote-control system.
- WARNING: Ensure that the appliance is switched off before replacing the lamp to avoid the possibility of electric shock.
- Accessible parts may become hot during use. Young children should be kept away.
- Steam cleaner is not to be used.
- Surface of a storage drawer can get hot.
- Do not use harsh abrasive cleaners or sharp metal scrapers to clean the oven door glass since they can scratch the surface, which may result in shattering of the glass.
- During use the appliance becomes hot. Care should be taken to avoid touching heating elements inside the oven.
- Only use the temperature probe recommended for this oven. (For ovens provided with a facility to use a temperature-sensing probe.)
- During the first use there is a particular smell due to production oils used to protect some components.
- This appliance can be used by children aged from 8 years and above and persons with reduced physical, sensory or mental capabilities or lack of experience and knowledge if they have been given supervision or instruction concerning use of the appliance in a safe way and understand the hazards involved. Children shall not play with the appliance. Cleaning and user maintenance shall not be made by children unless they are older than 8 and supervised.
- Keep the appliance and its cord out of reach of children less than 8 years.
- This appliance is intended to be used in household and similar applications such as:
- staff kitchen areas in shops, offices and other working environments;
- by clients in hotels, motels and other residential type environments;
- farm houses;
- bed and breakfast type environments.
- WARNING: The appliance and its accessible parts become hot during use. Care should be taken to avoid touching heating elements. Children less than 8 years of age shall be kept away unless continuously supervised.
READ CAREFULLY AND KEEP FOR FUTURE REFERENCE
DANGER
Electric Shock Hazard
Touching some of the internal components can cause serious personal injury or death. Do not disassemble this appliance.
WARNING
Electric Shock Hazard
Improper use of the grounding can result in electric shock. Do not plug into an outlet until appliance is properly installed and grounded.
CLEANING
Be sure to unplug the appliance from the power supply.
- Clean the inside of the oven after using with a slightly damp cloth.
- Clean the accessories in the usual way in soapy water.
- The door frame and seal and neighboring parts must be cleaned carefully with a damp cloth when they are dirty.
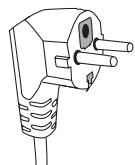
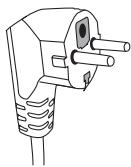
Two-round-pin plug
UTENSILS
See the instructions on "Materials you can use in microwave oven or to be avoided in microwave oven." There may be certain non-metallic utensils that are not safe to use for microwaving. If in doubt, you can test the utensil in question following the procedure below.
Utensil Test:
- Fill a microwave-safe container with 1 cup of cold water (250ml) along with the utensil in question.
- Cook on maximum power for 1 minute.
- Carefully feel the utensil. If the empty utensil is warm, do not use it for microwave cooking.
- Do not exceed 1 minute cooking time.
CAUTION
Personal Injury Hazard
It is hazardous for anyone other than a competent person to carry out any service or repair operation that involves the removal of a cover which gives protection against exposure to microwave energy.
| Materials you can use in microwave oven Utensils | Remarks |
| Aluminum foil | Shielding only. Small smooth pieces can be used to cover thin parts of meat or poultry to prevent overcooking. Arcing can occur if foil is too close to oven walls. The foil should be at least 1 inch (2.5cm) away from oven walls. |
| Browning dish | Follow manufacturer's instructions. The bottom of browning dish must be at least 3/16 inch (5mm) above the turntable. Incorrect usage may cause the turntable to break. |
| Dinnerware | Microwave-safe only. Follow manufacturer's instructions. Do not use cracked or chipped dishes. |
| Glass jars | Always remove lid. Use only to heat food until just warm. Most glass jars are not heat resistant and may break. |
| Glassware | Heat-resistant oven glassware only. Make sure there is no metallic trim. Do not use cracked or chipped dishes. |
| Oven coking bags | Follow manufacturer's instructions. Do not close with metal tie. Make slits to allow steam to escape. |
| Paper plates and cups | Use for short-term cooking/warming only. Do not leave oven unattended while cooking. |
| Paper towels | Use to cover food for reheating and absorbing fat. Use with supervision for a short-term cooking only. |
| Parchment paper | Use as a cover to prevent splattering or a wrap for steaming. |
| Plastic | Microwave-safe only. Follow the manufacturer's instructions. Should be labeled “Microwave Safe”. Some plastic containers soften, as the food inside gets hot. “Boiling bags” and tightly closed plastic bags should be slit, pierced or vented as directed by package. |
| Plastic wrap | Microwave-safe only. Use to cover food during cooking to retain moisture. Do not allow plastic wrap to touch food. |
| Thermometers | Microwave-safe only (meat and candy thermometers). |
| Wax paper | Use as a cover to prevent splattering and retain moisture. |
Materials to be avoided in microwave oven
| Utensils | Remarks |
| Aluminum tray | May cause arcing. Transfer food into microwave-safe dish. |
| Food carton with metal handle | May cause arcing. Transfer food into microwave-safe dish. |
| Metal or metaltrimmed utensils | Metal shields the food from microwave energy. Metal trim may cause arcing. |
| Metal twist ties | May cause arcing and could cause a fire in the oven. |
| Paper bags | May cause a fire in the oven. |
| Plastic foam | Plastic foam may melt or contaminate the liquid inside when exposed to high temperature. |
| Wood | Wood will dry out when used in the microwave oven and may split or crack. |
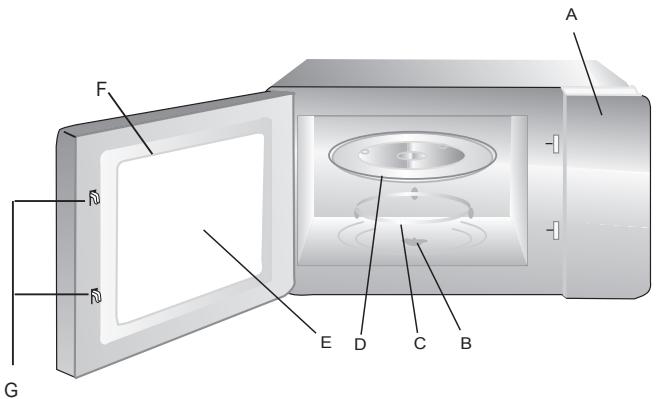
Names of Oven Parts and Accessories
Remove the oven and all materials from the carton and oven cavity.
Your oven comes with the following accessories:
Glass tray 1
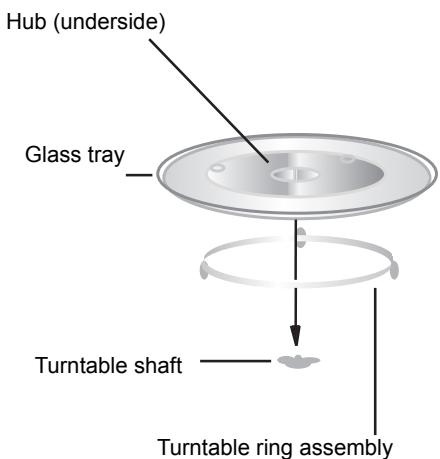
Turntable ring assembly 1
Instruction Manual 1
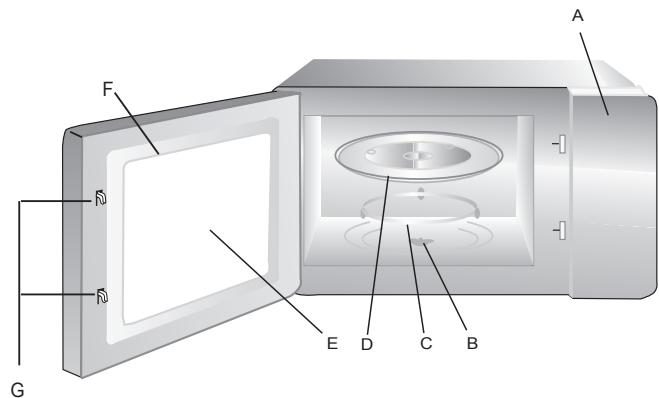
A) Control panel B) Turntable shaft C) Turntable ring assembly D) Glass tray E) Observation window F) Door assembly G) Safety interlock system
Turntable Installation
a. Never place the glass tray upside down. The glass tray should never be restricted. b. Both glass tray and turntable ring assembly must always be used during cooking. c. All food and containers of food are always placed on the glass tray for cooking. d. If glass tray or turntable ring assembly cracks or breaks, contact your nearest authorized service center.
Installation and connection
- This appliance is only intended for domestic use.
- This oven is intended for built-in use only. It is not intended for counter-top use or for use inside a cupboard.
- Please observe the special installation instructions.
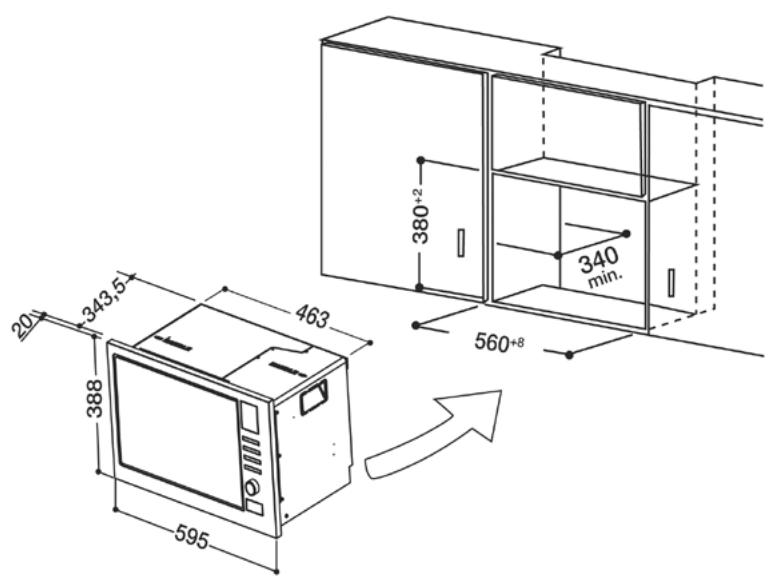
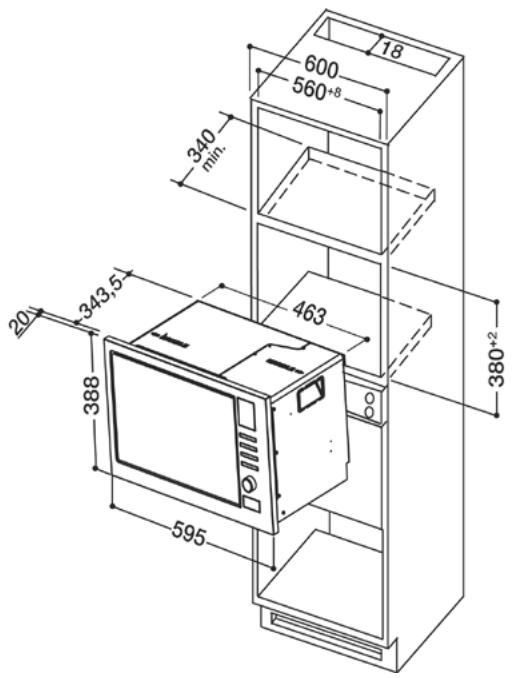
- The appliance can be installed in a 60cm wide wall-mounted cupboard (at least 55cm deep and 85cm off the floor).
- The appliance is fitted with a plug and must only be connected to a properly installed earthed socket.
- The mains voltage must correspond to the voltage specified on the rating plate.
- The socket must be installed and connecting cable must only be replaced by a qualified electrician. If the plug is no longer accessible following installation, an all-pole disconnecting device must be present on the installation side with a contact gap of at least 3mm.
- Adapters, multi-way strips and extension leads must not be used. Overloading can result in a risk of fire.
The accessible surface may be hot during operation.
1. Clock Setting
When the microwave oven is electrified, the oven will display "0:00", buzzer will ring once.
1) Press " ⏎ / ⏎ " once. "00:00" displays. 2) Turn "h" to adjust the hour figures, the input time should be within 0--23 (24-hour). 3) Press " ⏎ / ⏎ ", the minute figures will flash. 4) Turn "..." to adjust the minute figures, the input time should be within 0--59. 5) Press " ⏎ / ⏎ " to finish clock setting. ":" will flash.
Note: 1) If the clock is not set, it would not function when powered.
2) During the process of clock setting, if you press "PAUSE", the oven will go back to the previous status automatically.
2. Microwave Cooking
Press "≈" the LED will display
"P100". Press "≡ ≡ ≡ ≡" for times or
turn "🏽" to choose the power you want, and "P100", "P80" "P50", "P30" or "P10" will display for each added
press. Then press "START" to confirm, and turn "" to set cooking time from 0:05 to 95:00.
Press " START" again to start cooking.
Example: If you want to use 80% microwave power to cook for 20 minutes, you can operate the oven as the following steps.
1) Press "≡" once, the screen display "P100". 2) Press "≈" once again or turn
" to choose 80% microwave power.
3) Press "START" to confirm, and the screen displays "P 80". 4) Turn "..." to adjust the cooking time until the oven displays "20:00". 5) Press "START" to start cooking.
3. Quick Start
1) In waiting state, Press "START" to start cooking with 100% power, each added press will increase 30 seconds cooking time up to 95 minutes. 2) In microwave cooking or time defrost state, each press of "START" can increase 30 seconds of cooking time. 3) In waiting state, turn "O" left to set cooking time with 100% microwave power, then press "O" to start cooking.
4. Defrost By Weight
1) Press " ○/○ " once, and the oven will display "dEF1". 2) Turn "..." to select the weight of food from 100 to 2000 g. 3) Press " START" to start defrosting.
" " Pad instructions
| Order | Display | Microwave Power |
| 1 | P100 | 100% |
| 2 | P80 | 80% |
| 3 | P50 | 50% |
| 4 | P30 | 30% |
| 5 | P10 | 10% |
5. Defrost By Time
1) Press " ○/○ " twice, and the oven will display "dEF2". 2) Turn "..." to select the defrost time. The MAX time is 95 minutes. 3) Press " START" to start defrosting.
The defrost power is P30, and it will not be changed.
6. Kitchen Timer
(1) Press " ○/○ " twice, LED will display 00:00, timer indicator will light. (2) Turn "h" to enter the correct time. (The maximum cooking time is 95 minutes.) (3) Press "START" to confirm setting, timer indicator will be lighted. (4) When the kitchen time is reached, timer indicator will go out. The buzzer will ring 5 times. If the clock be set (24-hour system), LED will display the current time.
Note: The kitchen Time is differ from 24-hour system. Kitchen Timer is a timer.
7. Inquiring Function
(1) In states of microwave, grill and combination cooking, press " ≈ ", the current power will be displayed for 3 seconds. After 3 seconds, the oven will turn back to the former state; (2) In cooking state, press " ○/○ " to inquire the time and the time will display for 3 seconds.
8.Auto Menu
1) Turn "OK" right to choose the menu, and "A-1" to "A-10" will display. 2) Press " START" to confirm. 3) Turn " ○ " to choose the default weight as the menu chart. 4) Press "START" to start cooking. Example: If you want to use "Auto Menu" to cook fish for 350g. 1) Turn "clockwise till "A-4" display. 2) Press " START" to confirm. 3) Turn "to select the weight of fish till "350" display. 4) Press " START" to start cooking.
9. Multi-section cooking
At most 2 sections can be set for cooking. In multi-section cooking, if one section is defrosting, then defrosting shall be placed in the first section.
Example: If you want to defrost food for 5 minutes and then cook with 80% microwave power for 7 minutes, operate it as the following: 1) Press " ○/○ " twice, and the oven will display "dEF2". 2) Turn "h" to select the defrost time till "5:00" display. 3) Press " ≈ " once, the screen display "P100". 4) Press " ≈ " once again or turn " ≈ " to choose
80% microwave power.
5) Press "P 80".

" to confirm, and the screen displays
6) Turn "O" to adjust the cooking time until the oven displays "7:00". 7) Press "START" to start cooking, and the buzzer will sound once for the first section, defrosting time counts down; the buzzer will sound once again when entering the second cooking. When cooking finishes, the buzzer sounds five times.
10. Lock-out Function for Children
Lock: In waiting state, press "PAUSE" for 3 seconds, there will be a long beep denoting entering the children-lock state and current time will display if the time has been set, otherwise, the LED will display "C- - J". Lock quitting: In locked state, press "PAUSE" for 3 seconds, there will be a long "beep" denoting that the lock is released.
The menu chart:
| Menu | Weight (g) | Display |
| A-1 PIZZA | 200 g | 200 |
| 400 g | 400 | |
| A-2 Potato | 200 g | 200 |
| 400 g | 400 | |
| 600 g | 600 | |
| A-3 Meat | 250 g | 250 |
| 350 g | 350 | |
| 450 g | 450 | |
| A-4 Fish | 250 g | 250 |
| 350 g | 350 | |
| 450 g | 450 | |
| A-5 Vegetable | 200 g | 200 |
| 300 g | 300 | |
| 400 g | 400 | |
| A-6 Beverage | 1 cup (120 ml) | 1 |
| 2 cups (240 ml) | 2 | |
| 3 cups (360ml) | 3 | |
| A-7 Pasta | 50g(with 450 ml cold water) | 50 |
| 100g(with 800 ml cold water) | 100 | |
| A-8 Popcorn | 50 g | 50 |
| 100 g | 100 | |
| A-9 Chicken | 200 | 200 |
| 400 | 400 | |
| 600 | 600 | |
| 800 | 800 | |
| A-10 Reheat | 200 | 200 |
| 400 | 400 | |
| 600 | 600 | |
| Normal | ||
| Microwave oven interfering TV reception | Radio and TV reception may be interfered when microwave oven operating. It is similar to the interference of small electrical appliances, like mixer, vacuum cleaner, and electric fan. It is normal. | |
| Dim oven light | In low power microwave cooking, oven light may become dim. It is normal. | |
| Steam accumulating on door, hot air out of vents | In cooking, steam may can out of food. Most will get out from vents. But some may accumulate on cool place like oven door. It is normal. | |
| Oven started accidentally with no food in. | It is forbidden to run the unit without any food inside. It is very dangerous. | |
| Trouble | Possible Cause | Remedy |
| Oven cannot be started | (1) Power cord not plugged in tightly | Unplug. Then plug again after 10 seconds. |
| (2) Fuse blowing or circuits breaker works. | Replace fuse or reset circuits breaker (repaired by professional personnel of your company) | |
| (3) Trouble with outlet | Test outlet with other electrical appliances. | |
| Oven does not head | (4) Door not closed well | Close door well |
| Glass turntable makes noise when microwave oven operates | (5) Dirty roller rest and oven bottom | Refer to “Maintenance of Microwave” to clean dirty parts. |
According to Waste of Electrical and Electronic Equipment (WEEE) directive, WEEE should be separately collected and treated. If at any time in future you need to dispose of this product please do NOT dispose of this product with household waste. Please send this product to WEEE collecting points where available.
Please Read the Manual Carefully Before Installation
Please Note
Electrical connection
The oven is fitted with a plug and must be only connected to a properly installed earthed socket. In accordance with the appropriate regulations, the socket must only be installed and the connecting cable must only be replaced by a qualified electrician.
If the plug is no longer accessible following installation, an all-pole isolating switch must be present on the installation side with a contact gap of at least 3mm.
The fitted cabinet must not have a back wall behind the appliance.
Minimum installation ventilation slots and suction holes.
Note:
Do not trap or bend the power cable.
A. Built-in furniture
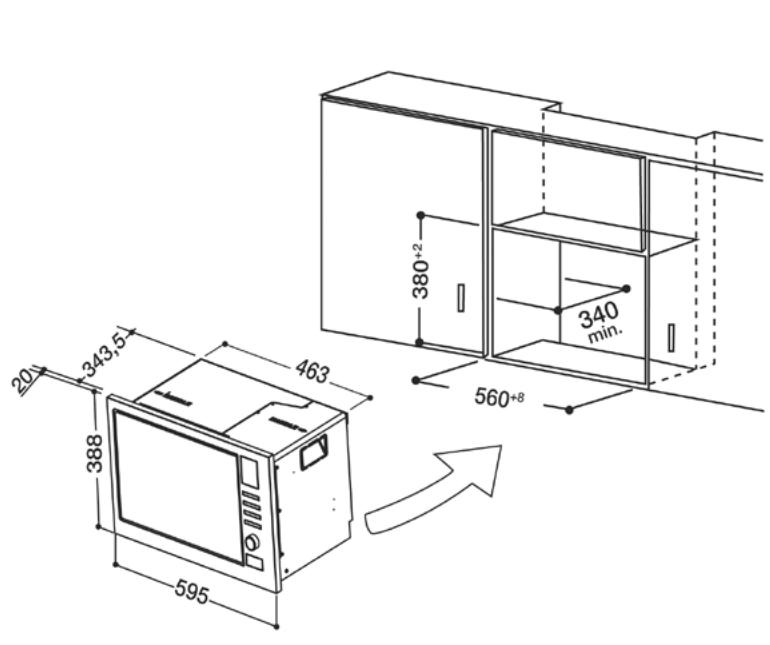
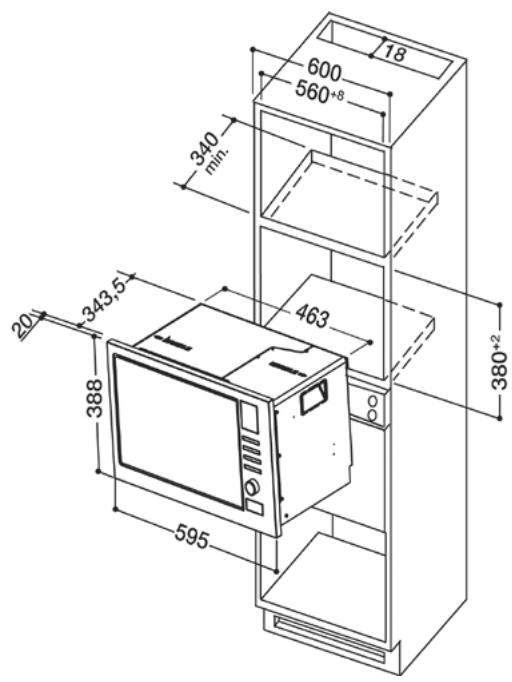
B. Prepare the cabinet
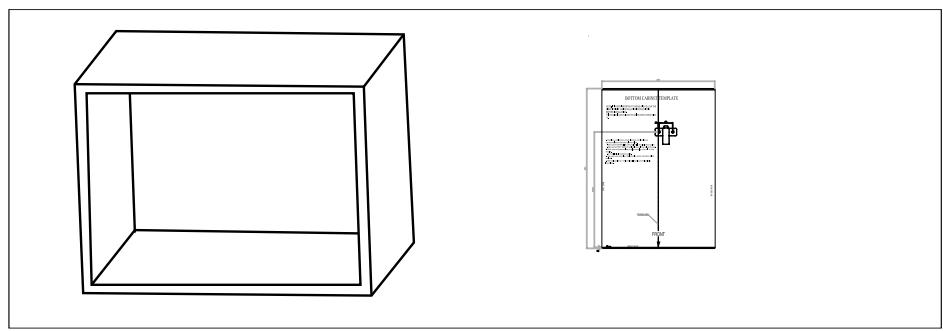
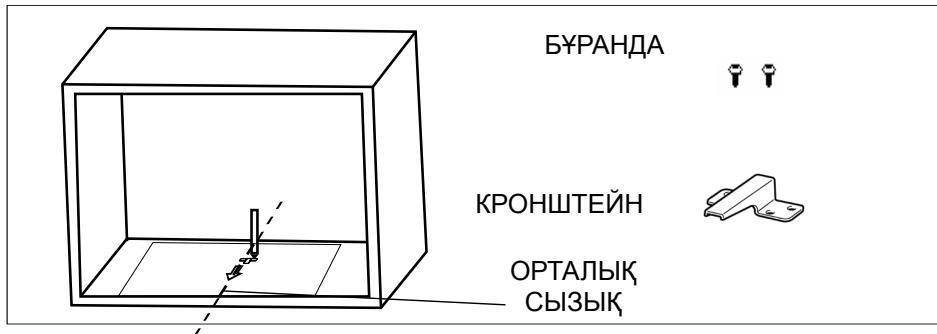
- Read the instructions on the BOTTOM CABINET TEMPLATE, and place the template on the bottom plane of the cabinet.
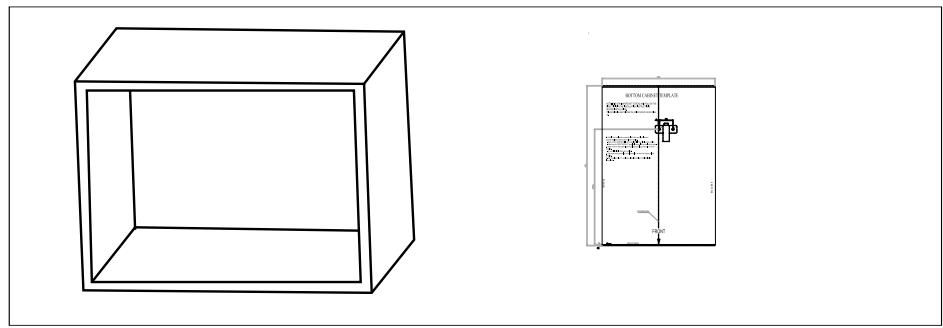
- Make marks on the bottom plane of the cabinet according to the marks "a" on the template.
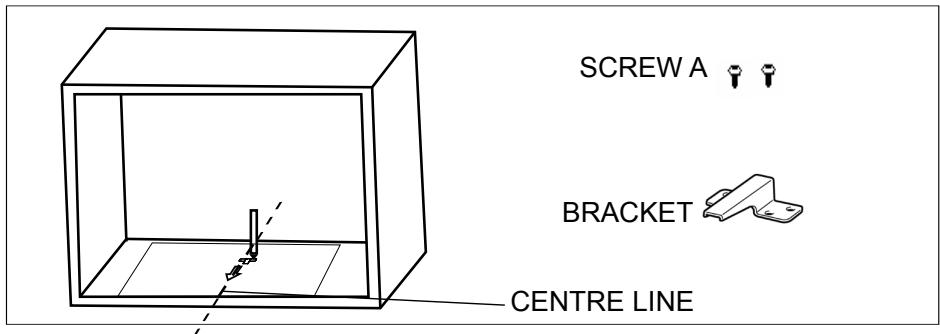
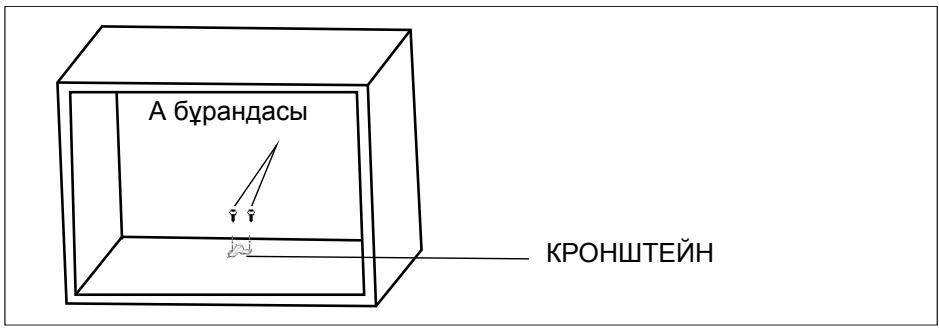
- Remove the bottom cabinet template and fix the bracket with screw A.
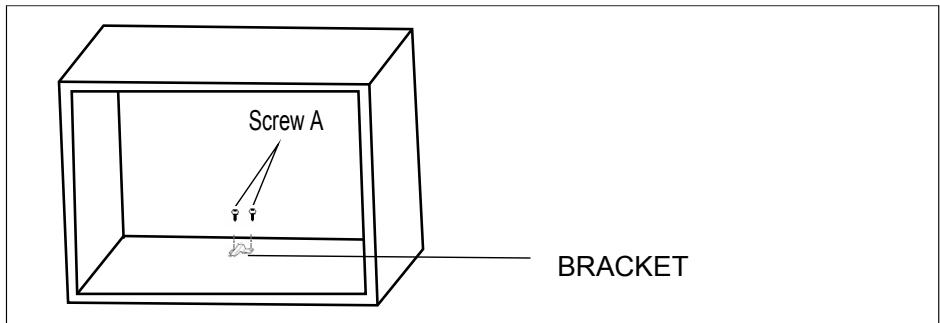
C. Install the oven
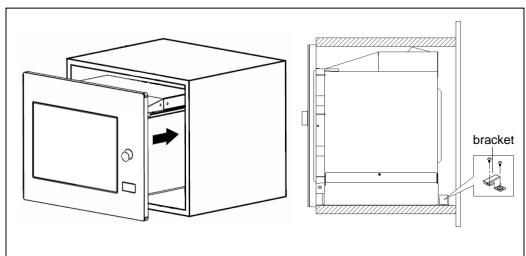
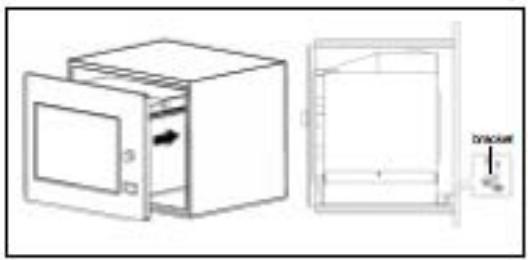
- Install the oven into the cabinet.
- Make sure the back of the oven is locked by the bracket.
- Do not trap or kink the power cord.
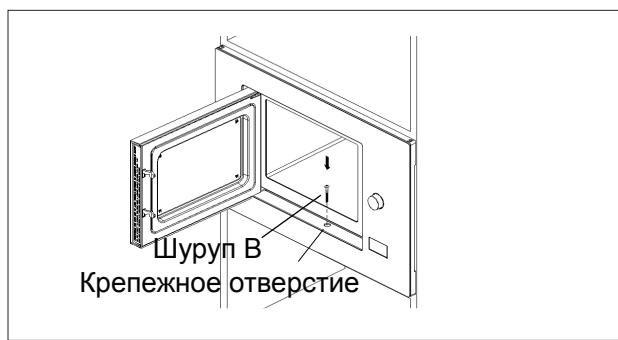
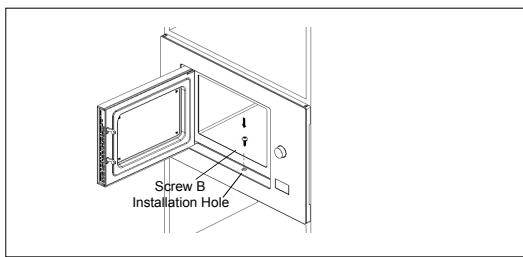
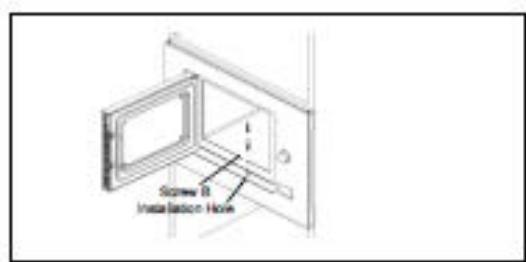
- Open the door, and fix the oven to the cabinet with screw B at the installation hole.
IT
Italian
FR
French
ES
Spanish
PT
Portuguese
NL
Dutch
DE
German
RU
Russian
KZ
Kazakh
Instructions
Safety instructions, 119
Installation, 124
Instructions for use, 125
Troubleshooting, 129
Installation, 130

Hotpoint
ARISTON
Please read and keep these instructions carefully before using the appliance.
If the instructions are not followed, the manufacturer is not responsible for any damage.
KEEP THESE INSTRUCTIONS
IMPORTANT: SAFETY INSTRUCTIONS FOR THE APPLIANCE
a) Do not perform any actions that could damage the appliance. Any damage caused by improper use may affect the appliance's operation. Risk of injury or damage to property.
(b) We do not give permission for the use of this product for any purpose other than that specified in the operating instructions, unless we have given our written consent. (c) WARNING: If the door or door seals are damaged, the appliance must not be operated until it has been repaired by a qualified person.
Storage
If the appliance is stored in a cold place, its performance may be affected.
Technical specifications
| Ynlri | MWA121.1 X /HA |
| Hominahandeli kephey | 230 B~50 Гц |
| Hominahandeli kipic kyaT (Кыstka Толковар) | 1250 Вт |
| Hominahandeli ШьIBLEС куТ (Кыstka Толковар) | 800 Вт |
| Пеш сыйыдылыБ | 20 Л |
| Айналatableн дeнгелектін диаметрì | Ø 245 мм |
| Сыrtкы олшемерì | 594x343,5x388 мм |
| Таза салмагь | 14,85 кг |
SAFETY INSTRUCTIONS
WARNING
To reduce the risk of fire, electric shock, or injury to persons or property, follow these basic safety precautions, including:
- Warning: Dryers and other appliances should not be used in areas where flammable liquids are stored, as they may ignite.
- Warning: Do not allow children to operate the appliance without supervision. Keep children away from the appliance during operation.
- Warning: To prevent accidents, ensure that children do not play with the appliance and that they are supervised when the appliance is in use.
Follow the instructions provided to avoid any hazards to children.
- Warning: If the appliance is used in a cold environment, it should be used with the thermostat set to the appropriate temperature for the items being dried. (For gas dryers only)
- Only use the appliance for drying fabrics that are suitable for drying.
- You must keep the device away from fire, heat sources, and open flames.
- Do not use the device in environments with high humidity or where it may come into contact with water.
- When preparing food with the device, be careful not to touch hot surfaces.
- If the device malfunctions, unplug it from the power outlet and contact qualified personnel for repair.
- Do not leave the device unattended while it is in operation.
- Do not use the device for purposes other than its intended use. Store it in a dry place away from children.
- Do not use the device near water, in damp areas, or with wet hands. Keep it away from metal objects.
- This device is intended for household use only. Do not use it for commercial purposes.
- Do not use the device to prepare food that is not intended for this device. Do not use it for purposes other than its intended use. This device is not designed for industrial or laboratory use.
- If the power cord is damaged, it must be replaced by the manufacturer, its service agent, or similarly qualified persons to avoid a hazard.
- Do not store or use the device outdoors. Do not use the device in wet or damp conditions.
- The temperature of accessible surfaces may be high when the device is operating. Be careful not to touch hot surfaces. Use oven mitts or handle with care.
- Do not immerse the device in water or any other liquid.
- This device can be used by children aged 8 and above, as well as persons with reduced physical, sensory or mental capabilities, or lack of experience and knowledge, if they have been given supervision or instruction concerning use of the appliance in a safe way and understand the hazards involved.
- To avoid damage to the device
Do not use steam cleaners to clean the appliance, as this could cause electric shock or damage the temperature sensor. 23. It is possible to clean the device with a soft cloth and mild detergent, but it must be kept away from water. 24. This device is not intended for use by persons (including children) with reduced physical, sensory or mental capabilities, or lack of experience and knowledge, unless they have been given supervision or instruction concerning use of the appliance by a person responsible for their safety. 25. Children should be supervised to ensure that they do not play with the appliance. 26. If the cabinet is not broken, do not place the device in the cabinet. 27. The device is not intended for use with an external timer or separate remote control system. 28. WARNING: To avoid the risk of electric shock, do not immerse the device in water. 29. The accessible surfaces may become hot during use. Keep children away. 30. Do not use steam cleaners. 31. The surface of the heating plate may become hot. 32. Do not use abrasive cleaners or sharp metal scrapers to clean the glass surface, as they can scratch the surface and cause the glass to shatter. 33. During use, the device becomes hot. Do not touch the heating elements inside.
- Only use the temperature probe supplied with this device (if the temperature probe is not supplied, this feature is not available).
- During first use, some parts may emit a slight odor.
36. This appliance can be used by children aged from 8 years and above and persons with reduced physical, sensory or mental capabilities or lack of experience and knowledge if they have been given supervision or instruction concerning use of the appliance in a safe way and understand the hazards involved. Children shall not play with the appliance. Cleaning and user maintenance shall not be made by children unless they are older than 8 and supervised.
- Keep the device and its cord out of reach of children less than 8 years old.
38. This device is intended for household and similar applications such as: - staff kitchen areas in shops, offices and other working environments; - farm houses; - by clients in hotels, motels and other residential type environments; - bed and breakfast type environments.
- WARNING: To avoid electric shock, the device must be grounded. The grounding elements must be connected to the ground wire. If the device is not grounded, it may cause electric shock to users.
PLEASE READ THE INSTRUCTIONS AND SAFETY WARNINGS BEFORE USE
SOURCE
Power source
The device can be connected to a power source with a voltage different from the specified one. This may cause damage to the device.
WARNING
Power source
Do not connect the device to a power source with a voltage different from the specified one. If the device is connected to a power source with a different voltage, it may cause damage to the device.
CLEANING
Clean the device regularly.
- Before cleaning, unplug the device and clean it with a dry cloth.
- Do not clean the device with water or other liquids.
- If the device is dirty, clean it with a soft, dry cloth and a mild detergent.
Two-pin plug
DEVICES
Short circuits can cause fire or electric shock. Short circuits can cause fire or electric shock. The instructions in this manual must be followed.
To work with short circuits, there are not only metal parts that can be touched. If necessary, refer to the procedure described in the manual for the equipment you are using.
Manual text:
- For short circuits, touch the surface with a dry cloth (250 mm), and then wipe with a dry cloth.
- Let it sit for at least 1 minute.
- Check the circuit. If the circuit is dry, it can be used for short circuits. Do not exceed 4.1 minutes of preparation time.
SAFETY WARNING
Dangerous voltage
Before any other work, the short circuit protection must be removed. Any work or maintenance must be carried out with the power disconnected.
Materials that can be used for short circuits: Materials that cannot be used for short circuits:
Signal lamp operation 1
Lamp replacement 1
A) Control panel B) Signal lamp indicator C) Signal lamp operation D) Power supply E) Fuse F) Heating element G) Safety switch
Signal lamp installation
a. Do not touch the lamp with bare hands. The lamp must be handled with care. b. Before installing the signal lamp, ensure that the power is disconnected. c. The lamp must be installed in the correct position for proper operation. d. If the lamp or signal lamp indicator is damaged, contact the nearest service center.
AinHaIaTbIH DeHreJek CaKINHaCbI XINHaFbl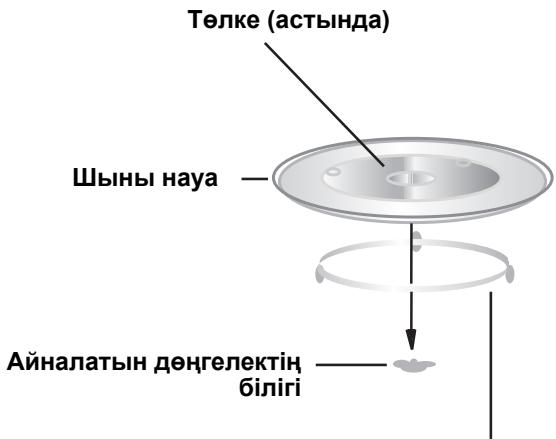
Ophaty KHeKocy
- ByI KypblfI TeK yIe naJaIaHyfa apHaJIFaH.
- Byn Kypblfbl Tek Kipictipinre H Typde naJaIaHaYfa apHaIraH. OJ yCTeN 6eTInDe naJaIaHaYfa HeMece uKaΦ iUiHne naJaIaHaYfa apHaJImaFah.
- OcbI opHaTy TpyaJIbI apHaNbI HycKaynapDbI opbIHdaHbI3.
- KypbIINFBHbKeHdi6CMKaabipfara6ekiTineH 1kaΦTa opHaTyfa 6oNaDbI (KemIHde 55 CM TepeH XeHe eDeHHHeH 85 CM KaUbIKTBiKTa).
- KypbIbnbl aawameh Xa6dbkTaNfah XaHE OHbl Tek Tnicti Typde opHaTbIaNfah, Jepre KocblnfaH po3eTKara XaNfay KepeK.
- Keniik Kephey KepceTkiuTep TaKtacbHda Kepcetijireh KepHeyre caB oJybl Kepek.
- Po3eTkaHbOpHaTydbJxHeJxanFaBbIu Ka6ebIaybICTbipydbI TeK 6iNikTI 3neKtpNK OpbIHdaybI Kepek. ErepOpHaTuAn KeyH aHaFA KOJ KeTeK3y MymKiH 6oImaca,OpHaTy OPhbIHda BaJIaHbIC caHbIaybl KeMHDe 3 MM 6apNbIK NOnHocTi axkbipTaTbIH Kypblfbl 6Olybl Kepek.
- AanTepnepdi, KEN JkaTbI JKOJaKTapDbI JKeHe y3apTkblcIMdapdbI naJdaJaan6ay KepeK. ApTbIK JyKTeMe eptke aKeJnyi MymKiH.
KoJ XeTki3yre 60JaTBiH 6et naJaIaHy Ke3IHde bICTbIK 6Olybl MymkIn.
1. CafattbI opHaTy
Kbicka tokblnbI neiTe aektp 6ap 6oIca, nei «0:00» KepceTei, zymMeH 6ip pet 7blbpnaIdbI.
1) “ / ” Tуймecин бір рет 6асыньз. «00:00» kерсетіпedi. 2) “” Tуймecин басьл са fatцфрьн peTTeHiz, eHriizinreH yaKbIT 0--23 (24 carat) apacbHda bonybI kepek. 3) “ / ” TVIMecIH 6acbHbI3, MInHyT cNΦpnapbl KblblblkTaIdbI. 4)“”Tymecin 6acbIMMHyT cHpnapbIH peTTeHi3, eHriizireh yaBt 0--59 apacbHa 6onyi KepeK. 5)Carat opHaTdybl aaykTay ywiH / TymeciH 6acblb3. XblblbIKtaIdbI.
Eckertne:
1) Press the button to start the cooking program. 2) Press the "STOP" button to cancel the program, or the automatic program will start after a delay.
2. Setting the cooking time
Press the "P100" button.
Press the button for the cooking time.
The cooking time can be set by pressing the "P100", "P80", "50", "P30" or "P10" buttons. To set the time for cooking, press the "START" button and then adjust the time between 0:05 and 95:00 by pressing the cooking time button.
Press the "START" button again to start cooking.
Example: For 80% cooking power, set the cooking time to 20 minutes, then press the start button.
1) Press the "***" button once, the screen shows "P100". 2) To select 80% cooking power, press the "≈≈" button repeatedly or press the cooking time button. 3) Press the "START" button to start, then the screen shows "P80". 4) To set the cooking time to "20:00", press the "" button. 5) Press the "START" button to start cooking.
3. Adding cooking time
1) To start cooking at 100% power, press the "START" button, the cooking time will increase by 30 seconds each time, up to 95 minutes. 2) When cooking at a set time or with a timer, press the "START" button to increase the cooking time by 30 seconds each time. 3) To set the cooking time at 100% power, press the cooking time button, then press the "START" button to start cooking.
4. Cooking by weight
1) Press the "○/○" button once, the screen shows "dEF1". 2) To select the food weight between 100 and 2000 g, press the "h" button. 3) Press the "START" button to start cooking.
| Рет | Ди检пей | Кыбka Толksьдардын Куаты |
| 1 | P100 | 100% |
| 2 | P80 | 80% |
| 3 | P50 | 50% |
| 4 | P30 | 30% |
| 5 | P10 | 10% |
5. Cooking by time
1) Press the "空○" button twice, the screen shows "dEF2". 2) To set the cooking time, press the cooking time button. The maximum cooking time is 95 minutes. 3) Press the "START" button to start cooking. The cooking power is P30 and it cannot be changed.
6. Defrosting
1) Press the timer button twice, the timer indicator will light up. 2) To set the cooking time, press the " " button. (The maximum cooking time is 95 minutes.) 3) To start the cooking process, press the "(START)" button, the timer indicator will light up. 4) When the cooking time is reached, the timer indicator will flash and beep 5 times. If the set time is exceeded (24-hour cycle), the remaining time will be displayed.
Example: Cooking time is set with a 24-hour cycle. The cooking timer is a timer.
7. Clock function
1) Press the " " button briefly with the arrow keys and the " " button to set the current time, the current time will be displayed for 3 seconds. After 3 seconds, the current time will be displayed again; 2) To set the time on the cooking day, press the " /" button, then the time will be displayed for 3 seconds.
8. Meat program
1) To select the meat program, press the " " button, then "A-1" - "A-10" will be displayed. 2) To start, press the "(START)" button. 3) To select the desired weight in the meat program sequence, press the " " button. 4) To start cooking, press the "(START)" button.
Example: To cook 350 g of fish, the "Meat program" should be selected.
1) Press the " " button until "A-4" is displayed. 2) To start, press the "(START)" button. 3) To select the weight "350" displayed, press the " " button. 4) To start cooking, press the "(START)" button.
If the replacement is not possible, the gap between the replacement and the original should be at least 3 mm.
The replaced cabinet should not have any additional holes on the back.
The minimum replacement distance and the test holes.
Example:
Do not shorten or damage the power cable.
A. Included accessories
B. Preparing the cabinet
- The cabinet is installed on a flat surface, and the cabinet is attached to the wall with screws.
- The hinges are installed on the cabinet door and on the cabinet body.
- Install the cabinet on a flat surface and secure it with the brackets provided.
C. Install the door
- Install the door on the cabinet
-Attach the door to the cabinet using the hinges. -Make sure the door opens and closes smoothly.
- Install the door on the cabinet and secure it with the brackets.

- NAMES OF PARTS AND CONSUMABLE PARTS
- INSTALLATION OF THE ROTATING RING
- INSTALLATION AND CONNECTION
- SETTING THE CLOCK
- NOTES
- IN STANDBY MODE, PRESS THE "START" BUTTON TO START COOKING AT 100% POWER. WITH EACH SUBSEQUENT PRESS, THE COOKING TIME INCREASES BY 30 SECONDS UP TO 95 MINUTES. 2) IN MICROWAVE MODE, PRESS THE "START" BUTTON TO INCREASE THE COOKING TIME BY 30 SECONDS. 3) IN STANDBY MODE, TURN THE REGULATOR
- PREPARING THE SAW
- INSTALLING THE SAW
- PRECAUTIONS TO AVOID POSSIBLE EXPOSURE TO EXCESSIVE MICROWAVE ENERGY
- ADDENDUM
- IMPORTANT SAFETY INSTRUCTIONS
- WARNING
- READ CAREFULLY AND KEEP FOR FUTURE REFERENCE
- DANGER
- CLEANING
- TWO-ROUND-PIN PLUG
- UTENSILS
- UTENSIL TEST
- CAUTION
- PERSONAL INJURY HAZARD
- NAMES OF OVEN PARTS AND ACCESSORIES
- TURNTABLE INSTALLATION
- CLOCK SETTING
- MICROWAVE COOKING
- QUICK START
- DEFROST BY WEIGHT
- PAD INSTRUCTIONS
- DEFROST BY TIME
- KITCHEN TIMER
- INQUIRING FUNCTION
- AUTO MENU
- MULTI-SECTION COOKING
- LOCK-OUT FUNCTION FOR CHILDREN
- PLEASE READ THE MANUAL CAREFULLY BEFORE INSTALLATION
- PLEASE NOTE
- ELECTRICAL CONNECTION
- NOTE
- BUILT-IN FURNITURE
- PREPARE THE CABINET
- INSTALL THE OVEN
- IMPORTANT: SAFETY INSTRUCTIONS FOR THE APPLIANCE
- STORAGE
- TECHNICAL SPECIFICATIONS
- SAFETY INSTRUCTIONS
- PLEASE READ THE INSTRUCTIONS AND SAFETY WARNINGS BEFORE USE
- SOURCE
- TWO-PIN PLUG
- DEVICES
- MANUAL TEXT
- SAFETY WARNING
- DANGEROUS VOLTAGE
- SIGNAL LAMP INSTALLATION
- OPHATY KHEKOCY
- CAFATTBI OPHATY
- ECKERTNE
- SETTING THE COOKING TIME
- ADDING COOKING TIME
- COOKING BY WEIGHT
- COOKING BY TIME
- DEFROSTING
- CLOCK FUNCTION
- MEAT PROGRAM
- EXAMPLE
- INCLUDED ACCESSORIES
- PREPARING THE CABINET
- INSTALL THE DOOR
Brand : HOTPOINT
Model : MP776IXHA
Category : Built-in oven