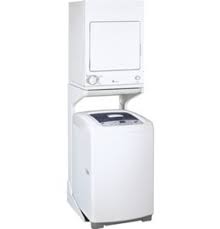
WSLP1500 - Washing machine GE APPLIANCES - Free user manual and instructions
Find the device manual for free WSLP1500 GE APPLIANCES in PDF.

| Brand | GE Appliances |
| Model | WSLP1500 |
| Appliance Type | Portable top-loading washing machine |
| Power Supply | 115 V, 60 Hz, 15 or 20 A circuit breaker protected |
| Required Water Pressure | 10 to 150 psi (dynamic) |
| Recommended Hot Water Temperature | 50 °C to 66 °C (120 °F to 150 °F) |
| Wash Cycles | Colors, Whites, Delicates, Speed Wash, Custom, Ultra Clean |
| Load Sensing Function | Automatic Load Sensing (load sensor) |
| Detergent Dispenser | Drawer with compartments for detergent and fabric softener |
| Lint Filter | Yes, annual cleaning recommended |
| Safety | Grounding required, detailed safety instructions |
| Water Connection Type | Portable model: single faucet (Uni-Couple) or two separate faucets |
| Drainage | Drain hose, height between 76 cm and 2.4 m |
| Leveling Instructions | Leveling legs at front |
| Minimum Installation Dimensions | 0 in sides, 2 in front, 3 in back; minimum height 96 in |
| Routine Maintenance | Cleaning basket, dispenser drawer, lint filter, checking hoses |
| Warranty | 1 year parts and labor (Canada) |
| Included Parts | 2 water hoses, 4 rubber washers, hose clamp |
Frequently Asked Questions - WSLP1500 GE APPLIANCES
User questions about WSLP1500 GE APPLIANCES
0 question about this device. Answer the ones you know or ask your own.
Ask a new question about this device
Download the instructions for your Washing machine in PDF format for free! Find your manual WSLP1500 - GE APPLIANCES and take your electronic device back in hand. On this page are published all the documents necessary for the use of your device. WSLP1500 by GE APPLIANCES.
USER MANUAL WSLP1500 GE APPLIANCES
Operating Instructions
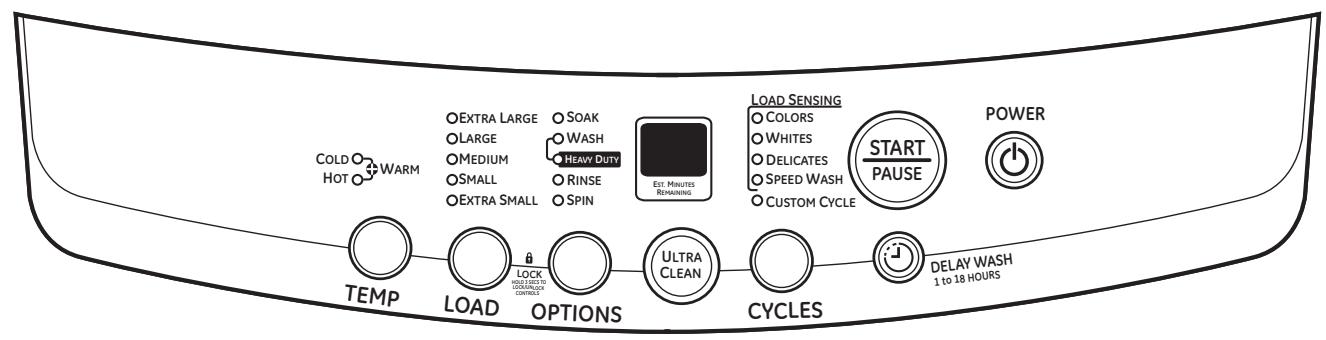
Control and Indicator Settings .5, 6
Loading and Using the Washer ....7, 8
Special Washer Features 4
Installation Instructions
Alcove or Closet Installation 12
Electrical Requirements 10
Grounding Instructions 10
Installation Requirements 9
Leveling the Washer 10
Washer Connections for
Portable Model 13-16
Washer Connections for
Stationary Model 11, 12
Troubleshooting Tips
Before You Call For Service . . . 17- 20
Status Indicators 17
Consumer Support
Consumer Support . . . . Back Cover
Ownership Registration for
Customers in Canada Only . . .21, 22
Warranty for Customers
in Canada 24
Warranty for Customers
in the U.S.A. 23
Write the model and serial numbers here:
You can find them on a label on the back of the washer.
Owner's Manual & Installation Instructions
WSLP1500
WSLS1500
Laveuses
For your safety, the information in this manual must be followed to minimize the risk of fire or explosion, electric shock, or to prevent property damage, personal injury or loss of life.
The instructions in this manual and all other literature included with this washer are not meant to cover every possible condition and situation that may occur. Good, safe practices and caution MUST be applied when installing, operating and maintaining any appliance.

WATER HEATER SAFETY
Under certain conditions, hydrogen gas may be produced in a water heater that has not been used for two weeks or more. Hydrogen gas can be explosive under these circumstances.
If the hot water has not been used for two weeks or more, prevent the possibility of damage or injury by turning on all hot water faucets and allowing them to run for several minutes. Do this before using any electrical appliance which is connected to the hot water system. This simple procedure will allow any built-up hydrogen gas to escape. Since the gas is flammable, do not smoke or use an open flame or appliance during this process.

PROPER INSTALLATION
This washer must be properly installed and located in accordance with the Installation Instructions before it is used.
Install or store where it will not be exposed to temperatures below freezing or exposed to the weather, which could cause permanent damage and invalidate the warranty.
- Properly ground washer to conform with all governing codes and ordinances. Follow details in Installation Instructions.

YOUR LAUNDRY AREA
-
Keep the area underneath and around your appliances free of combustible materials such as lint, paper, rags and chemicals.
-
Do not leave the washer door open. An open door could entice children to hang on the door or crawl inside the washer.
-
Close supervision is necessary if this appliance is used by or near children. Do not allow children to play on, with or inside this or any other appliance.

Use this appliance only for its intended purpose as described in this Owner's Manual.
WHEN USING THE WASHER
- Never reach into washer while it is moving. Wait until the machine has completely stopped before opening the door.
- Do not mix chlorine bleach with ammonia or acids such as vinegar and/or rust remover. Mixing different chemicals can produce a toxic gas which may cause death.
-
Do not wash or dry articles that have been cleaned in, washed in, soaked in or spotted with combustible or explosive substances (such as wax, oil, paint, gasoline, degreasers, dry-cleaning solvents, kerosene, etc.) which may ignite or explode. Do not add these substances to the wash water. Do not use or place these substances around your washer or dryer during operation.
The laundry process can reduce the flame retardancy of fabrics. To avoid such a result, carefully follow the garment manufacturer's wash and care instructions. -
To minimize the possibility of electric shock, unplug this appliance from the power supply or disconnect the washer at the building's distribution panel by removing the fuse or switching off the circuit breaker before attempting any maintenance or cleaning. NOTE: Pressing the power button does NOT disconnect the appliance from the power supply.
- Never attempt to operate this appliance if it is damaged, malfunctioning, partially disassembled, or has missing or broken parts, including a damaged cord or plug.

WHEN NOT IN USE
Turn off water faucets to relieve pressure on hoses and valves and to minimize leakage if a break or rupture should occur. Check the condition of the fill hoses; GE recommends changing the hoses every 5 years.
Before discarding a washer, or removing it from service, remove the washer door to prevent children from hiding inside.
- Do not attempt to repair or replace any part of this appliance unless specifically recommended in this Owner's Manual, or in published user-repair instructions that you understand and have the skills to carry out.
Do not tamper with controls.

READ AND FOLLOW THIS SAFETY INFORMATION CAREFULLY.
SAVE THESE INSTRUCTIONS
Before starting the washer:
- Load the laundry in the washer.
- Add the detergent and fabric softener to the dispenser drawer.
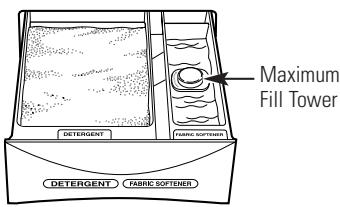
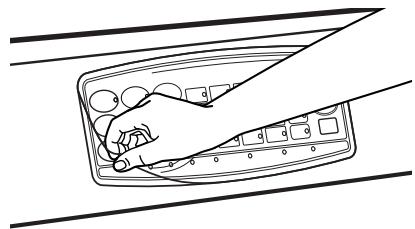
Detergent and Fabric Softener Dispenser Drawer
The detergent and fabric softener dispensers will automatically release their contents at the proper time during the cycle.
To Use the Detergent Dispenser:
Add measured detergent to the dispenser. Make sure detergent is spread evenly and is level.
To Use the Fabric Softener Dispenser:
Use only liquid fabric softener. Pour into dispenser, using amount recommended on package.
- Do not fill any higher than the top of the maximum fill tower.
Never pour fabric softener directly on clothes. It may stain them.
Cleaning the Detergent and Fabric Softener Dispenser Printer
- Remove the drawer by opening it fully then tilting the front of the door down. Pull out.
- Rinse the drawer with water. If necessary use a soft cloth to wipe off any debris.
- Line up the drawer with the opening and push the dispenser drawer straight in.
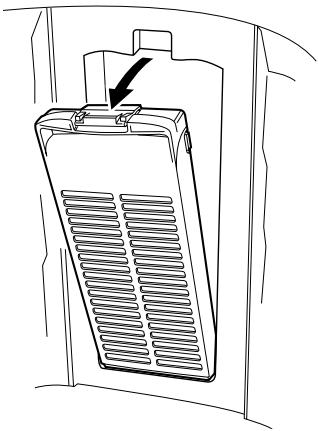
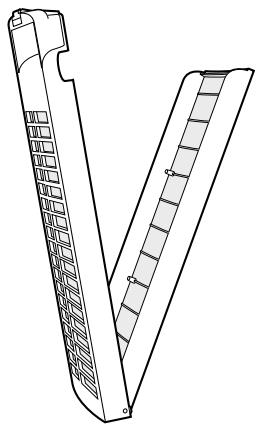
Lint Filter
Clean the lint filter inside the wall of the wash basket once a week for best filtering results.
To remove:
Press the tab at the top of the filter and pull out.
To clean:
Open the filter. Clean the filter with a toothbrush.
Before starting the washer:
- Load the laundry in the washer.
- Add the detergent and fabric softener to the dispenser drawer.

To Use Automatic One-Touch Washing
The LOAD SENSING feature automatically senses the size of your load, fills with the appropriate amount of water, and calculates the amount of wash time required to complete the cycle.
NOTE: When using the LOAD SENSING feature, it is normal for the pulsator to rotate before water fills in the tub.
To choose the automatic LOAD SENSING feature, press POWER ON/OFF.
The COLORS indicator light will light up automatically unless you have selected one of the other LOAD SENSING cycles such as WHITES, DELICATES, SPEED WASH, CUSTOM CYCLE or ULTRA CLEAN.
Then simply press START/PAUSE.
To Choose Your Own Cycle Selections
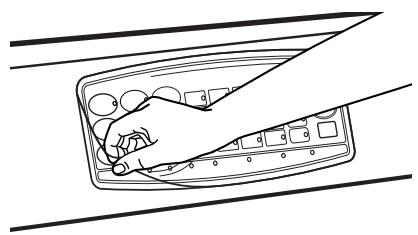
1 POWER ON/OFF
Press the POWER ON/OFF button to turn on the control panel.
2 WASH OPTIONS
Choose the wash options you would like to include in the cycle. Press the WASH OPTIONS button until all the options you want to include are lit. More than one option can be selected.
| Cycle | Soak+Wash +Rinse+Spin | Soak+Wash+Heavy Duty+Rinse+Spin | Wash+Rinse +Spin | Wash+Heavy Duty+Rinse+Spin | Wash +Rinse | Rinse +Spin | Wash Only | Rinse Only | Spin Only |
| COLORS | X | X | X | X | X | X | X | X | X |
| WHITES | X | X | X | X | X | X | X | X | X |
| DELICATES | X | X | X | X | X | X | X | X | X |
| SPEED WASH | X | X | X | X | X | X | X | X | X |
| CUSTOM CYCLE | X | X | X | X | X | X | X | X | X |
| ULTRA CLEAN | X |
3 LOAD SIZE
The water level should just cover the clothes. Adjust the load size accordingly. Loosely load clothes no higher than the top row of holes in the washer basket.
4 WASH CYCLE
These wash cycles control the length of the washing process. The chart below will help match the WASH CYCLE setting to your specific laundry needs. When a cycle is selected, the automatic temperature that the machine defaults to can be changed to whatever temperature you desire.
Default Wash/Rinse Temperatures
| COLORS | For easy care and wrinkle-resistant items. | WARM / COLD |
| WHITES | For heavy to lightly soiled cotton, household linens, towels, work and play clothes. | HOT / COLD |
| DELICATES | For lingerie and delicate fabrics with light to normal soils. | COLD / COLD |
| SPEED WASH | For one or two lightly soiled items that are needed quickly. | WARM / COLD |
| CUSTOM | Manually selected options of water temperature, load size, and wash options saved for future uses. | WARM / COLD |
| ULTRA CLEAN | Maximizes detergent efficiency by adding water in steps and slowly diluting the detergent to the standard level. | WARM / COLD |
5 TEMP WASH/RINSE
Select the water temperature for the wash and rinse cycles. Always follow fabric manufacturer's care label or instructions when laundering.
NOTE FOR PORTABLE MODELS: When using a one-facet connection, adjust the water flow mix and water temperature at the faucet.
6 START/PAUSE
Press the START/PAUSE button to start the wash cycle.
7 EST. MINUTES REMAINING
Displays the time remaining in the wash cycle. It will also display Status Indicators. See Troubleshooting Tips.
NOTE: When the cycle is complete the control panel will turn off automatically.

Sorting Wash Loads
| Colors | Soil | Fabric | Lint |
| Whites | Heavy | Delicates | Lint Producers |
| Lights | Normal | Easy Care | Lint Collectors |
| Darks | Light | Sturdy Cottons |

Proper Use of Detergent
Add detergent and fabric softener before adding clothes so that the detergent can work effectively. Using too little or too much detergent is a common cause of laundry problems.
Use less detergent if you have soft water, a smaller load or a lightly soiled load.
GE recommends the use of High Efficiency HE detergents. HE detergents are formulated to work with low water wash and rinse systems. HE detergents reduce the oversudsing problems commonly associated with regular detergents.
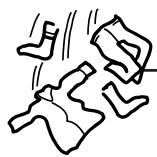
Loading the Washer
Load dry items loosely, no higher than the top row of holes in the washer tub. When loading wet items make sure you set the load/water level high enough to allow the items to move freely. Water level should just cover the clothes. To add items after washer has started, open the lid and add the additional items. Close the lid. Washer will start automatically.
- Do not wash fabrics containing flammable materials (waxes, cleaning fluids, etc.).
When the lid is up, a signal will sound and "Lo" will appear in the display. The washer will not agitate with the lid up.
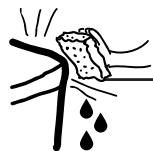
Care and Cleaning of the Washer
Wash Basket: Leave the lid open after washing to allow moisture to evaporate. If you want to clean the basket use a clean, soft cloth dampened with liquid detergent, then rinse. (Do not use harsh or gritty cleaners.)
Fill Hoses: Hoses connecting washer to faucet should be replaced every 5 years.
Exterior: Immediately wipe off any spills. Wipe with damp cloth. Try not to hit surface with sharp objects.
Moving and Storage: Ask the service technician to remove water from drain pump and hoses. Do not store the washer where it will be exposed to the weather.
Long Vacations: Be sure water supply is shut off at faucets. Drain all water from hoses if weather will be below freezing.
Loading and using the washer.

Fabric Care Labels
Below are fabric care label "symbols" that affect the clothing you will be laundering.
WASH LABELS
Machine wash cycle

Normal

Permanent Press/ wrinkle resistant

Gentle/ delicate

Hand wash

Do not wash

Do not wring
Water temperature

Hot (50°C/120°F)

Warm (40^ / 105^)

Cold/cool (30^ / 85^)
DRY LABELS
Tumble dry

Dry

Normal

Permanent Press/ wrinkle resistant

Gentle/ delicate

Do not tumble dry

Do not dry (used with do not wash)
Heat setting

High

Medium

Low

No heat/air
Special instructions

Line dry/ hang to dry

Drip dry

Dry flat

In the shade
If you have any questions, call 800.GE.CARES (800.432.2737) or visit our Website at: ge.com In Canada, call 1.800.561.3344 or visit GEAppliances.ca
BEFORE YOU BEGIN
Read these instructions completely and carefully.
- IMPORTANT - Save these instructions for local inspector's use.
- IMPORTANT - Observe all governing codes and ordinances.
- Note to Installer - Be sure to leave these instructions with the Consumer.
- Note to Consumer - Keep these instructions for future reference.
- Skill level - Installation of this appliance requires basic mechanical skills.
- Completion time - 1 hour
- Proper installation is the responsibility of the installer.
- Product failure due to improper installation is not covered under the Warranty.
- Note - This appliance must be properly grounded, and electrical service to the washer must conform with local codes and ordinances and the latest edition of the National Electrical Code, ANSI/NFPA 70.
WASHER LOCATION
Washer must be installed on firm flooring to minimize vibration during spin cycles. Concrete flooring is best, but wood base is sufficient providing floor support meets FHA standards. Washer should not be installed on rugs or exposed to the weather.
Install or store where it will not be exposed to temperatures below freezing or exposed to the weather.
ELECTRICAL
This appliance must be supplied with the voltage and frequency indicated on the rating plate (located on the back of the washer) and connected to an individual, properly grounded branch circuit, protected by a 15- or 20-amp circuit breaker or time-delay fuse.
If the washer is plugged into the dryer's 115-volt outlet, then the dryer needs to be on a dedicated circuit.
PLUMBING
- WATER PRESSURE—Must be 10 p.s.i. minimum to 150 p.s.i. maximum dynamic pressure measured at faucet.
- WATER TEMPERATURE—Household water heater should be set to deliver water at 120^ to 150^ ( 50^ to 66^) IN THE WASHER when HOT wash is selected.
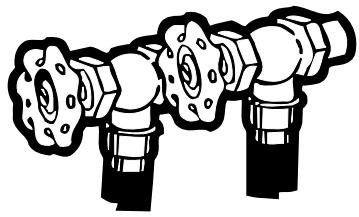
- SHUT-OFF VALVES—Both hot and cold shut-off valves (faucets) should be supplied.
- DRAIN—Water may be drained into a standpipe or set tub. The discharge height MUST NOT BE LESS THAN 30^ nor more than 8^ above the base of the washer. The standpipe must be 1 12^ minimum inside diameter and must be open to the atmosphere.
RACK INSTALLATION
- Ensure washer is centered between the rack sides.
PARTS SUPPLIED
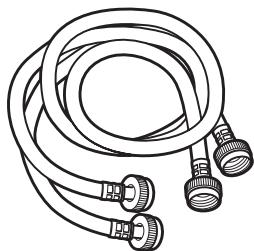
Water Hoses (2)

Rubber Washers (4)
Drain Hose
TOOLS REQUIRED

Pliers
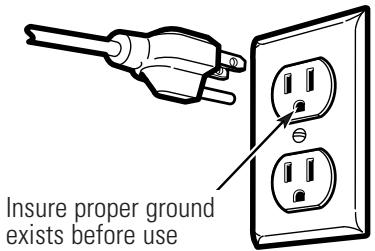
CAUTION: Before plugging in washer, read the following electrical requirements.
ELECTRICAL REQUIREMENTS
CAUTION: For personal safety, do not use an extension cord or adapter plug with this appliance.
Do not, under any circumstances, cut or remove the third grounding prong from the power cord. Follow National Electrical Codes or prevailing local codes and ordinances.
This appliance must be supplied with the voltage and frequency indicated on the rating plate (located on the back of the washer) and connected to an individual, properly grounded branch circuit, protected by a 15- or 20-amp circuit breaker or time-delay fuse.
If the electric supply provided does not meet the above requirements, call a licensed electrician.
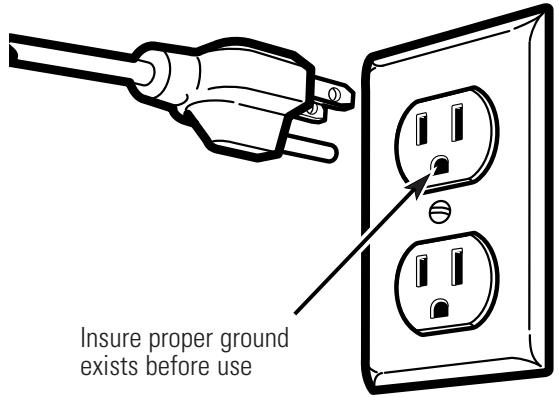
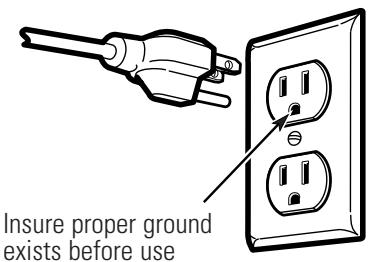
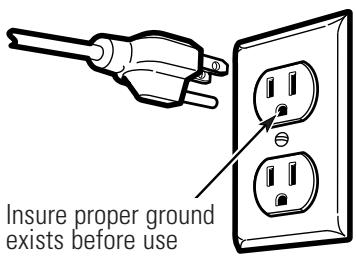
GROUNDING INSTRUCTIONS
This appliance must be grounded. In the event of a malfunction or breakdown, grounding will reduce the risk of electric shock by providing a path of least resistance for electrical current.
This appliance is equipped with a cord having an equipment grounding conductor and a grounding plug.
The plug must be plugged into an appropriate outlet that is properly installed and grounded in accordance with all local codes and ordinances.
A DANGER: Improper connection of the equipment-grounding conductor can result in a risk of electrical shock. Check with a qualified electrician if you are in doubt as to whether the appliance is properly grounded.
Do not modify plug with this appliance; if it will not fit the outlet installed, have a proper outlet installed by a qualified electrician.
LEVELING THE WASHER-STATIONARY MODELS
Before connecting the hoses, the washer must be level. Leveling locks are located at the bottom front of the left and right sides of the washer.
This releases the spring loaded leveling feet. The washer will automatically level itself.
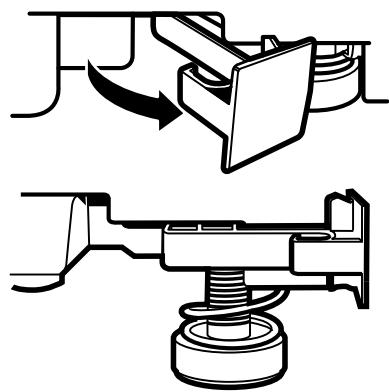
Do not kick or step on the leveling locks.
WASHER CONNECTIONS FOR STATIONARY MODEL WSLS1500
A WARNING: Make sure the washer is unplugged.
1 FLUSH WATER LINES
Run some water from the hot and cold faucets to flush the water lines and remove particles that might clog up the water valve screens.
2 CONNECT TO WATER LINES
Connect the inlet hose ends to the HOT and COLD water faucets tightly by hand, then tighten another 2 / 3 turn with pliers. Turn the water on and check for leaks.
3 CAREFULLY MOVE THE WASHER TO ITS FINAL LOCATION
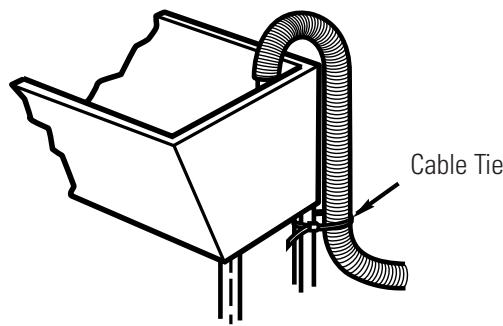
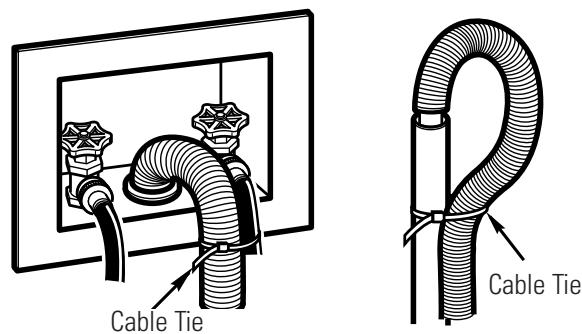
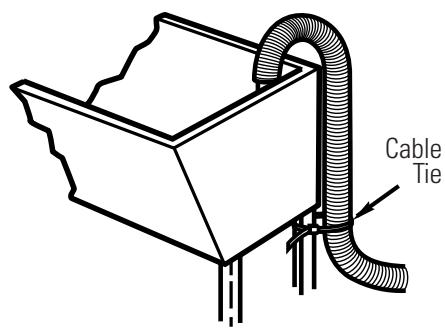
4 CONNECT DRAIN HOSE
Form a U shape on the end of the drain hose with the hose pointed toward the drain. Place the hose in a laundry tub or stand pipe and secure it with a cable tie (not included).
NOTE: If the drain hose is placed in a stand pipe without forming a U shape, a siphoning action could occur. There must be an air gap around the drain hose. A snug hose fit can also cause a siphoning action.
Laundry Tub
Stand Pipe
5 PLUG THE POWER CORD INTO A GROUNDED OUTLET
WASHER CONNECTIONS FOR STATIONARY MODEL WSLS1500
6 INSTALLATION CHECKLIST
Before starting the washer, check to make sure:
Main power is turned on.
The washer is plugged in.
The water faucets are turned on.
The unit is level.
The drain hose is properly tied up.
There are no leaks at the faucet, drain line or washer.
RUN THE WASHER THROUGH A COMPLETE CYCLE
Check for water leaks and proper operation.
8REMOVE THE PROTECTIVE FILM COVERING THE CONTROL PANEL
9 READ THE REST OF THIS OWNER'S MANUAL
It contains valuable and helpful information that will save you time and money.

NOTE: If your washer does not operate, please review the Before You Call For Service section.
ALCOVE OR Closet INSTALLATION
If your washer is approved for installation in an alcove or closet, there will be a label on the back of the machine describing requirements.
- Minimum clearances between washer and adjacent walls or other surfaces are: 0" either side, 2" front, 3" rear.
- Minimum vertical space from floor to overhead shelves, cabinets, ceilings, etc. is 96."
- Closet doors must be louvered or otherwise ventilated and have at least 60 square inches open area for washer only, or if the closet contains both a washer and dryer, doors must contain at least 120 square inches of open area equally distributed.
NOTE: The clearances stated on this label are minimums. Consideration must be given to providing adequate clearances for installation and servicing.
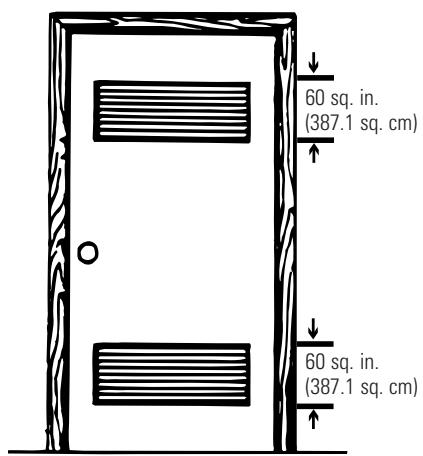
Closet door
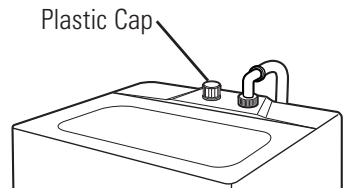
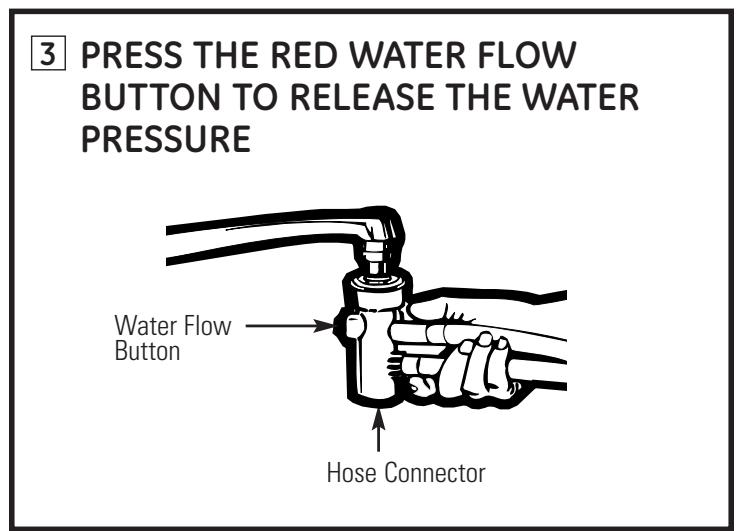
WASHER CONNECTIONS FOR PORTABLE MODEL WSLP1500—ONE-FAUCET CONNECTIONS
Use the hose connector provided with the washer for a one-facet connection.
TO CONNECT THE WASHER:
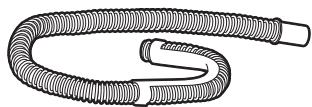
1REMOVE THE UNI-COUPLE® HOSE FROM INSIDE THE WASHER BASKET
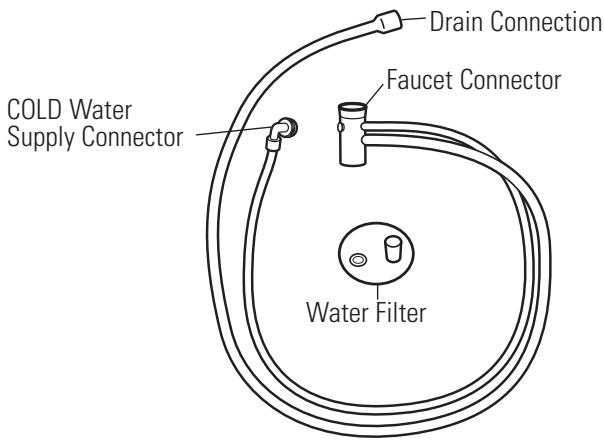
Uni-Coupler Hose
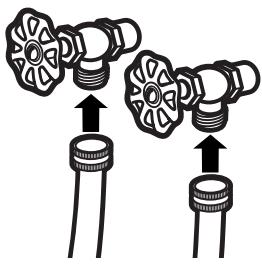
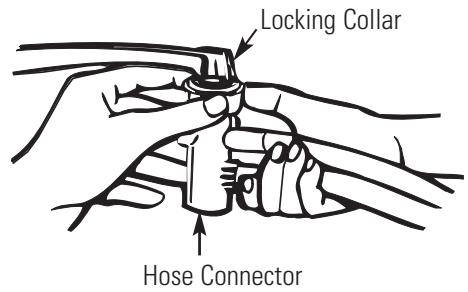
2 CONNECT TO WATER LINE
Attach the hose connector to the faucet adapter by pulling down on the locking collar while lifting up on the connector until it snaps into place. Make sure the water filter provided is in place.
3 CONNECT TO VALVE INLET
Attach the COLD water supply connector to the COLD water valve inlet (color BLUE). Make sure the washer is inside the connector before tightening.
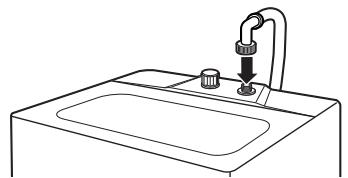
4 TIGHTEN CONNECTOR
Tighten the connector, ensuring the threads are aligned properly for tightest fit. Inspect for kinks or binding of the hose.
NOTE: Do not remove the plastic cap from the HOT water inlet for uni-coupler connections as leakage may occur.
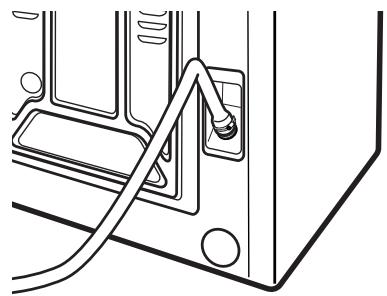
5 CONNECT DRAIN HOSE
Attach the drain hose to the rear of the washer. Install the clamp on the drain hose and tighten to prevent leakage of water.
WASHER CONNECTIONS FOR PORTABLE MODEL WSLP1500—ONE-FAUCET CONNECTIONS (CONT.)
6 MAKE SURE THE TEMPERATURE SELECTOR IS SET AT COLD/COLD
SLOWLY TURN ON THE WATER FAUCET ALL THE WAY TO THE DESIRED TEMPERATURE SETTING
8 PLUG THE POWER CORD INTO A 3-PRONG GROUNDED OUTLET
The electrical power cord is on the back of the washer.
9REMOVE THE PROTECTIVE FILM COVERING THE CONTROL PANEL
10 INSTALLATION CHECKLIST
Before starting the washer, check to make sure:
Main power is turned on.
The washer is plugged in.
The water faucets are turned on.
The unit is level.
There are no leaks at the faucet, drain line or washer.
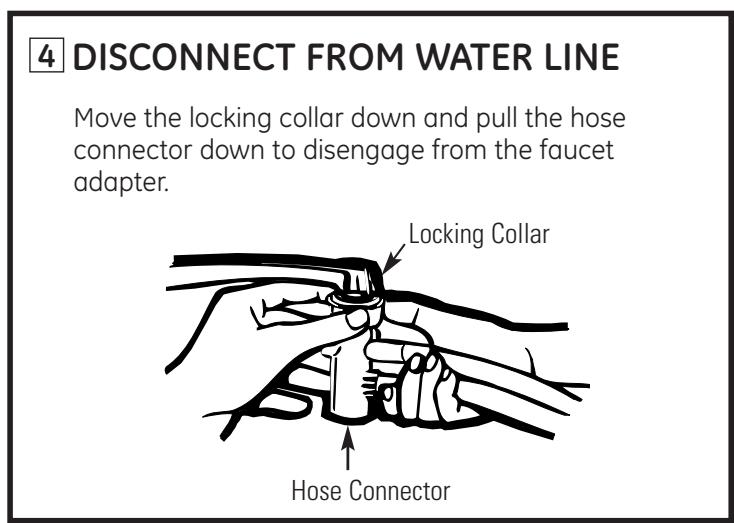
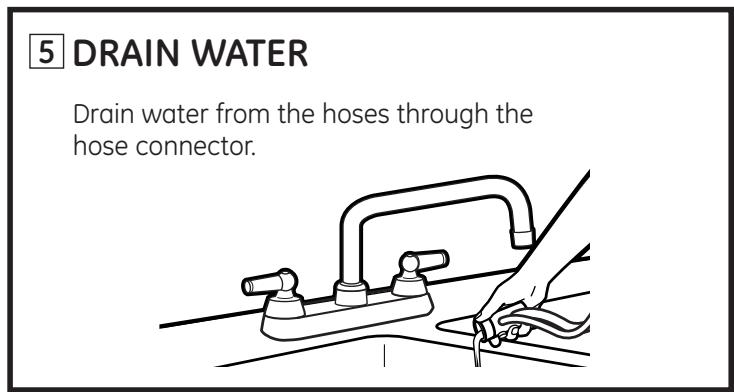
TO DISCONNECT THE WASHER:
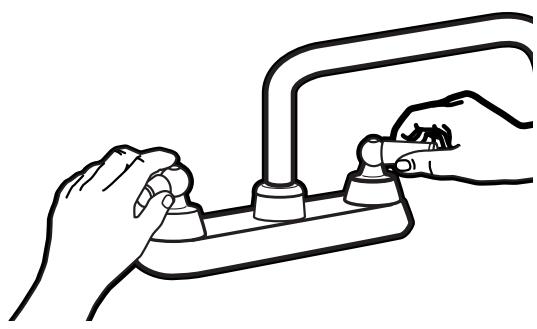
WASHER CONNECTIONS FOR PORTABLE MODEL WSLP1500—TWO-FAUCET CONNECTIONS
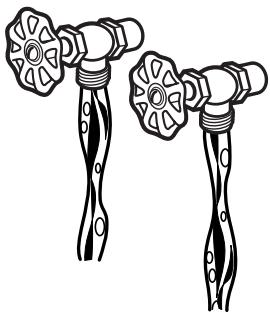
If you have two separate water connections, your washer can be connected to both the hot and cold water faucets. This kit can be purchased from your dealer or from Parts and Accessories. In the United States, call 800.626.2002. In Canada, consult the yellow pages for your local Camco number.
TO CONNECT THE WASHER:
1 CONNECT TO WATER LINE
Connect HOT and COLD water inlet hoses to the HOT and COLD faucets.
2 CONNECT DRAIN HOSE
Secure the drain hose to the sink or stand pipe.
Sink

Stand Pipe
3 PLUG THE POWER CORD INTO A 3-PRONG GROUNDED OUTLET
4 INSTALLATION CHECKLIST
Before starting the washer, check to make sure:
Main power is turned on.
The washer is plugged in.
The water faucets are turned on.
The unit is level.
The drain hose is properly tied up.
There are no leaks at the faucet, drain line or washer.
TO DISCONNECT THE WASHER:
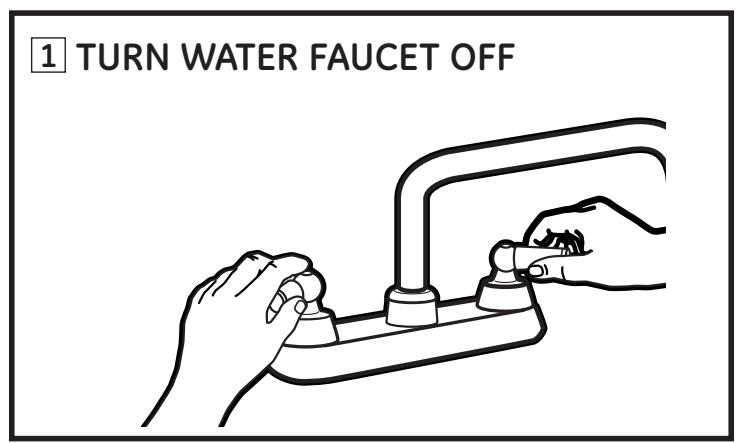
1 TURN WATER FAUCETS OFF
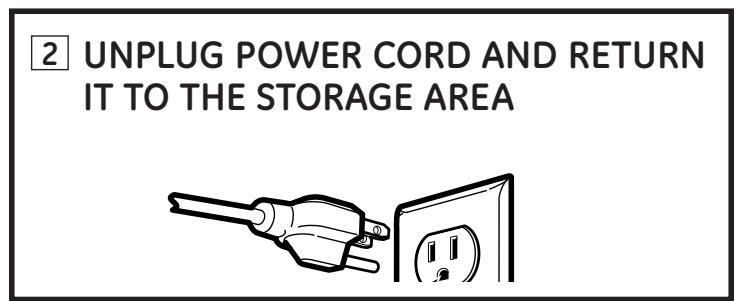
2 UNPLUG POWER CORD AND RETURN IT TO THE STORAGE AREA

3 DISCONNECT THE DRAIN AND WATER SUPPLY HOSES
Hang them on the storage rack.

Troubleshooting Tips
Save time and money! Review the charts on the following pages first and you may not need to call for service.
Status Indicators

Press POWER ON/OFF and call service.

■ Indicates washer failed to fill. Ensure wall faucets are on and fill hose is not clogged or kinked.

Indicates water has not drained from washer. Ensure the drain hose is not kinked or connected improperly.

■ Indicates the laundry load is unbalanced. Reposition laundry evenly in basket, and ensure washer is level.

Indicates the lid is open. Close the lid.

■ Indicates washer has leakage. Check the drain hose connection.

Indicates water has overflowed. Restart after spinning.

Troubleshooting Tips
| WATER | POSSIBLE CAUSES | WHAT TO DO |
| Too many suds | Type of detergent | •Switch to HE detergent. |
| Very soft water | •Try less detergent. | |
| Too much detergent | •Measure your detergent carefully. Use less soap if you have soft water, a smaller load or a lightly soiled load. | |
| Water leaks | Fill hoses or drain hose is improperly connected | •Make sure hose connections are tight at faucets and the washing machine. Make sure the end of the drain hose is correctly inserted and secured to the drain. |
| Household drain may be clogged | •Check household plumbing. You may need to call a plumber. | |
| Constant water pressure to the fill hoses at the water source | •Tighten hoses at the faucets and turn the water off after each use. •Check condition of the fill hoses; they may need replacement after 5 years. | |
| Using too much detergent in washer | •Use less detergent. Use less soap if you have soft water, a smaller load or a lightly soiled load. | |
| Water temperature is incorrect | Water supply is turned off or improperly connected | •Turn both hot and cold faucets fully on and make sure hoses are connected to correct faucets. |
| Water valve screens are stopped up | •Turn off the water source and remove the water connection hoses from the upper back of the washer. Remove screens and use a brush or toothpick to clean the screens in the machine. Reinstall screens, reconnect the hoses and turn the water back on. | |
| House water heater is not set properly | •Make sure house water heater is delivering water at 120°F–140°F (48°C–60°C). | |
| Water won't drain | Drain hose is kinked or improperly connected | •Straighten drain hose and make sure washer is not sitting on it. •Top of drain outlet should be less than 8 ft. above floor. |
| OPERATION | POSSIBLE CAUSES | WHAT TO DO |
| Washer pauses in cycle | The washer normally pauses between washing steps | |
| Washer won't operate | Washer is unplugged | • Make sure cord is plugged securely into a working outlet. |
| Water supply is turned off | • Turn both hot and cold faucets fully on. | |
| Controls are not set properly | • Make sure all selections have been made. | |
| Lid is open | • Close lid and press START/PAUSE. | |
| Circuit breaker/fuse is tripped/blown | • Check house circuit breakers/fuses. Replace fuses or reset breaker. Washer should have separate outlet. | |
| Washer has not been turned on | • Press the POWER ON/OFF button. | |
| PERFORMANCE | POSSIBLE CAUSES | WHAT TO DO |
| Colored spots | Incorrect use of fabric softener | • Check fabric softener package for instructions and follow directions for using dispenser. • Pretreat stain and rewash. |
| Dye transfer | • Sort whites or lightly colored items from dark colors. | |
| Grayed or yellowed clothes | Not enough detergent | • Use more detergent (especially with larger loads). |
| Hard water | • Use a water conditioner like Calgon brand or install a water softener. | |
| Water is not hot enough | • Make sure water heater is delivering water at 120°F–140°F (48°C–60°C). | |
| Washer is overloaded | • Select load size to match clothes load. | |
| Dye transfer | • Sort clothes by color. If fabric label states wash separately, unstable dyes may be indicated. | |
| Lint or residue on clothes | Clothes are air or line dried | • If you do not dry your clothes with a clothes dryer, your clothes may retain more lint. |
| Incorrect sorting | • Separate lint producers from lint collectors. | |
| Washing too long | • Wash small loads for a shorter time than larger loads. | |
| Overloading | • Load clothes no higher than the top row of holes in the washer tub. • Make sure load size selector matches clothes load size. | |
| Incorrect use of fabric softener | • Check fabric softener package for instructions and follow directions for using dispenser. | |
| Pilling | Result of normal wear on poly-cotton blends and fuzzy fabrics | • While this is not caused by the washer, you can slow the pilling process by washing garments inside out. |

Troubleshooting Tips
| PERFORMANCE (cont.) | POSSIBLE CAUSES | WHAT TO DO |
| Snags, holes, tears, rips or excessive wear | Pins, snaps, hooks, sharp buttons, belt buckles, zippers, and sharp objects left in pockets | • Fasten snaps, hooks, buttons and zippers. • Remove loose items like pins, objects in pockets and sharp buttons. • Turn knits (which snag easily) inside out. |
| Undiluted chlorine bleach | • Check bleach package instructions for proper amount. • Never add undiluted bleach to wash or allow clothes to come in contact with undiluted bleach. | |
| Chemicals like hair bleach or dye, permanent wave solution | • Rinse items that may have chemicals on them before washing. | |
| Wrinkling | Improper sorting | • Avoid mixing heavy items (like work clothes) with light items (like blouses). • Try a fabric softener. |
| Overloading or incorrect water level | • Load your washer so clothes have enough room to move freely. | |
| Repeated washing in water that is too hot | • Wash in warm or cold water. | |
| NOISE | POSSIBLE CAUSES | WHAT TO DO |
| Washer is noisy | Washer is uneven | • Level the washer. See Leveling the Washer. |
| Washer load is unbalanced | • Press the START/PAUSE button to stop the washer, open the lid and redistribute the load evenly. Close the lid and restart. | |
| Washer is sitting too close to wall (causes knocking during cycle) | • Pull washer away from the wall; about 4" is needed. | |
| Dragging noise prior to water filling in the tub | When using the LOAD SENSING feature, the agitator rotates before water fills in the tub | • This is normal. |
| OTHER | POSSIBLE CAUSES | WHAT TO DO |
| Labels on the exterior of the washer will not peel off cleanly | Occasionally the adhesive used on the labels does not release cleanly | • Use a hair dryer set at the lowest heat setting, directing the air at the label for a short amount of time. This will release the adhesive easily, without damaging the surface of the washer. |
Please place in envelope and mail to:
For Canadian Customers

CUT ALONG THIS LINE AND RETURN CARD—THANKS
| OWNERSHIP REGISTRATION CERTIFICATE - FICHE D'INScription DU PROPRIÉTAIRE | |||||
| Please register your product to enable us to contact you in the remote event a safety notice is issued for this product and to allow for efficient communication under the terms of your warranty, should the need arise. | Veuiliez enregistrer votre produit afin de nous permettre de communiquer avec vous si jamais un avis de sécurité concernant ce produit était émis et de communiquer facilement avec vous en vertu de votre garantie, si le besoin s'en fait sentir. | ||||
| REGISTER ON-LINE: www.geapliances.ca ENREGISTREMENT SUR INTERNET À: www.electromenagersge.ca MAIL TO: P.O. BOX 1780, MISSISSAUGA POSTER À: ONTARIO, LAY 4G1 | |||||
| □ MR./M □ MRS./MME. □ MISS/MLLE. □ MS. | FIRST NAME /PRÉNOM | LAST NAME /NOM | |||
| STREET NO/N° RUE | STREET NAME/RUE | APT.NO/APP./RR# | |||
| CITY/VILLE | PROVINCE | POSTAL CODE/POSTAL | |||
| AREA CODE/IND.RÉG. | TELEPHONE | ||||
| DID YOU PURCHASE A SERVICE CONTRACT FOR THIS APPLIANCE? YES/OUI □ IF YES/SI OUI:EXPIRATION AVEZ-VOUS ACHETE UN CONTRAT DE SERVICE POUR CET APPAREL? NO/NON □ | |||||
| NAME OF SELLING DEALER/NOM DU MARCHAND | MODEL/MODELE | ||||
| INSTALLATION DATE/DATE D'INSTALLATION Y/A M D/J | CORRESPONDENCE □ ENGLISH CORRESPONDANCE □ FRANÇAIS | SERIAL/SÉRIE | |||
| □ I do not wish to receive any promotional offers regarding this product. □ Je ne désire pas reçu d'affres promotionnelles concernant ce produit. | |||||

All warranty service provided by our Factory Service Centers, or an authorized Customer Care® technician. To schedule service, on-line, visit us at ge.com, or call 800.GE.CARES (800.432.2737). Please have serial number and model number available when calling for service.
Staple your receipt here. Proof of the original purchase date is needed to obtain service under the warranty.
For The Period Of:
We Will Replace:
One Year From the date of the original purchase
Any part of the washer which fails due to a defect in materials or workmanship. During this limited one-year warranty, GE will also provide, free of charge, all labor and related service costs to replace the defective part.
What Is Not Covered (in the United States):
Service trips to your home to teach you how to use the product.
■ Improper installation, delivery or maintenance.
Failure of the product if it is abused, misused, or used for other than the intended purpose or used commercially.
Damage after delivery.
■ Replacement of house fuses or resetting of circuit breakers.
- Damage to the product caused by accident, fire, floods or acts of God.
■ Incidental or consequential damage caused by possible defects with this appliance.
Product not accessible to provide required service.
EXCLUSION OF IMPLIED WARRANTY--Your sole and exclusive remedy is product repair as provided in this Limited Warranty. Any implied warranties, including the implied warranties of merchantability or fitness for a particular purpose, are limited to one year or the shortest period allowed by law.
This warranty is extended to the original purchaser and any succeeding owner for products purchased for home use within the USA. If the product is located in an area where service by a GE Authorized Servicer is not available, you may be responsible for a trip charge or you may be required to bring the product to an Authorized GE Service location for service. In Alaska, the warranty excludes the cost of shipping or service calls to your home.
Some states do not allow the exclusion or limitation of incidental or consequential damages. This warranty gives you specific legal rights, and you may also have other rights which vary from state to state. To know what your legal rights are, consult your local or state consumer affairs office or your state's Attorney General.
Warrantor: General Electric Company. Louisville, KY 40225
GE Washer Warranty. (For customers in Canada)

All warranty service provided by our Factory Service Centres or an authorized technician. For service, call 1.800.561.3344.
Please have serial number and model number available when calling for service.
| For The Period Of: | We Will Replace: |
| One Year From the date of the original purchase | Any part of the washer which fails due to a defect in materials or workmanship. During this limited one-year warranty, GE will also provide free of charge, all labour and related service costs to replace the defective part. |
What Is Not Covered (in Canada):
Service trips to your home to teach you how to use the product.
■ Improper installation, delivery or maintenance.
Failure of the product if it is abused, misused, or used for other than the intended purpose or used commercially.
Damage after delivery.
■ Replacement of house fuses or resetting of circuit breakers.
- Damage to the product caused by accident, fire, floods or acts of God.
■ Incidental or consequential damage caused by possible defects with this appliance.
Product not accessible to provide required service.
EXCLUSION OF IMPLIED WARRANTY--Your sole and exclusive remedy is product repair as provided in this Limited Warranty. Any implied warranties, including the implied warranties of merchantability or fitness for a particular purpose, are limited to one year or the shortest period allowed by law.
This warranty is extended to the original purchaser and any succeeding owner for products purchased for home use within Canada. In-home warranty service will be provided in areas where it is available and deemed reasonable by Mabe to provide.
WARRANTOR IS NOT RESPONSIBLE FOR CONSEQUENTIAL DAMAGES.
Warrantor: MABE CANADA INC.
INSTALLATION CORRECTE
2 WASH OPTIONS (OPTIONS DE LAVAGE)
| Programme | Soak+Wash +Rinse+Spin | Soak+Wash+Heavy Duty+Rinse+Spin | Wash+Rinse +Spin | Wash+Heavy Duty+Rinse+Spin | Wash +Rinse | Rinse +Spin | Wash Only | Rinse Only | Spin Only |
| COLORS (Couleurs) | X | X | X | X | X | X | X | X | X |
| WHITES (Blanc) | X | X | X | X | X | X | X | X | X |
| DELICATES (Délicat) | X | X | X | X | X | X | X | X | X |
| SPEED WASH (Lavage rapide) | X | X | X | X | X | X | X | X | X |
| CUSTOM CYCLE (Programme personnalisé) | X | X | X | X | X | X | X | X | X |
| ULTRA CLEAN (Ultra propre) | X |
3 LOAD SIZE (TAILLE DE BRASSEE)
Please place in envelope and mail to:
For Canadian Customers

CUT ALONG THIS LINE AND RETURN CARD—THANKS
| OWNERSHIP REGISTRATION CERTIFICATE - FICHE D'INScription DU PROPRIÉTAIRE | |||||
| Please register your product to enable us to contact you in the remote event a safety notice is issued for this product and to allow for efficient communication under the terms of your warranty, should the need arise. | Veuiliez enregistrer votre produit afin de nous permettre de communiquer avec vous si jamais un avis de sécurité concernant ce produit était émis et de communier facilement avec vous en vertu de votre garantie, si le besoin s'en fait sentir. | ||||
| REGISTER ON-LINE: www.geapliances.ca ENREGISTREMENT SUR INTERNET À: www.electromenagersge.ca MAIL TO: P.O. BOX 1780, MISSISSAUGA POSTER À: ONTARIO, LAY 4G1 P.O. BOX 1780, MISSISSAUGA POSTER À: ONTARIO, LAY 4G1 | |||||
| □ MR./M □ MRS./MME. □ MISS/MLLE. □ MS. | FIRST NAME / PRÉNOM | LAST NAME / NOM | |||
| STREET NO/N° RUE | STREET NAME/RUE | APT. NO./APP./RR# | |||
| CITY/VILLE | PROVINCE | POSTAL CODE/POSTAL | |||
| AREA CODE/IND. RÉG. | TELEPHONE | ||||
| DID YOU PURCHASE A SERVICE CONTRACT FOR THIS APPLIANCE? AVEZ-VOUS ACHETÉ UN CONTRAT DE SERVICE POUR CET APPAREIL? YES/oui □ IF YES/SI OUI: EXPIRATION NO/NON □ Y/A M D/J | |||||
| NAME OF SELLING DEALER/NOM DU MARCHAND | MODEL/MODELE | ||||
| INSTALLATION DATE/DATE D'INSTALLATION Y/A M D/J | CORRESPONDENCE □ ENGLISH CORRESPONDANCE □ FRANÇAIS | SERIAL/SÉRIE | |||
| □ I do not wish to receive any promotional offers regarding this product. □ Je ne désire pas recevoir d'affres promotionnelles concernant ce produit. | |||||

Garante: General Electric Company. Louisville, KY 40225
General Manager, Customer Relations
GE Appliances, Appliance Park
Louisville, KY 40225

Registre su electrodoméstico
ge.com
Have a question or need assistance with your appliance? Try the GE Appliances Website 24 hours a day, any day of the year! For greater convenience and faster service, you can now download Owner's Manuals, order parts or even schedule service on-line. In Canada: www.geappliances.ca

Schedule Service
In the U.S.: ge.com
Expert GE repair service is only one step away from your door. Get on-line and schedule your service at your convenience any day of the year! Or call 800.GE.CARES (800.432.2737) during normal business hours. In Canada, call 1.800.561.3344
Real Life Design Studio
In the U.S.: ge.com
GE supports the Universal Design concept—products, services and environments that can be used by people of all ages, sizes and capabilities. We recognize the need to design for a wide range of physical and mental abilities and impairments. For details of GE's Universal Design applications, including kitchen design ideas for people with disabilities, check out our Website today. For the hearing impaired, please call 800.TDD.GEAC (800.833.4322).
In Canada, contact: Manager, Consumer Relations, Mabe Canada Inc.
Suite 310, 1 Factory Lane
Moncton, N.B. E1C 9M3

Extended Warranties
In the U.S.: ge.com
Purchase a GE extended warranty and learn about special discounts that are available while your warranty is still in effect. You can purchase it on-line anytime, or call 800.626.2224 during normal business hours. GE Consumer Home Services will still be there after your warranty expires. In Canada, call 1.888.261.2133
Parts and Accessories
In the U.S.: ge.com
Individuals qualified to service their own appliances can have parts or accessories sent directly to their homes (VISA, MasterCard and Discover cards are accepted). Order on-line today, 24 hours every day or by phone at 800.626.2002 during normal business hours.
Instructions contained in this manual cover procedures to be performed by any user. Other servicing generally should be referred to qualified service personnel. Caution must be exercised, since improper servicing may cause unsafe operation.
Customers in Canada should consult the yellow pages for the nearest Mabe service center, or call 1.800.661.1616.

Contact Us
In the U.S.: ge.com
If you are not satisfied with the service you receive from GE, contact us on our Website with all the details including your
phone number, or write to: General Manager, Customer Relations
GE Appliances, Appliance Park
Louisville, KY 40225
In Canada: www.geappliances.ca, or write to:
Director, Consumer Relations, Mabe Canada Inc.
Suite 310, 1 Factory Lane
Moncton, N.B. E1C 9M3

Register Your Appliance
In the U.S.: ge.com
Register your new appliance on-line—at your convenience! Timely product registration will allow for enhanced communication and prompt service under the terms of your warranty, should the need arise. You may also mail in the pre-printed registration card included in the packing material. In Canada: www.geappliances.ca