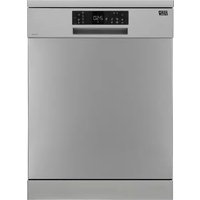
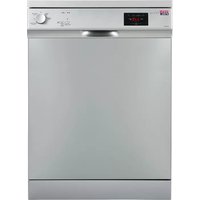
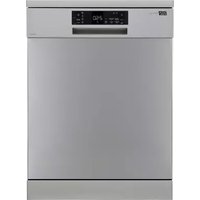
XS 251CO - Dishwasher NEW POL - Free user manual and instructions
Find the device manual for free XS 251CO NEW POL in PDF.


| Brand | NEW POL |
| Model | XS 251CO |
| Product type | Dishwasher |
| Dimensions (W x H x D) | 60 x 85 x 60 cm |
| Nominal capacity | 12 place settings |
| Electrical supply | 220-240 V ~ 50 Hz |
| Nominal power | See rating plate |
| Water consumption per cycle | Approximately 12 L |
| Noise level | 45 dB(A) |
| Wash programs | Intensive, Eco, Quick, Glass, Pre-wash |
| Delay start | Yes, up to 24 h |
| Child safety | Yes, key lock |
| Auto shut-off | Yes, at end of cycle |
| Salt and rinse aid indicator | Yes, indicator lights |
| Regular maintenance | Filter cleaning every cycle, descaling every 3 months |
| Spare parts available | Filter, wash arm, basket, heating element |
| Repairability | Repairability index 7.5/10 |
Frequently Asked Questions - XS 251CO NEW POL
User questions about XS 251CO NEW POL
0 question about this device. Answer the ones you know or ask your own.
Ask a new question about this device
Download the instructions for your Dishwasher in PDF format for free! Find your manual XS 251CO - NEW POL and take your electronic device back in hand. On this page are published all the documents necessary for the use of your device. XS 251CO by NEW POL.
USER MANUAL XS 251CO NEW POL
Thank you for having chosen our drier.
From this moment on, all your drying problems are solved: your purchase will prove to be extremely useful.
We should remind you, however, that the appliance will give you excellent service only if it has been installed correctly and is used properly.
Consequently, we suggest that you read the instructions and advice given in this manual carefully before using the drier.
If you follow these instructions scrupulously and dedicate the minimum of attention required to the drier, in exchange it will provide you with the service and results you expect.
CONTENTS
NOTES AND ADVICE FOR THE USER 16
TECHNICAL INFORMATION 16
INSTALLING THE APPLIANCE 17
17
DESCRIPTION OF THE ELECTRONIC DRIER 18
Description of the domestic appliance and control panel 18
DESCRIPTION OF THE MECHANICAL DRIER 19
Description of the domestic appliance and control panel 19
USING THE DRIER 20-24
Sorting the washing 20
Safety instructions and warnings 20
Preparing for drying 20
Loading 21
Using the electronic model 21
Further information on the electronic model timer program 21
Further information on the timer program 22
Program change on the electronic model 22
Program finish on the electronic model 22
Using the mechanical model 22-23
Further information on the mechanical model timer program 23
Program finish on the mechanical model 23
After a program finish on the mechanical model 24
MAINTENANCE 24-26
draining the condensation reservoir 24
Cleaning and maintenance 24-25
Internal light 25
Recommendations 25-26
Electronic model troubleshooting 26
Mechanical model troubleshooting 26
Dimensions 26
WE SUGGEST THAT YOU KEEP THE FOLLOWING INFORMATION CLOSE AT HAND:
MODEL:
SERIAL
DATE OF PURCHASE:
NOTES AND ADVICE FOR THE USER
This appliance has been designed for use as a domestic drier. Any other use is considered as improper and therefore dangerous.
- Keep this instruction book near to the appliance always, in order that it can be easily consulted when necessary.
Any modifications or attempts to interfere with the appliance can be dangerous for the user and may damage the product.
On delivery of the appliance, check that it has not been damaged during transport. If any damage is discovered, report the matter to the retailer immediately.
When positioning the appliance, ensure that the power supply cable is not kinked or squashed and is accessible.
The appliance must not be used by children unless supervised.
Never dry washing that has been in contact with chemical agents such as dry-cleaning fluids.
These products are volatile by nature and could cause an explosion.
Do not dry items with parts containing foam rubber or rubber in general, in that the material could melt and damage other items or even the appliance itself.
If the appliance is sold or given away, remember to hand over this instruction book with it. This will help the new owner use the drier both correctly and safely.
Do not attempt to repair any appliance faults alone, in that repairs carried out by a non-professional may cause serious damage and will nullify any rights to repairs under guarantee.
Repairs to the appliance can only be carried out by personnel authorised by the customer service centres.. All repairs must make use of original spare parts only.
Spin dry or wring the washing well before load
ing it into the drier. Spun dry washing will dry quicker.
Clean the filter thoroughly each time the drier is used in order to guarantee perfect air circulation.
Never insert or remove the plug from the mains socket with wet hands.
The machine must be connected to a mains socket fitted with an efficient earth complying with current safety standards.
Do not use extension leads or multiple plug adapters to connect the appliance to the mains supply.
Do not expose the appliance to atmospheric agents.
When cleaning the appliance, remember to disconnect it from the mains supply.
- Do not pull the power supply cable to unplug the appliance from the mains supply. Pull the plug only.
The manufacturer will not be held responsible for any accidents caused by non-compliance with the instructions reported in this instruction book.
TECHNICAL INFORMATION
The domestic appliance has specifically been designed for domestic use and not for industrial use.
The appliance is fitted with a suppressor for protection against radio interference.
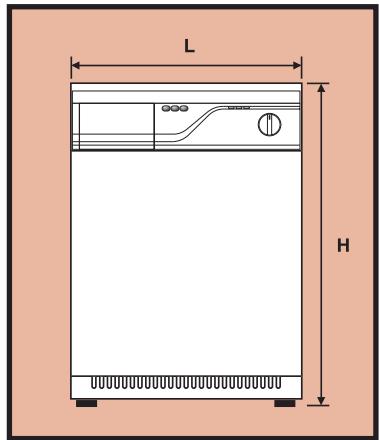
INSTALLING THE APPLIANCE
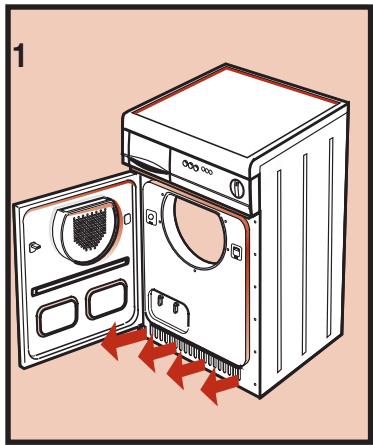
Position the drier in a well-ventilated room.
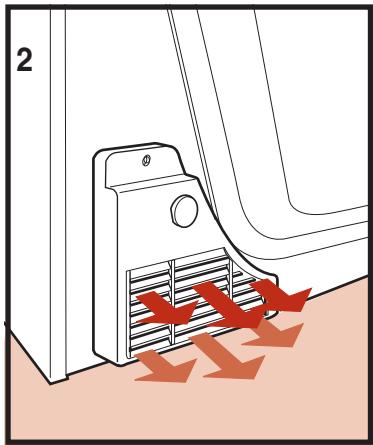
Do not cover the ventilation grills on the front and back (fig. 1 and 2) and do not place the drier on thick carpet.
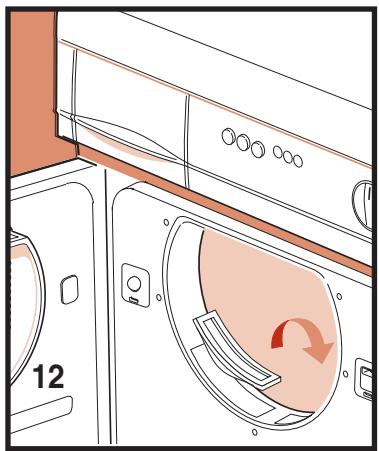
Position the filters (fig. 10 & 12).
Clean the drum using a soft cloth to remove any dust or grease.
Do not install the drier in rooms subject to freezing temperatures as these could damage the electronics.
Connecting the condensation drain to the drainage system.
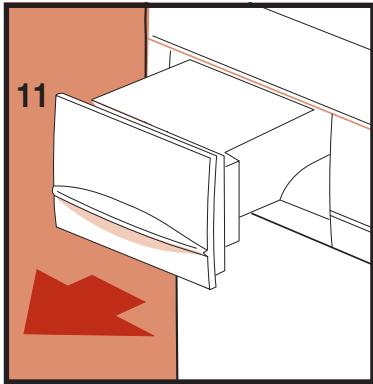
The condensation can be collected in the reservoir (fig. 11) or, alternatively, the hose can be connected directly to the drainage system.
In this case, the collected water is pumped out.
To connect the condensation hose directly to the drainage system, proceed as follows:
before starting any operations, unplug the appliance from the mains socket.
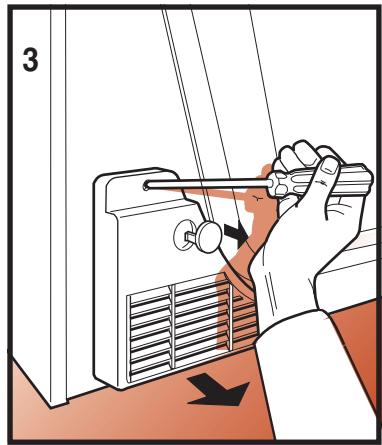
remove the grill on the back of the drier after first removing the screw (fig. 3).
remove the hose clip using a pair of pliers and
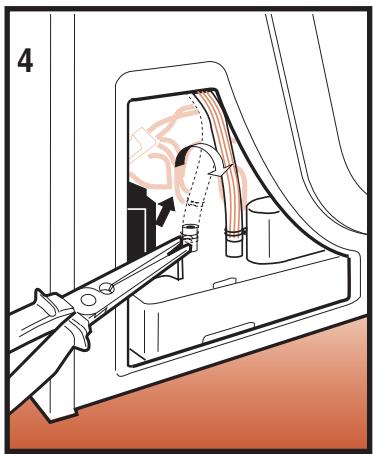
carefully remove the hose (fig. 4).
place the hose on the front nozzle and replace the hose clip.
position the hose supplied on the free nozzle
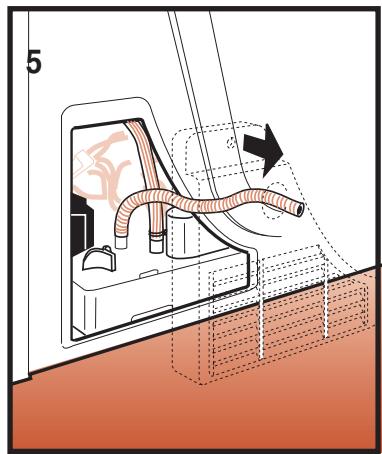
(fig. 5). Place the hose clip supplied in position.
pass the hose through the grill (fig. 5) while refitting the grill itself.
insert the hose in the drainage pipe.
LEVELLING
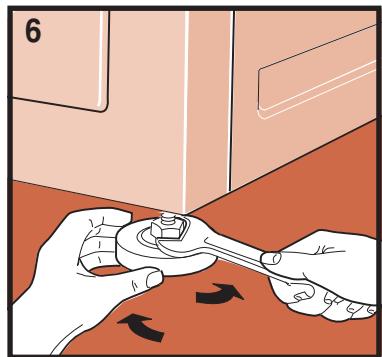
The appliance can be levelled by rotating the adjustable feet.
The appliance must be levelled in order to ensure its correct operation.
DESCRIPTION OF THE ELECTRONIC DRIER
DESCRIPTION OF THE DOMESTIC APPLIANCE AND CONTROL PANEL
- Condensation water reservoir.
The condensation is collected in this reservoir when the condensation drain hose is not connected directly to the drainage system.
- ON/OFF button
Switches the drier on and off, but does not start the program.
OFF (button released) ON (button pressed)
- Dry selection button for energetic programs only (cotton/linen).
Low temperature: delicate fabrics (synthetics) high temperature: cotton and linen.
WARNING: Pressed: low temperature.
Not pressed: high temperature.
- Condensation drain button
When the reservoir is full (the warning light flashes), position the programmer on STOP, when the reservoir is empty, keep the button pressed for approximately 10 seconds. This will activate the drain pump to remove any remaining condensation. On completion, reset the previously selected drying program.
- On/Off light
Lights up when the appliance is switched on and running. The light
will flash continuously on completion of the drying program, signalling that the washing can be removed from the drum.
When the light is flashing at the start of a program, the program must be reset.
Place the knob in the STOP position.
The program can be set after the audible signal. An audible signal is also heard on completion of the drying program.
- Temperature indicator light - Electronic programs:
A. In the energetic programs section, the light will be lit continuously, signalling that a high temperature has been set.
B. In the delicate programs section, the light will be flashing, signalling that a low temperature has
been set.
In the timed programs section, the light will be lit continuously.
The high or low tem perature must be set according to the type of washing to dry.
The light will go out during the last cooling phase.
- Condensation reservoir indicator light
This indicator light lights up when the reservoir is full. The drier will stop automatically.
- Programmer
The drying time is set by rotating the programmer knob clockwise only.
- Opening the door
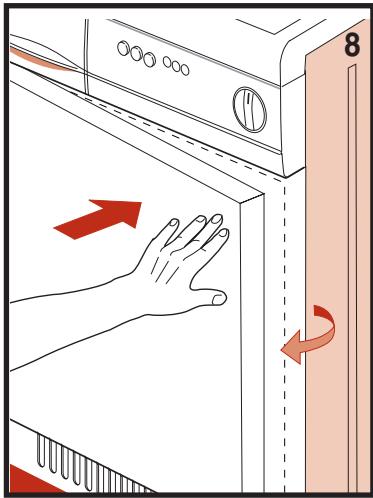
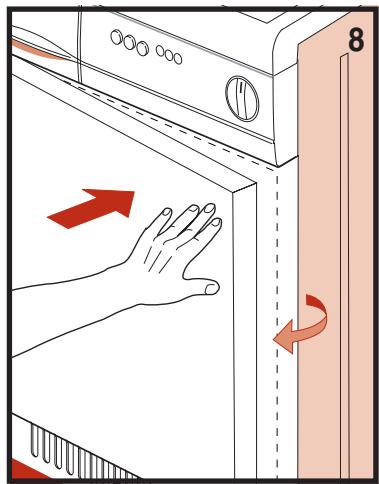
Press the right side of the door (fig. 8) to open it.
If the door has been reversed, press the left side.
DESCRIPTION OF THE MECHANICAL DRIER
DESCRIPTION OF THE DOMESTIC APPLIANCE AND CONTROL PANEL
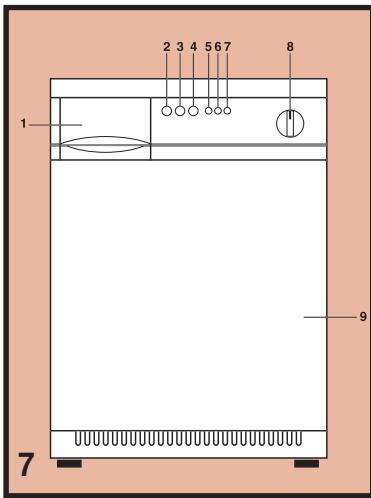
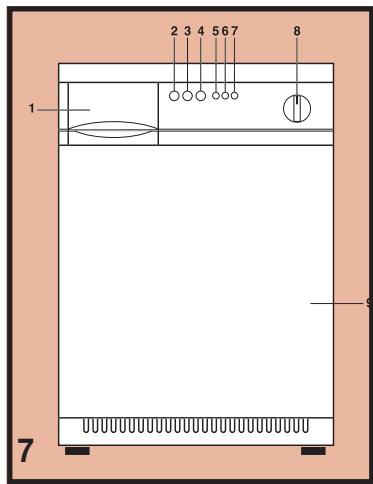
1. Condensation water reservoir.
The condensation is collected in this reservoir when the condensation drain hose is not connected directly to the drainage system.
2. ON/OFF button
Switches the drier on and off, but does not start the program.
OFF (button released)
ON (button pressed)
3. Dry selection button for energetic programs only (cotton/linen).
Low temperature: delicate fabrics (synthetics) high temperature: cotton and linen.
WARNING: Pressed: low temperature.
Not pressed: high temperature.
4. Dual function button
- start program
drain condensation water.
The indicator light lights up when the reservoir is full.
When the reservoir is empty, keep the button pressed for approximately 10 seconds.
This will activate the drain pump to remove any remaining condensation.
The drier will restart when the button is released.
5. On/Off light
Lights up when the appliance is switched on and running.
6. Temperature indicator light
A. In the energetic programs section, the light will be lit continuously, signalling that a low temperature has been set.
The high or low temperature must be set according to the type of washing to dry.
B. The light remains switched off for the delicate programs.
7. Condensation reservoir indicator light
This indicator light lights up when the reservoir is full.
The drier will stop automatically.
8. Programmer
The drying time is set by rotating the programmer knob clockwise only.
9. Opening the door
Press the right side of the door (fig. 8) to open it.
If the door has been reversed, press the left side.
USING THE APPLIANCE
SORTING THE WASHING
Before drying the washing, spin it at the recommended rpm for the type of load.
Spinning at maximum rpm will result in up to a 35% saving in energy. The higher the spin speed, the better the drying result.
Before drying the washing in the drier, check the items to make sure they can be machine dried.
Refer to the clothing care symbols on the labels.
If the label has no drying symbol, proceed as follows:
white/coloured washing and crease-proof washing can be dried at normal temperature using the appropriate drying program.
delicate washing, acrylics for example, must be dried at low temperature.
General advice:
Jersey often shrinks, not only in the wash but also during
drying.
Pure linen.
Only dry if indicated by the manufacturer on the label.
Otherwise, the fabric could roughen.
- Do not dry dark coloured washing together with light coloured washing in order to prevent discolouring.
SAFETY INSTRUCTIONS AND WARNINGS
Read these operating instructions carefully before using the drier.
This will ensure your safety and prevent damage to the drier.
Repairs to our driers can only be carried out by authorised personnel.
Repairs carried out by others or by the user may nullify the guarantee.
There is no electricity supply to the drier only if the plug has been removed
from the mains socket or if the main domestic supply switch has been switched off.
Children must be kept away from the drier when it is in operation.
Always close the door after using the drier.
This will prevent children from leaning on the door and possibly overturning the drier.
WARNING:
if the washing contains
parts in rubber or foam rubber;
if the washing has been treated with flammable detergent (stain removing fluid for example);
if the washing has been in contact with hair spray or nail varnish solvent or similar products; then there is a risk of fire!
Store these operating instructions in a safe place.
PREPARING FOR DRYING
Sort the washing into fabric types. ADVICE:
delicate fabrics (silk for example) that require dry cleaning or hand washing cannot be dried too often in the drier (see fabric label).
woollen items must have the "pure new wool" mark with the writing "will not fray", "superwash", "will not shrink" or similar. Woollen items with the "wool" mark only should not be dried in the drier.
fibrics containing rubber or foam rubber elements cannot be dried in the drier.
fibrics that have been treated with a stain removing fluid or poisonous or narcotic type products cannot be dried in the drier in that there is a risk of spontaneous combustion.
In some countries, the clothing items have wash labels with machine dry symbols.
In Holland, for example, this is still
not compulsory and not all items of clothing have these symbols. Nevertheless, the labels in question bear the following information:
MACHINE DRY
NORMAL FABRIC
HEAT SENSITIVE FABRIC
DO NOT MACHINE DRY
USING THE APPLIANCE
LOADING
close zips and fasten buttons.
Tie loose belts and apronties etc. together.
Turn jumpers and similar items inside out.
Use a towel to dry very wet
fabrics. This will save energy. Load sheets well spread out.
Dimensions of the loaded items:
whenever possible, load the drier with items of different dimensions.
WARNING
Make sure that no washing is trapped between the door and the drier.
This will prevent damage to the appliance and the washing.
USING THE ELECTRONIC MODEL
A 1. Close the door securely
2. Make sure that the ON/OFF buttuü is OFF.
3. Insert the plug in the mains socket.
B 1. Position the programmer on STOP prior to the selected program.
2. Press the ON/OFF button to switch on the drier. (The warning ght will flash for a short time and an audible signal will be emitted).
3. Position the programmer on the required program.
| ELECTRONIC PROGRAM TABLE | ||
| Program Selector Position | Quantity of washing in kg | Degree of dryness of dried washing |
| cotton, linen | 5 | extra dry |
| cotton, linen | 5 | wardrobe dry |
| cotton, linen | 5 | iron dry |
| cotton, linen | 5 | wringer dry |
| synthetic | 3 | extra dry |
| synthetic | 3 | wardrobe dry |
| synthetic | 3 | iron dry |
| synthetic | 3 | wringer dry |
| cotton/linen | 3 | timed |
| synthetic | 2 | timed |
(See Program table).
When setting the timed program, set the tem perature using the "dry se
lection" button. At the end of each program, the drier effects a cooling cycle of approximately 10 minutes.
FURTHER INFORMATION ON THE TIMED PROGRAM OF THE ELECTRONIC MODEL
The timed program lasts up to 60 minutes and is followed automatically by a cooling phase.
The program can be shortened by rotating the programmer knob in the direction of the STOP.
The required drying time depends on:
weight and dimensions of the washing
| THE FOLLOWING TABLE CONTAINS SOME GENERAL | ||
| Type of washing to dry | Quantity of washing to dry in kg | Wardrobe dry Iron dry |
| cotton, linen | 3 | +/- 60 min +/- 40 min synthetic |
| cotton, linen | 2 | +/- 40 min +/- 20 min cotton + synthetic |
| cotton, linen | 2 | +/- 40 min +/- 20 min |
USING THE APPLIANCE
FURTHER INFORMATION ON THE TIMED PROGRAM OF THE ELECTRONIC MODEL
type of fabric
degree of drying required
degree of dampness of the washing. (It is recommended that an appli
ance of spin speed of at least 800/1000 or a separate spin drier is used).
Note
Cotton/linen, for example un
derwear, handkerchiefs, tablecloths, sheets.
Synthetics: for example, underwear, nylon, dralon, terlenkja, etc.
CHANGING PROGRAM (ELECTRONIC MODEL)
To change the program, rotate the programmer knob to STOP.
Set the new program. The program must also be reset if the door has
been opened during a drying cycle.
END OF PROGRAM (ELECTRONIC MODEL)
At the end of the drying program, the indicator light will flash for a short time and an audible signal will be emitted. The drier has an automatic
anti-crease function to prevent the washing from creasing.
WARNING: Before removing the washing from the drum, rotate the programmer knob to
STOP, remove the dry washing from the drum and then press the ON/OFF button.
The drum light and the indicator light will both switch off.
DAFTER THE END OF A PROGRAM (ELECTRONIC MODEL)
Remove the plug from the mains socket or switch off the power supply.
Pull the filter upwards.
Open it and clean using a soft brush Then replace it.
In addition to cleaning af
ter each drying cycle, the filter must also be washed regularly with soapy water to remove any dust. This will greatly improve the efficiency of the drier.
NOTE: The required drying time depends on:
weight and thickness of the fabric;
Size of the items;
type of fabric;
degree of dampness of the washing.
USING THE MECHANICAL MODEL
| Fabric | Weight of dry washing | Dry button | Times in minutes | ||
| Wardrobe dry | Iron dry | Slightly damp | |||
| ENERGETIC PROGRAM SECTION | |||||
| Cotton/Linen | 5,0 kg | 80-120 min. | 60-100 min. | 50-80 min. | |
| Cotton/Linen | 2,5 kg | 50-80 min. | 40-60 min. | 30-50 min. | |
| Syntheti cs Resistant | 2,5 kg | 60-100 min. | — | — | |
USING THE APPLIANCE
USING THE MECHANICAL MODEL
| Fabric | Weight of dry washing | Dry button | Times in minutes | ||
| Wardrobe dry | Iron dry | Slightly damp | |||
| DELICATE PROGRAM SECTION | |||||
| Synthetics Delicates | 1,5 kg | 50-80 min. | — | — | |
| Mixed | 2,0 kg | 40-60 min. | — | — | |
NOTE: The duration of the drying cycle depends on: the weight, dimensions, fabric type and degree of dampness. In order to prevent the fabrics from creasing, never overload the drier.
A 1. Close the door securely.
- Make sure that the ON/OFF button is OFF.
- Insert the plug in the mains socket.
B 1. Position the programmer on the STOP prior to the selected program.
- Press the ON/OFF button to switch on the drier. (The indicator light will light up).
- Position the programmer on the required program. (See program table) (the indicator light lights up).
4 To start the program, press the "START" button.
N.B. For safety reasons, the cycle is interrupted automatically if the door is opened. To continue the cycle, re-press the START button.
FURTHER INFORMATION ON THE TIMED PROGRAM (MECHANICAL MODEL)
The timed program is divided into two sections:
energetic program section (Cotton/Linen)
delicate program section (synthetics); followed automatically by a cooling cycle.
The program can be shortened by rotating the programmer knob in the direction of the STOP. The required drying time depends on:
weight and dimensions of the washing
type of fabric
degree of drying required
degree of dampness of the washing.
(It is recommended that an appliance of spin speed of at least 800/1000 or a separate spin drier is used).
NOTE
Cotton/Linen for example un
derwear, handkerchiefs, tablecloths, sheets.
SYNTHETICS:
for example, underwear, nylon, dralon, terlenkja, etc.
CHANGING THE PROGRAM
To change the program, rotate the programmer knob to STOP. Set the new program (see Using the drier).
END OF PROGRAM MECHANICAL MODEL
At the end of each program, the drier effects a cooling cycle of approximately 10 minutes.
WARNING: Before removing the washing from the drum, press the ON/OFF button, ro
tate the programmer knob to STOP and then remove the dry washing from the drum.
USING THE DRIER
AFTER THE END OF A PROGRAM (MECHANICAL MODEL)
Remove the plug from the mains socket or switch off the power supply.
Pull the filter upwards (fig 10).
Open it and clean using a soft brush. Then replace it.
In addition to cleaning af-
ter each drying cycle, the filter must also be washed regularly with soapy water to remove any dust. This will greatly improve the efficiency of the drier.
NOTE: The required drying
time depends on:
weight and thickness of the fabric;
Size of the items;
type of fabric;
degree of dampness of the washing.
MAINTENANCE
DRAINING THE CONDENSATION WATER RESERVOIR
If the condensation drain hose is not connected directly to the drainage system, the condensation is collected in the reservoir (fig. 11).
The reservoir must be emptied after each drying cycle.
To empty the reservoir, proceed as follows:
remove the container from the drier Fig. 11).
empty the container. The drain hole is located on the
top right.
after emptying the container, replace it in position and slide it as far as it will go.
to continue, or start the program, repeat the operations from point "4" (condensation drain button).
If the reservoir is not emptied or it fills up during a drying cycle, the condensation reservoir warning light with light up and the drier will stop.
Then proceed as described above.
CLEANING AND MAINTENANCE
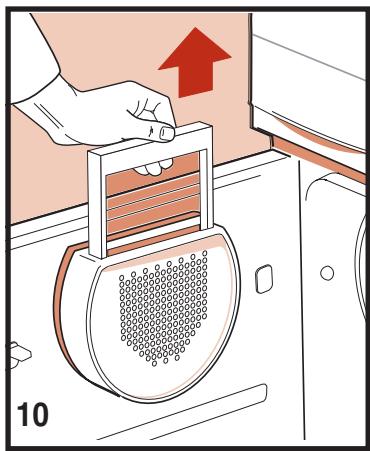
- Thread filter in the door (fig. 10)
- Thread filter in the door opening (fig. 12).
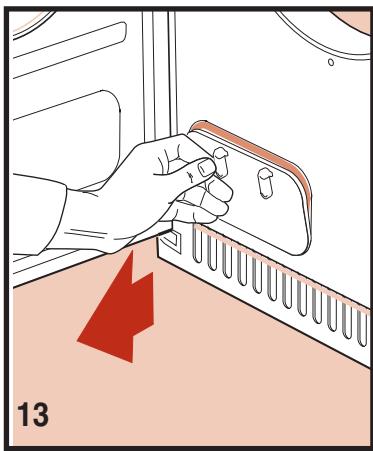
- Condenser. (fig. 13).
Disconnect the drier from the mains supply before cleaning.
It is important to clean the drier after each drying cycle
in order to save in drying time and consequently energy.
Remove the filter by pulling upwards and then clean it. (fig. 10).
MAINTENANCE
CLEANING AND MAINTENANCE
It is also possible to remove the two thread filters from the door opening and clean them (fig. 12).
The filters can be cleaned by simply placing them under hot running water.
The condenser should be
cleaned two or three times a year (fig. 13-16).
Open the door, rotate the lever to the vertical position and remove the cover (fig. 13).
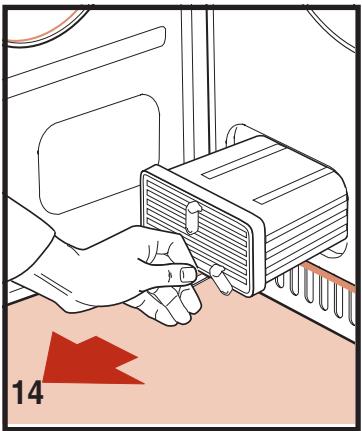
Rotate the 3 levers to the vertical position and remove the condenser (fig. 14).
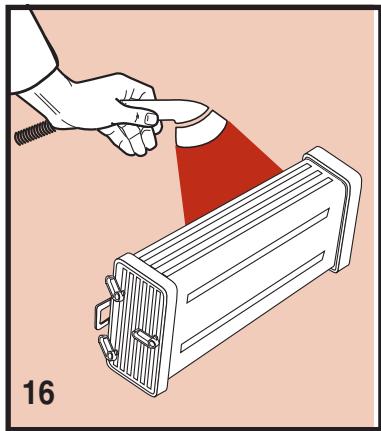
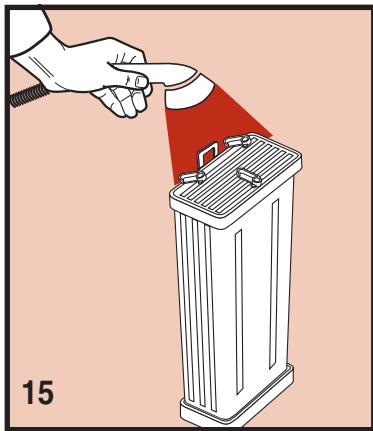
Wash the front and back (fig. 15-16) and sides of the condenser. To dry the condenser, rest it on one side on a towel.
When the condenser is dry, replace it following the same procedure in reverse order.
INTERNAL LIGHT
The drier is fitted with an internal light.
To replace the bulb, proceed as follows:
remove the plug from themains socket or switch offthe power supply.
remove the lamp cover.
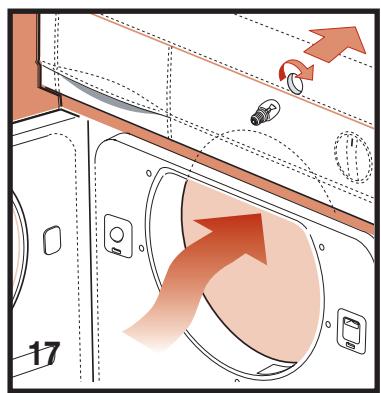
remove the bulb (fig. 17).
Warning: Do not use bulbs of rating higher than 15 W!
Replace the lamp cover.
RECOMMENDATIONS
When drying large items, rearrange them during the drying cycle.
This will help reduce creasing to a minimum.
The washing must be spun dry before being
placed in the drum of the drier.
While the energy consumed by the spin is minimal, the drying action is another matter. It is recommended, therefore,
that the washing is spun dry whenever possible at the highest possible rpm or in a separate spin drier. In this way, the drying time is reduced with a resulting substantial saving in energy.
MAINTENANCE RECOMMENDATIONS
Always add a softener to the wash. This will improve the drying results and reduce drying time.
The layer of fibre threads in the filter is not the result of the drying procedure. The threads come from the
fibres of fabrics damaged or unthreaded during the wash and, above all, as a result of wear.
ELECTRONIC MODEL TROUBLESHOOTING
If the machine is not working properly, carry out the following checks before calling for technical assistance:
1. The program will not start:
The plug is not inserted in the mains socket.
The door is not closed properly.
The ON/OFF button has
not been pressed.
- The program has been set, the indicator light is flashing, but the drier does not start:
position the programmer on "STOP", wait for the audible signal and set the program required.
- The drier does not dry within the set time:
Check that the filter is clean.
Check that the correct program has been selected.
Check that the air supply is not blocked. If the problem is not caused by one of the above, call technical assistance.
MECHANICAL MODEL TROUBLESHOOTING
If the machine is not working properly, carry out the following checks before calling for technical assistance:
1. The program will not start:
The plug is not inserted in the mains socket.
The door is not closed properly.
The ON/OFF button has not been pressed.
The START button has not been pressed.
2. The program has been set, the indicator light is flashing, but the drier does not start:
position the program mer on "STOP", wait for the audible signal and set the program re quired.
3. The drier does not dry
within the set time:
Check that the filter is clean.
Check that the correct program has been selected.
Check that the air supply is not blocked.
If the problem is not caused by one of the above, call technical assistance.
DIMENSIONS:
| Dimensioni: | Width cm: | 60.0 |
| Height cm: | 85.0 | |
| Depth cm: | 60.0 | |
| Max. capacity | 5 kg (dry) | |
| Power rating | see characteristics plate | |
| Voltage | see characteristics plate | |

INSTRUCCIONES PARA EL USO DE LA SECADER A DE CONDENSACION
Estimado cliente,
Recommendations 61-62
mouchoirs, nappes, draps.
Linge synthétique:
- CONTENTS
- NOTES AND ADVICE FOR THE USER
- TECHNICAL INFORMATION
- INSTALLING THE APPLIANCE
- Connecting the condensation drain to the drainage system.
- LEVELLING
- DESCRIPTION OF THE ELECTRONIC DRIER
- DESCRIPTION OF THE DOMESTIC APPLIANCE AND CONTROL PANEL
- DESCRIPTION OF THE MECHANICAL DRIER
- Condensation water reservoir.
- ON/OFF button
- Dry selection button for energetic programs only (cotton/linen).
- Dual function button
- On/Off light
- Temperature indicator light
- Condensation reservoir indicator light
- Programmer
- Opening the door
- USING THE APPLIANCE
- SORTING THE WASHING
- General advice:
- Pure linen.
- SAFETY INSTRUCTIONS AND WARNINGS
- WARNING:
- PREPARING FOR DRYING
- LOADING
- WARNING
- USING THE ELECTRONIC MODEL
- FURTHER INFORMATION ON THE TIMED PROGRAM OF THE ELECTRONIC MODEL
- Note
- CHANGING PROGRAM (ELECTRONIC MODEL)
- END OF PROGRAM (ELECTRONIC MODEL)
- DAFTER THE END OF A PROGRAM (ELECTRONIC MODEL)
- FURTHER INFORMATION ON THE TIMED PROGRAM (MECHANICAL MODEL)
- SYNTHETICS:
- CHANGING THE PROGRAM
- END OF PROGRAM MECHANICAL MODEL
- USING THE DRIER
- AFTER THE END OF A PROGRAM (MECHANICAL MODEL)
- time depends on:
- MAINTENANCE
- DRAINING THE CONDENSATION WATER RESERVOIR
- CLEANING AND MAINTENANCE
- INTERNAL LIGHT
- The drier is fitted with an internal light.
- RECOMMENDATIONS
- MAINTENANCE RECOMMENDATIONS
- ELECTRONIC MODEL TROUBLESHOOTING
- The program will not start:
- MECHANICAL MODEL TROUBLESHOOTING
- within the set time:
- INSTRUCCIONES PARA EL USO DE LA SECADER A DE CONDENSACION
- Linge synthétique:
Brand : NEW POL
Model : XS 251CO
Category : Dishwasher