CONTROL CENTER 540C - Game controller JOYTECH - Free user manual and instructions
Find the device manual for free CONTROL CENTER 540C JOYTECH in PDF.
User questions about CONTROL CENTER 540C JOYTECH
0 question about this device. Answer the ones you know or ask your own.
Ask a new question about this device
Download the instructions for your Game controller in PDF format for free! Find your manual CONTROL CENTER 540C - JOYTECH and take your electronic device back in hand. On this page are published all the documents necessary for the use of your device. CONTROL CENTER 540C by JOYTECH.
USER MANUAL CONTROL CENTER 540C JOYTECH
Thank you for purchasing the Control Center™ 540C. Before using this product please familiarize yourself thoroughly with this User Guide so you fully understand the setup procedure and functions of the product.
Note: Read your Xbox 360^TM console Instruction Manual for important safety information and health warnings. Please retain both documents for future reference.
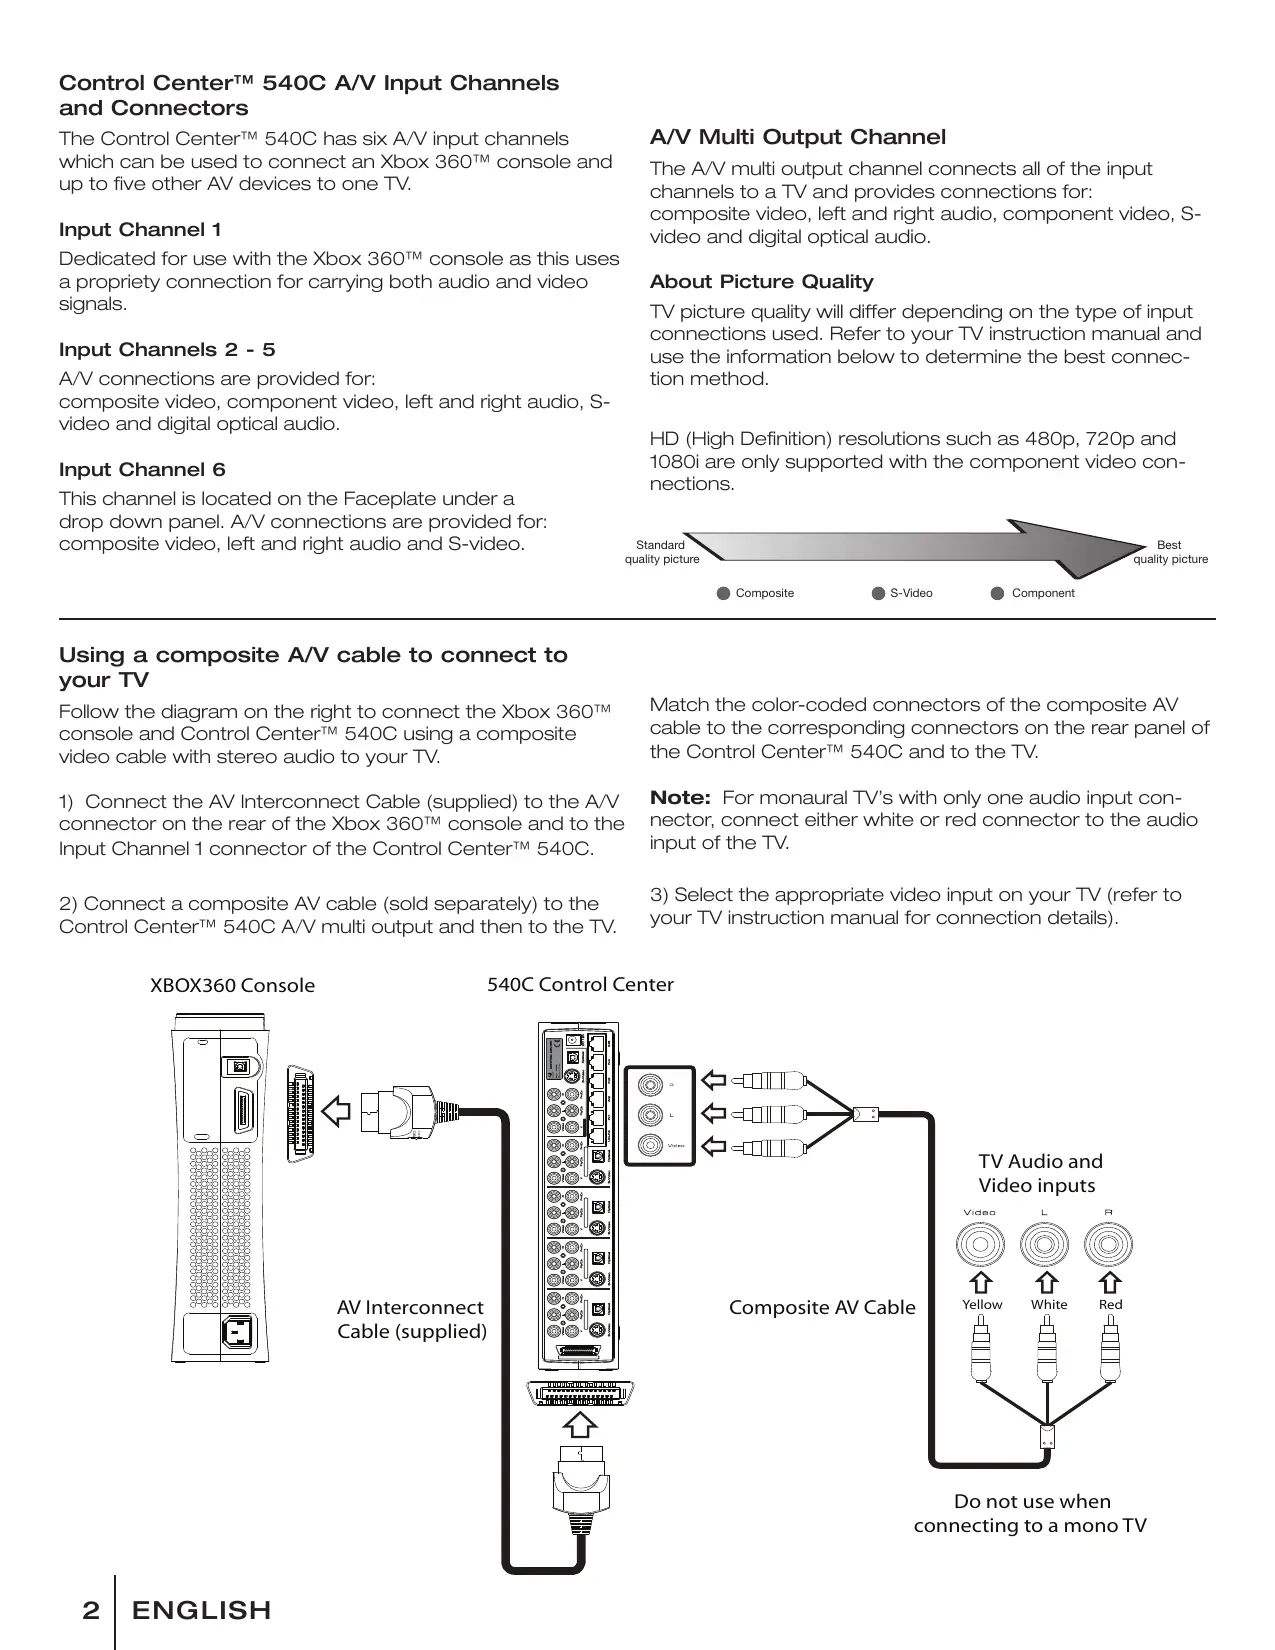
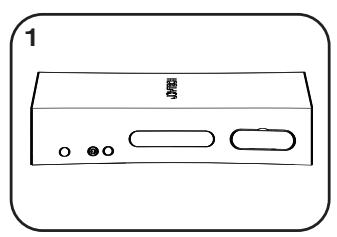
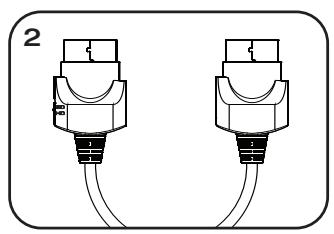
Package contents
Check that you have the following items:
1) Control Center 540C^TM
2) AV Interconnect Cable
3) Ethernet Cable
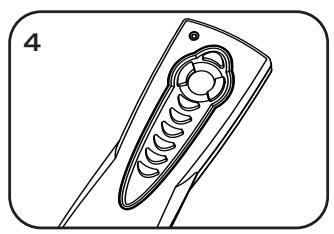
4) Remote Control
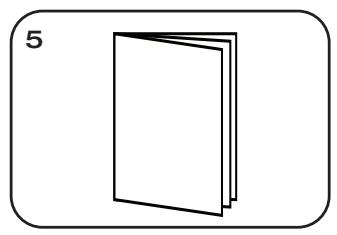
5)User Guide
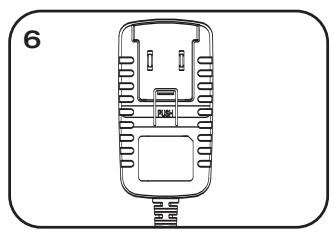
6) Power Adapter
Features
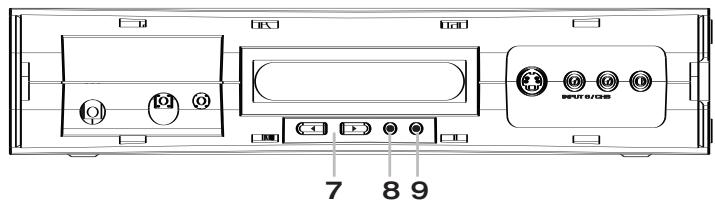
Control Center™ 540C Front with Faceplate
With faceplate removed
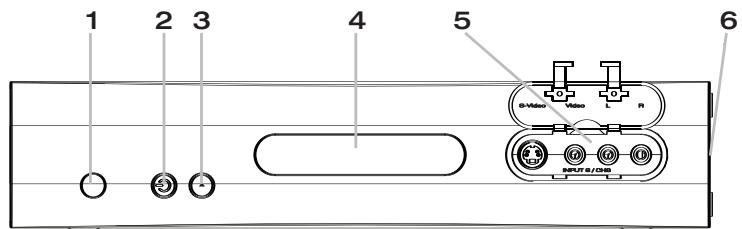
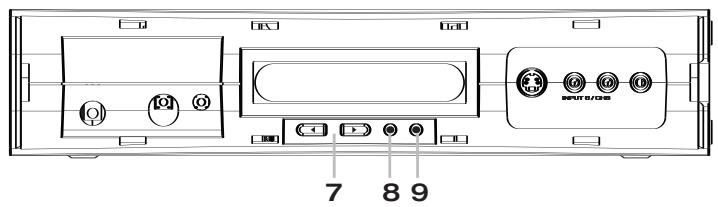
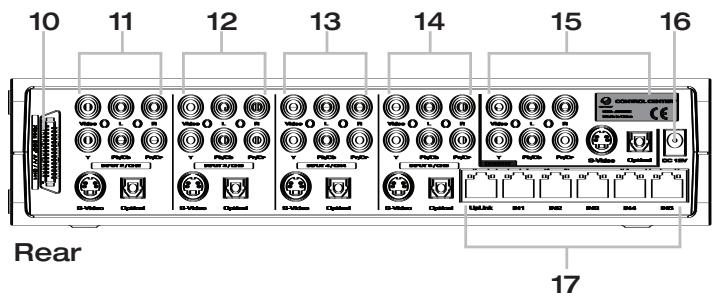
Part names
1) IR Receiver
2) (On/Standby) Button and Indicator
3) Input Channel Button
4) Display Screen
5) A/V Input Channel 6
6) Recess for removing Control Centre™ 540C Faceplate
7) Display Navigation Buttons
8) Cancel / Back Button
9) Confirm / Accept Button
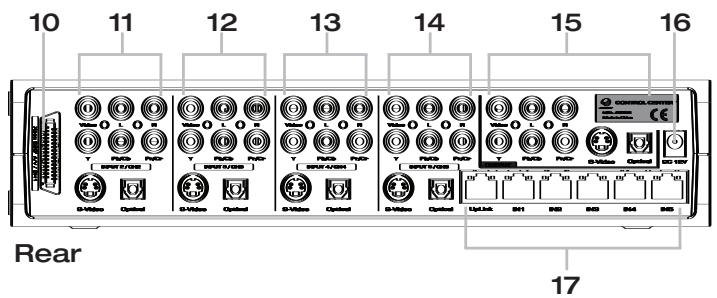
10) Xbox 360^TM A/V Input Channel
11) A/V input Channel 2
12) A/V input Channel 3
13) A/V input Channel 4
14) A/V input Channel 5
15) A/V Multi output Channel
16) DC IN 12V power connector
17) 5 Port 10/100 Hub
Control Center™ 540C A/V Input Channels and Connectors
The Control Center™ 540C has six A/V input channels which can be used to connect an Xbox 360™ console and up to five other AV devices to one TV.
Input Channel 1
Dedicated for use with the Xbox 360^TM console as this uses a propriety connection for carrying both audio and video signals.
Input Channels 2 - 5
A/V connections are provided for: composite video, component video, left and right audio, S-video and digital optical audio.
Input Channel 6
This channel is located on the Faceplate under a drop down panel. A/V connections are provided for: composite video, left and right audio and S-video.
A/V Multi Output Channel
The A/V multi output channel connects all of the input channels to a TV and provides connections for: composite video, left and right audio, component video, S-video and digital optical audio.
About Picture Quality
TV picture quality will differ depending on the type of input connections used. Refer to your TV instruction manual and use the information below to determine the best connection method.
HD (High Definition) resolutions such as 480p, 720p and 1080i are only supported with the component video connections.

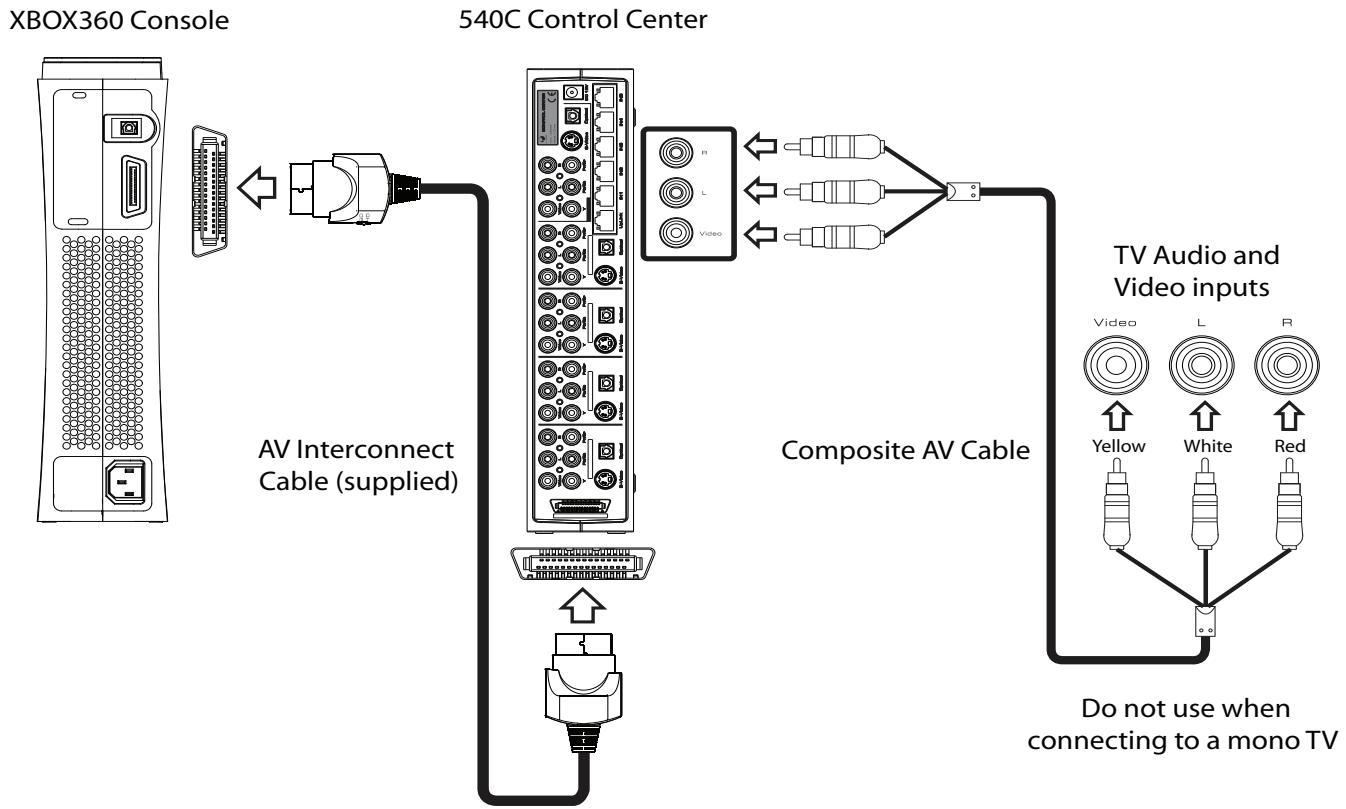
Using a composite A/V cable to connect to your TV
Follow the diagram on the right to connect the Xbox 360™ console and Control Center™ 540C using a composite video cable with stereo audio to your TV.
1) Connect the AV Interconnect Cable (supplied) to the A/V connector on the rear of the Xbox 360™ console and to the Input Channel 1 connector of the Control Center™ 540C.
2) Connect a composite AV cable (sold separately) to the Control Center™ 540C A/V multi output and then to the TV.
Match the color-coded connectors of the composite AV cable to the corresponding connectors on the rear panel of the Control Center™ 540C and to the TV.
Note: For monaural TV's with only one audio input connector, connect either white or red connector to the audio input of the TV.
3) Select the appropriate video input on your TV (refer to your TV instruction manual for connection details).
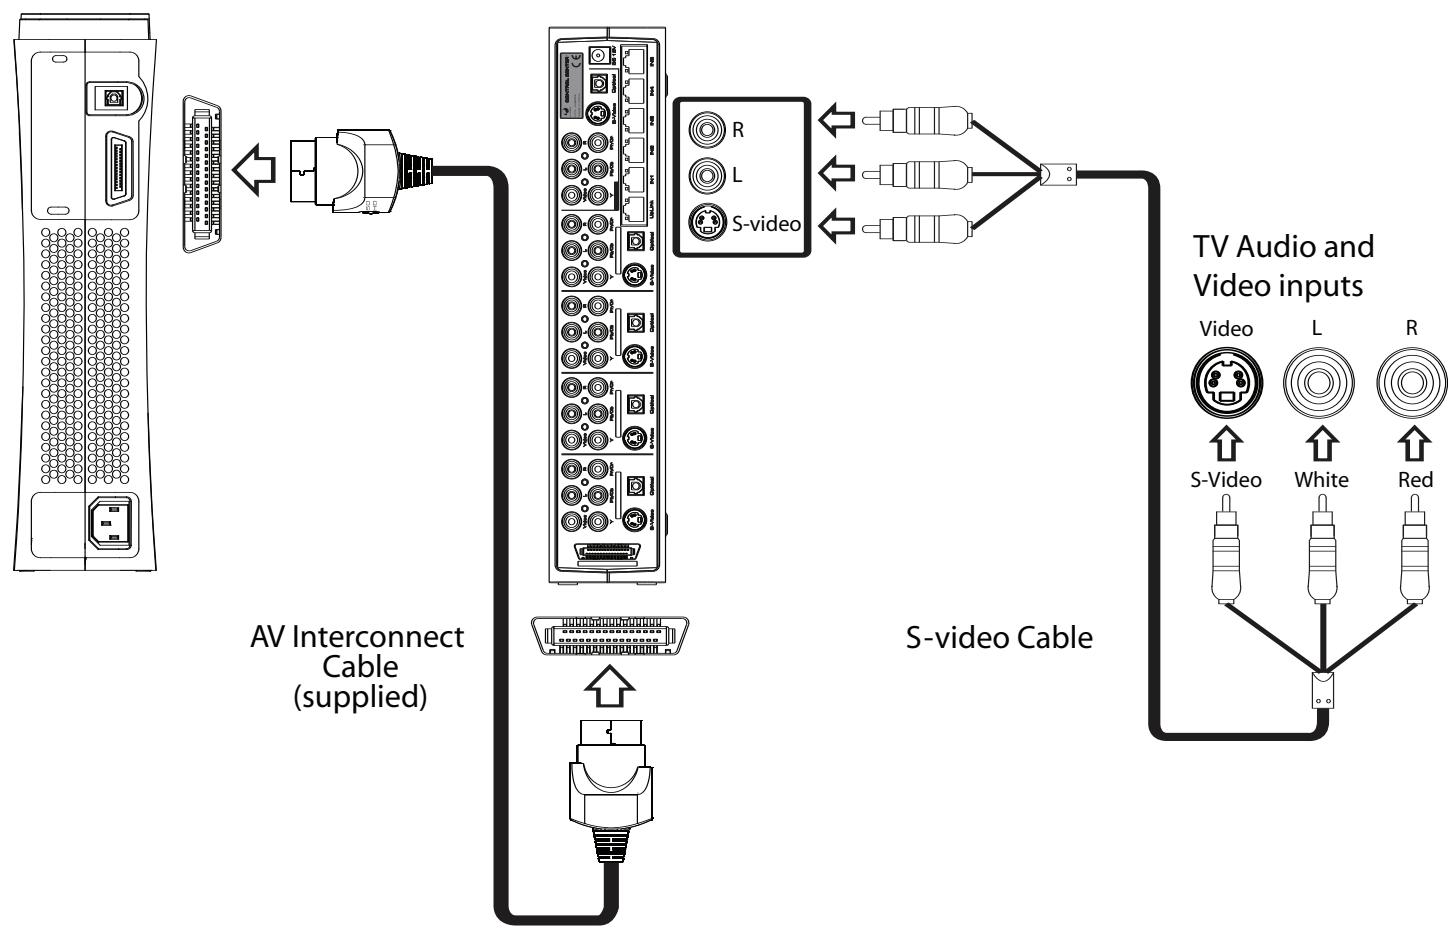
Using an S-video cable to connect to your TV
Follow the diagram below to connect the Xbox 360^TM console and Control Center™ 540C using an S-video cable with stereo audio to your TV.
1) Connect the AV Interconnect Cable (supplied) to the A/V connector on the rear of the Xbox 360™ console and to the Input Channel 1 connector of the Control Center™ 540C.
2) Check the Control Center™ 540C is set to output an S-video signal from input 1 (Xbox 360™ console)
Note: If you choose to connect the Control Center™ 540C to the S-video input on your TV, you must select the S-video setting on the Control Center™ 540C in order to display the picture correctly. If you are connecting via S-video and you see no picture on your TV, check the Control Center™ 540C is set to output S-V. For set-up details, see the section on Control Center™ 540C settings.
IMPORTANT: The AV output settings only need to be adjusted for Input 1 (Xbox 360^TM console). AV signals from inputs 2 to 6 pass directly through the Control Center™ 540C and are output through their corresponding connections in the multi output channel.
3) Connect an S-video cable (sold separately) to the Control Center™ A/V multi output and then to the TV.
REMEMBER: S-video does not carry audio signals so it must be combined with a right and left audio cable or a digital optical cable (both sold separately).
4) Select the appropriate video input on your TV (refer to your TV instruction manual for connection details).
XBOX360 Console
540C Control Center
Using a component video cable to connect to your TV
Follow the diagram below to connect the Xbox 360^TM console and Control Center™ 540C using a component video cable with stereo audio to your TV.
1) Connect the AV interconnect cable to the A/V connector on the rear of the Xbox 360™ console and the input channel 1 connector on the Control Center™ 540C.
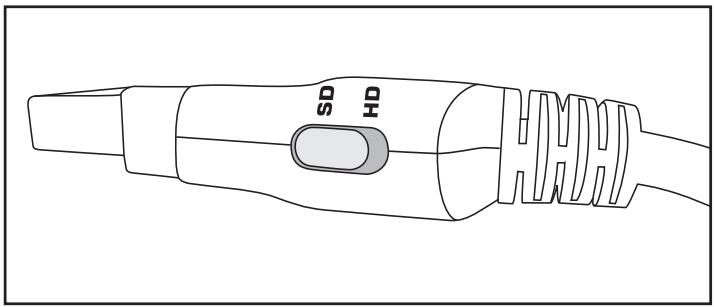
2) Slide the switch on the AV Interconnect Cable to the SD or HD position.
The HD position should be selected if your TV supports High Definition resolutions such as 480p, 720p and 1080i
3) Check the Control Center™ 540C is set to output a component video signal from input 1 (Xbox 360™ console).
Note: If you choose to connect the Control Center™ 540C to the component video input on your TV, you must select the component video setting on the Control Center™ 540C in order to display the picture correctly. If you are connecting via component video and you see no picture on your TV, check the Control Center™ 540C is set to output YUV or Y, Pb/Cb, Pr/Cr. For details, see the section on Control Center™ 540C settings.
4) Connect a component cable (sold separately) to the AV multi output and the TV. Match the color-coded connectors of the component cable to the corresponding connectors on the rear panel of the Control Center™ 540C and to the TV.
REMEMBER: Component video does not carry audio signals so it must be combined with a right and left audio cable or a digital optical cable (both sold separately).
5) Select the appropriate video input on your TV (refer to your TV instruction manual for connection details).

XBOX360 Console
Using a digital optical cable to connect to your sound system
To listen to digital optical sound from the Xbox 360™ console, connect a digital optical cable to the digital optical audio output connector at the rear panel of the Control Center™ 540C.
Using more than one AV device with the Control Center™ 540C
The Control Center™ 540C is designed to allow additional connection of up to five other AV devices to one TV. Input Channels 2 - 6 are provided for these additional devices.
The AV devices shown in the illustration are for reference only. Any suitable AV device may be connected to Input Channels 2 - 6. The display screen is pre-programmed with the abbreviated names of common AV devices, such as DVD, VCR etc. These pre-programmed channel input names can be easily edited to suit your setup. For details see the section on Control Center™ 540C settings. Refer to the AV output channels on your device and TV then select the connection method of your choice.
NOTE: Additional cables may be required to connect all of your AV devices.
Typical multi device setup:

IMPORTANT:
Each input connection will only output to the same style output connection (pass-through system). For example, a component video cable attached to component video on Input Channel 2 - 6 can only be viewed via the component video output and CAN NOT be displayed via the S-video, composite video or stereo audio outputs.
REMEMBER: Component video and S-video connections do not carry audio signals, so it must be combined with a right and left audio cable or a digital optical cable.
Connecting the Power Adapter
1) Connect the Power Adapter to the DC 12V input connector located on the rear of the Control Center™ 540C.
2) Plug the Power Adapter into a power outlet.
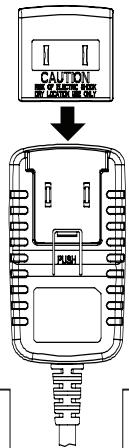
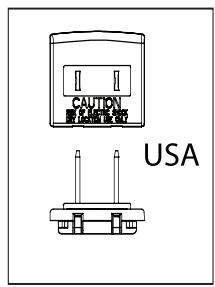
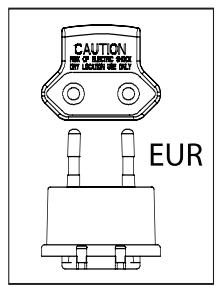
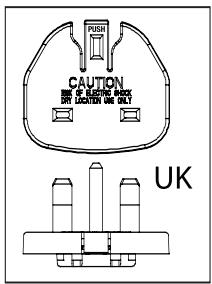
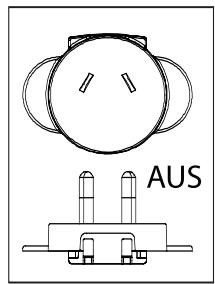
NOTE: In some territories your Power Adapter may include additional regional adapters designed to comply with your local domestic power outlets.
If these are supplied, slide the appropriate regional adapter into the Power Adapter as shown:
Control Center™ 540C settings
It is possible to change individual settings on the Control Center™ 540C. Settings that can be adjusted include the following:
CH1 OUT - output configuration
LIGHT - changes backlight
INVERT - display text color invert
BRIGHT - display brightness
SPEAKER - audible bleep
RESTORE - restore factory default settings.
CH NAME - channel input names
To change settings:
1) Ensure the Control Center™ 540C is switched ON.
2) Carefully remove the Control Center™ 540C Faceplate.
3) Using the display navigation buttons (< / >) cycle through the setting options.
4) At the desired setting, press the green button to access options. Adjust the settings by using the navigation buttons (< / >). Confirm and store the desired setting with the green button or cancel with the red button.
Setting 1: CH1 OUT
The Xbox 360^TM console outputs many different AV signals and the Control Center™ 540C must be adjusted to output the correct signal for your chosen method of connection to a TV. The default setting is “YUV” for displaying component video. Set to “S-V” to output an S-video signal by following these steps:
Use the display navigation buttons (< / >) to cycle through the settings to "CH1 OUT". Press the green button to access options. Use the display navigation buttons (< / >) to select either "S-V" or "YUV". Save the setting by pressing the green button.
NOTE: If you see no picture on your TV, check CH1 output is set correctly for your method of connection.
Setting 2: LIGHT
Three different back light settings are available: (OFF always / ON always / AUTO)
Follow the above procedure to make required setting changes.
Setting 3: INVERT
Change the background display color by inverting the display screen: (light green or black)
Follow the above procedure to make required setting changes.
Setting 4: BRIGHT
Change the backlight level of the display screen: (two levels of brightness are available)
Follow the above procedure to make required setting changes.
Setting 5: SPEAKER
The Control Center™ 540C features an audible bleep for confirming selection of each Input Channel: (the sound can be set to either ON and OFF)
Follow the above procedure to make required setting changes.
Setting 6:RESTORE
Reset all user made settings to the original default factory settings.
Follow the above procedure to make required setting changes.
Setting 7: CH NAME
The input number (1) CAN NOT be adjusted.
CH 2 - 6 can be adjusted from the default names if required. The 8 character name can be adjusted for easy identification of AV devices connected to the Control Center™ 540C.
For example should you wish Input 2 to read 'PS2', follow this simple setup procedure:
1) Ensure the Control Center™ 540C is switched ON.
2) Carefully remove the Control Center™ 540C Faceplate.
3) Use the Remote Control to select the input channel you want to rename.
4) Use the display navigation buttons (< / >) to cycle through the settings to "CH NAME". Press the green button to begin changing the channel name.
5) The cursor on the display screen will flash under the first letter on the left “C”. Use the display navigation buttons (< / >) to cycle through the letters until the letter you want is displayed. Press the green button to confirm the selection and move the next letter to change.
6) To save the new Input Channel name, push and hold down the green button for 3 seconds.
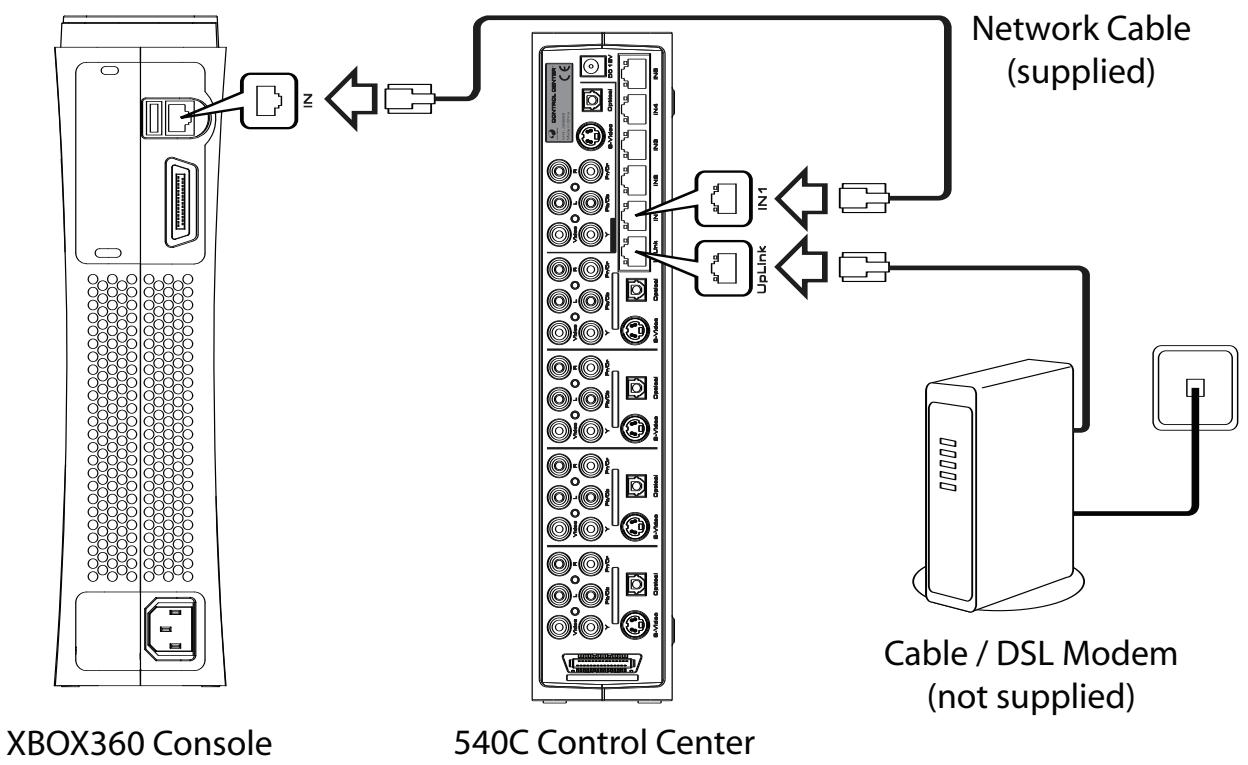
Connecting to a network
The Control Center™ 540C has an integral 5 port 10/100Mbps Ethernet Hub. The Hub is used for connecting to Xbox Live®, home networks and any other network enabled devices.
NOTE: You must have a high-speed (cable or DSL) internet connection to play on Xbox Live®.
1) Connect the Ethernet Cable (supplied) to the Ethernet LAN port on the rear of your Xbox 360™ console and the other end of the Ethernet Cable to the port labeled IN1 on the Control Center™ 540C Hub.
2) Connect an Ethernet Cable to the UPLINK port on the Control Center™ 540C Hub and the other end of the Ethernet Cable to your high-speed modem.
NOTE: You can connect other devices to the Ethernet Hub on LAN ports 2 - 5
The table below shows the status of the LAN port LED's during use.
| LED status | Description |
| (Red) On | Good connection |
| (Yellow) Flashing | Receive data |
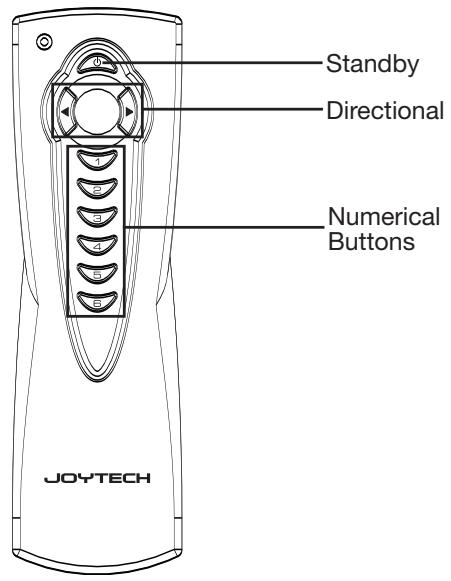
Remote Control
You can page through each Input Channel by pressing the Input Select Button on the front panel of the Control Center™ 540C. Alternatively you can select each Input Channel by using the directional or numerical buttons on the Remote Control.
The Standby Button located on the Remote Control allows the Control Center™ 540C to be switched from on to standby mode.
| Symptom | Possible Problem | Possible Solution |
| The Control Center™ 540C fails to turn ON | Power is not turned on. | Switch on by either pressing the Power / Standby Button at the front of the Control Center™ 540C or by pressing the Standby Button on the Remote Control |
| The unit is in standby mode. | Switch on by either pressing the Power / Standby Button at the front of the Control Center™ 540C or by pressing the Standby Button on the Remote Control Ensure that the Control Center is connected correctly to your Television. | |
| Wall outlet is not functioning | Plug another device into the same wall socket to confirm the outlet is working | |
| The Control Center™ 540C is on, but I do not see a picture from my TV | The Control Center™ 540C is incorrectly connected to TV | Ensure that the Control Center™ 540C is connected correctly to your Television |
| No sound from speakers | Wrong Input channel Selected on TV | Ensure the correct video input on your TV has been selected (Refer to your TV instruction manual for more information) |
| AV devices incorrectly connected to Control Center™ 540C | Make sure each AV device is connected to the Control Center™ 540C correctly | |
| Wrong device channel selected on Control Center™ 540C | Ensure you have selected the correct Input Channel on the Control Center™ 540C | |
| The Control Center™ 540C is on, but there is no sound from my TV | S-video and Component connections carry picture information only | Check that the AV device is connected to the Control Center™ 540C also has EITHER the left and right audio inputs or digital optical inputs connected |
| Volume settings on your TV and AV devices are set too low | Increase volume on AV devices | |
| When I view an AV device I get background interference | Loose cable connections | Check that the connections between AV devices are secure |
| Some AV devices can emit strong signals when left ON | Switch off any AV devices connected to the Control Center™ 540C that are not in use |
Battery Care
Incorrect use of batteries can result in battery leakage or explosion. When using batteries, be sure to follow these instructions:
- Make sure that the plus and minus terminals of the batteries are inserted in the correct directions.
- Do not mix old and new or different types of batteries.
- Do not attempt to recharge non-rechargeable type batteries.
- Remove the batteries when the product will not be used for an extended period of time.
- If the battery has leaked, be sure to carefully remove all residue before inserting new batteries.
CAUTION
- Do not remove this product when the console power is ON.
- Avoid placing this product near extreme temperatures or humidity.
- Do not submerse or allow this product to come into contact with water. Use in dry locations only.
- An adult should supervise young children when using this product.
- Use of any attachment or accessory with this product not recommended or sold by JOYTECH may result in risk of fire, electrical shock or injury to persons or product.
- Do not clean any parts with alcohol, cleaning solutions containing alcohol or strong abrasives. Use a soft cloth and a little water.
- Tampering with this product will invalidate your JOYTECH warranty.
IMPORTANT HEALTH WARNINGS
Photosensitive Seizure Warning
A very small percentage of people may experience a seizure when exposed to certain visual images, including flashing lights or patterns that may appear in video games. Even people who have no history of seizures or epilepsy may have an undiagnosed condition that can cause these "photosensitive epileptic seizures" while watching video games.
These seizures may have a variety of symptoms, including lightheadedness, altered vision, eye or face twitching, jerking or shaking of arms or legs, disorientation, confusion, or momentary loss of awareness. Seizures may also cause loss of consciousness or convulsions that can lead to injury from falling down or striking nearby objects.
Immediately stop playing and consult a doctor if you experience any of these symptoms.
Parents should watch for or ask their children about the above symptoms - children and teenagers are more likely than adults to experience these seizures.
Taking the following precautions may reduce the risk of photosensitive epileptic seizures:
- Sit further away from the screen
- Use a smaller TV screen
- Play in a well-lit room
- Do not play when you are drowsy or fatigued
If you or any of your relatives have a history of seizures or epilepsy, consult a doctor before playing.
We also advise you to take regular breaks of 15 minutes every hour.
Design and specifications are subject to change without notice.
- Dispose of this product or products contained in this pack in accordance with local and national disposal regulations.
Warranty
When you purchase from Joytech you've purchased a quality product. JOYTECH offers a Two (2) year replacement warranty on this product. JOYTECH warrants to the original consumer purchaser that this product is free from defects in either material or workmanship. If a defect covered by this warranty occurs, JOYTECH, at its option, will repair or replace the product at no charge. JOYTECH warranty excludes claims for incidental or consequential damages.
For technical support please consult the JOYTECH website at: www.JOYTECH.NET/SUPPORT
Bienvenue
Installingning 1: CH1 OUT
Installing 7: CH NAME
Installing 1: CH1 OUT
Installing 5: SPEAKER
Installing 7: CH NAME
Tia va aaaaEaTe TIC puOmuiaeic:
Incorrect use of batteries can result in battery leakage or explosion.
When using batteries, be sure to follow these instructions:
Make sure that the plus and minus terminals of the batteries are inserted in the correct directions.
Do not mix old and new or different types of batteries.
- Do not attempt to recharge non-rechargeable type
batteries.
- Remove the batteries when the product will not be used for an extended period of time.
If the battery has leaked, be sure to carefully remove all residue before inserting new batteries.
PPOZOxH
Mny aonouvEeTae auto To npoiov otav n Kovoola trophiodotetai e pue.
- AnoΦeúyεTe va to nOθετεiTe autó to npoióv ková σε Θημεia με akpaες tiες θερμokpαoiaç ἡ uyραoiaς.
MnuBuiizete auTo to npoiov oE vepo kai mnu EpiTpene Tnv eanah tou evpO. XpnoiunoieTc movo oE otEyVa onueia.
'Evaç ενήλικα πρέπει va επιβλέπει τα μικρά παιδία nou χρομοποιόν autó to προίν.
H xphon onoiouhnoTe npooaptnmuoC n EApntmuoc m auTo npoiov dev ouviotatai n dev nwlteia ano Tnv JOYTECH mOpεi va oynnoεi σ κivduvo npkaiaç, nλEKtpo0ok n tpaumatoμo, nσ ulikéc ζnμic.
Mny katheta kavéva eaptnmae oivonveu, diauama Kaapou nou npiexouv oivonveu na 1oxupa anoppunavtiká nou npokalov anoEo. Xpnoionoite eva maakopavi kalivo vpo
To npoiov auto nepiaa ave i Eaaptnataou xpiaovta ouvtnpon. Av npae tE oTo npoiov, nauei va ix n eyyunon tn JOYTECH.
ZHMMANTIKEZ IPOEIANOIHSEIZ IATHN YTEIA
Asetus 7: CH NAME (KANAVAN VAIHTO)
Incorrect use of batteries can result in battery leakage or explosion. When using batteries, be sure to follow these instructions:
- Make sure that the plus and minus terminals of the batteries are inserted in the correct directions.
- Do not mix old and new or different types of batteries.
- Do not attempt to recharge non-rechargeable type batteries.
- Remove the batteries when the product will not be used for an extended period of time.
- If the battery has leaked, be sure to carefully remove all residue before inserting new batteries.
VAROITUS
Incorrect use of batteries can result in battery leakage or explosion. When using batteries, be sure to follow these instructions:
- Make sure that the plus and minus terminals of the batteries are inserted in the correct directions.
- Do not mix old and new or different types of batteries.
- Do not attempt to recharge non-rechargeable type batteries.
- Remove the batteries when the product will not be used for an extended period of time.
- If the battery has leaked, be sure to carefully remove all residue before inserting new batteries.
BHIMAHNE!
He OTKIIOUaTe I3deJIne OTeN, ecNI BbIKHOaTeIb KOHcOJI NaXoIDNTcB NpOJKeHN BKJI.
- He nCnoJIb3yIte nI3dJIeN B MecTax C BbICOKOI TempepaTyPoI nJIN BlaJxHocTbIO.
- He norpyuKaIte u3dJIne B BOy u u36eRaIte KOHTaTc C BOIo. IcnoJb3uTe u3dJIne TOJbKO B CyXIM MecTaX.
- IcnoIb3OBAHHe n3JeJIa IeTbMn DoJXHO BbIOJIHrTbCn ION H6JIIODeHmE B3PocJIbIX.
- Ппименени COBmecTHO C n3dJIeM mHOrO o6OpyIOBaHnI, He peKOMeHDoBauHHoro nIi He peaJIu3yEmoro KOMnaHneJ JOYTECH, moKET npuBeCTn K BO3HnKHOBeHnIO nOxapa, nopaxHeHIO 3JIeKtpuYeCKm TOKOM, TpaBMam, a TaKxe K NOBpeXDeHnIO n3dJIeNIA.
He nCnoJIb3yIte IJn YnCTKn I3dJIINa CnIpTOCoepJXaUne JxNdkOcTn, YnCTaIe CpeCDtBa IIN a6pa3nBhIe MaTePnaJIbl. PpIMeHnTe MmKyo TkaHb CJeRkA CMOeHHyO BDOJ.
- I3dJIeHHe CoDEpKNT KOMnOHeHTOB, O6cIyXnBaEmbIX nOJIb3OBeTeJEM. BCKpbITNe I3dJIeNn npINBeDet K OTMeHe rapaHTnJOYTECH.
BAXHbIE INPEdYnPExKdEHnO BPeDE IJIa 3DOpOBbI
PekomeHnyetc TaKxe DeIaTb nepepbiv Ha 15 MmHyT KaJdbi Yac nRpbl.
BHeuHn BnI n xapaKTePcTnKn I3JeNn MOryT 6bITb I3MeHeHbI 6e3 npEdBaPnteHoro yBeDOMJIeHn.
YtJnI3aIIO u3dJIINu KOMNoHEHToB u3 daHHoyn yNaKOBKn CNeIyET BbIInOHrB B COOTBeTCTBnC MeCTHbIMn IpaBUNaMn YtJIn3aIIN.
For technical support please consult the JOYTECH website at: www.JOYTECH.NET/SUPPORT
Zapraszamy
With faceplate removed
Incorrect use of batteries can result in battery leakage or explosion. When using batteries, be sure to follow these instructions:
- Make sure that the plus and minus terminals of the batteries are inserted in the correct directions.
- Do not mix old and new or different types of batteries.
- Do not attempt to recharge non-rechargeable type batteries.
- Remove the batteries when the product will not be used for an extended period of time.
- If the battery has leaked, be sure to carefully remove all residue before inserting new batteries.
OSTROZNIE
For technical support please consult the JOYTECH website at:
WWW.JOYTECH.NET/SUPPORT
Uvitání
Incorrect use of batteries can result in battery leakage or explosion. When using batteries, be sure to follow these instructions:
- Make sure that the plus and minus terminals of the batteries are inserted in the correct directions.
- Do not mix old and new or different types of batteries.
- Do not attempt to recharge non-rechargeable type batteries.
- Remove the batteries when the product will not be used for an extended period of time.
- If the battery has leaked, be sure to carefully remove all residue before inserting new batteries.
VAROVÁNÍ
HactpoIKeTe Ha Control CenterTM 540C
MokTe Da npomEnTe INDnBnDyaJHnTe HAcTpoKn Ha Control CenterTM 540C. NapameTpne Ha HAcTpoKnTe, KOnTo noDnExKat Ha npomHa, ca cIeDnTe:
CH1 OUT - konhФгуразин ha n3xOda
LIGHT - npomeha ohoBOTo OCBetHeHne
INVERT - noka3Ba npehacOyBaHe Ha ZBeTa Ha TEkCTa
BRIGHT - noka3Ba cTeeneHTa Ha npKoCT
SPEAKER -иЗБекда 3Byк, habоюбявац рпу-пу"
RESTORE -ВрьшафбрчнITE NaCTPOnKn
IMaTe Bb3MOxHOCt Da n36peTe OT Tprn HaNChn HaCTpoKnHaФoHOBToOcBeTJeHne: (BnHaRn OFF / BnHaRn ON / AUTO)
CneBaIte npoueypaTa "Ja npomehnte HacTroKnTe", 3a da n3BbPunTe JekanHTe npomeHn B daJeHa HAcTroPkA.
Hac troka 3: INVERT (PPEHACOUBAHE)
ПоменeteцетаHaфонobOTOOCBETJIeHneHaДиCпгЯчezпehaocuBaHeHaekpaHaДиCпгЯ:(CBETЛЗeJIeHOИИчepHo)
CneBbAte npoceDypaTa "Ja npomehnte HacTpoKnTe", 3a da n3BbPHTe JekanHTe npomeHn B daJeHa HAcTpoKa.
Hactpoika 4: BRIGHT (RbK)
Поменete НВОТо HaфОHOBOTO OCBETпЕнеHa ekpaHa HaДиСПЛЯ: (HajИЧИ са ДBE НВа HaЯRPКОCT)
CneBbAte npoceDypata "Ja npomehnte Hactpoiknte, 3a da n3BbPHTe JekanHte npomEHn B daJeHa HacTpOka.
Hac troika 5: SPEAKER (BNCOKOROBOPUTEJI)
Control CenterTM 540C n3daBa 3ByK, noDoben Ha rny-ny", 3a da IOTBbPn n36opa Ha BCEKN OTdelen KaHaj 3a BXoJ: (3ByKbT MOKe Da ce HacTpOu CbOTBeTHo Ha ON nIN OFF)
CneBbAte npoceDypaTa "Ja npomehnte hactpoiknte, 3a da n3BbPHTe JekanHTe npomEHn B daJeHa hAcTpoiKa.
Hactpoika 6:RESTORE(Bb3CTAHOBN)
Bbphete BCnukn HacTpoKn, IpomehHn OT nOtpe6ntJr, KbM 0a6pnuHnte HacTpoKn.
CneBbAitpe npoceDypata "Ja npomehnte HacTpoiKnte, 3a da n3BbPHTe JeIahNTe npOMEH B daJeHa HAcTPOkA.
Hactrpoika 7: CH NAME (CH IMME)
HomepaHaBxoJa(1)HEMOXEda6bdeKOpunpaH.
Ako e Heo6xOJIMo, MoKeTe da KaOpIpaTe CH 2-6 KaTo ce BbPHeTe KbM fAbpUHNo 3aJaDeHIne IMeHa. Imeto, CbIbPkaIo 8 CmB0Ja, MoKe Da 6bJe IpOMeHEn O cen JeChO OTKpBaHe Ha AV yCTpoiCTBa, CbP3aHn KbM Control CenterTM 540C. HanpImep, aKO JcEJaTe BxOJ 2 da 6bJe ppeIctaBen KaTO 'PS2'; cJeDbaiTe OINcaHata No-dOly leCHa npOeDypa 3a HAcTpoiKa:
1) Ybepete ce, ye Control CenterTM 540C e BKJIIOUeH (ON).
2) Bнмателно Изва对接а Control Center™ 540C.
3)Използваite Дистанционноуnpавлени,за да Изберete Kaнала 3a BXOD,КоТTO келаTe Да псимеHyBaTe.
4)ИзползваиTe 6уToHnTe 3a HabIrGaцЯн HaДиСПля (< / >), 3a Да npemHeTeпeЗнстpoiKnTeи CTиrHete Do "CH NAME: HatисHTe 3eJIeHnT 6уToH, 3a Дa 3aNoUHete Дa npomehЯTe mMeTO Ha KaHana.
5) KypocobT Ha ekpaHa Ha dinCnIe Iue 3aNoUHe da npemrBa noIpbBaTa 6yKbA OTKbM IABo C". N3non3BaIte 6yToHInTe 3a HABnraun (< / >), 3a Da npemHHe Te pE3 6yKBInTe, DOKaTO DoCTnHHe Tdo OHa3N, KOTo KeJaTe. HatncHete 3eJEnHnT 6yToH, 3a Da NotBbPdInTe n360pa cn I da npemHHe T KbM cneDbauata 6yKbA 3a npomHa.
6) 3a Да 3ааЗИТЕ HOВОТ ИМЕ HA KaHа 3a BXOD, HAtUcHETe IN 3aДрБЖTe 3eJIeHЯ 6yToH B pOДьЛжЕне Ha 3 ceKунДи.
Cbbp3BaHe KbM MpeKa
Control CenterTM 540C e cna6dEN C 5 nHTerpaHn nopTa 10/100Mbps Ethernet xb6. Xb6bT ce u3noJ3Ba 3a CBp3BaHe c Xbox Live, domaunmpejN i npyn yCTpoJCTBa C Bb3MOXHOCT 3a Bpb3Ka c pa3nUHN TINOBE mpejN.
3A6EJEXKKA: Tp6BaДа pa3nOJaTe C BnCOKoCKOpocTha INHTepHET (Ka6eIen NJIi DSL) Bpb3ka, 3a Дa moKeTe Дa CTapTnpaTe Xbox Live.
1) CbpxeTe Ethernet ka6ena (npedocTaBeH) c nopTa Ethernet LAN ha rb6a ha koH3oJaXxOx 360TM, a npyTnT kpaHa Eternet ka6ena CbpxeTe C nopTa, hAmMeHOBaH IN1 Bbpxy Xb6 Control CenterTM 540C.
2) CBbpxeTe Ethernet ka6en KbM nopTa UPLINK bbypxy xb6 Control CenterTM 540C, a pynT kpaHa Ethernet ka6ena cbpxeTe KbM BVCOKOPoCTHnC MoDEM.
3A6EJEXKKA: MojTe Da CBpKeTe n npyTu yCTpoiCTBa KbM Ethernet xb6a Bbpxu nopToBe LAN 2 - 5
Донна табица пokа3ba CTatya ha CBetodnoite (LED)Ha LAN npTa no Врeme Ha pa6ota.
Incorrect use of batteries can result in battery leakage or explosion. When using batteries, be sure to follow these instructions:
- Make sure that the plus and minus terminals of the batteries are inserted in the correct directions.
- Do not mix old and new or different types of batteries.
- Do not attempt to recharge non-rechargeable type batteries.
- Remove the batteries when the product will not be used for an extended period of time.
- If the battery has leaked, be sure to carefully remove all residue before inserting new batteries.
BHIMAHNE
- He cbaJnTe TOnI npOdyKT, dOKaTO KOH3OJaTa e BkJIIOUeHa.
- N368aBaiTe da noCTaBTe npOyKta B ycNoBnHa KaPHo HnCKn nn KpaHb BnCOKn Tempeatypn nn BbB BnaXHa cpeJa.
- He notānīyīte pōdùyKt a n ɪsəbɪrbaɪte BcɪkɑkʌbB KɔHTaKT C BOda.ɪnənə3BaTe caMo Ha cyxɪ MecTa.
- MaJIKNiTe Deca TpIbBa Da 6bDaT Ha6JIIOJaBAHn, KOraTo n3NoJ3BaT npOdyKTa.
- I3non3BaHToC npOyKTa Ha npIcTbKn nIaKceCoapn, KOInTo He ca npenopbTuHa nIi He ce npOdaBat OT JOYTECH, MoKe da npuHnH NoXkap, TOKOB yIap, HapaHraBaHa He nIi NobpeJa Ha npOdyKTa.
- He постваite часте с дождьраши раэтвори, сыдьржаша дождьраши, Изполлваite
MEK napcaIIMaIko BODa
- Пюдуктбг He сьдьрkaЧаст, KOINTOTNotpe6nteIAT MOKeДа
- попавиCAM.ЕснepimentupaheTo Cюdukta BODNdo
- поекратуваеHa rapaHцида.
BAKHN IPREDYNPPEXDEHNA, CBbP3AHN CbC 3dPABETO
PpeDynpexKdEHe 3a Bb3MOxHepnCtbn nopadn NOBUnHe CBETJIOUYBCTBUNHOCT
PnCbBcem MaIbK npoceH T OXopaTa n3IarAHeTo Ha ONpeJeHn Bn3yAlHn N3O6paXKeHn, BKIoUHTeJIHO MmrauCBETJInHn IJI
dpyn 6bnuaHn 3a BnDeo Irgnte MOTBn, MoKe Da npEn3BnKa npncTbn. Bb3moXho e dOpn Xopa, KOnTO npEn He ca mAmn npncTbn n He cTpaDnat OT enJlecnna, da BoJeDyBaT OT cKpnto 3a6OJIbaHe, KoEt Oda npEn3BnKa TaKnBa TnpNCtbn BCJeDCTBnE Ha NOBuWeHa CBETIOUChyBCTBnTeIHOCT" PnI rJeDaHe Ha BnDeo Irpn.
ПпстьNTe MOrat Да Имат Най-раЗнбразн CMNТOMN, BKЛIOчNTeHNo Лево 3aMaIbAHe, 3aMbTJIeHO BIXДаНe, OCHN IJIINJIиCEВn CpA3Mn, KOHBYLCmN IJIIN TpepepeH Na KpaIHNUTe, De3OpneHNTaцИ,ОБьрКBaHе Ил NkaTKOTpaHHa 3aRy6a Ha CB3HaHHe.
Pnncbnte Morat da npuHHT n 3aY6a Ha cb3HaHne nn KOHByLCnn, KOITO da IOBeDaT DO HapaHBAHe BCJeCTBne Ha naDaHe nn yIap B 6n3Kn ppeMeTu.
Ako n3nntate HrKoN Te3u CmMnTOMn, He3a6abHO cnpete irpa n ce KOHCyIHTpaiTe c Jekap.
POnITeJIte TpI6Ba Da NaHbJIIOJaBaT DeUaTa Cn N Da rN IITat 3a ropeNoCooHeHTE CmMTOMN -DeUaTa N MlaJeXnTe Ca npEpa3NoJoxEHN KbMa TaKInBa PnpCTbPi NOBue,OTKoJIKOTO Bb3pactHnTE.
I36poeHNTe npedna3Hm MepKn MoaT da HamaJr pNcKa oT enJIenENTnHn npCTbNN BCJeDCTBne Ha NOBUnHeHa CBETJIOUyCBtBnTeJCT:
- CeñheTe Ha no-rolaMo pa3CToRHe eKpaHa
- 3n0n3BaIeMaJIbK TeJIeBn3IOHeH ekpaH
-ИграитЕВДобpeOCBteHaCTaI
He ngpaTe, Korato cTe cbHnBn nn npeymopeHn
IpeNi Da nrgaete Ce KOHcyTnpaTe C nekap, aKO Bne nn HAKoI OT BaunTe 6n3Kn CTe NmAn npncbnn nn 60JeDyBaTe OT ennlencnia.
CbBcBtBaMe Bn CbIoo Da npaBnte 15 MInHyTHn NOpuBKn Ha BCEKN Yac.
Дизайт И спсцфкаль Te могат Да Бдат поменяни Бezпредунгданe.
N3XBpIaIte npOyKta IJIN npOyKTnTe, cBbPkaIe Ce B NaKeTa, CbIaCHO MeCTHnTe IN HaCIOHaJIHnTe pa3nopeI6n 3a N3XBpJIaHE Ha CMeT.
Fapau
Korato KnyBaTe ot Joytech, BVE KnyBaTe KaueCTBeH npOdyKT. JOYTECH npednara DBy- (2) roDnHa rapaunca cbc 3amra Ha 3a To3n npOdyKT. JOYTECH rapaHTnpaHa na IpbBOHaaynna HOTpeBnteI n KnyBauch, ye To3n npOdyKT HMa HnKaKBn DeFeKTn B MaTePnAHa nn n3pa6oTKata.AKO ce NOBn DeFeKT, NOKpNT ot Ta3n rapaun, JOYTECH, no co6cTBHeHa npeueHka, ue nonpaBn nn 3ameHn npOdykTa be3nPaTHo. FapanzraHa JOYTECH n3KnIOvBa npTeHcnn 3a cnUaHn nn nocJeDbauo Bb3NknHaII Nobpei.
For technical support please consult the JOYTECH website at: www.JOYTECH.NET/SUPPORT
Bun venit
Incorrect use of batteries can result in battery leakage or explosion.
When using batteries, be sure to follow these instructions:
- Make sure that the plus and minus terminals of the batteries are inserted in the correct directions.
- Do not mix old and new or different types of batteries.
- Do not attempt to recharge non-rechargeable type batteries.
- Remove the batteries when the product will not be used for an extended period of time.
- If the battery has leaked, be sure to carefully remove all residue before inserting new batteries.