
ACTORDX - Portable speaker HK AUDIO - Free user manual and instructions
Find the device manual for free ACTORDX HK AUDIO in PDF.
| Product type | Active portable audio speaker system |
| Model | HK AUDIO ACTORDX (composed of satellite ADX 112A, subwoofer ADX 115 Sub A and Sub B) |
| Satellite dimensions (W x H x D) | 39 cm x 65 cm x 42 cm |
| Satellite weight | 30 kg |
| Subwoofer dimensions (W x H x D) | 48 cm x 65 cm x 66 cm (with casters) |
| Amplifier type | Class D amplifier, 600 W RMS (satellite) + 500 W RMS (subwoofer Sub A) |
| Power supply | 230 V / 117 V / 100 V, max consumption 1000 VA, fuses T8A |
| Main functions | DuoTilt™ technology (7.5° and 15° angles), DDO™ system controller, XLR and Speakon connectivity, satellite and subwoofer level settings |
| Maintenance and cleaning | Protect from moisture, clean ventilation grilles, avoid distortion, use original protective covers |
| Safety | Protection class 1 (grounded), do not open the enclosure, use IEC 127 compliant fuses, keep away from water and heat sources |
| Spare parts and repairability | Repairs exclusively by HK AUDIO or authorized technician, use original accessories |
| General information | Warranty up to 5 years after online or card registration within 30 days |
Frequently Asked Questions - ACTORDX HK AUDIO
User questions about ACTORDX HK AUDIO
0 question about this device. Answer the ones you know or ask your own.
Ask a new question about this device
Download the instructions for your Portable speaker in PDF format for free! Find your manual ACTORDX - HK AUDIO and take your electronic device back in hand. On this page are published all the documents necessary for the use of your device. ACTORDX by HK AUDIO.
USER MANUAL ACTORDX HK AUDIO
- Read all of these instructions!
- Save these instructions for later use!
- Follow all warnings and instructions marked on the product!
- Do not use this product near water, i.e. bathtub, sink, swimming pool, wet basement, etc.
- Do not place this product on an unstable cart, stand or table. The product may fall, causing serious damage to the product or to persons!
- Slots and openings in the cabinet and the back or bottom are provided for ventilation; to ensure reliable operation of the product and to protect it from overheating, these openings must not be blocked or covered. This product should not be placed in a built-in installation unless proper ventilation is provided.
- This product should not be placed near a source of heat such as a stove, radiator, or another heat producing amplifier.
- Use only the supplied power supply or power cord. If you are not sure of the type of power available, consult your dealer or local power company.
- Do not allow anything to rest on the power cord. Do not locate this product where persons will walk on the cord.
- Never break off the ground pin on the power supply cord.
- Power supply cords should always be handled carefully. Periodically check cords for cuts or sign of stress, especially at the plug and the point where the cord exits the unit.
- The power supply cord should be unplugged when the unit is to be unused for long periods of time.
- If this product is to be mounted in an equipment rack, rear support should be provided.
This product should be used only with a cart or stand that is recommended by HK AUDIO. - Never push objects of any kind into this product through cabinet slots as they may touch dangerous voltage points or short out parts that could result in risk of fire or electric shock. Never spill liquid of any kind on the product.
- Do not attempt to service this product yourself, as opening or removing covers may expose you to dangerous voltage points or other risks. Refer all servicing to qualified service personnel.
Clean only with dry cloth. - Do not defeat the safety purpose of the polarized or grounding-type plug. A polarized plug has two blades with one wider than the other. A grounding type plug has two blades and a third grounding prong. The wide blade or the third prong are provided for the safety. If the provided plug does not fit into your outlet, consult an electrician for replacement of the obsolete outlet.
- Unplug this product from the wall outlet and refer servicing to qualified service personnel under the following conditions:
- When the power cord or plug is damaged or frayed.
If liquid has been spilled into the product.
If the product has been exposed to rain or water. - If the product does not operate normally when the operating instructions are followed.
- If the product has been dropped or the cabinet has been damaged.
If the product exhibits a distinct change in performance, indicating a need of service! - Adjust only these controls that are covered by the operating instructions since improper adjustment of other controls may result in damage and will often require extensive work by a qualified technician to restore the product to normal operation.
- Exposure to extremely high noise levels may cause a permanent hearing loss.
- Individuals vary considerably in susceptibility to noise induced hearing loss, but nearly everyone will lose some hearing if exposed to sufficiently intense noise for a sufficient time. The U.S. Government's Occupational Safety and Health Administration (OSHA) has specified the following permissible noise level exposures:
| Duration Per Day In Hours | Sound LeveldBA, Slow Response |
| 8 | 90 |
| 6 | 92 |
| 4 | 95 |
| 3 | 97 |
| 2 | 100 |
| 11/2 | 102 |
| 1 | 105 |
| 1/2 | 110 |
| 1/4 or less | 115 |
- According to OSHA, any exposure in excess of the above permissible limits could result in some hearing loss.
- Ear plug protectors in the ear canals or over the ears must be worn when operating this amplification system in order to prevent a permanent hearing loss if exposure is in excess of the limits as set forth above. To ensure against potentially dangerous exposure to high sound pressure levels, it is recommended that all persons exposed to equipment capable of producing high sound pressure levels such as this amplification system be protected by hearing protectors while this unit is in operation.
Fuses: Replace with IEC 127 (5x 20 mms) type and rated fuse for best performance only.
TO PREVENT THE RISK OF FIRE AND SHOCK HAZARD, DO NOT EXPOSE THIS APPLIANCE TO MOISTURE OR RAIN. DO NOT OPEN CASE; NO USER SERVICE-ABLE PARTS INSIDE.
REFER SERVICING TO QUALIFIED SERVICE PERSONNEL.
- The unit has been built by HK AUDIO® in accordance with IEC 60065 and left the factory in safe working order. To maintain this condition and ensure non-risk operation, the user must follow the advice and warning comments found in the operating instructions. The unit conforms to Protection Class 1 (protectively earthed).
HK AUDIO* ONLY GUARANTEE THE SAFETY, RELIABILITY AND EFFICIENCY OF THE UNIT IF:
Assembly, extension, re-adjustment, modifications or repairs are carried out by HK AUDIO® or by persons authorized to do so. - The electrical installation of the relevant area complies with the requirements of IEC (ANSI) specifications.
- The unit is used in accordance with the operating instructions.
- The unit is regularly checked and tested for electrical safety by a competent technician.
WARNING:
- If covers are opened or sections of casing are removed, except where this can be done manually, live parts can become exposed.
- If it is necessary to open the unit this must be insulated from all power sources. Please take this into account before carrying out adjustments, maintenance, repairs and before replacing parts.
- The appliance can only be insulated from all power sources if the mains connection is unplugged.
- Adjustment, maintenance and repairs carried out when the unit has been opened and is still live may only be performed by specialist personnel who are authorized by the manufacturer (in accordance with VBG.4) and who are aware of the associated hazards.
- Loudspeaker outputs which have the IEC 417/5036 symbol (Diagram 1, below) can carry voltages which are hazardous if they are made contact with. Before the unit is switched on, the loudspeaker should therefore only be connected using the lead recommended by the manufacturer.
- Where possible, all plugs on connection cables must be screwed or locked onto the casing.
- Replace fuses only with IEC127 type and specified ratings.
- It is not permitted to use repaired fuses or to short-circuit the fuse holder.
- Never interrupt the protective conductor connection.
- Surfaces which are equipped with the "HOT" mark (Diagram 2, below), rear panels or covers with cooling slits, cooling bodies and their covers, as well as tubes and their covers are purposely designed to dissipate high temperatures and should therefore not be touched.
- High loudspeaker levels can cause permanent hearing damage. You should therefore avoid the direct vicinity of loudspeakers operating at high levels. Wear hearing protection if continuously exposed to high levels.
MAINS CONNECTION:
- The unit is designed for continuous operation.
- The set operating voltage must match the local mains supply voltage.
- The unit is connected to the mains via the supplied power unit or power cable.
- Power unit: Never use a damaged connection lead. Any damage must be rectified by a competent technician.
- Avoid condition to the mains supply in distributor boxes together with several other power consumers.
- The plug socket for the power supply must be positioned near the unit and must be easily accessible.
PLACE OF INSTALLATION:
- The unit should stand only on a clean, horizontal working surface.
- The unit must not be exposed to vibrations during operation.
- Keep away from moisture and dust where possible.
- Do not place the unit near water, baths, wash basins, kitchen sinks, wet areas, swimming pools or damp rooms. Do not place objects containing liquid on the unit - vases, glasses, bottles etc.
- Ensure that the unit is well ventilated.
- Any ventilation openings must never be blocked or covered. The unit must be positioned at least 20~cm away from walls. The unit may only be fitted in a rack if adequate ventilation is ensured and if the manufacturer's installation instructions are followed.
- Keep away from direct sunlight and the immediate vicinity of heating elements and radiant heaters or similar devices.
- If the unit is suddenly moved from a cold to a warm location, condensation can form inside it. This must be taken into account particularly in the case of tube units. Before switching on, wait until the unit has reached room temperature.
- Accessories: Do not place the unit on an unsteady trolley, stand, tripod, base or table. If the unit falls down, it can cause personal injury and itself become damaged. Use the unit only with the trolley, rack stand, tripod or base recommended by the manufacturer or purchased together with the unit. When setting the unit up, all the manufacturer's instructions must be followed and the setup accessories recommended by the manufacturer must be used. Any combination of unit and stand must be moved carefully. A sudden stop, excessive use of force and uneven floors can cause the combination of unit and stand to tip over.
Additional equipment: Never use additional equipment which has not been recommended by the manufacturer as this can cause accidents. - To protect the unit during bad weather or when left unattended for prolonged periods, the mains plug should be disconnected. This prevents the unit being damaged by lightning and power surges in the AC mains supply.
Diagram 1

Diagram 2

Welcome to the HK AUDIO family!
Thank you for choosing an HK AUDIO product.
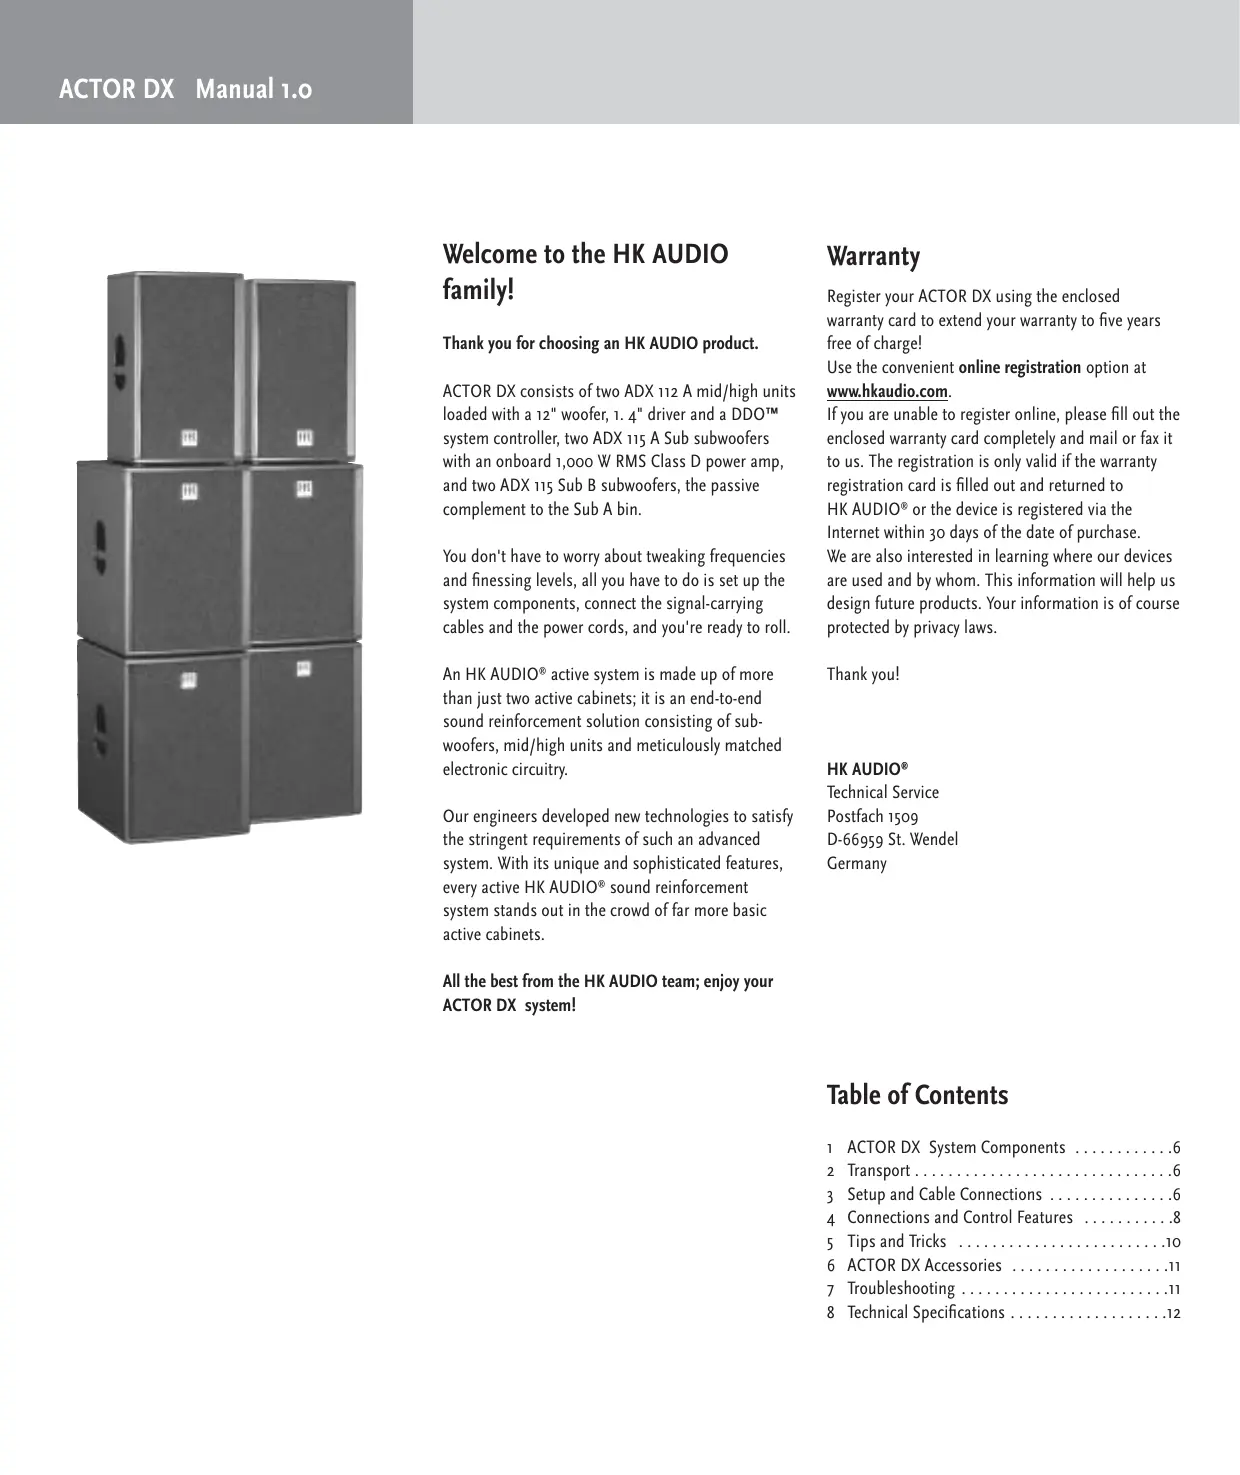
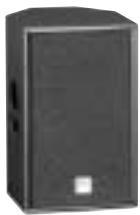
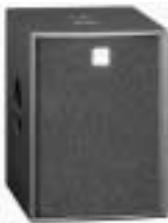
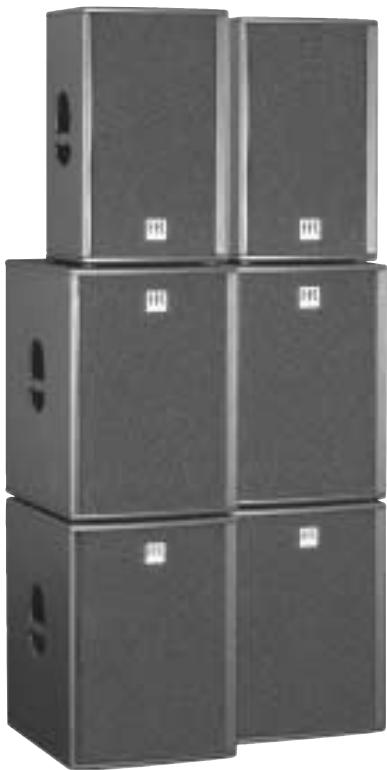
ACTOR DX consists of two ADX 112 A mid/high units loaded with a 12" woofer, 1.4" driver and a DDO™ system controller, two ADX 115 A Sub subwoofer with an onboard 1,000 W RMS Class D power amp, and two ADX 115 Sub B subwoofer, the passive complement to the Sub A bin.
You don't have to worry about tweaking frequencies and finressing levels, all you have to do is set up the system components, connect the signal-carrying cables and the power cords, and you're ready to roll.
An HK AUDIO® active system is made up of more than just two active cabinets; it is an end-to-end sound reinforcement solution consisting of subwoofoers, mid/high units and meticulously matched electronic circuitry.
Our engineers developed new technologies to satisfy the stringent requirements of such an advanced system. With its unique and sophisticated features, every active HK AUDIO® sound reinforcement system stands out in the crowd of far more basic active cabinets.
All the best from the HK AUDIO team; enjoy your ACTOR DX system!
Warranty
Register your ACTOR DX using the enclosed warranty card to extend your warranty to five years free of charge! Use the convenient online registration option at www.hkaudio.com.
If you are unable to register online, please fill out the enclosed warranty card completely and mail or fax it to us. The registration is only valid if the warranty registration card is filled out and returned to HK AUDIO® or the device is registered via the Internet within 30 days of the date of purchase. We are also interested in learning where our devices are used and by whom. This information will help us design future products. Your information is of course protected by privacy laws.
Thank you!
HK AUDIO
Technical Service
Postfach 1509
D-66959 St. Wendel
Germany
Table of Contents
1 ACTOR DX System Components 6
2 Transport 6
3 Setup and Cable Connections 6
4 Connections and Control Features 8
5 Tips and Tricks 10
6 ACTOR DX Accessories 11
7 Troubleshooting 11
8 Technical Specifications 12
Unique features for premium performance

Digital amping
- for enhanced efficiency and dynamics
With an extremely high efficiency rating topping the 90% mark, Class D digital power amps are substantially smaller, lighter, and more compact than comparable conventional amps. The reduced thermal load on components enhances reliability, while the far faster slew rate and higher attenuation factor audibly enhance the speed and accuracy of the system's dynamic response.

DuoTiltTM
- making the most of sonic energy
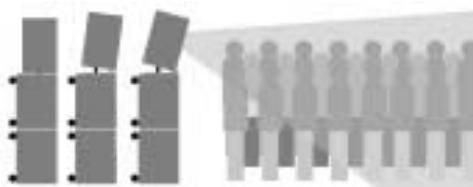
The novel DuoTilt™ pole mount allows sound energy to be utilized far more efficiently. DuoTilt™ offers 7.5^ and 15^ angles of tilt, enabling perfect mid/high unit-to-audience alignment. Troublesome ceiling reflections are minimized, making the sound clearer, tighter, and more focused.

DDO^TM Controller technology
The DDO™ Controller compensates for varying response of components such as low-frequency, midrange and high-frequency speakers, power amps, crossovers and so forth to forge a homogenous system with uniform dynamics and a sonic image with sharply defined contours.

Easy Setup and Handling
- for less pre-gig stress
Like all HK AUDIO Active Systems, ACTOR DX was designed as a cohesive system consisting of perfectly matched components. Painstaking effort was invested in ensuring ACTOR DX can be transported easily and set up quickly. Handling and EQing couldn't be any easier, with no complicated and time-consuming tweaking challenges to master.
ADX 112 A
ADX 115 Sub A
ADX 115 Sub B

Standard system connections

1 ACTOR DX System Components
ADX 112 A Mid/High Unit
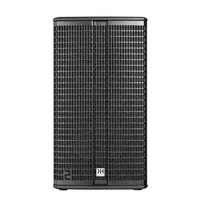
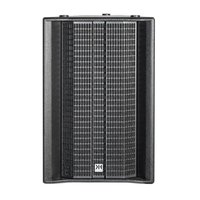
These enclosures are loaded with one 12" HK AUDIO Custom speaker and one 1.4" compression driver with a 60^× 40^ CD horn. Delivering 600 W RMS, the Class D power amp is housed in a separate chamber along with the DDO™ Controller.
ADX 115 Sub A Subwoofer
The ACTOR DX A Sub's housing is split up into two chambers. The front chamber serves as the speaker cabinet for the 15^ front-loaded loudspeaker, which has a power handling capacity of 500 W RMS and a nominal impedance of 8 ohms. The power amp is housed in a separate compartment at the rear of the cabinet.
ADX 115 Sub B Subwoofer
The housings and speakers of the ADX 115 Sub Bs and Sub A are identical. The Sub B is the passive version of the Sub A.
2 Transport
To transport the system, simply set the subwoofoers on their casters and place the mid/high units onto the subwoofoers with the foam rubber grille side facing down. Use original HK AUDIO, covers to get your system ready to handle the rigors of the road. Padded and protected against moisture, your ACTOR DX system is sure to serve you well for a long time to come.
3 Setup and Cable Connections
3.1 The Standard ACTOR DX System

The standard system comprises two ACTOR ADX 112 A mid/high units, two ADX 115 Sub A subwoofer and two ADX 115 Sub B subwoofer.
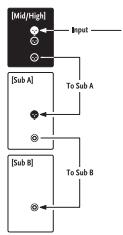
Always connect ACTOR DX starting at the top and working your way down (refer to the diagram on the rear panel of ACTOR DX components)! This may seem unusual if you are accustomed to working with active systems where signals are routed via paralleled pass-through jacks, which would allow connections to be made in any sequence. ACTOR DX, in contrast, features the DDO™ System Controller housed in the ADX 112 A mid/high unit. This controller lets you determine basic settings such as the system configuration, the mid/high unit's level and the subwoofer's level right on the mid/high unit. DDO™ then routes signals from the mid/high unit to Sub A.
Note: Always connect cords in the correct sequence. Never connect a cord carrying a signal from a mixer directly to Sub A because this bypasses the DDO™ system controller! Always connect signal sources to the "master" system input located on ACTOR DX mid/high units!
3.2 ACTOR DX Full-range Setup

The full-range setup comprises two ACTOR ADX 112 A mid/high units.
Select the appropriate system configuration on the system controller's control panel. In full-range mode, the subwoofer output (DDOTM controlled) is disabled to prevent handling errors.
3.3 ACTOR DX Club Set

The club set comprises two ACTOR ADX 112 A mid/high units and two ADX 115 Sub A bins.
3.4 Dual ACTOR DX System

The dual system comprises four ACTOR ADX 112 A mid/high units, four ADX 115 Sub A bins and four ADX 115 B Sub bins.
Connect cables from top to bottom as described above. Plug a microphone cord into the first mid/high unit's THROUGH port to route the mixer signal to the second ACTOR DX stack. Ensure XLR connectors are wired as follows: 1 = ground, 2 = +,3 = -
3.5 Flying ACTOR ADX 112 A Mid/High Units
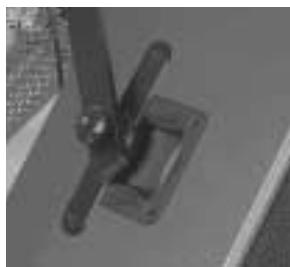
Use the HK AUDIO rigging frame to fly ACTOR DX mid/high units. To attach the frame, remove the countersunk M10 hex head bolts from the side panels. Bolt the rigging frame's brackets to the enclosure. Set the mid/high unit's inclination to the desired angle by loosening the knobs on the sides and firmly hand-tightening them again. The serrated plastic washers hold the mid/high unit in place.
Note: For reasons of safety, use tested and certified load-securing devices only (for example, half-couplers, TV spigots, brackets, and so forth)!
Ensure wall and pole mounts are designed to handle the load (an ACTOR ADX 112 A weighs 30kg ).
3.6 Using the ACTOR DX Tilt Unit
Using the optional tilt unit couldn't be easier: Proceed as if mounting the enclosure on a pole. Set the ACTOR DX tilt unit with the bottom plate facing down on the upper subwoofer and then set the ACTOR mid/high unit on it so the tilt unit's rod is inserted into one of the two holes (7.5^ or 15^) .
Club set connections
Dual system connections
ACTOR ADX 112 A with rigging bracket
Question
Can I connect speakers other than an ACTOR DX mid/high unit to an ACTOR DX Sub A or Sub B subwoofer?
Answer
The system components are acoustically matched
for optimum audio performance and may be operated in the indicated configuration only. Using other mid/high units can degrade the sound and damage the power amp (e.g. the Sub A's). Sub A's nominal impedance is 4 ohms, and impedance may not fall short of this value. Connect no more than one Sub B to Sub A's speaker out.
The ACTOR DX tilt unit in action

ACTOR DX
[ADX 112 A]
Rear panel and ventilation openings
may become too hot to touch!
Leave enough space for proper ventilation!
Caution
To prevent the risk of fire and shock
hazard don't expose this appliance
to moisture or rain. Don't open case;
on user servicable parts inside. Refer
To use services, please: receive servicing to qualified service personnel.


Power


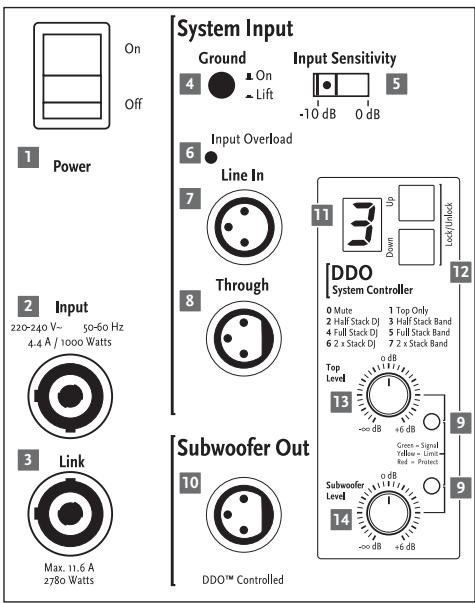
4 Connections and Control Features
4.1 ACTOR ADX 112 A
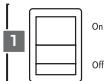
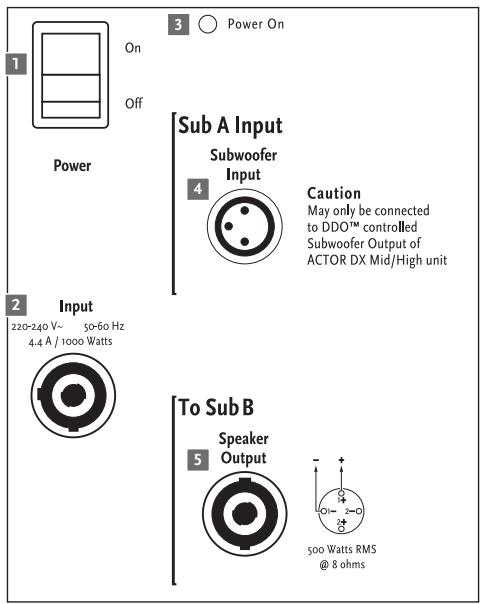
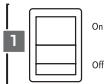
1 Power Switch
Handling: This is the on/off switch for the active system. When engaged, the system controller's display lights up orange.
Always switch the ACTOR DX active system on last, that is, after powering up all other components, and switch it off first before powering down all other connected devices.
2 Mains Input
Connecting cords: Use the factory-included Power-con cable to connect this socket to a wall receptacle. Caution! Make sure the local mains voltage matches the voltage specified on the device. If you connect the system to the wrong mains voltage, you may destroy the ACTOR DX system's electronic components.
3 Mains Link
Connecting cords: The Powercon Link socket is wired in parallel to the Mains Input. Connect other load consumers (for example, another ACTOR DX mid/high unit or an ACTOR DX Sub A bin) to it.
Heads up: The Powercon Link socket can handle loads up to 11.6 A and 2780 W (at 230 volts). This means you can use it to power up to but no more than two additional ACTOR DX components.
Note: Always switch on ACTOR DX components one after another to prevent a sudden spike in the venue's power supply. Otherwise the power surge may cause the house circuit breaker to trip.
4 Ground
Ground lift button for separating the signal and chassis ground in the event of humming noises. In the event of low-frequency hum, engage the Ground Lift switch. The ground circuit is severed when this button is pressed. If this doesn't solve the problem, check all cords connected to ACTOR DX as well as all signal cables routed to the mixing console for damage (see also Tips and Tricks).
5 Input Sensitivity
This selector matches the preamp's input sensitivity to the mixer's output signal level.
Engage this switch to select either -10 dB (for example, for unbalanced 1/4" jacks and consumer level devices) or +0 dB (for example, for balanced XLR ports and professional mixers).
Recommendation: Select +o dB when using a professional-grade mixer sporting balanced outputs.
This lets you take advantage of console faders' full control range and helps prevent overloads.
Opt for -10 dB A when using a console with a lower output level (unbalanced 1/4" output).
6 Input Overload
This LED lights up when the input level is too high and the entire system (preamp and controller) is being overdriven. Not only does this result in unpleasant distortion, it can also harm the system's components. If the red LED lights up, reduce the level (volume) at the mixer!
7 Line In
Connecting cords: Connect cords carrying signals from your mixer (master left/right, line out, or a similar circuit) to the balanced inputs using a mic cord equipped with XLR connectors.
Ensure XLR connectors are wired as follows:
1 = ground, 2 = +,3 = -
8 Through
Connecting cords: Use this parallel output to route the incoming line signal to other components (for example, to additional ACTOR DX mid/high units) via XLR cords.
9 Limiter LEDs
These are the active system's "rev counters," serving to indicate the limiter's operating status.
10 Subwoofer Output
Connecting cords: Use this output to send the subwoofer signal from the DDO™ controller to an ACTOR ADX 115 Sub A via an XLR cord.
Ensure XLR connectors are wired as follows:
1 = ground, 2 = +,3 = -
11 Display
Read-out: The numeric display indicates the currently selected system configuration.
o Mute
1 Top only 1 mid/high unit Full-range mode
2 Half Stack DJ 1 mid/high unit, 1 Sub A
3 Half Stack Band 1 mid/high unit, 1 Sub A
4 Full Stack DJ 1 mid/high unit, 1 Sub A+ Sub B
5 Full Stack Band 1 mid/high unit, 1 Sub A+ Sub B
6 Dual Stack DJ 2 mid/high units, 2 Sub A+ Sub B
7 Dual Stack Band 2 mid/high units, 2 Sub A + Sub B
L.Locked buttons are disabled
U Unlocked buttons are enabled
12 Up/Down Buttons
Use these buttons to select system configurations.
Operation: To enable the buttons, press Up and Down simultaneously and hold for about one to two seconds. The letter U (for unlocked) appears briefly in the display. Now you can press Up and/or Down to select the desired setup (see the table above). The buttons are automatically disabled soon thereafter. The letter L (locked) appears briefly in the display.
13 Top Level
Operation: Use this knob to determine the volume of the mid/high unit. The standard setting is o dB at the 12 o'clock position. This means the level is neither boosted nor cut.
More about limiter LEDs
A dedicated LED indicates the limiter status for the mid/high-range signal path and the subwoofer circuit, respectively.
What do the lights mean?
The green LED indicates that the given input is receiving a signal. As long as the LED lights up green, the system is operating at low-to-medium levels, with plenty of headroom available for the
14 Subwoofer Level
Operation: When the knob is set to the 12 o'clock position, the subwoofer's and the mid/high unit's respective volumes are matched, ensuring bass and mid/high ranges are rendered in balanced musical proportion. If desired, twist the Subwoofer Level knob to the left to decrease and to the right to increase the subwoofer's level by up to 6 dB.
Tip: If necessary or desired, use the Subwoofer Level knob to boost or cut bass frequencies below 100 Hz rather than resorting to the mixer's master EQ.
15 Rigging Points
Attach the ACTOR DX rigging frame here to fly the mid/high unit from a truss or similar suspension device.
ACTOR ADX 112 A control features
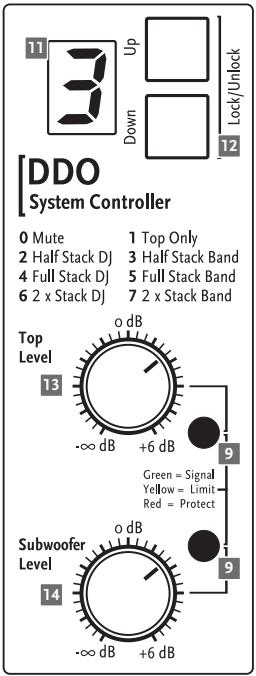
Control features of the ACTOR DX system controller
Control features of the ACTOR ADX 115 Sub A
Control features of the ACTOR ADX n15 Sub B
4.2 ACTOR ADX 115 Sub A
1 Power Switch
Operation: This is the on/off switch for the active system. When engaged, the Power On LED lights up red. Always switch the ACTOR DX active system on last, that is, after powering up all other components, and switch it off first before powering down all other connected devices.
2 Mains Input
Connecting cords: Use the factory-included Power-con cord to connect this socket to a wall receptacle. Caution! Make sure the local mains voltage matches the voltage specified on the device. If you connect the system to the wrong mains voltage, you may destroy the ACTOR DX system's electronic components.
3 Power On LED
This LED lights up when the Power switch is set to ON and the system is connected to a mains power supply.
4 Subwoofer Input
Connecting cords: To patch the signal from the DDO™ controller to a Sub A bin, plug one end of a mic cord equipped with XLR connectors into the mid/high unit's Subwoofer output and the other into the Subwoofer Input. Ensure XLR connectors are wired as follows: 1 = ground, 2 = + , 3 = - .
Note: Never patch the mixer's line and/or master signal directly into Sub A's Subwoofer Input. This bypasses the system's controller, crossover, equalization and protection circuitry, risking serious damage to the subwoofer. Read chapter 3, Setup and Cable Connections, for more on this.
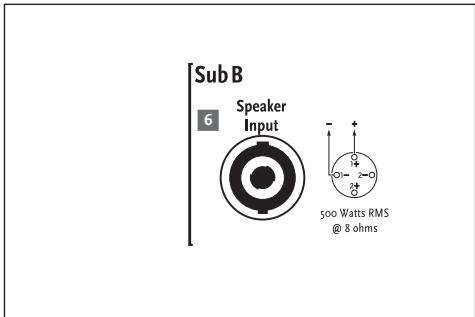
5 To Sub B Speaker Output
Connecting cords: Use this parallel Speakon® output to connect a passive ACTOR DX B Sub bin.
Note: Be sure to twist the Speakon" connectors clockwise until they lock in place! You must first disengage the safety catch before you can unplug the connector. To do this, pull the bayonet catch towards the cord. Pin assignments are pin 1 + = + , pin 1 - = - .
Feel free to use a four-core cable if you wish, though pin 2+ and 2- remain unused, of course.
4-3 ACTOR ADX 115 Sub B
6 Sub B In
Connecting cords: Connect the Speakon® input to the ADX 115 Sub A bin's Speaker Output using a suitable loudspeaker cord.
5 Tips and Tricks
Do not expose electronic circuitry to moisture! When you set the system up outdoors, be sure to protect it against rain. Keep soft drinks, beer and all other liquids well away from the cabinets to protect their electronic components from short circuits.
Ensure that the ducts on the enclosures' rear panels are free of dirt and the devices are ventilated properly. Otherwise, electronic components may overheat and suffer damage.
ACTOR DX delivers optimum sound, so you should provide it with optimum input signals! Noise such as humming is generally caused by defective cables, the wrong type of cords, or unbalanced signals routed into the mixing console. Check all signal and mains cables.
Prevent distortion! Not only is it unpleasant to your audience's ears, it also endangers your equipment. Make sure all components that are connected directly and indirectly to ACTOR DX have sufficient power ratings, and that they don't distort because they're running at their respective limits. Provide an undistorted signal to the system that doesn't have to be cleaned up by backing off the Gain knob.
Avoid ground loops! You may encounter a ground loop when the mixer is grounded via a mains cord which isn't connected to the same mains circuit as ACTOR DX. To prevent this problem, always connect the ACTOR DX system and the mixing console to the same electrical circuit (same phase!). If your equip-
ment hums despite this precaution, the Ground Lift switch can be a great help.
CAUTION: Never tape over the plug's ground terminalæthis endangers lives!
6 ACTOR DX Accessories
HK AUDIO ACTOR DX Tilt-Unit
Designed to hold the ACTOR DX mid/high unit, the tilt unit is placed on the subwoofer, with the DuoTiltTM fitting offering a choice of 7.5^ or 15^ angles.
HK AUDIO Dust Covers for ACTOR DX
This set comprises subwoofer and satellite covers. Extremely tear resistant, water repellant and thickly padded, these covers afford lasting protection for the ACTOR DX system during transport.
HK AUDIO ACTOR DX Rigging Frame
Easy-to-mount U bracket for attaching half-couplers, TV spigots and clamps.
To learn more about original HK AUDIO accessories, talk to your HK AUDIO dealer or visit www.hkaudio.com.
7 Troubleshooting
The Power On LED or display does not light up red when switched on.
1 Check if the power cord is plugged into the Mains Input.
2 Check if the mains power supply is providing current.
3 Check if the house circuit breaker has tripped.
The Power On LED lights up red, but the cabinets produce no sound.
1 Check the cords connected to the inputs.
2 Check if the signal sources (mixer, keyboard, CD player, etc.) are on.
3 Are the Gain knobs turned up?
4 Check the speaker cords for damage.
5 Check if the Speakon" connectors are locked (twisted to the right). An electrical connection is established only if their locking mechanism engages.
The subwoofer's low frequency output is weak.
1 Check the setting of the Subwoofer Level knob. Set Sub A's volume to the desired level using the Subwoofer Level.
2 Check if the system configuration "Top Only" is selected on the system controller. This mutes the subwoofer.
The signal sounds distorted.
1 Check the LED displays on your mixer. Ensure they are not constantly in the red. If necessary, back off the volume at the mixer.
2 If the LED displays on your mixer are in the green, but the sound is still distorted, back off the Level knobs on the ACTOR ADX 112 A enclosures.
3 Observe the Input Overload indicator and the Limiter LEDs on the ACTOR DX mid/high units' control panels. It is acceptable for these to flash yellow from time to time, but under no circumstances may the yellow LEDs illuminate continuously. If they do, turn down the Level knobs. Check also the Input Sensitivity setting. If the signal is saturated, set it to +0 dB.
Annoying hum
1 Check the cords connecting the signal source to ACTOR DX. Replace damaged cords.
2 If you cannot pinpoint the cause of the humming, engage Ground Lift. This should remedy the problem in most cases.
8 Technical Specifications
ACTOR ADX 112 A
| Connections: | 1x XLR Line In |
| 1x XLR Line Through | |
| 1x XLR Subwoofer Output | |
| Line In: | XLR female (pin 1= Ground; 2=+, 3=-) |
| Input: | Electronically balanced & floating |
| Input impedance: | 20 k ohms |
| Sensitivity: | Switchable from -10 dB to 0 dB (= +4 dBu) |
| Max. input level: | +22 dBu |
| Frequency response +/- 3dB:1) | 80 Hz - 19 kHz full-range mode |
| 130 Hz - 19 kHz Stop-only mode | |
| Axial sensitivity 1W@1m:2) | 106 dB |
| Maximum SPL @1m: 2) | 129 dB @ 10% THD |
| Mid/high-range amplifier: | 1x 600 W RMS/ Class D |
| Active protective circuits: | DDOTM Controller Multiband Limiter, Subsonic Filter |
| Midrange speaker: | 12" |
| Tweeter/ driver: | 1.4" |
| Directivity: | 60° x 40° CD horn |
| Crossover frequency: | 950 Hz, 12 dB/octave |
| Pole mount: | HK AUDIO DuoTiltTM, 36 mm, 7.5°, 15° |
| Rigging points: | 4 M10 threaded bushings for attaching an optional rigging bracket |
| Accessories: | ACTOR DX Tilt-Unit, 7.5°, 15° |
| Dimensions (WxHxD): | 39 cm x 65 cm x 42 cm |
| 15 1/4" x 25 5/8" x 16 1/2" | |
| Weight: | 30 kg/ 66 lbs. |
General electrical data:
Protection class 1 (protectively earthed)
Max. current consumption: 4.4 A (230 V)
8 A (117 V)
8 A (100 V)
Max. power consumption: 1000 VA
Mains voltage range: +/ - 10%
Ambient temperature range: -10°C to +35°C
Internal fuses: T8A
1) Via active crossover
2) All measurements taken under half-space conditions
ACTOR ADX 115 Sub A
Connections:
1x XLR Subwoofer Input
1x XLR Subwoofer Through
1x Speakon® Parallel Out
XLR female (pin 1 = Ground; 2 = +, 3 = -)
Electronically balanced & floating
20 k ohms
+10 dBu (turned all the way up)
+22 dBu
48 Hz - 130 Hz
104 dB
126 dB @ 10% THD
1x 1,000 W RMS / Class D
DDOTM Controller, Multiband Limiter, Subsonic Filter
15"
M20 thread base plate
Four 100 mm castors on the rear panel
48cm× 65cm× 66cm incl. castors
187/8"×255/8"×26"
35kg / 77 lbs.
Subwoofer Input:
Input:
Input impedance:
Sensitivity:
Max. input level:
Frequency response + / - 3dB :1
Axial sensitivity 1W@1m:2)
Maximum SPL @1m: 2)
Active protective circuits:
Woofer:
Pole mount:
Castors
Protection class 1 (protectively earthed)
Max. current consumption:
Max. power consumption:
Mains voltage range:
Ambient temperature range:
Internal fuses:
4.4 A (230 V)
8 A (117 V)
8 A (100 V)
1000 VA
+/- 10%
-10°C to +35°C
T8A
ACTOR ADX 115 Sub B
Connections:
Nominal power handling:
Frequency response + / - 3dB :1
Axial sensitivity t 1W@1m: *
Maximum SPL @1m:*
Woofer:
Pole mount:
Castors
Dimensions (WxHxD):
Weight:
1x Speakon® Input
500 W RMS/ 8 ohms
48 Hz - 130 Hz
104 dB
126 dB @ 10% THD
15"
-
Four 100 mm castors on the rear panel
48cm× 65cm× 66cm incl. castors
187/8"×255/8"×26"
32 kg/70.4 lbs.
This is to certify that
HK AUDIO® ACTOR DX
complies with the provisions of the Directive of the Council of the European Communities on the approximation of the laws of the Member States relating to electromagnetic compatibility (EMC Directive 89/336/EEC) and the low voltage Directive (73/23/EEC).
This declaration of conformity of the European Communities is the result of an examination carried out by the Quality Assurance Department of STAMER GmbH in accordance with European Standards EN 50081-1, EN 50082-1 and EN 60065 for low voltage, as laid down in Article 10 of the EMC Directive.

Stamer Musikanlagen
GmbH*
Magdeburger Str. 8
666o6 St.Wendel

Lothar Stamer Dipl. Ing.
Managing Director
St.Wendel, 04/15/05
- Stamer Musikanlagen manufactures exclusively for HK AUDIO®.
Easy Setup and Handling
3.3 ACTOR DX Club Set

Rear panel and ventilation openings
may become too hot to touch!
Leave enough space for proper ve


120=140V 10-60Hz1.4A/1000W


Subwoofer Out
DDO™ Controlled
4.2 ACTOR ADX 115 Sub A
1 Power-Schalter
Schutzklasse 1 / protection class 1 (protectively earthed)
Easy Setup and Handling
3.3 ACTOR DX Club Set

Rear panel and ventilation openings
may become too hot to touch!
Leave enough space for proper ve
Caution - Do not expect this appliance to moisture or rain. Don't open case; it should be properly cleaned before servicing to qualified service personnel.


DDO™ Controlled
4.2 ACTOR ADX 115 Sub A
DDOTM Controller, Multiband Limiter, Subsonic Filter 15"
18-7/8" x 25-5/8" x 26"
Poids :
35 kg/77 lbs.
18-7/8" x 25-5/8" x 26"
Poids :
32 kg/70,4 lbs.
This is to certify that
HK AUDIO® ACTOR DX
complies with the provisions of the Directive of the Council of the European Communities on the approximation of the laws of the Member States relating to electromagnetic compatibility (EMC Directive 89/336/EEC) and the low voltage Directive (73/23/EEC).
This declaration of conformity of the European Communities is the result of an examination carried out by the Quality Assurance Department of STAMER GmbH in accordance with European Standards EN 50081-1, EN 50082-1 and EN 60065 for low voltage, as laid down in Article 10 of the EMC Directive.

Stamer Musikanlagen
GmbH*
Magdeburger Str. 8
666o6 St.Wendel

Lothar Stamer Dipl. Ing.
Managing Director
St.Wendel, 04/15/05
- Stamer Musikanlagen manufactures exclusively for HK AUDIO®.

Easy Setup and Handling
3.3 ACTOR DX Club Set

El Club Set consta de 2 ACTOR ADX 112 A, 2x ADX 115 Sub A.
3.4 Sistema ACTOR DXuble

El planta doble consta de 4x ACTOR ADX 112A, 4x ADX 115 Sub A, 4x ADX 115 Sub B.
Rear panel and ventilation openings
may become too hot to touch!Leave enough space for proper ve
Caution
To prevent the risk of fire and shock
hazard don't expose this appliance
to moisture or rain. Don't open case;
no user servicable parts inside. Refer servicing to qualified service personnel.


Power

20-240Y 50-60Hz
4.4 A 1000 Watts


DDOTMControlled
2780Wt
Subwoofer Out
4.2 ACTOR ADX 115 Sub A
1. Interruptor Power
This is to certify that
HK AUDIO® ACTOR DX
complies with the provisions of the Directive of the Council of the European Communities on the approximation of the laws of the Member States relating to electromagnetic compatibility (EMC Directive 89/336/EEC) and the low voltage Directive (73/23/EEC).
This declaration of conformity of the European Communities is the result of an examination carried out by the Quality Assurance Department of STAMER GmbH in accordance with European Standards EN 50081-1, EN 50082-1 and EN 60065 for low voltage, as laid down in Article 10 of the EMC Directive.

Stamer Musikanlagen
GmbH*
Magdeburger Str. 8
666o6 St.Wendel

Lothar Stamer Dipl. Ing.
Managing Director
St.Wendel, 04/15/05
- Stamer Musikanlagen manufactures exclusively for HK AUDIO®.

- WARNING:
- MAINS CONNECTION:
- PLACE OF INSTALLATION:
- Welcome to the HK AUDIO family!
- Warranty
- HK AUDIO
- Table of Contents
- Unique features for premium performance
- Digital amping
- DuoTiltTM
- DDOTM Controller technology
- Easy Setup and Handling
- ACTOR DX System Components
- ADX 112 A Mid/High Unit
- ADX 115 Sub A Subwoofer
- ADX 115 Sub B Subwoofer
- Transport
- Setup and Cable Connections
- The Standard ACTOR DX System
- ACTOR DX Full-range Setup
- ACTOR DX Club Set
- Dual ACTOR DX System
- Flying ACTOR ADX 112 A Mid/High Units
- Using the ACTOR DX Tilt Unit
- Question
- Answer
- Caution
- Connections and Control Features
- ACTOR ADX 112 A
- Power Switch
- Mains Input
- Mains Link
- Ground
- Input Sensitivity
- Input Overload
- Line In
- Through
- Limiter LEDs
- Subwoofer Output
- Display
- o Mute
- Up/Down Buttons
- Top Level
- More about limiter LEDs
- What do the lights mean?
- Subwoofer Level
- Rigging Points
- ACTOR ADX 115 Sub A
- Power On LED
- Subwoofer Input
- To Sub B Speaker Output
- 4-3 ACTOR ADX 115 Sub B
- Sub B In
- Tips and Tricks
- ACTOR DX Accessories
- HK AUDIO ACTOR DX Tilt-Unit
- HK AUDIO Dust Covers for ACTOR DX
- HK AUDIO ACTOR DX Rigging Frame
- Troubleshooting
- The Power On LED or display does not light up red when switched on.
- The Power On LED lights up red, but the cabinets produce no sound.
- The subwoofer's low frequency output is weak.
- The signal sounds distorted.
- Annoying hum
- Technical Specifications
- ACTOR ADX 112 A
- General electrical data:
- ACTOR ADX 115 Sub A
- ACTOR ADX 115 Sub B
- HK AUDIO® ACTOR DX
- Power-Schalter
- Sistema ACTOR DXuble
- Interruptor Power
Brand : HK AUDIO
Model : ACTORDX
Category : Portable speaker