
WS151GDBI - Air-conditioner HAIER - Free user manual and instructions
Find the device manual for free WS151GDBI HAIER in PDF.
| Product type | Wine cellar |
| Brand | HAIER |
| Model | WS151GDBI |
| Capacity | 151 bottles |
| Dimensions (D × W × H) | 695 × 595 × 1850 mm |
| Weight | 92 kg |
| Power supply | 220-240 V, 50 Hz, 85 W |
| Temperature range | 5 °C to 20 °C |
| Refrigerant | R600a (55 g) |
| Climate class | SN~ST (10 °C – 38 °C) |
| Noise level | 39 dB(A) |
| Temperature zones | 2 independently adjustable zones |
| Display | Real-time temperature and humidity |
| Interior lighting | Yes, with Light button |
| Air circulation | Built-in fan (Circulate button) |
| Auto-lock | Yes, after 30 s of inactivity |
| Low temperature compensation | Yes, active heating if internal temperature < set point -2 °C |
| Power failure memory | Maintains set temperature after power outage |
| Defrost | Automatic with drain hole |
| Activated carbon filter | Yes, replace yearly |
| Installation | Free-standing, not built-in, 100 mm clearance around |
| Maintenance | Clean with warm water and baking soda, petroleum jelly on seals |
Frequently Asked Questions - WS151GDBI HAIER
User questions about WS151GDBI HAIER
0 question about this device. Answer the ones you know or ask your own.
Ask a new question about this device
Download the instructions for your Air-conditioner in PDF format for free! Find your manual WS151GDBI - HAIER and take your electronic device back in hand. On this page are published all the documents necessary for the use of your device. WS151GDBI by HAIER.
USER MANUAL WS151GDBI HAIER
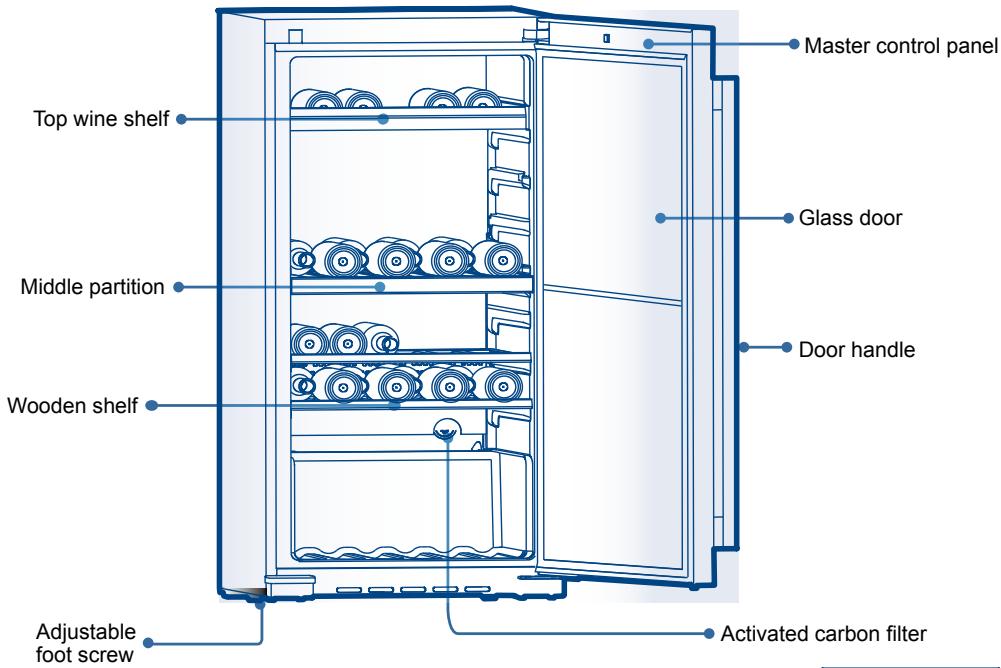
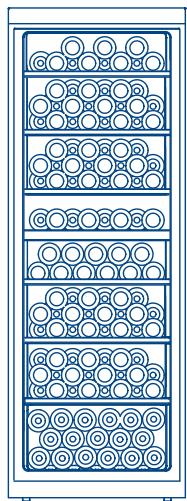
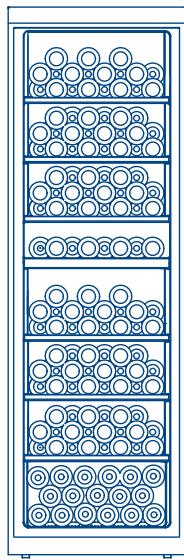
Names of Wine Cellar Components
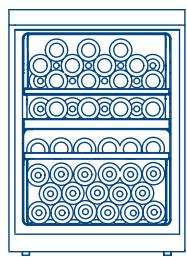
WS50GDBI
(50 bottle capacity)
WS92GDBI
(92 bottle capacity)
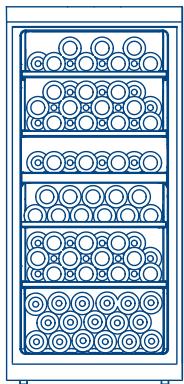
WS136GDBI
(136 bottle capacity)
WS151GDBI
(151 bottle capacity)
Page
IMPORTANT SAFEGUARDS 4
Installing Your Wine Cellar 5
Unpacking Your Wine Cellar 5
Leveling Your Wine Cellar 5
Proper Air Circulation 5
Electrical Requirement 6
Install Limitations 6
Use of Extension Cord. 6
Initial Setup 6
Introduction to Primary Functions of the Appliance 7
1.Automatic Locking and Unlocking. 7
2.Temperature Adjustment. 7
3.Humidity Display 8
4.Interior Light 8
5.Circulation Inside Cellar 8
6.Celsius/Fahrenheit Conversion 8
7.Power 8
8. Low-Temperature Compensation 8
9.Temperature Power-Off Memory 8
Precautions for Use of Wine Cellar 9
Automatic Defrosting 9
Shelving 10
Normal Operating Sounds You May Hear 10
Proper Wine Cellar Care and Cleaning 11
Troubleshooting 12
Technical Data\*Packing List. 13
This appliance is intended to be used exclusively for the storage of wine. When using this appliance, always exercise basic safety precautions, including the following:
- Read all of the instructions before using this appliance.
- Use this appliance only for its intended purpose as described in this use and care guide.
- This wine cellar must be properly installed in accordance with the installation instructions before it is used. See grounding instructions in the installation section.
- It is intended strictly for household use. If using it for industrial or commercial purpose, be sure to observe the relevant norms and regulations. This appliance can be used by children aged from 8 years and above and persons with reduced physical, sensory or mental capabilities or lack of experience and knowledge if they have been given supervision or instruction concerning use of the appliance in a safe way and understand the hazards involved. Children shall not play with the appliance. Cleaning and user maintenance shall not be made by children without supervision.
- The appliance must be positioned so that the plug is accessible.
- If the supply cord is damaged, it must be replaced by the manufacturer, its service agent or similarly qualified persons in order to avoid a hazard.
- Keep ventilation openings, in the appliance enclosure or in the built-in structure, clear of obstruction.
- Do not use mechanical devices or other means to accelerate the defrosting process, other than those recommended by the manufacturer.
- Do not damage the refrigerant circuit.
- Do not use electrical appliances inside the food storage compartments of the appliance, unless they are of the type recommended by the manufacturer.
- If the light is damaged, it must be replaced by the manufacturer, its service agent or similarly qualified persons in order to avoid a hazard.
- This appliance is intended to be used exclusively for the storage of wine.
- Risk of child entrapment. Before you throw away your old wine cellar, take off the doors. Leave the shelves in place so that children may not easily climb inside.
- Do not store explosive substances such as aerosol cans with a flammable propellant in this appliance.
Unpacking Your Wine Cellar
- Remove all packaging material. This includes the foam base and all adhesive tape holding the wine cellar accessories inside and outside.
- Inspect and remove any remains of packing, tape or printed materials before powering on the wine cellar.
Leveling Your Wine Cellar
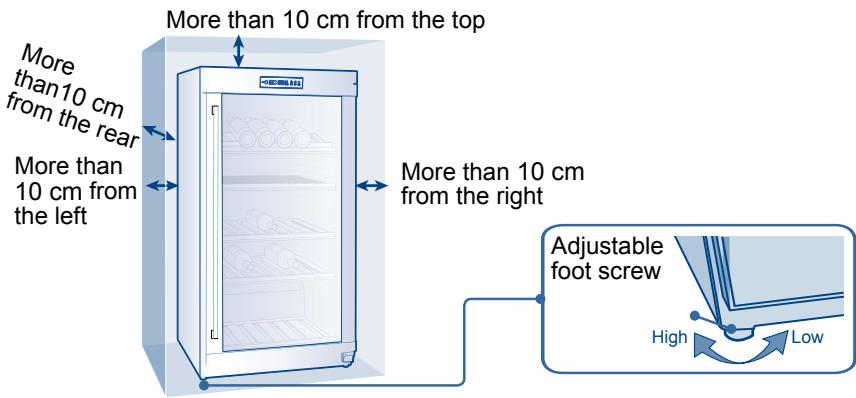
- Your wine cellar has four leveling legs which are located in the front and rear corners of your wine cellar. After properly placing your wine cellar in its final position, you can level your wine cellar.
- Leveling legs can be adjusted by turning them clockwise to raise your wine cellar or by turning them counterclockwise to lower your wine cellar. The wine cellar door will close easier when the leveling legs are extended.
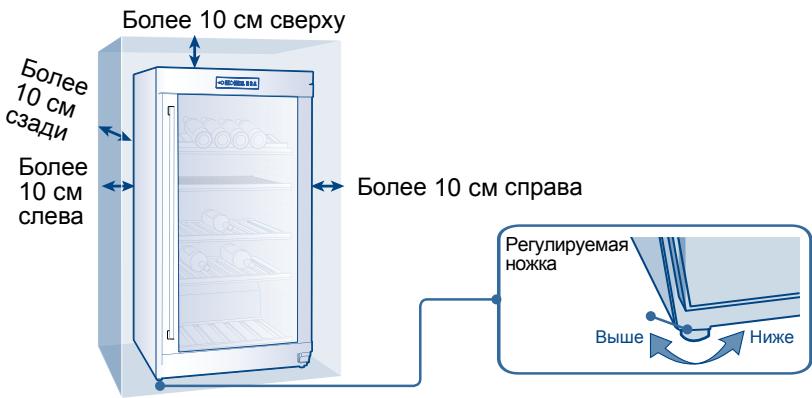
Proper Air Circulation
- To assure your wine cellar works at the maximum efficiency it was designed for, you should install it in a location where there is proper air circulation, plumbing and electrical connections.
- The following are recommended clearances around the wine cellar:
Sides. 4" (100mm)
Top. 4" (100mm)
Back. 4" (100mm)
- Do not over fill your wine cellar for proper wine cooling.
Note: If your wine cellar has been tilted for any reason, wait 24 hours before plugging it in.
Electrical Requirement
- Make sure there is a suitable power Outlet (220-240V, 15 amps outlet) with proper grounding to power the wine cellar.
- Avoid the use of three plug adapters or cutting off the third grounding in order to accommodate a two plug outlet. This is a dangerous practice since it provides no effective grounding for the wine cellar and may result in shock hazard.
Install Limitations
- Do not install your wine cellar in any location not properly insulated or heated e.g. garage etc. Your wine cellar was not laid to operate if the ambient temperature is below 10^ .
- Select a suitable location for the wine cellar on a hard even surface away from direct sunlight or heat source e.g. radiators, baseboard heaters, cooking appliances etc. Any floor unevenness should be corrected with the leveling legs located on the front and rear bottom corners of the wine cellar.
- Your wine cellar is designed for free-standing installation only. It is not designed for built-in application.
Use of Extension Cord
- Avoid the use of an extension cord because of potential safety hazards under certain conditions. If it is necessary to use an extension cord, use only a 3-wire extension cord that has a 3-blade grounding plug and a 3-slot outlet that will accept the plug. The marked rating of the extension cord must be equal to or greater than the electrical rating of the appliance.
Initial Setup
Once you have plugged the unit into an electrical outlet, let the unit run for at least 30 minutes to acclimate itself before making any adjustments. During this time, depending on the internal temperature, the red or white wine light will stay on for the upper compartment and red or white wine light will stay on for the lower compartment. The LED display will show the current internal temperature.
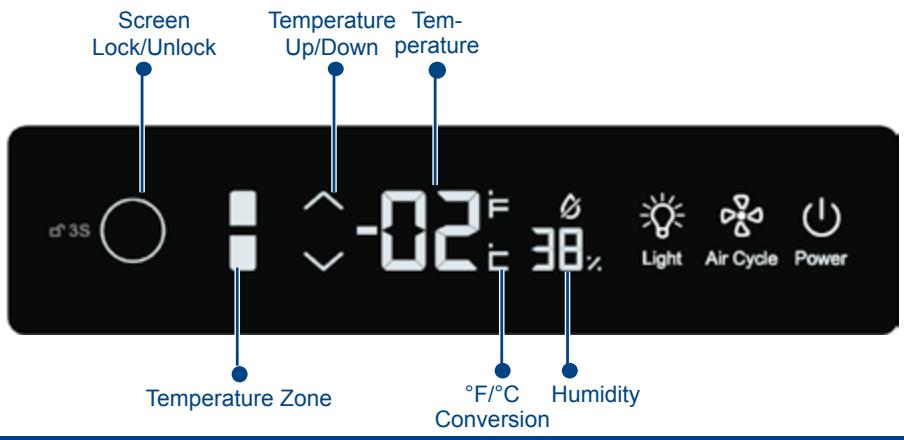
Control Panel
EN
1. Automatic Locking and Unlocking
The appliance has an automatic locking function in order to prevent improper operation of the set operating conditions and temperature due to accidental triggering.
The "Lock" icon will be displayed and control panel will be locked if operation is stopped for 30 seconds.

In order to unlock the panel, press the key and hold it for 3 seconds. The control panel will be unlocked. Other keys can be operated when the panel is unlocked.

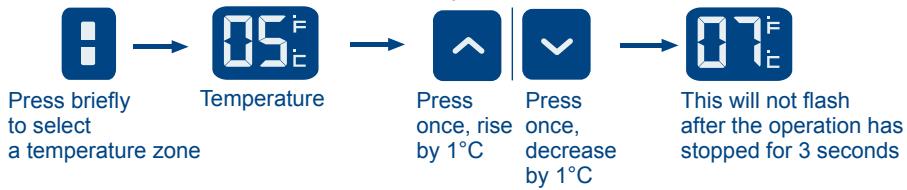
2. Temperature Adjustment
Press "TEMP Zone Selection" briefly in order to select the required temperature zone. If the selected temperature zone turns on, "TEMP Display Zone" displays the temperature of the current temperature zone.
After completion of temperature zone selection, press the "TEMP Up/Down" keys briefly in order to enable temperature settings. At this time, the figures on "TEMP Display Zone" flash and can be set by pressing the "TEMP Up/Down" keys. The temperature rises by 1^ each time when the Up key is pressed and falls by 1^ each time when the Down key is pressed. Temperature settings range is between 5 20^ . After the temperature is selected, operation will be suspended for 3 seconds, and then the currently set parameter will become the system default. The process of temperature adjustments in other temperature zones is the same as that given above.
3. Humidity Display
Humidity display zone will display the humidity inside your wine cellar in real time.
4. Interior Light
- To complement the look of your wine collection, a soft light has been built into the wine cellar. Simply push the "Light" button and the light comes on, push again for off. For maximum energy efficiency, leave light off when not viewing your collection.
- When door is open the light will go on. Upon closing the door, the light will go off.
5. Circulation Inside Cellar
Press "Circulate" briefly to start up the fan inside the cellar in order to make the temperature inside more uniform.
Press "Circulate" and hold it for 3 seconds in order to activate the conversion between Celsius and Fahrenheit.
7. Power
In the initial status, the power key is in on. If it is not locked, all of the power key icons are on. After holding the power key for 3 seconds, the main power will turn off (power for all electrical devices inside will be cut off and the whole appliance will be in standby) and the power key will be half-on. If the device is off, the power can be turned on by holding the power key for 3 seconds, and then all icons on the display screen will turn on. After the operation is stopped for 30 seconds, the display screen will be locked. If the screen is locked, the power key icons are half-on.
8. Low-Temperature Compensation
This wine cellar has a low-temperature compensation function so as to ensure the stability of the storage temperature of the wine.
If the ambient temperature is lower than the set temperature, the temperature inside the cellar will fall accordingly. If the temperature inside the cellar is lower than the shutdown temperature by 2^(4^) , the cellar will automatically enable the low-temperature compensation function in order to heat the cellar. If the temperature inside reaches the set temperature, the low-temperature compensation function will be disabled.
9. Temperature Power-Off Memory
In case of a power outage, the cellar will automatically save the set temperature. After power recovery, it will run based on the temperature set before the power outage while other functions will return to the default status.
Precautions for Use of Wine Cellars
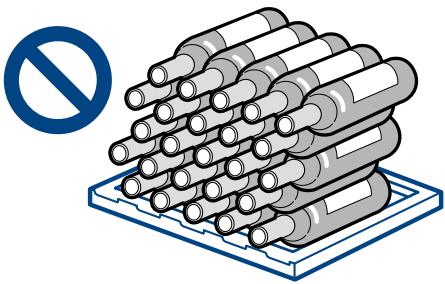
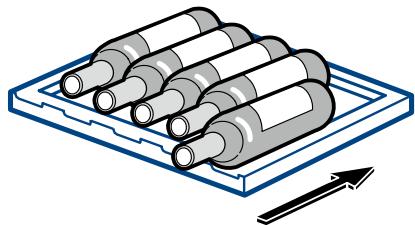
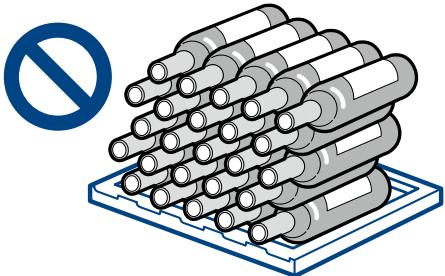
Do not place too much wine in the cellar so as not to exceed the bearing capacity of the wine shelves. Do not place more than three layers of wine on each shelf. The number of wine bottles should not exceed three layers on each shelf, or the bearing capacity of the wine shelves should not exceed 35kg.
Before placing the bottles inside the wine cellar, confirm whether or not the wine shelves are completely stable.
In addition, confirm whether or not any bottle protrudes from the shelves in order to prevent bottles hitting the glass door upon closing.
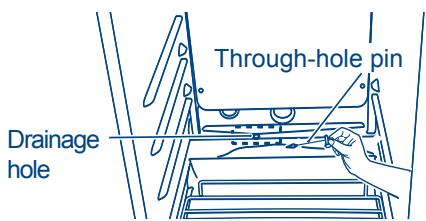
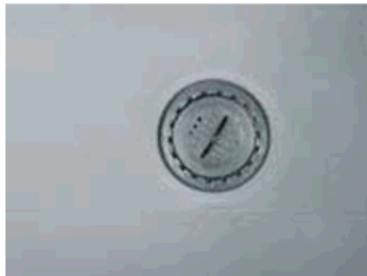
Automatic Defrosting
This appliance has an automatic defrosting function. When using the appliance for the first time, please place a through-hole pin at the drainage hole. During use, ensure that the drainage hole is unblocked so as to force defrosting water to flow smoothly through the drainage hole into the water receiver inside the cellar cabin. If blocked, take the through-hole pin inside drainage hole out, clear away blockages inside and then put the pin back.
Regularly clean water receivers at the bottom of the upper and lower compartments; use a dry cloth to absorb water inside the water receivers and wipe down them (clean them every three months as suggested).
Air exchange with activated carbon filter
The way in which wines continue to mature depends on the ambient conditions. The quality of the air is therefore decisive for preserving the wine. An activated carbon filter has been fitted in the lower area of the rear wall of the appliance to ensure that the air through put remains at an optimum quality.

We recommend that you replace the filter once a year. Filters can be obtained from your dealer.
Changing the filter:
Take the filter by the handle. Turn it to the left and remove.
Inserting the filter:
Insert with the handle in a vertical position. Turn it to the right and insert.
Shelving
- The shelves are designed for appearance and easy cleaning. Larger bottles or Magnums can be more easily accommodated at the cross shelves at the bottom of the cellar.
- There are some shelves for easy storage and removal of your wine.
Normal Operating Sounds You May Hear
- Boiling water, gurgling sounds or slight vibrations that are the result of the refrigerant circulating through the cooling coils.
- The thermostat control will click when it cycles on and off.
Cleaning and Maintenance
Warning: To avoid electric shock always unplug your wine cellar before cleaning. Ignoring this warning may result in death or injury.
Caution: Before using cleaning products, always read and follow manufacturer's instructions and warnings to avoid personal injury or product damage.
General:
- Prepare a cleaning solution of 3-4 tablespoons of baking soda mixed with warm water. Use sponge or soft cloth, dampened with the cleaning solution, to wipe down your wine cellar.
- Rinse with clean warm water and dry with a soft cloth.
- Do not use harsh chemicals, abrasives, ammonia, chlorine bleach, concentrated detergents, solvents or metal scouring pads. SOME of these chemicals may dissolve, damage and/or discolor your wine cellar.
Door Gaskets: Clean door gaskets every three months according to general instructions. Gaskets must be kept clean and pliable to assure a proper seal.
- Petroleum jelly applied lightly on the hinge side of gaskets will keep the gasket pliable and assure a good seal.
Wine Shelf: If the wine shelf was accidentally sprinkled with wine or water droplets, please use 300-400 sandpaper to polish, then use soft cloth to wipe down the sawdust. Do not use towel or soft cloth with water.
Power Interruptions
- Occasionally there may be power interruptions due to thunderstorms or other causes. Remove the power cord from AC outlet when a power outage occurs. When power has been restored, replug power cord to AC outlet.
Vacation and Moving Care
- For long vacations or absences, unplug the wine cellar and clean the wine cellar and door gaskets according to "General cleaning" section. Leave doors open, so air can circulate inside.
- When moving always move the wine cellar vertically. Do not move with the unit lying down, as possible damage to the sealed system could occur.
Note: After moving, wait for 24 hours before plugging in the wine cellar.
Wine Cellar Does Not Operate:
- Check if wine cellar is plugged in.
- Check if there is power in the AC outlet, by checking the circuit breaker.
Wine appears too warm:
- Frequent door openings.
- Allow time for recently added wine to reach desired temperature.
- Check gaskets for proper seal.
- Clean condenser coils.
- Adjust temperature control to colder setting.
Wine temperature is too cold:
- If temperature control setting is too cold, adjust to a warmer setting.
Wine cellar runs too frequently:
- This may be normal to maintain constant temperature during high temperature and humid days.
- Doors may have been opened frequently or for an extended period of time.
- Clean condenser coils.
- Check gasket for proper seal.
- Check to see if doors are completely closed.
Moisture build up on interior or exterior of the wine cellar:
- This is normal during high humidity periods.
- Prolonged or frequent door openings.
- Check door gaskets for proper seal.
Wine cellar door does not shut properly:
- Level the wine cellar.
- Check for blockages e.g. wine bottles, shelves.

Do not dispose of electrical appliances as unsorted municipal waste, use separate collection facilities. Contact you local government for information regarding the collection systems available. If electrical appliances are disposed of in landfills or dumps, hazardous substances can leak into the groundwater and get into the food chain, damaging your health and well-being. When replacing old appliances with new ones, the retailer is legally obligated to take back your old appliance for disposals at least free of charge.
Technical Data
| Model | Climate Type | Electric Shock Resistance Type | Available Capacity (I) | Rated Voltage (V) | Rated Frequency (Hz) | Input Power (W) |
| WS50GDBI | SN~ST | I | 106 | 220~240 | 50 | 80 |
| WS92GDBI | SN~ST | I | 206 | 220~240 | 50 | 85 |
| WS136GDBI | SN~ST | I | 306 | 220~240 | 50 | 75 |
| WS151GDBI | SN~ST | I | 356 | 220~240 | 50 | 85 |
| Temperature Range (℃) | Refrigerant (R600a) (g) | Supply Cord Connection Mode | Weight (kg) | Noise (Acoustic Power Level) dB (A) | Overall Dimension (Depth × Width × Height) (mm) |
| 5~20 | 22 | Y | 55 | 39 | 695×595×820 |
| 5~20 | 32 | Y | 76 | 39 | 695×595×1,265 |
| 5~20 | 50 | Y | 86 | 39 | 695×595×1,655 |
| 5~20 | 55 | Y | 92 | 39 | 695×595×1,850 |
Remarks:
1. According to international standards, if the climate is an SN-ST type, the ambient temperature for use of the wine cellar ranges between 10^ and 38^ .
2. "Noise (acoustic power level)" marked in the technical data refers to a situation in which the semi-anechoic room is set up as specified according to national standards, in the case of an empty wine cellar, a resilient rubber cushion as thick as 5mm to 6mm is placed inside. It can run for at least 30 minutes after the door is closed. A test will be conducted after stable running (excluding startup and shutdown). Ground noise will be tested at 1m from the front, rear, left and right surfaces of the wine cellar respectively.
During use, it is normal that the actual noise is different from the marked noise due to the effects of the type of wine stored in the wine cellar, ambient noise, door opening and closing, compressor startup and shutdown, etc.
- The standard implementation sequence of the enterprise for this appliance series is: Q/0212BGC 007-2012
Packing List
This appliance is being developed continuously. We reserve the right to change the components of the wine cellar without notice.
| Quantity Product Model | Name User Guide | Information Kit | Top Oblique Wine Shelf (Optional) | Small Wooden Shelf | Wooden Shelf | Through-hole Pin | Key |
| WS50GDBI | 1 | 1 | 0 | 1 | 1 | 1 | 2 |
| WS92GDBI | 1 | 1 | 1 | 1 | 3 | 1 | 2 |
| WS136GDBI | 1 | 1 | 1 | 1 | 5 | 1 | 2 |
| WS151GDBI | 1 | 1 | 1 | 0 | 6 | 1 | 2 |
MEPblI PEPdoCTOPOXHOCTN 100
UctaHOBka XOJIoNDJIbHNKa dJa BnHa 101
Pacnakobka xoJIoUJIbHnKa IJIa BnHa. 101
BbipabHnBaHne xoJIoDnIbHnKa dJa BnHa 101
IpaBnJIbNaI cIrpKUJIaCnBa BO3duXa 101
3JIeKtpueckne Tpe6oBaHnra 102
OrpanuHEny no yctaHOBke 102
IcnoJIb3OBAHne ydJIuHHTeJIa 102
IepbohaJIbHa HaCTpoJa 102
BVeDeHHe: ochOBHbIe ФунКци npn6opa 103
1.ABtOMaTHuecka 6JoknOpBa n pa36JoknOpBa. 103
2.PerynpoBka Tempepatypbl 103
3.ИндIKETop BnaJxHocTn 104
4.BhytpenHee ocBeuHne 104
5.LnpkyraB03dyxBHytpn xoJouNbHnka. 104
6.PepeKJIouHeMeJy TempepaTpyo no LcIbCIO/ΦapeHReTy. 104
7.IntaHne 104
8.KompeHcaunBa03deIcTBn Hn3Knx TempePaTyp 104
9.3anomnHaHne Tempeatypbl npn BbIKNoeHHn 104
Mepbippeoctopoxhoctn npn HcnoJIb3OBaHm XOJIOJIbHnKa dIy BnHa 105
ABTomatuecka pa3Mop03ka 105
Pojkni 106
3Bykn npn pa6ote xoJouHbHnka 106
HaJIeKaaun yXoN ouNCtKa XOJOnuNbHnKa dJa BnHa 107
Ponck uyctpaHne HencnpaBHOcte 108
TexHHueckne daHHbIe·YnaKOBOHyB JnCT. 109
Pn6bop npedHa3HaueH NCKJIouHTeJbHO dJa XpaHeHna. Pn nCpONb3OBAHN daHHoro np6bopa Bcerda NOMHnte 06 OCHOBhIX Mepax 6e3oNaCHOCTN, BKJIouyau CJeDyUoIne:
- O3HaKOMbTeCb c HnHcTpkykCnMy npeEd nCNoJb3OBaHnEm.
- ИспосльзуйтepиборТольконоHAЗHAчЕнюВ COOTBEТСТВИN C ДаHHыIM pyKOBODCTBOM NOЛьЗOBATEЛЯ.
3.Перед Испльбовимхолдьнк Дявидалжен 6ыть установпс corla scho Иструкцям по установке.Иструкци по 3аземени можно НайtnВ раздөе об установке. - XoNoDnJIbHnK npEJaHa3HaueH ToJbKO dIy IOMaUHeRo nCNoJIb3OBaHnIy. EcIn Bbl nCnoJIb3yeTe npi6Op B nPOMbIJIeHHbIX nII IN KOMMepeCheKINx ceJIax, y6eIHTecB, yTO BCE HeO6XoIMbIe HOpMbI IN ppaBnla CO6IIODeHbI. DOnyckaETcra NcNoJIb3OBaHnIe npi6OpbaTe TBMn, NaHnAra C 8 JET n CTapWe, n IIuCaMn C OrpaHnueHHbIMn fN3NuCeCKmM, CeHCOPHbIMn INIyUMCTBeHHbIMn cNOco6HOCTaMn, 6e3 ONbITa IN DOCTaTOHbIX 3HaHn, ecIn OHN HaxOJaTcRA NO pRNCMOrPOM INI IN OJnyuHNI INHCTpyKznn INo 6e3Opanachomy nCNoJIb3OBaHnIO daHHoro npi6Op aN OCO3HaIoT notEHnIaNbHyO onaChocTb. He nO3BOJnTe DeTAMIrPaTb C npi6Opom. OYnICTKa IN TexHnueeCKoe 6cbNyKnbAHne npi6Op aHe DoJnxHo npON3BOIDNTCBdTeTBMn 6e3 npiSCMOtpa.
- Пибор Должен бытб раснохен tak, утобьIBLE obecneueн дocун Kштencelю.
- Ecni nHyp nHTaHnIOBpeKdeH, npOn3BOdnteH, aReH T O 06cJyXnBaHnIO nI IN dpyoR KBAJIINΦuICIpOBaHHb I CneUaJIInCT O6raH eRo 3aMeHNtB BO n36exKaHne OnaCHOCTn.
- BeHTnJIaIIOHbIe OTBepCTnB KOpnyce npIbopa NJIIN BCTpoEHbIX KOMnOHeHTax He IOnJXhbl 6bITb 3a6JIOKIpOBaHbl.
- He nCnoIb3yIe IJy yCKopeHnI npOcecca pa3mOpaXnBaHnMexAHnueckne yCTpoIcTBA IJN dpyIne cpeIcTBA OTnUHbIe OT Tex, KOToPbIe peKOMeHdyeT pOnI3BOIDTeJI npIbOpa.
- He noBpeIte KOHTyp cIrpKylraun xJaadaReHtA.
- He nCnoIb3yIte 3neKtpo np6Opby BHyTpN OTCeKOB dJa XpaHeHn npOdyKTOB, ecn TOnbKO OHn He peKOMeHIOBaHb IpnO3BOIDTeJIeM.
- Ecni 3JIeMeHT OCBeIeHnI NOBpeKJdE, IPOU3BOUITeJIb, aReHT IO o6cnykBaHIO nIII dpyrO KBAJIINΦuIcIPoBAHHbI CneuaJIInCT o6ra3aH erO 3aMeHtB BO N36ExKaHHe OnaCHOCTN.
12.Пиборпретнанзанец ИСКЛЮЧТЕЛБН ДЯХра themselves inHa. - Ппсдтавлгет onacnoctь дя DeTei. Перд Tem кak Bblbocntb CTapbl XOLOdINbHnK Дя BnHa, CHIMITE DBepcIb. OCTaBbTe NOJKN Ha MeCTe, YTO6bl DeTAM bIIO CNOXHO 3a6paTbcr BHTpb XOLOdINbHnKa.
- He xpaHnTe B xOIoDnIbHnKe B3pblBAtbIe BeUeCTBa, TaKne KaKa a3po30JbHbIe 6aJIIOHbIc JIeRKOBOcPNaMeHryIOuIMNCr BeUeCTBaMn.
PacnaKOBka xOJIoIJIbHnKa IJIa BnHa
- YdaJIte ynaKoBOHyb MaTePnAaN. 3To OTHocITcK NeHOnPiacty N KJIeIKoJIeHTe, CKpeIJIaOSeJ DoONOHtEnbHbIe DeTaN XOJIoINbHnKa dIa BINA BHYTpN u ChapyKn.
- Поверъп удаипь Се OCTаТКУнбОчHOrO MaTePnAla, KJIeNKоJ IeHTbI IINI bymaI npeД NOДКЛЮЧЕНМ EXONODJIbHnka K CETN.
BbipabHnBaHne XOJIoDnJIbHnKa IJa BnHa
- Y xOJIoNbIbHnKa IMeIOTcra YeTbIpe HOKKn, paCIOLOXeHNbIe B OCHOBaHm IpeEJaHe N 3aJHne qactn XoJIoNbIbHnKa. IocJIe yCTaHOBKn XoJIoNbIbHnKa Ha MeCTO erO IIOJOKeHme MOxHO BbIpOBHrTb.
- Hoxxm MoxHNO peryInpoBaTb, NobopaynbAix No yacobOc CTpeNke, YTObI pInpOndHbTb xOIOdINbHNK, INI pOTnB YacobOc CTpeNk, YTObI ONyCTnTB XOIOdINbHNK. DBePca xOIOdINbHNKa 3akpbIbaETcJeue, ecNI HoXXm dIIINHee.
PpaBnJIbHaI ZnRpKUJzIa BO3dYxa
Для мakсимально зф ekтвов рабъхлодьнka HeOxOДМО yctahOBt b erO B MecTe C Xopoшецркулгпьпсьи BO3dUxa, HeOxOДмьIMI TexHnueckIMN n 3NeKtpnueckIMN COeDINHeHnAIMN.
- PeKOMeHIOBaHHOe MHNIMaJIbHOe paCCToHne BOKpyr XOJIOJIbHnKa IJIa BnHa: Ito 6okam.....100 MM
Cbepxy. 100 MM
CHIN3Y 100 MM
- He nepenonnay Te xoNOniNbHnK dIy npaBnIb HorO oxnaJdeHn BnHa.
RU
PpmeaHne. Ecnx xoOniNbHK bIy nO KaKoT-TO npuHHe hKaIOHe, cJeNyET noOxJaTb 24 yaca nepe nnoknIOyeHem erO K cTeN.
Злектучески Треобavenя
- Y6eDntecb, yTO IJI NOI KI HcHEn XOIOINJIbHnKa IMeETcI POxOJaA po3EtKa (220-240 B, 15 A) C COOTBETCTBYUcIM 3a3EMLJHeM.
- ɪəsərəaTeɪnɒlɪbʒɔBɑHʌŋ TpɔɪnɒhɪxɪpePexOʌnHɪKOBɪ He oʊbεəaTeɪtpetɪŋ Kɔntaɪkt (3a3eMJIeHne), UTObI NɔdKJIIOUHTb B IdoBNIHуO p03EуK. 3To ONaCHo, TAK KaK OTCyTCTByET COOTBeTCTByUoJIe e 3a3eMJIeHne, UTO MoKTe IpNIBeCTɪ N InpaXeHɪNTO TokOM.
OrpaHnueHnNo yCTaHOBKe
- He yctahabnBaIte XoIoDnIbHnK B MeCTe, DoJXHBIM o6pa3OM He n3OJInpoBaHHOM nIi He o6orpeBaemOM, HanpImep, B rapaxke n T.I. XoIoDnIbHnK HnpiroDeH nIpa6tbl npI tempeatype hnxke 10^
BbIbepnte noxOJaee paCnoIOKeHne IyXoNoIbHnka Ha POBHO TBePODIOBepxHOCTN,BdAINOTPpAByCXoJIHeuHbIX LyueY INI NcTOHNKOB TeIIa,paDnATOPOB,HAnOJIbHbIX 3NEKTPOHaRpeBaTeJIeE,KxyOHbIX 3NEKTponPi6OpOB uT.I. JIObIe HEPOBHOCTNI OJMAOJHO KOMIeHCupOBaTB C NOMOUsBO HOXeK,paCNOIOKeHHbIX B OCHOBAHNI NO yrIaMpepeHnei 3aDHei qactn XoLODiNbHnka.
XoOnDnBnK npedHa3NaeH dIy He3aBcMmO yCTaHOBKn. He nOxOHT Iy BCTpaNBAHnA.
IcnoJb3OBAHne ydInHNTeJIa
- I36eRaTe nCNoB3OBaHn yDInHtEnIy 13-3a yrPo3bI be3oNaChOCTN B onpeJeHbIX ycNoBnx. Pn HeobxOAnMocTn nCNoB3yIte 3-npBoDHOy yDInHtEnIb c 3-KoHTaKTHoB BNkOu n PoXoJaIe 3-Φa3HOu po3Eko C 3a3EmHeHem. NapameTpby yDInHtEnIa DOnJKBb 6Itb paBhbl nn BblIe, Yem 3JIeKtpueckne npaMeTpbl pnp6opa.
He xpaHnTe B XOLOINbHnke CnIiKOM MHOro 6yTbIOK BnHa BO n36eKaHne IpeBbIeHnI
DOnyCTHMoH HArpy3Kn Ha NoJkn. Ha KaJdyo
NoNkY MoNkHO BbIIOxNtB He BoJee TpE pIaOB
6yTbIok. He KnaIaTe H AoNDy KoJee Tpex
pIaOB 6yTbIok N He IpeBbIaJNe MaKcIMaJIbHyO
DOnyCTHMuO Harpy3Ky Ha NoJky, paBHyO 35 Kr.
Ipeid nomeeHnEM B XOJIOINbHNIK 6byIbNO pOBepBte, HAdEKNo IIN 3aKpENJIbNbl ONIK.
Takke yobeiTeCb, YTO 6yblIkn He bYCTynaiOT 3KpaJ N0OK n H npenr7CTbYOT 3aKpbTuHIO DBePbU.
ABytOMaTnuecka pa3MOp03ka
Tempepatya BnHa cJnIrkom Hn3Ka:
- EcznyctaHOBJIeHa CzIuKOM Hn3KaTempeaTypa, NOBbIcTe ee.
XoIOnBnK OueHb YaactO BkIIOuAeTc:
- 3To HopMaJIbHoДЯ NOДерЖанЯ NOCTOЯHHo TEmpeaTpybI BO BpeM XapKnx N BlaJxHbIx Dnei.
Bo3MOxHNO, XOIOINbHnK YaCtO OTKpbIbAIN INN OCTaBJIIN DEBcIbOTKpbITbIMN Ha DOJIORe BpeM.
OuICTnte OXlaJdaIOUIN 3MeeBnK. - Поверътейлnotиель на девцх на reрmetунoctь.
- PpOBepeT, nonHocTbIO nI 3aKpbItbI dBepcbl.
CkopJIeHne BJIaRn BHyTpN IJI N ChapyXxOJIoIbHnka:
- 3To HopmaJIbHoeЯBJIeHneIpiNIOBblIeHHoB BLaJxHoCTn BO3dYxa.
XoIOniNbHnK qacto OTKpbIBaJIIN IJN OCTaBIAJI IN DBepcbl OTKpbITbIMN. - Поверътейнлгели на Деверцх наRepmetуность.
Дверцьхолдльнka понocтью He 3akpbblaOTся:
- OTPeryninyTe ypoBeHb XoJIOuJIbHnka.
- PpOBepeTe, yTo MoKeT MeuTaB: 6yTbIKN BnHa, nOLKn.


He BbIbpaCbIbAaTe 3JIeKTPoPn6OpbI BMeCTe CobIyHbIM TROPdCKM MycOpOM, NOb3yIbTecB CneuIaIbHO O6OpyIDBaHHbIM MeCTaMI. CBXkITEcB C MeCTHbIMn OprAHAMn Bnactn DnIa NOlyeHINHΦOPMaUIM O DocTyNHbIX CnCTeMAX c6opa n yTbn3aun 3JIeKTPoPn6OpOB.EcIn BBIbPaBt 3JIeKTPnueckne Pnp6opbHa O b6bHyO CBAJky, OnaChbIE BeueCTBa MOrYT nonactb B rpyHTOBbie BObl n BnIseByU cenb, YTO BpeNo dJa 3IOpOBbN 6IarOnNoynu. Ppi 3aMeHe cTapBX I np6oBpOB Ha HOBle, npOdaBeu no 3aKOHy 063aH 3a6paTB BaW cTapbI np6opD Jn yTbn3aun, XOT b6bl 6ecnnatHo.
TexHnueckne daHHbIe
| Модаль | КлIMатиеский КлASS | Тин 3aцNTыОТ пороженяЗлЕKTРУЧESСКIM TOKOM | ФakтчESСКй обьем(питры) | HOMINAHLбhoeнапраЖенie(B) | HOMINAHLьнаячAstOTа (Гц) | ВхODнЯМоцноCTь(BT) |
| WS50GDBI | SN~ST | I | 106 | 220~240 | 50 | 80 |
| WS92GDBI | SN~ST | I | 206 | 220~240 | 50 | 85 |
| WS136GDBI | SN~ST | I | 306 | 220~240 | 50 | 75 |
| WS151GDBI | SN~ST | I | 356 | 220~240 | 50 | 85 |