
LASERJET PRO M130FN - Laser MFP HP - Free user manual and instructions
Find the device manual for free LASERJET PRO M130FN HP in PDF.

| Product type | Laser multifunction printer |
| Brand | HP |
| Model | LASERJET PRO M130FN |
| Main functions | Print, copy, scan, fax |
| Print technology | Laser |
| Max paper size | A4 |
| Connections | USB, Ethernet, Wi-Fi (wireless models) |
| Mobile printing | AirPrint, HP ePrint, Wi-Fi Direct |
| Fax type | Analog, telephone line |
| Control panel | Touchscreen or 2-line LCD depending on version |
| Power supply | Mains, adapter included |
| Power consumption (standby) | Approximately 1 W |
| Dimensions (approx.) | 420 x 365 x 310 mm |
| Weight (approx.) | 8.5 kg |
| Maintenance and cleaning | Clean exterior with dry cloth; avoid moisture |
| Safety | Do not expose to water; use on a stable surface |
| Spare parts and repairability | Replaceable toner cartridge; parts available through HP |
| General information | Manual available in PDF at notice-facile.com |
Frequently Asked Questions - LASERJET PRO M130FN HP
User questions about LASERJET PRO M130FN HP
0 question about this device. Answer the ones you know or ask your own.
Ask a new question about this device
Download the instructions for your Laser MFP in PDF format for free! Find your manual LASERJET PRO M130FN - HP and take your electronic device back in hand. On this page are published all the documents necessary for the use of your device. LASERJET PRO M130FN by HP.
USER MANUAL LASERJET PRO M130FN HP
Follow Steps 1 - 3 on the printer hardware setup poster, then continue with Step 4.

www.hp.com/support/ljM129MFP

www.registerer.hp.com
4. Set up the control panel
At the printer control panel, check the display status before beginning software installation.
5. Select a connection method

USB connection directly between the printer and the computer
Use an A-to-B type USB cable.
Windows
- For Windows 7 or lower, do not connect the USB cable before installing the software. The installation process prompts to connect the cable at the appropriate time. If the cable is already connected, restart the printer when installation prompts to connect the cable.
- Continue to "6. Locate or download the software installation files."

NOTE: During Windows software installation, select the option to connect through a network.
Mac
- For Mac, connect the USB cable between the computer and the printer before installing the software.
- Continue to "6. Locate or download the software installation files."

Wired (Ethernet) network connection (optional)
Use a standard network cable.
-
Connect the network cable to the printer and to the network. Wait a few minutes for the printer to acquire a network address.
-
Continue to "6. Locate or download the software installation files."

NOTE: During software installation, select the option to Connect through a network.

Wireless network connection (wireless models only)
Touchscreen control panels
- To connect the printer to a wireless (Wi-Fi) network, on the printer control panel, touch the Wireless button.
- Touch Wireless Menu, and then touch Wireless Setup Wizard. Select the network name from the SSID list, or enter the network name if it is not listed.
- Use the keyboard to enter the passphrase, and then touch the OK button.
- Wait while the printer establishes a network connection.
- On the printer control panel, touch the Network button. If an IP address is listed, the network connection has been established. If not, wait a few more minutes and try again. Note the IP address for use during software installation. Example IP address: 192.168.0.1
- To print from a computer, continue with "6. Locate or download the software installation files." To print from a phone or tablet only, continue with "8. Mobile and wireless printing (optional)."
2-line control panels
- To connect the printer to a wireless (Wi-Fi) network, make sure that the printer, access point, and computer are turned on and that the computer is connected to the wireless network.
- A USB cable will be required.
- Disconnect any USB or Ethernet cable that is connected to the printer.
- To print from a computer, continue with "6. Locate or download the software installation files." To print from a phone or tablet only, continue with "8. Mobile and wireless printing (optional)."

NOTE: During software installation, select the option to Help me set up a first-time wireless connection.
1 Manually configure the IP address
See the printer user guide for information on how to manually configure the IP address www. hp. com/support/ljM129MFP.
6. Locate or download the software installation files

Method 1: Download HP Easy Start (Windows and OS X)
- Go to 123.hp.com/laserjet, and click Download.
- Follow the on-screen instructions and prompts to save the file to the computer.
- Launch the software file from the folder where the file was saved, and continue with "7. Install the software."

Method 2: Download from the printer support website (Windows and OS X)
- Go to www.hp.com/support/ljM129MFP.
-
Select Software and drivers.
-
Download the software for your printer model and operating system.
- Launch the software file from the folder where the file was saved, and continue with "7. Install the software."

Method 3: Install from the printer CD (Windows only)
- Insert the printer CD into the computer.
- Continue with "7. Install the software."
7. Install the software
Windows solution
- Insert the printer CD into the computer, or launch the software installation file downloaded from the web.
- The software installer detects the language of the operating system, and then it displays the main menu of the installation program in the same language. When installing from the CD, if the installer program does not start after 30 seconds, browse the CD drive on the computer, and then launch the file named SETUP.EXE.
- Follow the on-screen instructions to install the software.
-
When prompted to select a connection type, select the appropriate option for the type of connection:
-
Directly connect this computer using a USB cable
- Connect through a network
- Help me set up a first-time wireless connection

NOTE: When connecting through a network, the easiest way to detect the printer is to select Automatically find my product on the network.
OS X solution
Mac users can click the link on the CD, or go directly to 123. hp.com and download HP Easy Start to install the printer software.
- Go to 123.hp.com.
- Enter HP LaserJet Printers.
- Click Begin, and then click Download to download HP Easy Start.
- Open HP Easy Start, and then follow the on-screen instructions.
Readiris Pro for HP
Download this free software to enable extra scanning features, including Optical Character Recognition (OCR).
To download the software from the web, go to: www.hp.com/support/ljM129MFP
Select Drivers, select the appropriate operating system, and then click Next. Click Application - 3rd Party, and then click the Download button.
8. Mobile and wireless printing (optional)
8.1 Connect the device to the wireless network
To print from a phone or tablet, connect the device to the same wireless network as the printer.
Apple iOS devices (AirPrint)
Open the item to print, and select the Action icon. Select Print, select the printer, and then select Print.
Newer Android devices (4.4 or newer)
Open the item to print, and select the Menu button. Select Print, select the printer, and select Print.
Some devices require downloading the HP Print Service plugin app from the Google Play store.
Older Android Devices (4.3 or older)
Download the HP ePrint app from the Google Play store.
Windows Phone
Download the HP AiO Remote app from the Windows Store.
1 Learn more about mobile printing
To learn more about other mobile printing options, including additional ePrint solutions, scan the QR code, or see the "Mobile printing" section of the user guide.

8.2 Wi-Fi Direct
(wireless models only)
Wi-Fi Direct enables close-proximity printing from a wireless mobile device directly to an Wi-Fi Direct-enabled printer without requiring a connection to a network or the Internet.
Enable Wi-Fi Direct
To enable Wi-Fi Direct from the control panel, complete the following steps.
- 2-line control panels: On the printer control panel, press the Setup button, and then open the Network Setup menu. Touchscreen control panels: From the Home screen on the printer control panel, select the Connection Information 品 /(q) button.
- Open the following menus:
Wi-Fi Direct
- Settings (touchscreen control panels only)
On/Off
- Touch the On menu item. Touching the Off button disables Wi-Fi Direct printing.
For more information on wireless printing and wireless setup, go to www.hp.com/go/wirelessprinting.
Discover the printer
- From the mobile device, turn on the Wi-Fi, and search for wireless networks.
- Select the printer, which will show up as 'HP-Print-model-name' as shown on the printer control panel. Example printer name: HP-Print29-AJ OJP 8620
9. Set up HP ePrint via email (optional)
Use HP ePrint via email to print documents by sending them as an email attachment to the printer's email address from any email enabled device, even from devices that are not on the same network.
To use HP ePrint via email, the printer must meet these requirements:
- The printer must be connected to a wired or wireless network and have Internet access.
HP Web Services must be enabled on the printer, and the printer must be registered with HP Connected.
Enable HP Web Services
2-line LCD control panel
-
Once the printer is connected to a network, enter the printer's network IP address into a web browser. Use one of the following options to find the printer IP:
-
Go to "Find printer IP address," in this getting started guide
Refer to the user guide -
On the web page that appears, click the HP Web Services tab.
- Review and accept the terms of use, and then click the Enable button.
Touchscreen control panel
- From the Home screen on the printer control panel, touch the Web Services button.
- Touch the Enable Web Services button. The printer enables Web Services, and then prints an information page. The information page contains a printer code necessary to register the HP printer at HP Connected.
- Go to www.hpcconnected.com to create an HP ePrint account and complete the setup process.
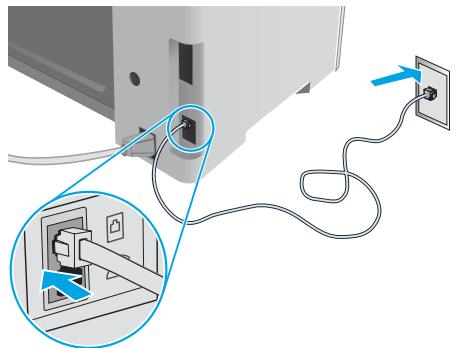
10. Set up fax (fax models only - optional)
10.1 Connect the printer
The printer is an analog device. HP recommends using the printer on a dedicated analog telephone line.
NOTE: Some countries/regions might require an adapter for the phone cord that came with the printer.
Connect the phone cord that came with the printer to the Fax port on the printer and to the telephone jack on the wall.
1 How do I connect an answering machine or extension phone?
- Remove the plug from the phone port
- Disconnect the answering machine phone cord from the phone jack, and then connect it to the phone port on the printer.
- Connect the phone cord that came with the printer to the fax port on the printer and to the telephone jack on the wall.

How do I set up HP printers in digital phone environments?
HP printers are designed specifically for use with traditional analog phone services. For a digital phone environment (such as DSL/ADSL, PBX, ISDN, or VoIP), digital-to-analog filters or converters might be necessary when setting up the printer for fax.
Note: Depending on the phone company, the printer might not be compatible with all digital service lines or providers, in all digital environments, or with all digital-to-analog converters. Contact the phone company to determine which setup options are best.
Note: When setting up ring pattern detection in a PBX phone system that has different ring patterns for internal and external calls, make sure to dial the printer fax number using an external number for recording the ring pattern.
10.2 Configure the printer
Configuring the fax time, date, and header settings is required to use the fax feature.
HP Fax Setup Wizard (Windows)
- Click Start, and then click Programs.
- Click HP, click the name of the printer, and then click Fax Setup Wizard.
- Follow the on-screen instructions to configure the fax settings.
2-line LCD control panel
- On the printer control panel, press the Setup button.
- Select System Setup, and then select Time/Date.
- Select Time/Date.
- Select the 12-hour or 24-hour.
- Use the keypad to enter the current time, and then press the OK button.
- Select the date format.
- Use the keypad to enter the current date, and then press the OK button.
- From the Setup menu, select Fax Setup, and then select Fax Header
- Use the keypad to enter the fax number, and then press the OK button.
NOTE: The maximum number of characters for the fax number is 20.
- Use the keypad to enter your company name or header, and then press the OK button.
NOTE: The maximum number of characters for the fax header is 40.
Touchscreen control panel
- From the Home screen on the printer control panel, touch the Setup button.
- Select Fax Setup, and then select Basic Setup.
- Select Time/Date.
- Select the 12-hour or 24-hour.
- Use the keypad to enter the current time, and then touch the OK button.
- Select the date format.
- Use the keypad to enter the current date, and then touch the OK button.
- Select Fax Header.
- Use the keypad to enter the fax number, and then touch the OK button.
NOTE: The maximum number of characters for the fax number is 20.
- Use the keypad to enter your company name or header, and then touch the OK button. To enter special characters that are not on the standard keypad, touch the @#$ button to open a keypad that contains special characters.
NOTE: The maximum number of characters for the fax header is 40.
1 Learn more!
For more information about other ways to send faxes, such as scheduling a fax to be sent later or sending faxes from a computer, see the user guide on the printer CD, or go to: www.hp.com/support/ljM129MFP
11. Use the scan feature
Use the HP Scan software on your computer to start a scan job at the printer.
Windows
Open HP Printer Assistant, select Scan, and then select Scan a Document or Photo.
OSX
Click Applications, select HP, and then select HP Easy Scan.
User guide
The user guide includes printer usage and troubleshooting information. It is available on the printer CD and on the web:
- Go to:
www.hp.com/support/ljM129MFP - Select the appropriate language, and then select the printer if prompted to, and then click User Guides.
For Windows, the user guide is copied to the computer during the recommended software installation.
WindowsXP,WindowsVista,andWindows7
Click Start, select Programs or All Programs, select HP, select the folder for the HP printer, and then select Help.
Windows 8
On the Start screen, right-click an empty area on the screen, click All Apps on the app bar, click the icon with the printer's name, and then select Help.
Check for firmware updates
- Go to:
www.hp.com/support/ljM129MFP
- Select a printer or category from the list, and then click Drivers.
- Select the operating system, and click the Next button.
- Select Firmware, and click the Download button.
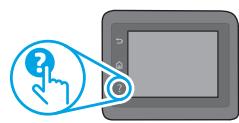
Control panel help (touchscreen models only)
Touch the Help? button on the printer control panel to access help topics.
Additional support resources
For HP's all-inclusive help for the printer, go to: www.hp.com/support/ljM129MFP
- Solve problems
Find advanced configuration instructions
Download software updates - Join support forums
Find warranty and regulatory information - Access mobile printing resources

Wired (Ethernet) network connection (optional)
- Verify that the printer is attached to the correct network port using a cable of the correct length.
- Verify that the lights next to the network port are lit.
- Verify that the print driver is installed on the computer.
- Test the network connection by pinging the network:
Windows
Click Start > Run. Type cmd, and press ENTER. Type ping, type a space, type the printer IP address, and then press ENTER. Example IP address: 192.168.0.1. To find the printer IP, see "Find the printer IP address."
OSX
Open the Network Utility, and type the IP address in the ping pane. Press ENTER. Example IP address: 192.168.0.1. To find the printer IP, see "Find the printer IP address."
- If the window displays round-trip times, the network is working.
- If the ping does not work, try restarting the printer and recheck all of the connection steps.

Wireless network connection (wireless models)
- Verify that the network cable is not connected. The printer cannot connect to a wireless network when a network cable is connected.
- Verify that the printer and wireless router are turned on and have power. Also make sure the wireless switch is turned on.
- Verify that the printer is within the range of the wireless network. For most networks, the printer must be within 30m (100 ft) of the wireless access point (wireless router).
- Verify that the print driver is installed on the computer.
- Verify that the computer and printer connect to the same wireless network.
- For Mac, verify that the wireless router supports Bonjour.
- Restart the wireless router.

Fax troubleshooting (fn, fp, and fw models only)
Verify the physical connection
- Verify that the phone cord is connected to the fax port on the back of the printer and to the wall jack.
- For an extension phone or other additional device, verify the phone cord is connected to the telephone port on the back of the printer and to the device.
- If outgoing phone calls fail because no dial tone is detected or the line is busy, connect to a different phone line.
- For Fax over IP service, reduce the Fax Speed, and turn off Error Correction Mode from the Fax Settings menu on the printer control panel.
Verify the printer fax settings
- To use a voice-mail service from the phone company or service provider, make sure that the printer Rings to Answer setting is set to be fewer rings than the telephone answering machine.
- If multiple phone numbers are assigned to the same physical phone line and the line is shared by multiple devices, make sure that the printer is set to the correct distinctive ring setting. Use a setting in which the printer answers faxes and ignores other ring types.
- Configuring the Fax Speed setting to Medium(V.17) or Slow (V.29) can also improve your ability to send a fax.

www.hp.com/support/ljM129MFP

www.registerer. hp.com

IMPORTANT :
Activer Wi-Fi Direct
www.hp.com/support/ljM129MFP

www.registerer.hp.com
www.hp.com/support/ljM129MFP

www.registerer.hp.com
Para fazer download do softwareILA Web, acesse: www.hp.com/support/ljM129MFP
Copyright 2016 HP Development Company, L.P.
Reproduction, adaptation or translation without prior written permission is prohibited, except as allowed under the copyright laws.
The information contained herein is subject to change without notice.
The only warranties for HP products and services are set forth in the express warranty statements accompanying such products and services. Nothing herein should be construed as constituting an additional warranty. HP shall not be liable for technical or editorial errors or omissions contained herein.
Trademark Credits
Windows® is a U.S. registered trademark of Microsoft Corporation.
Apple and the Apple logo are trademarks of Apple Inc., registered in the U.S. and other countries.
OS X is a trademark of Apple Inc., registered in the U.S. and other countries.
AirPrint is a trademark of Apple Inc., registered in the U.S. and other countries.
FCC Regulations
This equipment has been tested and found to comply with the limits for a Class B digital device, pursuant to Part 15 of the FCC rules. These limits are designed to provide reasonable protection against harmful interference in a residential installation. This equipment generates, uses, and can radiate radio-frequency energy. If this equipment is not installed and used in accordance with the instructions, it may cause harmful interference to radio communications. However, there is no guarantee that interference will not occur in a particular installation. If this equipment does cause harmful interference to radio or television reception, which can be determined by turning the equipment off and on, correct the interference by one or more of the following measures:
Reorient or relocate the receiving antenna.
- Increase separation between equipment and receiver.
- Connect equipment to an outlet on a circuit different from that to which the receiver is located.
- Consult your dealer or an experienced radio/TV technician.
Any changes or modifications to the product that are not expressly approved by HP could void the user's authority to operate this equipment. Use of a shielded interface cable is required to comply with the Class B limits of Part 15 of FCC rules. For more regulatory information, see the electronic user guide. HP shall not be liable for any direct, indirect, incidental, consequential, or other damage alleged in connection with the furnishing or use of this information.
www.hp.com
© Copyright 2016 HP Development Company, L.P.