
PFA01 - Digital photo frame GENUIS - Free user manual and instructions
Find the device manual for free PFA01 GENUIS in PDF.

User questions about PFA01 GENUIS
0 question about this device. Answer the ones you know or ask your own.
Ask a new question about this device
Download the instructions for your Digital photo frame in PDF format for free! Find your manual PFA01 - GENUIS and take your electronic device back in hand. On this page are published all the documents necessary for the use of your device. PFA01 by GENUIS.
USER MANUAL PFA01 GENUIS
Symbol for Separate Collection in European Countries
This symbol indicates that this product is to be collected separately.
The following apply only to users in European countries:

- This product is designated for separate collection at an appropriate collection point. Do not dispose of as household waste.
- For more information, contact the retailer or the local authorities in charge of waste management.
Important Notice
The Digital Photo Frame has been thoroughly tested to be certain it meets our own exacting quality control standards. Please take a few moments to review the following important information before using it.
For your safety
CAUTION
- TO REDUCE THE RISK OF ELECTRIC SHOCK, DO NOT REMOVE COVER OR BACK. THERE ARE NO USER-SERVICEABLE PARTS INSIDE.
- TO DEDUCE THE RISK OF FIRE OR ELECTRIC SHOCK, DO NOT EXPOSE THIS UNIT TOWATER OR MOISTURE.

The lightning flash with arrow-head symbol within an equilateral triangle is intended to alert the user to the presence of insinuated "dangerous voltage" within the unit's enclosure that may be of sufficient magnitude to constitute a risk of electric shock.

The exclamation point within an equilateral triangle is intended to alert the user to the presence of important operating and maintenance (servicing) instructions in the literature accompanying the unit.
IMPORTANT SAFETY INSTRUCTIONS
All the safety and operating instructions should be read, adhered to and followed before the unit is operated.
DANGER
To reduce the risk of electric shock, burns, fire or injury:
- Always unplug the unit from the electrical outlet immediately after using.
- Do not use while bathing or in a shower.
- Do not place or store unit where it can fall or be pulled into a tub or sink.
- Do not place in or drop into water or other liquid.
- Do not reach for unit that has fallen into water.
- Care should be taken so that objects do not fall and liquids are not spilled onto the unit.
WARNING
- Close supervision is necessary when this unit is used by or near children.
- Use this unit only for its intended use as described in this manual.
- Unplug this unit during lightning storms or when unused for long periods of time.
- Never drop or insert an object into any opening.
- Protect the power cord from being walked on or pinched, particularly at plug outlets, convenience receptacles, and the point where it exits the unit.
- Do not allow cord to touch hot surfaces. Wrap cord loosely around the unit when storing.
- The unit should be situated away from direct sunlight or heat sources, such as radiator, electric heaters, heat registers, stoves, or other units (including amplifiers) that product heat. Avoid placing on top of stereo equipment that radiates heat.
- Never block the air openings of the unit with materials such as a bed or couch, where the air openings may be blocked.
- Do not overload electrical outlet. Use only the power source as indicated.
- Do not carry this unit by cord or use cord as handle.
- Never operate this unit if it has a damaged cord or plug, if it is not working properly, or if it has been dropped or damaged or drooped into water. If the unit's power supply cord or plug is damaged, do not attempt to fix it by yourself.
- To avoid the risk of electrical shock, do not disassemble or attempt to repair the unit. Incorrect repair can cause risk of electrical shock or injury to persons when unit is used.
- Do not operate in the presence of explosive and/or flammable fumes.
Introduction
Features Overview
10.4-inch Digital TFT LCD with 128MB flash memory
- Photo playback without pixel limitation (JPG/BMP)
Different photo slide show: Single or multi-photos(up to 4 photos on one screen)
- Nine thumbnails preview (3x3)
- Delete & Copy photo function
- Resize photo when copying photos from card to internal flash memory.
- Different slide show speed: 5sec/10sec/30sec/1min/41hr/2hr/3hr/4hr
Supports photo rotation: 90^ / 180^ / 270^
Supports MP3 music playback
Supports Motion-JPEG playback
Calendar and Real Time Display function
Built-in speaker
- Sleep mode function to increase the life of backlight (30 min /1hr /2hr /4hr/8h)
Ps. Card capacity:
| MMC:~1G | MS:~1G | MD:~4G |
| SD:~2G | CF:~4G |
Package contents
Carefully unpack your package and make sure that you have the following items. In the event that any item is missing or if you find any mismatch or damage, promptly contact your dealer.
PF-A01
Quick guide
Remote control
USB cable
Stand
Power adapter
System requirements
- Intel Pentium III 200Hz CPU or above
- Minimum 40 MB hard disk space available
One free USB 1.1 port or higher - USB storage compatible with Windows 2K/XP/Vista, Linux 2.4.2
- CD-ROM drive
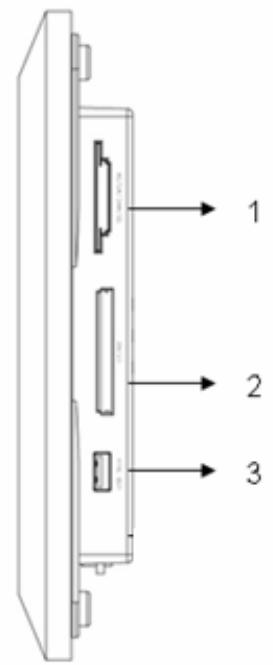
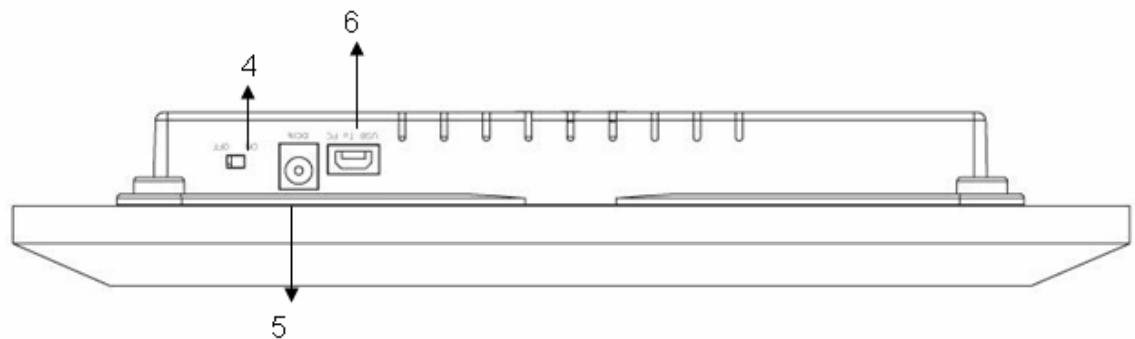
Product Overview
Product overview
- MEMORY CARD SLOT: SD/MMC/MS/ (for Secure Digital, MultiMedia Card, Memory Stick cards)
- MEMORY CARD SLOT: CF/MD (for Compact Flash and Microdrive cards)
- USB Stick
- Power Switch: On-Off
- 12V DC IN
- USB to PC port
LEFT SIDE
RIGHT SIDE

| Key | Function |
| Exit | Press to return to thumbnail /Set-up |
| Slide | Press for single slide show or multi-picture slide show |
| Display | Display real-time clock and calendar |
| Del | Press to delete the file |
| Copy | Press to copy the file from cards to internal memory |
| ▲、▼ | Press up or down to select the item |
| ▲、▲ | Press left or right to select the item |
| V+ V- | Enlarge or decrease sound volume |
| Mp3 | Press to play MP3 music |
| B | Press to adjust panel brightness |
| Pg Up Pg Dn | In Preview 9 photos (Thumbsails) Mode. Press to move to next / previous page. |
Basic Operation
Turning on/off
- Insert one end of the AC ADAPTER into 12V DC IN, and the other end into an electrical outlet.
- Push the power switch of the player to the ON position. The button is at the bottom of the back cover. The red POWER ON INDICATOR illuminates.
- After power on, if no memory cards and memory stick plugged in, or no photo stored in the built-in memory, the screen will show “Insert Memory Card or Memory Stick”, after you plug a memory card or memory stick then the screen displays preview (photbnails) 9 photos.
Insert cards or USB storage device
- Insert your memory card into CF/MD or SD/MS/SM/MMC card slot according to indicators on the memory card. The green PHOTO READER INDICATOR illuminates, and then plays photos.
- You can also plug a USB drive or USB data bank (mass storage Hard Drive) into the USB STICK PORT. This unit can play JPEG, MP3 and AVI (Motion-JPEG) format.
- If no operation occurs when you are in the nine preview photo mode, 30 seconds later the screen will auto display the Slideshow feature in five second intervals.
Up/Down/Left/Right
In Preview 9 photos (Thumbsnails) Mode
Press , , , button to move to the selected photo.
Under Single Photo Mode
Press "←" to rotate 90 degrees counter-clockwise for four directions.
Press “▶” to rotate 90 degrees clockwise for four directions.
MP3 playback
Press "MP3" button, the screen will show MP3 LIST.
Press to select song.
Set-up
(All operation buttons are on the remote control.)
Setup Manu: In Preview 9 photos (Thumbnails) Mode. Press Exit button to enter setup Manu.
- Slide Interval
Slide Interval: 5sec/10sec/30sec/1min/41hr/2hr/3hr/4hr (press "ENTER" to select).
- Multi Interval
3 / 6 / 12 / 30 sec (press "ENTER" to select).
- Sleep Interval
30 / 1 hr / 2 hr / 4hr/ 8hr / Off (press "ENTER" to select)
Music Repeat
ALL / ONE / NONE (press "ENTER" to select).
Volume:
1 to 9 (press "ENTER" to select).
- Set Date & Time
Date:YYYY/MM/DD
Time: HH: MM: SS
Press “ENTER” and either the , button to move to the selected item. Press , to adjust.
Note: You need to re-setup the Date & Time if you remove the power adaptor.
Press EXIT button again to return to Preview 9 photos (Thumbnails) Mode.