
MIX-R1U - Audio Mixer CORTEX - Free user manual and instructions
Find the device manual for free MIX-R1U CORTEX in PDF.
| Product Type | Audio Mixer |
| Brand | CORTEX |
| Model | MIX-R1U |
| Rack Format | 19 inches, 1U |
| Dimensions (device) | 44 x 483 x 133 mm (H x W x D) |
| Weight (device) | 1.8 kg |
| Power Supply | Universal 115/230-240 VAC, 60/50 Hz, 60 mA, class I |
| Microphone Inputs | 2 x (front XLR + rear 6.35 mm jack), balanced, with talkover |
| Line/Phono Inputs | 2 x RCA pairs, switchable PH/LN, RIAA preamp for phono |
| Master Output | Stereo balanced XLR |
| Auxiliary Output | 6.35 mm jack unbalanced |
| Record Output | RCA unbalanced |
| Equalization | 2-band parametric (bass/treble) per channel |
| VU Meter | 5 segments (-10/-5/0/+3/+6 dBu) with peak hold |
| Crossfader | Yes, for transition between channels |
| Headphone Pre-listening | 6.35 mm jack, adjustable level, channel selection |
| Cleaning | Slightly damp cloth, no chemical products |
| Warranty | 1 year (subject to conditions) |
| Chassis Material | Standard steel |
Frequently Asked Questions - MIX-R1U CORTEX
User questions about MIX-R1U CORTEX
0 question about this device. Answer the ones you know or ask your own.
Ask a new question about this device
Download the instructions for your Audio Mixer in PDF format for free! Find your manual MIX-R1U - CORTEX and take your electronic device back in hand. On this page are published all the documents necessary for the use of your device. MIX-R1U by CORTEX.
USER MANUAL MIX-R1U CORTEX
Now that you Own it...
Read it!
product manual
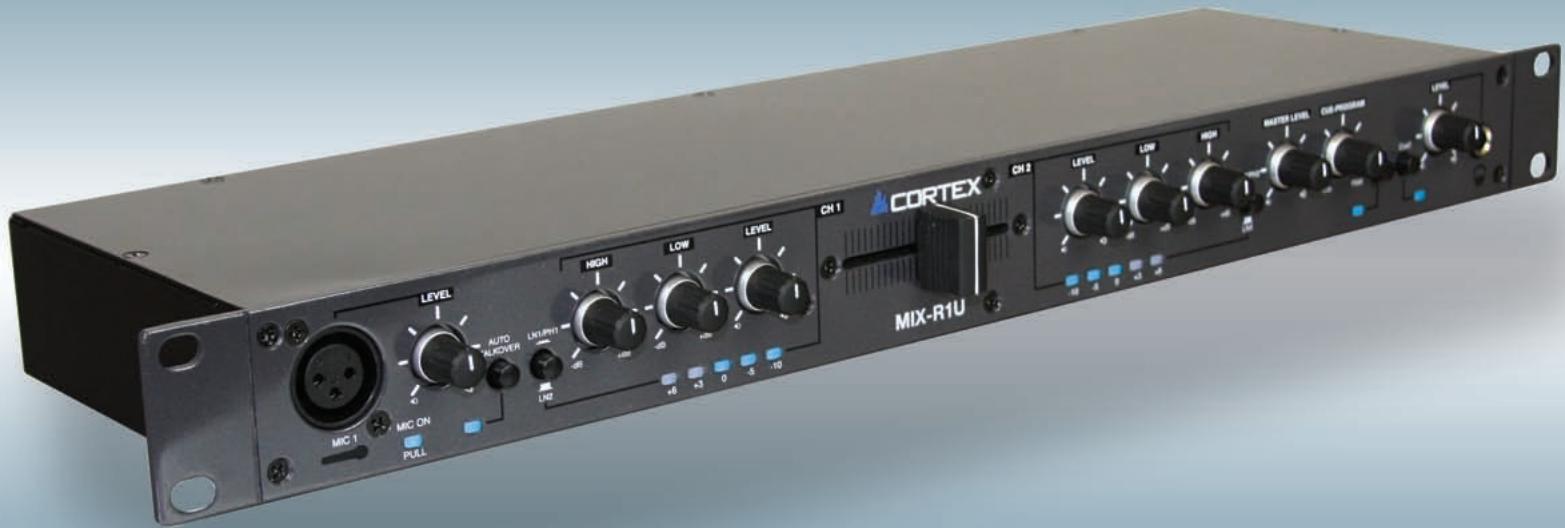
Table of Contents
Warnings and WEEE. 2
Introduction. 3
Features. 4-5
Connections. 6
Specifications. 7
Warranty. 8
IMPORTANT WARNING & SAFETY INSTRUCTIONS
PLEASE READ PRIOR TO OPERATING THIS DEVICE!
CAUTION: This product satisfies FCC regulations when shielded cables and connectors are used to connect the unit to other equipment. To prevent electromagnetic interference with electric appliances such as radios and televisions, use shielded cables and connectors for connections.
The exclamation point within an equilateral triangle is intended to alert the user to the presence of important operating and maintenance (servicing) instructions in the literature accompanying the appliance.
The lightning flash with arrowhead symbol, within an equilateral triangle, is intended to alert the user to the presence of uninsulated "dangerous voltage" within the product's enclosure that may be of sufficient magnitude to constitute a risk of electric shock to persons.
READ INSTRUCTIONS: All the safety and operating instructions should be read before the product is operated.
REtain INSTRUCTIONS: The safety and operating instructions should be retained for future reference.
HEED WARNINGs: All warnings on the product and in the operating instructions should be adhered to.
FOLLOW INSTRUCTIONS: All operating and use instructions should be followed.
CLEANING: The product should be cleaned only with a polishing cloth or a soft dry cloth. Never clean with furniture wax, benzine, insecticides or other volatile liquids since they may corrode the cabinet.
ATTACHMENTS: Do not use attachments not recommended by the product manufacturer as they may cause hazards.
WATER & MOISTURE: Do not use this product near water, for example, near a bathtub, wash bowl, kitchen sink, or laundry tub; in a wet basement; or near a swimming pool; and the like.
ACCESSORIES: Do not place this product on an unstable cart, stand, tripod, bracket, or table. The product may fall, causing serious injury to a child or adult, and serious damage to the product. Use only with a cart, stand, tripod, bracket, or table recommended by the manufacturer, or sold with the product. Any mounting of the product should follow the manufacturer's instructions, and should use a mounting accessory recommended by the manufacturer.
CART: A product and cart combination should be moved with care. Quick stops, excessive force, and uneven surfaces may cause the product and cart combination to overturn. SEE FIGURE A.

VENTILATION: Slots and openings in the cabinet are provided for ventilation and to ensure reliable operation of the product and to protect it from overheating, and these openings must not be blocked or covered. The openings should never be blocked by placing the product on a bed, sofa, rug, or other similar surface. This product should not be placed in a built-in installation such as a bookcase or rack unless proper ventilation is provided or the manufacturer's instructions have been adhered to.
POWER SOURCES: This product should be operated only from the type of power source indicated on the marking label. If you are not sure of the type of power supply to your home, consult your product dealer or local power company.
LOCATION: The appliance should be installed in a stable location.
NON-USE PERIODS: The power cord of the appliance should be unplugged from the outlet when left unused for a long period of time.
GROUNDING OR POLARIZATION:
-
If this product is equipped with a polarized alternating current line plug (a plug having one blade wider than the other), it will fit into the outlet only one way. This is a safety feature. If you are unable to insert the plug fully into the outlet, try reversing the plug. If the plug should still fail to fit, contact your electrician to replace your obsolete outlet. Do not defeat the safety purpose of the polarized plug.
-
If this product is equipped with a three-wire grounding type plug, a plug having a third (grounding) pin, it will only fit into a grounding type power outlet. This is a safety feature. If you are unable to insert the plug into the outlet, contact your electrician to replace your obsolete outlet. Do not defeat the safety purpose of the grounding type plug.
POWER-CORD PROTECTION: Power-supply cords should be routed so that they are not likely to be walked on or pinched by items placed upon or against them, paying particular attention to cords at plugs, convenience receptacles, and the point where they exit from the product.
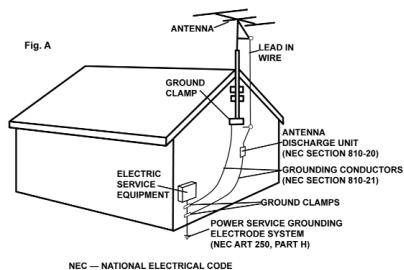
OUTDOOR ANTENNA GROUNDING: If an outside antenna or cable system is connected to the product, be sure the antenna or cable system is grounded so as to provide some protection against voltage surges and built-up static charges. Article 810 of the National Electrical Code, ANSI/NFPA 70, provides information with regard to proper grounding of the mast and supporting structure, grounding of the lead-in wire to an antenna discharge unit, size of grounding conductors, location of antenna-discharge unit, connection to grounding electrodes, and requirements for the grounding electrode. SEE FIGURE B.
LIGHTNING: For added protection for this product during a lightning storm, or when it is left unattended and unused for long periods of time, unplug it from the wall outlet and disconnect the antenna or cable system. This will prevent damage to the product due to lightning and power-line surges.
POWER LINES: An outside antenna system should not be located in the vicinity of overhead power lines or other electric light or power circuits, or where it can fall into such power lines or circuits. When installing an outside antenna system, extreme care should be taken to keep from touching such power lines or circuits as contact with them might be fatal.
OVERLOADING: Do not overload wall outlets, extension cords, or integral convenience receptacles as this can result in a risk of fire or electric shock.
OBJECT & LIQUID ENTRY: Never push objects of any kind into this product through openings as they may touch dangerous voltage points or short-out parts that could result in a fire or electric shock. Never spill liquid of any kind on the product.
SERVICING: Do not attempt to service this product yourself as opening or removing covers may expose

you to dangerous voltage or other hazards. Refer all servicing to qualified service personnel.
DAMAGE REQUIRING SERVICE: Unplug this product from the wall outlet and refer servicing to qualified service personnel under the following conditions:
- When the power-supply cord or plug is damaged.
- If liquid has been spilled, or objects have fallen into the product.
- If the product has been exposed to rain or water.
- If the product does not operate normally by following the operating instructions. Adjust only those controls that are covered by the operating instructions as an improper adjustment of other controls may result in damage and will often require extensive work by a qualified technician to restore the product to its normal operation.
- If the product has been dropped or damaged in any way.
- When the product exhibits a distinct change in performance, this indicates a need for service.
REPLACEMENT PARTS: When replacement parts are required, be sure the service technician has used replacement parts specified by the manufacturer or have the same characteristics as the original part. Unauthorized substitutions may result in fire, electric shock, or other hazards.
SAFETY CHECK: Upon completion of any service or repairs to this product, ask the service technician to perform safety checks to determine that the product is in proper operating condition.
WALL OR CEILING MOUNTING: The product should not be mounted to a wall or ceiling.
HEAT: The product should be situated away from heat sources such as radiators, heat registers, stoves, or other products (including amplifiers) that produce heat.
DISPOSAL: This product shall not be treated as household waste. Instead it shall be handed over to the applicable collection point for the recycling of electrical and electronic equipment. By ensuring this product is disposed of correctly, you will help prevent potential negative consequences for the environment and human health, which could otherwise be caused by inappropriate waste handling of this product. The recycling of materials will help to conserve natural resources. For more detailed information about recycling of this product, please contact your local city office, your household waste disposal service or the shop where you purchased the product.
Foreword
Thank you for purchasing our Cortex MIX-R1U. We are confident that the Cortex platform of products will not only make your life easier through the use of the latest advancements in cross-platform connectivity and sound reproduction but will raise the bar for DJ and pro audio products. With the proper care & maintenance, your unit will likely provide years of reliable, uninterrupted service. All Cortex products are backed by a 1-year limited warranty.
Preparing for First Use
Please insure that you find these accessories included with the MIX-R1U
Power Cord. 1
Operating instructions. 1
We Want You Listening For A Lifetime!


Dear Customer:
Selecting fine audio equipment such as the unit you have just purchased is only the start of your musical enjoyment. Now it's time to consider how you can maximize the fun and excitement your equipment offers. This Manufacturer and the Electronic Industries Association's Consumer Electronics Group want you to get the most out of your equipment by playing it at a safe level. One that lets the sound come through loud and clear without annoying blaring or distortion-and, most importantly, without affecting your sensitive hearing.
Sound can be deceiving. Over time your hearing "comfort level" adapts to higher volumes of sound. So what's sounds "normal" can actually be loud and harmful to your hearing. Guard against this by setting your equipment at a safe level BEFORE your hearing adapts.
To establish a safe level:
- Start your volume control at a low setting.
- Slowly increase the sound until you can hear it comfortably and clearly, and without distortion.
Once you have established a comfortable sound level:
- Set the dial and leave it there.
Taking a minute to do this now will help to prevent hearing damage or loss in the future. After all, we want you listening for a lifetime.
Used wisely, your new sound equipment will provide a lifetime of fun and enjoyment. Since hearing damage from loud noise is often undetectable until it is too late, This Manufacturer and the Electronic Industries Association's Consumer Electronics Group recommend you avoid prolonged exposure to excessive noise. This list of sound levels is included for your protection.
Decibel
Level Example
30 Quiet library,soft whispers
40 Living room, refrigerator, bedroom away from traffic
50 Light traffic, normal conversation, quiet office
60 Air conditioner at 20 feet, sewing machine
vacuum cleaner, hair dryer, noisy restaurant
80 Average city traffic, garbage disposals, alarm clock at two feet
THE FOLLOWING NOISES CAN BE DANGEROUS UNDER CONSTANT EXPOSURE
90 Subway, motorcycle, truck traffic, lawn mower
100 Garbage truck, chain saw, pneumatic drill
120 Rock band concert in front of speakers, thunderclap
140 Gunshot blast, jet plane
180 Rocket launching pad
Information courtesy of the Deafness Research Foundation.
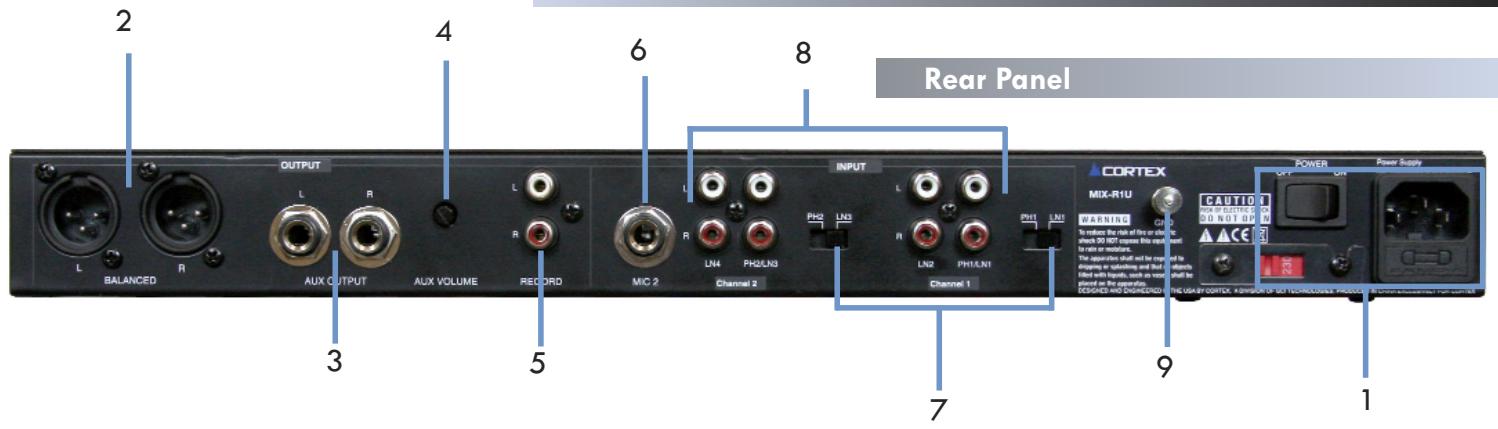
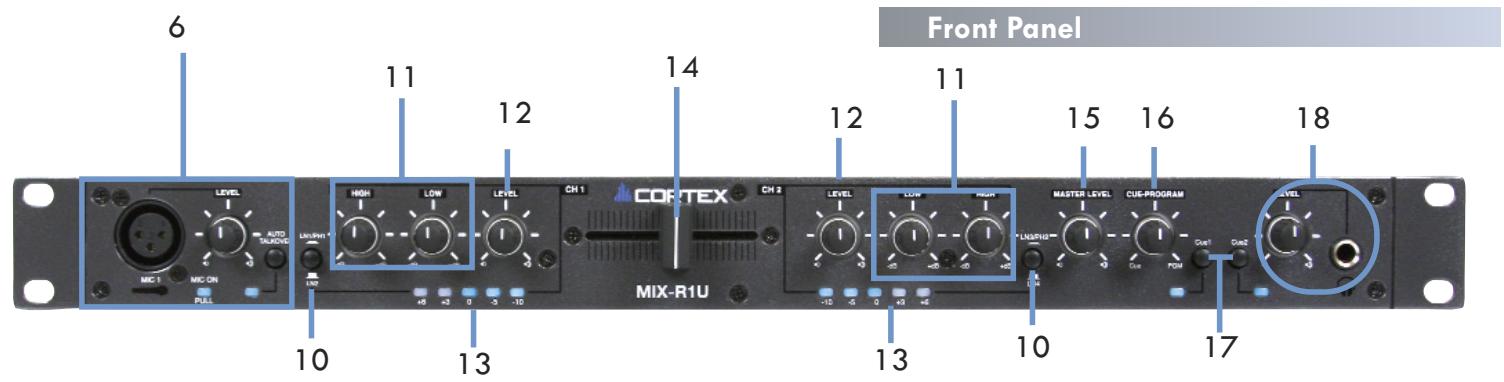
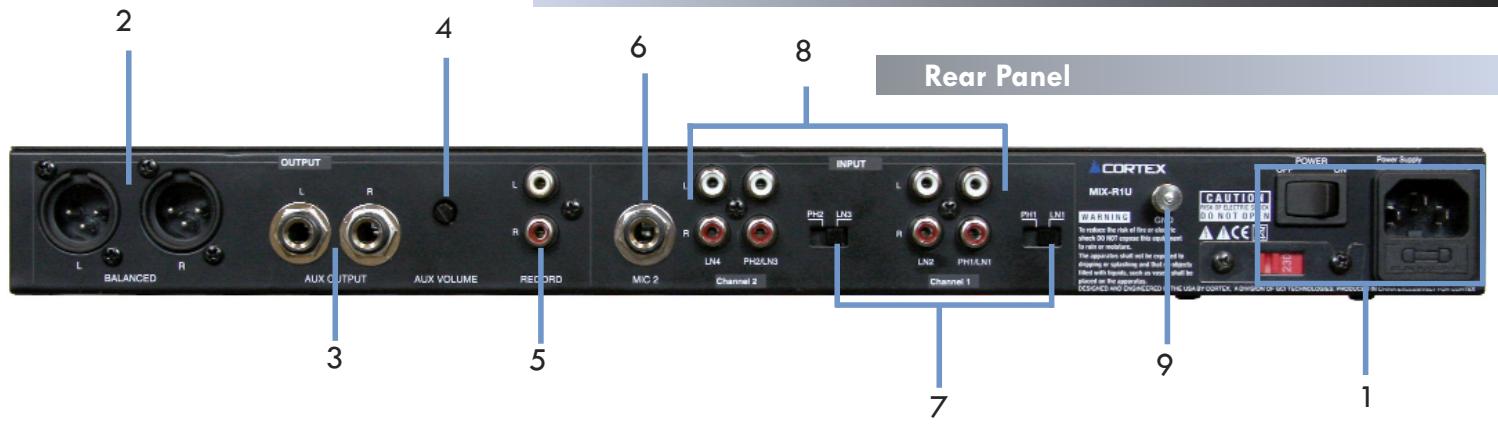
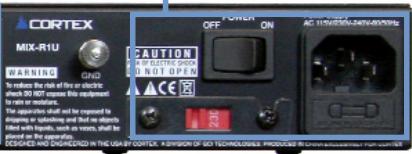
1. MAIN POWER INLET SWITCH
This section is for the AC power connection, The MIX-R1U comes with a standard 3 prong AC power cord and has an auto switching internal power supply. once hooked up properly you can switch the on off switch to the ON position.
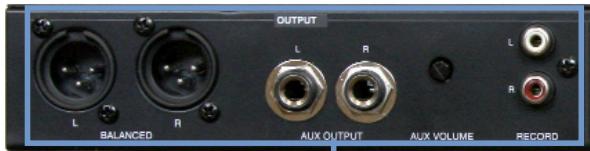
2. MAIN OUT L/R XLR CONNECTORS (BALANCED)
XLR type balanced stereo audio output. These connectors output audio signal generated from the MIX-R1U unit
3. AUX OUT L/R 1/4" CONNECTORS (UNBALANCED)
1/4" type unbalanced stereo audio output. These connectors output the main output signal of the MIX-R1U unit.
4. AUX OUTPUT VOLUME CONTROL
This mini rotary volume controls the AUX OUTPUT volume.
5. RECORD OUTPUT
A third output, with no volume control and set to output at a consistent level for recording. Use this to connect to a recording device.
6. MICROPHONE INPUTS
The MIX-R1U has two microphone inputs, one located on the front panel, and one on the back. Both are controlled by the same microphone volume control rotatry which is also located on the front panel. The volume rotary features an on/off switch built into its design, so when you pull the knob out it will "click" to the on position and the blue LED will turn on indicating the microphone channel is ON. There is also a TALKOVER switch which will lower the main volume when pressed allowing for better microphone clarity, a blue LED will illuminate indicating the TALKOVER is engaged.
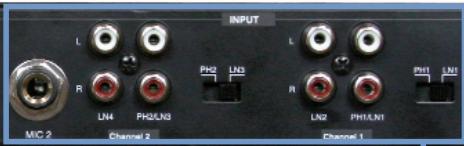
7. CONVERTIBLE PHONO/LINE SWITCHES
The MIX-R1U has 2 CONVERTIBLE PHONO/LINE (PH/LN) RCA SWITCHES. These small switches which are located to the right of the RCA inputs for channels 1 and 2 allow you to choose between a PHONO (Turntable) input or a LINE level (Mp3, CD, Tape player etc..).and require the proper switching. When switched to the PH position you may use any Turntable with a magnetic cartridge, remember to connect your ground wire (see GROUNDING SCREW) or there may be a system hum And when the switch is in the LN position you may connect any line level device as described before (Mp3, CD, Tape etc).
NOTE: CONNECTING A LINE LEVEL DEVICE TO A PH INPUT MAY CAUSE THAT MIXER CHANNEL TO OVERLOAD AND OR DISTORT.
8. CHANNEL INPUTS
Now you may plug the RCA's from your playable medium into each input to be connected to their respective CHANNELS (CH).
9. GROUNDING SCREW
When using a turntable(s), you will need to ground the RCA cable(s) by screwing in the grounding fork(s) to the GROUNDING SCREW located on the rear panel of the MIX-R1U.
10.CHANNEL INPUT SELECTOR
The CHANNEL INPUT SELECTOR switches allow you to choose which input will be controlled by that channels corresponding volume rotary.
For example on CHANNEL (1) the INPUT SELECTOR allows you to choose between PHONO 1/LINE 1 and LINE 2, and also on CHANNEL (2) the INPUT SELECTOR SWITCH allows you to choose between PHONO 2/ LINE 3 and LINE 4.
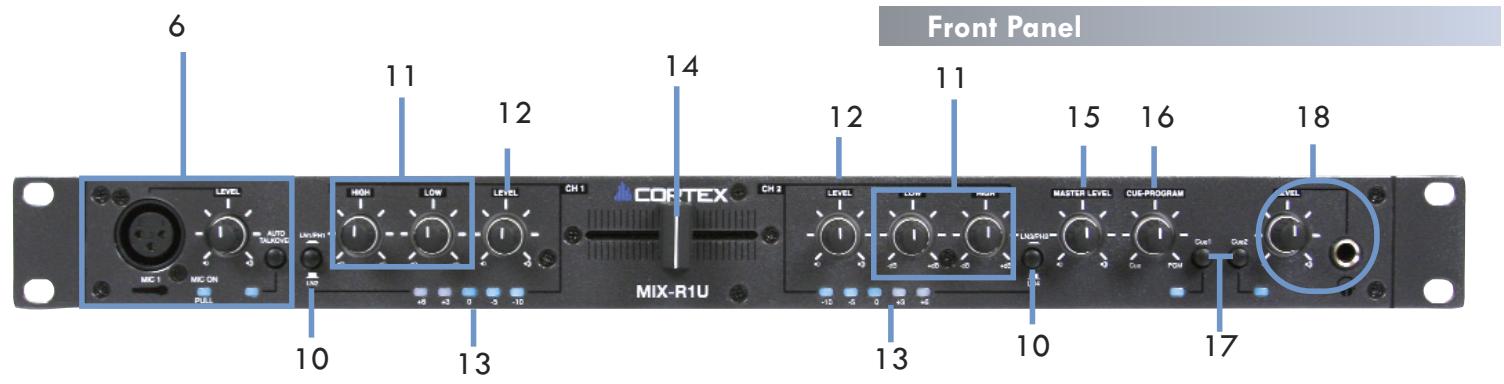
11. LINE EQ
The MIX-R1U has a 2 band EQ, the LOW rotary knob adjusts the gain of the BASS frequencies and the HIGH rotary knob adjusts the gain of the high frequencies
12. LINE LEVEL ROTARY
The Line level rotary is used to control the volume of each channel.
13. LINE VUMETER
The Line VU meter displays the individual channel output level using five segment bright blue LED's.
14. CROSSFADER
The CROSSFADER allows you to smoothly fade between channel one to channel two without having to use the CHANNEL rotary volume knob.
15. MASTER VOLUME ROTARY
Adjusts the the MAIN OUTPUT VOLUME but does not affect the AUX OUTPUT or the RECORD OUTPUT
16. CUE PROGRAM ROTARY
Adjusts the mix between the CUE OUTPUT and the MAIN OUTPUT. and works in conjunction with the HEADPHONE LEVEL rotary.
17. CUE SELECTOR SWITCHES
Select which channel will be sent to the CUE/PROGRAM MIX and can either both be pressed at the same time or individually allowing you to CUE (Listen)one channel while playing the other.
18. HEADPHONE INPUT AND VOLUME CONTROL
The MIX-R1U accepts a standard 1/4 connector which is controlled by its own volume level rotary knob. The headphone volume works in conjunction with the CUE/PROGRAM ROTARY and the CUE SELECTOR SWITCHES.
Preparing for Use
STEP THREE
After you have connected all the inputs and outputs properly you may then connect the AC CORD to the DC Inlet, found on the rear and turn on the unit.
STEP ONE
The MIX-R1U features a wide variety of output choices depending on your requirements, all outputs can be used simultaneously. Connect either the XLR type (BALANCED) audio output or the 1/4 type (UNBALANCED) audio outputs as well as the RECORD RCA type (UNBALANCED) audio outputs to a suitable source (see diagram below).
STEP TWO
The MIX-R1U has the ability to accept up to two analog sources. The input section consists of 4 analog RCA inputs, labeled PHONO 1/LINE 1, LINE 2, PHONO 2/LINE 3 and LINE 4. When used together with the Line/Phono switch on each channel, these can accept either a line level source (CD Player, Cassette Deck) or a Turntable with a Magnetic Cartridge. Set the switch to LINE if you wish to connect a Line Level source. Set the switch to PHONO if you wish to connect a Phono level Source. You may also connect a second microphone to the 1/4 MIC 2 input.
NOTE: BOTH MICROPHONES WILL BE CONTROLLED BY THE SAME LEVEL ROTARTY ON THE FRONT OF THE MIX-RIU.
Connections
AUDIO MIXER
Phono Inputs: 2 stereo pairs RCA jacks, RIAA curve. ±2 dB
Input Impedance .47k / 220pf, Gain 46 dB 1 kHz
Line Inputs: 2 stereo pairs RCA jacks
Input Impedance 20kohm 1 kHz, Gain 14 dB 1 kHz
Frequency Response 10-27 kHz (+0, -3 dB) Gain 10 dB, 2k load
Noise, Unity Gain. -82 dBu 20 kHz BW
Noise, Max Gain .-80 dBu 20 kHz BW, re +4 dBu
THD+N .0.05% 20 kHz BW, 20-20k Hz, +0 dBu
Crosstalk. < -70 dB 1 kHz
Control feed through. .80db 1khz
Tone Controls: . Two-band, shelving
Metering: (Dual mono). 5-segment -24, -12, 0, +12 dBu, peak responding
MIC Inputs........Balanced instrumentation XLR/1/4" TRS Jack
Input Impedance .511 Each leg to ground, 1 kHz
Gain . 50 dB 1 kHz
Frequency Response .20-20k Hz (+0, -3dB) Gain 50 dB
Equivalent Input Noise. 111 dBu 150 ohm source, gain 50 dB
Common Mode Rejection. >40 dB 150 ohm source, gain 50 dB, 1 kHz
House / Aux. Outputs.... Stereo Balanced, XLR and 1/4 TRS jacks
Output Impedance 102 ohm each leg, 1 kHz
Gain. 6 dB 1 kHz
Maximum Output. +26 dBu 1 kHz, 2 k ohm load
Record output. Stereo RCA jacks, unbalanced
Output Impedance. 300 ohm each leg, 1 kHz
Gain. 0 dB 1 kHz
Maximum output. +22dBu1kHz,2k ohm load
2. GENERAL
Universal Line Voltage. 115/230-240 VAC, 60/50Hz, 60MA, Class I
Agency Listing. UL/cUL/CE
Construction. All Steel Standard 19" x 1U rack-mount
Unit Size. 1.75"H x 19"W x 5.3"D 4.4 cm x 48.3 cm x 13.3 cm
Unit. Weight 4 lb 1.8 kg
Shipping Size. 4.25" x 20.3" x 13.75" 11 cm x 52 cm x 35 cm
Shipping Weight. 8 lb 3.6 kg
Should your Cortex product require warranty or non-warranty service in the USA, or if you wish to purchase replacement parts, operating instructions, or accessories, please contact GCI Technologies at the phone number listed below:
732-346-0061
Do not, under any circumstance, ship your product to GCI without first calling the Technical Support Department at the number listed above. Failure to establish an RMA (Return Merchandise Authorization) number prior to shipping your product will delay your repair indefinitely. GCI reserves the right to refuse all packages that arrive without an RMA number.
For warranty information, please refer to the warranty page included in this manual.
Once an RMA number is established, your unit should be sent to the address specified by your customer service representative, with the RMA clearly written on the outer carton:
For support or repair outside of the USA, please visit the Cortex website at http://www.cortex-pro.com.
Published by GCI Technologies Corporation
Copyright © 2007 GCI Technologies Corp.
All rights reserved.
Features & specifications subject to change without notice.

Cortex
intelligent. sound.
Cortex products are designed and manufactured to the highest standards in professional audio. With proper care and maintenance, your product will provide years of reliable service. Please register your product online at http://www.cortex-pro.com
Limited Warranty:
In the USA, Cortex guarantees its products against defects in workmanship for the period of One (1) year* from the original date of purchase.
This limited warranty does not cover damage or failure caused by abuse, misuse, abnormal use, faulty installation, improper maintenance or any repairs other than those provided by an authorized service center.
There are no obligations of liability on the part of GCI, Cortex, or any of its retailers for consequential damages arising out of or in connection with the use or performance of the product or other indirect damages with respect to loss of property, revenues, profit, or costs of removal, installation, or reinstallation. All implied warranties for GCI, including implied warranties for fitness, are limited in duration to One (1) year from the original date of purchase, unless otherwise mandated by local statutes.
Returning Your Product for Service:
In the U.S.A., please call our helpful Customer Service Representatives at (732) 346-0061, and they will be happy to give you a Return Merchandise Authorization (RMA) number and the address of an authorized service center closest to you.
After receiving an RMA, include a copy of the original sales receipt, with defective product and a description of the defect. Send by insured freight to GCI Technologies Corporation, and use the address provided by your customer service representative. Your RMA must be written on the outside of the package, or processing will be delayed indefinitely! GCI reserves the right to refuse all packages that arrive without an RMA number.
Service covered under warranty will be paid for by GCI and returned to you. For non-warrantees products, GCI will repair your unit after payment is received. Repair charges do not include return freight.
Your warranty is valid only in the country where the unit has been purchased. Repairs performed outside of the country of purchase will be treated as out-of-warranty.
For warranty service, you pay for shipping to GCI; we pay for return shipping within the Continental United States. Alaska, Hawaii, Puerto Rico, Canada, Bahamas, and the Virgin Islands will be charged for freight.
Please allow 2-4 weeks for return of your product. Under normal circumstances your product will spend no more than 10 working days at GCI. We are not responsible for shipping times.
For repairs and warranty information outside of the USA, please call the GCI affiliate closest to where you reside, listed on the specifications page of this manual (page 18), or visit the Cortex website at http://www.cortex-pro.com.
- Unless otherwise mandated by local statutes.
For Your Records
Model Number of Product:
(HDC-1000, HDC-3000, MIX-R1U DMIX-300
Serial Number of Product:
found on rear panel of unit
Original Purchase Date:
Name of Retailer:
Tabla de Contenso
Tone Controls. 2-bandas, shelving
Metering: (Dual mono) 5-segment -10 -5, 0, +3, +6 dBu, peak responding
MIC Entrada...instrumentacion balanceada XLR/1/4" TRS Jack
Entrada Impedance. 511Ω Each leg to ground, 1 kHz
Gain. 50 dB 1 kHz
Frecuencia Response. 20-20k Hz (+0, -3 dB) Gain 50 dB
Equivalent entrada Noise. 111 dBu 150 source, gain 50 dB
Common Mode Rejection. >40 dB 150 Ω source, gain 50 dB, 1 kHz
House / Aux. Salidas.... Stereo Balanceadas, XLR y 1/4" TRS jacks
Salidas Impedance. 102 Ω each leg, 1 kHz
Gain. 6 dB 1 kHz
Maxima salute. +26 dBu 1 kHz, 2 kΩ load
Tape Salida... Stereo RCA jacks, no balanceadas
Salida Impedance. 300 Ω each leg, 1 kHz
Gain. 0 dB 1 kHz
Maxima salute. +22 dBu 1 kHz, 2 kΩ load
2. GENERAL
Linea de voltage. 115/230-240 VAC, 60/50Hz, 60MA, Class
1
Agency Listing. UL/cUL/CE
Construccion. All Steel Standard 19" x 1U rack-mount
dimensiones de la unidad.......1.75"H x 19"W x 5.3"D 4.4 cm x 48.3 cm x 13.3 cm
Peso de launidad. 4 Ib 1.8 kg
Dimensiones para envio. 4.25" x 20.3" x 13.75" 11 cm x 52 cm x 35 cm
Peso para envio. 8 lb 3.6 kg
Published by GCI Technologies Corporation
Copyright © 2007 GCI Technologies Corp.
All rights reserved.
Features & specifications subject to change without notice.

Cortex
intelligent. sound.
found on rear panel of unit
Fecha de Compra:
Published by GCI Technologies Corporation
Copyright © 2007 GCI Technologies Corp.
All rights reserved.
Features & specifications subject to change without notice.

Cortex
intelligent. sound.
2. MASTER OUT L/R XLR Anschlüsse (SYMMETRISCH)
Copyright © 2006 GCI Technologies Corp.


- Read it!
- Table of Contents
- IMPORTANT WARNING & SAFETY INSTRUCTIONS
- PLEASE READ PRIOR TO OPERATING THIS DEVICE!
- GROUNDING OR POLARIZATION:
- Foreword
- Preparing for First Use
- We Want You Listening For A Lifetime!
- Dear Customer:
- To establish a safe level:
- Once you have established a comfortable sound level:
- Decibel
- Level Example
- THE FOLLOWING NOISES CAN BE DANGEROUS UNDER CONSTANT EXPOSURE
- MAIN POWER INLET SWITCH
- MAIN OUT L/R XLR CONNECTORS (BALANCED)
- AUX OUT L/R 1/4" CONNECTORS (UNBALANCED)
- AUX OUTPUT VOLUME CONTROL
- RECORD OUTPUT
- MICROPHONE INPUTS
- CONVERTIBLE PHONO/LINE SWITCHES
- NOTE: CONNECTING A LINE LEVEL DEVICE TO A PH INPUT MAY CAUSE THAT MIXER CHANNEL TO OVERLOAD AND OR DISTORT.
- CHANNEL INPUTS
- GROUNDING SCREW
- 10.CHANNEL INPUT SELECTOR
- LINE EQ
- LINE LEVEL ROTARY
- LINE VUMETER
- CROSSFADER
- MASTER VOLUME ROTARY
- CUE PROGRAM ROTARY
- CUE SELECTOR SWITCHES
- HEADPHONE INPUT AND VOLUME CONTROL
- Preparing for Use
- STEP THREE
- STEP ONE
- STEP TWO
- Connections
- AUDIO MIXER
- GENERAL
- 732-346-0061
- Cortex
- intelligent. sound.
- Limited Warranty:
- Returning Your Product for Service:
- For Your Records
- Tabla de Contenso
- MASTER OUT L/R XLR Anschlüsse (SYMMETRISCH)
Brand : CORTEX
Model : MIX-R1U
Category : Audio Mixer