
DCC ROLLEIFLEX AF 5.0 - Camera MINOX - Free user manual and instructions
Find the device manual for free DCC ROLLEIFLEX AF 5.0 MINOX in PDF.
| Device Type | 5 MP digital camera |
| Sensor | 3 MP AF module |
| Image Quality | 2304 x 2304 (high resolution/interpolated), 1536 x 1536 (normal), 768 x 768 (low) |
| Lens | 4.9 mm F/2.8 AF |
| Focus Range | From 10 cm to infinity |
| Shutter Speed | From 1/15 to 1/2500 s (electronic control) |
| Exposure Adjustment | Automatic |
| White Balance | Automatic |
| Display | 1.1 inch TFT color display |
| Storage | Mini SD card (replaceable) |
| Image Format | JPEG |
| Power Supply | 1 CR2 Lithium battery |
| Automatic Power Off | After 60 seconds of inactivity |
| Dimensions (W x H x D) | 43 x 73 x 45 mm |
| Weight (including battery) | 100 g |
| Average battery life | Approximately 2 hours |
| Number of images (256 MB) | High resolution: approx. 250; Normal: approx. 430; Low: approx. 1300 |
| Shooting modes | Photo, Playback |
| Self-timer | Not specified |
| Maintenance and cleaning | Avoid moisture and dust; clean with a soft dry cloth; do not disassemble the device |
| Safety | Use only a CR2 battery; do not expose to fire; keep out of reach of children; do not short-circuit |
| Spare parts and repairability | CR2 battery, neck strap, mini SD card; contact MINOX customer service for repairs |
| General information | Miniature replica of the Rolleiflex 2.8 F; transport crank must be turned before each shot; autofocus |
Frequently Asked Questions - DCC ROLLEIFLEX AF 5.0 MINOX
User questions about DCC ROLLEIFLEX AF 5.0 MINOX
0 question about this device. Answer the ones you know or ask your own.
Ask a new question about this device
Download the instructions for your Camera in PDF format for free! Find your manual DCC ROLLEIFLEX AF 5.0 - MINOX and take your electronic device back in hand. On this page are published all the documents necessary for the use of your device. DCC ROLLEIFLEX AF 5.0 by MINOX.
USER MANUAL DCC ROLLEIFLEX AF 5.0 MINOX
Design subject to alterations without notice.
MINOX is a registered trademark of MINOX GmbH, Wetzlar.
D-35578 Wetzlar, Germany
Tel.: +49 (0) 6441 / 917-0
Fax: +49 (0) 6441 / 917-612
info@minox.com
www.minox.com
DCC RolleiFlex AF 5.0
Thank you for purchasing the new Rolleifflex MiniDigi AF 5.0 digital camera, a miniature replica of the famed Rolleifflex 2.8F twin-lens-reflex camera.
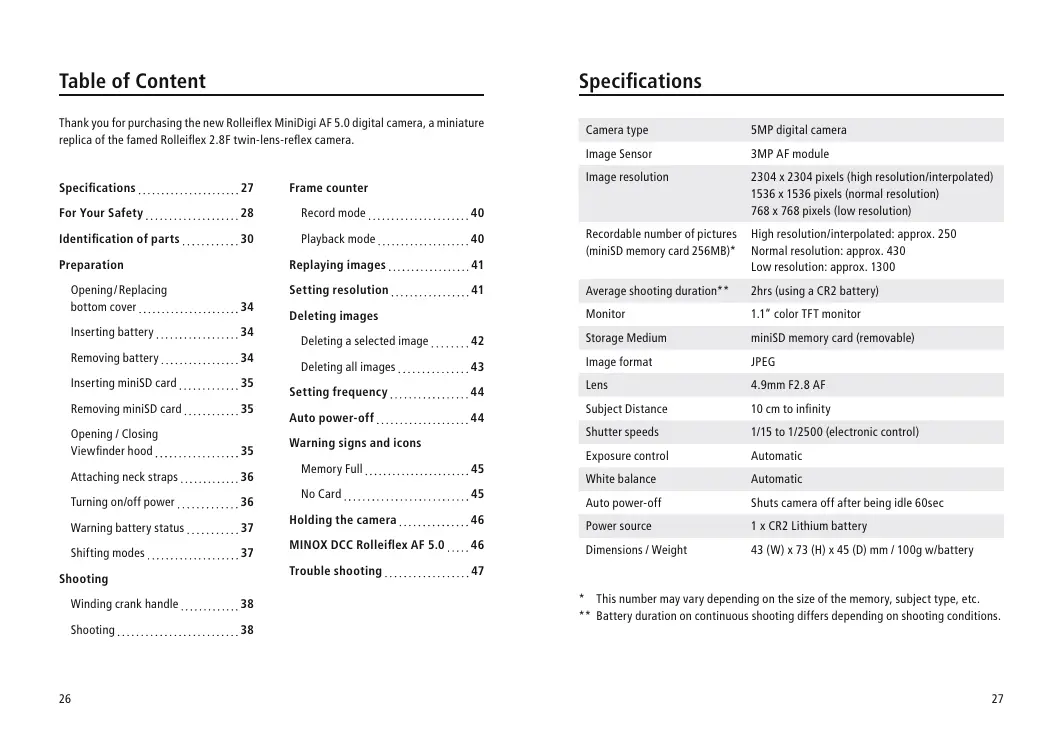
Specifications 27
For Your Safety 28
Identification of parts. 30
Preparation
Opening/Replacing
bottom cover 34
Inserting battery 34
Removing battery 34
Inserting miniSD card 35
Removing miniSD card 35
Opening / Closing
Viewfinder hood 35
Attaching neck straps. 36
Turning on/off power 36
Warning battery status 37
Shifting modes 37
Shooting
Winding crank handle 38
Shooting 38
Frame counter
Record mode 40
Playback mode 40
Replaying images 41
Setting resolution 41
Deleting images
Deleting a selected image 42
Deleting all images 43
Setting frequency 44
Auto power-off 44
Warning signs and icons
Memory Full 45
No Card. 45
Holding the camera 46
MINOX DCC Rolleiflex AF 5.0....46
Trouble shooting 47
Specifications
| Camera type | 5MP digital camera |
| Image Sensor | 3MP AF module |
| Image resolution | 2304 x 2304 pixels (high resolution/interpolated) 1536 x 1536 pixels (normal resolution) 768 x 768 pixels (low resolution) |
| Recordable number of pictures (miniSD memory card 256MB)* | High resolution/interpolated: approx. 250 Normal resolution: approx. 430 Low resolution: approx. 1300 |
| Average shooting duration** | 2hrs (using a CR2 battery) |
| Monitor | 1.1" color TFT monitor |
| Storage Medium | miniSD memory card (removable) |
| Image format | JPEG |
| Lens | 4.9mm F2.8 AF |
| Subject Distance | 10 cm to infinity |
| Shutter speeds | 1/15 to 1/2500 (electronic control) |
| Exposure control | Automatic |
| White balance | Automatic |
| Auto power-off | Shuts camera off after being idle 60sec |
| Power source | 1 x CR2 Lithium battery |
| Dimensions / Weight | 43 (W) x 73 (H) x 45 (D) mm / 100g w/battery |
- This number may vary depending on the size of the memory, subject type, etc.
** Battery duration on continuous shooting differs depending on shooting conditions.
For Your Safety
For the safe and correct use of your camera, please read the following notes carefully. Our warranty may be void for damage caused by willful disregard of the instructions.
The instruction alerts are to protect the user of the camera and people around him/her from possible damages and injuries. Caution and prohibition signs used in the booklet are shown on the right:

Caution
This mark indicates that the disregard of the notes may lead to fatal or serious injuries or substantial material damages.
This mark with additional symbols indicates prohibition of certain actions or processes specified in the notes.

Prohibition

Never use a battery other than specified in the manual.
Possible explosion and leakage could cause hazards and injuries.

When discarding a battery, insulate the poles with a piece of tape, etc. to prevent possible contact with metallic objects that could lead to ignition and/or explosion.

Insert battery correctly in the camera. Wrong polarity (+/-) could cause explosion and/or leakage of battery, possibly leading to hazards and injuries.

Keep removed battery out of children's reach. If swallowed, consult the doctor immediately as electrolyte within may seriously harm digestive organs.

Should the camera (battery) get hot, emit smoke or smell as if burning, stop using it immediately and contact our service department. Continued use may cause fire or burn.

Never throw in fire, short-circuit, break up or heat batteries, nor try to charge the ones not designed for recharge. This could lead to possible explosion and serious injuries.

Never try to disassemble the camera. High-voltage circuitry inside the camera could cause an electric shock.

Keep the camera out of the reach of infants and small children.
Camera s strap could wind itself round their necks, causing suffocation.

Store the camera away from moisture and dust. Do not store in high temperatures, as inside a closed car in summer, or close to a hot object.

Never operate the camera while driving a car, which could lead to a traffic accident.

When hanging the camera with the strap. Be careful the strap will not catch other objects, which could lead to injuries and hazards.

Should the camera dropped in water or water gets into it, remove the battery and contact our service department. Using it wet could cause fire or an electric shock.
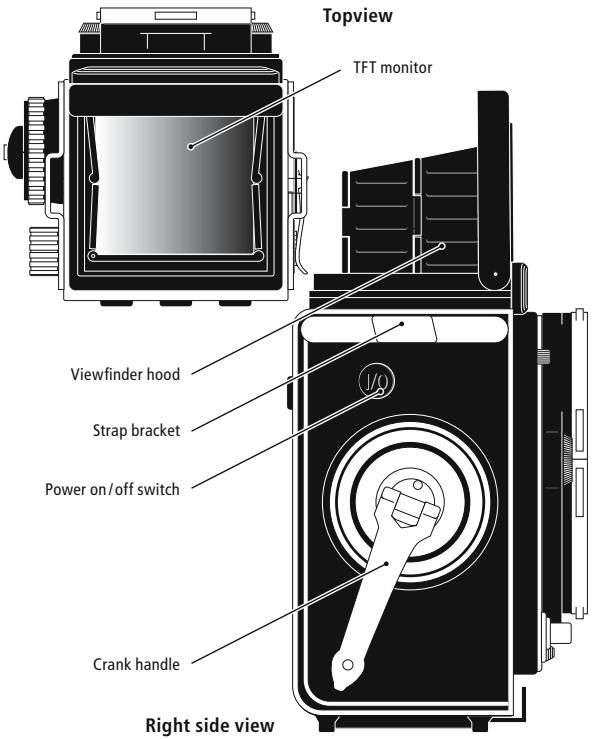
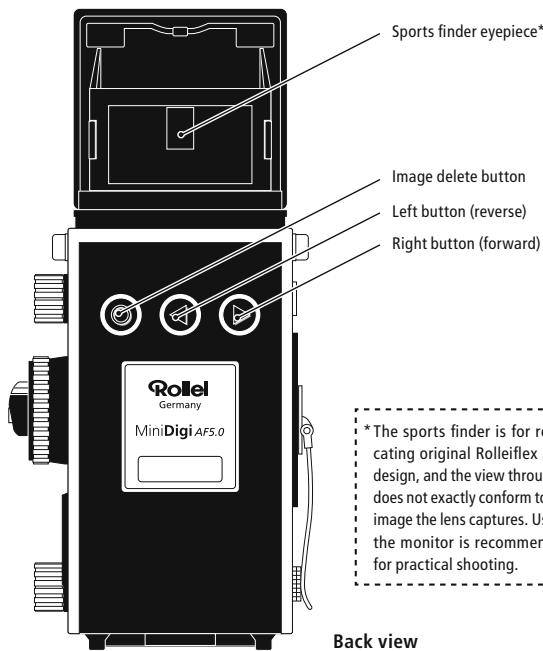
Back view
Preparation
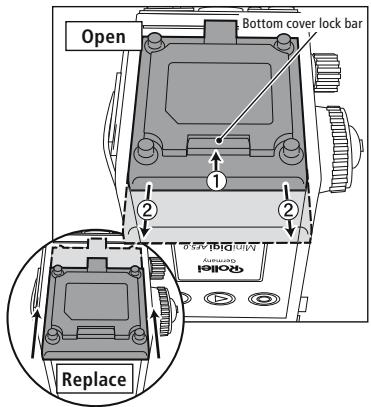
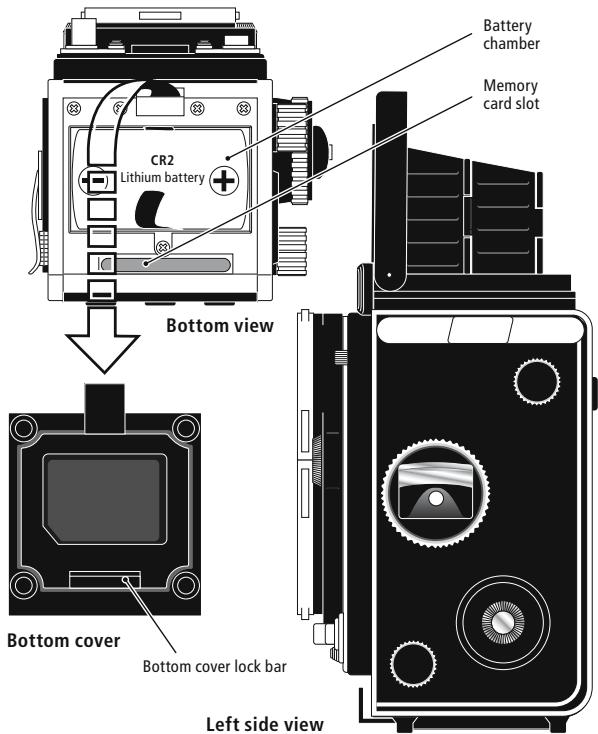
Opening Bottom cover
Remove the cover by sliding it to the direction of Arrow ② , while pushing the Bottom cover lock bar to the direction of Arrow ①
Replacing Bottom cover
Set the cover as shown and slide it toward the camera front (Arrows) till it clicks in place.
*The cover can be removed from the camera. Be careful not to misplace it!
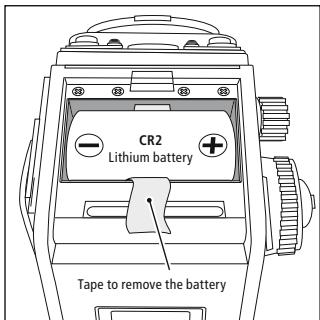
Inserting Battery
Put the battery as shown, minding the battery polarity (as shown), placing it over the tape so that the tip of the tape juts out.
Removing Battery
Pull the tape to remove the battery.
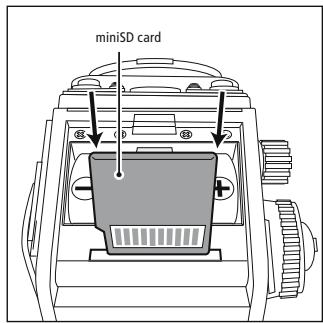
Inserting miniSD card
With the Bottom cover removed insert the card all the way as shown.
Removing miniSD card
Push the card further to make it spring back.

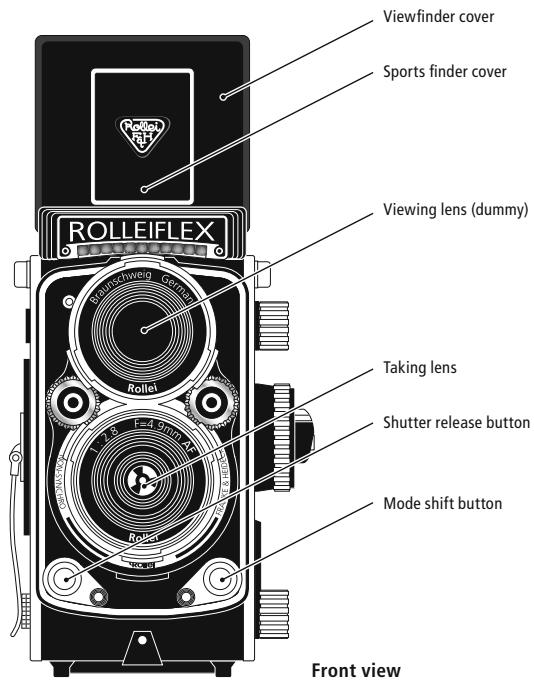
Opening Viewfinder hood
Hold both sides of Viewfinder cover as shown and lift the cover up ①.
Closing Viewfinder hood
Close the hood while pressing inward the hinges on both sides of the hood as shown ②.

Attaching Neck straps
① Put the string attached to the strap through a Strap bracket and let the strap go through the loop as shown.
② After attaching a strap to both brackets (right and left) put the straps together and adjust length as shown.
Warning battery status
When the battery is almost drained, the battery icon gives a warning signal by blinking (F). (Replacing the battery at this point with a new one is recommended.) Then, before the battery is completely drained, the icon flashes ( F) and the power is automatically turned off.
*When you do not use the camera for a long time, be sure to remove the battery from the camera in order to prevent battery drain.
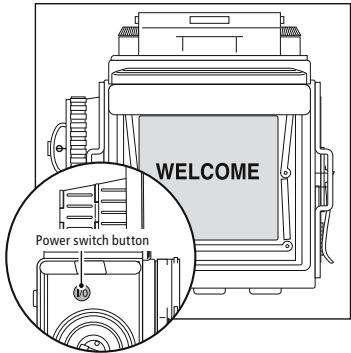
Turning on and off the power
Push the Power switch button to turn the camera on. WELCOME sign appears on the monitor. Another push on the button turns power off.
Power will be cut when the power source button is depressed continuously while the power source button is turned on.
- When the camera is idle for longer than 60sec, power will automatically be turned off.
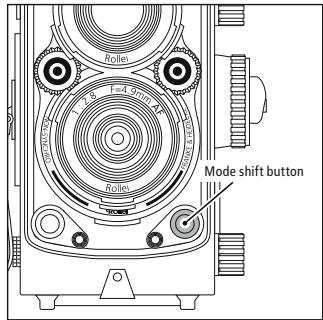
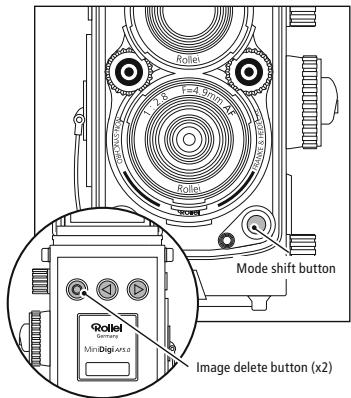
Shifting modes
Pushing Mode shift button will alternately shift the mode between Record and Playback.
- You cannot shift to Playback mode when no image is stored.
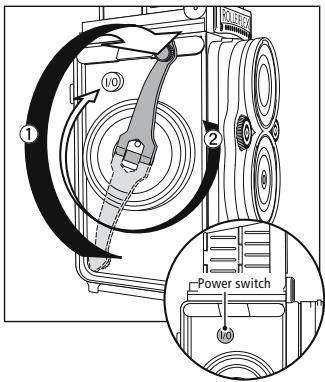
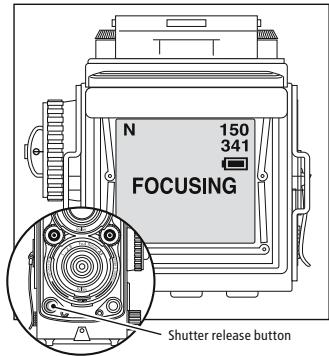
Winding Crank handle
Press Power switch to turn power on.
An image will appear on Monitor display in 1-2 sec.
Unfold Crank handle as shown (Arrow ①) and turn it 360^ clockwise (Arrow ②).
*Turn the handle before shooting each picture. Otherwise the shutter remains locked.
-
Focusing may take longer time under low light conditions.
-
Image may be captured even when the shutter button is not fully depressed, but crank handle may not be released in this case.
Shooting
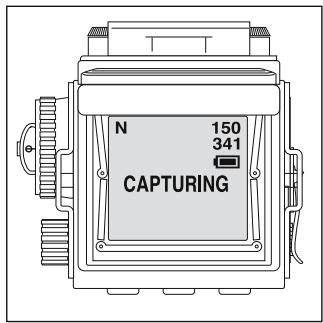
When composition is decided depress the shutter button all the way.
Display will show:
"FOCUSING"
↓
"CAPTURING"
↓
"SAVING"

About focus-lock
When the shutter release button is depressed, the "FOCUSING" signal is displayed once. Focusing is completed when the display disappears, and the camera is in a focus-lock condition. Remove your finger from the shutter release button to capture ("CAPTURING") and save the image ("SAVING").
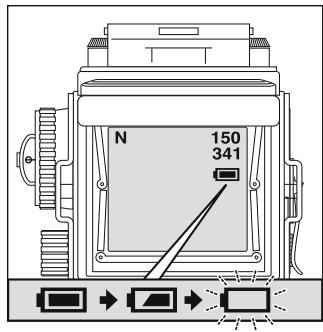
Frame counter
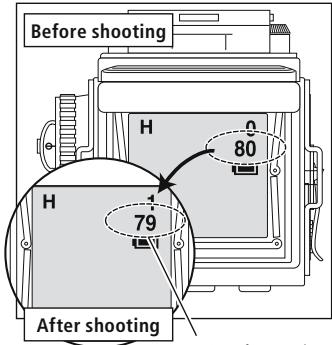
Maximum frame number allowing predicted capturing
Record mode
A frame counter is displayed in the right upper corner of the display when the camera is in a shooting mode. The upper number shows the total shot number and the lower number indicates the remaining number of frames, which is subtracted each time when the shutter is released.
- Since the function of the lower counter is calculated based on images with relatively low data compression ratios, depending upon photographic conditions, there may be a case that the number is not subtracted.
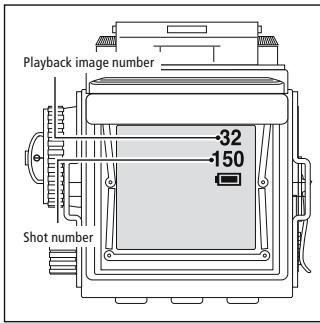
Playback mode
When the camera is in Playback mode, two numbers appear at upper right corner of the monitor. The upper one indicates the frame number of the image being played on the monitor. The lower one indicates total number of pictures taken.
Replaying images
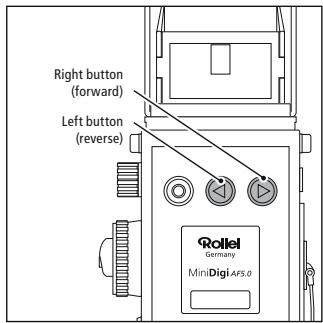
Press Mode shift button to set the camera to Playback mode and the last picture taken appears on the monitor.
Press Right button to advance pictures and Left button to reverse them.
Setting resolution
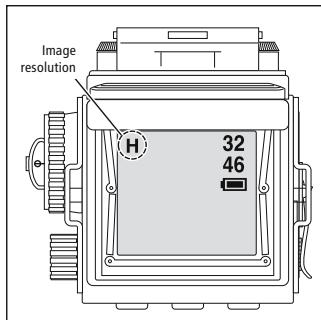
Remember to select the resolution setting each time you turn on the camera. The setting auto starts at "N" Normal resolution. With camera turned on in Record mode, press Right button to select image resolution which will appear upper left corner of the monitor in letters H, N and L. The letters stand for:
H = High resolution at 2304× 2304 pixels (interpolated)
N = Normal resolution at 1536 x 1536 pixels
L = Low resolution at 768× 768 pixels
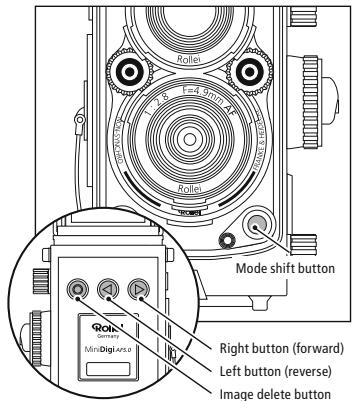
Deleting selected image
Press Mode shift button to set the camera to Playback mode.
Select the image to be deleted with Left and Right buttons.
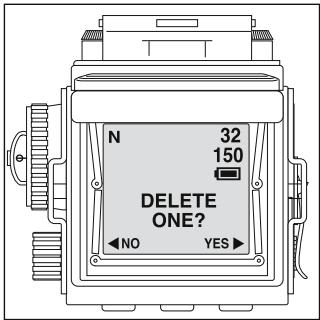
Press Image delete button once and DELETE ONE? sign appears in the center of the monitor accompanied by < NO YES > below it.
Press Right button to delete the image and Left to cancel deletion, returning to Playback mode.
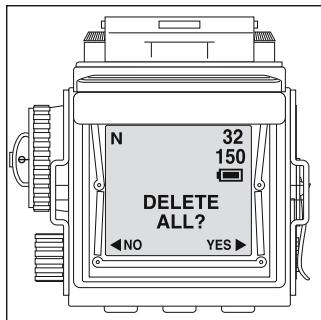
Deleting all images on the card
Press Mode shift button to set the camera to Playback mode.
Press Image delete button twice and DELETE ALL?
< NO YES > sign appears on the monitor screen.
Press Right button to delete all images on the card and Left button to cancel deletion, returning to Playback mode.
When all images are deleted, the mode will be automatically shifted to Record mode.
Setting frequency (for fluorescent lamp)
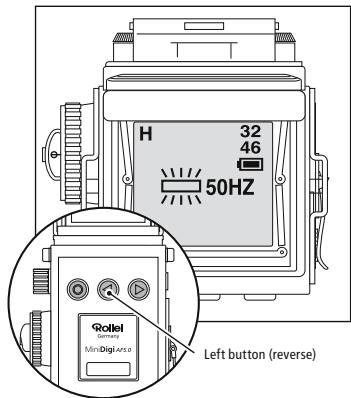
While the camera is in Record mode, press Left button to select frequency for shooting under fluorescent lamp(s). 50Hz and 60Hz alternately appears on the monitor for selection.

Caution
- This is to prevent the flickering of light under fluorescent lamp(s). Except for high-frequency fluorescent lamp(s), stripes may appear across images captured under normal fluorescent lamp(s) at the incompatible frequency. Even set at the correct frequency, stripes may appear under strong fluorescent lighting.
Auto power-off
The camera, when left without operation for longer than 60sec, automatically activates Auto power-off circuitry to turn power off.
Press Power switch again to resume operation.
Warning signs and icons
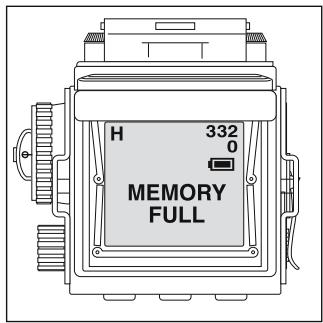
Warning signs: Memory Full
When a memory card is used up and shutter release button is pressed, MEMORY FULL sign will appear. To continue shooting, deletion of partial or all images on the card will be necessary. Otherwise, replace memory card with new one.
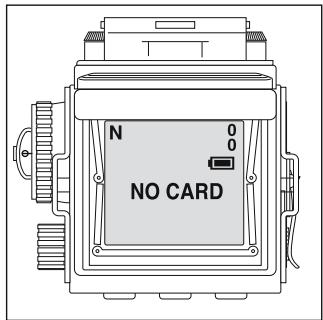
Warning signs: No Card
When a mini SD memory card is not loaded, the situation is indicated in this way, and the power is turned off automatically.
Holding the camera
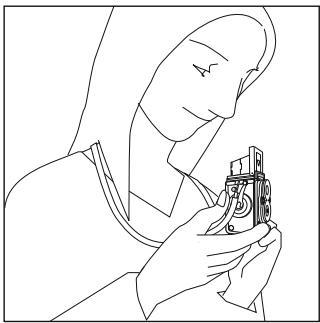
Hold the camera securely with both hands as shown.
- Keep finger(s) off the taking lens!
MINOX DCC Rolleiflex AF 5.0
- Battery life will be approx. 2 hours in continuous use. This may become shorter under low temperature condition.
- Images taken with Rolleiflex MiniDigi AF5.0 may not be replayed on mobile phones.
- In photographic situations where contrast is extremely high, for example in a scene where a light source is directly captured in the frame in indoor photography, preview screen images may sometimes blink, but the actual image will be unaffected.
- In low-lit conditions or when the contrast of your subject is low, it may take several seconds for the camera to do auto-focusing. Also, in such photographic conditions, auto-focus accuracy may be affected.
Trouble Shooting
| Problem | Possible causes | Solution |
| Shutter release button depressed, but no response. | * Memory card exhausted * Crank handle not wound | → Delete data or replace the card → Wind the Crank handle |
| Playback fails | * No pictures taken | → Refer to the above mentioned solutions |
| No power | * Power on/off switch not pressed * Battery exhausted | → Press the switch firmly → Replace battery and press |
| Stripes appear across the pictures | * Frequency set incorrectly | → Alter frequency (see Page 42) → Turn power on again |
| Power turned off | * Auto power/off circuitry activated | → Turn power on again |
| Shadow over the pictures | * Finger(s) pictured | → Keep finger(s) away from the taking lens (lower lens) |