
DCC 14.0 - Camera MINOX - Free user manual and instructions
Find the device manual for free DCC 14.0 MINOX in PDF.

| Product type | Compact digital camera |
| Brand | Minox |
| Model | DCC 14.0 |
| Dimensions (L x W x H) | 74 x 47 x 49 mm |
| Weight | 113.5 g (with battery) |
| Power supply | Rechargeable lithium-ion battery via USB cable |
| Sensor | 14.0 Megapixels, CMOS |
| Photo resolution | 4,320 x 3,240 pixels (multiple quality levels) |
| Video resolution | 640 x 480 pixels |
| Storage media | SD/SDHC card up to 32 GB |
| Lens | Minoctar, 5 glass elements, IR filter, focal length 7.4 mm (35mm equivalent: 45 mm), F2.4 |
| Zoom | 4x digital |
| Focus | From 0.5 m to infinity (continuous adjustment between 0.5 and 1 m) |
| Viewfinder | Optical (Galilean type) |
| Screen | 2.0-inch TFT LCD monitor |
| Flash | Optional external (MINOX Classic Camera Blitz, ref. 69127) |
| White balance | Auto, Daylight, Cloudy, Incandescent lamp, Fluorescent light |
| Exposure compensation (EV) | Manually adjustable |
| Self-timer | 10 seconds |
| Main functions | Photo, video, slideshow, delete, date/time settings, SD card formatting |
| Maintenance and cleaning | Clean with a soft, dry cloth; for the lens, use a special lens cleaner |
| Safety | Avoid moisture, dust, sand, extreme temperatures, and impacts |
| Spare parts and repairability | Rechargeable battery, USB cable, optional flash; repairs by an authorized Minox service center |
| General information | Legal 2-year warranty, manufactured by Minox GmbH, Germany |
Frequently Asked Questions - DCC 14.0 MINOX
User questions about DCC 14.0 MINOX
0 question about this device. Answer the ones you know or ask your own.
Ask a new question about this device
Download the instructions for your Camera in PDF format for free! Find your manual DCC 14.0 - MINOX and take your electronic device back in hand. On this page are published all the documents necessary for the use of your device. DCC 14.0 by MINOX.
USER MANUAL DCC 14.0 MINOX
natural_image
Technical line drawing of a vintage digital camera with open lid and internal components (no text or symbols)Introducing your camera 23
Inserting the battery 23
Charging the battery 24
Inserting the SD card 24
Switching the camera on 25
Taking your first picture ..... 25
Taking movies 26
Playback mode 27
Image quality 28
Memory space / SD-card 28
Deleting unwanted images 28
Downloading your images
to your computer 29
Using the Self Timer 30
Adjusting the white balance (WB) ..... 31
Adjusting the Exposure Values (EV) ..... 31
Showing Time Stamp on your images . . . . . 32
Distance settings 32
Using MINOX Classic Camera Flash
with your camera 33
Adjusting your camera settings . . . . . . . 34
Camera maintenance 36
Technical Data 38
Conditions of warranty 39
Introduction
Congratulations on the purchase of your new digital camera MINOX DIGITAL CLASSIC CAMERA (DCC).
Like all other MINOX products this digital camera boasts the traditional values fostered by the house of MINOX. It combines functionality in the smallest possible space with maximum quality.
Simple and fast operation make the MINOX DCC ideal for digital photography. It also guarantees unlimited photographic fun with its distinguished striking looks. The MINOX DIGITAL CLASSIC CAMERA is now ready to become your permanent companion and capture wonderful memories in a modern way.
These instructions are to help you benefit from the full performance spectrum of your MINOX DCC.
We wish you great enjoyment with your new camera!
Introducing your camera
Please take a few moments to read these guidelines and the Safety and Maintenance information on the last section of the manual.
Inserting the battery
Your Camera uses a Lithium-Ion rechargeable battery. The battery can be charged using the accessories provided with the camera. We do not warrant battery or camera damaged by using any other method to charge the battery.
To insert the batteries, open the battery compartment in the direction as shown.
Insert the batteries into the battery compartment, taking care to insert them such that the battery latch gets a full hold of the battery.
Close the battery compartment.
When the batteries are removed or replaced all your photos will remain safe on the SD card.
Charging the battery
Connect the camera to your computer's USB port through the USB cable provided while the camera is turn off. This starts the charging automatically.
When the battery is being charged, there is a green LED indicator light up in the USB connector area. When this indicator is turn off, the charging is completed.

Inserting an SD card
Open the battery compartment and insert the SD card in the SD card slot with the gold contacts facing the display.

natural_image
Technical line drawing of a vintage film camera with no visible text or symbolsImportant: When the SD card is locked (protected), card lock icon will appear on the display screen and photo and videos cannot be taken.
Switching the camera on
| Setup |
| Camera |
| Power Off |
| Format |
| Auto Off |
| Buzzer |
To switch your camera on, press and hold the mode button.
To switch your camera off, press the mode button* until the Setup
Screen shows up. Press the down button to highlight Power Off and then press the shutter button to switch your camera off.
Your camera will automatically turn itself off in 60 seconds if unused to conserve battery power.
Taking your first picture
Frame your subject
When the camera is turn on, the camera is in Take Photo mode, 📄 will show on the display screen, if it is not visible, press mode button until it is.
Frame the subject you want to capture in the display screen on the back of your camera or through the viewfinder.
To change the size of the desired image detail (zoom function) press the up button (to zoom in) or the down button (to zoom out)
* see schematic diagram on the opened out side
Take the picture
Press the shutter button to take the picture. Hold the camera steady until you hear two short beeps. This tells you that a photo has been taken.
Using the flash
There is no flash integrated in your camera. If you wish to shoot images in unfavourable light conditions (e.g. twilight or in dark-lit areas), you will require the MINOX Classic Camera Flash which is optionally available from MINOX dealers or under www.minox.com. The Order number is 69127. Further detail on how to connect the optional flash module is available in the Get More section on Page 33.
Taking movies
Select Take Movie mode
| Setup |
| Camera |
| Power Off |
| Format |
| Auto Off |
| Buzzer |
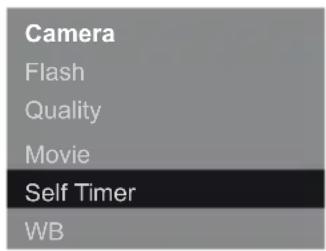
| Camera |
| Flash |
| Quality |
| Movie |
| Self Timer |
| WB |
Press the mode button until the setup screen shows up. The option Camera is highlighted. Press the shutter button to get into the Camera setup screen.
Press the down button to highlight Movie and then press the shutter button to get into the movie setup screen.
The option Movie is highlighted. Press the shutter button to confirm the setting. After the setting is confirmed, the screen will return to the setup menu. Press the mode button again and the camera is in movie mode, will show on the display screen.
Frame your subject
Frame the subject you want to capture in the display screen on the back of your camera.
To change the size of the desired image detail (zoom function) press the up button (to zoom in) or the down button (to zoom out)
Take the movie
Press the shutter button to start recording.
Press it again to end your recording. During recording a red dot will appear on the screen.
Playback mode
Review your photos or movies on the display screen
Press the mode button repeatedly until you reach the playback mode ( )▶
Use the up or down buttons to scroll through the stored images.
To review a movie clip, press the shutter button to start viewing, to stop viewing before the end of the clip press the shutter button again.
Review your photos and videos in a slide show
You can set the camera to display your images automatically.
In Playback mode (▶ press shutter button to view the playback menu, scroll to Slide Show
and press the shutter button. The slide show will then start.
To stop the slideshow press the shutter again.

Image quality
The higher the quality, the larger the size of the individual image file. You can choose between three different quality settings for your images. This has an impact on the number of available shots.
For example with a 4 GB SD card:
Low (*) - 4320 x 3240 Px up to 1692 images Normal (**) - 4320 x 3240 Px up to 1128 images High (***) - 4320 x 3240 Px up to 692 images
Press the mode button until you enter the Set-up menu. Select Camera and press the shutter button. You will enter the camera menu. Select Quality and press the shutter button.
| Camera |
| Flash |
| Quality |
| Movie |
| Self Timer |
| WB |
| Quality |
| Low |
| Normal |
| High |
You will enter the quality menu where you can select the different quality settings using the up and down buttons.
Press the shutter button again to confirm your selection.
Memory space / SD card
An SD card is included in the scope of delivery.
SD cards are available from good photography shops and electronic goods retailers.
The DCC supports SD Cards up to 32 GB (SDHC).
Deleting unwanted images
Delete your image one at a time
In Playback mode ( ) use the up or down buttons to select the image you want to delete.
Press shutter button to view the Playback menu, scroll to Delete One and press the shutter button.
Select Yes and press the shutter button again. The selection is deleted from the SD card.
Delete all your images at once
In Playback mode ( ), press shutter button to view the playback menu, scroll to Delete All and press the shutter button. Select Yes and press the shutter button again. All saved images will be deleted from the SD Card.
Downloading your images to your computer
Note: You do not need to install camera drivers for Windows XP / Vista / 7 and Apple Mac OS X. Your camera does not support version older than those stated above.
Note: When your camera is connected, your computer provides power through the USB cable, saving your camera's battery power.
Connecting your camera to the computer
To connect your camera to your computer, the camera must always be turned on first. Then connect the camera to your computer using the provided USB cable (the smaller head connect to the camera side and the larger head side connect to the computer side).
When you connect the camera to your computer for the first time, your computer detects it as a new hardware. Your computer will install the drivers automatically. Wait until your computer notifies you the installation is completed before trying to access the pictures or movies stored on the SD card.
Download the images on a Windows PC
Open My computer icon on your computer. You will see a new icon named Removable disc ...
Double click the icon and select the folder DCIM and then 100_MDCC, all your images will be stored inside.
Download the images on an Apple Mac
With the camera connected and switched on a new icon will appear on your desktop called untitled.
Inside this file is a folder called DCIM this contains the folder 100_MDCC, your images are stored inside.
You can rename untitled to any name you prefer.
Note: You can use the camera as a way of saving or transferring other information as well. Simply open the folder as shown above and copy in the file that you want to save or transfer, it will be saved on the SD card.
Using the Self Timer
Put yourself in the picture using the timer feature.
The timer has a ten second delay.
Press the mode button until you get to the setup menu. Scroll to Camera and press the shutter button. It will take you to the camera setting menu. Scroll to Self Timer and press the shutter button again. The Self Timer menu will show up and you can use up or down buttons to select On or Off. Press the shutter button again to confirm your selection.
The camera is now in timer mode, will appear in the screen.

Frame your picture as you want it, you can use zoom as normal.
Press the Shutter release; you now have ten seconds before the picture is taken.
Adjusting the white balance (WB)
The white balance ensures that colors appear natural in your pictures, even when being taken in very bright or dim lighting. In critical light conditions you can adjust the white balance accordingly.
Press the mode button until you get to the setup menu. Scroll to Camera and press the shutter button again. It will take you to the Camera setting menu. Scroll to WB and press the shutter button. The WB
menu will show up and you can use up or down buttons to select from 5 settings:
Auto (automatic), Daylight, Cloudy, Lamp, Tungsten.
Press the shutter button to confirm your selection.
Adjusting the Exposure Values (EV)
In critical light conditions you can manually adjust the brightness of your images.
Press the mode button until you get to the setup menu. Scroll to Camera and press the shutter button again. It will take you to the Camera setting menu. Scroll to EV and press the shutter button.
| Camera |
| Flash |
| Quality |
| Movie |
| Self Timer |
| WB |
| WB |
| Auto |
| Daylight |
| Cloudy |
| Lamp |
| Tungsten |
| Camera |
| Quality |
| Movie |
| Self Timer |
| WB |
| EV |
| EV+0.3 |
Then use the up or down buttons to increase or reduce the EV value.
When you are satisfied, press the shutter button to confirm.
Showing Time Stamp on your images
You can show the date on your images. Press the mode button until you get to the setup menu. Scroll to Camera and press the shutter button again. It will take you to the Camera setting menu. Scroll to Time Stamp and press the shutter button. Then use up or down buttons to select On or Off. Press the shutter button again to confirm your selection.


Distance Setting
The depth of field of the camera extends from 1 m to infinity, i.e. focusing is not required within this range. For close-focus shots you can infinitely adjust distances between 0.5 m and 1 m using the depth of field ring.

Using MINOX Classic Camera Flash with your camera
There is no flash integrated in your camera. If you wish to shoot images in unfavourable light conditions (e.g. twilight or in dark areas), you will require the MINOX Classic Camera Flash which is optionally available from your MINOX dealer or under www.minox.com. The Order number is 69127.
Connect the flash as described in the instructions enclosed with the flash unit. Pay attention to the correct seat of the contacts.
Turn on your camera and press the mode button until you get to the setup menu. Scroll to Camera and press the shutter button. It will take you to the Camera setting menu. Scroll to Flash and press the shutter button again. The flash menu will show up and you can use up or down buttons to select Auto or Off. Select Auto and press the shutter button again to confirm your selection.
| Camera |
| Flash |
| Quality |
| Movie |
| Self Timer |
| WB |
| Flash |
| Auto |
| Off |
Press the mode button to go back to Take Photo mode, ⌘A will show on the display screen. Then you can take a picture as usual.
Adjusting your camera settings
| Setup |
| Camera |
| Power Off |
| Format |
| Auto Off |
| Buzzer |
Open the Setup menu
Press the mode button until the setup menu appears on the display screen.
Use the up or down but-
tons to select one of the following.
Set an AutoOff time
Scroll to AutoOff and press the shutter button.
Select the amount of time after which you wish the camera to turn itself off, press the shutter button to confirm.
Turn the Buzzer off
To stop your camera beeping when your press buttons, you can turn off the Buzzer. Scroll to Buzzer and press the shutter button. Select Buzzer On or Off, and press the shutter button to confirm.
Revert to default settings
If you want to revert the settings on your camera back to the default settings, scroll to Settings in the Setup menu and press the shutter button. Select Default and press the shutter button to reset to the factory settings.
Set your time
If you want to set your time in your camera, scroll to Set Time in the Setup menu and press the shutter button. Use the up or down buttons and press the shutter button after each setting to set the time.
Note: In order to keep the time, do not remove the battery and keep the battery full.
Change your language
You can change the language of your display menu by choosing Language in the Setup menu.
Select your preferred language and press the shutter button to confirm.
Formatting your SD card
From time to time you may want to format your SD card to ensure that all images have been deleted and to maximise space.
In the setup menu select Format, press the shutter button. At the Format screen, select Yes and press the shutter button to confirm. All your images and settings will be deleted.
Camera maintenance
Always read the following information to make sure you are using your DCC correctly.
Places to avoid
Do not store or use the camera in the following places:
• Very damp, dirty or dusty places
- Places in direct sunshine or extreme temperatures, such as inside a locked car in summertime.
• Extremely cold places.
- Places exposed to severe vibrations.
- Places exposed to smoke or steam.
- Places exposed to strong magnetic fields (e.g. in close vicinity of electrically operated motors, transformers or magnets)
- Places in which aggressive chemicals such as
pesticides, rubber or vinyl products are stored on a long-term basis.
Note: Keep the DCC away from sand and dust
Like any other digital camera the DCC is also particularly susceptible to sand and dust. Always make sure that the camera is not exposed to sand in sandy places, particularly on beaches or in deserts where fine sand is blown about by wind.
If the camera is not used
for a prolonged period of time
If you plan not to use the camera for a prolonged period of time, always remove the battery.
Cleaning your DCC
Use a small brush to carefully remove the dust from the lens and the LCD surface. Wipe the surface gently with a dry, soft, fluff-free cloth. Should there be any spots on the optical system pour a drop of liquid lens cleaning agent onto a piece of optical
cloth and wipe over the lens surface gently.
Never scratch any parts of the camera using hard objects. Do not use volatile substances such as solvents, benzole or insecticides as these could react with the camera housing and lead to deformation or destroy the coating.
Travelling overseas
Do not pack your camera with your standard luggage. The baggage handling at airports can cause damage inside the camera, even when no external damage is visible.
Notes
Technical Data
| Image sensor 14.0 MP, CMOS Sensor |
| Image resolution Still: 4,320 x 3,240 pixels,Videoclip: 640 x 480 pixels |
| Memory SD cards up to 32 GB (SDHC) |
| Viewfinder Optical (Galileian-Style) |
| Display 2.0” TFT LCD display |
| Lens Minoctar, 5 elements glass lens with IR filter glass |
| Focal length / Lens aperture 7.4 mm (corresponds to approx. 45 mm with 35 mm format) / F 2.4 |
| Zoom 4 x digital zoom |
| Focus range 0.5 m, 1.0 m, infinity |
| White balance Automatic, Daylight, Cloudy, Lamp, Tungsten |
| Power supply Rechargeable Lithium-Ion-Battery / USB-cable |
| Support Windows XP/Vista/7; Apple MacOS X |
| Dimensions / Weight 74 x 47 x 49 mm, Weight: 113,5 g / 4.0 oz. |
Conditions of warranty
With the purchase of this MINOX product you have acquired a product which has been manufactured and checked to special quality standards.
For this product the MINOX GmbH provides warranty of 2 years. The period commences on the date of purchase from an authorized dealer and the warranty is subject to the following conditions:
1) During the warranty period we shall deal with complaints based on faulty manu-
facture (free of charge) by repair, replacement of defective parts or replacement by an identical flawless product at our own discretion. Consequential claims, no matter what kind of what legal argument in connection with this warranty, cannot be accepted.
2) Claims under warranty are null and void, if the defect has been caused by improper handling – which also can include the use of non-MINOX
accessories – if the MINOX product is serviced by unauthorized persons or workshops, or if the serial number has been obliterated.
3) Warranty claims can only be made by submission of the typewritten sales slip of an authorized dealer.
4) When submitting claims under warranty please return the MINOX product together with the typewritten sales slip and a description of the claim to the MINOX GmbH or MINOX agency.
5) Tourists may, if required, make use of the Agency of the country in which they are travelling (within the terms of the Warranty of the MINOX GmbH) by presenting the typewritten sales slip.
MINOX GmbH
Walter-Zapp-Str. 4
D-35578 Wetzlar · Germany
Sommaire
Présentation 41
natural_image
Technical line drawing of a vintage camera with open lid and internal components (no text or symbols)Design subject to alterations without notice.
MINOX is a registered trademark of MINOX GmbH, Wetzlar.
D-35578 Wetzlar, Germany
Tel.: +49 (0) 6441 / 917-0
Fax: +49 (0) 6441 / 917-612
e-mail: info@minox.com
www.minox.com


99524

- Introduction
- Introducing your camera
- Inserting the battery
- Charging the battery
- Inserting an SD card
- Switching the camera on
- Taking your first picture
- Take the picture
- Using the flash
- Taking movies
- Frame your subject
- Take the movie
- Playback mode
- Image quality
- Memory space / SD card
- Deleting unwanted images
- Delete all your images at once
- Downloading your images to your computer
- Connecting your camera to the computer
- Download the images on a Windows PC
- Using the Self Timer
- Adjusting the white balance (WB)
- Adjusting the Exposure Values (EV)
- Showing Time Stamp on your images
- Distance Setting
- Using MINOX Classic Camera Flash with your camera
- Adjusting your camera settings
- Revert to default settings
- Set your time
- Formatting your SD card
- Camera maintenance
- Places to avoid
- Notes
- Conditions of warranty
- Sommaire
Brand : MINOX
Model : DCC 14.0
Category : Camera