ENERGY F3510 - Digital photo frame ENERGY SISTEM - Free user manual and instructions
Find the device manual for free ENERGY F3510 ENERGY SISTEM in PDF.
| Product type | Digital photo frame |
| Brand | ENERGY SISTEM |
| Model | ENERGY F3510 |
| Dimensions (approx.) | 10 x 7.5 x 1.5 cm |
| Weight (approx.) | 150 g |
| Screen | TFT LCD 3.5 inches, resolution 320x240, aspect ratio 4:3 |
| Power supply | USB 5V (via power adapter or USB port); rechargeable internal battery |
| Internal memory | Capacity of approximately 50 images |
| Compatible image formats | JPEG (JPG) |
| Supported memory cards | SD / MMC / MS (Memory Stick) |
| Main functions | Simple display, slideshow with adjustable intervals (3/5/10/60 s, 10/30 min, fixed), zoom (2x/3x/4x), image rotation, thumbnail selection, copy/delete images |
| Care and cleaning | Clean with a soft, dry cloth; do not use abrasive or corrosive cleaners; keep clean and dust-free |
| Safety | Do not expose to shocks, dust, direct sunlight, moisture or extreme temperatures; do not disassemble the device; have any repairs carried out by qualified personnel |
| Included spare parts and accessories | 3 interchangeable frames, cleaning cloth, USB cable, AC/DC power adapter (Europlug to USB) |
| Repairability | Do not disassemble; contact ENERGY SISTEM technical support for any repairs |
| Warranty | 36 months from date of purchase |
Frequently Asked Questions - ENERGY F3510 ENERGY SISTEM
User questions about ENERGY F3510 ENERGY SISTEM
0 question about this device. Answer the ones you know or ask your own.
Ask a new question about this device
Download the instructions for your Digital photo frame in PDF format for free! Find your manual ENERGY F3510 - ENERGY SISTEM and take your electronic device back in hand. On this page are published all the documents necessary for the use of your device. ENERGY F3510 by ENERGY SISTEM.
USER MANUAL ENERGY F3510 ENERGY SISTEM
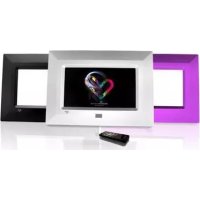
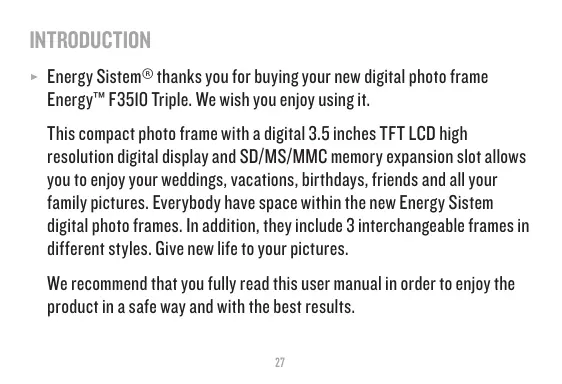
Energy System® thanks you for buying your new digital photo frame Energy™ F3510 Triple. We wish you enjoy using it.
This compact photo frame with a digital 3.5 inches TFT LCD high resolution digital display and SD/MS/MMC memory expansion slot allows you to enjoy your weddings, vacations, birthdays, friends and all your family pictures. Everybody have space within the new Energy Sistem digital photo frames. In addition, they include 3 interchangeable frames in different styles. Give new life to your pictures.
We recommend that you fully read this user manual in order to enjoy the product in a safe way and with the best results.
CARE AND MAINTENANCE
Do not expose your Energy™ digital Photo frame to shakes, dust, direct sun light, moisture or extreme temperatures.
Do not use abrasive or corrosive cleansers.
- Keep the device clean and dust free with a soft and dry cloth. We recommend you to use the provided cleaning cloth.
Clean the unit while it is turned off and unplugged from electric power.
Do not disassemble the device. Any repairs must be performed by qualified Energy Sistem Soyntec's personnel.
MAIN FEATURES
3.5^ TFT LCD high resolution digital display.
4:3 image format.
320x240 resolution.
Built-in memory (capacity for 50 pictures aprox.)
Compatible with JPG pictures from the majority of digital cameras.
▶ Slide show with different time intervals available (3/5/10/60 sec. 10/30 min. Still).
Compatible with Secure Digital (SD) / Multimedia Card (MMC) / Memory Stick (MS) memory cards.
Picture rotation of 90^ , 180^ and 270^ .
Zoom mode (2x / 3x / 4x)
Picture selection by thumbnails.
AC/DC power adaptor (Europlug to USB).
Can also be charged via USB port of any computer.
PRODUCT CONTENT
Energy System® digital photo frame Energy™ F3510 Triple.
Magnetized tabletop support.
3 exchangeable frames.
Cleaning cloth.
User manual.
USB cable for computer power supply.
AC/DC power adaptor (Europlug to USB).
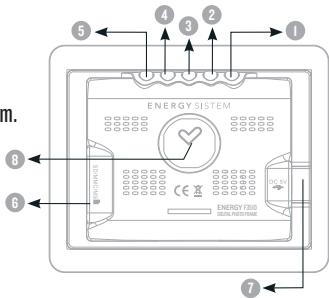
GENERAL OVERVIEW
- MODE: Single press to change mode. Hold to turn off the screen.
- DOWN: Move the cursor down.
- UP: Move the cursor up.
- ESC: Previous screen.
- ENTER: Confirm selection / Rotate / Zoom.
- Secure Digital (SD) / Multimedia Card (MMC) / Memory Stick (MS) expansion slot.
- USB/DC: Connector for USB cables or AC/DC 5V power adaptors (Europlug to USB).
- Magnet for tabletop support. Also can be use don magnetized surfaces.
BATTERY POWER
Your Energy™ F3510 digital photo frame is powered through the USB/ DC connector. To provide electrical energy to your unit you can use two methods:
You can either use the AC/DC power adaptor with USB 5 pin mini-B type connector provided with the unit (although you can use any other adaptor with USB 5 pin mini-B type cable), or you can connect the digital photo frame directly to a computer with the provided USB cable.
SWITCHING ON / OFF
To power on your Energy™ F35IO digital photo frame simply plug the provided power adaptor, or connect it to a computer through the USB port with the provided USB cable. Right then, the photo frame will automatically search the memory card should it be present, and display the number of images found.
Important: Do not remove the memory card when it is being accessed to avoid data losses.
To switch off your photo frame, simply unplug the appropriate cable.
Additionally you can power off your Energy™ F3510 digital photo frame without unplugging any cable, just hold the MODE button for a few seconds. To turn the unit on again, press again the MODE button for a few seconds. After the power up, the memory card will be searched again for pictures, should it be present.
Note: Built-in memory does not show any file count.
At the end of the card scan the main menu will appear in the photo frame screen, which consists in two options: PHOTO and SETUP.
IMAGE DISPLAY - PHOTO
Select this option with the ENTER button to enjoy the pictures you have inside the memory card or the built-in memory on your Energy™ F3510 digital photo frame. Note: Only the images present in the memory card will be shown on thumbnails. To see the images in the built-in memory, go to the main menu and remove the memory card.
A thumbnail presentation will appear with the images found. Use the MODE button to move the cursor from left to right, and the buttons UP/DOWN to move up and down respectively. Finally press ENTER to show the selected image.
On the top right corner of the screen you can see the type of the memory card being used, and a message in the middle will inform the current mode of visualization. There are two options for image display: Single show and Slide show.
IMAGE DISPLAY-SINGLESHOW
This is the default mode of visualization. On single show the image is still. You can go to the next/previous image pressing DOWN/UP respectively.
Important: Do not leave the same image still for more than one day because you risk damaging the TFT screen. We recommend changing the image at least once or twice a day, or even better use slide show with a high elapse time.
Press ENTER to do a zoom on the current image. The zoom level is displayed on the top left corner of the screen. Using the MODE/DOWN/UP/ESC buttons you can move the amplified image to the left/up/down/right respectively. To exit the zoom mode, press ENTER three more times to return to single show.
Another function of the ENTER button is the possibility to rotate images. To rotate the image 90^ counter clockwise. Press three more times the ENTER button to fully rotate the image back to the original position.
Press the MODE button to access the Slide show. To exit back to the thumbnails selection, press ESC.
IMAGE DISPLAY - SLIDE SHOW
Press MODE button while watching an image to enter the slide show mode. Images inside the built-in memory or the memory card will be displayed sequentially. To modify the wait time between images, press repeatedly MODE and select your desired time interval.
To get back to single show mode press ENTER, and to go back to the thumbnails press ESC.
BUILT-IN MEMORY MANAGEMENT - SETUP
On the main menu, choose the SETUP option and press ENTER. To copy images to the built-in memory you must have a compatible memory card inserted. In this screen, you have four options to manage the built-in memory:
"Copy one": Select this option to copy one image from the memory card to the built-in memory. Use the thumbnails to select the appropriate image and press ENTER. On the bottom left corner of the screen you will see the messages "PROCESSING..." and "SAVE OK" if the process is successful. When you are done copying images, press ESC to exit the thumbnails back to the SETUP menu.
"Copy all": Select this option to copy all the images in the inserted memory card to the built-in memory. The images will be transferred sequentially and a status message will be displayed for each one. Wait until the end of the copy process. If the memory gets full a warning message will appear.
"Delete all": To delete all the images in the built-in memory at once press ENTER while selecting this option. On the bottom left corner of the screen you will see the messages "PROCESSING..." and "PROCESS OK" if the emptying is successful.
"Delete one": Use this option to delete images from the built-in memory one by one. Use the thumbnails to choose the image to be deleted and press ENTER. Repeat the process for all the images you wish to delete and press ESC to go back to the SETUP menu.
To go back to the main menu press ESC.
FRAME EXCHANGE
The three frames with different styles and colors provided with your Energy™ F35IO digital photo frame have magnets attached for nice subjection. To exchange the different frames simply apply a small push to the installed frame and the magnets will detach. Install now the new frame by simply dropping it on the magnets so they join.
TROUBLESHOOTING
- Why can't I display my.JPG files?
Many digital cameras and image edition software add hidden data to the .JPG files. This data can prevent your digital photo frame from loading the images. Try to eliminate them by saving the file with another name.
- I can't transfer files from my computer to the built-in memory or the memory card.
The USB connection to the computer is only for power supply, not for file transferring.
- I have a Memory Stick card that does not fit inside the card slot.
The memory expansion slot is compatible with original Memory Sticks.
Memory Stick Pro DUO and similar need of adapters usually provided with the memory.
- The memory card I'm using is not recognized.
Make sure the memory card is inserted in the right direction and fully inserted. Also remember the photo frame is compatible with SD/MMC/MS only.
Have any other question? Check the product F.A.Q. section at www.energysystem.com.
WARRANTY
Energy Sistem Soyntec S.A. warrants its products to be free from defects in materials and workmanship at the time of purchase.
The warranty period is 36 months from the date of purchase for Digital photo frames.
WARRANTY PROCEDURE
-
Visit the Support section at http://support.energysystem.com and select your product to view the FAQ (Frequently Asked Questions). The solution to your problem is very likely to have been already published there. You will also be able to download user manuals, user guides, drivers and updates.
-
If you cannot find an appropriate solution in the Support section, you may send us your enquiry or warranty service request by email: support@energysystem.co.uk
- Alternatively, you may prefer to contact the distributor from which you purchased the product, presenting the purchase receipt or invoice."
Specifications are subject to change without notice.
© 2008 by Energy Sistem®. All rights reserved.
Trademarks.
All company, brand and product names are trademarks or registered trademarks of their respective companies