BV178 - Fridge BORETTI - Free user manual and instructions
Find the device manual for free BV178 BORETTI in PDF.

| Brand | BORETTI |
| Model | BV178 |
| Product type | Refrigerator-freezer |
| Niche dimensions (H x W x D) | 1780 x 560 x 550 mm |
| Climate class | T / ST / N / SN |
| Cooling technology | Ventilated cold (No Frost) |
| Defrost | Automatic |
| Freezer compartment | 4 stars |
| Fast freeze | Yes (activation by button C) |
| Overheating alarm | Yes (audible and visual signal) |
| Open door alarm | Yes (after 1 minute) |
| Ice cube tray | Yes |
| Thermal accumulators | 2 pieces |
| Interior lighting | Yes |
| Door reversibility | Yes (right-hand opening by default) |
| Power supply | 230 V / 50 Hz (tolerance ±6%) |
| Display | LCD |
| Built-in installation | Yes (instructions provided) |
| Cleaning | Warm water and baking soda |
| Condenser maintenance | Regular dusting |
Frequently Asked Questions - BV178 BORETTI
User questions about BV178 BORETTI
0 question about this device. Answer the ones you know or ask your own.
Ask a new question about this device
Download the instructions for your Fridge in PDF format for free! Find your manual BV178 - BORETTI and take your electronic device back in hand. On this page are published all the documents necessary for the use of your device. BV178 by BORETTI.
USER MANUAL BV178 BORETTI
Geen symbol :normale werking.
Het uitschakelen
It is most important that this instruction book should be retained with the appliance for future reference. Should the appliance be sold or transferred to another owner, or should you move house and leave the appliance, always ensure that the book is supplied with the appliance in order that the new owner can be acquainted with the functioning of the appliance and the relevant warnings.
If this appliance featuring magnetic door seals is to replace an older appliance having a spring lock (latch) on the door or lid, be sure to make that spring lock unusable before you discard the old appliance. This will prevent it from becoming a death-trap for a child.
These warnings are provided in the interest of safety. You must read them carefully before installing or using the appliance.
General Safety
- This appliance is not intended for use by persons (including children) with reduced physical, sensory or mental capabilities, or lack of experience and knowledge, unless they have been given supervision or instruction concerning use of the appliance by a person responsible for their safety. Children should be supervised to ensure that they do not play with the appliance.
It is dangerous to alter the specifications or modify this product in any way. - Before any cleaning or maintenance work is carried out, be sure to switch off and unplug the appliance.
- This appliance is heavy. Care should be taken when moving it
- Ice lollies can cause frost burns if consumed straight from the appliance.
Take utmost care when handling your appliance so as not to cause any damages to the cooling unit with consequent possible fluid leakages. - The appliance must not be located close to radiators or gas cookers.
- Avoid prolonged exposure of the appliance to direct sunlight.
- There must be adequate ventilation round the back of the appliance and any damage to the refrigerant circuit must be avoided.
- For freezers only (except built-in models): an ideal location is the cellar or basement.
- Do not use other electrical appliances (such as ice cream makers) inside of refrigerating appliances.
Service/Repair
- Any electrical work required to install this appliance should be carried out by a qualified electrician or competent person
This product should be serviced by an authorized Service Centre, and only genuine spare parts
should be used.
- Under no circumstances should you attempt to repair the appliance yourself. Repairs carried out by inexperienced persons may cause injury or more serious malfunctioning. Refer to your local Service Centre, and always insist on genuine spare parts.
- This appliance contains hydrocarbons in its cooling unit; maintenance and recharging must therefore only be carried out by authorized technicians.
Use
- The domestic refrigerators and freezers are designed to be used specifically for the storage of edible foodstuffs only.
- Best performance is obtained with ambient temperature between +18^ and +43^ (class T); +18^ and +38^ (class ST); +16^ and +32^ (class N); +10^ and +32^ (class SN). The class of your appliance is shown on its rating plate.
Warning: when the ambient temperature is not included within the range indicated for the class of this appliance, the following instructions must be observed: when the ambient temperature drops below the minimum level, the storage temperature in the freezer compartment cannot be guaranteed; therefore it is advisable to use the food stored as soon as possible.
- Frozen food must not be re-frozen once it has been thawed out.
Manufacturers' storage recommendations should be strictly adhered to. Refer to relevant instructions. -
The inner lining of the appliance consists of channels through which the refrigerant passes. If these should be punctured this would damage the appliance beyond repair and cause food loss. DO NOT USE SHARP INSTRUMENTS to scrape off frost or ice. Frost may be removed by using the scraper provided. Under no circumstances should solid ice be forced off the liner. Solid ice should be allowed to thaw when defrosting the appliance.
-
Do not place carbonated or fizzy drinks in the freezer as it creates pressure on the container, which may cause it to explode, resulting in damage to the appliance.
Installation
- During normal operation, the condenser and compressor at the back of the appliance heat up considerably. For safety reasons, minimum ventilation must be as shown in the instructions.
Attention: keep ventilation openings clear of obstruction. - Care must be taken to ensure that the appliance does not stand on the electrical supply cable.
Important: if the supply cord is damaged, it must be replaced by a special cord or assembly available from the manufacturer or its service agent. - If the appliance is transported horizontally, it is possible that the oil contained in the compressor flows in the refrigerant circuit. It is advisable to wait at least two hours before connecting the appliance to allow the oil to flow back in the compressor.
- There are working parts in this product which heat up. Always ensure that there is adequate ventilation as a failure to do this will result in component failure and possible food loss. See installation instructions.
- Parts which heat up should not be exposed. Wherever possible the back of the product should be against a wall.

Environment Protection
This appliance does not contain gasses which could damage the ozone layer, in either its refrigerant circuit or insulation materials. The appliance shall not be discarded together with the urban refuse and rubbish. Avoid damaging the cooling unit, especially at the rear near the heat exchanger. Information on your local disposal sites may be obtained from municipal authorities. The materials used on this appliance marked by the symbol are recyclable.
Disposal of old Appliances
The symbol on the product or on its packaging indicates that this product may not be treated as household waste. Instead it shall be handed over to the applicable collection point for the recycling of electrical and electronic equipment. By ensuring this product is disposed of correctly, you will help prevent potential negative consequences for the environment and human health, which could otherwise be caused by inappropriate waste handling of this product. For more detailed information about recycling of this product, please contact your local city office, your household waste disposal service or the shop where you purchased the product.
CONTENTS
Warnings 24
Use - Cleaning the interior - Control panel - Display 26
Use - Operation - Activation of functions - Switching off - Temperature regulation - Freezing fresh food . . . . .
Storage of frozen food 27
Excessive temperature alarm - Thawing - Ice-cube production - Cold accumulator - Door open acoustic alarm 28
Hints - Hints for freezing - Hints for storage of frozen food - Freezing calendar 29
Maintenance - Periods of non-operation - Periodic cleaning - Defrosting 30
Customer service and spare parts 30
Installation - Location - Electrical connection - Door reversibility 31
Installation-Building-in instructions 32
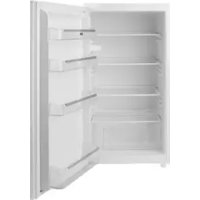
Cleaning the interior
Before using the appliance for the first time, wash the interior and all internal accessories with lukewarm water and some neutral soap so as to remove the typical smell of a brand-new product, then dry thoroughly.

Do not use detergents or abrasive powders, as these will damage the finish.
Control panel

A - Appliance button ON/OFF
B - Temperature and function indicator
C - Function button
D - Freezer Thermostat control knob
DISPLAY

- Door open alarm indicator
- Positive or negative Temperature indicator
- Temperature indicator
- If on the fast freeze function is on
Operation
After plugging the plug into the power outlet, if the display is not illuminated, press key (A), appliance on.
As soon as the appliance is turned on, the following signals will appear on the control panel:
symbol (2) will be positive, indicating that the temperature is positive.
- the temperature flashes, the background of the display is red and you will hear a buzzer. Press key (C) and the buzzer will go off (also see the section on "excessive temperature alarm").
Place the freezer thermostat control knob (D) in a middle position, and the appliance will be set up to provide the following temperature:
roughly -18^ in the refrigerator.
Activation of functions
Each time key C is pressed, the following functions are activated in a clockwise direction:
Symbol 4: rapid freezing function.
No Symbol: Normal operation
Switching off
The appliance is shut off by holding down key (A) for more than 1 second. After this, a countdown of the temperature from -3 -2 -1 will be shown.
When the appliance is shut off, display (B) also goes off.
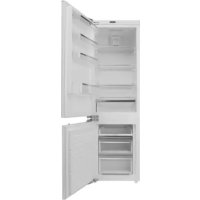
Use of the freezer compartment
Temperature regulation
The temperature is automatically regulated and can be increased to achieve a higher temperature (warmer) by rotating the thermostat knob toward settings or reduced (colder) rotating the knob towards settings.
However, the exact setting should be chosen keeping in mind that the temperature inside the refrigerator depends on:
- room temperature;
how often the door is opened;
the quantity of food stored; - location of appliance.
We suggest setting the knob to the middle position to obtain an internal temperature of approximately -18^ , which guarantees proper freezing and conservation of the frozen foods.
Freezing fresh food
The freezer compartment is suitable for long term storage of commercially frozen food, and for freezing fresh food.
The maximum quantity of foods to freeze in 24 hours is shown on the serial number plate.
To freeze fresh foods, you will need to activate the rapid freezing function. Press key C (several times if necessary) until the corresponding icon appears
After a pre-cooling period of 24 hours, place the foods in the freezer.
The freezing process takes 24 hours. During this period do not put other foods in the freezer.
This function stops automatically after 54 hours.
Put the foods to be frozen in the upper compartment of the freezer, as this is the coldest location.
The function can be de-activated at any time by pressing key C (see paragraph "Activation of Functions").
Storage of frozen food
When first starting-up or after a period out of use, before putting the products in the compartment let the appliance run at least 12 hours on the fast freeze setting.
To obtain the best performance from this appliance, you should:
if large quantities of food are to be stored, remove all drawers and baskets from appliance and place food on cooling shelves.
Pay careful attention not to exceed load limit stated on the side of the upper section (where applicable).

Important
In the event of accidental defrosting, for example due to a power failure, if the power has been off for longer that the value shown in the technical characteristics chart under "rising time", the defrosted food must be consumed quickly or cooked immediately and then refrozen (after cooling).
Excessive temperature alarm
An increase in the temperature in the freezer compartment (for example due to an electricity outage) is indicated by:
- flashing temperature;
- freezer compartment flashing (symbol 2);
- red illumination of display;
- sounding of buzzer.
- alarm symbol.
When normal conditions are restored:
- the acoustic signal shuts off;
- the temperature value continues to flash;
- the display illumination remains red.
When you press key "C" to de-activate the alarm, the highest temperature reached in the compartment appears on indicator 2 for approximately 5 seconds. At this point the flashing stops and the display illumination changes over from red to white.
Thawing
Deep-frozen or frozen food, prior to being used, can be thawed in the refrigerator compartment or at room temperature, depending on the time available for this operation.
Small pieces may even be cooked still frozen, directly from the freezer: in this case, cooking will take longer.
Ice-cube production
This appliance is equipped with one or more trays for the production of ice-cubes. Fill these trays with water, then put them in the freezer compartment.
Do not use metallic instruments to remove the trays from the freezer.
Cold accumulator
The appliance is equipped with two cold accumulators. If there is a power outage, they will extend food conservation for a few hours.
Door open acoustic alarm
An acoustic alarm will sound when the door is left open for more than 1 minute.
The door open alarm conditions are indicated by:
- flashing symbol (1);
- red display illumination;
- beeping sound.
Press the button (C) to stop the acoustic alarm.
When normal conditions are restored (door closed):
- the acoustic alarm will stop.
Hints for freezing
To help you make the most of the freezing process, here are some important hints:
- the maximum quantity of food which can be frozen in 24 hrs. is shown on the rating plate;
- the freezing process takes 24 hours. No further food to be frozen should be added during this period;
- prepare food in small portions to enable it to be rapidly and completely frozen and to make it possible subsequently to thaw only the quantity required;
- wrap up the food in aluminium foil or polythene and make sure that the packages are airtight;
- do not allow fresh, unfrozen food to touch food which is already frozen, thus avoiding a rise in temperature of the latter;
water ices, if consumed immediately after removal from the freezer compartment, can possibly cause the skin to be freeze burnt; - it is advisable to show the freezing-in date on each individual pack to enable you to keep tab of the storage time;
- The symbols on the drawers show different types of frozen goods.
The numbers indicate storage times in months for the appropriate types of frozen goods. Whether the upper or lower value of the indicated storage time is valid depends on the quality of the foods and pre-treating before freezing.
- do not put carbonated liquids (fizzy drinks, etc.) in the freezer compartment as they may burst.
Hints for storage of frozen food
To obtain the best performance from this appliance, you should:
- make sure that the commercially frozen foodstuffs were adequately stored by the retailer;
- be sure that frozen foodstuffs are transferred from the foodstore to the freezer in the shortest possible time;
not open the door frequently or leave it open longer than absolutely necessary. - Once defrosted, food deteriorates rapidly and cannot be refrozen.
- Do not exceed the storage period indicated by the food manufacturer.
Freezing Calendar
The symbols show different types of frozen goods.
The numbers indicate storage times in months for the appropriate types of frozen goods. Whether the upper or lower value of the indicated storage time is valid depends on the quality of the foods and pre-treating before freezing.
***
3|6|9|12|
MAINTENANCE

Unplug the appliance before carrying out any maintenance operation.
Warning
This appliance contains hydrocarbons in its cooling unit; maintenance and recharging must therefore only be carried out by authorized technicians.
Periods of non-operation
When the appliance is not in use for long periods, take the following precautions:
remove the plug from the wall socket;
remove all food;
defrost and clean the interior and all accessories;
leave the door ajar to allow air to circulate to prevent unpleasant smells.
Defrosting
The freezer compartment of this model, on the other hand, is a "no frost" type. This means that there is no buildup of frost when it is in operation, neither on the internal walls nor on the foods.
The absence of frost is due to the continuous circulation of cold air inside the compartment, driven by an automatically controlled fan.
Periodic cleaning
Many proprietary kitchen surface cleaners contain chemicals that can attack/damage the plastics used in this appliance. For this reason it is recommended that the outer casing of this appliance is only cleaned with warm water with a little washing-up liquid added.
Clean the inside with warm water and bicarbonate of soda.
Rinse and dry thoroughly.
Clean the condenser (black grill) and the compressor at the back of the appliance with a brush or a vacuum cleaner. This operation will improve the performance of the appliance and save electricity consumption.
CUSTOMER SERVICE AND SPARE PARTS
If the appliance is not functioning properly, check that:
- the plug is firmly in the wall socket and the mains power switch is on;
- there is an electricity supply (find out by plugging in another appliance);
- the thermostat control knob is in the correct position.
If your appliance is still not working properly after making the above checks, contact the nearest service centre.
To obtain fast service, it is essential that when you apply for it you specify the model and serial number of your appliance which can be found on the guarantee certificate or on the rating plate located inside the appliance, on the bottom left-hand side.
Location
The appliance should be installed well away from sources of heat such as radiators, boilers, direct sunlight etc.
For building into kitchen units follow the special "Building-in" instructions given.
Electrical connection
Before plugging in, ensure that the voltage and frequency shown on the serial number plate correspond to your domestic power supply. Voltage can vary by ± 6% of the rated voltage.
For operation with different voltages, a suitably sized auto-transformer must be used.
The appliance must be earthed.
The power supply cable plug is provided with a contact for this purpose.
If the domestic power supply socket is not earthed, connect the appliance to a separate earth in compliance with current regulations, consulting a specialist technician.
The Manufacturer declines all responsibility if the above safety precautions are not observed.

Door Reversibility

The appliance is supplied with the door opening to the right.
For door opening in the opposite direction, perform the following actions prior to installation
- Unscrew the upper pin and remove the spacer
- Remove the door.
- Unscrew with a key the lower pin and replace it on the opposite side.
- Reinsert the door, refit the spacer and rescrew the upper pin on the opposite side.

Attention
It must be possible to disconnect the appliance from the mains power supply; the plug must therefore be easily accessible after installation.

This appliance complies with the following E.E.C.Directives:
- 87/308 EEC of 2/6/87 relative to radio interference suppression.
- 73/23 EEC of 19.2.73 (Low Voltage Directive) and subsequent modifications;
- 89/336 EEC of 3.5.89 (Electromagnetic Compatibility Directive) and subsequent modifications.


Instructions for totally built-in appliances
Dimensions of the recess
Height (1) 1780 mm
Depth (2) 550 mm
Width (3) 560 mm
For safety reasons, minimum ventilation must be as shown in Fig.
Attention: keep ventilation openings clear of obstruction.
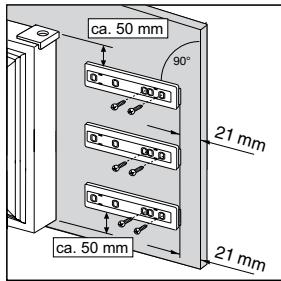
Furthermore, it is necessary that the niche is provided with a conduct of ventilation having the following dimensions:
depth 50 mm
width 540 mm
Drill the unit using a 0.25mm drill (10 mm max. penetration);
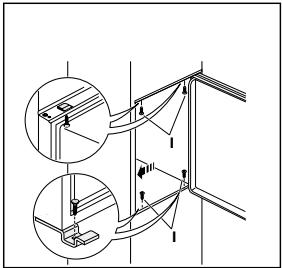
Fix the square fitting to the appliance.
Make sure that a distance of 44mm is maintained in the lower part between the kitchen furniture and the border of the appliance.
The lower hinge cover inserted in the accessories bag, is useful to guarantee the exact position of the kitchen furniture and the appliance.
Also make sure that the appliance does not clamp the mains cable.


Fasten the appliance with 4 screws provided in the kit included with the appliance.
Press in the joint covers between the appliance and the kitchen unit.
From the plastic cover (E), which is used to cover the hinge with the pivot pin, you must take away the part as indicated in the drawing.
This operation is made easier since there is, in the internal part of the cover hinge lid a groove that facilitates the removal of this coomponent.
"Remove the part marked with DX, if the pivot pin is inserted in the right hinge, SX in opposite case."
Apply covers (C-D) on joint cover lugs and into hinge holes.
Snap vent grille (B) and hinge covers (E) into position.
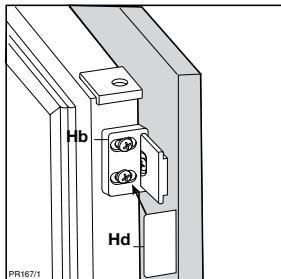
Separate parts Ha, Hb, Hc, Hd as shown in the figure


Place guide (Ha) on the inside part of the furniture door, as shown in the figure and mark the position of external holes. After having drilled holes, fix the guide with the screws supplied.
Fix cover (Hc) on guide (Ha) until it clips into place.
Open the appliance door and the furniture door at 90^ . Insert the small square (Hb) into guide (Ha). Put together the appliance door and the furniture door and mark the holes as indicated in the figure. Remove the squares and drill holes with 2mm at 8 mm from the outer edge of the door. Place the small square on the guide again and fix it with the screws supplied.
Should the lining up of the furniture door be necessary, use the clearance of slots.
At the end of operations, it is necessary to check if the door of the furniture closes properly.
Fix cover (Hd) on guide (Hb) until it clips into place.


These warnings would be given to the Schutz under his command. The Schutz would be given to the other members of the Schutz's organization, and he would be given to the other members of the Schutz's organization.