
DLX-181 DUAL LINK CARDBUS - Expansion card ADS TECH - Free user manual and instructions
Find the device manual for free DLX-181 DUAL LINK CARDBUS ADS TECH in PDF.

| Product Type | Extension Card |
| Brand | ADS TECH |
| Model | DLX-181 DUAL LINK CARDBUS |
| Category | FireWire/USB Controller |
| Interface | CardBus (PCMCIA Type II) |
| FireWire Ports | 2 IEEE 1394a ports (400 Mbps) |
| USB Ports | 2 USB 2.0 ports (480 Mbps) |
| FireWire Speed | 400 Mbps |
| USB Speed | 480 Mbps |
| Supported Operating Systems | Windows 98SE, Windows 2000, Windows ME, Windows XP |
| Minimum Processor | Intel Celeron 500 MHz or AMD Athlon/Duron |
| Minimum RAM | 64 MB (128 MB recommended) |
| Required Disk Space | 200 MB for application, 4 GB for 20 min DV video |
| Required Video Card | AGP or PCI with 4 MB RAM |
| Required Sound Card | Yes |
| Included Software | VideoStudio 7 SE (video editing) |
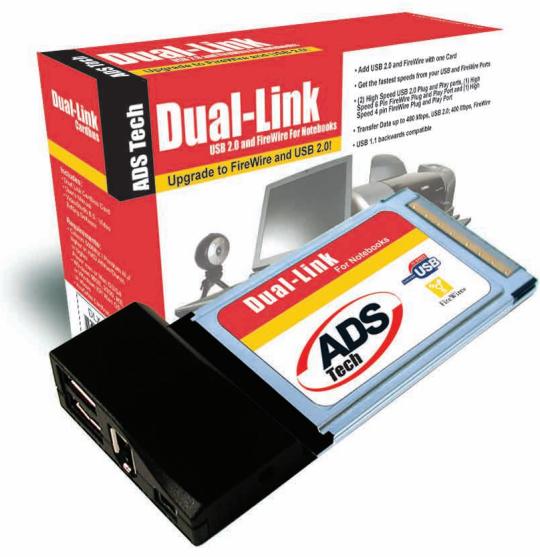
| Package Contents | Dual-Link Cardbus card, Driver and software CD, Power adapter, User guide |
| Power Supply | Via CardBus bus |
| Main Functions | Adds 2 FireWire and 2 USB 2.0 ports, Plug and Play support, hot swapping, DV video capture and editing, VCD creation |
| Plug and Play | Yes |
| Hot Swapping | Yes |
Frequently Asked Questions - DLX-181 DUAL LINK CARDBUS ADS TECH
User questions about DLX-181 DUAL LINK CARDBUS ADS TECH
0 question about this device. Answer the ones you know or ask your own.
Ask a new question about this device
Download the instructions for your Expansion card in PDF format for free! Find your manual DLX-181 DUAL LINK CARDBUS - ADS TECH and take your electronic device back in hand. On this page are published all the documents necessary for the use of your device. DLX-181 DUAL LINK CARDBUS by ADS TECH.
USER MANUAL DLX-181 DUAL LINK CARDBUS ADS TECH
Dual Link Cardbus: Multilingual Manual
Upgrade to Firewire or USB 2.0
User's Guide: First Edition
If you have any problems or questions on this product, please call :
| Technical Support | 562.926.4338 |
| North America Support Hours: M-F: 8 am - 5 pm, PST Email: support@adstech.com website: www.adstech.com | ADS Tech |
European Technical Support: +353.61.702042
Table of Content
A letter from the President of ADS 4
Introduction 5
System Requirements 5
DLX-181 6
Installation Guide 6
Step 1 Driver Installation 7
Step 2 Hardware Installation 8
Dual-Link Cardbus card Hardware install
Step 3 Connecting Devices 9
Step 4 Install VideoStudio 7 SE 10
Help Resources 10
Installation Manual- German 11
Installation Manual- French 18
Installation Manual- Spanish 25
Service and Warranty 32
FCC Information 33
A Letter from the President of ADS Technologies "Connect, Create, and Store"
At ADS Technologies, Inc. we bring the best and latest multimedia technology to your PC. Our products allow you to "Connect, Create and Store".
CONNECT with our line of USB 1.1, USB 2.0 and 1394 Host and Hub devices. Today, external bus technologies such as USB and FireWire/ 1394 let you connect hundreds of devices to your PC or MAC. We have the connectivity solutions that allow you to get the most out of USB and 1394 technologies.
CREATE audio and video productions with our line of video capture and editing solutions. We have video editing and MPEG2/DVD Capture and Authoring solutions to fit everyone's needs, ranging from the novice level to the professional level.
STORE that multimedia masterpiece with one of our 1394 storage or USB 2.0 Storage solutions. Today's multimedia files are getting larger and larger. You need solutions that help you easily and cost effectively store your work; we've got those solutions.
More than ever, my goal has been to bring new technologies to the consumer market at affordable prices and with significant value to you, our customer.
ADS products are easy to use. Most of our products are Plug-and-Play, easy to install and offer software to help get the best value out of the hardware product. And if you do need help, we will do our best to support you. We want every customer to be a happy ADS customer.
The combination of technology innovation, affordability, quality, value and support has made our products award-winners in the press and at conventions. More over they are winners with our customers.
I wish to thank you for choosing ADS Technologies and I hope you enjoy your new multimedia experience.
Sincerely,
Michael McCoy President
Introduction
Add 2 FireWire Ports and 2 USB 2.0 Ports to your Notebook!
Use the Dual-Link Cardbus card and Video Studio 7 SE (included) to transfer video from your digital camcorder to your PC, edit the video, add titles, effects, background music and more. Then send your edited video back to your digital recorder or save it as an MPEG1 File that you can then master to a VCD that can play on most DVD Players.
FireWire/1394 and USB 2.0 are the latest in high-speed external bus technology. This means you can instantly connect devices like DV Camcorders or Firewire Hard Drives to your PC without opening up the case. FireWire offers true plug and play and hot swapping of devices. Just plug in your digital camcorder, launch the software and you're ready to make movies.
Dual Link Features:
- Connect to Digital Camcorders
- Connect the PYRO 1394 WebCam
- Connect to 1394 Hard Drives/USB 2.0 Drives
- Edit video and send out to tape
- Capture still images
- Produce Digital Video Movies or VCD Movies for your DVD Player
- 2 Firewire ports at 400 Mbps/2 USB 2.0 ports at 480 Mbps
Fully IEEE 1394a and USB 2.0 compliant - Plug and Play
Requirements:
Intel Celeron 500MHz or above
- AMD Athlon or Duron (any speed)
- Windows 98SE, Windows 2000, Windows ME, or Windows XP
Available Cardbus slot
- 64 MB of RAM (128MB or higher Recommended)
Sound card
- AGP or PCI video card with 4 MB of RAM
- CD-ROM Drive
- 200 MB hard disk space for capture/editing applications
- 4 GB hard disk space (20 minutes of raw DV footage)
Installation Guide
Package Contents
- Dual-Link Cardbus Card
- CD with Drivers and Video Studio 7 SE
- Power Adapter
- User's Manual
Note: If you did not receive one or more of the contents listed above inside the Dual-Link Cardbus package, please contact the vendor you purchased it from or contact ADS directly.
What you need to install Dual-Link Cardbus:
Available Cardbus slot
Notebook PC
- Windows 98 SE, Win ME CD, Windows2000, or Windows XP CD
- Dual-Link CD
Getting Started Using Dual Link PCI Card INSTALL IN THIS ORDER:
Step 1: Driver Installation
Step 2: Hardware Installation
-
Dual-Link Cardbus card Hardware install
-
Dual-Link Cardbus card Driver install
Step 3: Connecting Devices
Driver Installation
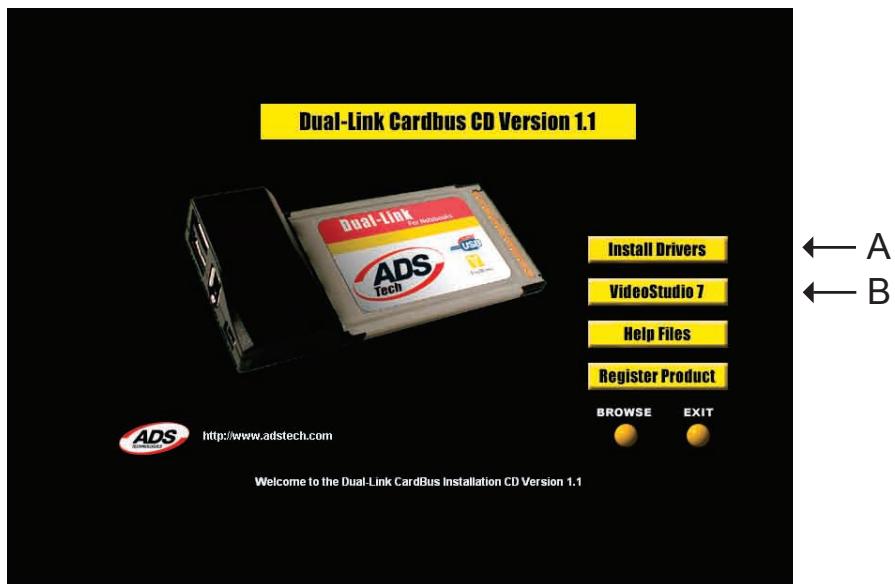
A. Install Drivers
B. Install VideoStudio 7 SE for Video Editing
Hardware Installation

Step 1
Locate your Notebook's open Cardbus port and place the card into the slot as you see in Fig. A.
Fig. A
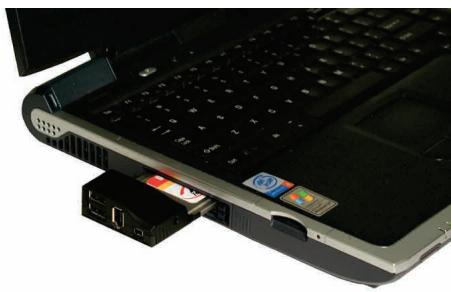
Fig. B
Step 2
Push the card all the way into the slot until it is secure.
(see Fig. B)
Connecting Devices
FireWire
Once you have installed the camcorder drivers you are ready to connect your camcorder to the Dual-Link Cardbus. Follow these steps to ensure that the operating system recognizes your camcorder and you are familiar with the camcorder driver your system is using.
- Use the External Power source supplied with your camcorder. Many camcorders do not have enough power when running from the battery.
- Turn the Camcorder ON to the VCR/VTR mode.
- Connect the DV Cable supplied with the Dual Link to any available port on the Dual Link card and your digital camcorder.
- Your Camcorder will be recognized, as a new device by Windows and the camcorder driver will be loaded. In some cases Windows may ask for the Windows 98, WinME, WinXP or Win2000 CD to load other needed files.
- Open Device Manager (Start, Settings, Control Panel, System, Device Manager Tab). Check to see how your camcorder is listed. If you are using Win98 your camcorder will appear as "1394 DV Camcorder" appears under "Sound, Video and Game Controllers". You are using the Texas Instruments camcorder driver. If you are using Win98SE, WinMe, WinXP or Win2000 your camcorder will appear in Device Manager under "Imaging Device" and will be listed as a "DV camera or VCR". Your camcorder is using the Microsoft camcorder drivers.
You can also connect Firewire drives/drive kits, Firewire webcams and any other Firewire device to the Dual-Link Cardbus card.
USB Devices
Any USB 2.0 or USB 1.1 device may also be connected to the Dual-Link Cardbus card. To learn more about USB 2.0/Firewire products, please check our website, www.ADSTECH.com
INSTALL VideoStudio 7 SE
- Connect your camcorder. Turn on to VTR/VCR PLAY Mode. Note: Your Camcorder must be connected and "On"
- INSTALL Video Studio from Dual-Link CD. Follow the installation instructions.
- Re-Boot when the Installation is complete.
- Run VideoStudio 7 SE. Go to page 16 of this Guide and start a new project. Make sure your camcorder is turned on to VTR/VCR MODE and connected to the Dual-Link Cardbus at this time.
Help Resources:
VideoStudio Help - Press "F1" on your keyboard at any time.
VideoStudio User Manual - on Dual-Link CD
ADS website: www.adstech.com
Online Help:
We are constantly adding more information to the Online Help section of our website. Click the "Support" button on the home page or the "Technical Support" button on any ADS web page. Click on the
Dual-Link or PYRO - Online Help. Here you will find many answers to commonly asked questions.
Software Updates:
We are constantly updating camcorder drivers, adding utilities or posting bug fixes or patches in the "Downloads" section of our website. Click the "Support" button on the home page or the "Technical Support" button on any ADS web page.
For European Customers Only:
Most of the DV camcorders shipping in Europe only allow for DV OUT but not DV IN. To fix this, third party companies have provided
hardware to enable the DV INPUT for most DV CAMCORDERS. Please check these internet links:
www.datavision.co.uk
www.lynxdv.com
Resources on the web:
Web page with Dual-Link info: www.price98.freereserve.co.uk
Forum with tips & info for the ADS PYRO & Ulead VS & MS Pro:
http://pub9.ezboard.com/bpyro1394
ADS Tech, Inc. Forum on the WWUG (World Wide User Groups):
www.wwug.com/forums/ads-tech/index.htm
Table of Content
Einleitung 12
Hardware Installation
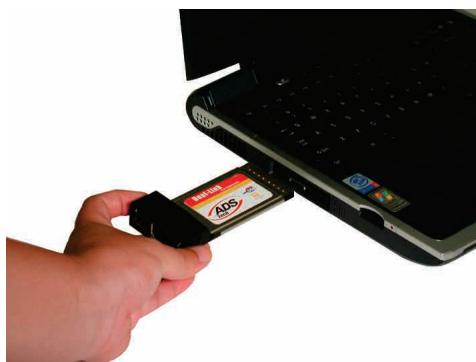
Abbildung A
Schritt 1
Characteristics del Dual Link:
Service and Warranty:
Service:
If you require assistance with the installation, operation, or application of your ADS Technologies, Inc. product there are several options available to you as described in the technical support section of this manual. Your primary source for information and assistance is always your computer store or computer parts dealer. If your ADS product needs repair or replacement, contact your dealer for on-site repair service.
The ADS Technologies technical support and customer service staff can aid in solving many problems. Our technical support department is available to repair any ADS Technologies product. You or your dealer must return products to our factory for repair or warranty replacement.
Return/Replacement:
If you need to return your ADS Technologies product you should return the product directly to the dealer or store where you purchased the product. Each individual computer store or dealer sets product returns policies for their customers. ADS Technologies, Inc. cannot be responsible for the actions or policies set by our dealers. If you desire to return the product for a refund, you must get the refund from the dealer or store you purchased the product from. If you purchased the product directly from ADS please see the "Terms and Conditions of Sale" on the reverse side of your sales invoice.
Returns to ADS Technologies, Inc. are for repair or warranty replacement only. If you need to return product to ADS Technologies, Inc. for repair or replacement you must follow these steps:
- Call our Technical Support department at (562) 926-4338 in the USA or +353-61-702042 in Europe to obtain a Return Merchandise Authorization (RMA) number.
- The RMA number is valid for 30 days.
- Ship the product to the ADS factory with the RMA number marked on the inside and outside of the package. If there is no RMA number on the package or the RMA number has expired, the shipment will be refused. ADS will not be liable for lost or mis-shipped products.
- Replacement product cannot be shipped to you until the defective product has been received by ADS.
-
Once the product is received at the factory it will be tested and then repaired or replaced.
-
Turn around time is approximately one week. A repaired or replacement product will be shipped back to you.
Warranty:
This ADS Technologies, Inc. product comes with a One (1) year hardware warranty. ADS Technologies, Inc. (ADS) warrants this product against defects in material and workmanship for a period of One (1) year from the date of original purchase from ADS or an authorized ADS dealer. This warranty applies only to the original purchase of the product and is not transferable. This warranty does not cover any incompatibilities due to the user's computer, hardware, software or other related system configuration in which the product interfaces. Proof of purchase will be required before any warranty consideration by ADS occurs.
This warranty does not cover any damage caused by negligence, non-authorized modifications, or parts installed without prior written permission from ADS.
This warranty does not apply if the product has been damaged by accident, abuse, or misapplication, nor as a result of service to the product by anyone other than ADS.
If your ADS product is not in working order, your only recourse is repair or warranty replacement, as described above. UNDER NO CIRCUMSTANCES will ADS Technologies, Inc. be liable for consequential damages, including but not limited to any lost savings, lost profits, or any other damages, caused by the use of any ADS Technologies, Inc. product or inability to use the product, even if the dealer or ADS Technologies, Inc. has been advised of such liability or other claims. This includes damage to property and, to the extent permitted by law, damages for personal injury. This warranty is in lieu of all other warranties including implied warranties of merchantability and fitness for a particular purpose.
FCC Information
Federal communications Commission Radio Frequency Interference Statement
Note: This equipment has been tested and found to comply with the limits for a class B digital device, pursuant to Part 15 of the FCC Rules. These limits are designed to provide reasonable protection against harmful interference when the equipment is operated in a residential installation. This equipment generates, uses and can radiate radio frequency energy and if not installed and used in accordance with the instruction manual may cause harmful interference to radio communications. However, there is no guarantee that interference will not occur in a particular installation. If this equipment does cause harmful interference to radio or television reception, which can be determined by turning the equipment off and on, the user is encouraged to try to correct the interference by one or more of the following measures:
- Reorient or relocate the receiving antenna
-
Increase the separation between the equipment and receiver. Dual-Link 33
-
Connect the equipment into an outlet on a circuit different from that to which the receiver is connected.
- Consult the dealer or an experienced radio TV technician for help.
Notice:
(1) The changes or modifications not expressly approved by the party responsible for compliance could void the user's authority to operate the equipment.
(2) Shielded interface cables and AC power cord, if any, must be used in order comply with the emission li
| If you have any problems or questions on this product, please call : | ||
| ADS Tech | Technical Support | 562.926.433 |
| North America Support Hours: M-F: 8 am - 5 pm, PST Email: support@adstech.com website: www.adstech.com | ADS Tech | |
| European Technical Support: +353.61.702042 | ||
ADS Technologies
North America Office
12627 Hidden Creek Way
Cerritos, CA, 90703
Phone: 562.926.1928
Technical Support: 562.926.4338
Technical Support Hours: M-F 8am-5pm PST
Fax: 562.926.0518
European Office
Shannon Industrial Estate
Shannon Co. Clare, Ireland
Phone: +353.61.702042
Part No. 181-593

www.adstech.com