GA 607 - Gas detector DEXAPLAN - Free user manual and instructions
Find the device manual for free GA 607 DEXAPLAN in PDF.

User questions about GA 607 DEXAPLAN
0 question about this device. Answer the ones you know or ask your own.
Ask a new question about this device
Download the instructions for your Gas detector in PDF format for free! Find your manual GA 607 - DEXAPLAN and take your electronic device back in hand. On this page are published all the documents necessary for the use of your device. GA 607 by DEXAPLAN.
USER MANUAL GA 607 DEXAPLAN
with sensor for liquid gas (propane, butane) and town gas/natural gas (methane)
Operation and safety notes
Page 5
Operation and safety notes


IB_GA607_UK_IRL_Cover.indd 4-6

EC Directives - Declaration of Conformity
Dexaplan GmbH declare that the Product listed below is in conformity with the Directives, Standards and other Normative Directives listed below:
89/336/EEC Electromagnetic Compatibility Directive (EMC) 73/23/EEC Low Voltage Directive
Product type: Gas Alarm, including 12 Volt Adapter
Model: GA 607
Intended use: Domestic Gas Detector
Standards relating to EMC Emission and Immunity:
For the Gas Alarm:
EN 55022:1998
EN61000-4:3:1999; EN61000-4:4:1996; EN61000-4:5:1996; EN61000-4:6:1997; EN61000-4:11:1995
For the Adapter:
EN 55014-1 (1993), Amendment A1 (1997) and Amendment A2 (1998)
EN 61000-3-2 (1995), Amendment A1 (1998) and Amendment A2 (1998)
EN 61000-3-3 (1995)
LVD, Low Voltage Directive:
IEC/EN 61558:1992 + Amd.1, Amd.2, Amd.3, & Amd.4
This Declaration is given on 26.07.2005 by:
Safety instructions Page 7
Initial operation.. 10
Power supply. 11
Installation.. 12
Operation 12
Function test. 13
Troubleshooting 13
Disposal 14
Warranty. 14
Service. 15
Declaration of conformity.. 15


Introduction
Please read these operating instructions thoroughly and carefully. They are part of this product and contain important instructions relating to its operation and handling. Please always observe all safety instructions. Before initial operation, please check that all parts are fitted correctly. If you have any questions or are unsure about handling of the device, please contact the dealer or the service office. Please keep these instructions in a safe place and pass them on to anyone else intending to use the device.

Proper use
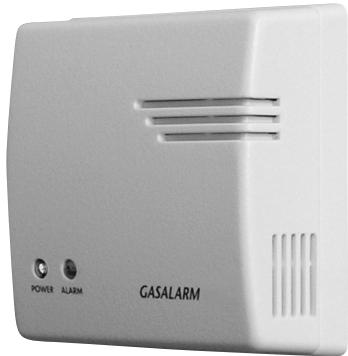
The gas alarm indicates a leakage of methane, propane or butane gas from appliances, lines, etc. with a high-frequency tone and a flashing red ALARM LED ③. It is intended for use in dry areas inside buildings, vehicles, caravans and boats. The power supply is either by way of a 12VDC mains adapter connected to the 230V 50Hz mains electricity or by connection to the 12VDC on-board power supply system of a car, caravan or boat. The device is for private use only. Any other use or modification of the device constitutes improper use and poses a serious risk of accident. The manufacturer is not liable for damage caused
by improper use or incorrect operation of the device. Before initial operation, please read all operating instructions carefully and refer to the page showing the illustrations. Keep these operating instructions in a safe place. Please pass on all supplied documents along with the device to anyone else intending to use it.
Pack contents
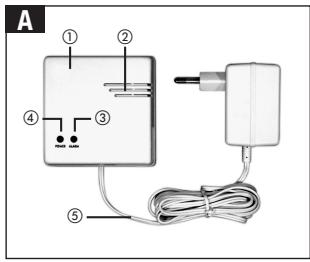
We supply the gas alarm with the following components (see Fig. A):
1x gas alarm
1x 12 V DC mains adapter
1x mounting fixture
2x fastening screws
2x wall plugs
1x operating instructions
Features
On the front of the casing (see Fig. A):
① Front of casing
② Piezo siren opening
③ ALARM LED
④ POWERLED
⑤ 12V DC mains adapter connecting cable
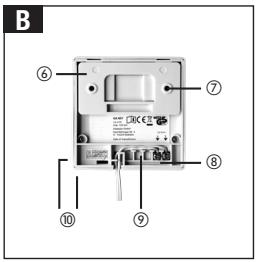
On the rear of the casing (see Fig. B):
⑥ Rear of casing


Initial operation
Preparation and materials required:
The stated materials are not included in the delivery scope. The information provided here is non-binding and intended as a guide. The quality of the material depends on individual local requirements. You will need:
Power supply: 12 V DC mains adapter connection to a 230V 50Hz socket, or 12 V DC on-board power supply system.
A crosstip screwdriver for installation with the fastening screws.
A pen to mark the installation points.
A drill for the mounting holes.
An in-line fuse holder (250 mA/slow-acting fuse) - only for connection to on-board supply system.
Selecting the installation position
Danger: take care not to damage any gas, electricity or telecommunication lines when fitting the device. Danger to life and risk of injury and damage.
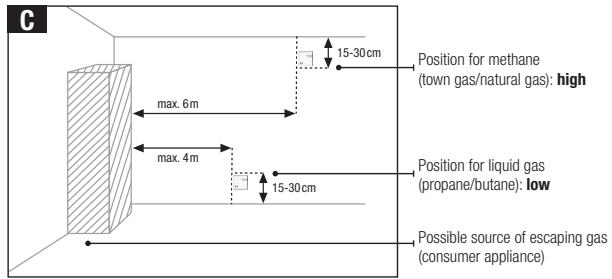
Choose a position for installation that is as close as possible to the gas appliance/device and no further than 4m (liquid gas) or 6m (methane) away from it (see Fig. C). Make sure that the mains socket for connection of the
12 V DC mains adapter is located max. 2 m away from the installation position of the gas alarm. To detect town, natural and methane gas, the installation position should be as far up on the wall as possible. The gas alarm should be mounted 15 - 30cm below the room ceiling and must be higher than the highest door or window opening. The gases in question are lighter than air and therefore rise. To detect propane and butane gas, choose a low installation position on the wall. It should be 15 - 30cm above the floor. Liquid gases are heavier than air and therefore sink to the floor and spread from there.
Do not under any circumstances install the gas alarm in any of the following places:
Outside buildings, e.g. to guard open crates of bottled gas.
Enclosed spaces (e.g. in cupboards or behind curtains), which could prevent the alarm from responding in the event of a gas leak.
Directly next to an oven.
- Directly above a washbasin or drain.
- Next to a door, window, ventilation, fan, air conditioning unit, etc.
Areas in which the temperature can fall


below 10^ or rise above +50^ or in which air humidity can rise above 95% .
- Areas in which dust or dirt can clog the sensor.
Any position in which it could accidentally get damaged or pulled down.
Areas under the risk of explosion.
Power supply
Danger: make sure that the system is not live when connecting the power supply.
Only operate the gas alarm connected to a 12 V DC power supply. Connect it either with the 12 V DC mains adapter (included in the delivery scope) or to a 12 V DC onboard power supply system of a car, caravan or boat.
Before connecting the 12 V DC power pack to the mains, make sure that the mains current is 230V 50Hz and equipped with a max. 16 amp fuse in accordance with requirements.
12 V DC mains adapter
Lead the bare cable ends (approx. 8 mm) of the 12 V DC connecting cable ⑤ from the 12 V DC mains adapter to the terminal screws ⑧ in the cable guide ⑨ . The cable guide provides strain relief.
Attach each cable end to a terminal screw ⑧ . The polarity is not important for this connection.
12 V DC on-board power supply system
○ Remove the connecting cable of the mains adapter from the terminal screws ⑧
- Equip the connecting cable for the power supply (12 V DC) in cars, caravans or boats with a switch.
o Lead the bare cable ends (approx. 8mm ) of the 12 V DC connecting cable of the 12 V DC power source to the terminal screws ⑧ in the cable guide ⑨. The cable guide helps to prevent strain on the connections.
Attach each cable end to a terminal screw ⑧ . The polarity is not important for this connection.
- Important information regarding on-board operation: only one power supply may be connected to the terminal screws (8), even if the mains adapter is not plugged in. The mains adapter will be damaged if a dual connection (parallel connection) is made.


Installation
Danger: make sure that the gas alarm is not live during installation.
○ Remove the mounting fixture ⑦ from the rear side of the casing ⑧ (see Fig. B).
Mark the installation position with the aid of the two round holes in the mounting fixture ⑦.
- Install the mounting fixture ⑦ in the chosen and marked position using the fastening screws and wall plugs supplied with the gas alarm.
- Push the gas alarm flush from above onto the mounting fixture ⑦.

Operation
Danger: Make sure that your hearing is not exposed to the loud siren for any length of time. This can cause serious damage to the hearing.
Make sure that the alarm is not triggered close to the ears. This can cause serious damage to the hearing.
Once the power supply has been connected properly, an automatic self-test is carried out: the gas alarm emits several loud alarm signals and at the same time the red ALARM LED ③ on the front of the casing (1) flashes. The
green POWER LED ④ then lights up to indicate that the device is ready for operation (see Fig. A)
12 V DC mains adapter
Switching on:
Plug the mains adapter directly and fully into a 230V - 50Hz mains socket. Do not use any type of tabletop socket or extension cable, since these can cause interruptions in the power supply.
Switching off:
Remove the mains adapter from the mains socket.
12 V DC on-board supply system
Switching on:
- Switch the 12 V DC on-board power supply on.
Switching off: - Switch the 12 V DC on-board power supply off.
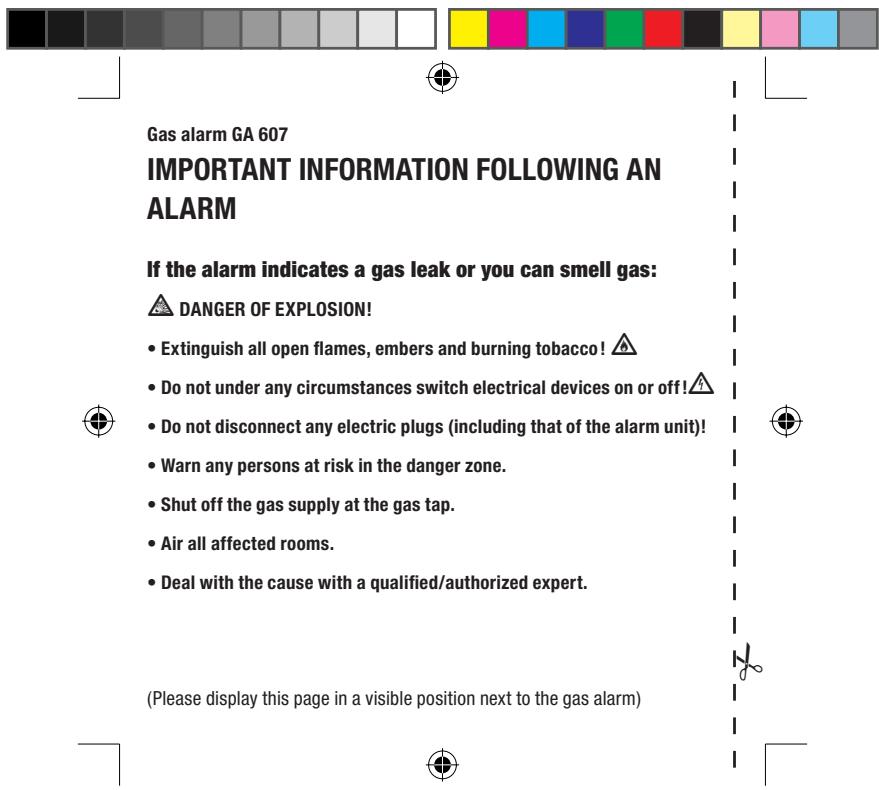
Alarm in the event of a gas leak
The gas alarm detects a gas leak with the sensor. If the concentration of gas at the sensor exceeds the pre-set sensitivity threshold on the gas alarm, the alarm responds: the red ALARM LED ③ flashes and the loud alarm signal is emitted.

The alarm continues until the gas concentration falls back to below the pre-set sensitivity level.
Follow the instructions on to how to respond in the event of a gas leak.
Function test
Use a gas lighter to test the function of the gas alarm.
- Allow gas to escape from the gas lighter
directly next to the lower or side sensor opening
Make sure that there is no flame on the lighter. The gas alarm detects the gas with the sensor. If the gas concentration at the sensor exceeds the pre-set sensitivity threshold, the alarm responds: the red ALARM LED ③ flashes and the loud alarm signal is emitted.
Do not allow any more gas to escape from the lighter once the gas alarm has
Troubleshooting
| Fault | Cause | Remedy |
| The gas alarm responds when there is no actual gas leak. | The gas alarm will respond to fumes from cleaning agents, paint, lacquers, sprays, water vapour, steam from cooking, tobacco smoke and smoke from candles. | Remove the source of the fumes. |
| The gas alarm fails the function test. | The service life of the gas alarm expires after approx. 5 years of operation. | Replace the gas alarm. |

13

the warranty, please contact the service office for your country. This is the only way to ensure that your device can be sent in free of charge. This warranty is only valid for the first purchaser and is not transferable.
The warranty furthermore covers material or manufacturing defects only. It does not apply to wear parts or damage to fragile parts. The product is solely intended for private use and not for commercial use. No claim for damages may be brought in the event of fire or explosion. An alarm is no substitute for insurance cover and does not replace your duty of care. In the event of incorrect and/or improper handling, the use of force or any work on the device that is not performed by the service office, the warranty shall expire. This warranty does not restrict your statutory rights.
Declaration of conformity C E
This product satisfies the requirements of the valid European and national directives (Electromagnetic Compatibility 89/336/EEC and Low-Voltage Directive 73/23/EEC). Its conformity has been verified. The declaration of conformity can be found on the inside front cover.
Dexaplan GmbH
Information on dealing with problems can be found under www.dexaplan.com.
If you have any questions, please contact our service office by email (service@dexplan.de) or by telephone (GB) 08702413029
1890851851).Mo.-Fr.08:30-17:00
Here you can obtain all necessary information on service questions such as returns, etc.