MC 610 - Surveillance Camera DEXAPLAN - Free user manual and instructions
Find the device manual for free MC 610 DEXAPLAN in PDF.

| Product type | Wired surveillance camera |
| Brand | DEXAPLAN |
| Model | MC 610 |
| Intended use | Indoor and outdoor surveillance (IP44), private domestic use |
| Image sensor | Black and white CMOS sensor |
| Image resolution | 384 x 287 pixels |
| Viewing angle | Approximately 32° horizontal |
| Infrared illumination | Integrated infrared LEDs for night vision |
| Microphone | Built-in |
| Power supply | Mains adapter 230V~ 50Hz, output 9V DC, max. 150 mA |
| Power consumption | 0.9 VA (adapter) |
| Protection rating | IP44 (weather resistant) |
| Operating temperature | -10 °C to +39 °C |
| Housing material | ABS |
| Dimensions (excluding accessories) | 43 mm × 58 mm × 33 mm |
| Weight (excluding accessories) | Approximately 39 g |
| Connectivity | SCART connector for TV or VCR |
| Included cable length | 15 m (connection cable with SCART plug) |
| Cable extension possible | Up to 45 m max. with optional extension cables (MC-10 M) |
| Package contents | Camera, wall mount, 15 m cable, mains adapter, screws, wall plugs, cable clips, Allen key, manual |
| Maintenance and cleaning | Disconnect before cleaning; use a soft cloth and mild detergent or soapy water; do not use solvents |
| Safety | Do not expose to moisture; keep cables away from children; check for damage before use |
| Warranty | 3 years from date of purchase (domestic use only) |
| Customer service | www.dexaplan.com or e-mail: service@dexaplan.de |
Frequently Asked Questions - MC 610 DEXAPLAN
User questions about MC 610 DEXAPLAN
0 question about this device. Answer the ones you know or ask your own.
Ask a new question about this device
Download the instructions for your Surveillance Camera in PDF format for free! Find your manual MC 610 - DEXAPLAN and take your electronic device back in hand. On this page are published all the documents necessary for the use of your device. MC 610 by DEXAPLAN.
USER MANUAL MC 610 DEXAPLAN
Proper use 4
Included items.. 4
Features and equipment.. 5
Technical information.. 5
Safety advice 6
Planning where you install the device
Power supply . 7
Checking that the camera functions properly.. 7
Assembly and installation
Cable feed hole (for outside installation only).. Page 7
Installing the camera.. 8
Connecting the camera to the television.. 9
Operation 9
Optional accessories.. 9
9
Maintenance. 10
Disposal 10
Guarantee. 10
Service. 11

GB/IE 3
Introduction
Please read carefully and completely through these operating instructions and fold out page 3, the page with the illustrations. These operating instructions form part of the product and contain important information about bringing the product into use and its handling.
Always observe all the safety advice. If you have any questions or are unsure of how to handle the device please consult our Internet site at www.dexaplan.com or contact our service centre.
Be careful to keep these instructions and if necessary pass them on to a third party.
Proper use
The MC 610 is a ready-to-connect video security camera, which is quick and easy to install. The camera is weather-proof (ingress protection IP44) and therefore is suitable for monitoring interior areas as well as for installation and monitoring outside. It is intended exclusively for use in private domestic dwellings. The camera can be connected to the scart socket on an ordinary television set.
Alternatively, the MC 610 can be connected to a video recorder to record pictures and sound.
Using extension cables the maximum distance
between camera and television can be up to 45m
The power to the security camera is provided by the supplied 9V DC mains adapter connected to the 230V AC,50Hz mains supply.
Any other use or modification to the device shall be
Introduction
considered as improper use and could give rise to considerable dangers. The manufacturer will not be liable for damage caused by improper use or incorrect operation.
Included items
Check that all the items and accessories are present and undamaged immediately after unpacking.
1 Camera
1 Wall bracket including clamp bolt and nut
1 Ready-to-connect 15m connection cable with scart connector
1 Mains adapter with approx. 1.8m cable
2 Mounting screws and 2 dowels
15 Cable clips
1 Allen key
1 Operating instructions
GB/IE 4
Features and equipment
See Fig. A
① Camera
② Infrared LEDs
③ Ball joint
④ Cable plug
⑤ Connection cable
⑥ Socket
⑦ Scart plug
⑧ Mains adapter
(9) Mains adapter cable plug
10 Mains adapter cable
11 Bracket
Cable cover
⑬ Nut
14 Washer
15 Cable eye
16 Attachment clamp
⑰ Clamp bolt
Mounting screws
19 Dowels
20 Allen key
② Cable clips
Technical information
Camera
Operating voltage: 9V=DC
Current input: max. 150 mA
Power supply: From the supplied mains adapter
Installation site: In internal areas and sheltered external positions
Protection type: IP 44
Image sensor: Black/white CMOS sensor
Image resolution: 384x287 pixels
Angle of view: Approx. 32^ horizontal
Lighting: Infrared LEDs (for lighting the nearby area during darkness)
Microphone: Integrated
Operating temperature: -10 °C to +39 °C
Housing material: ABS
Housing dimensions: 43mm × 58mm × 33mm
Weight: Approx. 39 g (not including accessories)
Mains adapter
Power supply: 230V\~ AC,50Hz
Power consumption: 0.9VA
Output: 9V = = = DC, max. 150 mA
Installation site: Internal rooms only
Safety advice
The following advice is intended for your safety and satisfaction during operation of the device. Please note that non-observation of this safety advice can lead to considerable danger.
Explanation of the symbols and terms used:
Danger! Non-observance of this instruction or advice could endanger life and health.
Attention! Non-observance of this instruction or advice will endanger property.
Tip! Observance of this instruction or advice will achieve best performance.
Danger!
- Do not leave small children unattended with the device, packaging material or small parts! Otherwise there is a risk to life from suffocation!
- When you drill holes or install the fastenings make sure that you do not damage any cables or pipes carrying gas, electricity, water or telecommunications! Otherwise there is a risk to life and limb!
- Handle the electricity supply feed cable carefully! Place the cable in such a position that it cannot be damaged or become a trip hazard. Fasten the cable in place with an adequate number of cable clips. Do not pull the cable over sharp edges or allow it to become squashed or clamped in other ways. Otherwise there is a risk to life and limb!
If you use the device for monitoring babies or small children ensure that the camera and cable are out of reach of children. Otherwise there is a risk to life and limb!
- Do not allow the mains adapter to come into contact with moisture! Otherwise there is a danger to life!
Attention!
- Operate the camera with 9V = -DC only! Check before connecting the mains adapter to the mains that the electricity supply circuit is 230V AC, 50Hz and is fitted with a max. 16 amp fuse or trip.
- Protect the camera and cable from strong magnetic or electric fields!
- Do not place the device near fire, heat, or subject it to prolonged high temperatures!
- Protect the device from violent mechanical loads and vibrations!
- Use the device only with the supplied original parts or original accessories!
- Before assembling and bringing the device into use check the supplied items for damage and completeness!
- If the device is damaged (e.g. transport damage) do not connect it. If in doubt ask your customer service centre. Repairs and interference with the device may only be carried out by trained specialists.
- Use a dry or slightly moist cloth for cleaning the device. Never immerse the device in water.
Planning where you install the device
Before you install the camera you must first plan what to do at the installation site.
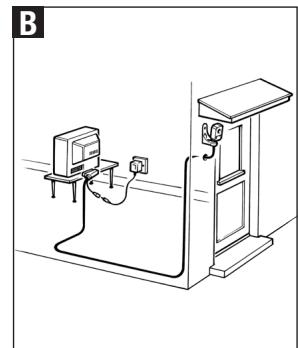
Example installation see Fig. B
Check that the camera works satisfactorily at the installation site before you install it.
Tip! Observe the following points:
The camera should be attached in such a way that as little direct light or direct sunlight as possible strikes the lens. When considering this, remember that the position of the sun does not remain constant. The camera image is best checked before it is installed. To do this set the camera operating and hold it in the planned position. If necessary alter the position of the camera until you obtain your desired picture coverage.
The camera has an infrared light for the adjacent area for better facial recognition. Additional lighting in the area at night will improve the image quality from the camera.
If you wish to install the camera outside a building please remember that it must be possible to provide a cable feed hole to the installation site. The installation site should if possible be sheltered from rainfall.
- Avoid wherever possible placing the connection cable directly alongside electrical cables otherwise this could adversely affect picture and sound quality.
Power supply
- Connect the scart-plug ⑦ to the scart socket of your television set.
Insert the cable plug ④ firmly into the hole in the ball joint ③ of the camera ①
Tip! Insert the cable plug so firmly into the ball joint that you hear three clicks. Only when you do this is the cable properly connected.
Connect the mains cable plug ⑨ to the socket ⑥.
Connect the mains adapter ⑧ to a mains socket.
Checking that the camera functions properly
- Switch on your television.
- Set your television to the AV channel corresponding to the connected scart socket.
- Now check picture and sound.
- Lay out the cable on a temporary basis to the proposed installation site.
Check the actual picture displayed. - Adjust the camera direction if necessary.
- Switch the television off again.
Pull out all the connections.
Continue with the installation.
Assembly and installation
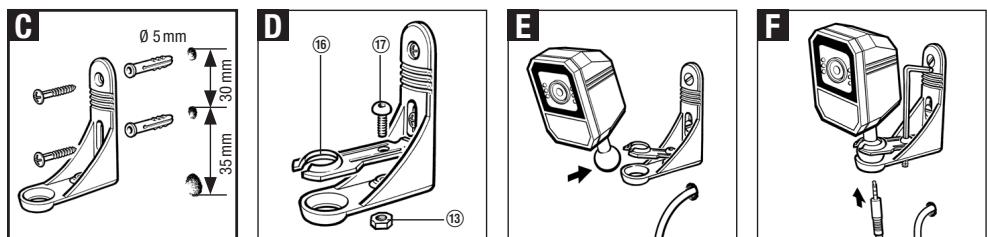
Cable feed hole (for outside installation only)
- Select a suitable position for the cable feed hole (preferably directly below the bracket ⑪)

1 3
Assembly and installation
(refer to Fig. C), so that the cable feed hole is protected by the cable cover (2) (see Figs. C and H). Ensure that the hole is large enough for the cable plug 4 of the connection cable (min. 8mm ).
- Push the cable plug ④ from inside to outside through the hole.
Tip! Do not try to cut through the connection cable or take off the cable plug.
Pull through enough of the connection cable ⑤ so that it reaches the camera ①
Installing the camera
See Fig. C
- Mount the bracket ⑪ at the proposed installation site using the supplied mounting screws ⑱ and dowels ⑲ (hole spacing 30 mm, drilled depth approx. 25 mm).
See Fig. D
The bracket, washer and attachment clamp 16 have been preassembled together at the factory with the nut 13 and clamp bolt 17.
See Fig. E
If necessary loosen the clamp bolt 17 fastened with the nut 13 using the supplied Allen key 20, so that the attachment clamp 16 can be moved.
Push the ball joint ③ of the camera between the bracket ① and attachment clamp ⑥
See Fig. F
- Now use the supplied Allen key ② to carefully tighten the clamp bolt.
Tip! Tighten the clamp bolt enough so that the camera is held in the desired position. Do not over-tighten the bolt or the bracket may be damaged. - Now insert the cable plug ④ through the cable eye ⑤ into the hole in the ball joint ③ of the camera and press it in firmly. Insert the cable plug so firmly into the ball joint that you hear three clicks. Only when you do this is the cable properly connected.
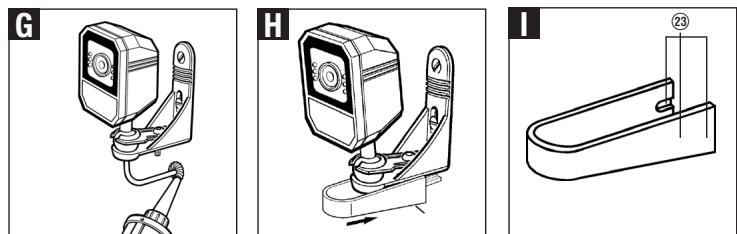
See Fig. G
If the camera is mounted outside a building and a cable feed hole has been made then the hole must be sealed, e.g. with silicone.
See Fig. H
Push the cable cover ⑫ over the guide from front to back. If the connection cable ⑤ is led over a surface (not fed through a drilled hole directly behind the cable cover) then you must cut out one of the three preformed breakout areas ② (see Fig. I) in the cable cover.
See Fig. B
Lay the connection cable ⑤ back to your television and if necessary fix it in place using the supplied cable clips ②1.
Connecting the camera to the television
See Fig. B
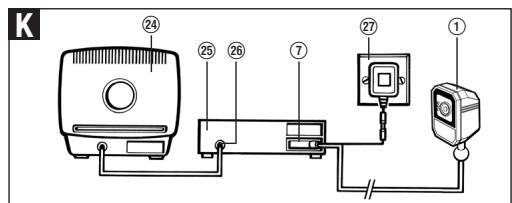
Connect the Scart-plug ⑦ to the scart socket of your television set. If you do not have a scart socket on your television or the scart socket is already occupied, then you can connect the camera through a video recorder ⑤ with a scart input ⑥ (see Fig. K). Alternatively you can use a scart switcher (available in electrical appliance shops).
Connect the mains cable plug ⑨ to the socket ⑥.
Connect the mains adapter ⑧ to a 230V mains socket ⑦.
Operation
- Switch on your television set.
- Select the AV channel (on most televisions it may be called VCR, channel 0 or marked with the symbol ). If the camera is connected through a video recorder (see Fig. K), select the AV channel as above.
You should now see the camera image and hear the sound from the microphone integrated into the camera.
Optional accessories
Extension cable
The camera cable can be extended to a maximum
length of up to 45m . 10m extension cables are available for this (MC-10 M). The extension cables are fitted with a cable plug and a cable socket and can therefore be connected together.
You can find information about ordering an extension cable or other accessories on the Internet at www.dexaplan.com
Rectifying faults
| Fault | Cause | Remedy |
| No picture/sound | Television is not tuned to the AV channel | Switch your te-levatorion to theAV channel cor-responding to thescart connector |
| Camera has no power supply | Check the mains adapter connection. | |
| The connection to the camera is interrupted | Check that the scart plug isproperly seated and that the ca-ble plug is fully inserted (when you insert it you must hear 3x clicks) |
GB/IE 9
| Fault | Cause | Remedy |
| No sound | The volume at the television is set too low | Set the volume at the television |
| Poor picture at dusk/dawn/in darkness | The camera needs light to show an image | Place the camera a maximum of approx. 1 m away from the object monitored or install some additional lighting |
Maintenance
- Disconnect the mains adapter from the mains before carrying out any maintenance or cleaning on the device.
- You should regularly check the device to see that it is safe and working properly.
- Use a soft cloth and some mild cleaning agent or weak soap solution to clean the surface of the camera housing.
- Never use petrol, thinners or similar chemicals.
Disposal
Dispose of packaging materials and worn out devices at a local authority approved disposal facility.
In accordance with European Directive 2002/96/EC (covering waste electrical and electronic equipment
and its transposition into national legislation, worn out electrical devices must be collected separately and taken for environmentally compatible recycling.
Guarantee
This product carries a 3-year guarantee from the date of purchase. Please retain the sales voucher as proof of purchase. In the event of a claim under the guarantee please contact the service centre for your country to ensure that your goods can be returned at no cost. Furthermore, the guarantee is restricted to defects in material and manufacture only. It does not cover wear parts or damage to fragile parts. The product is intended for private and domestic use exclusively. It is not intended for commercial use. A camera does not replace your duty of supervision and care. The guarantee is void in the event of misuse or improper handling, the use of force or interference unless carried out by the service centre. This guarantee does not limit your statutory rights.
10 GB/IE
Service
Information on what to do in the event of a problem can be found on the Internet at www.dexaplan.com. In the event of questions please contact our service centre by e-mail (service@dexaplan.de) or telephone (空) 0870 / 2413029)(空) 081890 / 851851)
Monday-Friday, 8:30 - 17:00 hours. There you will obtain all the necessary information about service procedures such as returning devices etc.