
FERRARI GT EXPERIENCE - Racing simulator TRUSTMASTER - Free user manual and instructions
Find the device manual for free FERRARI GT EXPERIENCE TRUSTMASTER in PDF.
| Product type | Racing simulator with steering wheel and pedals |
| Brand | TRUSTMASTER |
| Model | FERRARI GT EXPERIENCE |
| Compatibility | PlayStation 2, PlayStation 3, PC (Windows XP/Vista) |
| Connectivity | USB (PC/PS3), Gameport (PS2), RJ45 for pedals |
| Power supply | Via USB port of the console or PC |
| Steering wheel | Rotation with 2 sensitivity modes (Normal and High) |
| Gear shifters | 2 digital Up/Down levers (paddles) |
| Action buttons | 3 action buttons + D-Pad + SE/ST buttons (Select/Start) + Home button (PS3) |
| Pedals | Accelerator and brake, separate (3 axes) or combined (2 axes) modes |
| Programming | Programmable: all buttons and D-Pad can be assigned to other buttons or pedals |
| Vibration feedback | Force Feedback (Vibration Feedback) configurable (8 effects on PC) |
| Mounting system | Table mounting with clamping screw |
| Dimensions (steering wheel) | Approx. 28 cm diameter, 30 cm width |
| Weight (set) | Approx. 2.5 kg |
| Cable | Detachable USB cable, pedal cable included |
| Included CD-ROM | PC drivers (Vibration Feedback) |
| Manual languages | French, English, German, Spanish, Italian, Dutch, Russian, etc. |
| Warranty | 2 years against material and workmanship defects |
| Technical support | Website: thrustmaster.com, phone (Canada, France, Switzerland, Belgium) |
| Recycling | Do not dispose of with household waste; deposit at a WEEE collection point |
Frequently Asked Questions - FERRARI GT EXPERIENCE TRUSTMASTER
User questions about FERRARI GT EXPERIENCE TRUSTMASTER
0 question about this device. Answer the ones you know or ask your own.
Ask a new question about this device
Download the instructions for your Racing simulator in PDF format for free! Find your manual FERRARI GT EXPERIENCE - TRUSTMASTER and take your electronic device back in hand. On this page are published all the documents necessary for the use of your device. FERRARI GT EXPERIENCE by TRUSTMASTER.
USER MANUAL FERRARI GT EXPERIENCE TRUSTMASTER
1 2 digital gearshift levers (UP and DOWN)
2 LED
3 Action buttons
4 D-Pad
5 "SE" and "ST" buttons:
- for Select and Start
- for programming
6 "Home" button for PlayStation® 3
7 USB selector ("PC" / "PS3")

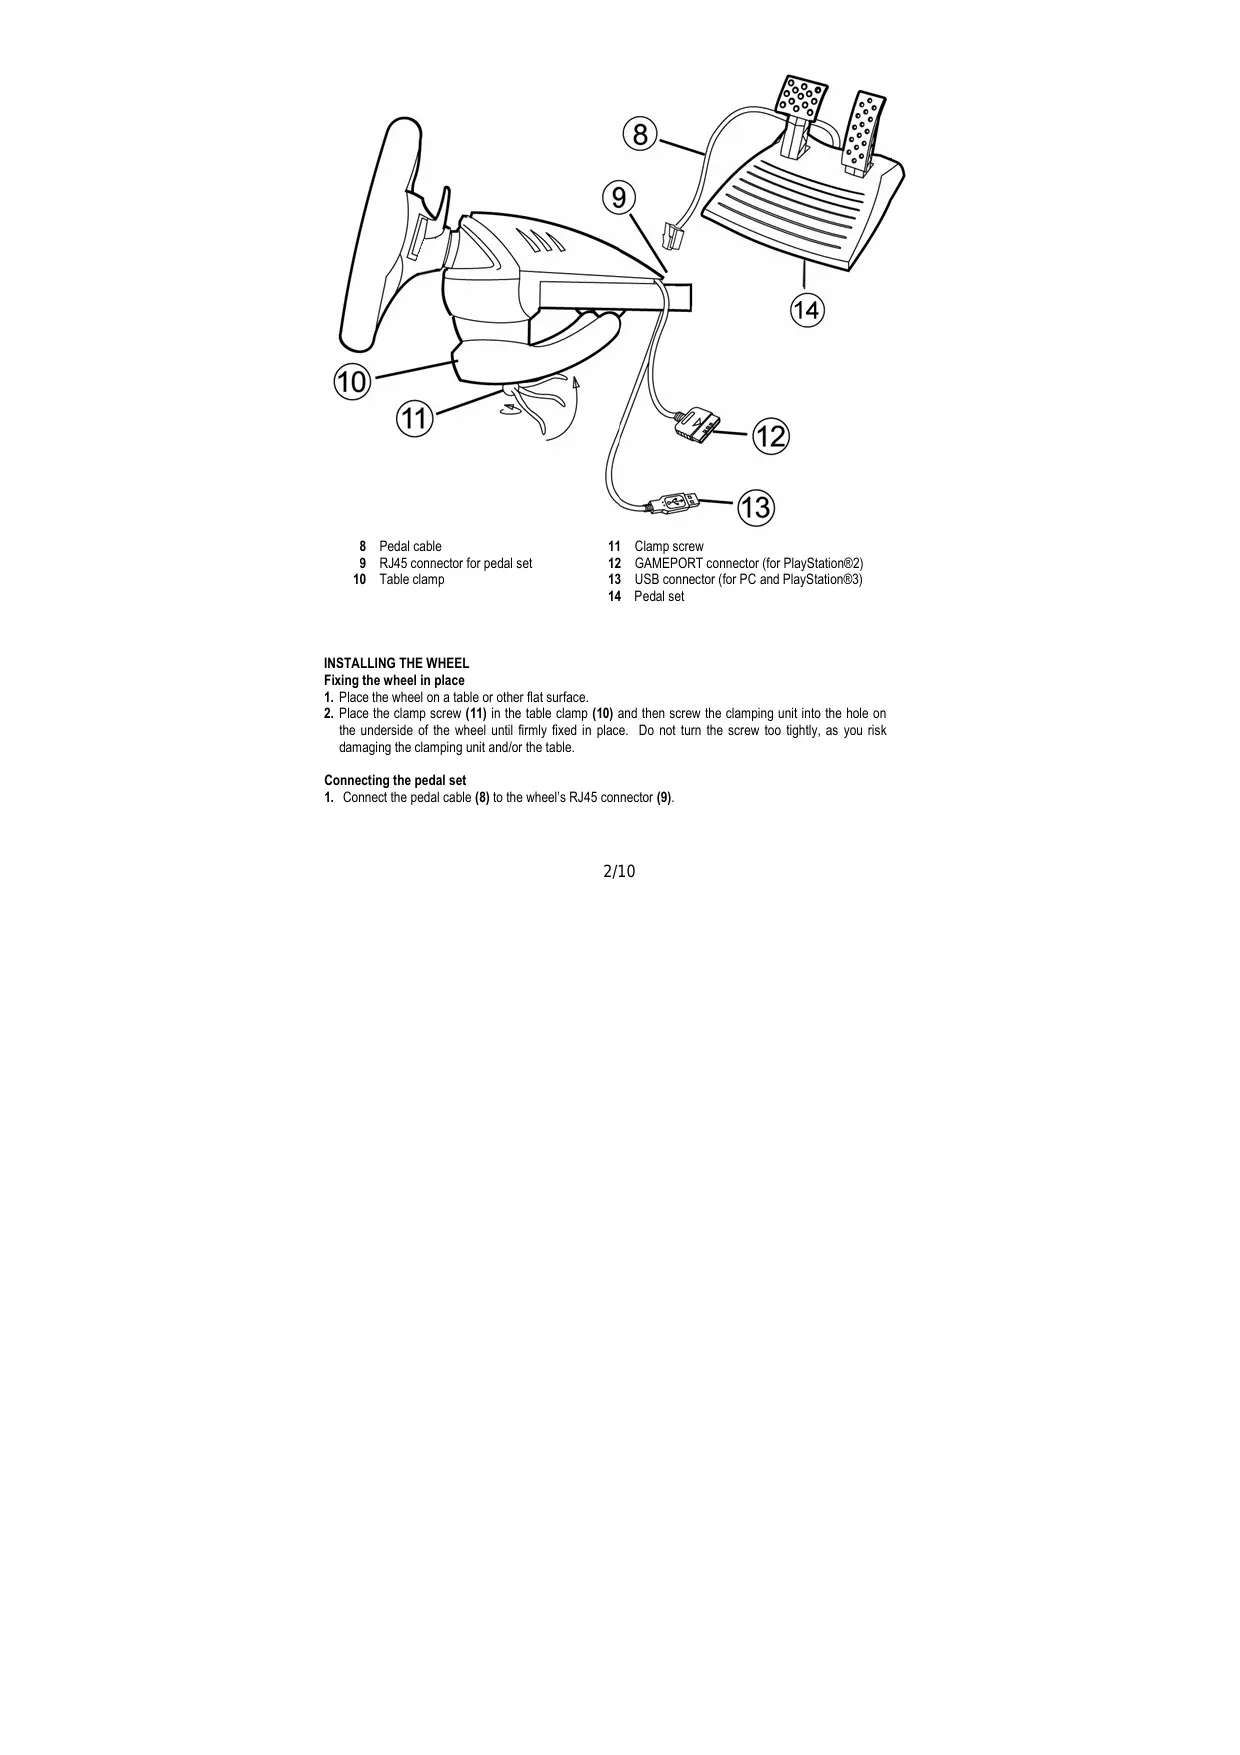
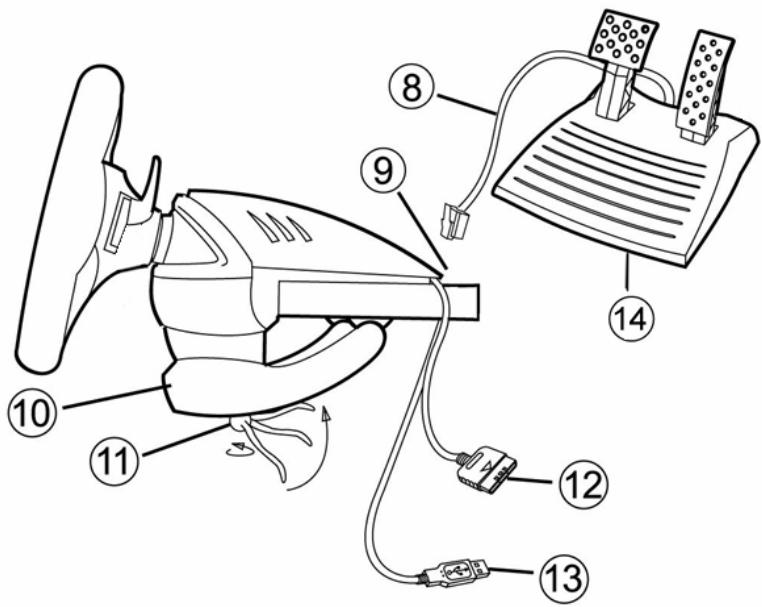
8 Pedal cable
9 RJ45 connector for pedal set
10 Table clamp
11 Clamp screw
12 GAMEPORT connector (for PlayStation®2)
13 USB connector (for PC and PlayStation®3)
14 Pedal set
INSTALLING THE WHEEL
Fixing the wheel in place
- Place the wheel on a table or other flat surface.
- Place the clamp screw (11) in the table clamp (10) and then screw the clamping unit into the hole on the underside of the wheel until firmly fixed in place. Do not turn the screw too tightly, as you risk damaging the clamping unit and/or the table.
Connecting the pedal set
- Connect the pedal cable (8) to the wheel's RJ45 connector (9).
PLAYSTATION® 2
INSTALLATION ON PLAYSTATION® 2
- Connect the PS2 Gameport connector (12) to port number 1 on your console.
- Turn on your console and launch the game.
- Your wheel's LED lights up in red.
You are now ready to play!
ATTENTION: NEVER CONNECT THE USB CABLE (13) TO YOUR PLAYSTATION® 2 (to avoid the risk of damaging your wheel or your console)
IMPORTANT NOTES ON PLAYSTATION® 2
In certain racing games, do not hesitate to test out your wheel's 2 sensitivity modes in order to optimize its precision and responsiveness.
PLAYSTATION® 3
INSTALLATION ON PLAYSTATION® 3
- Set the wheel's USB selector (7) to the "PS3" position.
- Connect the USB connector (13) to a USB port on your console.
- Turn on your console.
- Launch the game.
You are now ready to play!
USING THE "HOME" BUTTON (6)
Your wheel's "Home" button allows you to exit games and access your PlayStation®3 system's menus.
IMPORTANT NOTES ON PLAYSTATION® 3
- The wheel's USB selector (7) must always be set to the "PS3" position before connecting your wheel.
- In "1 Player" mode: If your official gamepad is turned on, you will have to switch it to "controller port 2" in order for your wheel to be functional.
- On PlayStation® 3, the wheel is only compatible with PlayStation® 3 games (and will not function with PlayStation® 2 games).
- In certain racing games, do not hesitate to test out your wheel's 2 sensitivity modes in order to optimize its precision and responsiveness.
PC
Installation on PC
The CD-ROM included with this product allows you to install the "Vibration Feedback" drivers.
- Set the wheel's USB selector (7) to the "PC" position.
- Insert the installation CD-ROM into your CD-ROM drive. Follow the on-screen instructions to install the "Vibration Feedback" drivers. Once the installation is complete, click Finish and restart your computer.
- Once your computer has restarted, connect the USB connector (13) to one of your computer's USB ports. Windows® XP or Vista will automatically detect the new device.
- Driver installation
Drivers are installed automatically. Follow the on-screen instructions to complete the installation.
- Click Start/Settings/Control Panel and then double-click Game Controllers (or Gaming Options, depending on your operating system).
The Game Controllers dialog box displays the wheel's name with OK status.
-
In the Control Panel, click Properties to configure your gamepad:
-
Test device: Allows you to test and visualize the buttons, D-pad and axes of the wheel and pedal set.
- Test forces: Allows you to test 8 vibration effects and configure effect and vibration settings.
You are now ready to play!
IMPORTANT NOTES ON PC
- The wheel's USB selector (7) must always be set to the "PC" position before connecting your wheel.
- Your wheel and pedals automatically self-calibrate upon connection of the USB connector. In the event of any problems, you can also carry out manual calibration by downloading the "Thrustmaster Calibration Tool" software, available at the following address:
http://ts.thrustmaster.com
ADVANCED FUNCTIONS
ADJUSTING THE WHEEL'S SENSITIVITY
Your wheel's steering has 2 sensitivity modes:
- Normal sensitivity (the default mode)
-
High sensitivity (must be set)
-
Setting "High Sensitivity" mode:
| Action | LED color |
| Simultaneously press and release: the D-Pad (4) + the 2 UP and DOWN levers (1) | FLASHES SLOWLY |
Your wheel's steering is now more sensitive.
(This procedure must be repeated each time you restart or disconnect your wheel)
- Setting "Normal Sensitivity" mode (default mode):
| Action | LED color |
| Simultaneously press and release: the D-Pad (4) + the 2 UP and DOWN levers (1) | DOES NOT FLASH |
Your wheel's steering has now returned to normal sensitivity (the default mode)
PROGRAMMING THE WHEEL AND PEDALS
Your wheel is fully programmable:
- All buttons as well as the D-Pad can be switched between themselves.
- All buttons as well as the D-Pad can be programmed onto the 2 pedals.
Examples of possible applications:
- On PS2 and PS3: Programming L2/R2 or L3/R3 onto the 2 UP and DOWN digital levers (L1/R1).
- Programming a button(s) onto one or both pedals.
-
Switching different buttons for greater accessibility.
-
Programming procedure
| Steps | Action | LED color |
| 1 | Simultaneously press and release: SE + ST (5) | OFF |
| 3 | Press and release the button to program. | FLASHES QUICKLY |
| 4 | Press and release the button or pedal onto which you wish to place your function. | ON |
Your programming has now taken effect.
(You must repeat this procedure each time you restart or disconnect your wheel)
Erasing your programming
| Steps | Action | LED color |
| 1 | Press and hold for 2 seconds: SE + ST (5) | TURNS OFF THEN ON AGAIN |
Your programming has now been erased.
CONFIGURING THE PEDALS ON PLAYSTATION® 2 AND PLAYSTATION® 3
On these consoles, your wheel's accelerator and brake controls are in "separate" mode by default, meaning that the pedals function on independent axes:
- On PlayStation® 2:
"Accelerator" = "Cross" button & "Brake" = "Square" button
- On PlayStation® 3:
"Accelerator" = "R2" trigger & "Brake" = "L2" trigger
For a different type of control (to limit skidding, for example), you can switch your wheel to "combined" (2 axes) mode: the pedals then function on a single axis.
- On PlayStation® 2 and PlayStation® 3:
"Accelerator and Brake" = Up/Down direction on "Right mini-stick"
- Setting "Combined Pedals" mode
| Action | LED color |
| Simultaneously press and release: the 2 pedals (14) + the “Home” button (6) | GREEN |
Your pedals are now combined
(You must repeat this procedure each time you restart or disconnect your wheel)
- To return to "Separate Pedals" mode (the default mode)
| Action | LED color |
| Simultaneously press and release: the 2 pedals (14) + the “Home” button (6) | RED |
| On PlayStation® 2 On PlayStation® 3 |
Your pedals have now returned to the default mode: "Separate"
CONFIGURING THE PEDALS ON PC
Your wheel's accelerator and brake controls are in "separate" (3 axes) mode by default, meaning that the pedals function on independent axes.
3 axes mode allows you to considerably improve the precision of your driving.
If your game does not support 3 axes mode, your wheel's pedals will not function properly. You will then have to exit the game and select "combined" (2 axes) mode instead.
| Mode | LED color |
| Separate pedals (3 axes) | RED |
| Combined pedals (2 axes) | GREEN |
- Selecting axes via "Software"
(This setting will be saved even after you restart or disconnect your wheel)
On page 1 of the "Control Panel": Select the mode you wish to use, then click OK.
- Selecting axes via "Hardware"
(This setting will not be saved: It must be repeated each time you restart or disconnect) (Allows you to select your mode directly in your game's "Controls" options)
Simultaneously press and release: the 2 pedals (14) + the "Home" button (6)
TROUBLESHOOTING AND WARNINGS
-
My wheel doesn't function correctly or appears to be improperly calibrated:
-
Switch off your computer or your console, completely disconnect your wheel including all cables, then reconnect the wheel and restart your game.
- If the problem persists on PC, download the "Thrustmaster Calibration Tool" manual calibration software available at the following address: http://ts.thrustmaster.com
- Never move the wheel or pedals when connecting your wheel in order to avoid any calibration problems.
My pedal set does not work correctly:
- Reconfigure your wheel in your game's controller options section.
-
If the problem persists on PC, exit the game and switch the pedals to "combined" (2 axes) mode. You can then return to your game to reconfigure the wheel with the new axes.
-
I can't configure my wheel:
-
On PS2 and PS3: In your game's "Options / Controller / Gamepads" menu: select the most appropriate configuration.
- On PC: In your game's "Options / Controller / Wheels" menu: select the most appropriate configuration.
- Please refer to your game's user manual or online help for more information.
-
You can also use your wheel's "programming" function to resolve this type of problem.
-
On PC or PS3, my wheel does not work correctly:
-
Exit your game, disconnect your wheel, verify that the "PC/PS3" USB selector (7) is in the proper position, then reconnect everything and try again.
- On PC, my game's menus scroll by themselves:
- Exit the game and switch the pedals to "combined" (2 axes) mode. Then return to your game to reconfigure the wheel with the new axes.
- On PC, the vibrations are continuous:
- Decrease the intensity of force effects in your game's controller options section or adjust the forces in the wheel's control panel.
- In your game's controller options, select "Force type: Gamepad" (if the option is available).
My wheel's steering is not responsive enough: - Switch your wheel to high sensitivity mode.
FAQs, tips and drivers available at www.thrustmaster.com
TECHNICAL SUPPORT
If you encounter a problem with your product, please go to http://ts.thrustmaster.com and click Technical Support. From there you will be able to access various utilities (Frequently Asked Questions (FAQ), the latest versions of drivers and software) that may help to resolve your problem. If the problem persists, you can contact the Thrustmaster products technical support service ("Technical Support"):
By email:
In order to take advantage of technical support by email, you must first register online. The information you provide will help the agents to resolve your problem more quickly. Click Registration on the left-hand side of the Technical Support page and follow the on-screen instructions. If you have already registered, fill in theUsername and Password fields and then click Login.
By telephone:
| United Kingdom | 08450800942Charges at local rate | Monday to Friday from Noon to 4pm and 5pm to 10pm Saturday from 9am to Noon and 1pm to 7pm Sunday from 9am to Noon and 1pm to 4pm |
| United States | 1-866-889-5036Free | Monday to Friday from 7am to 11am and from Noon to 5pm Saturday and Sunday from 7am to Noon (Eastern Standard Time) |
| Canada | 1-866-889-2181 Gratisuit / Free | Monday to Friday from 7am to 11am and from Noon to 5pm Saturday and Sunday from 7am to Noon (Eastern Standard Time) |
| Denmark | 80887690Free | Monday to Friday from 1pm to 5pm and 6pm to 11pm (English) Saturday from 9am to 1pm and 2pm to 8pm Sunday from 10am to 1pm and 2pm to 5pm |
| Sweden | 0200884567Free | Monday to Friday from 1pm to 5pm and 6pm to 11pm (English) Saturday from 9am to 1pm and 2pm to 8pm Sunday from 10am to 1pm and 2pm to 5pm |
| Finland | 0800 913060Free | Monday to Friday from 2pm to 6pm and 7pm to Midnight (English) Saturday from 10am to 2pm and 3pm to 9pm Sunday from 11am to 2pm and 3pm to 6pm |
WARRANTY INFORMATION
Worldwide, Guillemot Corporation S.A. ("Guillemot") warrants to the consumer that this Thrustmaster product will be free from material defects and manufacturing flaws for a period of two (2) years from the original date of purchase. Should the product appear to be defective during the warranty period, immediately contact Technical Support, who will indicate the procedure to follow. If the defect is confirmed, the product must be returned to its place of purchase (or any other location indicated by Technical Support).
Within the context of this warranty, the consumer's defective product will, at Technical Support's option, be either repaired or replaced. Where authorized by applicable law, the full liability of Guillemot and its subsidiaries (including for indirect damages) is limited to the repair or replacement of the Thrustmaster product. The consumer's legal rights with respect to legislation applicable to the sale of consumer goods are not affected by this warranty.
This warranty shall not apply: (1) if the product has been modified, opened, altered, or has suffered damage as a result of inappropriate or abusive use, negligence, an accident, normal wear, or any other cause not related to a material defect or manufacturing flaw; (2) in the event of failure to comply with the instructions provided by Technical Support; (3) to software not published by Guillemot, said software being subject to a specific warranty provided by its publisher.
Additional warranty provisions
In the United States of America and in Canada, this warranty is limited to the product's internal mechanism and external housing. Any applicable implied warranties, including warranties of merchantability and fitness for a particular purpose, are hereby limited to two (2) years from the date of purchase and are subject to the conditions set forth in this limited warranty. In no event shall Guillemot Corporation S.A. or its affiliates be liable for consequential or incidental damage resulting from the breach of any express or implied warranties. Some States/Provinces do not allow limitation on how long an implied warranty lasts or exclusion or limitation of incidental/consequential damages, so the above limitation may not apply to you. This warranty gives you specific legal rights, and you may also have other legal rights which vary from State to State or Province to Province.
COPYRIGHT
© 2007 Guillemot Corporation S.A. All rights reserved. Thrustmaster® is a registered trademark of Guillemot Corporation S.A. Ferrari® is a registered trademark of Ferrari Idea S.p.A. Microsoft® Windows® is a registered trademark of Microsoft Corporation in the United States and/or other countries. PlayStation® is a registered trademark of Sony Computer Entertainment Inc. All other trademarks and brand names are hereby acknowledged and are property of their respective owners. Illustrations not binding. Contents, designs and specifications are subject to change without notice and may vary from one country to another.
ENVIRONMENTAL PROTECTION RECOMMENDATION

At the end of its working life, this product should not be disposed of with standard household waste, but rather dropped off at a collection point for the disposal of Waste Electrical and Electronic Equipment (WEEE) for recycling.
This is confirmed by the symbol found on the product, user manual or packaging.
Depending on their characteristics, the materials may be recycled. Through recycling and other forms of processing Waste Electrical and Electronic Equipment, you can make a significant contribution towards helping to protect the environment.
Please contact your local authorities for information on the collection point nearest you.
Ferrari GT
3-in-1 Rumble Force
Compatible : PlayStation® 3 / PlayStation® 2 / PC
die "Thrustmaster Calibration Tool" Software herunter
"Gas given" = X-toets & "Remmen" = Vierkant-toets
-OpPlayStation ⑧ 3:
"Gas given" = R2-trigger & "Remmen" = L2-trigger
PROBLEM OPLOSSEN EN WAARSCHUWINGEN
INFORMATIE MET BETREKKING TOT DE GARANTIE
ToOnuHbI pyNb 3 B 1 Rumble Force c Bn6paunOHnoO6paTHo CBra3bIO
Дл рабовиHa:PlayStation®3/PlayStation®2/PC

PykoBoODCTBO NOIb3OBATeJRA
TEXHINCHECKX XAPAKTEPNCIKN
1 2 zhiФрobbIX pblaHa nepeKnIyEnHa nepeDaU (UP nDOWN (BBEPX n BHN3))
2 CBeToOnIO
3KOMaHdHbIe KHOPIK
4 MannyJTop D-Pad
5 KhoNk"SE"(BbIbOP) n"ST"(PvCK):
-ДЯВьбopaиПусka
-Длгпрогаммюваня
6 KhoNka "HOME" pour PlayStation® 3
7 USB celenkTop ("PC" / "PS3")
8 Ka6eJI peJaiI
9 Pa3bEm RJ45 nIe neIaIe
10 3aJIM
11 3axmHOB BnHT
12 Pa3bEm IVPOBOGO IIOPTA (dPrPlayStation@2)
13 USB-pa3bEm (ДЯ PC n PlayStation®3)
14 Pedi
YCTAHOBKA PYJI
Kpennenepyra
- UctahOBHTe pyNb Ha cTOn IIN dpyTuI NIOCKTuI NOBepxHOCTb.
- YctaHOBNTe 3aXMMHON BHTT (11) B 3aXMM (10), 3aTeM BbNHTnte 3aXMMHOY cTPOIcTB O B OTBepCTHe, paCnIOXeHHOE B HmKHeY aChTu pYNJ. 3aTaRbMaTe 3aXMM Do TEX NOP, nOKa PyNb He 6yDet HadeKHO 3aKePENHe. He 3aTaRbMaTe BHT NcMIKOM TyO BO N36ExAHne NobpeXdEHNr 3aXMMHOr O cTPOIcTBa ININ) CTOnA.
Iopknioyenne neaalei
- PtoKIOUChTe Ka6eBJepeAe8) Kpa3bEmy pyrRJ45 (9).
PLAYSTATION® 2
ПОДКЛIOUЕНМ K PLAYSTATION® 2
- Подклочиразьем Ировoro пота PS2 (12) к поту 1 на koнсоли.
- BkIIOHnTe KOHcOJIb I 3aNycTIne nRpy.
- 3aropntc kpaehb CBeToDIOHa pyne.
Tenepb moxho hauhnaTb irpy!
BHIMAHINE:3AIPPEUAAETCJIOIDKJIQUATb KABENb USB (13) K PLAYSTATION® 2
(60 u3bexaHue noBpeXdEHHy pynI unKoHcOnu)
BAXHBIE 3AMEYAHNIO PABOTE C PLAYSTATION®2
B HeKOTOpbIX ToHOUYbIX IPRpax O6ra3aTeNbHO NcblTaIe 2peXkMa YyBCTBnteNbHOCtM, YTO6bl NObICNTb TOOHCTb YyBCTBnteNbHOCtB ynpabJIeHn.
PLAYSTATION® 3
ПОДКЛIOUЕНМ K PLAYSTATION® 3
- YctaHOBtE USB celenkTop pyIa (7) B noIooJeHne PS3.
2.ПодклочиТЕUSB-разьем(13)KUSB-nopTuHa KOHCoII. - BkIIOUHTe KOHCOJIb.
- 3aynctnte irpy.
Tenepb moxho haunha Tnpy!
KHONKA HOME (6)
C nmooukno HnOKn "Home" pyJn MOKHO BuiTN uRpyi NBOITN B MeHIO CnCTembl PlayStation® 3.
BAXHbIe 3AMEUAHNIO PABOTE C PLAYSTATION® 3
- USB celenkTop pyra (7) Bcerda doJxhen 6bIb yctahOBInen B noJoxHne "PS3" nepei noKluOHeHemempyra.
- B pexime oJnHoro irpoka "1 Player": EcnI KOHTpOJIpeR (oΦmuaNbHaBepCnA) BKIOUeH, Heo6xOIMOnepekIQUHTb ero ha "controller port 2", UTObI pyIb paOtAn.
-B npntcbVe PlayStation® 3,pynbcoBmecTm TOnbKO c npramn dIpaPlayStation® 3 (Hne bdyet pa60TaTc npramn PlayStation® 2).
-BHEKOTOpbIXrOHOuHbIXnRpaXOB3aTeBbHONCbTaIte2peXIMaYyBCTBHTeBHOCTN,YTObIIOBbICITb TOHOCTbN3pFKeTbHcOCTbYnpaBHeHJ.
#
YctaHObKaHaIK
CD-dnck, noctabnaembmy c n3dennm, no3B0JrE yCTaHOBtB dpAIBepbl "Vibration Feedback".
- YctahOBnTE USB celenktop pyna (7) B noJooKHeNc "PC".
- BCTabTe yctaHOBOvHb CD-NDCB n prnoBD CD NDCOB. Iyra yctaHObKn dpaIbepoB "Vibration Feedback" bblonHne HcHTpyKuHN, KOTpbie 6ydt noRbIbrcn Ha 3kpane. Nocne 3abepeHmna YctaHObKn HauKMNTe Finish (3akOHHTs) n nepeaerpy3ne kOMnbOpTe.
- ПocneToronto, Кад KMOBtOteP 3aRpy3TcN, pOdkHIOUHTpe 3a3bEM USB (13) K OdHOMy 3N noptOB USB Ha KMOBtOtepe.ОпацMuONHьссмTeB Wynds@ XP mIIN Vista abTomatnueckm 6OBAPyKAT HOBOE yCTPOINCTBO.
- UctanOBka dpaBepa
- Hac trojka pekima "HopmaJIbHOu YUbCTBNTeJIbHOCTn" (no yMOJUaHHo):
| ДeйстVENe | Цев сбетомда |
| Одновразимно нажмITE и OTПУСТИTE:pbчaram D-Pad (4) + 2 UP(BBEPX) u DOWN (BHIN3) (1) | HE MИГАЕТ |
Pynleoe ynpablenne Teepb B pexime HopmaIbHOn YyBCTBnTbHOCTn (no ymonuHaHIO)
IPOΓPAMMPOBAHNE PYJI N IIEDAJIEN
PnyabnreTc nonHOctbIO nporpaMMpyembIM:
-Bce KhoNk, a taKke MaHnIyIaTOp D-Pad, mOryT nepeKlnuOaTbcra MeXdy co6oJ.
-Bce KhoIKn, a taKke MaHnnyIaTOp D-Pad, mOyt npOrpaMMnpoBaTbca Ha 2 neJaII.
-
Ппмеры BO3MOxHOrO поMuHeHnA:
-
Ha PS2 n PS3: Погамmarоване L2/R2 по L3/R3 на заховыпьчаги 2 UP и DOWN (L1/R1).
- PporpammmpoBaHne KHOJOK Ha OndHy nIIN oBe peJaII.
-
IpekeKIOUeHnE pa3IuHbIX KHOJOK dIa 60JIbIeO yIO6CTBa.
-
Празецура поррамповань.

- INSTALLING THE WHEEL
- Fixing the wheel in place
- Connecting the pedal set
- PLAYSTATION® 2
- INSTALLATION ON PLAYSTATION® 2
- IMPORTANT NOTES ON PLAYSTATION® 2
- PLAYSTATION® 3
- INSTALLATION ON PLAYSTATION® 3
- USING THE "HOME" BUTTON (6)
- IMPORTANT NOTES ON PLAYSTATION® 3
- PC
- Installation on PC
- IMPORTANT NOTES ON PC
- ADVANCED FUNCTIONS
- ADJUSTING THE WHEEL'S SENSITIVITY
- PROGRAMMING THE WHEEL AND PEDALS
- CONFIGURING THE PEDALS ON PLAYSTATION® 2 AND PLAYSTATION® 3
- CONFIGURING THE PEDALS ON PC
- - Selecting axes via "Software"
- - Selecting axes via "Hardware"
- TROUBLESHOOTING AND WARNINGS
- TECHNICAL SUPPORT
- By email:
- WARRANTY INFORMATION
- Additional warranty provisions
- COPYRIGHT
- ENVIRONMENTAL PROTECTION RECOMMENDATION
- Ferrari GT
- 3-in-1 Rumble Force
- PROBLEM OPLOSSEN EN WAARSCHUWINGEN
- INFORMATIE MET BETREKKING TOT DE GARANTIE
- TEXHINCHECKX XAPAKTEPNCIKN
- YCTAHOBKA PYJI
- Kpennenepyra
- Iopknioyenne neaalei
- ПОДКЛIOUЕНМ K PLAYSTATION® 2
- BAXHBIE 3AMEYAHNIO PABOTE C PLAYSTATION®2
- ПОДКЛIOUЕНМ K PLAYSTATION® 3
- KHONKA HOME (6)
- BAXHbIe 3AMEUAHNIO PABOTE C PLAYSTATION® 3
- #
- YctaHObKaHaIK
- IPOΓPAMMPOBAHNE PYJI N IIEDAJIEN
Brand : TRUSTMASTER
Model : FERRARI GT EXPERIENCE
Category : Racing simulator