
TOPTRONIC - Electric saw ATIKA - Free user manual and instructions
Find the device manual for free TOPTRONIC ATIKA in PDF.
| Product type | Electric saw |
| Brand | ATIKA |
| Model | TOPTRONIC |
| Motor power P1 (S6-40%) | 1900 W |
| Motor power P2 (S6-40%) | 1350 W |
| Supply voltage | 230 V~ |
| Rated current | 9.5 A |
| Blade speed | 1800 - 4200 rpm (electronic adjustment) |
| Blade diameter | 245 - 250 mm |
| Arbor bore | 30 mm |
| Cutting depth at 90° | 0 - 83 mm (progressive adjustment) |
| Cutting depth at 45° | approx. 59 mm |
| Blade tilt | -2° to 47° |
| Table dimensions | 765 x 580 mm |
| Table height | 360 mm |
| Weight | approx. 35 kg |
| Sound pressure level (operation) | LpA = 89.4 dB(A) |
| Sound power level (operation) | LWA = 102.4 dB(A) |
| Main functions | Table saw and pull saw, electronic speed adjustment, motor circuit breaker |
| Maintenance | Clean and oil moving parts regularly (sewing machine oil or hydraulic oil), do not use grease |
| Safety | Protective cover, riving knife, emergency stop, overload protection device |
| Spare parts | Carbide blade Ø 250/30 mm (supplied), spare parts list available |
| Warranty | 2 years |
Frequently Asked Questions - TOPTRONIC ATIKA
User questions about TOPTRONIC ATIKA
0 question about this device. Answer the ones you know or ask your own.
Ask a new question about this device
Download the instructions for your Electric saw in PDF format for free! Find your manual TOPTRONIC - ATIKA and take your electronic device back in hand. On this page are published all the documents necessary for the use of your device. TOPTRONIC by ATIKA.
USER MANUAL TOPTRONIC ATIKA
Pull-Push Saw TOPTRONIC
Safety information
Operating Instructions
Spare Parts List

Scie universelle coulissante TOPTRONIC
| Model designation | AZS |
| Motor output P1 | 1900 W S 6-40% |
| Motor output P2 | 1350 W S 6-40% |
| Mains voltage | 230 V~ |
| Mains frequency | 50 Hz |
| Rated current | 9,5 A |
| Saw blade speed | 1800 to 4200 min-1 electronically adjustable |
| Mains fuse | 10 A inert |
| Saw blade ∅ maximum | 250 mm |
| Saw blade ∅ minimum | 245 mm |
| Saw blade location hole | 30 mm |
| Cutting speed (at maximum saw blade ∅) | 23,5 to 55 m/s (depending on saw blade speed) |
| Cutting height at 90° (for maximum saw blade ∅) | approx. 0 - 83 mm continuously variable |
| Cutting height at 45° (for maximum saw blade ∅) | approx. 59 mm |
| Bevel cut adjustment (swivelling range) | -2° - 47° |
| Table size | 765 x 580 mm |
| Table height | 360 mm |
| Maximum cutting length for 10 mm workpiece thickness | 321 mm |
| 70 mm workpiece thickness | 262 mm |
| 80 mm workpiece thickness | 234 mm |
| Weight | ca. 35 kg |
| Exhaust outlet guard ∅ | 30 mm |
| Exhaust outlet ∅ | 30 mm |
Commercial, small dust collectors or industrial vacuum cleaners are used for vacuuming.
You must not start up the machine until you have read these operating instructions, observed all the given and assembled the machine as described.
Keep the instructions in a safe place for future use.

Before reading the operating instructions, fold out the pages at the start and end.

The motor is equipped with an electronic control, which keeps the cutting speed constant at each speed stage even when loaded. Idle running, especially in low revolutions, can cause noise at gear which the operator may consider as unusual and untypical for saws. This noise is absolutely normal and does not alter all affect the function.
A further advantage is the electronic motor protection. The motor is immediately cut-off in case of overloading or if the saw blade is blocked, to prevent damage. In this case, the right-hand light-emitting diode (LED) in the control panel (B) flashes, fig. 4
- Press the red button, then the green button, fig. 4
The motor continues to run.
Contents
| Technical data | 12 | Working instructions | 17 |
| Symbols used in the operating instructions | 13 | Maintenance and care | 18 |
| Extent of delivery | 13 | Transport | 19 |
| Characteristic noise values | 13 | Storage | 19 |
| Normal intended use | 13 | Guarantee | 19 |
| Residual risks | 13 | Possible faults | 19 |
| Safe working | 14 | Circuit diagram | 37 |
| Preparation for commissioning | 15 | Spare parts list | 38 |
| Commissioning | 16 | ||
| Adjusting the saw | 16 |
Symbols used in the operating instructions

Threatened hazard or hazardous situation. Not observing this instruction can lead to injuries or cause damage to property.

Important information on proper handling of the saw. Not observing this instruction can lead to faults in the saw.

User information. This information helps you to use all the functions of the saw optimally.

Assembly, operation and servicing the saw. Here you are explained exactly what to do.
Extent of delivery
- Flush-mounted crosscut saw TOPTRONIC with mains cable and plug, with HM saw blade Ø 250/30 x2.6 /1.6 34 teeth, and splitting wedge 2.2 mm thick.
- Saw guard with exhaust outlet
- Pushstick
Universal rip fence, complete - Ring spanner, engineer's wrench
- Operating instructions
After unpacking, check the contents of the box
That it is complete
Check for possible transport damage
Report any damage or missing items to your dealer, supplier or the manufacturer immediately. Complaints made at a later date will not be acknowledged.
Characteristic noise values
DIN EN ISO 3746 / DIN EN ISO 11202 / ISO 7960 Appendix A
Use of the machine as a bench to circular saw with standard circular saw blade.
| Sound levels: | Sound levels at the workplace | |
| No-load | LWA=95 dB(A) | LpA=84 dB(A) |
| Load | LWA=102,4 dB(A) | LpA=89,4 dB(A) |
The factor of measurement uncertainty is 4 dB.
The same noise levels can be used for the operation as a crosscut saw.
The values given are emission values and must therefore not simultaneously represent safe workplace values too. Although there is a relationship between emission and immission levels, it can be reliably deduced whether additional precautionary measures are necessary or not. Factors, which can influence the immission level currently existing at the workplace include the duration of the effects, the special type of the workroom, other noise sources, etc. e.g. the number of machines and other adjacent processes. The permissible workplace values can also vary from country to country. This information should however enable an improved assessment of the danger and risk to be carried out.
Normal intended use
- The Flush-mounted cross-cut saw is solely intended for use as a bench top circular saw and cross-cut oscillating saw for the longitudinal and transverse cutting of solid timber, panel materials such as chipboard, wood core plywood, and medium density fibreboard (MDF) as well as aluminium sections and hard plastics using HM circular saw blades, whereby only saw blades that comply with the standard EN 847 - 1 may be used.
- The use of saw blades made of HSS steel (high-alloy high speed tool steel) is not permissible, because this steel is hard and brittle. Risk of injury due to the saw blade breaking and pieces of saw blade spinning off.
- Round materials (logs, pipes, etc.) are not permitted to be cut without a special device for this purpose.
- The diameter of the saw blade must lie between 245 and 250 mm .
- Only workpieces which have been securely mounted and aligned can be processed.
- The intended usage also includes compliance with the operating, servicing and repair conditions prescribed by the manufacturer and following the safety instructions included in the instructions.
- The relevant accident prevention regulations for the operation as well as the other generally acknowledged occupational medicine and safety rules must be complied with.
- Any other use is deemed not to be use as prescribed. The manufacturer is not liable for any type of damage resulting from this: the user bears the sole risk.
- Independently made alterations to the crosscut saw preclude any liability of the manufacturer for resulting damages of any kind.
- The cross-cut saw may only be equipped, used and serviced by persons who are familiar with these and have been instructed in the hazards. Repair works may only be carried out by us or by a customer service agent nominated by us:
- The machine may not be used in a potentially explosive environment or be exposed to the rain.
Metal parts (nails, etc.) must be removed from the timber to be sawn.
Residual risks
Even if used properly, residual risks can exist even if the relevant safety regulations are complied with due to the design determined by the intended purpose.
Residual risks can be minimised if the "Safety information" and the "Intended usage" as well as the whole of the operating instructions are observed.
Potential risks:
- Risk of injury to fingers and hands caused by the tool (saw blade) or workpiece (e.g. when changing the saw blade).
- Injury from parts of the workpiece spinning off.
- Throwback of the workpiece or workpiece parts.
-
Breakage and spinning off from the saw blade.
-
Risk from electricity, by using non-standard electrical connections.
- Touching live parts of opened electrical components.
- Impairment of hearing when working on the machine for longer periods of time without ear protection.
- Emission of harmful timber dust when operating without exhaust suction.
In addition, in spite of all the precautionary measures taken, non-obvious residual risks can still exist.
Safe working
Woodworking machines can be dangerous if not used properly. If electrical tools are used, the fundamental safety precautions must be met to preclude the risks of fire, electric shock and injuries to persons.
Before commissioning this product, read and keep to the following advice. Also observe the preventive regulations of your professional association and the safety provisions applicable in the respective country, in order to protect yourself and others from possible injury.
Pass the safety instructions on to all persons who work with the machine.
i Keep these safety instructions in a safe place.
- Avoid unusual posture. Ensure that you have stand in a secure standing position and maintain your balance at all times.
- Be attentive. Be careful what you do. Behave sensibly when working. Do not use the saw if you are tired.
-
Wear suitable work clothes!
-
Do not wear loose-fitting clothes or jewellery; they can catch in moving parts.
- Slip-proof shoes
-
Wear a hairnet if your hair is long
-
Wear protective clothing
-
Ear protection (sound pressure levels at the workplace usually exceed 85 dB(A)
- Safety goggles (When cutting aluminium.)
- Breathing mask when carrying out works that produce a lot of dust
Only operate the circular saw on a
- firm
level
slip-free -
vibration free surface
-
Keep your workplace in an orderly condition! Untidiness can result in accidents.
Take into consideration environmental influences. -
Do not expose the saw to rain
- Do not use the saw in a damp or wet environment
- Ensure that the workplace is well lit.
- Do not use the saw near to flammable liquids or gases.
- The timber dust created while operating the machine impairs the visibility required and is partially damaging to health. If the machine is not used in the open air, a
shavings exhauster must be attached to both exhaust outlets (e.g. small transportable dust remover).
- Never leave the saw unattended
- Persons under the age of 18 must not operate the circular saw. An exception is youngsters under the age of 16 within the scope of their vocational training under supervision
- Keep other persons away
Do not allow other persons, especially children, to touch the tool or cable.
Keep them away from your working area.
Take up a working position, in which you are always to the side of the saw blade outside of the cutting level
- Only begin cutting when the saw blade has reached the required speed
- Do not overload the machine! You work better and safer in the given performance range
- Only operate the machine with complete and correctly attached safety equipment and do not alter anything on the machine that could impair the safety
- Do not used cracked saw blades or those that have changed shape
- Only use well sharpened saw blades, as blunt saw blades not only increase the risk of throw-back errors, but also load the motor
- Do not use saw blades made of high-alloy high-speed tool steel (HSS), because this steel is hard and brittle, only tools in accordance with EN 847 - 1 may be used.
The use of other tools and other accessories can signify a risk of injury for you.
- Use the installed splitting wedge. It is set in the works so that its distance from the toothed ring is at least 3 ~mm and maximum 5 ~mm
- Do not use the saw for unsuitable purposes (see 'Normal intended use').
- When longitudinally cutting narrow workpieces (distance between the saw blade and the parallel rip fence less than 120 ~mm ), use the pushstick. (see working instructions)
-
To push narrow workpieces against the parallel rip fence, use a pushstick.
Pushsticks can be purchased in retail outlets -
Do not use defective pushsticks
- The upper saw blade guard must always be used except for blind cuts. It must be adjusted so that the toothed ring is covered except for the part required for machining the workpiece
- Ensure that cut off pieces are not caught up by the saw blade and projected away
- Do not remove splinters, chips and waste from the hazardous area of the saw blade by hand
- It is not permissible to use wobble devices and groove milling tools
-
Cutting logs with the standard feed guides is not permissible. When cutting logs, use a special device, which secures the workpiece on both sides of the saw blade against turning
-
Switch the machine off and remove the mains plug from the socket when
-
carrying out repair works
- carrying out servicing and repair works, removal of faults (this also includes removing clamped splinters)
- Transporting the saw
- Changing the saw blade
-
leaving the saw unattended (even during short interruptions)
-
Look after your saw with care
-
Keep the tools sharp and clean to be able to work better and more safely
- Follow the servicing instructions and the information about changing tools
-
Keep handles dry and free of oils and grease
-
Check the machine for possible damage
-
Before continuing to use the machine, the protective devices must be inspected to ensure that they work perfectly and with their intended function
- Check whether the movable parts function perfectly and do not stick or whether the parts are damaged. All parts must be correctly installed and fulfil all conditions to ensure perfect operation of the saw
-
Damaged guards and parts must be properly repaired or exchanged by a recognized, specialist workshop; insofar as nothing else is stated in the instructions for use.
-
Do not allow any tool key to be plugged in!
- Store the unused machine in a dry locked place away from the reach of children
Electrical safety
- Design of the connection cable according to IEC 60 245 (H 07 RN-F) with a core cross-profile section of at least
1.5 mm² for cable lengths up to 25m
- 2.5 ~mm^2 for cable lengths over 25 ~m
- Protect yourself against an electric shock. Avoid touching earthed parts with your body.
- Do not use the cable for purposes for which it is not meant. Protect the cable against heat, oil and sharp edges. Do not use the cable to pull the plug from the socket.
- Regularly check the saw cable and if damaged, have it renewed by a recognised skilled electrician.
- Regularly check the extension cables and replace them if they are damaged
- Do not use any defective connection cables
- When working outdoors, only use extension cables especially approved and appropriately labelled for outdoor use
- Do not set up any provisional electrical connections
- Never bypass protective devices or deactivate them.
The electrical connection or repairs to electrical parts of the machine must be carried out by a certified electrician or one of our customer service points. Local regulations - especially regarding protective measures - must be observed.
Repairs to other parts of the machine must be carried out by the manufacturer or one of his customer service points.

Use only original spare parts, accessories and special accessory parts. Accidents can arise for the user through the use of other spare parts. The manufacturer is not liable for any damage or injury resulting from such action.
Preparing for commissioning

To achieve perfect function of the machine, follow the notes given in these instructions

The saw set has been swivelled by 30^ for transport place the saw blade in a vertical position (see page 8)
You have to attach the following parts:
- Hand wheel handle
Protective guard (39)
Universal stopper
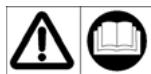
You will require the following tools
SW 10
SW5
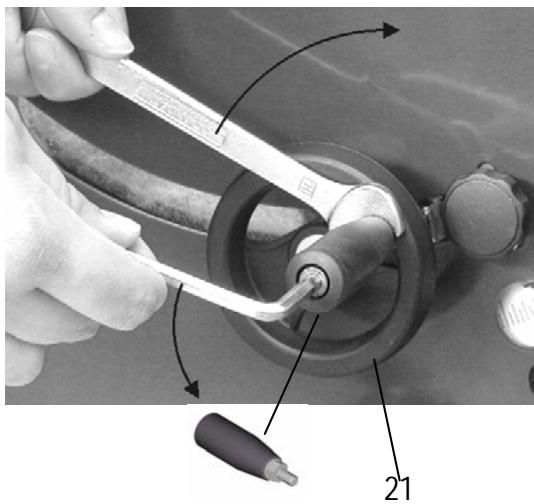

First screw the hand wheel handle on. Turn it and then screw back again as shown in the picture.

The handle must still be able to be turned.
- Using the hand wheel (21), turn the saw blade to its highest position
- Then pull out the splitting wedge (32) (fig. 13)
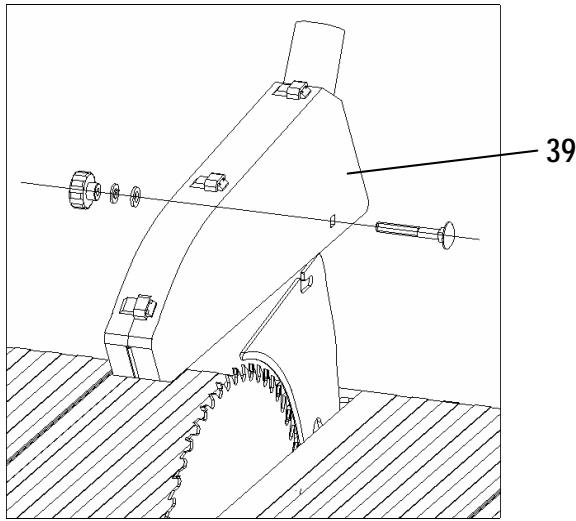
- Assemble the guard (39)
The split cotter pin must be removed before the guard hood is mounted; otherwise damage or injury is possible. Fig. 13
Commissioning
-
Place the saw in a place that fulfils the following conditions:
-
secured against slipping
free of vibrations
even
free of tripping hazards
adequate light
Before each use, check
- Connection cables for defects (cracks, cuts, etc.)
Do not use any defective cables
that the guard is in a proper condition
- the splitting wedge setting (see splitting wedge setting)
that the saw blade is in a perfect condition
whether the pushstick is to hand
- Do not use any cracked saw blades or those that have changed their shape
- Do not use any saw blades made of HSS steel
-
When sawing, place yourself to the side of the danger area (saw blade)
Lower the guard onto the bench top -
when working on the workpiece
- when interrupting the work or leaving the saw
Rotational direction of the saw blade
Ensure that the rotational direction of the saw blade is the same as the rotational direction given on the guard (39)
Mains connection
Compare the voltage given on the machine model plate e.g. 230 V with the mains voltage and connect the saw to the relevant and properly earthed plug
Alternating current motor: Use a shockproof plug, mains voltage 230V with residual current circuit breaker and 10 A inert fuses.
Use the connection or extension cable according to IEC 60 245 (H 07 RN-F) with a core cross-profile section of at least
1.5 mm² for cable lengths up to 25m
2.5 mm² for cable lengths over 25m
Switch on
by pressing the green, upper button on the switch (25)
If there is a power cut, the machine switches off automatically. To switch on again, first press the red and then the green button.
Switching off

You can switch off the saw by pressing the red lower button of the switch
Motor protection

The motor is equipped with a safety switch and switches off independently when overloaded. This is indicated by the flashing the outer red LED (in the control panel B, Fig 4). It can be switched back on following a cooling off phase. First, press the red and then the green button (Fig 4).
Selection of saw blades
When changing the saw blade, ensure that you do not use blunt or damaged saw blades and that the diameter of the blade location hole is 30 ~mm .
The saw blade supplied as a standard is suitable for timber and most plastics.

Other saw blades are available for other uses on request. Ask your dealer or us.
Adjusting the saw
Replacing the saw blade (p 2 fig 2 + p 1 fig 6 - 11)
Before replacing the saw blade remove the plug from the mains.
- Do not use any saw blades made of HSS steel
- Do not use any cracked saw blades or those that have changed their shape
Only use well-sharpened saw blades
Proceed as follows:
- Wear work gloves.
- Undo the locking screw (A) with the attached tools (fig. 2)
- Lift the left hand bench profile section (7) on the switch side and pull it out (fig 6).
- Hook the open-end spanner (88) into the saw blade flange (37) and loosen the hexagon bolt (80, fig. 7 + 8).
Left-handed thread!
- Remove the saw blade flange (37, fig. 9).
- Now you can take off the saw blade (36) and pull it out (fig. 10).
- A new saw blade is installed in the reversed order.
Note the rotational direction!
- Push on the saw blade (36), and then use the spanner (88) to push the saw blade flange (37) onto the motor shaft hub and keep a firm hold on it (fig. 11).
- Screw in the hexagon bolt (80, fig. 11) and tighten it firmly.
Tightening torque min. 20 Nm Left-handed thread!
- Check whether the saw blade runs smoothly if turned by hand.
Splitting wedge setting

The splitting wedge (32) is set in the factory at the correct measurement.
The splitting wedge is an important safety device as it prevents the workpiece from recoiling
To guarantee the function of the splitting wedge, its distance from the toothed wheel must be at least 3mm and maximum 8 mm.

In order to avoid damage or injury, the guard hood (39) can only be mounted if the split cotter pin has been fully removed.
Set the cutting height

The cutting height can be infinitely adjusted between 0 – 93 mm with the aid of the crank (21).

Set the cutting height 5mm higher than the material thickness.
Adjust saw blade pitch

When the saw blade is running, ensure that there are no workpieces or stoppers in the swivel zone before adjusting. See Fig 3.

Adjusting between 0^ - 45^ .
- Release the clamp lever (58)
- Turn the large star grip nut (18) until the required angle is displayed in the scale (D) (0^ - 45^)
- Retighten the clamp lever to fix the angle set.

Adjusting between -2^ - 47^

The saw blade can be swivelled 2^ beyond the two end settings (-2^ - 47^) :
- Undo the small star grip nut (87), push it upwards and then retighten it.
- Undo the clamp lever (58)
- Turn the large star grip nut until the required angle is displayed on the scale (-2^ - 47^) .
- Retighten the clamp lever to fix the set angle.

To readjust the limit to 0^ - 45^ , push the star grip nut back down and tighten it. To do this, the saw blade must be at an angle of 0^ - 45^ .
Set the speed of the motor

To achieve a constant satisfactory cutting quality, you can infinitely vary the speed of the saw blade between 1800 min ^-1 - 4200 min ^-1 .

Set the speed by pressing the or 一 key on the control panel (B). Each time the rotational speed is reached, the corresponding LED lights up. E.g. diode No 2 if 2400 revolutions are reached.

By tipping or once, the speed increases or reduced by 100 revolutions.

If you hold the + or - key pressed for a longer time, the speed automatically changes to the maximum or the minimum speed.
Adjusting the universal rip fence

The enclosed universal guide fence can be used as a cross fence with the pull saw configuration and as a rip fence with the table saw configuration.

Make sure that the fences are correctly adjusted. (See "Working instructions")

Fastening to the saw table

Push the stopper plate (45) onto one of the peripheral clamping lip (E). Tighten firmly the wing nut screw (63A). (fig. 1)

Moving fence (50) on the stopper plate

Unscrew the wing nut screw (63B) and move the fence. Retighten the wing nut screw. (fig. 5)

Moving the fence scale (41)

Unscrew the wing nut (62) and move the fence scale. Retighten the wing nut.

Angle adjustment
Unscrew the wing nut screw (63C) and pivot the fence scale. The common angle adjustments can be locked.

When working on very flat and narrow workpieces use the lower guide are of the fence scale (41)
Working instructions

Before commencing work, ensure the following:
- Protective guard, splitting wedge and saw blade ok?
- Saw blade sharp?
- Stoppers (fences) ready for use and pushstick to hand?
- Workplace tidied?
- You may not start to operate the machine until you have read these operating instructions, observed all the instructions given and installed the machine as described!

Also, note the following important points:
- Place yourself outside of the area of danger
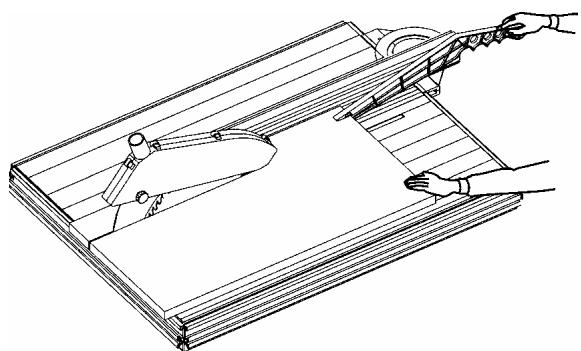
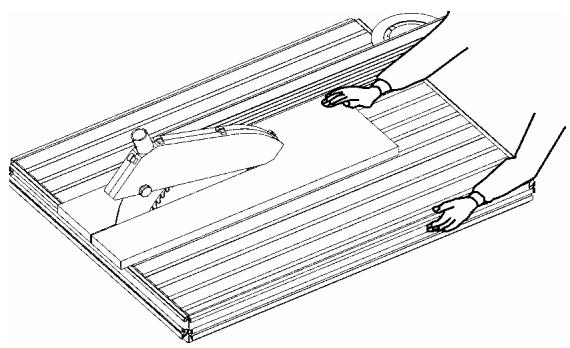
- Place your hands flat on the workpiece with fingers closed. Only guide the workpiece manually up to the front edge of the protective hood.
- Never remove loose splinters, chips, or similar by hand

Ensure that you always comply with the safety instructions given on p.14 ff.

The saw can be used as a bench-top circular saw or as a crosscut saw.
Use as a bench-top circular saw
Fig. 17 and 19, p. 45/46

To longitudinally cut larger workpieces

The saw blade is fixed in the middle of the bench with the catch lever (52).
- Lift the drawbar (20) slightly
- Remove it slowly and simultaneously push part 52 in the direction of the arrow until it clicks in place (fig. 8)
- To unlock: Hold the drawbar firmly and press the catch lever in the opposite direction to the arrow. You can then move the saw set with the hand wheel (21).
- Adjust the required cutting width using the parallel fence.
- Set the cutting height approx. 5 mm higher than the workpiece thickness
- Lower the guard (39) until it is approx. 8 mm above the workpiece.
Use as a flush-mounted crosscut saw
Fig. 15, 16, 18 and 20, p. 45 and 46
For precisely separating fixed workpieces.
- Press the catch lever (52) all the way up (cross-cutting setting)
- Press the hand wheel (21) slightly upwards
- You can now pull the saw set forward with the hand wheel (21) until the workpiece has been sawn through (fig. 16)
Cutting narrow workpieces
Use as a bench-top circular saw
Width less than 120~mm
Push the workpiece forward with both hands, in the area of the saw blade, use the pushstick (42)
When working on very flat and narrow workpieces (Width 30 mm and less) use the lower guide are of the fence scale (41) (fig. 19)
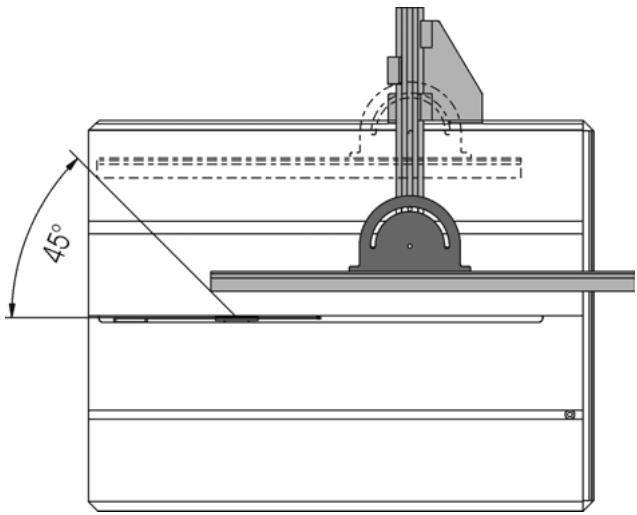
Cutting wide workpieces
Use as a bench-top circular saw
-
Set the fence scale (41) (rear end behind the splitting wedge)
-
Draw the fence back if the workpiece could clamp between the saw blade, splitting wedge and fence.
Rule of thumb: The rear end of the fence butts against an imaginary line, which starts approximately in the centre of the saw blade and runs to the rear at an angle of 45^ .
Blind cuts

Remove the protective cover and press the splitting wedge (32) downwards (Fig 12)
After blind cuts, the splitting wedge has to be removed again and the guard reattached
- Ensure that the workpiece is safely guided
- Press the workpiece firmly on the table
In order to avoid damage or injury, the split cotter pin must be completely removed before the guard hood is mounted.
Cross cuts / litre cuts (fig. 15 / 18)
Fix the universal fence to the front joint strip
- Set the fence scale (41) at the required angle and ensure that it is close to the cutting level
- Push the fence support (50) so that the workpiece can be safely placed
- Hold the workpiece firmly and pull the saw set forwards.
Maintenance and Care
Remove the mains plug before all maintenance works
Observe the following to maintain the functionality of the saw
Clean and oil all moving parts regularly (p. 46, fig. 21)

- lower the saw blade
- Incline the saw unit by 45^
-
place the saw carefully on its left side
Clean the movable parts and lubricate positions 1 - 4
Never use any grease!
Use for instance sewing machine oil, liquid hydraulic fluid or environmentally acceptable spray oil. -
Ensure that the saw blade remains free of rust and resin
- Remove all resin residues from the saw bench top
- The saw blade is a wearing part and becomes blunt after long or frequent use
renew the saw blade or have it sharpened
Transport

Remove mains plug before each transport

Only transport the saw with the traction cradles locked in the end position, the saw blade lowered and lowered guard This way you prevent damage to the locking technique and injuries caused by the saw blade
For safe transport
Grip cut outs (C) are provided on all sides
Storage
Remove the mains plug from the socket
- Store unused equipment in a dry, locked place out of the reach of children.
To extend the service life of the saw and guarantee smooth operation, before storing for a longer period
thoroughly clean the saw
- treat all movable parts with an environmentally friendly oil
Guarantee
We grant a guarantee of two years, commencing with the day of delivery from the dealer's store, for material and manufacturing faults.
Warranty claims, even during the warranty period, will not be accepted for damages due to incorrect handling or inadequate packaging during return of the devices or to a non-observation of the operating instructions.
Faulty parts must be sent to our works, postage or freight free. We reserve the right to decide upon free spare part delivery.
Guarantee work will be completed by us or an authorised servicing agency. Guarantee damage can only be remedied by another firm with our explicit approval.
The guarantee does not cover normal wear to: saw blade, protective hood, sliding body, bench profile, braking unit
Guarantee is also granted if original spare parts are used.
Subject to changes in the interest of technical progress.
Possible faults
| Fault | Possible cause | Removal |
| Machine fails to start after switching on or switches off during idle running | • Power failure • Extension cable defect • Motor protecting switch has tripped – right LED on the control panel is flashing. • Motor or switch defect • Saw blade sticks | • Replace fuse • Check cable, no longer use defect cable • Switch motor back on after cooling "Motor protection", p 16 • Have motor or switch checked by an approved electrician or replaced by original spare parts • Remove bench profile section and remove cutting box cover, remove cause |
| Machine stops while cutting | • Saw blade blunt • Feed too large | • Replace saw blade • Allow motor to cool |
| Workpiece sticks when feeding | • Saw blade blunt • Scale of the universal fence is not parallel to the saw blade | • Hold the workpiece firmly and switch the motor off immediately. The have the saw blade sharpened or renew • Readjust the scale |
| Burn marks at the cut edges | • Saw blade is unsuitable for the cutting task or blunt | • Replace saw blade or have it sharpened |
| Chip exit blocked | • No exhaust suction connected • Suction too weak | • Switch off saw and remove chips • See "Safe working" |
| Height adjustment stiff | • Thread or guide plate soiled | • Clean components and oil (p. 46, fig. 21, 22) Never use any grease! |

The motor is equipped with an electronic control, which keeps the cutting speed constant at each speed stage even when loaded. Idle running, especially in low revolutions, can cause noise at gear which the operator may consider as unusual and untypical for saws. This noise is absolutely normal and does not alter all affect the function.
The spare parts are given in the spare parts drawing and list To order spare parts:
- The supplier is the manufacturer
- Information required when ordering:
Machine model
Machine number
- Spare part number
- Designation of the spare part
Number required
colour
Example: Model AZS, Serial No. XXXX, 363112 Casing sidepiece, 1 No. bluish green
GB declare in sole responsibility, that the product Pull Push Saw Type AZS
as the object of this Declaration, complies with the requisite basic safety and health requirements of the guidelines 98/37/EC as well as the demands of the other requisite guidelines