
AQUA - Weather Station IROX - Free user manual and instructions
Find the device manual for free AQUA IROX in PDF.

User questions about AQUA IROX
0 question about this device. Answer the ones you know or ask your own.
Ask a new question about this device
Download the instructions for your Weather Station in PDF format for free! Find your manual AQUA - IROX and take your electronic device back in hand. On this page are published all the documents necessary for the use of your device. AQUA by IROX.
USER MANUAL AQUA IROX
Congratulations on your of purchasing this new Weather Station. This unique product is designed for everyday use for the home or office and is a definite asset of great use. To fully benefit from all the features and understand the correct operation of this product, please read this instruction manual thoroughly.
FUNCTIONS OF THE WEATHER STATION
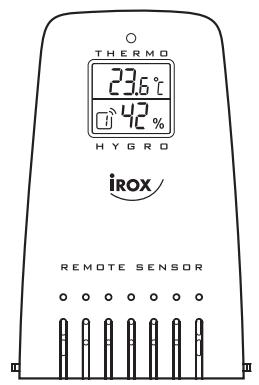
This weather station measures the environment of its surrounding area and receives weather data transmitting from up to five outdoor thermo-hygrometers for temperature and humidity. The data is continuously updated to bring you the latest weather information displayed on the LCD of the receiving unit. Its wireless 433MHz can transmit data over a distance of 75 meters (250 feet) in open space.
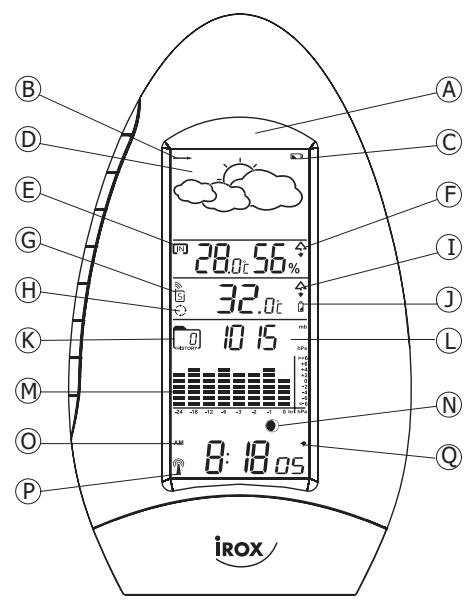
FEATURES:MAINUNIT
A. IR motion sensor
It is a contactless key for user to wave hand within 3 inches distance to activate the backlit or snooze function
B. Air pressure trend arrows
Indicate the trend of air pressure changes
C. Low battery indicator
Shown to indicate the battery in the main unit is low and all displayed information in LCD is no longer reliable. The user needs to change the batteries at once
D. Weather forecast window
Show weather forecast in animation with snowfall indicator and storm warning indicator
E. Indoor indicator
Indicates the indoor temperature and humidity are displayed
F. Indoor maximum/minimum indicator
Indicates the maximum/minimum indoor temperature and humidity are displayed
G. Outdoor remote sensor indicator
Indicates the current outdoor remote sensor signal received. It can display up to 5 different remote sensors which is placed in 5 different places and within 75 meter distance from the main unit.
H. Auto scroll indicator
The animated rolling arrow icon is shown to indicate the auto scroll of 5 different remote channel.
I. Outdoor maximum/minimum indicator
Indicates the maximum/minimum outdoor temperature or humidity is displayed
J. Remote sensor battery low indicator
Appears when the batteries of the remote sensor are running dry and the temperature or humidity measured by this sensor is no longer reliable. The user must change the batteries at once.
K. Barometric history indicator
Indicates the recorded air pressure reading in the past 24 hours
L. Barometric pressure window
Displays the barometric pressure reading in mb hpa or inHg.
M. Barometric pressure chart
Shows the barometric pressure trend chart for the past 24 hours
N.Moon phase
The animated running moon phase will pause for 5 seconds in place of current moon phase.
O. Clock window
Display current time, current time and weekday, calendar or alarm time
P. Radio reception signal
Indicates the condition of DCF77 radio controlled time reception
Q. Alarm on icon
Appears when alarm is activated
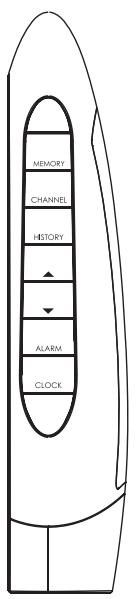
DESCRIPTION OF BUTTONS
AQUA has 7 major function buttons on the edge
- [MEMORY]
Toggle to view the Max/Min reading of the Indoor & Remote Temperature/Humidity.
Press & hold 2 seconds to clear Indoor & all Remote temperature/humidity memories
- [CHANNEL]
Select among channel 1, 2, 3, 4, 5 or to enter auto scroll mode.
Press and hold 2 seconds to activate or deactivate the sensor searching mode
- [HISTORY]
Press to view the past 24-hour barometric readings.
Press and hold 2 seconds to enter the altitude adjustment mode:
- [▲]
Press once to increase the date to view the MOON PHASE status of a specific day in Day-Month-
Year (or Month-Day-Year depends on the date format setting)
Press once to increase the setting in CLOCK,CALENDAR or ALARM setting mode
Press & hold 2 seconds to manually activate or deactivate the radio controlled function
- [▼]
Press to decrease the calendar date to view the MOON PHASE status of a specific day in Day-
Month-Year (or Month-Day-Year depends on the date format setting)
Press once to decrease the setting in CLOCK, CALENDAR or ALARM setting mode
- [ALARM]
Press once to switch from clock mode to alarm time display mode
While in alarm display mode, press once to toggle between arm or disarm the daily alarm
- [CLOCK]
Toggle amongst display for Clock-Sec (HR-MIN-Sec),Clock-day (HR-MIN-Weekday), Calendar (Date
Month-Weekday) and repeat...
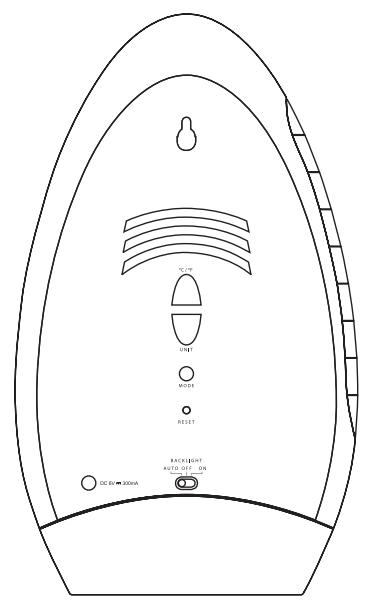
And 3 buttons on the rear side
- [^ / ^]
Toggle the temperature unit ^ C < - - > F
- [UNIT]
Press to toggle the pressure unit. (hPa/mb -> inHg)
During altitude unit setting mode, press once to exchange the altitude unit.
During altitude setting mode, press once to advance the altitude reading, press and hold for 2 seconds to fast increase the reading.
3.[MODE]
Press & hold 2 seconds to enter backlight color setting mode.
Slide switch on the rear side to select the backlight mode
| Power Supply | |||
| Slide switch position | Battery Only | Battery & Adapter | Adapter only |
| Auto | Wave hand in front of the IR sensor to activate backlight for 5 seconds | ||
| OFF | Disable the backlight function | ||
| ON | Wave hand in front of the IR sensor to activate backlight for 5 seconds | Backlight always on | |
GETTING STARTED
This Weather Station was designed for easy set up. For best operation, the following steps are required to be done in the proper sequence.
- INSERT BATTERIES FOR MAIN UNIT BEFORE DOING SO FOR THE SENSOR UNITS.
- RECEIVING UNIT CANNOT BE PROGRAMMED MANUALLY UNTIL THE WIRELESS REMOTE SENSOR UNIT REGISTRATION PROCEDURE HAS BEEN COMPLETED.
- POSITION THE REMOTE UNIT AND MAIN UNIT WITHIN EFFECTIVE TRANSMISSION RANGE, WHICH, IN USUAL CIRCUMSTANCES, IS 250 FEET.
Although the remote unit is weather resistant, it should be placed away from direct sunlight, rain or snow.
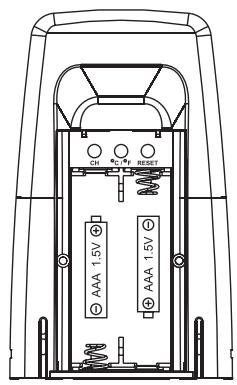
BATTERY INSTALLATION FOR MAIN UNIT
- Turn the metal nut anti-clockwise on the bottom of the unit to unlock and release the battery compartment;
- Insert 4 AA size 1.5V alkaline battery as indicate by the polarity;
- Push the battery compartment back, turn the metal nut clockwise to lock;
Note: Replace the batteries when the low battery indicator appears on the top-right corner of the LCD.
WIRELESS REMOTE SENSOR REGISTRATION PROCEDURE
-
Insert x4 AA batteries first to the main unit, the temperature display shows - - - While the wave icon will keep blinking for 2 minutes indicate unit is in sensor searching mode.
-
In a second step, insert the x2 AAA batteries for the sensor unit. The LED on the front panel will start flashing at a rate of one time per around 2 seconds indicates channel-1 is in use.
- While the LED is flashing, press once the [CH] key will change the sensor channel setting to 2. Keep toggle on [CH] key can change channel setting up to 5. The LED is blinking at a frequency to indicate the channel setting. i.e. continuous blinks 2 times indicate channel-2 is selected.
Note: If user does not press any key for 10 seconds, it will exit the channel setting mode and transmit the RF signal. The main unit will register the temperature reading.
(If the transmitter has the LCD display, the ^ C / ^ key will toggle the temperature unit on the LCD.)
REMOTE CHANNEL AUTO-SCROLLING
This device is equipped with an auto-Scroll function. While the auto-Scroll function is set, the unit will automatically cycle to display the temperature and humidity of each remote sensor for 6 seconds.
- To retrieve manually the specific sensor temperature and humidity reading, press CHANNEL key until desired channel number is displayed.
- To enable autoScroll function, use CHANNEL button to select channel 1, 2, ... until auto scroll icon appears on the left hand corner of the 3rd line display.
DCF 77 RADIO CONTROLLED CLOCK
The built-in radio controlled clock is designed to synchronize the time automatically once the unit is brought within the range of the Frankfurt DCF 77 radio signal. When the unit is receiving the signal, the radio reception " 念 " icon will start flashing and during this reception all manual settings are disabled.
The time reception may take, depending on the signal strength, up to 10 minutes.
When the time reception is complete, the " ^ icon will stop blinking and the following result is shown:
“
: Last reception was successful
: Last reception was not successful
You may start a new reception manually. To enable this feature, press & hold the [▲] button for 3-5 seconds. The radio reception signal " © " icon will start flashing.
If you wish to disable the time reception while it is active in order to perform an operation on the unit, press the [▲] button. The radio signal " icon will stop blinking and the tower will be shown without waves.
Note:
The radio controlled clock will start to receive the time automatically in the early morning hours.
SET THE CLOCK,CALENDAR & LANGUAGE
- Press & hold [CLOCK] button for 2 seconds to enter clock setting mode. Flashing 24 hours will appear.
- Press [▲] or [▼] button to switch between 24 hours and 12 hours format, and then press [CLOCK] button to confirm.
- The hour digits will flash. Use the [] button to increase by one hour or [] button to decrease by one hour to your desired hours. Holding down either button will change the increment unit rapidly. Press [CLOCK] button to confirm.
- The minute digits will flash. Use the [] button or [] button to set your desired minutes. Holding down either button will change the increment unit rapidly. Press [CLOCK] button to confirm.
Note: Every change of minute digit will automatically reset the seconds to zero.
- The year digit will flash and Yr icon appears. Press [▲] or [▼] button to set your desired year. Press [CLOCK] button to confirm.
Note: Year range is from 2000 to 2099.
-
D and M icons will flash. Press [▲] or [▼] to select D M (Date Month) or M D (Month Date) format. Press [CLOCK] button to confirm.
-
Month digits will flash. Press [▲] or [▼] button to set your desired month. Press [CLOCK] button to confirm. Do the same to set Date.
Note: The month phase and the weekday will be automatically calculated and displayed for the date set above.
- E digit will flash. Press [▲] or [▼] button to switch 5 languages display of weekday (English/ German/French/Spanish/Italian. See table 1). Press [CLOCK] button to confirm and exit setting mode
Note: If no key press during setting mode for 10 seconds, it will automatically keep the setting and exit to normal display.
TO SET DAILY ALARM
- In clock time display mode, press [alarm] button once to switch to display alarm time for 10 seconds.
- Press [alarm] button again in alarm display mode to arm or disarm the daily alarm.
- Press and hold [alarm] button for 2 seconds to enter alarm setting mode.
- The hour digits will flash, use [▲] button to increase by one hour or [▼] button to decrease by one hour to your desired hours. Holding down the button will change the increment unit rapidly. Press [ALARM] button to confirm.
- The minute digits will flash. Use [▲] button to increase by one minute or [▼] button to decrease by one minute to your desired minutes. Holding down the button will change the increment unit rapidly. Press [ALARM] button to confirm and finish the setting.
MOON PHASE
Our weather station is equipped with 8 moon phases display (i.e. from new moon to waning crescent) on the screen.

New Moon

Waxing Crescent

First Quarter

Waxing Gibbous

Full Moon

Waning Gibbous

Last Quarter

Waning Crescent
- The animated rolling moon phase will pause 5 seconds in the place of the current month phase calculated by the current calendar date
- The user also can press [▲] button or [▼] button go through the calendar to check the moon phase for a specific date other than the current date
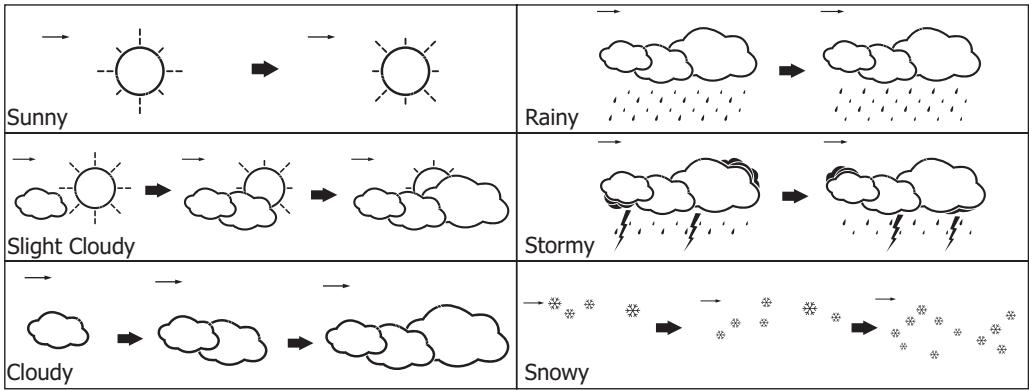
WEATHER FORECAST
Our weather station is capable of detecting local barometric pressure changes, and based on the data collected, can predict the weather for the next 12 to 24 hours.
NOTE:
- It is not necessary and not possible to adjust the altitude of the weather station. After the initial start-up of the weather station, a first forecast will be made within
the first 24 hours of operation.
- In periods of long stable weather conditions, it becomes difficult to make a reliable forecast.
- The weather forecast is solely calculated on the basis of barometric air pressure changes.
- The probability of a correct weather forecast is approximately 70% and is valid for an area of approx. 20-30 km around the location of the weather station.
- The forecast "Sunny" means at night "cloudless weather". Fog is not indicated by the weather station as this can occur with different weather conditions.
- If you travel with the weather station, a reliable weather forecast will become impossible due to changes in altitude and location. You'll have to wait up to 24 hours so that the weather station can calculate a new forecast based on the conditions at the new location.
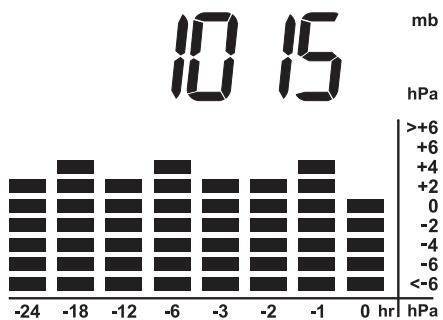
HOW TO CHECK THE BAROMETRIC PRESSURE
The current and historical barometric pressure is shown on the atmospheric pressure window. For monitoring the Sea Level barometric pressure reading at certain altitude, the user needs to select the local altitude (-100 to 2500 meter or -330 to 8250 foot) for the altitude setting. Our weather station requires entry of elevation in meter and in foot separately.
- To enter the altitude compensation setting mode, press and hold [HISTORY] button for 2 seconds to switch from Barometric Pressure to Altitude adjust mode for 10 seconds and the meter icon flashes.
- During Altitude adjust mode, press [UNIT] button to toggle between meter and foot unit. Then press [HISTORY] button to confirm.
- Last altitude reading will flash, press [UNIT] button to increase the value by 10. Hold down the button to have fast stepping. Press [HISTORY] button once to confirm and exit setting.
The atmospheric pressure can be displayed in mb/hPa, inHg. Press [UNIT] to select the pressure unit. Our weather station is equipped with barometer reading for 24hr history. If you want to check the pressure history for a particular hour during the past 24 hours, press [HISTORY] button, each press on the button will go back by an hour.
Note: If the weather station was just installed with batteries and past data was not yet measured, it will display "...".
The recorded barometric changes for the past 24 hours are displayed in a bar chart below the barometric pressure window.
SETBACKLIGHTCOLOR
Press & hold [ MODE ] for 2 seconds to enter the backlight color setting and the barometric chart displays a "C" pattern to prompt the user to set the color, the alternate backlight indicates the backlight is set to auto mode and its color is changed according to the weather condition (see more details in 'BACKLIGHT COLOR CHANGE ACCORDING TO FORECAST WEATHER CONDITION'), press [UNIT] button to select fix backlight color in the sequence, 'WHITE' -> 'LIGHT BLUE' -> 'DARK BLUE' and then cycle back to "auto mode". Press [MODE] button to confirm the setting or auto exit after 10 second.
BACKLIGHT COLOR CHANGE ACCORDING TO FORECAST WEATHER CONDITION While the backlight is set to auto mode, the color of the backlight will change according to the forecast weather condition to acknowledge the user for the forecast weather.
Sunny : DARK BLUE color
Slight Cloudy & Cloudy : LIGHT BLUE color
Rainy & Stormy (or Snowing) : WHITE color
SPECIFICATIONS
Main unit
Indoor temperature range : 0^ to +50.0^ (32.0°F to 122.0°F)
Resolution : 0.1^ (0.2°F)
Rel. Humidity measuring range : 20% to 99%
Resolution : 1% rel. F.
Power : 4x AA 1,5V battery and/or power adapter (incl.)
Dimensions : 250 x 140 x 46mm
Sensor
Outdoor temperature range : -20.0°C to +60.0°C (-4.0°F to 140.0°F)
Resolution : 0.1°C (0.2°F)
Rel. Humidity measuring range : 20% to 99%
Resolution : 1% rel. F.
RF transmission frequency : 433 MHz
RF transmission range : max. 75m (open area)
Power : 2x AAA 1,5V battery (incl.)
Dimensions : 90 x 55 x 20mm

Garantieschein
Certificat de garantie