
IMOVE 7S - Light projector JBSYSTEMS LIGHT - Free user manual and instructions
Find the device manual for free IMOVE 7S JBSYSTEMS LIGHT in PDF.

| Product type | Moving head light projector (Moving Head) |
| Brand | JBSYSTEMS LIGHT |
| Model | IMOVE 7S |
| Dimensions (L × W × H) | 373 × 295 × 451 mm |
| Weight | 13 kg |
| Power supply | AC 230 V, 50 Hz |
| Fuse | 6.3 A / 250 V |
| Bulb | HTI 150 W |
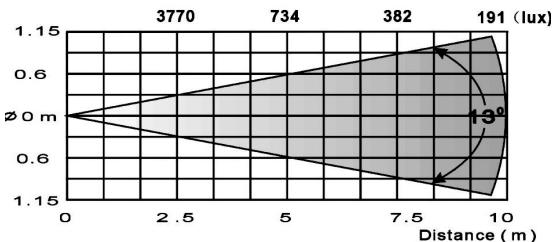
| Beam angle | 13° |
| DMX channels | 7 |
| Movements | Pan 540°, Tilt 270° |
| Colors | 9 dichroic trapezoidal colors + white, rainbow effect |
| Gobos | 7 interchangeable rotating gobos + 1, glass gobos |
| Dimmer | 0–100% |
| Strobe | Variable high speed |
| Control | DMX512, master/slave, CA-8 controller (optional) |
| Built-in programs | 4 shows (Show 1–4) |
| Special functions | Blackout, Pan/Tilt inversion, split colors, focus adjustment, self-test |
| Safety | Min. distance from illuminated surfaces: 1 m; Max. ambient temperature: 40 °C; Max. housing temperature: 85 °C; Indoor use only |
| Maintenance and cleaning | Cleaning of external optics: every 30 days; Cleaning of internal optics: every 90 days; Annual inspection by qualified personnel |
| Spare parts and repairability | Bulb (HTI 150 W) and fuse (6.3 A/250 V) replaceable by user; internal repairs must be carried out by a qualified technician |
| General information | Compliant with European standards; Warranty not applicable in case of incorrect use |
Frequently Asked Questions - IMOVE 7S JBSYSTEMS LIGHT
User questions about IMOVE 7S JBSYSTEMS LIGHT
0 question about this device. Answer the ones you know or ask your own.
Ask a new question about this device
Download the instructions for your Light projector in PDF format for free! Find your manual IMOVE 7S - JBSYSTEMS LIGHT and take your electronic device back in hand. On this page are published all the documents necessary for the use of your device. IMOVE 7S by JBSYSTEMS LIGHT.
USER MANUAL IMOVE 7S JBSYSTEMS LIGHT
Copyright © 2007 by BEGLEC cva.
Reproduction or publication of the content in any manner, without express permission of the publisher, is prohibited.
C
Version: 1.0


EN - DISPOSAL OF THE DEVICE
Dispose of the unit and used batteries in an environment friendly manner according to your country regulations.
FR-DECLASSES L'APPAREIL
Thank you for buying this JB Systems® product. To take full advantage of all possibilities and for your own safety, please read these operating instructions very carefully before you start using this unit.
FEATURES
This unit is radio-interference suppressed. This product meets the requirements of the current European and national guidelines. Conformity has been established and the relevant statements and documents have been deposited by the manufacturer.
- This device has been designed to produce decorative effect lighting and is used in light show systems.
- Powerful Moving Head for Pro DJ, renting companies and discotheques
- 7 DMX channels (pan - tilt - colour - gobo - gobo rotation - shutter/shaking - dimmer)
- Excellent optics for sharp gobos and big light output
- 9 trapezoid dichroic colours + white, rainbow effect
- 7 + 1 interchangeable rotating gobos (also glass gobos)
- Blackout, 0-100% dimmer and high speed variable strobe
- Built in programs and micro for stand alone "Master/slave" mode!
- Easily controlled by our Scanmaster SM1216, iLEAD controller or any other DMX controller
BEFORE USE
- Before you start using this unit, please check if there's no transportation damage. Should there be any, do not use the device and consult your dealer first.
- Important: This device left our factory in perfect condition and well packaged. It is absolutely necessary for the user to strictly follow the safety instructions and warnings in this user manual. Any damage caused by mishandling is not subject to warranty. The dealer will not accept responsibility for any resulting defects or problems caused by disregarding this user manual.
- Keep this booklet in a safe place for future consultation. If you sell the fixture, be sure to add this user manual.
Check the contents:
Check that the carton contains the following items:
- iMove 7S unit
- Mains cable
- Operating instructions
SAFETY INSTRUCTIONS:

CAUTION
RISK OF ELECTRIC SHOCK
DO NOT OPEN

CAUTION: To reduce the risk of electric shock, do not remove the top cover. No user-serviceable parts inside. Refer servicing to qualified service personnel only.

The lightning flash with arrowhead symbol within the equilateral triangle is intended to alert the use or the presence of un-insulated "dangerous voltage" within the product's enclosure that may be of sufficient magnitude to constitute a risk of electric shock.

The exclamation point within the equilateral triangle is intended to alert the user to the presence of important operation and maintenance (servicing) instructions in the literature accompanying this appliance.

This symbol means: indoor use only.
This symbol means: Read instructions.

This symbol determines: the minimum distance from lighted objects. The minimum distance between light-output and the illuminated surface must be more than 1 meters.
-
To protect the environment, please try to recycle the packing material as much as possible.
-
A new light effect sometimes causes some unwanted smoke and/or smell. This is normal and disappears after some minutes.
-
To prevent fire or shock hazard, do not expose this appliance to rain or moisture.
-
To avoid condensation to be formed inside, allow the unit to adapt to the surrounding temperatures when bringing it into a warm room after transport. Condense sometimes prevents the unit from working at full performance or may even cause damages.
-
This unit is for indoor use only.
-
Don't place metal objects or spill liquid inside the unit. Electric shock or malfunction may result. If a foreign object enters the unit, immediately disconnect the mains power.
-
Locate the fixture in a well ventilated spot, away from any flammable materials and/or liquids. The fixture must be fixed at least 50cm from surrounding walls.
-
Don't cover any ventilation openings as this may result in overheating.
-
Prevent use in dusty environments and clean the unit regularly.
-
Keep the unit away from children.
-
Inexperienced persons should not operate this device.
Maximum save ambient temperature is 40^ . Don't use this unit at higher ambient temperatures.
-
The units' surface temperature may reach up to 85^ . Don't touch the housing with bare hands during its operation.
-
Make sure the area below the installation place is free from unwanted persons during rigging, de-rigging and servicing.
-
Allow the device about 10 minutes to cool down before replacing the bulb or start servicing.
-
Always unplug the unit when it is not used for a longer time or before replacing the bulb or start servicing.
-
The electrical installation should be carried out by qualified personal only, according to the regulations for electrical and mechanical safety in your country.
-
Check that the available voltage is not higher than the one stated on the rear panel of the unit.
-
The power cord should always be in perfect condition: switch the unit immediately off when the power cord is squashed or damaged.
-
Never let the power-cord come into contact with other cables!
-
This fixture must be earthed to in order comply with safety regulations.
-
Don't connect the unit to any dimmer pack.
-
Always use an appropriate and certified safety cable when installing the unit.
-
In order to prevent electric shock, do not open the cover. Apart from the lamp and mains fuse there are no user serviceable parts inside.
-
Never repair a fuse or bypass the fuse holder. Always replace a damaged fuse with a fuse of the same type and electrical specifications!
-
In the event of serious operating problems, stop using the fixture and contact your dealer immediately.
- The housing and the lenses must be replaced if they are visibly damaged.
- Please use the original packing when the device is to be transported.
- Due to safety reasons it is prohibited to make unauthorized modifications to the unit.
Important: Never look directly into the light source! Don't use the effect in the presence of persons suffering from epilepsy.
LAMP (RE)PLACEMENT
In case of replacement of the lamp or maintenance, do not open the fixture within 10 minutes until the unit cools down after switching
off. Always unplug the unit before servicing! Always use the same type of spare parts (bulbs, fuses, etc.) When replacing parts, please only genuine spare parts.
- Switch off the unit and unplug the mains cable.
- Wait for about 10 minutes until the unit has been cooled down.
- Unscrew the two screws on the back of the Unit where the sign "open" is written.
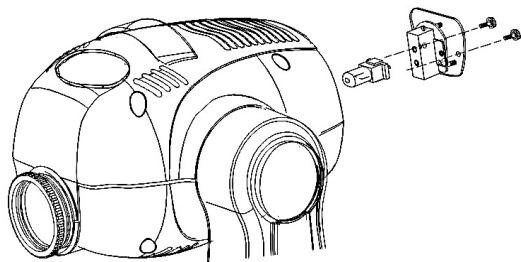
- Tear the lamp socket gently out of the lamp compartment.
- Unplug the old lamp. Hold the lamp socket while unplugging the lamp instead of pulling the cable!
- Hold the lamp socket while pressing the new lamp gently in the socket.
Attention! Check the label on the backside of the device or see the technical specifications in this manual to know which lamp should be used. Never install lamps with a higher wattage!
- Don't touch the bulb with bare hands! This drastically shortens the lifespan of the lamp. If you touched the lamp, clean it with a cloth and a little denatured alcohol. Wipe the lamp off before installing.
- Put the new lamp back inside the unit. Be sure that the wires don't touch the lamp.
- Close the lamp compartment with the screws
- Turn on the unit and point the beam to a white surface. Use the three adjustment screws indicated by "lamp adjust". Gently turn these three screws until you obtain maximum light output.
- Done!
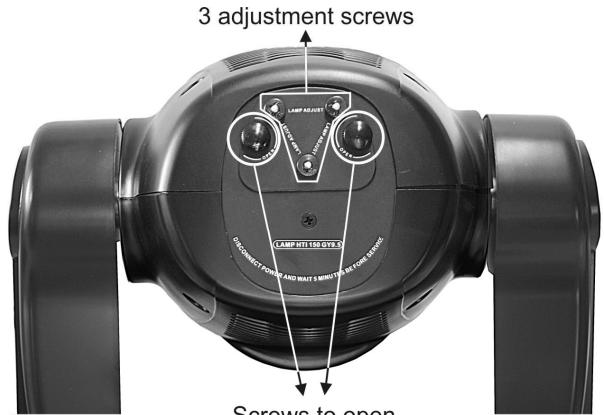
Screws to open the lamp compartment
EXCHANGING/ROTATING GOBOS

ATTENTION: Install the gobos only when the unit is switched off! Never unscrew the screws of the rotating gobo as the ball bearing will be opened. Repairing this is very difficult!
- Switch off the main supply and unplug the unit.
- Open the plastic top cover (4screws)
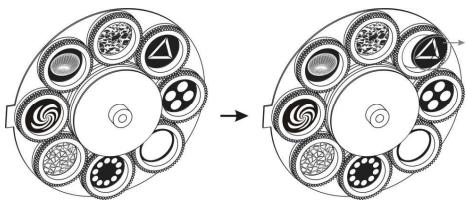
- Locate the gobo wheel and remove the fixation ring of the gobo you want to change with an appropriate tool.
- Remove the gobo and insert the new gobo.
- Press the fixation-ring together and insert it in the front of the gobo.
- Done!
OVERHEAD RIGGING
- Important: The installation must be carried out by qualified service personal only. Improper installation can result in serious injuries and/or damage to property. Overhead rigging requires extensive experience! Working load limits should be respected, certified installation materials should be used, the installed device should be inspected regularly for safety.
- Make sure the area below the installation place is free from unwanted persons during rigging, de-rigging and servicing.
- Locate the fixture in a well ventilated spot, far away from any flammable materials and/or liquids. The fixture must be fixed at least 50cm from surrounding walls.
- The device should be installed out of reach of people and outside areas where persons may walk by or be seated.
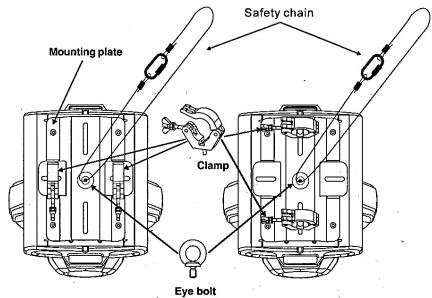
- Before rigging make sure that the installation area can hold a minimum point load of 10 times the device's weight.
- Always use a certified safety cable that can hold 12 times the weight of the device when installing the unit. This secondary safety attachment should be installed in a way that no part of the installation can drop more than 20cm if the main attachment fails.
- The device should be well fixed; a free-swinging mounting is dangerous and may not be considered!
- Don't cover any ventilation openings as this may result in overheating.
- The operator has to make sure that the safety-relating and machine-technical installations are approved by an expert before using them for the first time. The installations should be inspected every year by a skilled person to be sure that safety is still optimal.
HOW TO SET UP THE UNIT
CONTROL PANEL:
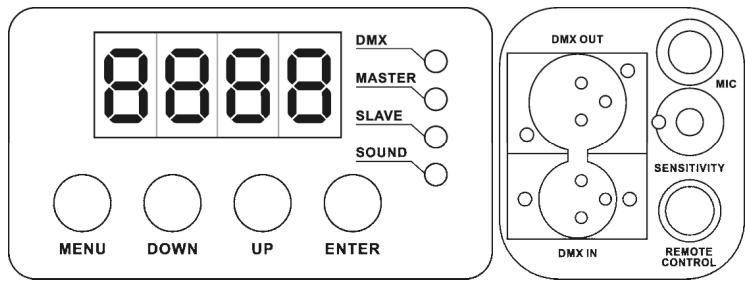
- DISPLAY shows the various menus and the selected functions.
- LEDs
| DMX | On | DMX input present |
| MASTER | On | Master mode |
| SLAVE | On | Slave mode |
| SOUND | Flashing | Sound activation |
- BUTTONS
| MENU | To select the programming functions |
| DOWN | To go backward in the selected functions |
| UP | To go forward in the selected functions |
| ENTER | To confirm the selected functions |
- REMOTE CONTROL INPUT: Used to connect an optional CA-8 hand controller while the unit is used in standalone or master/slave mode.
- SENSITIVITY: Used to adjust the sensitivity of the micro when the unit is used in standalone or master/slave mode.
- MICROPHONE: used to trigger the internal programs to the rhythm of the music.
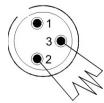
- DMX INPUT/OUTPUT: used for DMX512 linking. Use good quality 3pin XLR M/F balanced cable to link the units together.
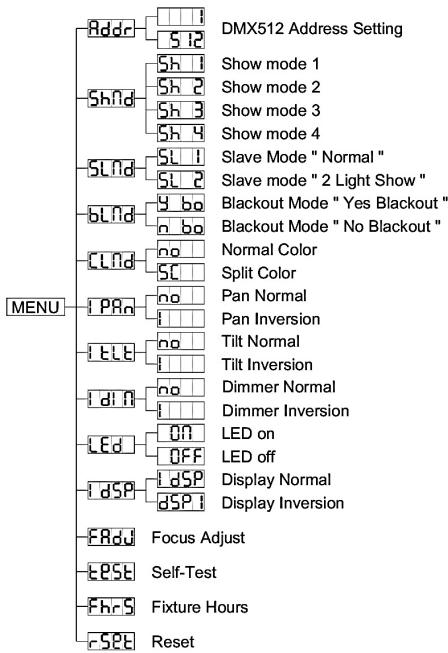
MAIN MENU:
- To select any of the pre-set functions, press the MENU button up to when the required one is shown on the display.
- Select the function with the ENTER button. The display will blink.
- Use DOWN and UP button to change the mode.
- Once the required mode has been selected, press the ENTER button to select. After 8 seconds the display will automatically return to the main functions without any change. To go back to the functions without any change press the MENU button. The main functions are shown on the right.

DMX512 Address Setting
Used to set the starting address in a DMX setup.
- Press the MENU button until Rddr is shown on the display.
- Press the ENTER button, the display starts blinking.
- Use DOWN and UP buttons to change the DMX512address.
- Once the correct address shows on the display, press the ENTER button to save it. (or automatically return to the main functions without any change after 8 seconds)
To go back to the functions without any change press the MENU button again.

Show Mode
Used to choose the Show mode when used in standalone or master/slave mode.
- Press the MENU button until Shnd is showing on the display.
- Press the ENTER button, the display starts blinking.
- Use DOWN and UP buttons to select (show 1), (show 2), (show 3) or (show 4) mode.
- Once the right mode shows on the display, press the ENTER button to save it. (or automatically return to the main functions without any change after 8 seconds) To go back to the functions without any change press the MENU button again.

Show 1 mode- Fixture is placed on the floor. Tilt movement angle 210^ .

Show 2 mode-Fixture is fixed under ceiling. Tilt movement angle 90^

Show 3 mode - Fixture is placed on a podium, in front of the audience
The spot is always projecting to the audience's direction; i.e in front of the stage. Pan movement angel (left to right to left): 160^ . Tilt movement angel: 90^ ( 60^ above horizon; 30^ below horizon.)

Show 4 mode - Fixture is fixed under ceiling.
The spot is mainly projecting in front of the stage. Pan movement angel ( left to right to left ) :160°. Tilt movement angel: 90° ( vertically, front 75°; back 15°)

Slave Mode
Used to make the slave unit work in opposite to the master or to work in complete sync.
- Press the MENU button until SL1d is shown on the display.
- Press the ENTER button, the display starts blinking.
- Use DOWN and UP button to select SL (normal) or SL (2 light show) mode.
- Once the mode has been selected, press the ENTER button save it. (or automatically return to the main functions without any change after 8 seconds) To go back to the functions without any change press the MENU button again.
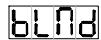
Blackout Mode
Blackout mode: when no DMX-signal is detected, the unit goes in blackout and waits for the DMX-signal.
No blackout mode: when no DMX-signal is detected, the unit automatically switches to standalone mode.
- Press the MENU button until bLnd is shown on the display.
- Press the ENTER button, the display starts blinking.
- Use DOWN and UP button to select (yes blackout) or (no blackout) mode.
- Once the mode has been selected, press the ENTER button to save it. (or automatically return to the main functions without any change after 8 seconds)
To go back to the functions without any change press the MENU button again.
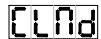
Color Mode
Normal: only full colors can be selected.
Split colors: you can select full colors and 2 colors that are next to each other on the color wheel.
- Press the MENU button unitl Lnd is shown on the display.
- Press the ENTER button, the display starts blinking.
- Use DOWN and UP button to select no (normal) or BC (split color) mode.
- Once the mode has been selected, press the ENTER button to save it. (or automatically return to the main functions without any change after 8 seconds)
To go back to the functions without any change press the MENU button again.
Pan Inversion
Normal: Panning movement is not inversed.
Pan inversion: Panning movement is inversed
- Press the MENU button until Pan is shown on the display.
- Press the ENTER button, the display starts blinking.
- Use DOWN and UP button to select no (normal) or pan inversion mode.
- Once the mode has been selected, press the ENTER button to save it. (or automatically return to the main functions without any change after 8 seconds)
To go back to the functions without any change press the MENU button again.
Tilt Inversion
Normal: Tilt movement is not inversed.
Tilt inversion: tilt movement is inversed
- Press the MENU button until TLb is shown on the display.
- Press the ENTER button, the display starts blinking.
- Use DOWN and UP buttons to select no (normal) or (tilt inversion) mode.
- Once the mode has been selected, press the ENTER button to save it. (or automatically return to the main functions without any change after 8 seconds)
To go back to the functions without any change press the MENU button again.
Dimmer Inversion
Standard dimming: fader closed (DMX value 000) full light output
fader open ( DMX value 255 ) → blackout
Inverse dimming: fader closed (DMX value 000) blackout fader open (DMX value 255) full light output
- Press the MENU button up to when the df is shown on the display.
- Press the ENTER button so the display starts blinking.
- Use DOWN and UP buttons to select the no (normal) or dimmer inversion) mode.
- Once the mode has been selected, press the ENTER button to save it. ( or automatically return to the main functions without any change after 8 seconds )
To go back to the functions without any change press the MENU button again.

Led Display
Display on: display is always on.
Display off: display is off when not used.
- Press the MENU button until the display shows Ed
- Press the ENTER button, the display starts blinking.
- Use DOWN and UP buttons to select on (display always on) or OFF (display off when not used).
- Once the mode has been selected, press the ENTER button to save it. (or automatically return to the main functions without any change after 8 seconds)
To go back to the functions without any change press the MENU button again.

Display Inversion
Display normal: display is readable when the unit is on the floor.
Display inversion: display is readable when the unit is mounted upside down.
- Press the MENU button until DSP is blinking on the display. (normal display)
- Use the ENTER button to change to the mode (display inversion), the option will be automatically stored after 8 seconds. Or press the ENTER button again return to the mode (normal display).
- To go back to the functions press the MENU button.

Focus Adjust
Used to help you adjusting the focus of the light beam and gobos.
- Press the MENU button until FRdU is blinking on the display.
- Press the ENTER button so the unit goes to the "tilt 90^ " position.
- Press the ENTER button so the unit goes to the "pan 0^ " position.
- Press the ENTER button so the unit goes to the "pan 90^ " position.
- Press the ENTER button so the unit goes to the "pan 180^ " position.
- Press the ENTER button so the unit goes to the "pan 270^ " position.
In the Previous 5 steps you are able to adjust the focus with the UP/DOWN buttons on the unit (the display shows the current focus status).
Attention: please note that you can only set an "average focus" for all 5 positions, so it is not possible to set the focus perfectly sharp for all directions.
- To go back to the functions press the MENU button.
Self-Test
Used to activate the internal "self-test" program which shows all possibilities of the unit.
- Press the MENU button until EPSE is blinking on the display.
- Press the ENTER button to start the internal self-test program
- To go back to the functions press the MENU button.

Fixture Hours
Used to show the number of working hours of the unit.
- Press the MENU button until FhrS is blinking on the display.
- Press the ENTER button to show the number of working hours in the display.
- To go back to the functions press the MENU button.

Reset
Used to force a reset of the unit.
- Press the MENU button until FSEB is blinking on the display.
- Press the ENTER to reset all channels to their standard position.
- To go back to the functions press the MENU button.
Please also check the chapter about the DMX-channel configuration of the unit to find out how you can force a reset by DMX.
HOW TO CONNECT THE UNIT BY DMX
The DMX-protocol is a widely used high speed signal to control intelligent light equipment. You need to "daisy chain" your DMX controller and all the connected light effects with a good quality XLR M/F balanced cable. To prevent strange behavior of the light effects, due to interferences, you must use a 90 to 120 terminator at the end of the chain. Never use Y-splitter cables, this simply won't work!
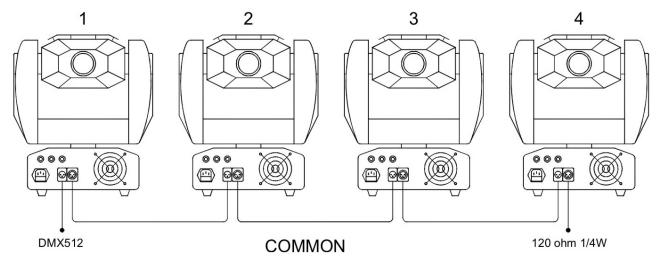

Each light effect in the chain needs to have its proper starting address so it knows which commands from the controller it has to decode.
HOW TO SET THE RIGHT STARTING ADDRESS:
Refer to the previous chapter (DMX-512 address setting) to learn how to set the starting address on this unit. The starting address of each unit is very important. Unfortunately it is impossible to tell you in this user manual which starting addresses you have to set because this completely depends on the controller you will use... So please refer to the user manual of your DMX-controller to find out which starting addresses you must set.
DMX-CONFIGURATION OF IMOVE 7S:
| DMX512 Configuration | |||
| Ch1 | Ch2 | Ch3 | Ch4 |
| Pan | Tilt | Shutter/Shaking | Gobo |
| 540° | 270° | 248-255 Open | 255 Fastest speed Gobo change |
| 247 Fastest speed Shaking | 128 Slowest speed Gobo change | ||
| 132 Slowest speed shaking | 112-127 | ||
| 096-111 | |||
| 080-095 | |||
| 270° | 135° | 131 Fastest speed shutter | 064-079 |
| 048-063 | |||
| 16 Slowest speed shutter | 032-047 | ||
| 0° | 0° | 008-015 Open | 016-031 |
| 000-007 Blackout | 000-015 | ||
| Ch5 | Ch6 | Ch7 | |
| Color | Gobo Rotation | Dimmer | |
| Normal | Split | 246-255 Stopped | 255 0% |
| 255 Fastest speed Rainbow effect | 255 Fastest speed Rainbow effect | 245 Fastest speed clockwise | |
| 128 Slowest speed Rainbow effect | 128 Slowest speed Rainbow effect | 135 Slowest speed clockwise | |
| 116-127 Pink | 113-120 Light Green | ||
| 103-115 Light Green | 106-112 UV/Purple+light Green | ||
| 090-102 UV Purple | 098-105 UV Purple | ||
| 077-089 Blue | 091-097 Blue+UV Purple | 121-134 Stopped | |
| 064-076 Orange | 083-090 Blue | 120 Slowest speed counterclockwise | |
| 052-063 Yellow | 068-075 Orange | ||
| 039-051 Light Blue | 061-067 Yellow+Orange | 010 Fastest speed counterclockwise | |
| 026-038 Magenta | 063-060 Yellow | ||
| 013-025 Green | 046-052 Light Blue+Yellow | ||
| 000-012 White | 038-045 Light Blue | ||
| 000-012 White | 031-037 Magenta+Light Blue | ||
| 000-012 White | 023-030 Magenta | ||
| 013-025 Green | 016-022 Green+Magenta | ||
| 000-012 White | 008-015 Green | 000-009 Stopped | 000 100% |
HOW TO OPERATE THE UNIT
Every time you turn the unit on, it will show IM7S on the display and move all the motors to their 'home' position and you may hear some noises for about 20 seconds. After that the unit will be ready to receive DMX signal or run the built-in programs.
You can operate the unit in three ways:
By master/slave built-in preprogram function
By CA-8 easy controller
By universal DMX controller
BY MASTER/SLAVE BUILT-IN PREPROGRAM FUNCTION:
Select this function when you want an instant show. By linking the units in master/slave connection, the first unit will control the other units to give an automatic, sound activated, synchronized light show. Its DMX input will have nothing plugged into it, and its master-LED will be constantly on and sound-LED will flash to the music. Important! This function only works when the blackout mode in the menu of the master is set to OFF, otherwise nothing will happen! Read more about this option in the "Main Menu" paragraph.
-
MASTER has 4 built-in shows: You can select 5h (show 1), 5h (show 2), 5h (show 3) or 5h (show 4) directly in the menu of the master.
-
SLAVES have 2 working options: The other units are set to slave mode (slaveLED is constantly on). In order to create a great light show you can introduce contrast movements (pan/tilt of slave is inversed) In the menu of the slave units you can go to option and select:
Normal slave: slave works in sync with the master.
2 light show: slave works in opposite with the master.
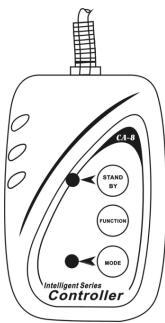
BY EASY CONTROLLER:
When used in Master/slave mode we strongly advice you to use the CA-8 "Easy controller" Just connect this small controller to the 1/4" jack of the master unit, and you will be able to control the following FUNCTIONS:
| Stand by | Blackout the unit | |||
| Function | Strobe 1.Gobo/Color sync. strobe 2.Sync. strobe 3.Two-light strobe | X/Y moving show mode selection (Show 1 ~ Show 4) | Color/Gobo selection 1. Hold on for gobo change. 2. Press shortly for color change. | X/Y moving setting 1.Pan position 2.Tilt position 3.Dimmer First set Master unit, then set Slave units' position. |
| Mode | Sound 1 (LED off) | Sound 2 (LED normal blinking) | Slow/Sound 3 (LED on) | Position/Latch (LED fast blinking) |
MAINTENANCE
- Make sure the area below the installation place is free from unwanted persons during servicing.
- Switch off the unit, unplug the mains cable and wait until the unit has been cooled down.
During inspection the following points should be checked:
- All screws used for installing the device and any of its parts should be tightly fastened and may not be corroded.
- Housings, fixations and installations spots (ceiling, truss, suspensions) should be totally free from any deformation.
- When an optical lens is visibly damaged due to cracks or deep scratches, it must be replaced.
- The mains cables must be in impeccable condition and should be replaced immediately when even a small problem is detected.
- In order to protect the device from overheat the cooling fans (if any) and ventilation openings should be cleaned monthly.
- The interior of the device should be cleaned annually using a vacuum cleaner or air-jet.
-
The cleaning of internal and external optical lenses and/or mirrors must be carried out periodically to optimize light output. Cleaning frequency depends on the environment in which the fixture operates: damp, smoky or particularly dirty surroundings can cause greater accumulation of dirt on the unit's optics.
-
Clean with a soft cloth using normal glass cleaning products.
Always dry the parts carefully. - Clean the external optics at least once every 30 days.
- Clean the internal optics at least every 90 days.
Attention: We strongly recommend internal cleaning to be carried out by qualified personnel!
SPECIFICATIONS
Mains Input: AC 230V, 50Hz
Fuse: 6,3 A/250V
Sound Control: Internal microphone
DMX connections: 3pin XLR male / female
Lamp: HTI: 150 W
Size: 373 × 295 × 451 ~mm
Weight: 13 kg
IM-7S
Lamp: HTI 150W Beam angle: 13 degree
Every information is subject to change without prior notice
You can download the latest version of this user manual on our website: www.beglec.com