
CD 410 - Professional audio equipment JBSYSTEMS LIGHT - Free user manual and instructions
Find the device manual for free CD 410 JBSYSTEMS LIGHT in PDF.

| Product Type | Professional CD player with separate controller |
| Brand | JBSYSTEMS LIGHT |
| Model | CD 410 |
| Category | Professional audio equipment |
| Controller dimensions | 482 x 88.8 x 60 mm |
| Charger weight | 5 kg |
| Controller weight | 2 kg |
| Power supply | Mains (not specified) |
| Main functions | Play/pause, LOOP, variable pitch ±10%, CUE, track programming (max 30), RELAY (alternating between two players), auto start via mixer, accelerated search, track selection |
| Display | Digital display with time indicators (elapsed, remaining) and BPM change |
| Connectivity | Remote connector (DIN), Line Out RCA (cinch) outputs, AUTO START input |
| Disc compatibility | Standard audio CDs (avoid dirty, scratched or warped discs) |
| Maintenance and cleaning | Clean discs with a soft cloth and specific products; avoid dust, moisture, smoke and heat sources |
| Safety precautions | Avoid sudden temperature changes (condensation); do not open the drawer manually; unplug before cleaning |
| General information | Manual available in multiple languages; free PDF download |
Frequently Asked Questions - CD 410 JBSYSTEMS LIGHT
User questions about CD 410 JBSYSTEMS LIGHT
0 question about this device. Answer the ones you know or ask your own.
Ask a new question about this device
Download the instructions for your Professional audio equipment in PDF format for free! Find your manual CD 410 - JBSYSTEMS LIGHT and take your electronic device back in hand. On this page are published all the documents necessary for the use of your device. CD 410 by JBSYSTEMS LIGHT.
USER MANUAL CD 410 JBSYSTEMS LIGHT
- Allow for sufficient heat dispersion when installed on a rack.
- Handle the power cord carefully. Hold the plug when unplugging the cord.
- Keep the set free from moisture, water and dust.
- Unplug the power cord when not using the set for a long period of time.
- Do not obstruct the ventilation holes (for sets with ventilation holes).
- Do not let foreign objects into the set.
- Do not let insecticides, benzene and thinner come in contact with the set.
- Never disassemble or modify the set in any way.
Use proper plug for the local outlet.
MAIN UNIT
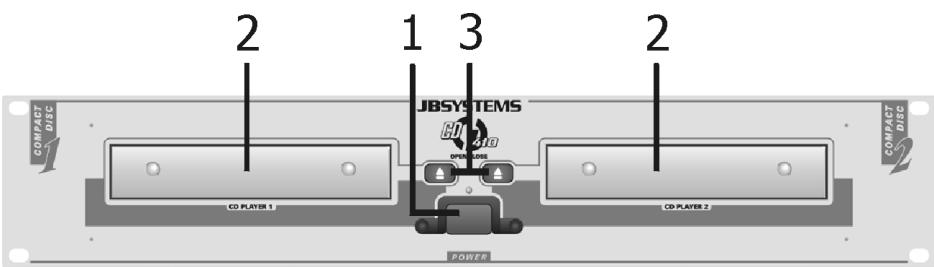
- Power (Power ON/OFF switch)
- Disc Holder
- Open/Close
Press it to open and close the disc holder. The control unit also includes OPEN/CLOSE button. The disc holder cannot be opened during playback, so stop playback before pressing the button.
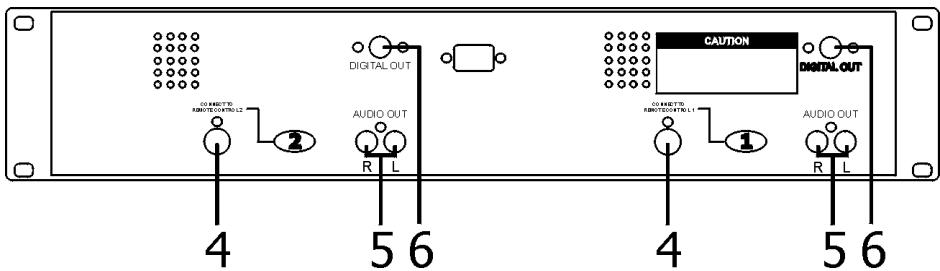
- Remote Control Connector
Connect this connector to the control unit using the included control cord.
- Audio Out 1 & 2
The audio signals from each player are output from these jacks.
- Digital Out Socket
The music signal of this socket is digital. Connect the output to the respective input of for example a digital amplifier.
CONTROL UNIT
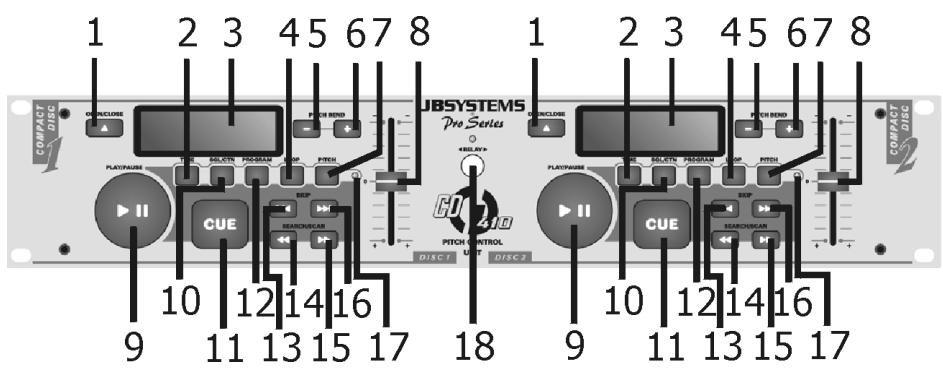
1. Open/Close
Press it to open and close the disc holder. The main unit also includes OPEN/CLOSE buttons. The disc holder cannot be opened during playback, so stop playback before pressing the button.
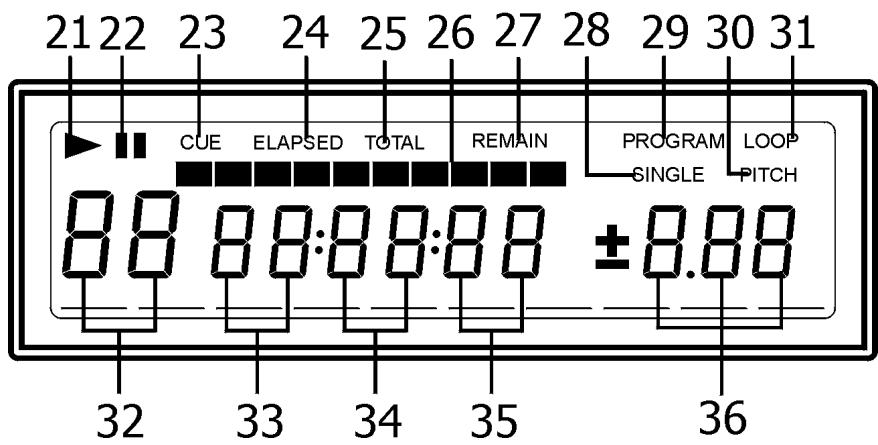
2. Time Button
Press this button to switch the time display between the elapsed time and remaining time and total remaining time. The selected mode is indicated by the indicators 'Elapsed', 'Remain' and 'Total Remain' on the LCD.
3. LCD
4. LOOP (Loop Button)
Press the LOOP button to set the loop start point, press the LOOP button again to set the loop end point.
5. PITCH - Button
The CD slows down while this button is pressed. Release the button to return to the original BPM.
6. PITCH + Button
The CD speeds up while this button is pressed. Release the button to return to the original BPM.
7. PITCH (Pitch Button)
Use this button to enable or disable BPM adjustment with the pitch sliders. BPM adjustment with the pitch sliders is enabled when the pitch LED lights.
8. Pitch Slider
Use the slider to adjust the CD pitch. Slide up to decrease the pitch, down to increase the pitch.
9. Play/Pause Button
Use the button to start playback. Press once to start playback, once again to set the pause mode, and once more to resume playback.
10. SGL/CTN (Single/Continuous Button)
Press it to switch between the single and continuous play modes. The SINGLE mode is indicated by the Single indicator on the LCD.
11. CUE (Cue Button)
Press the Cue button during playback to return to the position at which playback started.
12. Program (Program Button)
Press the Program button, the player will enter the program mode and stop the CD playback.
13. SKIP
Use this button to go back to the beginning of the current track or to select a previous track for playing.
14 & 15. Search/Scan << & >>
Press these buttons to perform frame search function during pause mode or to perform scan function during play mode.
16. SKIP
Use this button to skip to the next CD track.
17. PITCH (Pitch Indicator)
Moving the pitch slider will change the pitch but only when the pitch LED is illuminated.
18. Relay
Press the Relay button to enable or disable the Relay function. While the Relay is enabled, the LED will light. In the single mode, the CD player will be paused at the next track when finished playing the current track. Only the other side of the CD player that is standby in pause mode will start playing automatically. There is no Fader start function when in the Relay mode. Press the Relay button do disable relay function. The LED will go out when Relay is disabled.
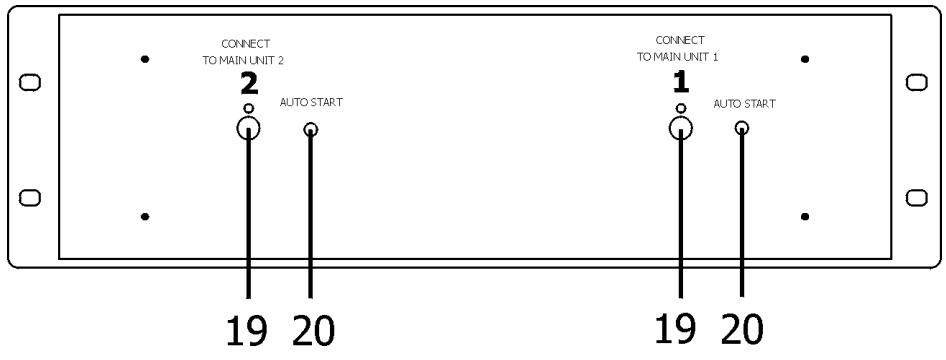
19. Control Connector
Connect this connector to the Remote connector on the main unit using the included control cord.
20. Auto Start
Via the Control socket, the respective CD player can be remotely controlled. If you are using a mixer with fader start function, connect the player with the control out socket. Please note that these sockets must never be connected with any voltage.
LED
21. PLAY Indicator
The play indicator lights during play mode.
22. PAUSE Indicator II
The pause indicator lights during pause mode.
23. CUE Indicator
The cue indicator lights during cue mode or pause mode, flashes when cue point is changed.
24. Elapsed Indicator
It indicates that the time shown on the display is the elapsed time.
25. Total Indicator
It indicates that the time shown on the display is the Total Remaining time of playback.
26. BAR Indicator
These ten indicators provide a visual display of the approximate position of the pickup within the current track.
27. Remain Indicator
Indicates that the time shown on the display is the remaining time of the playing track.
28. Single Indicator
When the indicator lights, playback will stop at the beginning of the next track.
29. Program Indicator
The program indicator lights when the program mode is set.
30. Pitch Indicator
When the indicator lights, the pitch mode is enabled.
31. Loop Indicator
When the indicator lights, the loop mode is enabled.
32. - 35. Track, Minute, Second & Frame Displays
These displays indicate information on the CD's current position and time.
36. Pitch Display
It shows the BPM change range, the BPM changes within a range of ± 10% .
Specifications
Power Source: AC 230V, 50Hz, 25W
Dimensions:
Main unit: 482 (W) x 88,8 (H) x 251 (D) mm
Control unit: 482 (W) x 88,8 (H) x 60 (D) mm
Weight:
Main unit: 5 Kgs
Control unit: 2 Kgs
Mode d'emploi
AVANT L'USAGE
10. SGL/CTN (Single/Continuous)
Alimentation/Consommation: AC 230V, 50Hz, 25W
Dimensions:
Chargeur: 482 (W) x 88,8 (H) x 251 (D) mm
- Remote control connector
10. SGL/CTN (Single/Continuous)
32. - 35. Track, Minute, Second & Frame Displays
Power Source:AC 230V,50Hz,25W
Dimensions:
Main unit: 482 (W) x 88,8 (H) x 251 (D) mm
Control unit: 482 (W) x 88,8 (H) x 60 (D) mm
Weight:
Main unit: 5 Kgs
Control unit: 2 Kgs