
MEDIAHOME 4 - Multimedia Software NERO - Free user manual and instructions
Find the device manual for free MEDIAHOME 4 NERO in PDF.
User questions about MEDIAHOME 4 NERO
0 question about this device. Answer the ones you know or ask your own.
Ask a new question about this device
Download the instructions for your Multimedia Software in PDF format for free! Find your manual MEDIAHOME 4 - NERO and take your electronic device back in hand. On this page are published all the documents necessary for the use of your device. MEDIAHOME 4 by NERO.
USER MANUAL MEDIAHOME 4 NERO
Copyright and Trademark Information
This document, like the software described therein, is provided as a license and may only be used or reproduced in accordance with the licensing agreement. The contents of this document, as well as the associated software, is subject to change without prior notice. Nero AG rejects any responsibility for the correctness of the contents of this document and rejects any claims that transcend the clauses of the guarantee agreement.
This document and all of its contents are protected by copyright and are the property of Nero AG. All rights reserved. In addition, this document contains material that is protected by internationally valid copyright. This document may not be reproduced, transmitted, or transcribed in whole or in part without the express written permission of Nero AG.
Please keep in mind that existing graphics, pictures, videos, music titles or other materials that you may wish to insert or transcribe into projects may be protected by copyright. The unauthorized use of this type of material in your projects may violate the rights of the owner of the copyright. Make sure that you obtain all necessary authorizations from the owner of the copyright.
Unless you own the copyright, have permission from the copyright owner or your actions fall under the "fair use" provisions of copyright law, you may be violating national or international copyright laws. The transcribing, re-formation, modification or publication of copyright-protected material may lead to claims for damages and the enforcement of other legal measures against you. If you are unsure of your rights, you should contact your legal advisor.
Nero MediaHome requires technologies developed by third party manufacturers, some of which are contained in Nero MediaHome as demo versions. These applications can be activated online free of charge or by sending an activation fax to have unlimited use of the version. Only the data necessary for activation of technology licensed from third parties will be transmitted. For unlimited use of Nero MediaHome, it is therefore necessary to have an Internet connection or a fax machine.
Copyright © 2006 - 2008 Nero AG and its licensors. All rights reserved.
Nero, the Nero logo, Nero Digital, Nero Essentials, Nero Express, Nero ImageDrive, Nero LiquidTV, Nero MediaHome, Nero PhotoSnap, Nero Recode, Nero RescueAgent, Nero ShowTime, Nero SecurDisc, Nero StartSmart, Nero Vision, InCD, Move it, and UltraBuffer are trademarks or protected trademarks of Nero AG.
Adobe, Acrobat, Acrobat Reader and Premiere are trademarks or protected trademarks of Adobe Systems, Incorporated.
AMD Athlon, AMD Opteron, AMD Sempron, AMD Turion, ATI Catalyst and ATI Radeon are trademarks or registered trademarks of Advanced Micro Devices, Inc.
ATSC is a trademark of the Advanced Television Committee.
ICQ is a registered trademark of AOL, LLC.
Apple, iPhoto, iPod, iTunes, iPhone, FireWire, and Mac are brands or registered trade names of Apple, Inc.
ARM is a registered trademark of ARM, Ltd.
AudibleReady is a registered trademark of Audible, Inc.
BenQ is a trademark of the BenQ Corporation.
Blu-ray Disc is a brand of Blu-ray Disc Association.
CyberLink is a registered trademark of CyberLink Corp.
DLNA is a registered trademark of Digital Living Network Alliance.
DivX and DivX Certified are registered trademarks of DivX, Inc.
Dolby, Pro Logic and the double-D symbol are brands or registered trademarks of Dolby Laboratories, Inc.
DTS and DTS Digital Surround are trademarks or registered trademarks of DTS, Inc.
DVB is a registered trademark of the DVB Project.
Freescale is a trademark of Freescale Semiconductor, Inc.
Google and YouTube are trademarks of Google, Inc.
WinTV is a registered trademark of Hauppauge Computer Works, Inc.
Intel, Pentium and Core are trademarks or registered trademarks of Intel Corporation.
Linux is a registered trademark of Linus Torvalds.
Memorex is a registered trademark of Memorex Products, Inc.
ActiveX, ActiveSync, DirectX, DirectXShow, Internet Explorer, Microsoft, HDI, MSN, Outlook, Windows, Windows Mobile, Windows
NT, Windows Server, Windows Vista, Windows Media, Xbox, Xbox 360, the Windows Vista start button and the Windows logo are trademarks or registered trademarks of Microsoft Corporation.
My Space is a trademark of MySpace, Inc.
NVIDIA, GeForce and ForceWare are brands or registered trademarks of NVIDIA Corporation.
Nokia is a registered trademark of Nokia Corporation.
CompactFlash is a registered trademark of SanDisk Corporation.
Sony, Memory Stick, PlayStation, PLAYSTATION and PSP are brands or registered trademarks of Sony Corporation.
HDV is a trademark of Sony Corporation and Victor Company of Japan, Limited (JVC).
UPnP is a registered trademark of the UPnP Implementers Corporation.
Labelflash is a registered trademark of Yamaha Corporation.
The trademarks mentioned here are named for information purposes only. All trade names and trademarks are the property of their respective owners.
Nero AG, Im Stoeckmaedle 13-15, D-76307 Karlsbad, Germany
Table of contents
1 Start Successfully 4
1.1 About the manual 4
1.2 About This Application 4
1.3 Installing Nero MediaHome 5
1.4 Working with Nero MediaHome 7
1.4.1 Share Files and Folders 7
1.4.2 Starting the Server 8
2 Main window 9
3 Share Screen 11
3.1 Window Dialog 12
4 Options Screen 14
5 Network Screen 16
6 Devices Screen 17
6.1 Control device remotely 18
7 Transcoding Screen 19
8 Remote UI Screen 21
9 TV Screen 23
9.1 Selecting and Setting TV Channels for Streaming 24
10 Technical Information 27
10.1 System Requirements 27
10.2 Formats supported 28
10.2.1 Audio formats and codecss 28
10.2.2 Video formats and codecss 28
10.2.3 Image formats 29
10.2.4 Formats for Playlists 29
10.2.5 Metadata 29
11 Glossary 31
12 Index 33
13 Contact 35
1 Start Successfully
1.1 About the manual
This manual is intended for all users who want to learn how to use Nero MediaHome. It is process-based and explains how to achieve a specific objective on a step-by-step basis.
In order to make best use of this documentation, please note the following conventions:
| ○ | Indicates warnings, preconditions or instructions that have to be precisely followed. |
| ○ | Indicates additional information or advice. |
| 1. Start ... | A number at the beginning of a line indicates a request for action. Carry out these actions in the order specified. |
| → | Indicates an intermediate result. |
| → | Indicates a result. |
| OK | Indicates text passages or buttons that appear in the program interface. They are displayed in bold print. |
| (see...) | Indicates references to other chapters. They are executed as links and are shown in red and underlined. |
| [...] | Indicates key combinations for entering commands. |
1.2 About This Application
Nero MediaHome is a certified UPnP (Universal Plug and Play) AV (Audio/Video) media server which automatically recognizes UPnP devices within a network.
Using Nero MediaHome you can share media files (audio, picture, and video files). This means that all users in the local network have access to the files. Players that are compatible with the UPnP standard can use, play and display shared media files. Television channels and radio stations as well as Internet services (web TV, web radio, audio/video/image casts) can also be transmitted.
Thanks to Nero MediaHome, your PC can link up to other consumer electronics devices (e.g. television sets) to create a unified media center. This gives you the option of viewing transmitted television programs via Nero MediaHome on two players simultaneously. Nero MediaHome automatically supplies the files in the appropriate format for the player in question. Transcoding is performed in real time.
1.3 Installing Nero MediaHome
An installation wizard will walk you through the quick and uncomplicated installation process. To install Nero MediaHome, proceed as follows:
- Close all Microsoft Windows programs and exit any anti-virus software that may be running.
- Start the installation process with a double click on the downloaded installation file.
The files are automatically unzipped and stored on drive C in a temporary folder from which they are automatically deleted once they have been used.
The installation is prepared and the installation wizard appears.
- Click the Next button.
The Installation of Nero Ask Toolbar screen is displayed.
- If you want to use the Ask Toolbar, please read the licensing agreement carefully and select the first option button.
If you do not want to use the Ask Toolbar, activate the second option button.
- Click the Next button.
The License Conditions (EULA) screen is displayed. - Please read the license agreement carefully and select the appropriate check box if you agree to the terms of the agreement. Installation is not possible without this agreement.
- Click the Next button.
→ The Personalize Your Nero MediaHome screen is displayed. - Enter your name and serial number in the input fields. Corporate customer should also include their company's name.

The serial number can be found on the back of the disc jacket. If you are using the download version you will have received the serial number per e-mail.
- Click the Next button.
The Select Installation Type screen is displayed.
Here it is possible to choose between Default, meaning standard installation, or User Defined installation. In the user-defined installation you can determine the languages and choose the installation path.
- Enter the desired installation type and click the Next button.
If you choose default installation, the Optional Settings screen is displayed. If you choose custom installation, the User-defined Installation screen is displayed.
-
If you have chosen the user-defined installation:
-
Select the desired folder and click the OK button.
- Click the Next button.
The Select Application Language screen is displayed.
- Select the check boxes for the languages you wish to install and click the Next button.
The next screen is displayed. - If you wish to define the installation folder, click the Change button.
The Browse Folder window is displayed.
The Optional Settings screen is displayed.

If applications are found on your computer that could conflict with the software to be installed, the screen will display Uninstallation of the Products Required. It is recommended that these applications be removed before proceeding with the installation.

Nero MediaHome checks the availability of required components, such as DirectX on your PC. If applications are missing, then the Missing Components screen is displayed. Select the components that need to be downloaded and installed.
- If you want to adapt optional settings, select or clear the desired check boxes.
- Click the Next button.
The Ready to Start Installation Process screen is displayed.
- Click the Next button.
The installation process is started. Nero MediaHome is installed in the selected folder, and a progress bar informs you of the progress of the installation process.
15. Click the Next button.
→ The Help Us to Improve Our Software screen is displayed.
In order to offer a better service, Nero is collecting anonymous data to determine which features are used and what problems, if any, occur.
- If you want to take part in the anonymous collection of data, select the check box and click the Next button.
The final screen of the installation wizard is displayed.
- Click the Exit button.
The installation wizard closes.
You have now installed Nero MediaHome. The Nero MediaHome link is now available on the computer's desktop.

Nero ControlCenter
The Nero MediaHome application is installed with Nero ControlCenter.
With Nero ControlCenter, you can determine whether new updates are available for your Nero products and can download them if required. In addition, you can select an installed language and enter or remove serial numbers. You can find further information in the Nero ControlCenter manual.
See also:
Working with Nero MediaHome 7
Main window 9
1.4 Working with Nero MediaHome
In order to use Nero MediaHome you must share folders with media files and start the server. Then clients can access the server and use Nero MediaHome.
As there is no shared folder in your share list yet immediately after the installation, Nero MediaHome will greet you upon initial startup with the SharedFolders window. By clicking Yes, you can make your personal music, videos and pictures available. Nero MediaHome indexes the files.

By sharing your files over the network you enable everybody throughout the LAN (local area network) to browse and download your shared media files. Please take care not to share any private or confidential files!
Changes to the settings of the first shares can naturally be carried out at any time in the Share screen. In addition, all further sharing can be undertaken here as well as starting of the Server.
In the default settings, when restarting the computer, both the Nero MediaHome and the active Server are restarted. The application becomes available via the icon in the system tray. A double click opens Nero MediaHome in the Status screen.
If you have not activated these default settings or you wish to deactivate them, then the corresponding check boxes are available in the Options screen.
See also:
Share Files and Folders 7
Starting the Server 8
Main window 9
1.4.1 Share Files and Folders
To share audio, video and picture files, proceed as follows:
- Click the Share menu icon in the main window.
The Share screen is displayed. - Open the Local Folders tab.
- Click the Add Share button.
The Browse Folder window opens. - Mark the folder you wish to share and click the OK button.
The folder is indexed and added to the list of shared folders, meaning that not only the files of the folder but also any existing sub folders are shared. - To share more folders, repeat the last two steps.
- If you want to adapt the transcoding settings, select the desired option in the Transcoding screen.
You have shared the folder with audio, video and picture files. All playback devices and other PCs in the network can now list these files and play them back.
See also:
Share Screen 11
Transcoding Screen 19
Working with Nero MediaHome 7
1.4.2 Starting the Server
In order to use Nero MediaHome, you need to manually start the Server once.
To start the server, proceed as follows:
- Click the Start Server button in the bottom area of the main window.
The Security Information window opens.
- Click the OK button.
Nero MediaHome automatically configures the Windows firewall so that connections to the server are allowed.
The Nero MediaHome server is started and the Status screen is displayed. The files currently being used by a client are shown here. The players found in the network are shown in the Devices screen.
In the default setting each new start of the computer will also start Nero MediaHome and the active Server.
If you do not wish to use the automatic server start, clear the Automatically Start Nero MediaHome When the Computer is Started check box in the Options screen in the Autostart and Tray Settings area.
You have successfully started the server.
See also:
Options Screen 14
Working with Nero MediaHome 7
2 Main window
The main window is the starting point for using Nero MediaHome.
Menu icons are shown in the left area of the window. When one of the menu icons is clicked, the corresponding screen will open in the right hand area.
Main window
The following menu icons are available in the selection list in the left hand area:
| Shares | Displays the Share screen, where you can select the folders containing the media files for sharing. |
| Options | Displays the Options screen, where you can define the setting options for the server and autostart. |
| Network | Displays the Network screen, where you can define the setting options for the network. |
| Transcoding | Displays the Transcoding screen, where you can define the setting options for transcoding. |
| Remote UI | Displays the Remote UI screen, where you can activate Remote UI. |
| Devices | Displays the Devices screen, which shows the players found in the network. |
| TV | Displays the TV screen, where you can define the setting and selec- tion options for TV streaming. |
| Status | Displays the Status screen, which shows the status of the server and the media files currently being used by players. |
In addition, the following buttons are available in the main window:
| ? | Displays a context menu where you can call up the Help and open the windows About Nero MediaHome and Nero on the Web. |
| Starting the Server | Starts the Nero MediaHome server. The Stop Server button is displayed while the server is running. |
| Stop Server | Stops the Nero MediaHome server. The Start Server button is displayed while the server is stopped. |
| Exit | Terminates the Nero MediaHome server and closes Nero MediaHome. |
See also:
Share Screen 11
Options Screen 14
Network Screen 16
Devices Screen 17
Transcoding Screen 19
Remote UI Screen 21
TV Screen 23
Working with Nero MediaHome 7
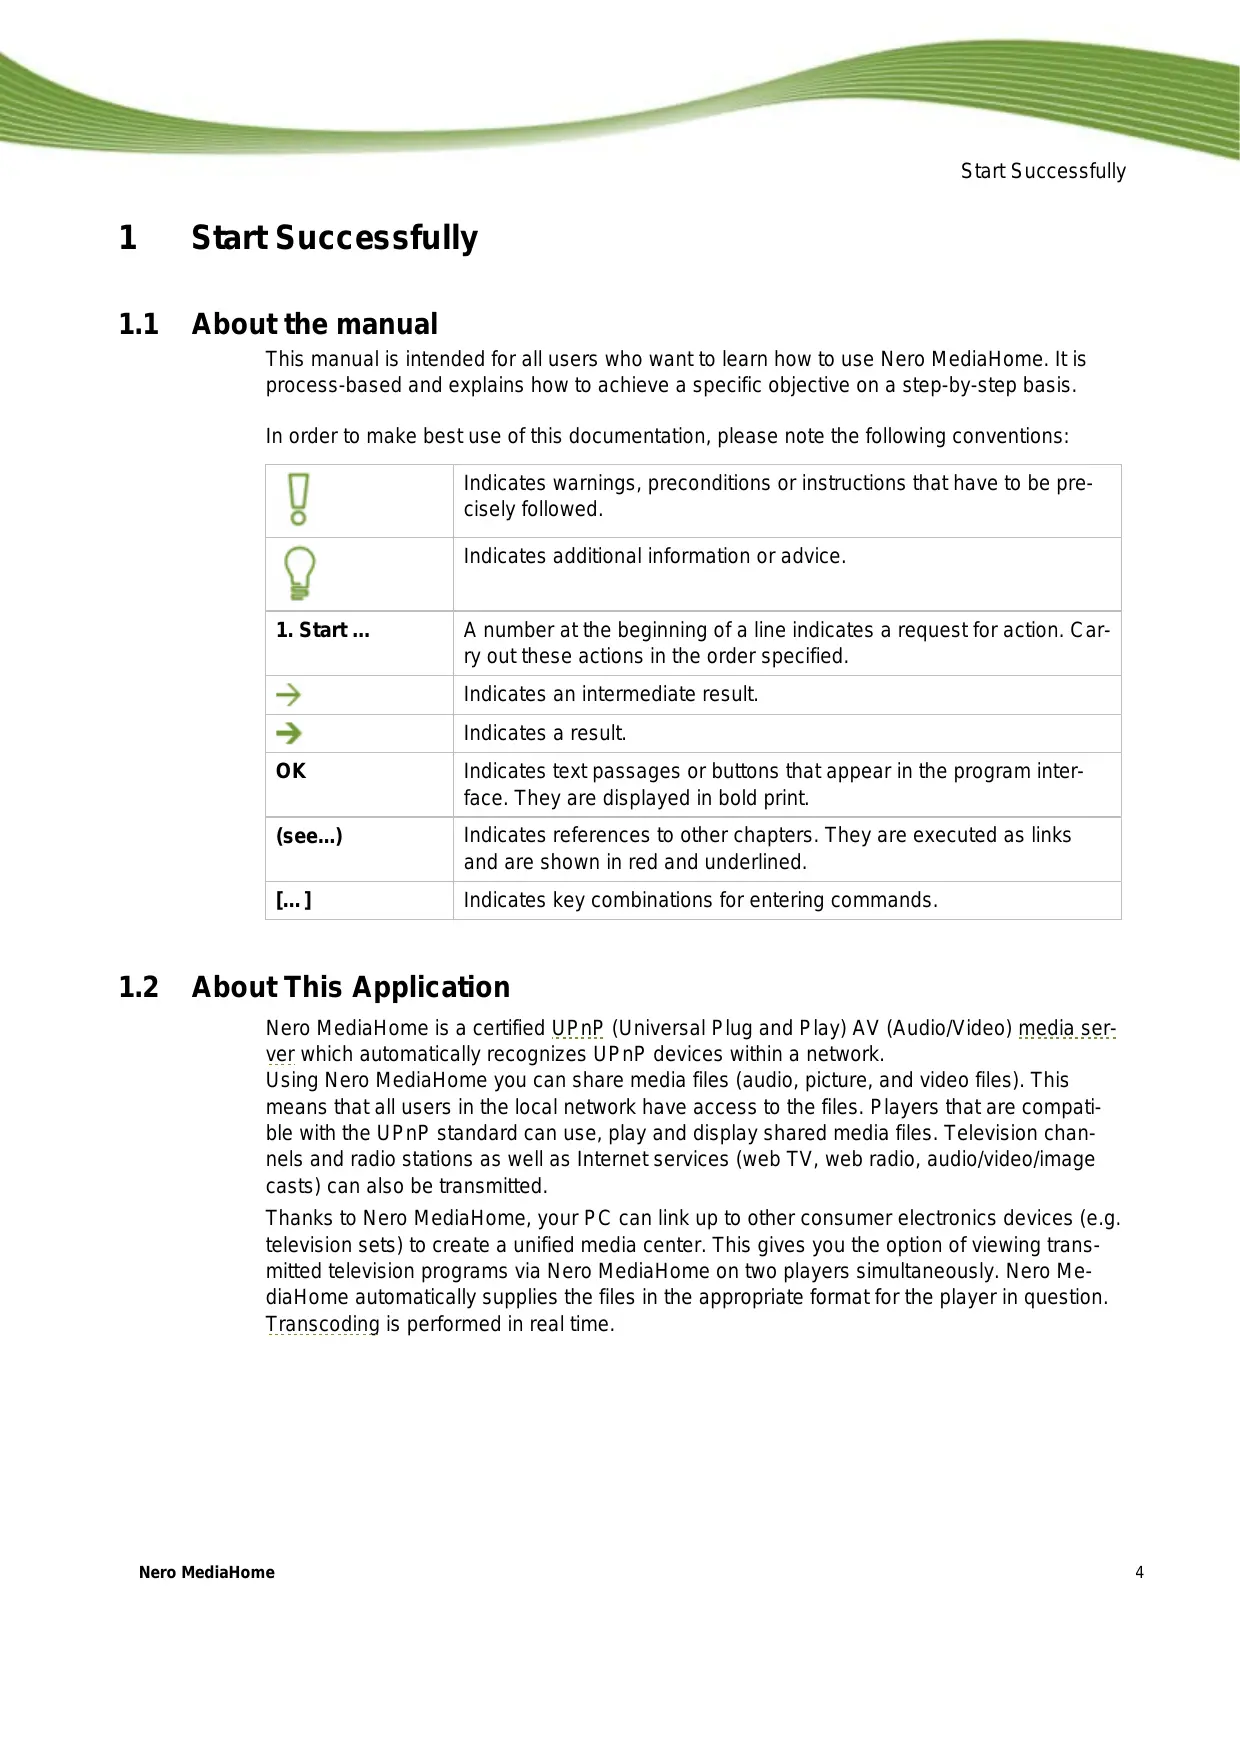
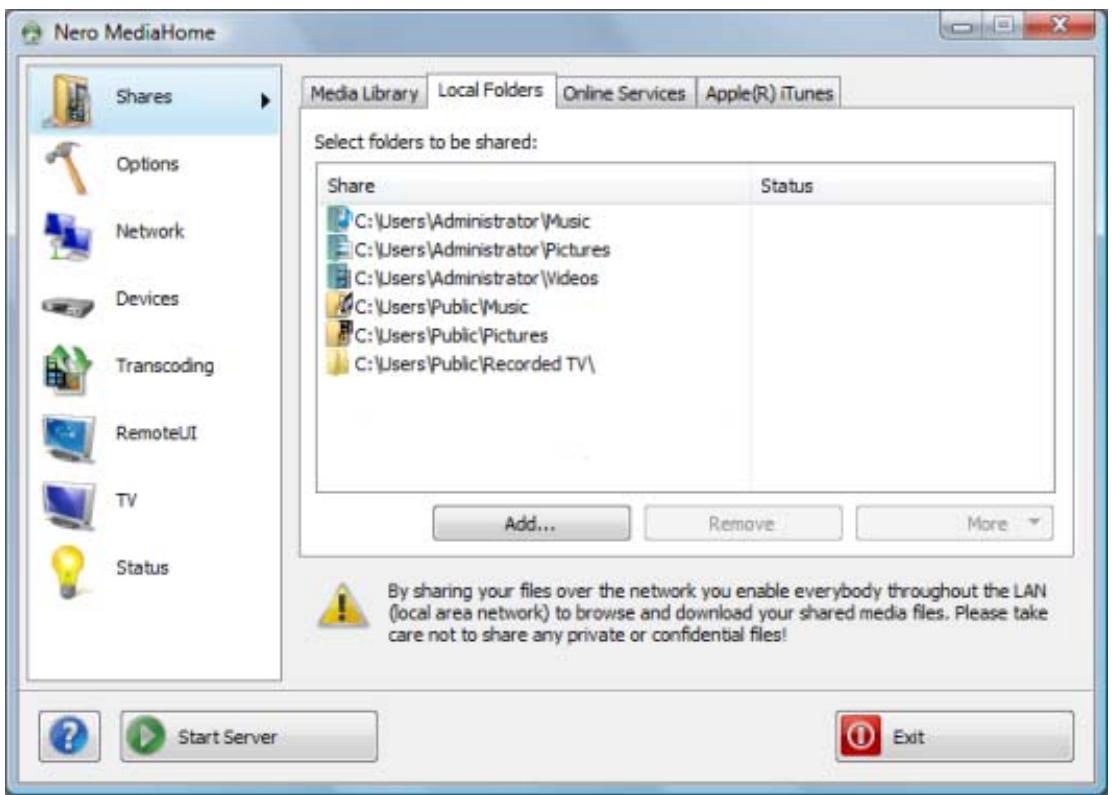
3 Share Screen
Available on the Shared screen are the Media Library, Local Folders, Internet Services, as well as the Apple iTunes tabs.
Share screen
The Media Library tab gives an overview of the already installed files. Nero MediaHome arranges the files in a clear navigation tree such as video or photos. Here the files are further sorted into subcategories such as the music according to artists, album or genre. The same file, for instance, will be sorted both under the name of a well known artist such as Mozart as under the genre Classics
Audio, video and picture files can be defined for sharing on the Local Folders tab. In addition, you can see how many files have already been indexed and the status of the indexing process. Final sharing will take place with the server start. The following setting options are available:
| Button Add | Opens the Browse Folder window. Here you select the folder containing the files you want to share. The selected folder is added to the list of shared folders. |
| Button Remove | Removes the selected folder from the list of shared folders. Only available if at least one folder has been marked in the shared list. |
| Button More | Rescan Folder - carries out indexing for the marked folder again. Open in Explorer - shows the selected folder in the navigation tree of Windows Explorer. Only available if at least one folder has been marked in the shared list. |
On the Internet Services tab it is possible to enter, save and update the URL (Uniform Resource Locator) of various media (web radio stations, web TV stations, audio casts, video casts and image casts).
| Subscribe | Opens the Dialog window. A new subscription can be created here. |
| Unsubscribe | Deletes a selected entry from the Internet Services tab. Only available if at least one entry has been marked. |
If you have Apple iTunes installed on your computer, you can import the Apple iTunes library into Nero MediaHome. The following buttons are available for this purposes on the Apple iTunes tab.
| Importing iTunes library | Imports the media data from Apple iTunes into Nero MediaHome. |

After importing the Apple iTunes library into Nero MediaHome, the files must still be indexed. Depending on the size of the library, this may take a while. The files are fully available to you only after the indexing is completed.
See also:
Window Dialog 12
Main window 9
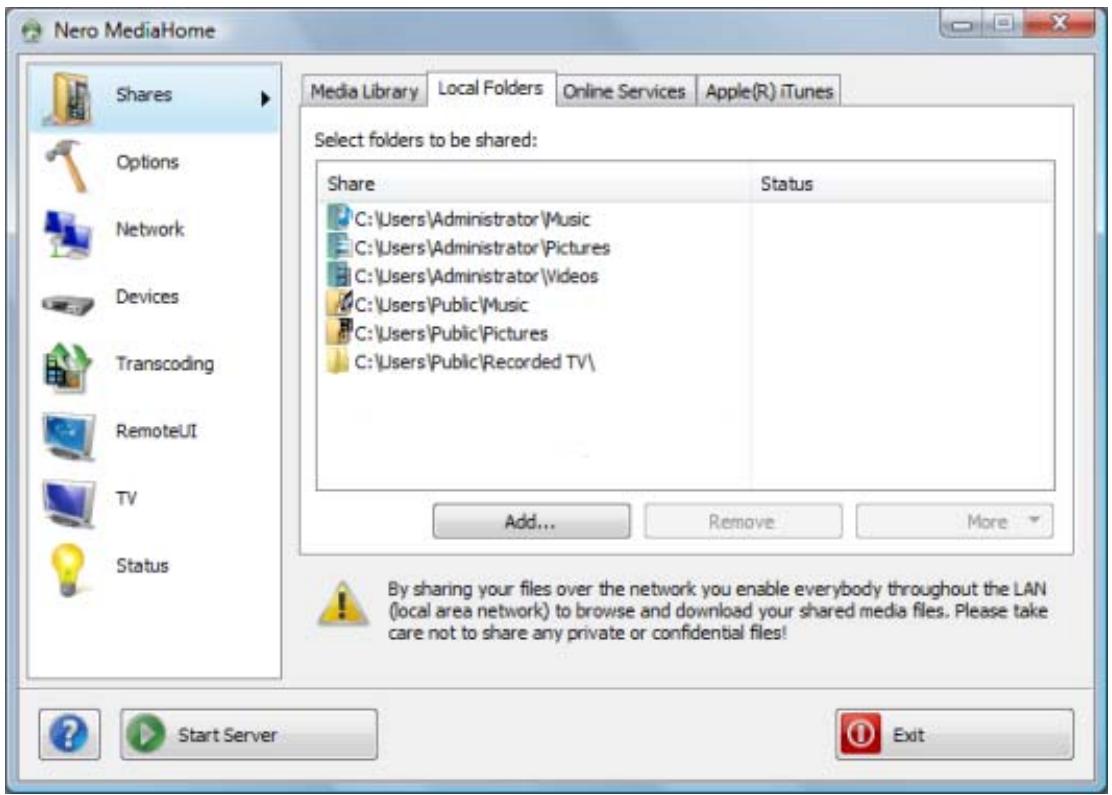
3.1 Window Dialog
In the Dialog window you can create a new entry for Internet Services.
Window Dialog
The following setting options are available:
| Drop-down menu Category | Defines the category of the entry. |
| Input field Title | Defines the name of the subscription. |
| Input field URL | Defines the URL of the subscription. |
| Option button Automatically (recommended) | Automatically updates the subscription. |
| Option button Once a day | Updates the subscription once each day. |
| Option button Never (only manually) | Updates the subscription only when an update is manually initiated. |
| Button Update now | Initiates the update manually. Only available when the input fields of the window have been completely filled in. |
See also:
Share Screen 11
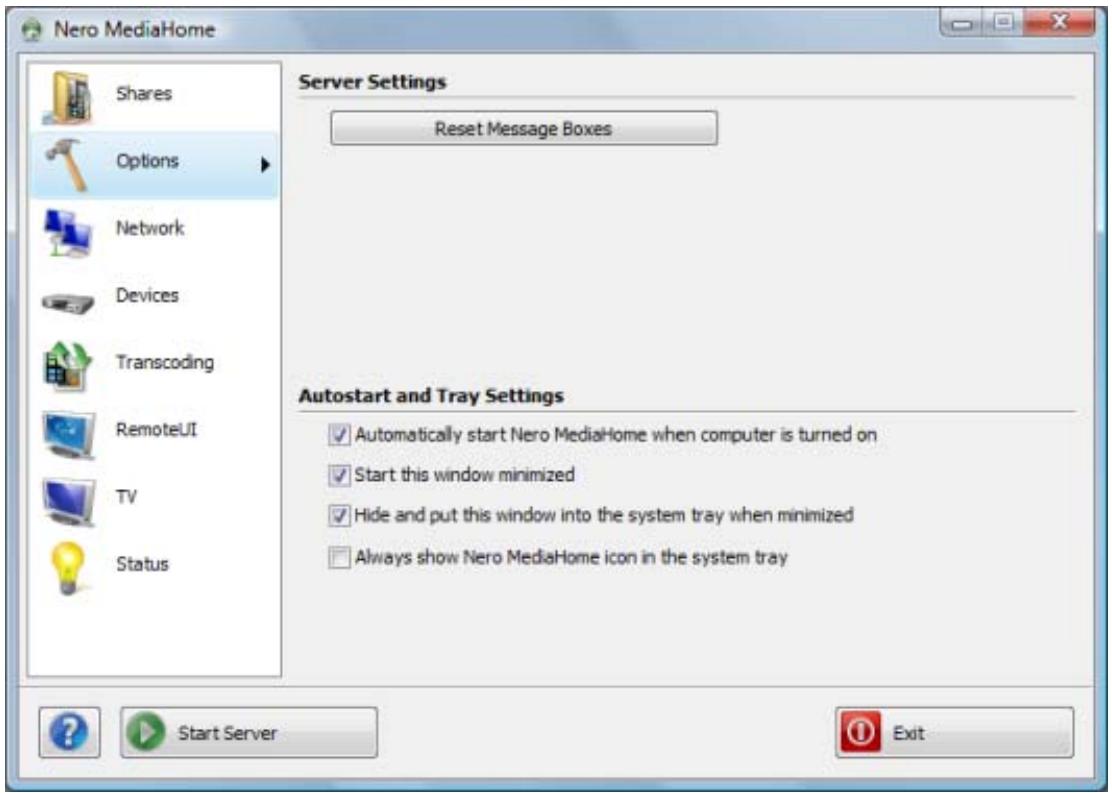
4 Options Screen
In the Options screen you can make server and autostart settings.
Options screen
The following setting options are available in the Server Settings area:
| ButtonReset Message Boxes | Shows all messages and warnings that you had previ-ously disabled. |
The following setting options are available in the Autostart and Tray Settings area:
| Check box Automatically start Nero Media-Home when computer is turned on | Starts Nero MediaHome automatically as soon as the PC is switched on. |
| Check box Start this window minimized | Starts Nero MediaHome minimized. |
| Check box Hide and put this window into the system tray when minimized | Shows the window as an icon in the system tray when it is minimized rather than in the taskbar. |
Check box
Always show Nero MediaHome icon in the system tray
Always displays the Nero MediaHome icon in the system tray, even when the window is open.
See also:
Main window 9
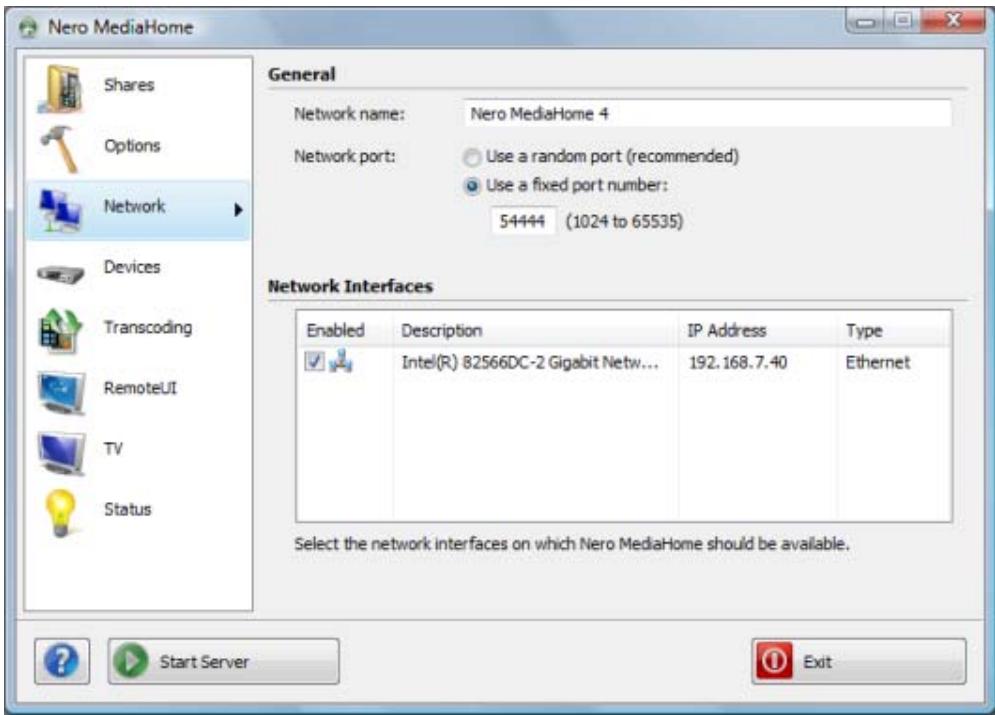
5 Network Screen
In the Network screen you can define network settings.
Network screen
The following setting options are available:
| Input field Network name | Defines the network name for the server. |
| Option button Use a random port number | Selects a random port number for the Nero MediaHome network port. |
| Option button Use a fixed port number | Defines a port number for the network port that stays the same each time Nero MediaHome is launched. |
| List box Network interfaces | Shows all installed network connections with their status, the name of the respective network adapter, the assigned IP address as well as the type of network connection. If you select the Activated check box, the server can be accessed from this network connection. |
See also:
Main window 9
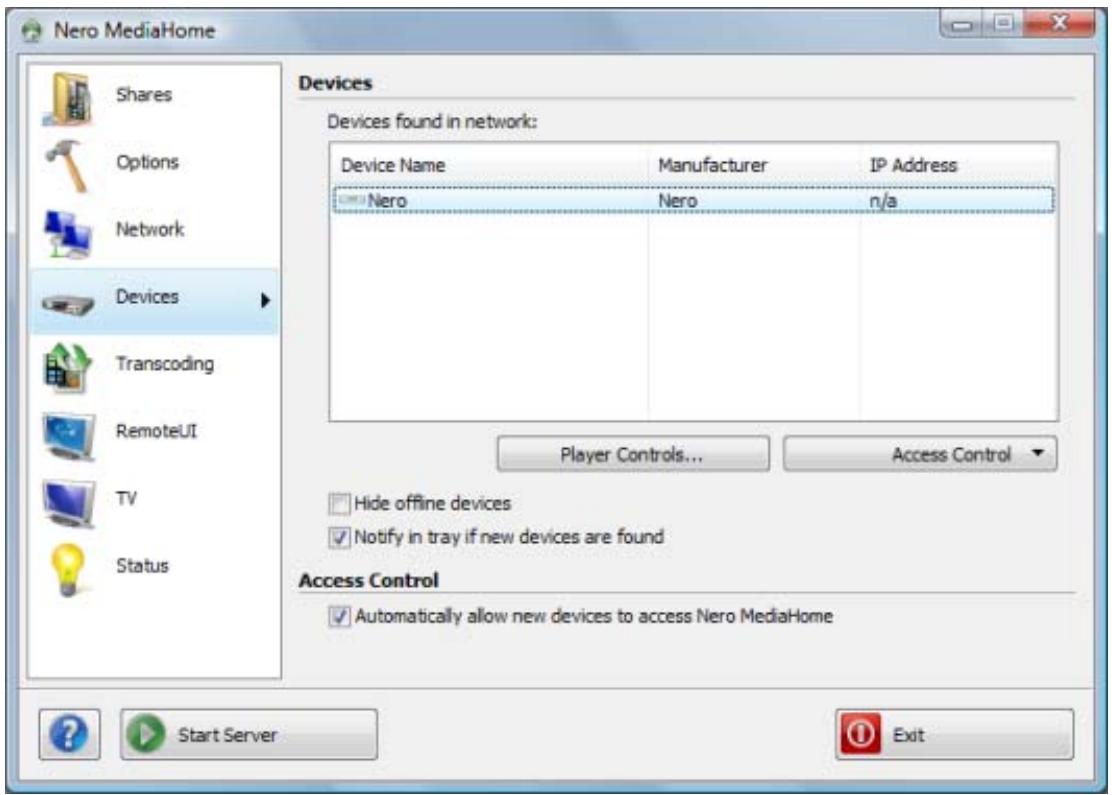
6 Devices Screen
In the Devices screen you can define how players access the server and even control them with the remote control.
Devices screen
The following setting options are available:
| List box Playback devices found in network: | Displays the players detected in the network. |
| Button Operate player controls | Opens a remote control for the selected play- er. Only available when a player was marked in the selection list. |
| Button Access control | Defines the server access for the selected player. You can allow or refuse access or remove the player from the list. Only available when a player was marked in the selection list. |
| Check box Hide offline devices | In the Players Found in the Network sele- tion list only the players that are available online are shown. |
| Check box Provide notification in the system tray if new devices are found | Displays in the system tray when a new player has been recognized in the network. |
| Check box Automatically allow new devices to access Nero MediaHome | Allows new players access to the server and adds them to the Players found in the network list. |
See also:
Control device remotely 18
Main window 9
6.1 Control device remotely
With the Player Control you can remote control players that have been found in the network. UPnP capable DMR devices are supported.
To remotely control a player, proceed as follows:
- Mark the desired device in the Players found in the network selection list.
- Click the Operate Player button.
The remote control is opened. The status message and the status of the Browse button (enabled/disabled) tell you whether the device is ready.
A remote control has the name of the selected device. You can have any number of player controls open at the same time.
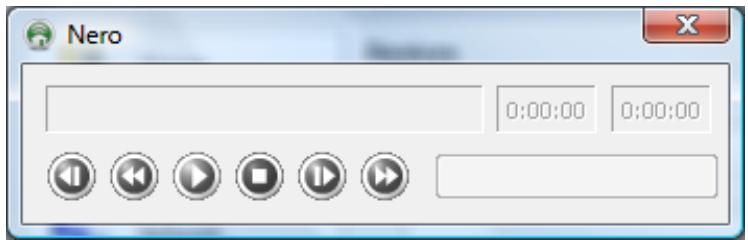
Remote control
- Click the Browse button and select an audio or video file, depending on the device. You can also drag & drop audio and video files to the remote control.
The selected device plays the selected file. Nero MediaHome transcodes the file automatically to the appropriate playback format. You can use the control buttons to control playback, e.g. to play the next selected file.
See also:
Devices Screen 17
7 Transcoding Screen
In the Transcoding screen you can define transcoding settings for audio, video, and picture files in the Transcoding Audio, Video and Picture Files areas.

Transcoding screen
Other than the entries for the relevant formats, the following entries are available in the dropdown menus for the Transcoding Audio, Video and Picture Files areas:
| Retain original format | This means the original file is always retained. There is no check to see whether the client can play the relevant file in its original format. This may mean that the client is unable to play the file. |
| Auto-detect | Checks whether the client can play the format. If this is the case, the original format is retained. If the client cannot play the file in this format, Nero MediaHome asks which formats are supported and transcodes the file accordingly. This procedure calls for computing capacity and may possibly impair the playback quality. The Auto-detect option is selected by default. |
The following option buttons are available in the Transcoding of Video Files and Transcoding of Picture Files areas:
| PAL | Selects the television mode PAL (Phase Alternating Line), which is used in Europe, but also in Australia, South America, and many African and Asian countries. |
| NTSC | Selects the television mode NTSC (National Television System Committee), which is used in extensive parts of America and some East Asian countries. |
| Original resolution | Retains the original resolution. The Original resolution option is selected by default. |
See also:
Main window 9
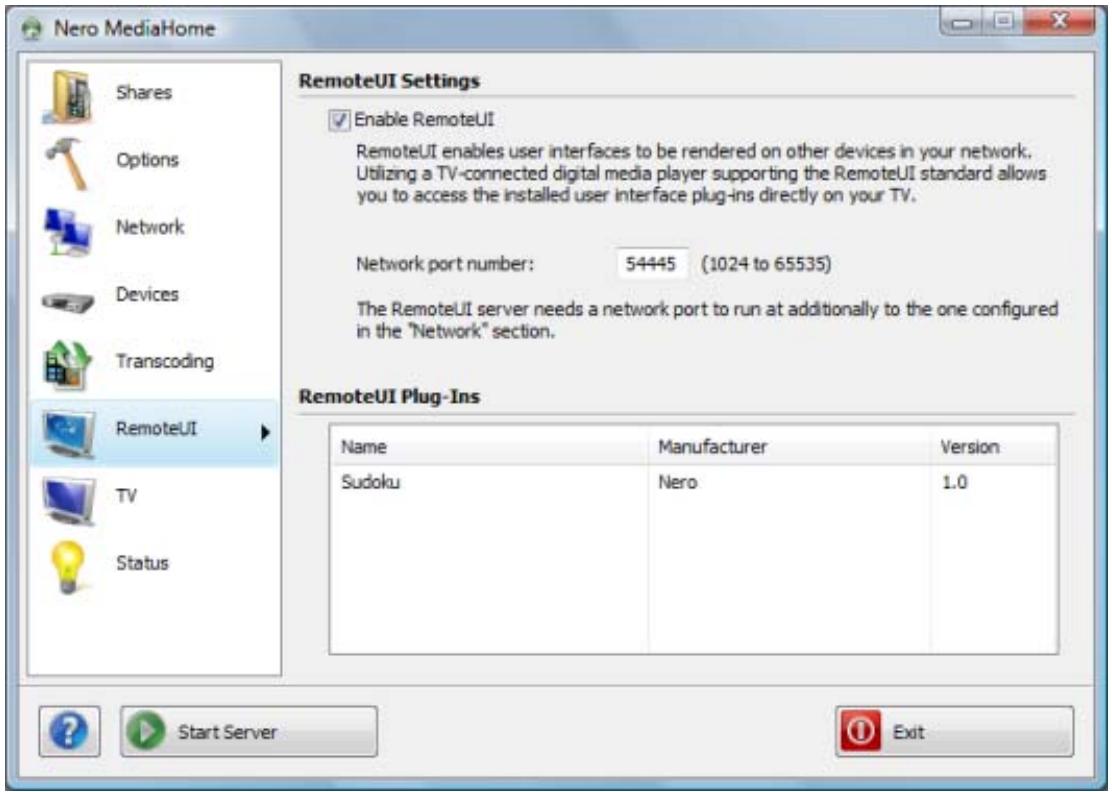
8 Remote UI Screen
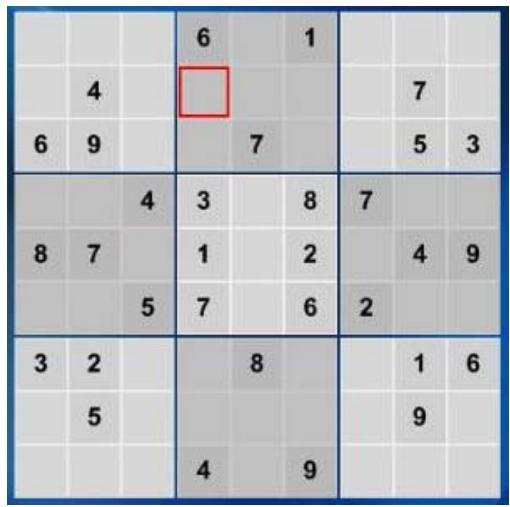
In the Remote UI screen you can enable Remote UI and have the available Remote UI plugins displayed. Remote UI is an open UPnP standard that makes it possible to display a graphic interface on devices. With Remote UI you can use applications such as the included Selenium game on your television and thereby expand the capabilities of your television.
You can also program applications yourself for Remote UI; basic programming knowledge in JScript is sufficient. The application must be in the Nero MediaHome folder to be detected by Nero MediaHome.
Remote UI screen
The following setting options are available:
| Check box Enable Remote UI | Enables Remote UI. |
| Input field Network port number | Assigns a port number. Please note: The port number entered here must differ from the one you entered in the Options screen. |
Display list Remote UI Plug-ins
Lists the available plug-ins for Remote UI. The Selenium application is included.
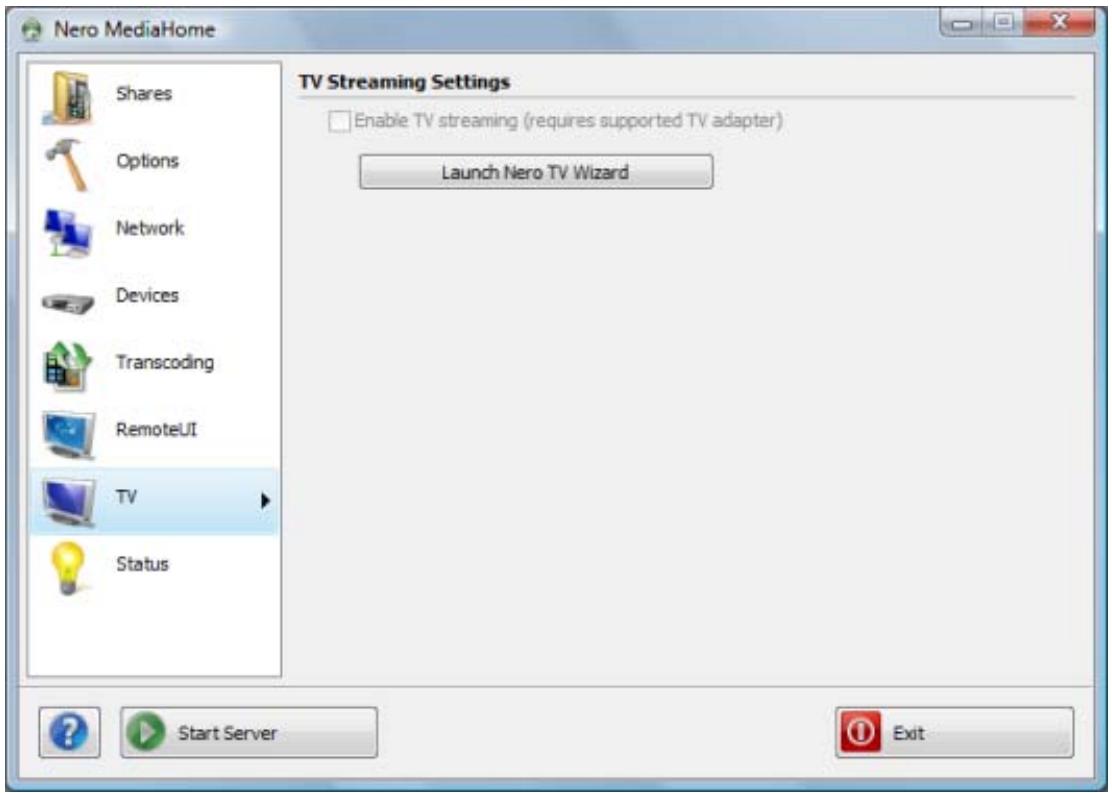
9 TV Screen
In the TV screen you can make settings for TV streaming.
TV screen
The following setting options are available:
| Check box Enable TV streaming | Enables TV streaming and the Launch Nero TV Wizard button. Only available when the server is stopped and when a TV card is configured. |
| Button Launch Nero TV Wizard | Opens the TV Wizard window, where you can define settings for the TV card and select channels for TV streaming. Only available when the server is stopped. |
See also:
Selecting and Setting TV Channels for Streaming 24
Main window 9
9.1 Selecting and Setting TV Channels for Streaming
The following requirements have to be fulfilled:
The server is stopped.
A supported TV card is connected to and installed on your computer.
Using Nero MediaHome you can choose and set TV channels for streaming. To do this, proceed as follows:
- Click the TV menu icon.
The TV screen is displayed. - Click the Launch Nero TV Wizard button.
→ The TV Wizard window is opened with the Device Selection screen. - Select the entry for your TV card in the Video Device drop-down menu.
- If your TV card has several video inputs, select the entry you want in the Video Input dropdown menu.
- Select the entry for the audio device in the Audio Device drop-down menu. In most cases, the correct entry is Use audio from video device.
- If your TV card has several audio inputs, choose the entry you want in the Audio Input dropdown menu.
- Select the recording profile you want in the Recording Quality drop-down menu.
-
If you want to change the path where recordings are stored:
-
Click the ... button.
The Browse Folder dialog box is opened.
-
Select the required folder and click the OK button.
The dialog box is closed and the chosen path is accepted. -
Click the Next button.
The TV Channel Search screen is displayed.
-
In the Select Country drop-down menu, select the country you are in at the moment.
-
Click the Start Search button to find TV channels.
The search is started. You can follow the progress of the search in the Search Status area based on the progress bar. The number of channels found is shown in the Search Status area.
- When the channel search is finished, click the Next button.
The TV Channel Edit screen is displayed. The channels found are shown in the selection lists on the TV Channels and Radio Channels tabs.
-
If you want to rename a channel:
-
Highlight the channel you want in the selection list.
- Click the Rename button.
The Rename Channel dialog box is opened.
- Enter the required name in the input field and click the OK button.
The dialog box is closed. The relevant channel is renamed.
-
To remove a channel:
-
Select the desired channel.
-
Click the Remove button.
The channel is removed from the selection list.
-
To change the position of a channel:
-
Select the desired channel.
-
Click the Up or Down button.
The channel changes its position accordingly.
- Click the Next button.
The Manage TV Channel Groups screen is displayed.
Channel groups are useful for managing TV channels. For example, you can group all sports stations into one channel group "Sport".
-
If you want to manage TV channel groups, click the TV Channel Groups tab.
-
If you want to create a new channel group:
-
Click the Add button.
The Add Group dialog box is opened.
- Enter the required name in the input field and click the OK button.
The dialog box is closed and the group is added to the selection list.
-
To change the position of a channel group:
-
Select the desired channel group.
-
Click the Up or Down button.
The channel group changes its position accordingly.
- If you want to view and manage TV channels, click the TV Channels in Groups tab.
The Available Channels selection list shows the channels that have not yet been allocated to a group.
-
Select the entry for the group to which you want to add channels or from which you want to delete channels in the Change Groups menu.
-
Select the channels you want to add to the group from the Available Channels selection list.
-
Click the >> button.
-
Repeat the last three steps for each group to be allocated channels.
-
To change the position of a channel:
-
Select the relevant channel in the Modify your groups area.
-
Click the Up or Down button.
The channel changes its position accordingly.
-
To delete a channel from the group:
-
Select the relevant channel in the Modify your groups area.
- Click the button.
The channel is removed from the group and moved to the Available Channels selection list.
- Click the Finish button.
The information is saved. The TV screen is displayed.
- Select the Enable TV streaming check box.
You have defined the TV settings and selected TV channels for streaming. Suitable players can receive the TV channels from the server and play them.
See also:
TV Screen 23
10 Technical Information
10.1 System Requirements
Windows XP (SP2 or higher), Windows Server 2003 (SP2005 or higher), Windows XP Media Center Edition 2 or higher, Windows Vista
Windows Vista x64 (the product functions in the x86 emulator that makes it possible to carry out 32-bit applications)
DirectX 9.0c Revision 30 (August 2006) or higher
Windows Internet Explorer 6.0 or higher
1.2 GHz Intel Pentium III processor, AMD Sempron 2200+ or equivalent
Minimum 256 MB RAM
200 MB hard drive space for standard installation.
- Graphics card with at least 32 MB video memory and a minimum resolution of 800 × 600 pixels and 16-bit color settings. However, we recommend 24-bit or 32-bit for true color.
Network environment with 100 Mbit/sec Ethernet, WLAN (IEEE 802.11g) or faster.
To install Nero MediaHome you need administrator rights for all operating systems.
System Requirements
Supported UPnP devices for streaming from the Nero MediaHome server.

A list of the certified UPnP devices can be found in http://www.upnpic.org/certification/default.asp#devices.
- Analog or digital TV card (DVB-T, DVB-S, DVB-C, and ATSC) that complies with the BDA driver standard

For supported cards see www.nero.com
- Broadband Internet connection (e.g. with DSL-1000 or higher speed) for registering, for updating of Nero MediaHome, the help file and other features. This activation is free of charge. The costs for the Internet connection are carried by the user.

We recommend that you install the latest WHQL-certified drivers. WHQL stands for Windows Hardware Quality Labs and means that the device driver certified by Microsoft is compatible with Microsoft Windows and the relevant hardware.
10.2 Formats supported
10.2.1 Audio formats and codecs
The following formats can be played and transcoded on the fly in the transmission if they are not supported by the target device (streaming & transcoding):
Audio Interchange File Format (AIFF, AIF)
Moving Picture Experts Group-1 Audio Layer 1 (MP1)
Moving Picture Experts Group-1 Audio Layer 2 (MP2)
Moving Picture Experts Group-1 Audio Layer 3 (MP3)
Moving Picture Experts Group - 1 Audio Layer 1/2/3 (MPA)
Nero Digital (MP4)
Dolby Digital (AC3)
Advanced Audio Coding (AAC, M4A, MP4)
Recource Interchange File Format WAVE (WAV, WAVE)
Windows Media Audio (WMA)
OGG Vorbis (OGG, OGM)
Linear Pulse Code Modulation (LPCM, PCM, L16)
The following formats can only be played (streaming):
Audible Audiobook (AA)
Atrac3 (AT3P)
Sun Audio Format (AU, SND)
Digital Theater System (DTS)
Musical Instrumental Digital Interface (MIDI, MID)
Real Audio (RA)
X-Twinvq (VQF, VQL)
Adaptive Multirate Codec (AMR)
Adaptive Multirate Wide Band (AWB)
10.2.2 Video formats and codecs
The following formats can be played and transcoded on the fly in the transmission if they are not supported by the target device (streaming & transcoding):
3rd Generation Partnership Project (3GP)
Audio Video Interleave (AVI)
Digital Video Express (DIVX)
Advanced Streaming Format (ASF)
Digital Video (DV)
- Moving Picture Experts Group-2 (MPEG, MPG, MPE, M1V, DAT, MPEG2, MPG2, M2V, PVA, MOD, TOD, VOB, MP2P, PS, MP2T, TS)
H.263/H.264/ASP/AVC Video with AAC/HE-AAC Audio (MP4, M4P, MOV, QT)
Windows Media Video (WMV)
Microsoft Digital Video Recording (DVR-MS)
Flash Video (FLV)
Nero Digital (MP4)
The following formats can only be played (streaming):
Motion Joint Photographic Expert Group (MJPG)
OGG Vorbis (OGG, OGM)
Real Media (RM)
10.2.3 Image formats
Bitmap (BMP)
- Graphics Interchange Format (GIF)
Joint Photographic Expert Group (JPEG, JPG, JPEG)
Portable Network Graphics (PNG)
Tagged Image File Format (TIFF, TIF)
Windows Media File (WMF)
10.2.4 Formats for Playlists
Moving Picture Experts Group Audio Layer 3 Uniform Resource Locator/MP3 URL (M3U)
- Playlists File Format (PLS)
Rich Site Summary (RSS)
10.2.5 Metadata
Advanced Streaming Format (ASF)
Audio Video Interleave (AVI)
Moving Picture Experts Group-1 Audio Layer 3 (MP3)
Nero Digital (MP4)
OGG Vorbis (OGG, OGM)
Recource Interchange File Format WAVE (WAV, WAVE)
Windows Media Audio (WMA)
Windows Media Video (WMV)
Joint Photographic Expert Group (JPEG, JPG, JPEG)
Portable Network Graphics (PNG)
Bitmap (BMP)
- Graphics Interchange Format (GIF)
Tagged Image File Format (TIFF, TIF)
Moving Picture Experts Group-1 Audio Layer 1 (MP1)
Moving Picture Experts Group-2 (MPEG)
Moving Picture Experts Group-1 Audio Layer 3 (MP3)
11 Glossary
Audio Cast
An audio cast is a series of audio contributions on the Internet that you can subscribe to using a news feed.
Client
A client is a computer, program or device that utilizes the services of a server in a network.
Image Cast
An image cast is a series of pictures on the Internet that you can subscribe to using a news feed.
NTSC
The national television system Committee Standard is a standard for video and TV in the USA and Japan. NTSC has more individual frames (29.97 frames per second) than PAL, but has fewer horizontal lines (525 lines).
PAL
The Phase Alternation Line procedure is the TV standard applicable for Europe. PAL possesses 625 lines per screen and the film transmission speed is 25 pictures per second. These are transmitted in the so-called line-jump procedure where a picture with all the odd lines and then a picture with all the even lines are created. This corresponds to a half-picture frequency of 50Hz .
Port
A port is an interface, in other words, an input and output channel used by a server to communicate with the network. The server on which a data package is received uses the port number to identify the service for which the data package is intended (e.g. WWW or FTP); some services run on fixed ports, e.g. Webserver on Port 80. A port can be open or closed. Thus, for example, certain ports must be opened with a router and forwarded to the target computer in order for server applications and online updates to work.
Remote UI
Remote UI is an open UPnP standard that makes it possible to display a graphic interface on devices, which means that operating surfaces can be depicted on other devices of the network. If a digital playback device connected to the TV that supports the UI standard is used, then the TV can be used for direct access to the installed operating surface plug-ins.
Server
A server is a software program that allows other software (clients) access to certain services. A computer running one or more server programs is also known in short as a server. For instance, in a network, the server provides its access to data and resources to other clients linked in the network.
Streaming
Streaming refers to the continuous transmission of data that can already be played during the transmission procedure. This means that it is not necessary to wait until a media file has been transmitted completely before it can be played back. A TV channel can be received and displayed at the same time without it first having to be saved to the hard drive.
Transcoding
Transcoding denotes a conversion process from one media format (video/audio) into another such as the conversion of WAV files into MP3 files.
UPnP
The purpose of the Universal Plug and Play is to control devices in a local network. UPnP-capable devices such as printers, routers or other computers in a network can easily be combined into a network.
Video Cast
A video cast is a series of video contributions in the Internet that you can subscribe to using a news feed.
12 Index
A
Access control. 17
Apple iTunes 12
Apple iTunes tab 12
Auto-detect. 19
Automatic starting 7,8
Autorun. 7,8,9,14
Autostart and Tray Settings 7,8
Autostart settings 14
C
Channel Search 24
Configuring TV channels. 24
Control device remotely 18
Conventions, manual 4
D
Device Selection 24
Devices 7,9,17
Devices screen. 7, 9, 17
DMR Devices 18
E
Enable Remote UI. 9, 21
Enable TV streaming 26
End Nero MediaHome 10
Exit 10
H
Help. 10
1
Indexing. 7
Internet services 12
Internet Services tab 12
L
Local Folders. 7, 11
Local Folders tab. 7, 11
Local Network 4
M
Main window 9
Manual, conventions 4
Media Library 11
Media Library tab 11
N
Nero ControlCenter 6
Network. 4, 9, 16, 18
Network name 16
Network port number 21
Network port: 16
Network screen 9, 16
NTSC 20
0
Operate player controls. 18
Options. 7, 9
Options screen. 7,8,9,14
Original resolution 20
P
PAL 20
Play formats 18
Playback devices 9, 17, 18
Plug-ins 22
Port number: 16, 21
Preferences For Network 16
R
Radio Channels. 24
Recording Quality 24
Remote control. 17, 18
Remote UI. 9, 21
Remote UI screen 9, 21
Remove Share 11
Resolution 20
Retain original format. 19
S
Safety warning 7
Index
Select TV channels 24
Server. 7,8,9,24
Server Settings. 14
Share files 4
Share media files 4
Share screen. 7, 9, 11
Shares. 7, 9, 11
Sharing folders 7
Starting the Media Server 7
Starting the Server 7,8,10
Status. 7, 10
Status screen 7, 10
Stop Server 10
Streaming 24
Sudoku 21
T
Task bar 14
Transcoding 9
Transcoding screen 7, 9, 19
Transcoding settings 19
TV. 10, 23, 24
TV card. 24
TV Channel Groups 25
TV Channel Search 24
TV channels 24
TV screen. 10, 23, 24
TV standard. 20
TV Streaming 10, 23
TV Wizard 23, 24
U
Universal Plug and Play 4
UPnP. 4,18,21
V
Video mode 20
W
Window Dialog 12
X
Xbox® 360 4
13 Contact
Nero MediaHome is a Nero AG product.
nero
MediaHome 4
Nero AG
Glendale, CA 91203-2335
USA
Web: www.nero.com
Help: http://support.nero.com
Fax: (818) 956 7094
E-mail: US-CustomerSupport@nero.com
Nero KK
Rover Center-kita 8F-B, 1-2-2
Nakagawa-chouo Tsuzuki-ku
Yokohama, Kanagawa
Japan 224-0003
Web: www.nero.com
Help: http://support.nero.com
Copyright © 2008 Nero AG and its licensors. All rights reserved.