
SHOWTIME 9 - Burning software NERO - Free user manual and instructions
Find the device manual for free SHOWTIME 9 NERO in PDF.
User questions about SHOWTIME 9 NERO
0 question about this device. Answer the ones you know or ask your own.
Ask a new question about this device
Download the instructions for your Burning software in PDF format for free! Find your manual SHOWTIME 9 - NERO and take your electronic device back in hand. On this page are published all the documents necessary for the use of your device. SHOWTIME 9 by NERO.
USER MANUAL SHOWTIME 9 NERO
Copyright and Trademark Information
This document, like the software described therein, is provided as a license and may only be used or reproduced in accordance with the licensing agreement. The contents of this document, as well as the associated software, is subject to change without prior notice. Nero AG rejects any responsibility for the correctness of the contents of this document and rejects any claims that transcend the clauses of the guarantee agreement.
This document and all of its contents are protected by copyright and are the property of Nero AG. All rights reserved. In addition, this document contains material that is protected by internationally valid copyright. This document may not be reproduced, transmitted, or transcribed in whole or in part without the express written permission of Nero AG.
Please keep in mind that existing graphics, pictures, videos, music titles or other materials that you may wish to insert or transcribe into projects may be protected by copyright. The unauthorized use of this type of material in your projects may violate the rights of the owner of the copyright. Make sure that you obtain all necessary authorizations from the owner of the copyright.
Unless you own the copyright, have permission from the copyright owner or your actions fall under the "fair use" provisions of copyright law, you may be violating national or international copyright laws. The transcribing, re-formation, modification or publication of copyright-protected material may lead to claims for damages and the enforcement of other legal measures against you. If you are unsure of your rights, you should contact your legal advisor.
Some Nero Suite applications require technologies developed by third-party manufacturers, some of which are contained in the Nero Suite as demo versions. These applications can be activated online free of charge or by sending an activation fax to have unlimited use of the version. Nero will only transmit the data necessary for activation of the technology licensed from third parties. For unlimited use of Nero Suite, it is therefore necessary to have an Internet connection or a fax machine.
Copyright © 2006-2008 Nero AG and its licensors. All rights reserved.
Nero, the Nero logo, Nero Digital, Nero Essentials, Nero Express, Nero ImageDrive, Nero LiquidTV, Nero MediaHome, Nero PhotoSnap, Nero Recode, Nero RescueAgent, Nero ShowTime, Nero SecurDisc, Nero StartSmart, Nero Vision, InCD, Move it, and UltraBuffer are trademarks or registered trademarks of Nero AG.
Nero ShowTime versions with 2.0-channel DTS® decoding:
| dtds™ 2.0+Digital Out | Manufactured under license under U.S. Patent #’s: 5,451,942; 5,956,674; 5,974,380; 5,978,762; 6,487,535 & other U.S. and worldwide patents issued & pending. DTS and DTS 2.0 + Digital Out are registered trademarks and the DTS logos and symbol are trademarks of DTS, Inc. © 1996-2007 DTS, Inc. All rights reserved. |
Nero ShowTime versions with 2.0-channel DTS® decoding:
| Digital Surround | Manufactured under license under U.S. Patent #’s: 5,451,942; 5,956,674; 5,974,380; 5,978,762; 6,487,535 & other U.S. and worldwide patents issued & pending. DTS and DTS Digital Sur-round are registered trademarks and the DTS logos and symbol are trademarks of DTS, Inc. © 1996-2007 DTS, Inc. All rights reserved. |
| gracenote® | Gracenote®is either a registered trademark or a trademark of Gracenote, Inc. in the United States and/or other countries. The Gracenote logo and logotype, and the "Powered by Gracenote" logo are trademarks of Gracenote. |
Adobe, Acrobat, Acrobat Reader and Premiere are brands or protected trade names of Adobe Systems, Incorporated. AMD Athlon, AMD Opteron, AMD Sempron, AMD Turion, ATI Catalyst and ATI Radeon are brands or registered trademarks of Advanced Micro Devices, Inc.
ATSC is a brand of the Advanced Television Committee.
ICQ is a registered trademark of AOL, LLC.
Apple, iPhoto, iPod, iTunes, iPhone, FireWire, and Mac are brands or registered trade names of Apple, Inc.
ARM is a registered trademark of ARM, Ltd.
AudibleReady is a registered trademark of Audible, Inc.
BenQ is a brand of the BenQ Corporation
Blu-ray Disc is a brand of Blu-ray Disc Association.
CyberLink is a registered trademark of CyberLink Corp.
DLNA is a registered trademark of Digital Living Network Alliance.
DivX and DivX Certified are registered trademarks of DivX, Inc.
Dolby, Pro Logic and the double-D symbol are brands or registered trademarks of Dolby Laboratories, Inc.
DTS and DTS Digital Surround are registered trademarks of DTS, Inc.
DVB is a registered trademark of the DVB Project.
Freescale is a brand of Freescale Semiconductor, Inc.
Google and YouTube are brands of Google, Inc.
WinTV is a registered trademark of Hauppauge Computer Works, Inc.
Intel, Intel XScale, Pentium and Core are brands or registered trademarks of Intel Corporation.
Linux is a registered trademark of Linus Torvalds.
Memorex is a registered trademark of Memorex Products, Inc.
ActiveX, ActiveSync, DirectX, DirectXShow, Internet Explorer, Microsoft, HDI, MSN, Outlook, Windows, Windows Mobile, Windows
NT, Windows Server, Windows Vista, Windows Media, Xbox, Xbox 360, the Windows Vista start button and the Windows logo are brands or registered trademarks of Microsoft Corporation.
My Space is a brand of MySpace, Inc.
NVIDIA, GeForce and ForceWare are brands or registered trademarks of NVIDIA Corporation.
Nokia is a registered trademark of Nokia Corporation.
CompactFlash is a registered trademark of SanDisk Corporation.
Sony, Memory Stick, PlayStation, PLAYSTATION and PSP are brands or registered trademarks of Sony Corporation.
HDV is a brand of Sony Corporation and Victor Company of Japan, Limited (JVC).
UPnP is a registered trademark of the UPnP Implementers Corporation.
Labelflash is a registered trademark of Yamaha Corporation
The trademarks mentioned here are named for information purposes only. All trade names and trademarks are the property of their respective owners.
Nero AG, Im Stoeckmaedle 13-15, D-76307 Karlsbad, Germany
Table of contents
1 Start Successfully 6
1.1 About the manual 6
1.2 About Nero ShowTime 6
2 Launching the program 7
3 Program Interface 8
3.1 Extended Area 10
4 Media File Playback 12
4.1 Playing Video from Disc 12
4.2 Play Audio CD 12
4.3 Playing Audio and Video Files from the Hard Drive 14
5 Playing Streamed Media 16
5.1 About playing Nero MediaHome streamed TV channels 16
5.2 Playing Web Media 16
6 Playlist 19
6.1 Playlist window 19
6.1.1 Playlists Tab 20
6.1.2 Local Media tab 22
6.1.3 UPnP tab 23
6.1.4 Web Media tab 23
6.2 Creating a Playlist 25
6.3 Loading and Playing a Playlist 26
6.4 Editing a Playlist 26
6.5 Identifying Audio Files 27
7 Control During Playback 29
7.1 Navigation bar 29
7.2 Context menu 29
7.3 Controlling external subtitles 30
7.4 Subtitles control window 31
8 Options Window 33
8.1 General settings 33
8.1.1 OSD setting 34
8.1.2 External Subtitles 35
8.1.3 Keyboard and mouse 35
8.1.4 Capture a frame 35
8.1.5 Configuring the navigation bar 37
8.2 Disc playback 38
8.2.1 Bookmarks editor 39
8.2.2 Parental control 39
8.2.3 Interactive content 42
Table of contents
8.3 Video 42
8.3.1 Video mode 43
8.3.2 Video quality 44
8.3.3 Nero Digital settings 45
8.3.4 Film effects 45
8.3.5 Enhance video 45
8.4 Audio 46
8.4.1 DRC 46
8.4.2 Metadata 46
8.5 Enable Quiet DiscPlayback 47
9 Key Combinations 48
10 Technical Information 50
10.1 System requirements 50
10.2 Formats supported 50
10.2.1 Disk types 50
10.2.2 Disc formats 50
10.2.3 Audio formats and codecsc 50
10.2.4 DRM-protected media formats 51
10.2.5 TV formats 51
10.2.6 Video formats and codecsc 51
10.2.7 Formats for Playlists 52
10.3 Nero ShowTime versions 52
11 Index 53
12 Contact 55
1 Start Successfully
1.1 About the manual
This manual is intended for all users who want to learn how to use Nero ShowTime. It is process-based and explains how to achieve a specific objective on a step-by-step basis.
To make best use of this documentation, please note the following conventions:
| ○ | Indicates warnings, preconditions or instructions that have to be precisely followed. |
| ○ | Indicates additional information or advice. |
| 1. Start ... | The number at the beginning of a line indicates a prompt for action. Carry out these actions in the order specified. |
| → | Indicates an intermediate result. |
| → | Indicates a result. |
| OK | Indicates text passages or buttons that appear in the program interface. They are shown in boldface. |
| (see...) | Indicates references to other chapters. They are executed as links and are shown in red and underlined. |
| [...] | Indicates keyboard shortcuts for entering commands. |
1.2 About Nero ShowTime
Use Nero ShowTime to play all digital recordings (movies, TV programs, home videos, and DVD videos) with excellent picture and sound quality. You can also use it to play Audio CDs. Nero ShowTime has a reminder feature for each inserted disc, and during playback you can create screenshots for the video being shown. The playback window can be scaled down or viewed in full-screen mode. Playlists can be conveniently created and managed for the files you want to play.
2 Launching the program
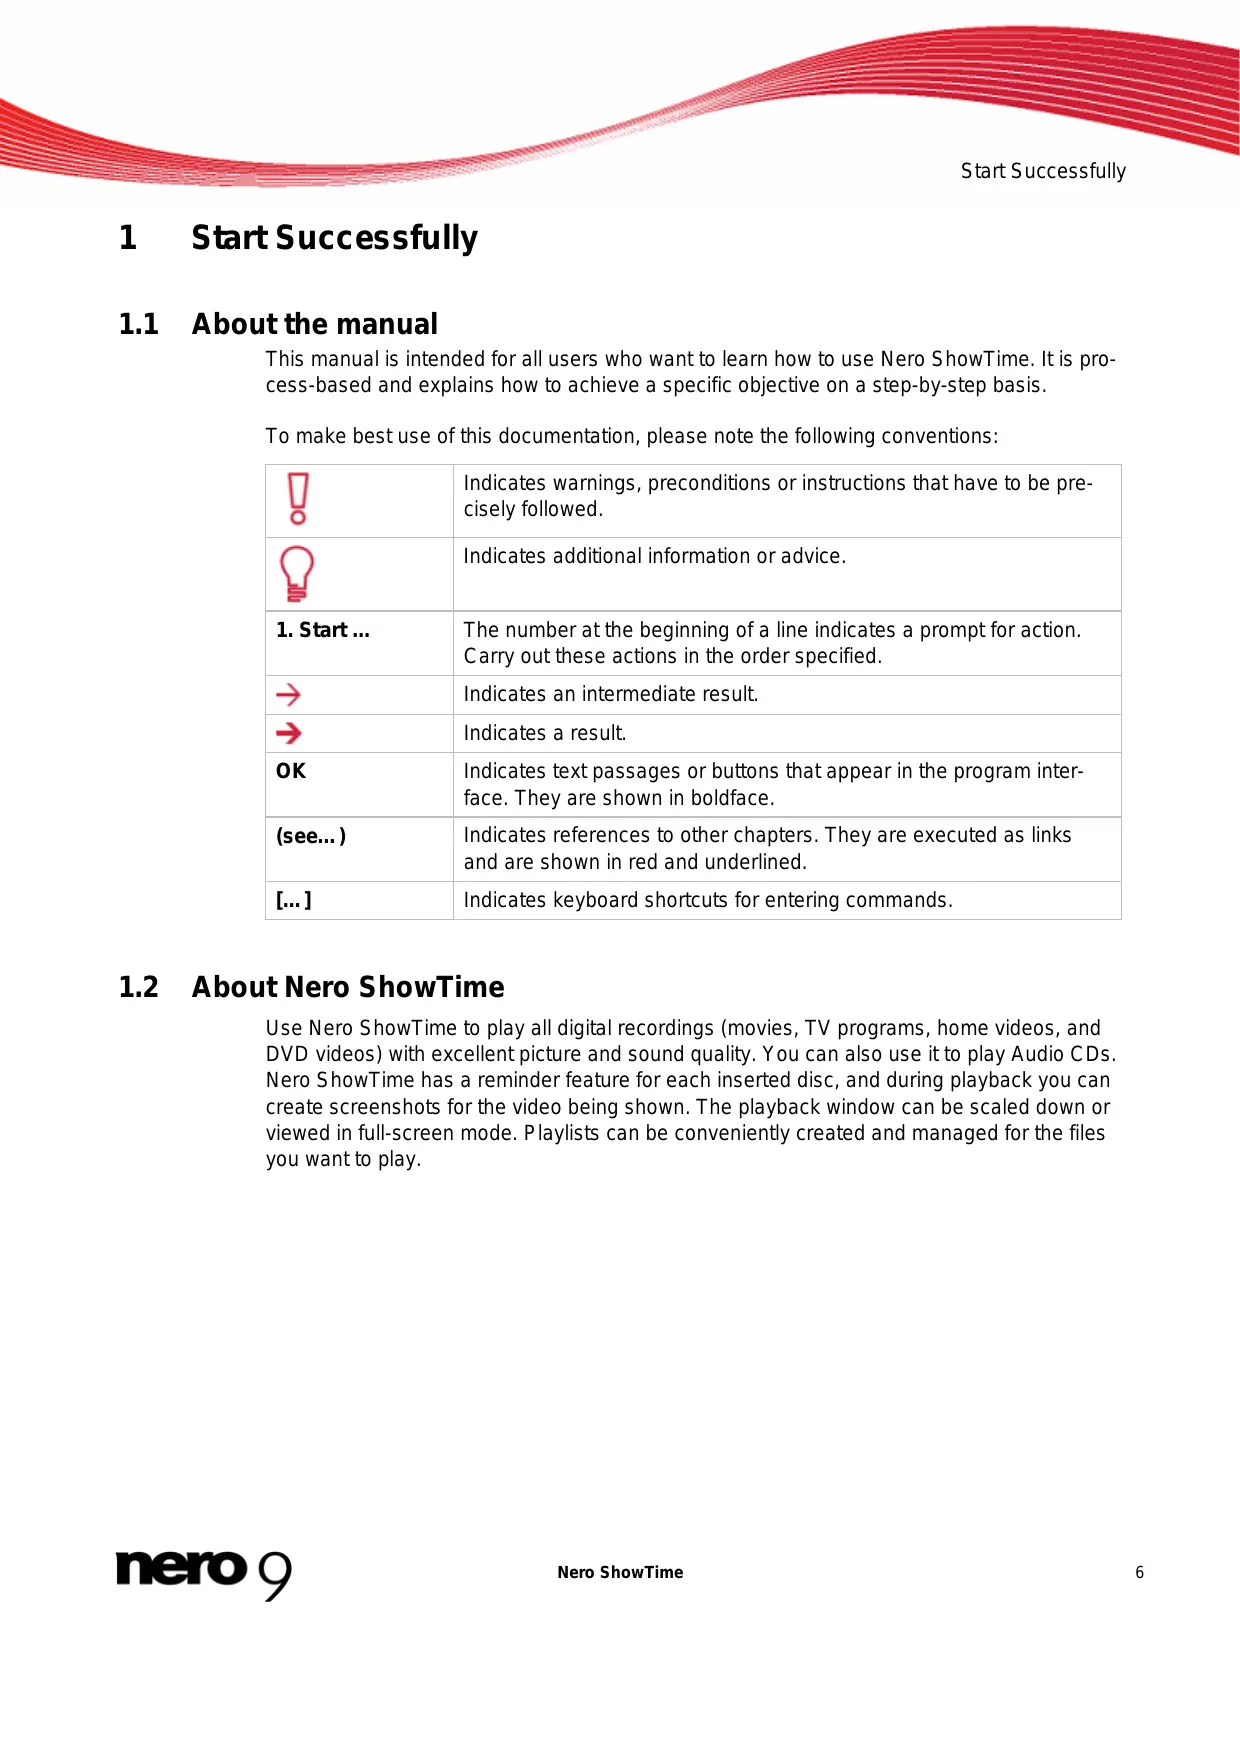
To start Nero ShowTime via Nero StartSmart, proceed as follows:
- Click the StartSmart icon.
The Nero StartSmart window opens.

Click the

The list of Nero applications appears.
Nero StartSmart window
- Select the Nero ShowTime entry in the selection list.
- The Nero ShowTime window opens.
You have launched Nero ShowTime via Nero StartSmart.
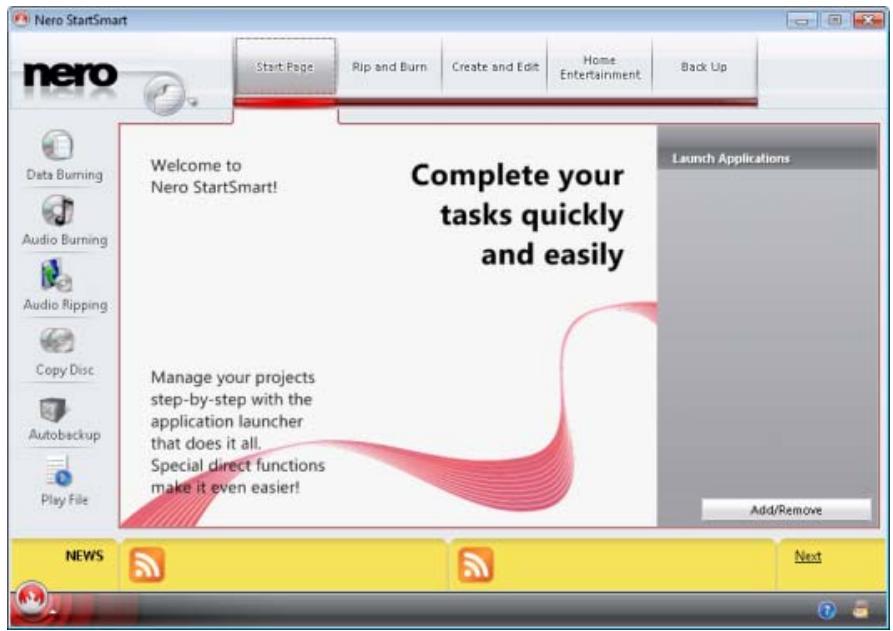
3 Program Interface
The Nero ShowTime program interface is the starting point from which you can play videos and listen to music.
The program interface consists of a playback window for videos and a control bar. You can use the control bar to select a file or video for playback, open the Options window, adjust the volume, control playback, and see information regarding the file that is currently being played.

Program Interface
Thumbsail View
The following setting options are available:
| ? | Shows the Help file. [F1] |
| Opens the Options menu. [Ctrl+C] | |
| Displays the control bar in thumbnail view. This button is only available during full-screen mode playback, and does not provide all buttons. | |
| - | Minimizes Nero ShowTime in the taskbar. |
| 0:00:00 Title 0 Ch 0 | Displays the activated feature, title, current chapter, running time and more. The cover for the Audio CD is shown here during Audio CD play-back if a matching entry is found in the Gracenote media database. Double-clicking the running time opens the Seek to Time window. Here you can select a running time. [Ctrl+G] |
| Switches to mute/LOUD. [Q] | |
| Adjusts the volume. | |
| Navigates steplessly (no chapter boundaries). | |
| Jumps to the previous chapter or to the previous media file. [P] | |
| Selects a rewind speed or rewinds. [Alt+F] | |
| Rewinds and fast forwards within the track. The farther the wheel is moved in one direction, the faster it winds. | |
| Starts playback. [Enter] | |
| Selects a fast-forward speed or fast forwards. [F] | |
| Jumps to the next chapter or to the next media file. [N] | |
| Pauses playback. [Space] Playback is resumed by clicking the button or the button again. | |
| Ends playback and shows the start screen. [S] | |
| Depending on the playback, this opens the selection of available menus or a track selection. [L] | |
| Plays the titles in the Audio CD or in the current playlist in random order. Each track is played only once. | |
| Selects a disc or playlist to be played. [O] | |
| Opens the Playlist window. | |

Nero ShowTime plays discs (e.g. DVD-Videos and Audio CDs) as well as files on your hard drive. The setting options are not enabled for every type of playback; they may be grayed out and cannot be used.

Music recognition technology and related data are provided by Gracenote®. Gracenote is the industry standard in music recognition technology and related content delivery. For more information, please visit www.gracenote.com.
3.1 Extended Area
An extended area can be opened on the control bar with the arrow button. This area provides advanced selection and setting options.

Program interface - Extended area
The following operating elements are available in the extended area:
| / ▲ | Opens/closes the extended area. |
| Allows you to jump to chapters immediately when playing back VCDs and Audio CDs. | |
| Changes the language. [H] | |
| Opens subtitle selection. [U] | |
| Changes the perspective if the movie provides different camera settings for individual scenes. [Ctrl+A] | |
| Switches between the channels on a karaoke DVD. This option is only available if a karaoke DVD is inserted. [K] | |
| Adds a bookmark. [M] | |
| Jumps to the next bookmark. [G] | |
| Repeats a chapter, a title or everything. [Ctrl+R] | |
| Repeats a section or stops repeating. [R] Depending on the format, this button first sets two markers between which the chapter or title is repeated. | |
| Activates/deactivates the digital zoom. [Ctrl+D] |

Creates a frame, i.e. a picture of the current playback window. [Alt+C] The frame is stored in the folder that you specified in Options.
This feature is only available if hardware acceleration is disabled.
4 Media File Playback
With Nero ShowTime you can play or play back various file types. You can select the following files to play:
Video file
Video movie that is available in a video folder structure, on a DVD or hard drive for instance
Audio file
Audio CD
Image file
You can start files from different sources. To select the source, click the button.
4.1 Playing Video from Disc
You can use Nero ShowTime to play video files from a disc, for example a DVD-Video.

You can find more information on Blu-ray support at www.nero.com/link.php?topic_id=416.
To play video files from a disc, proceed as follows:
- Insert the disc into the drive.
Playback starts automatically. If playback does not start automatically, use the button to select the drive where the disc is located.
The disc is played. The control bar and extended area are available for regulating playback.

If a DVD-Video has already played, the DVD Auto-Resume window opens. Here you can choose whether the Video-DVD should be resumed at the last point viewed or started at the beginning.
See also:
Creating a Playlist 25
4.2 Play Audio CD
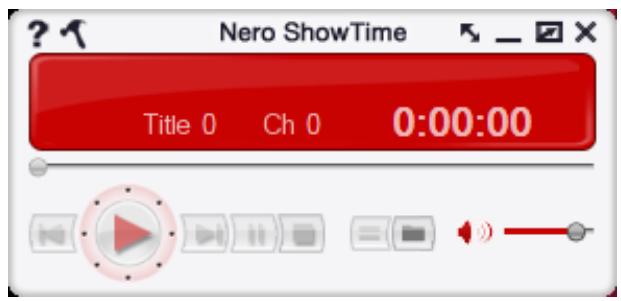
Nero ShowTime plays an Audio CD. The Audio CD can be automatically identified with Gracenote MusicID when it plays. Metadata (e.g. artist, album title, genre, track title) is accessed by the Gracenote Media Database and assigned to the tracks. Gracenote Album Art provides the matching album cover for the Audio CD.
To play an Audio CD, proceed as follows:
- Insert the Audio CD into a drive.
Playback starts automatically. If playback does not start automatically, use the button to select the drive in which the disc is located.
The disc is analyzed and the required information is sent to Gracenote. If a Gracenote Media Database entry matches your Audio CD exactly, the metadata is applied and displayed in the playlist and info area.
If several entries are found, the Matches window opens and the possible metadata records are displayed.
- Select the metadata record that matches your Audio CD.
- Click the Send New Data button if none of the metadata records match your Audio CD.
- The Edit Metadata window opens.
Edit Metadata

The Edit Metadata window also opens if no matching entry is found in the database but you want to enter the metadata and make it available.
- If necessary, edit the metadata (e.g. title, artist, album title, year, genre).
- Click the Advanced Options button to add information.
The Gracenote MusicID Information window, which originates from Gracenote, opens. After entering the additional information, you have to close the window so that the Edit Metadata window displays again.
- Click the Submit Data button.
Changed or new Audio CD metadata is sent to Gracenote and added to the Gracenote Media Database.
The Edit Metadata window is closed and the information displays in the playlist and info area.
The disc is played and the album cover is displayed in the playback window. The control bar and extended area are available for regulating playback.

Music recognition technology and related data are provided by Gracenote®. Gracenote is the industry standard in music recognition technology and related content delivery. For more information, please visit www.gracenote.com.
4.3 Playing Audio and Video Files from the Hard Drive
To play an audio or video file from the hard drive, proceed as follows:
- Click the button.
The selection list of the playback source opens.
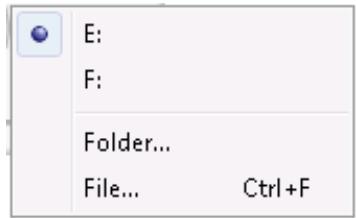
Selection list of the playback source
-
To play the content of an entire folder or a video title (e.g. a Video-DVD movie copied to the hard drive) located in a folder:
-
Select the Folder entry.
The Select Folder window opens.
- Select the folder you want and click the OK button.
If the folder has a video title, the video movie is played. If the folder contains other media files, the files are played in alphabetical order. During playback you can use the button to view the playlist and select individual files.
-
If you want to play one single file:
-
Select the File entry.
The Open window opens.
- Select the file (audio, image or video file) you want and click the Open button.
The file is played.
You have played audio or video files from the hard drive. The control bar and extended area are available for regulating playback. The button makes the selected files available in the Quick Playlist for repeated playback.
See also:
[ \text{Playlist window} \rightarrow 19 ]
5 Playing Streamed Media
Nero ShowTime lets you play streamed media. Streaming refers to the continuous transmission of data from the Internet or a network; the data can be played while it is being transmitted. This means it is no longer necessary to wait until a media file is completely transmitted before playing it.
5.1 About playing Nero MediaHome streamed TV channels
If a Nero MediaHome server is started in the network and has made TV channels available for streaming, you can watch television using Nero ShowTime.

Nero MediaHome is a server that allows clients, e.g. playback devices that request services, such as Nero ShowTime, to play files located in shared folders on the server. Nero MediaHome is a stand-alone product from Nero and can purchased on the Internet at www.nero.com. More information is available in the Nero MediaHome user manual available for download from www.nero.com free of charge.
The following requirements have to be fulfilled:
- The PC is part of a (UPnP) network in which a Nero MediaHome server has been launched.
- TV channels have been selected for streaming in Nero MediaHome (see the Nero MediaHome user manual for how to do this and the system requirements for Nero MediaHome).
To watch television with Nero ShowTime, follow the steps below:
- Click the button.
The playlist opens. - Click the UPnP tab.
Nero ShowTime searches for a Nero MediaHome network and the TV channels of the network. - Select a channel of your choice in the MediaHome network entry.
- To add the channel to the playlist, click the Add to Existing Playlist button.
- Click the Play button.
Nero ShowTime starts playback.
See also:
Playlist window 19
5.2 Playing Web Media
With Nero ShowTime you can enter and play Web media from the Internet. This includes audio, video and image casts web radio and web TV.
A cast is a series of posts (audio, video, or pictures) on the Internet to which you can subscribe with a news feed.
To enter and play web media, proceed as follows:
- Click the button.
The playlist opens. - Click the Web Media tab.
→ The Playlist window opens. - Click the Add URL tab to enter new web media.
The Add a New Subscription window opens.
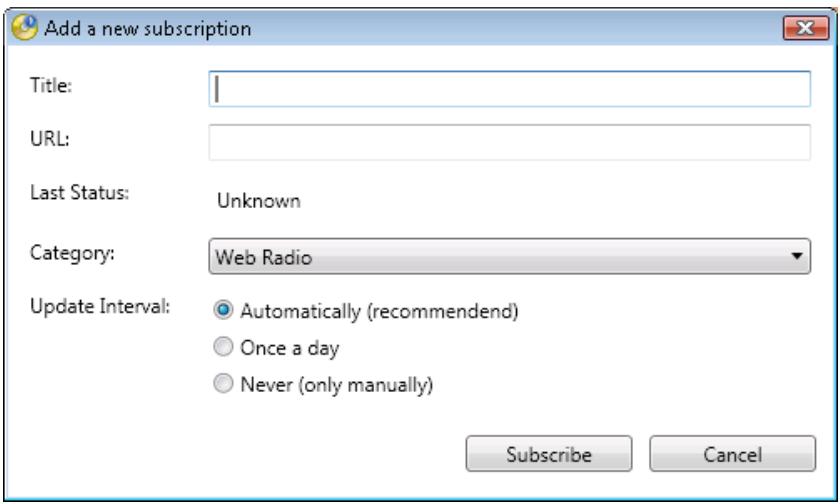
Add a new subscription
- Select the desired category for the subscription in the Category drop-down menu.
- Enter a name for the entry in the Title edit box.
- Enter the Internet address for the entry in the URL edit box.
- Use the radio buttons in the Update Interval area to specify the the updating frequency for the entry.
- Click the Subscribe button.
You have subscribed to the web media. A folder is created under the Web Media tab and the feeds are saved in this folder.
- Choose the web media you want and click Play.
Nero ShowTime starts playback.

Time delays may occur because the files are transmitted in real time and are not stored locally.
See also:
[ \text{Playlist window} \rightarrow 19 ]
My Nero Video RSS Feeds 24
6 Playlist
You can use Nero ShowTime to create playlists for playback. These playlists may include media files in different formats. During playback, the files are played in the order in which you compiled them. You can save the created list and load it at a later time to play it again or to edit it quickly and easily. In addition, you can load and play playlists that have been created by other programs.
The media files can be from your hard drive, from a UPnP network, or from the Internet.
6.1 Playlist window
The Playlist window is the starting point from which you can create, load, and save playlists, as well as select files for playback. The window consists of four tabs.
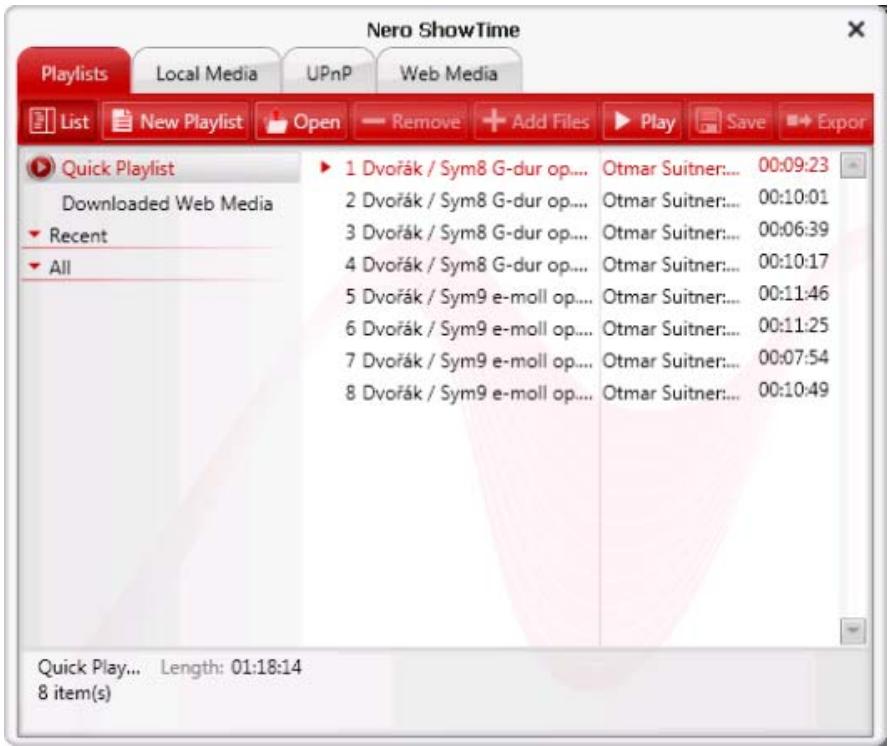
Playlist window
The following tabs are available:
| Tab Playlists | Shows your playlists. Playlists can be created, loaded, edited, and played. |
| Tab Local Media | Displays the contents of the PC and network folders. Media files can be added to a playlist. |
| Tab UPnP | Displays media files in the local network. Media files can be shared between your PC and other PCs with compatible software (e.g. Nero Media-Home or Nero MediaStreaming), or between your PC and UPnP devices. |
| Tab Web Media | Provides the option of entering and playing web media such as web TV and audio casts. |

Nero MediaHome is a server that allows clients, e.g. playback devices that request services, such as Nero ShowTime, to play files located in shared folders on the server. Nero MediaHome is a stand-alone product from Nero and can purchased on the Internet at www.nero.com. More information is available in the Nero MediaHome user manual available for download from www.nero.com free of charge.
6.1.1 Playlists Tab
There are two areas available under the Playlists tab. The left area provides an overview of all playlists. The right area lists the contents of a selected playlist.
If the playlist's content consists of music files, the artist, title, and track time of the title are shown. With the Get Metadata entry in the context menu, you can have Audio CDs be identified with Gracenote MusicID and call up metadata, such as artist and title, from the Gracenote media database.
Playlists
The following setting options are available on the Playlists tab:
| Button List | Displays or hides the playlist overview. |
| Button New Playlist | Creates a new playlist that you can save with a name of your choosing, and to which you can save media files for playback. |
| Button Open | Opens the Add Links on Playlists window. The File Type drop-down menu shows all available playlist formats. Choose a playlist here in order to show and play it in Nero ShowTime. |
| Button Remove | Removes a playlist or an individual entry from a playlist. |
| Button Add Files | Opens the Add Files to Playlist window. Select media files here in order to add them to the selected playlists. |
| Button Play | Plays the selected playlist, starting with the selected playlist entry. |
| Button Save | Saves the selected playlist with the name chosen in the Documents > Nero Collections folder as an M3U Playlist. |
| Button Exporting | Saves the selected playlist. You can choose any name, folder, and playlist format during the process. |
The following setting options are available in the left area:
| Quick Playlist | Shows the files you last played. The Quick Playlist only shows files that are not stored inside their own playlist. If you start an Audio CD, the files located on the Audio CD are also shown in the Quick Playlist. |
| Downloaded Web Media | Shows all files that you have downloaded from the Internet. |
| Recent | Shows the last playlists that you played. |
| All | Shows all stored playlists. |

Music recognition technology and related data are provided by Gracenote®. Gracenote is the industry standard in music recognition technology and related content delivery. For more information, please visit www.gracenote.com.
6.1.2 Local Media tab
The Local Media tab allows you to select media files located on your PC or network folders.
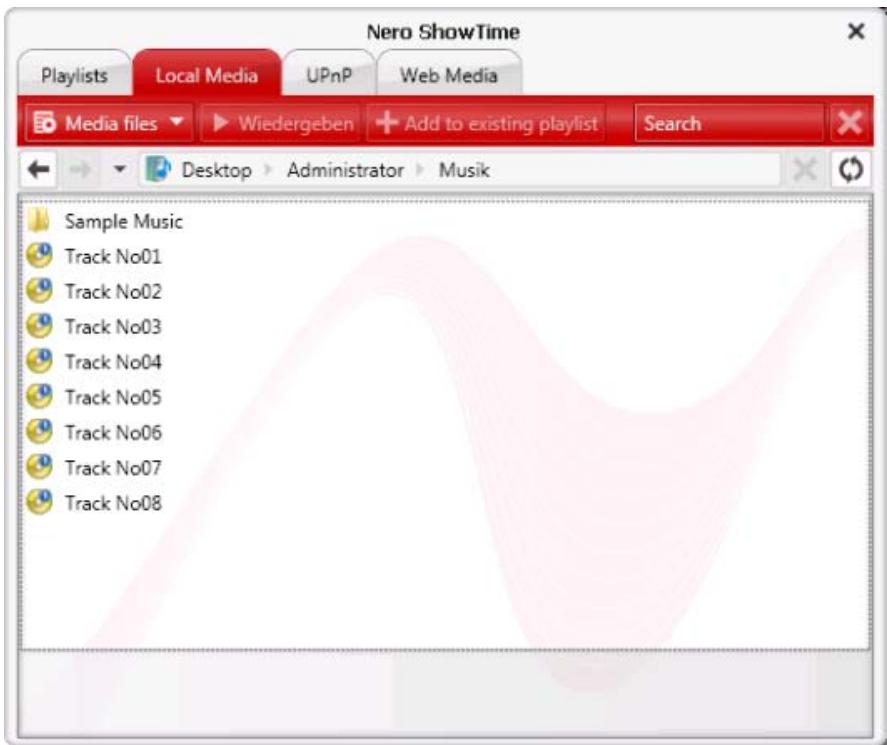
Local Media
The following setting options are available on the Local Media tab:
| Drop-down menu Media File | Selects the media that should be shown. You have the option of fil- tering in order to show only picture, music, or video files, or of show- ing all files. |
| Button Play | Plays a selected file. |
| Button Add to existing gallery | Opens the Select Playlist window. You can select a playlist to which you can add this file. |
| Input field Search | Searches for the name that you entered in the input field - in the fol- der that you selected. |
| Button × | Ends the search and deletes the search term that you entered in the Search input field. |
| Button Back arrow | Moves a folder up. |
| Button Forward arrow | Moves a folder down. This button is only enabled if you have moved one folder up previ- ously by using the Back arrow button. |
| Button | Updates the view. |
6.1.3 UPnP tab
The UPnP tab gives you the option of selecting media files located on a UPnP network, such as Nero MediaHome.
The following setting options are available on the UPnP tab:
| Drop-down menu Media File | Selects the media that should be shown. You have the option of fil- tering in order to show only picture, music, or video files, or of show- ing all files. |
| Button Play | Plays a selected file. |
| Button Add to existing gallery | Opens the Select Playlist window. You can select a playlist to which you can add this file. |
| Button Back arrow | Moves a folder up. |
| Button Forward arrow | Moves a folder down. This button is only enabled if you have moved one folder up previ- ously by using the Back arrow button. |
| Button | Updates the view. |
6.1.4 Web Media tab
The Web Media tab gives you the option of downloading, entering, and adding web media.
The following setting options are available on the Web Media tab:
| Drop-down menu Media File | Selects the media that should be shown. You have the option of fil- tering in order to show only picture, music, or video files, or of show- ing all files. |
| Button Play | Plays a selected file. |
| Button Add URL | Opens the Add a New Subscription window, where you can enter web media (web TV, web radio, or media casts). The web medium is shown in the Web Media tab. |
| Button Download | Downloads the selected media file from the Internet and saves it to the hard drive. You can select several media files for downloading, but only one media file at a time will be transferred. The downlo- ded media files are automatically added to the Downloaded Web Media playlist. |
6.1.4.1 My Nero Video RSS Feeds
If you have My Nero Community activated, you can also use Nero ShowTime to display My Nero video RSS feeds and play the content. By default a number of feeds are already provided for you in Nero ShowTime.
You can access My Nero Community at http://my.nero.com. This is where registered users can manage blogs, publish multimedia files to share with other users and more.
In addition to the default feeds, other video feeds recommended for viewing by a My Nero Buddy are available to My Nero users. These recommendations can be found in My Nero Community under Buddies Recommended.
To use My Nero Buddy feeds, you must be registered with My Nero Community. You also have to store your access data in the Nero ControlCenter. For more information, please see the Nero ControlCenter manual.
See also:
Playing Web Media 16
6.2 Creating a Playlist
To create and save a playlist, proceed as follows:
- Click the button.
The Playlist window opens.

Playlist
- Click the New Playlist button.
A new playlist is created in the left area under ALL.
-
Enter a name for the playlist, e.g. Hits, and press the Enter key on your keyboard.
-
Click the Add Files button.
The Add Files to Playlist window opens.
- Select the files to add to the playlist and click the Open button.
The files are now available in the playlist. You can add more media files to the playlist from the Local Media and UPnP tabs by using the Add to Existing Playlist button. You can now playback the playlist by clicking the Play button. To close the window without
starting playback, click the × button.
See also:
Playlist window 19
6.3 Loading and Playing a Playlist
To load and play a saved playlist, proceed as follows:
- Click the button.
The Playlist window opens.
- Click the Open button.
The Add Playlist Links window opens.
- Select the playlist you want to load and click the Open button.
The playlist is available in the Playback window in the Playlists tab.
- To play this playlist, select it and click the Playback button.
Nero ShowTime starts by playing the playlist. During playback you can use the button to view the list and select individual files.
See also:
[ \text{Playlist window} \rightarrow 19 ]
6.4 Editing a Playlist
To edit a saved playlist, proceed as follows:
- Click the button.
The Playlist window opens. - Select the desired playlist.
-
To add files to the playlist:
-
Click the Add Files button.
The Add Files to Playlist window opens. -
Repeat the last step for each file to be added to the playlist.
-
To remove files from the playlist:
-
Select the file you want to remove.
- Click the Remove button.
The file is removed from the playlist.
3. Repeat the last step for each file that is to be added to the playlist.
-
To re-sort the files of the playlist:
-
Right-click to open the context menu.
-
Select the Sort list entry.
The sub-entries are displayed. Select the sorting criterion you want here. You can also do a random sort of the list. -
To save the playlist under a new file name:
-
Click the Export button.
The Export Playlist window opens.
- Enter the desired file name in the File Name edit box.
- Choose a playlist format from the Save As drop-down menu.
-
Select the required folder.
The playlist is saved. -
To save the changes made to the playlist:
-
Click the Save button.
The Save As window opens. - Select the file name of the selected playlist.
- Click the Save button.
The selected playlist is overwritten.
You have successfully edited a saved playlist.
See also:
[ \text{Playlist window} \rightarrow 19 ]
6.5 Identifying Audio Files
You can have the added audio files in the playlist identified with Gracenote MusicID and access metadata such as artist and title from the Gracenote Media Database. This is particularly useful when audio files are not named or are only partially named. The metadata provided by Gracenote MusicID is used for display purposes and is also written to the audio files.

Music recognition technology and related data are provided by Gracenote®. Gracenote is the industry standard in music recognition technology and related content delivery. For more information, please visit www.gracenote.com.
To do this, proceed as follows:
- Click the button.
The Playlist window opens.
- Choose a playlist.
- Select one or more audio files from the playlist.
- Right-click to open the context menu.
- Choose the Get Metadata entry.
The audio files are analyzed and the required information is sent to Gracenote. The Edit Metadata window opens. The metadata received from Gracenote is displayed in the New Info area.
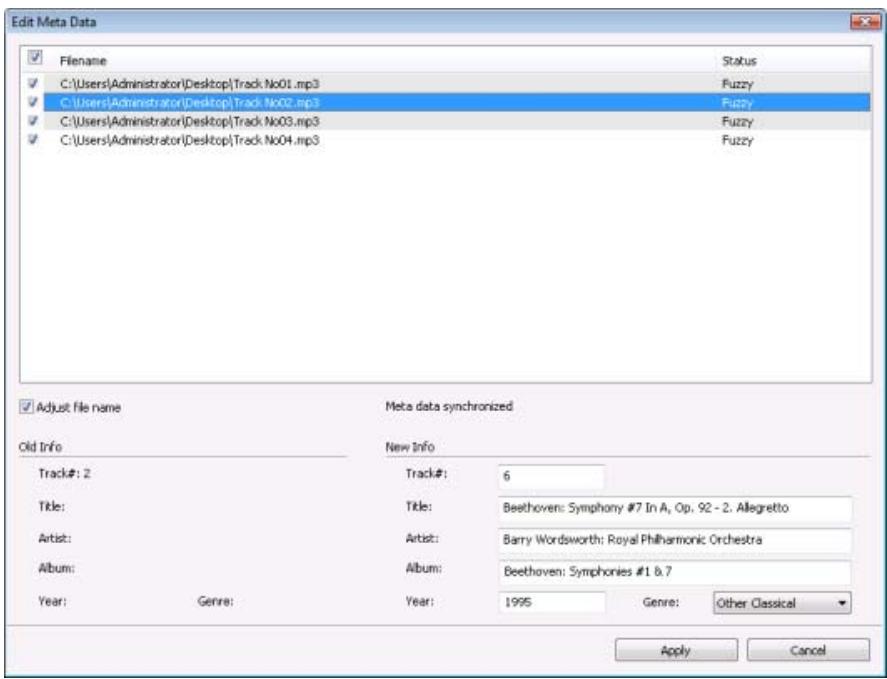
Edit Data window
- If necessary, edit the metadata (e.g. track number, track title, artist, album title, year, genre).
- Click the Apply button.
The Edit Metadata window closes.
The metadata is written to the audio file and displayed in Nero ShowTime.
See also:
Metadata 46
7 Control During Playback
7.1 Navigation bar
During playback in full-screen mode, you can display the navigation bar by moving the mouse pointer to the top of the screen. In addition to the playback duration being displayed, various control options are made available to you.

Which buttons are shown in the navigation bar depends on your settings in Options.

Program Interface - Navigation Bar
The following setting options are available:
| Opens the Options window. [Ctrl+C] | |
| Switches between full-screen and normal view. [Z] | |
| Jumps to the previous chapter or to the previous media file. [P] | |
| Starts playback. [Enter] | |
| Jumps to the next chapter or to the next media file. [N] | |
| II | Interrupts playback, then continues it after a second click. [Space] |
| Ends playback. [S] | |
| Creates a frame, i.e. a picture of the current playback window. [Alt+C] The frame is stored in the folder that you specified in Options (see Capture Frame→35). | |
| Ejects the disc. [J] | |
| Navigates steplessly (no chapter boundaries). |
See also:
Configuring the navigation bar 37
7.2 Context menu
You can use the context menu to control Nero ShowTime during playback. It is not configurable. The funtions of the individual entries correspond to the buttons on the program interface.
The following entries are also available:
| Help | Opens the Nero ShowTime help. |
| Tutorial | Opens the www.nero.com tutorials page, where you can download interactive tutorials for Nero products free of charge. |
| About | Opens the About Nero ShowTime window, where you will find information such as the version number. |
7.3 Controlling external subtitles
With Nero ShowTime you can control the external subtitles of a movie during playback. External subtitles mean that the subtitle information is not in the movie but rather in an external file in a special format.

If the subtitle file is in the same folder as the movie and has the same name, Nero ShowTime detects the subtitle file automatically and displays it in accordance with the selected setting.
The following requirements have to be fulfilled:
The movie is being played back.
- Playback of external subtitles is enabled.
To control subtitles, proceed as follows:
-
To have subtitles displayed from an external file:
-
Display the expanded area.
-
Click the button.
-
Click the External subtitles adjustment > Add subtitles to list entry.
A browser window opens.
-
Select the desired subtitles and click the Open button.
The subtitles are added to the subtitles list and displayed in the movie. -
If the movie and subtitles are not synchronized and you want to synchronize them:
-
Display the expanded area.
- Click the button.
- Click the External subtitles adjustment > Subtitles control entry.
The Subtitles Control window opens.
- Select the Standard movie speeds or Change to radio button to adapt the speed of the subtitles to the movie.
-
Enter a value in the Delay subtitles by edit box to synchronize the subtitles to the movie.
-
Click the OK button.
The changes are applied.
You have displayed the subtitles and controlled the running time.
See also:
Subtitles control window 31
7.4 Subtitles control window
If the subtitles are not in synch with the movie, you can adjust the subtitles with Nero Show-Time in the Subtitles Control window. You can open the window during the movie in the expanded area of the control bar using the > Adjust external subtitles > Control Sub-titles button.
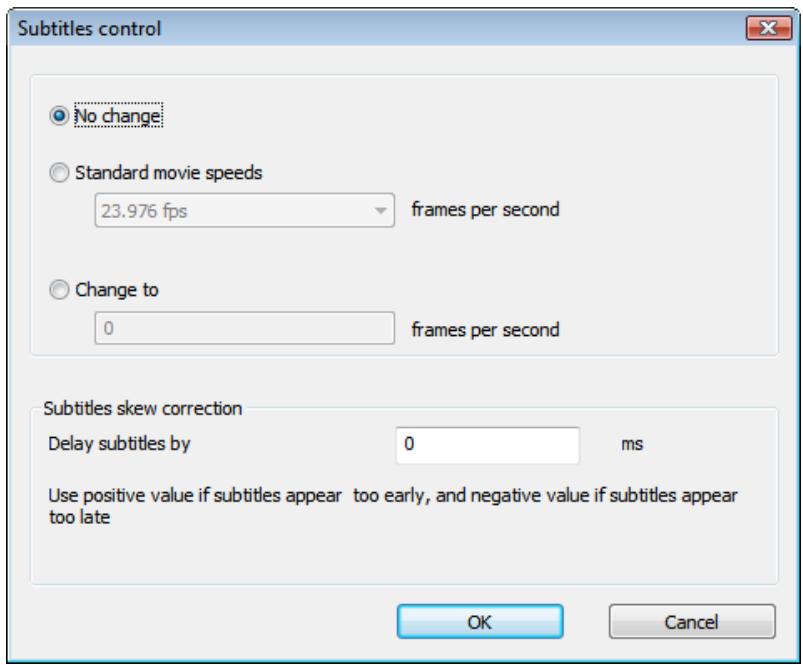
Subtitles Control window
The following setting options are available:
| Radio button No change | Retains the speed of the subtitles. |
| Radio button Normal movie speed | Chooses a different speed for the subtitles. The standard frame ra- tes of 23.976 (for NTSC), 24.25 (for PAL), 29.97 (for NTSC), and 30 frames per second are available in the drop-down menu. Choo- se this setting option if the speeds for the movie and the subtitles are different from each other. This happens, for example, when the movie is coded in NTSC, but the subtitles are coded in PAL (or vice versa). |
| Radio button Change to | Specifies a user-defined speed for subtitles. You can specify a value between 0 and 200 frames per second. Choose this setting option if the speeds for the movie and the subtitles are different from each other and the default settings in the Normal movie speed drop-down menu are not sufficient to fix this. |
| Input field Delay subtitles by | Defines a synchronization time in milliseconds. Enter a positive value in order to delay subtitle displays. Enter a negative value in order to display subtitles earlier. Choose this setting option if the movie and the subtitles have the same movie speed but are not running synchronously. |
See also:
External Subtitles 35
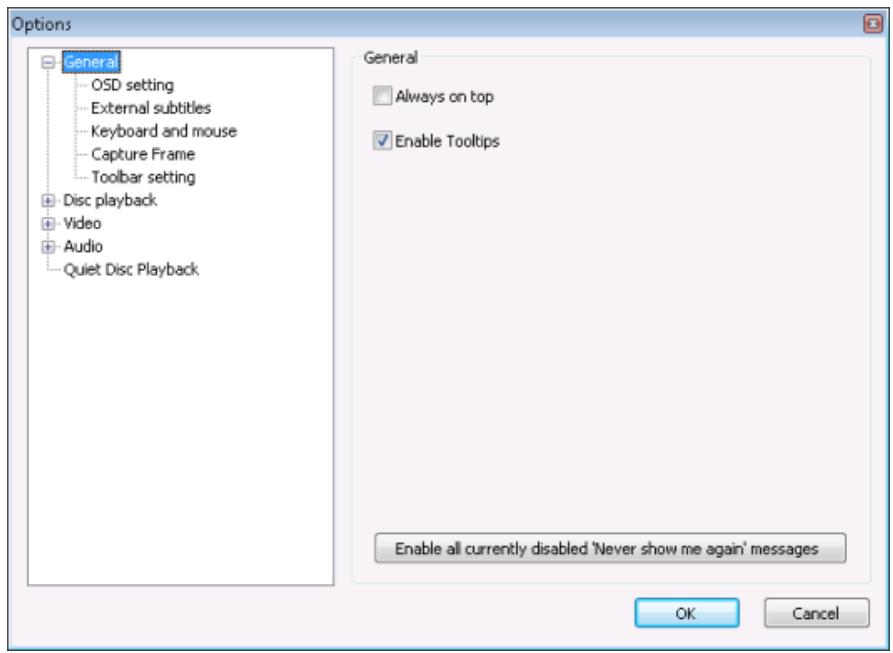
8 Options Window
The Options window provides various options for customizing the appearance of the Nero ShowTime interface and for configuring settings according to your requirements. The window can be opened using the button. It consists of a navigation tree and a screen area. Depending on the entry that is selected in the navigation tree, a different screen area is displayed.
Options Window
8.1 General settings
The General entry provides, e.g. configuration options for the keyboard and mouse, as well as for configuring the navigation bar.
The following setting options are available:
| Check box Always on top | Nero ShowTime remains in the foreground even if other pro- grams are started. |
| Check box Enable Tooltips | Enables Tooltips. |
| Button Enable all currently disabled "Never show me again" messages | Re-enables all windows that you had disabled with the "Never show me this message again" check box. |
8.1.1 OSD setting
The OSD setting entry contains configuration options for the on-screen display. The on-screen display indicates the current procedure in the playback window such as "Play" or "Volume increased."
Options - OSD setting window
The following setting options are available:
| Check box Activate | Enables/disables the on-screen display, i.e. process messages in the playback window. If the on-screen display is enabled, the current process is displayed in the playback window. |
| Input field Display for | Defines the time of the on-screen display in seconds. |
| Check box Display extra information | Enables display of additional information, e.g. about the video stream bit rate and audio encoding. |
| Radio buttons OSD position | Defines the position of the on-screen display in the playback window. |
| Button Set font | Defines the font for the on-screen display. |
| Button Set text color | Defines the text color for the on-screen display. |
| Button Set background color | Defines the background color for the on-screen display. |
8.1.2 External Subtitles
The External subtitles entry allows you to enable external subtitles and to define the display.
The following setting options are available:
| Check box Enable external sub-titles | Enables display of external subtitles. External subtitles are only available if the relevant file with exter-nal subtitles is saved in the same directory as the selected film. |
| Buttons New font / text color | Defines the font and text color of the subtitles. |
| Check box Use shadow | Enables shadows around external subtitles. |
| Input field Pixel | Defines the pixel width of the shadow. |
8.1.3 Keyboard and mouse
The Keyboard and mouse setting entry contains configuration options for control via the keyboard and mouse.
The following setting options are available:
| Button Use mouse wheel for | Specifies which function should be assigned to the mouse wheel during playback. The Volume, Time and Previous/Next Chapter entries are avail-able. |
| Check box Inverse | Inverts the mouse wheel's function. |
| Input field Time seek duration | Defines the time interval in seconds that makes it possible to jump forwards and backwards in the program using the < | and > buttons. |
8.1.4 Capture a frame
The Capture Frame entry provides configuration options for the frame. A frame is a snapshot of the playback window.
The following setting options are available in the Capture to area:
| Radio button Clipboard | Depending on the configuration of your PC saves one picture only. |
| Radio button Background image | Saves one frame immediately as the desktop wallpaper. In the combo box select how the frame should be displayed on the desk-top. |
| Radio button File | Numbers your frames and saves them in BMP format. |
| Button Screenshot Folder | Defines a folder where the images are saved. |
| Radio button Printer | Sends a frame directly to the printer. |
The following setting options are available in the Captured aspect ratio area:
| Radio button Original video source size | Saves the frame in the original aspect ratio of the movie. |
| Radio button Current video window size | Saves the frame in the current aspect ratio of the playback window. |
8.1.5 Configuring the navigation bar
The Navigation bar setting entry provides configuration options for the navigation bar. The navigation bar is used principally so that the entire control panel does not need to be displayed during playback. It is displayed at the top of the screen during playback if you move the cursor to this position and provides selection and configuration options for the movie being shown (see Navigation bar 29).
Options - Navigation Bar Setting window
The following setting options are available:
| Check box Activate | Enables the navigation bar. |
| Radio button Always show | Enables the navigation bar for playback in full-screen and normal mode. |
| Radio button Show only in full screen mode | Activates the navigation bar only for playback in full screen mode. |
| Selection list Disabled | Displays the features that are not available on the navigation bar. |
| Selection list Enabled | Displays the features of the navigation bar. |
| Button Show (all) | Adds (all) features of the Enabled selection list. All buttons are displayed in the navigation bar. |
| Button Hide (all) | Removes (all) features from the Enabled selection list to the Dis- abled selection list. |
| Button Default | Resetset the Active and Inactive selection lists to the default setting. The most frequently used buttons are displayed in the navigation bar. |
8.2 Disc playback
The Disc playback entry provides configuration options for showing videos from a drive.
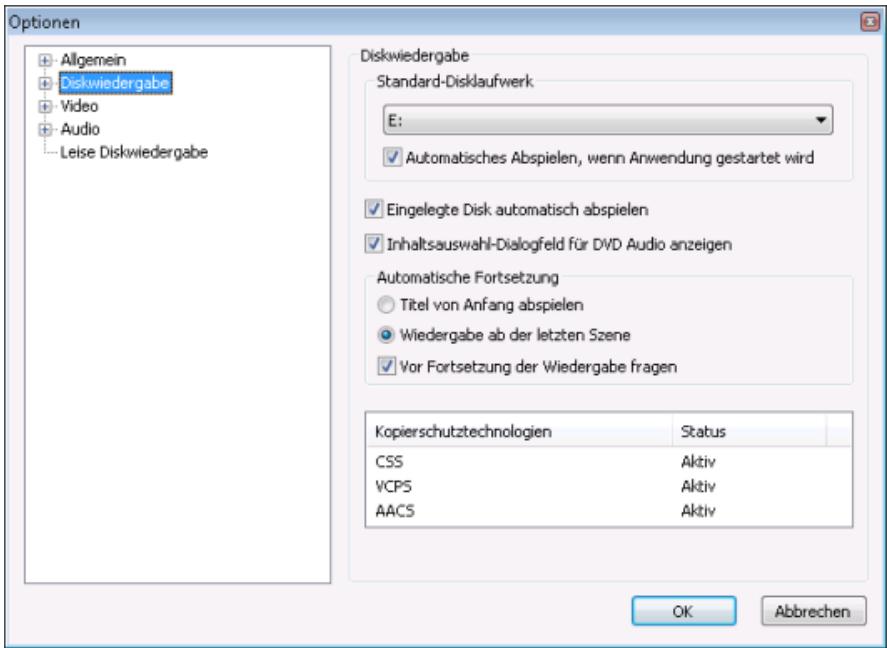
Options - Disc Playback window
The following setting options are available:
| Drop-down menu Default disc drive | Defines the drive from which discs are played by default. |
| Check box Auto play when application started | Checks the drives when launching Nero ShowTime and starts play- back if an appropriate disc has been inserted. |
| Check box Play automatically upon inserting disc | Starts playback as soon as the appropriate disc has been inserted. |
| Check box Show the content selection dialog box for DVD Audio | Shows a window for selecting content before playing a DVD-Audio. |
| Radio button Play title from the beginning | Starts playback from the beginning if a disc that is already known is inserted again. |
| Radio button Resume playback from the last scene | Resumes playback if a disc that is already known is inserted again. |
| Check box Prompt before resuming playback | Asks the user before playing back a disc that is already known whether it should be resumed at the last position viewed or started from the beginning. |
8.2.1 Bookmarks editor
The Bookmark editor entry allows you to edit bookmarks. The Bookmark Editor area contains a list of all bookmarks that have been set so far under the name of the DVD. You can have the bookmarks of a DVD displayed by clicking the + icon in front of the name of the DVD.
The following buttons are available:
| Go to | Selects the point the selected bookmark jumps to in the video. If you close the Options window, you can resume the movie from the selected bookmark. |
| Edit name | Edits the name of the selected bookmark. |
| Delete | Deletes the selected bookmark. |
| Bookmark file | Displays the path where the bookmark file is stored. You can change the path by clicking the button. |
8.2.2 Parental control
The Parental control entry enables you to set up parental control. The parental control feature in Nero ShowTime enables you to prevent your children from watching a movie that is not appropriate for them. You can also create a user profile for each of your children and specify restrictions. If a DVD for which parental control criteria are relevant is inserted, a login window is displayed. A user with a defined profile can log in and show the movie or can be prevented from doing so by virtue of inadequate rights.
Children users cannot change their profiles themselves; only an administrator (parent) can view and administer the profiles.

You must have administrator rights on your computer to be able to create a user or set up parental controls. You also must be logged on as an administrator.
The Parental level area displays the restrictions that apply for the user currently logged on. The following setting options are available:
| G | Released without age restriction. Suitable for general audiences. |
| Level 2 | Films up to release Level 2 are played. Suitable for most audien-ces. |
| PG | Not suitable for children under 13. |
| PG-13 | Parental guidance suggested for children under 13. |
| Level 5 | Films up to release Level 5 are played. Suitable for teenagers. |
| R | Parental guidance suggested for children under 18. |
| NC-17 | Not suitable for viewers under 18 years old. Not allowed for children or teenagers under 18 under any circumstances. |
| Level 8 | Films up to release Level 8 are played. Maximum age restriction. |
| Unlimited | All films are played. |
The following buttons are available:
| Login | Opens the Login window where an administrator or user can log into the system. |
| Administration | Opens the User Administration window in which you can create new profiles for administrators and users. You can also view and edit these profiles, e.g. the level of parental control and/or change the password. The button is active only if you have logged into the system as an administrator. Users cannot view or change profiles. |
8.2.2.1 Create Administrator
In order to set up parental control, you must first create an administrator. Only an administrator can create users and specify a restriction for watching movies.
To create an administrator, proceed as follows:
- Click the Administrator button.
The User Administration window opens. - Click the Add User button.
The Edit User window opens. -
Enter a name and a password.
-
Select the Unlimited radio button in the Parental level area.

All films will be played only if the Unlimited option has been activated.
- Click the OK button.
You are entered as an administrator. You can see your profile in the list included in the User Management window. You can now log into the system in order to create users.
See also:
Parental control 39
8.2.2.2 Creating Users
An administrator can create profiles for users. You can specify which movies can and cannot be viewed for each user. To do this, define the parental level.
The following requirement has to be fulfilled:
- You are logged in as an administrator.
To set up parental control and to create a user, proceed as follows:
- If you are not logged into the system yet, click the Login button and log in.
The Administrator button is enabled. - Click the Administrator button.
The User Administration window opens. - Click the Add User button.
The Edit User window opens.

Edit User window
- Enter a name and a password for the user.
-
Select the desired restriction option in the Parental level area.
-
Click the OK button.
The desired profile is created and entered in the list. - If you want to create other profiles, repeat the last four steps.
You have successfully set up parental control and created users.

If a DVD is inserted for which the parental control criteria are relevant, a login window appears. Only a user with a defined profile can log in and play the movie.
See also:
Parental control 39
8.2.3 Interactive content
The Interactive content entry provides setting options for the disc space required by Blu-ray discs. This disc space is needed for interactive applications that may be part of the Blu-ray disc. Interactive applications are small programs that may interact with the user and that can, for example, manage scores or control playback.

You can find more information on Blu-ray support at www.nero.com/link.php?topic_id=416.
The following setting options are available:
| Button Folder for local data storage | Defines the folder where the data of the interactive applications is to be temporarily stored. |
| Edit box Maximum data storage size | Defines the maximum storage space reserved for interactive applications. |
| Button Delete all local BD content from the hard drive | Deletes the temporarily stored data of the interactive applications from the hard drive. |
8.3 Video
The Video entry provides configuration options for playing videos.
The following setting options are available in the Hardware acceleration area:
| Check box Activate | Enables hardware acceleration. This means that DVD-Video image acceleration is performed by the graphics card. This reduces the load on the main processor. |
The following setting options are available in the Screen control area:
| Check box Run full screen | Shows the movie automatically on the full screen. |
| Check box Keep aspect ra-tio | Shows the movie in its original aspect ratio. |
The following setting options are available in the Screen control area:
| Radio button Adjust player to video | Shows the video in its original size. The playback window expands or shrinks accordingly. |
| Radio button Reduce video to fit to the player | Shows the video in the playback window's default size. |
The following setting options are available in the Video mode preferences area:
| Radio button Default | Shows the movie in 4:3 standard format. |
| Radio button 16:9 | Shows the movie in 16:9 widescreen format. |
| Radio button 4:3 (Pan and Scan) | Shows a widescreen movie in 4:3 standard format. Part of the image is cut off with this option. |
| Radio button 4:3 (letterbox) | Shows a widescreen movie in 4:3 standard format. The movie is ad-justed to fit the screen and the empty areas above and below are filled with black bars. |
8.3.1 Video mode
The Video mode entry provides setting options for interlacing. Video images are shown as two half images in interlaced mode. Every second line (1, 3, 5, ..., 575) is shown in the first half image. The second half image displays the rest of the lines in the image (2, 4, 6,... 576), so that the eye perceives a full picture. Most video material consists of half images.
A deinterlacer is required for display on a full-screen device (monitor, projector). Nero Show-Time supports the deinterlacing techniques weave, bob and adaptive.
The easiest way to fill in half images consists of displaying even and odd half images simultaneously. This way, one half image fills in the lines missing from the other half image. The Weave deinterlacing method is appropriate if both half images originate from the same point in time and can be interlaced inconspicuously.
With adaptive deinterlacing the missing lines in the fields are found and added while taking into account the surrounding fields. Good adaptive deinterlacers take into account up to five
images in both directions. The more images the algorithm takes into account, the more the output may lag.
With bobbing, the missing lines in the fields are found, thus expanding each field to form a full image. The result of this technique is soft blending and some horizontal details may be missing.
The following setting options are available:
| Radio button No deinterlacing (weave) | Defines that deinterlacing is not used. |
| Radio button Adaptive deinter-lacing | Defines that the computer performance takes over the deinterlacing process. Depending on the processor, there may be interruptions in the images. The radio button is not available if hardware acceleration is disabled. |
| Check box Fine-tuning view | Adjusts the picture quality. |
| Radio button Fixed deinterlac-ing (bob) | Defines that the hardware takes over the deinterlacing process. Recommended in particular for older PCs with less than 600 MHz processor performance. |
| Button Set default values | Restores the default setting. |
8.3.2 Video quality
The Video quality entry provides configuration options regarding the quality of Nero Digital videos.

The settings in this section only affect Nero Digital videos and have no significance for DVD-Videos, VCDs and SVCDs.
The following setting options are available:
| Radio button Off | Deactivates adjustment of the quality. |
| Radio button Manual | Selects the manual quality setting. Use the adjuster to set the quality setting between None and Maximum. |
| Radio button Auto-adjust | Automatically adjusts the quality to ensure the optimum setting for your computer. |
8.3.3 Nero Digital settings
The Nero Digital settings entry provides configuration options for playing Nero Digital videos.

The settings in this section only affect Nero Digital videos and have no significance for DVD-Videos, VCDs and SVCDs.
The following setting options are available:
| Check box Remember subtitle setting when playing Nero Digital movie | Retains the settings for the subtitles for the next time a film is played. |
| Check box Display subtitles smoothly | Improves the display of subtitles. |
8.3.4 Film effects
The Film effects entry allows effects to be applied to the video movie.
The following setting options are available:
| Check box Use film effects | Activates the use of film effects. |
| Slider Luma | Defines the brightness of the image. |
| Slider Chroma | Defines color hue and color saturation. |
| Button Reset | Restores the default setting. |
8.3.5 Enhance video
The Enhance video entry allows you to change the appearance of the video.
The following setting options are available:
| Drop-down menu Preferences | Selects a predefined entry and adjusts the slider accordingly. If the values are changed, the Custom entry is selected. |
| Button Save As | Opens the New Preset window where you can store the current setting under a name of your choice. |
| Button Delete Preset | Deletes the currently selected self-defined preset. Presets predefined by the system cannot be deleted. |
| Slider Brightness | Defines the brightness of the video. |
| Slider Contrast | Defines the contrast of the video. |
| Slider Saturation | Defines the saturation of the video. |
| Slider Hue | Defines the hue of the video. |
| Slider Gamma | Adjusts the gamma setting of the video. |
| Slider Sharpness | Defines the sharpness of the video. |
| Button Reset | Reset the setting value to the default value. |
8.4 Audio
The Audio entry provides configuration options for the output of audio files.
The following setting options are available:
| Area Audio output | Specifies the settings for audio output. For example you can specify the number of speakers or configure the bass boost feature and spec-ify the positioning of the speakers in the room. |
| Selection list Output mode | Defines the audio output mode. |
8.4.1 DRC
The DRC entry lets you enable Dynamic Range Control. Originally very loud or very quiet passages of a movie are adjusted to each other. This option is recommended when very small speakers are used for playback.
8.4.2 Metadata
The Metadata entry provides the option of calling up metadata through the Gracenote Internet database.
The following setting options are available:
| Check box Use Gracenote CD database | Enables the Gracenote Media Database feature. |
| Button Internet Connection Settings | Opens the Internet Properties window. You can specify the settings for your Internet connection here. This button is only enabled if you have enabled the Use Gracenote CD database check box. |
| Check box Enable cover art | Shows the corresponding album cover in the Playback window during Audio CD playback, provided there is a matching entry in the Gracenote Media Database. |
| Check box Enable display of Nero Digital Audio logo | When Nero Digital audio files are started, displays the Nero Digital Audio Logo in the playback window. |

Music recognition technology and related data are provided by Gracenote®. Gracenote is the industry standard in music recognition technology and related content delivery. For more information, please visit www.gracenote.com.
See also:
Identifying Audio Files 27
8.5 Enable Quiet DiscPlayback
The Quiet disc playback entry provides the option of reducing the noise caused by a drive when a CD/DVD is being played.
9 Key Combinations
The following shortcuts and key combinations are available in Nero ShowTime:
| + | Raises the volume. |
| - | Reduces the volume. |
| [Enter] | Starts playback. |
| [Space] | Cancels playback/resumes playback. |
| [Q] | Switches to mute/LOUD. |
| [R] | Repeats a selected part of the movie. |
| [Ctrl+R] | Repeats a chapter or title. |
| [T] | Jumps one frame forwards. |
| [Ctrl+T] | Minimizes the program interface. |
| [U] | Opens subtitle selection. |
| [Ctrl+U] | Displays or hides subtitles. |
| [Ctrl+Alt+U] | Displays or hides external subtitles. |
| [O] | Opens the playback source selection. |
| [Ctrl+O] | Opens the playback list. |
| [P] | Jumps to the previous chapter. |
| [N] | Jumps to the next chapter. |
| [Ctrl+P] | Opens the file. |
| [Ctrl+A] | Changes the camera perspective. |
| [S] | Ends playback. |
| [Ctrl+D] | Enables/disables the zoom tool. |
| [F] | Plays the movie forwards. |
| [G] | Jumps to the next bookmark. |
| [Ctrl+G] | Opens the Go to Time window. |
| [Ctrl+Alt+S] | Opens the Subtitles Control window. |
| [H] | Changes the language. |
| [J] | Ejects the disc. |
| [K] | Switches between the channels on a karaoke DVD. |
| [L] | Opens the selection of the available menus. |
| [Z] | Changes between full-screen and normal view. |
| [Alt+F] | Plays the movie backwards. |
| [Ctrl+B] | Jumps back one intra coded frame. An intra codec picture is compressed in the video stream independently of other pictures while the picture is being processed. This corresponds to approximately 10 frames. |
| [Alt+C] | Creates a frame. |
| [Ctrl+C] | Opens the Options menu. |
| [M] | Adds a bookmark. |
| [0-9] | Keyboard range 0-9. |
| [F1] | Shows the Help file. |
| [Page up] | Fast forwards. |
| [Page down] | Rewinds. |
10 Technical Information
10.1 System requirements
Nero ShowTime is installed along with the Nero Suite. Its system requirements are the same. You can find more detailed information on the system requirements under www.nero.com.
In addition, the following requirements apply:
DVD drive for playing DVD-Video
16-bit Windows compatible sound card and speakers
- Optional: Multichannel/Dolby®Digital 5.1 channel-decoding plug-in (Dolby Digital 5.1 sound system for audio playback in 5.1 channel)
- Optional: DVD-Video plug-in for DVD-Video features and encoding in Dolby Digital 2-channel sound. This plug-in is already included in the full version.
10.2 Formats supported
10.2.1 Disk types
CD
DVD

You can find more information on Blu-ray support at www.nero.com/link.php?topic_id=416.
10.2.2 Disc formats
Audio CD
Mixed mode CDs
CD EXTRA
Video CD (VCD)
Super Video CD (SVCD)
miniDVD
Audiobook CD
DVD-Video
10.2.3 Audio formats and codecs
Advanced Audio Coding (AAC, M4A, MP4)
Audible Audiobook (AA)
Audio Interchange File Format (AIFF, AIF)
- Compact Disc Digital Audio (CDA)
Dolby Digital (AC3)
Dolby Surround
Musical Instrumental Digital Interface (MIDI, MID)
- Moving Picture Experts Group-1 Audio Layer 3 (MP3)
- Moving Picture Experts Group-1 Audio Layer 2 (MP2)
- Moving Picture Experts Group - 1 Audio Layer 1/2/3 (MPA)
Moving Picture Experts Group-4 (MP4)
Nero Digital (MP4)
OGG Vorbis (OGG, OGM)
Recourse Interchange File Format WAVE (WAV, WAVE)
Windows Media Audio (WMA)
10.2.4 DRM-protected media formats
Windows Media Audio Digital Rights Management (WMA-DRM)
Windows Media Video Digital Rights Management (WMV-DRM)
Content Protection for Recordable Media (CPRM)
10.2.5 TV formats
National Television Systems Committee (NTSC)
Phase Alternating Line (PAL)
10.2.6 Video formats and codecs
Advanced Streaming Format (ASF)
Audio Video Interleave (AVI)
Advanced Video Coding/H.264 (BSF)
AviSynth (AVS)
Backup File of the IFO (BUP)
Digital Video (DV)
DVD Movie Info (IFO)
Flash Video (FLV)
Hard Disc Camera Movie (MOD)
Micro MV (MMV)
Microsoft Digital Video Recording (DVR-MS)
Digital Video Express (DIVX)
- Moving Picture Experts Group-2 (MPG, MPEG, M2T, M2P, M1V, M2V, DAT, TRP, TOD)
- Moving Picture Experts Group-4 (MP4)
Nero Digital (MP4)
OGG Vorbis (OGG, OGM)
QuickTime Movie (MOV)
3rd Generation Partnership Project (3GP)
Video Object (VOB)
Packet Video Audio (PVA)
Television Input/Video Output (TIVO)
10.2.7 Formats for Playlists
- Moving Picture Experts Group Audio Layer 3 Uniform Resource Locator/MP3 URL (M3U)
- Playlists File Format (PLS)
10.3 Nero ShowTime versions
Nero ShowTime is available in various different versions:
Nero ShowTime full version
Nero ShowTime Essentials
Nero ShowTime Essentials SE
The Essentials versions differ from the full version as indicated below:
Not all formats are supported
No album art and no identification of individual audio files with Gracenote MusicID.
11 Index
A
Adaptive deinterlacing 44
Administrator Create 40
Audio Playing from hard drive. 14
Audio cast 17
Audio CD Play. 12
Audio file Identify 27
B
Bass boost 46
Bobbing 44
Bookmark 39
Brightness 45
C
Capture 10
Copy 35
Chapter Repeat. 10 Select. 10
Configuring the navigation bar 37
Context menu 29
Contrast. 45
Conventions, manual 6
Cover Audio 46
Audio output .46
Display. 46
D
Deinterlacing 43
Deinterlacing methods Adaptive deinterlacing 44 Bob 44 Weave 43
Disc playback 38
DRC 46
Dynamic Range Control 46
E
External Subtitles Control 30 Customize 30 Synchronize 30
F
Film effects 45
Chroma 45
Luma. 45
Frame rate. 31
G
Gamma 45
Gracenote 10, 14, 21, 27, 47
H
Hardware acceleration 42
Hue. 45
K
Key Combinations 48
M
Manual, conventions 6
Mouse Configuring the mouse wheel 35
N
Nero Digital settings 45
Nero Digital subtitle settings 45
Newsfeed 23 Download 24
0
on-screen display 34
P
Parental control
Create administrator 40
Create Users 41
Playback
Controlling with the context menu. 29
Exit .8
Jog shuttle.. 8
Select. 8
Playing media files 12
Playing Streamed Media 16
Playlist
Create 25
Edit 26
Load 26
Play 26
Save 25
Sort 26
Program
Launching the Program 7
Startup 7
Program Interface 8
Extended area 10
Navigation Bar 29
Program Interface 29
Q
Quiet DiscPlayback 47
S
Saturation 45
Screen control 42
Screenshot 10
Settings
General 33
General settings 33
Keyboard 35
Keyboard and mouse 35
Mouse 35
OSD. 34
OSD setting 34
Sharpness 45
Shortcuts 48
Snapshot 10
Startup
Program 7
Stepless navigation 8
Streamed media
Nero MediaHome 16
Play. 16
Streaming 16
TV Channels. 16
Watch TV. 16
Subtitle settings. 45
Subtitles
Activate 35
Changing the speed 31
External. 35
Subtitles control. 31
System requirements 50
Other 50
U
UPnP 23
User
Create 41
V
Version
Variety. 52
Video 42
Playing from hard drive. 14
Video cast 17
Video mode 42, 43
Video optimization
Brightness 45
Contrast 45
Enhancedevo 45
Gamma 45
Hue 45
Saturation. 45
Sharpness 45
Video quality. 44
W
Weave 43
Web media
Play 17
Web Media 23
Web radio 17
Web TV 17
Window
Subtitles control 31
12 Contact
Nero ShowTime is a Nero AG product.
Nero AG
Glendale, CA 91203-2335
USA
Internet: www.nero.com
Help: http://support.nero.com
Fax: (818) 956 7094
E-mail: US-CustomerSupport@nero.com
Nero KK
Rover Center-kita 8F-B, 1-2-2
Nakagawa-chuou Tsuzuki-ku
Yokohama, Kanagawa
Japan 224-0003
Internet: www.nero.com
Help: http://support.nero.com
Copyright © 2008 Nero AG and its licensors. All rights reserved.