
LINUX EXPRESS 4 - Software NERO - Free user manual and instructions
Find the device manual for free LINUX EXPRESS 4 NERO in PDF.
User questions about LINUX EXPRESS 4 NERO
0 question about this device. Answer the ones you know or ask your own.
Ask a new question about this device
Download the instructions for your Software in PDF format for free! Find your manual LINUX EXPRESS 4 - NERO and take your electronic device back in hand. On this page are published all the documents necessary for the use of your device. LINUX EXPRESS 4 by NERO.
USER MANUAL LINUX EXPRESS 4 NERO
Copyright and Trademark Information
This document, like the software described therein, is provided as a license and may only be used or reproduced in accordance with the licensing agreement. The contents of this document, as well as the associated software, is subject to change without prior notice. Nero AG rejects any responsibility for the correctness of the contents of this document and rejects any claims that transcend the clauses of the guarantee agreement.
This document and all of its contents are protected by copyright and are the property of Nero AG. All rights reserved. In addition, this document contains material that is protected by internationally valid copyright. This document may not be reproduced, transmitted, or transcribed in whole or in part without the express written permission of Nero AG.
Please keep in mind that existing graphics, pictures, videos, music titles or other materials that you may wish to insert or transcribe into projects may be protected by copyright. The unauthorized use of this type of material in your projects may violate the rights of the owner of the copyright. Make sure that you obtain all necessary authorizations from the owner of the copyright.
Unless you own the copyright, have permission from the copyright owner or your actions fall under the "fair use" provisions of copyright law, you may be violating national or international copyright laws. The transcribing, duplication, modification or publication of copyright-protected material may lead to claims for damages and the enforcement of other legal measures against you. If you are unsure of your rights, you should contact your legal advisor.
Nero Linux Express requires technologies developed by third party manufacturers, some of which are contained in Nero Linux Express as demo versions. These applications can be activated online free of charge or by sending an activation fax to have unlimited use of the version. Nero will only transmit the data necessary for activation of the technology licensed from third parties. For unlimited use of Nero Linux Express, it is therefore necessary to have an Internet connection or a fax machine.
Copyright © 2006 - 2009 Nero AG and its licensors. All rights reserved.
Nero, Nero Digital, Nero BacklitUp, Nero Essentials, Nero Express, Nero ImageDrive, Nero LiquidTV, Nero MediaHome, Nero Recode, Nero RescueAgent, Nero ShowTime, Nero Simply Enjoy, Nero StartSmart, Nero Vision, InCD, Move it, PhotoSnap, the SecurDisc logo, Burn-At-Once, DNC Dynamic Noise Control, LayerMagic, Nero DMA Manager, SmartDetect, SmoothPlay, Superresolution, Nero Surround, Nero LiquidMedia, Nero MediaStreaming and UltraBuffer are trademarks or registered trademarks of Nero AG.
Adobe, Acrobat, Acrobat Reader and Premiere are trademarks or registered trademarks of Adobe Systems, Incorporated. AMD Athlon, AMD Opteron, AMD Sempron, AMD Turion, ATI Catalyst and ATI Radeon are trademarks or registered trademarks of Advanced Micro Devices, Inc. ATSC is a trademark of the Advanced Television Committee. ICQ is a registered trademark of AOL, LLC. Apple, iPhoto, iPod, iTunes, iPhone, FireWire, and Mac are trademarks or registered trademarks of Apple, Inc. ARM is a registered trademark of ARM, Ltd. AudibleReady is a registered trademark of Audible, Inc. BenQ is a trademark of the BenQ Corporation. Blu-ray Disc is a trademark of Blu-ray Disc Association. CyberLink is a registered trademark of CyberLink Corp. DLNA is a registered trademark of Digital Living Network Alliance. DivX and DivX Certified are registered trademarks of DivX, Inc. Dolby, Pro Logic and the double-D symbol are trademarks or registered trademarks of Dolby Laboratories, Inc. DTS and DTS Digital Surround are registered trademarks of DTS, Inc. DVB is a registered trademark of the DVB Project. Freescale is a trademark of Freescale Semiconductor, Inc. Google and YouTube are trademarks of Google, Inc. WinTV is a registered trademark of Hauppauge Computer Works, Inc. Intel, Intel XScale, Pentium and Core are trademarks or registered trademarks of Intel Corporation. Linux is a registered trademark of Linus Torvalds. Memorex is a registered trademark of Memorex Products, Inc. ActiveX, ActiveSync, DirectX, DirectXShow, Internet Explorer, Microsoft, HDI, MSN, Outlook, Windows, Windows Mobile, Windows NT, Windows Server, Windows Vista, Windows Media, Xbox, Xbox 360, the Windows Vista start button and the Windows logo are trademarks or registered trademarks of Microsoft Corporation. My Space is a trademark of MySpace, Inc. NVIDIA, GeForce and ForceWare are trademarks or registered trademarks of NVIDIA Corporation. Nokia is a registered trademark of Nokia Corporation. CompactFlash is a registered trademark of SanDisk Corporation. Sony, Memory Stick, PlayStation, PLAYSTATION and PSP are trademarks or registered trademarks of Sony Corporation. HDV is a trademark of Sony Corporation and Victor Company of Japan, Limited (JVC). UPnP is a registered trademark of the UPnP Implementers Corporation. Labelflash is a registered trademark of Yamaha Corporation.
The trademarks mentioned here are named for information purposes only. All trade names and trademarks are the property of their respective owners.
Nero AG, Im Stoeckmaedle 13-15, D-76307 Karlsbad, Germany
Table of Contents
1 Start Successfully 5
1.1 About Nero Linux Express 5
1.2 Enter Serial Number 5
1.3 About the Manual 5
1.4 Versions of Nero Linux Express 6
1.5 Working With the Application 6
2 Start Screen 8
2.1 Extended Area (Start Screen) 8
3 Compiling Data Disc 10
4 Music 11
4.1 Compiling Audio CDs 11
4.2 Copy Audio CDs to Hard Drive 12
4.3 Encoding Options 14
5 Compiling DVD-Videoes 16
6 Loading a Disc Image or Saved Project 18
7 Burn Compilation 19
7.1 Choice of Burner 19
7.2 Starting the Burn Process 19
7.3 Final Burn Settings Screen 20
7.3.1 Extended Area (Burn Settings) 21
7.4 Creating an Image File 22
8 Copying a Disc 24
8.1 Methods of Copying 24
8.1.1 On-the-fly Copying 24
8.1.2 Copy Over Image 24
8.2 Copying a Disc 25
8.3 Copy Settings 27
9 Erase Rewritable Disc Window 29
10 Final Screen 31
11 Configuration Options 32
11.1 Expert Features 33
12 Technical Information 34
12.1 System Requirements 34
12.2 Formats Supported 34
12.2.1 Disc Formats 34
12.2.2 Disc Types 34
12.2.3 Audio Formats and CODECs 34
Table of Contents
13 Glossary 35
14 Index 37
15 Contact 38
1 Start Successfully
1.1 About Nero Linux Express
Nero Linux Express provides all the performance and efficiency of Nero Linux with a simplified user interface. Whether you are a beginner or an expert, Nero Linux Express guides you quickly and easily through your desired burning tasks. The default settings are selected to automatically produce the best possible results. Using the program is remarkably easy: simply select the project to be burned, add the files, and start burning.
Nero Linux Express is therefore the burning solution for the Linux community.

Installation
Nero Linux Express is installed together with Nero Linux. For more information on how to install Nero Linux please refer to the documentation of Nero Linux which can be downloaded free of charge from www.nero.com.
1.2 Enter Serial Number
By opening Nero Linux or Nero Linux Express for the first time, you have to enter your name and serial number in order to activate the program. The activation will be valid for both applications.
However, you always have the option of entering a new serial number in the program afterwards.
1.3 About the Manual
This manual is intended for all users who want to learn how to use Nero Linux Express. It is process-based and explains how to achieve a specific objective on a step-by-step basis.
To make best use of this documentation, please note the following conventions:
| ○ | Indicates warnings, preconditions or instructions that have to be precisely followed. |
| ○ | Indicates additional information or advice. |
| 1. Start ... | The number at the beginning of a line indicates a prompt for action. Carry out these actions in the order specified. |
| → | Indicates an intermediate result. |
| → | Indicates a result. |
| OK | Indicates text passages or buttons that appear in the program interface. They are shown in boldface. |
| (see...) | Indicates references to other chapters. They are executed as links and are shown in red and underlined. |
| [...] | Indicates keyboard shortcuts for entering commands. |
1.4 Versions of Nero Linux Express
Nero Linux Express is available in versions with different features. In addition to the full Nero Linux Express version, there are other versions with restricted features.
Nero Linux Express Essentials does not offer the following features:
- Blu-ray (not included in standard functionality)
Support of freedb (not included in standard functionality)
Encoding files (not included in standard functionality)
Ripping Audio CD (not included in standard functionality) - Playlist support (not included in standard functionality)
- Burning an Audio CD (not included in standard functionality)
- Burning a DVD-Video (not included in standard functionality)
Advanced options
Command line support
Creating a disc image (Nero Image Recorder)
Full ISO and UDF support
In addition, the encoding and decoding formats in Nero Linux Express Essentials are restricted.
1.5 Working With the Application
Basically, the user interface of Nero Linux Express consists of the selection of a compilation method in the start screen. You then complete the task by navigating through the different steps where a separate window is displayed for each individual step. This generally requires four steps:
Choose compilation type
Select what you would like to do by moving the cursor over the menu item and clicking one of the tasks displayed. This manual contains a chapter for each task that describes all of the steps required for its completion.
Completing a task
Depending on the task you will have to go through various steps until you reach the end. Each individual step consists of a new screen.
Burning a compilation
Burning marks the end of the procedure. To burn, set the burn parameters and click the Burn button. Depending on the type of the task you are working on and the recorder connected to the system, a number of different entries are available for selection.
Options after burning
After burning is complete, you can decide what to do next: select the option to continue working with Nero Linux Express or exit the program.
2 Start Screen
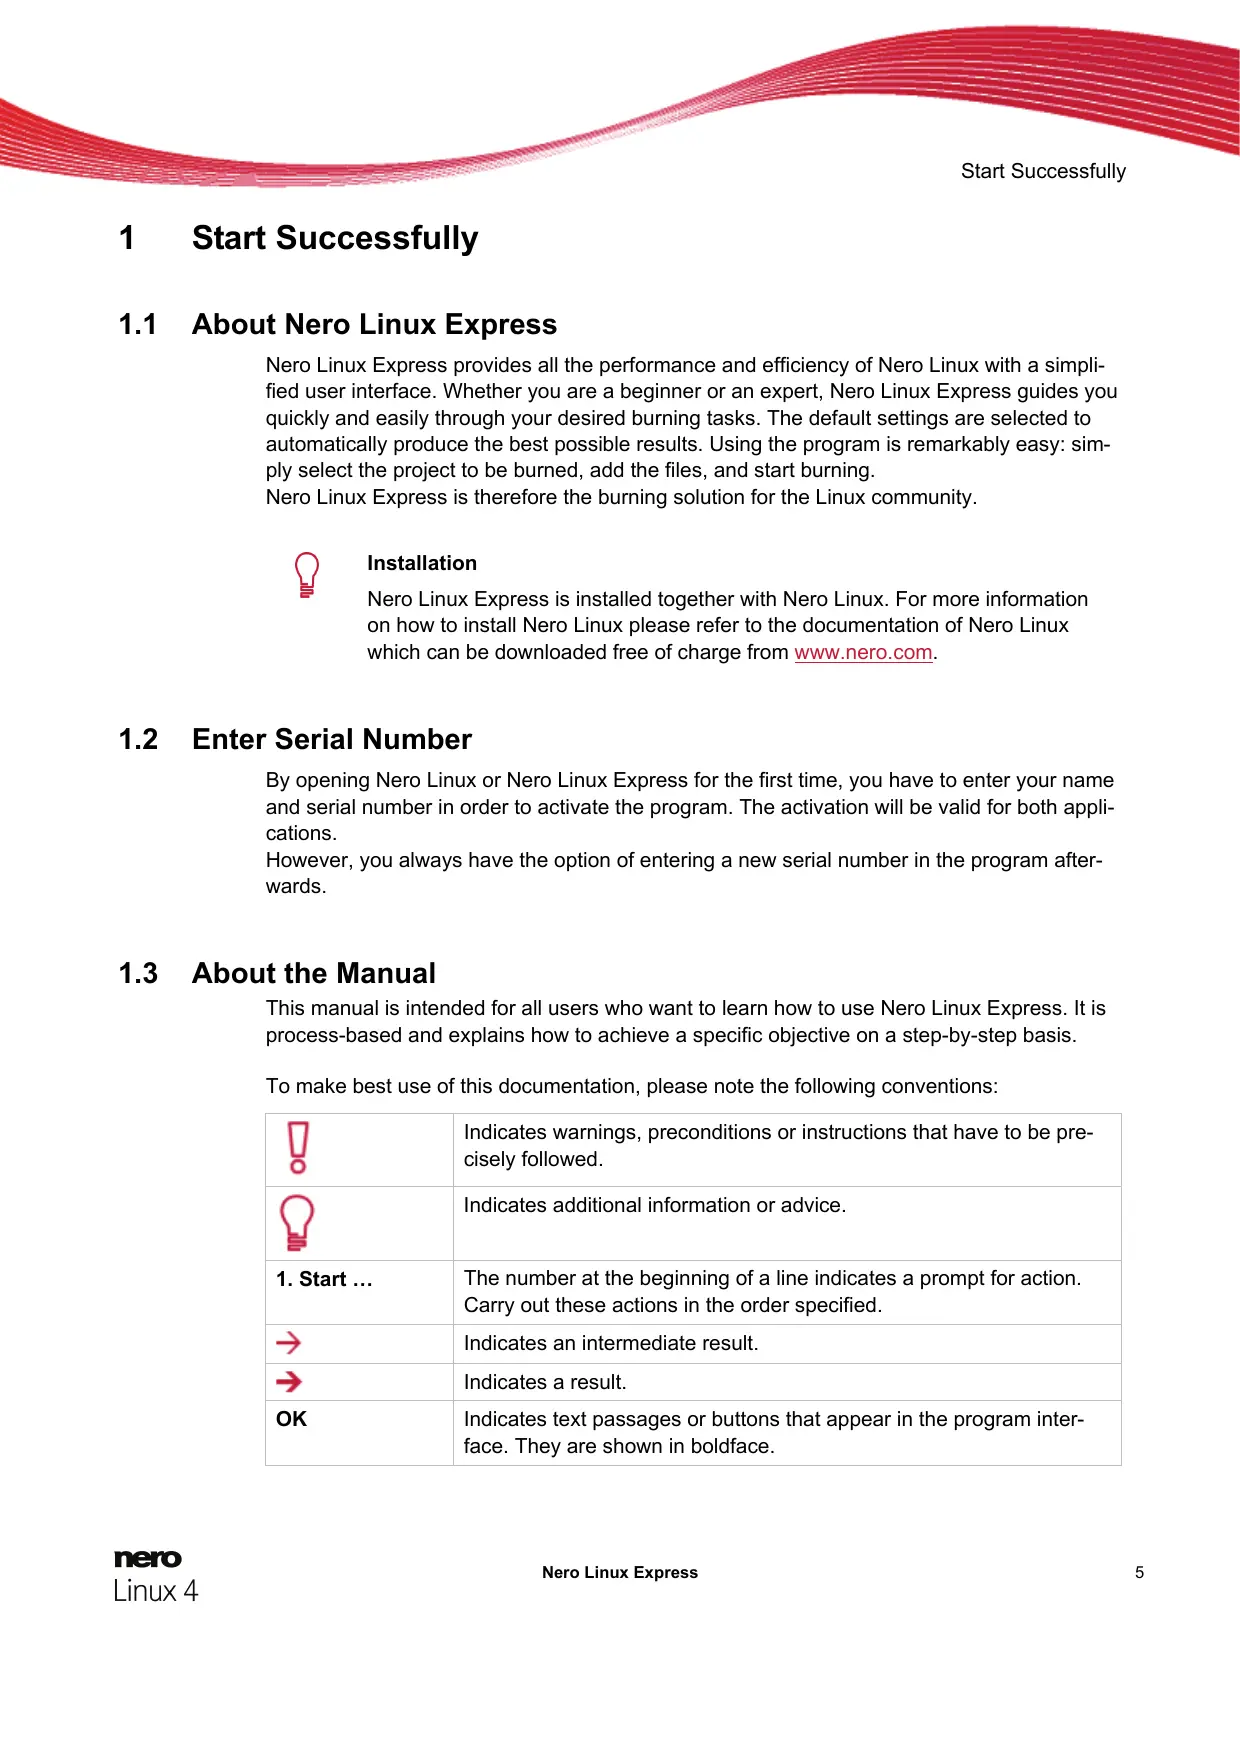
The main screen in Nero Linux Express is the starting point for all actions. Click here on the relevant menu icons to go to the desired screen where you can compile and work on your project.
Click the button in the left margin of the window to display an extended area with additional options and features.
The following compilation methods are available:
| Data | Allows you to compile and burn all types of files and folders. |
| Music | Creates a standard Audio CD that will play on all CD players. |
| Video/Pictures | Creates a Video-DVD from video files. |
| Image, Project, Copy | Allows you to copy a source disc and to load an image file or a saved project. |

The actual entries that are available and the actual disc types (e.g. DVD) to which can be written depend on the used recorder.
2.1 Extended Area (Start Screen)
You can access the additional options and features in the extended area of the start screen by clicking the button in the left margin of the window. The extended area is available in all Nero Linux Express screens.
The following menu icons are available:
| Options | Opens the Options window in which you can customize Nero Linux Express to suit your requirements. |
| Copy Audio CD Tracks | Opens the Save Track window in which you can copy audio files from Audio CD to the hard drive. |
| Erase Disc | Opens the Erase Rewritable Disc window in which you can erase data from a rewritable CD/DVD. |
| Disc Info | Opens the Disc Info window in which you can display information about the inserted CD/DVD. The total capacity and available capacity are displayed, in addition to the tracks and sessions. |
| Recorder | Defines the recorder that you want to use for burning and/or the Nero Image Recorder. |

Some of the functions mentioned here are only available in the full version. You can always upgrade your Essentials version at www.nero.com to get the full version with all the functions.
3 Compiling Data Disc
With Nero Linux Express you can compile and burn all types of files and folders. If a DVD recorder is installed on your computer, you can burn both data CDs and data DVDs. If you have a CD recorder, you can only burn data CDs and the option for burning a DVD is already grayed out in the start screen.

Creating and burning a Blu-ray Disc is only available in the full version. You can always upgrade your Essentials version at www.nero.com to get the full version with all the functions.
To create a data disc, proceed as follows:
- Click the Data menu icon in the Nero Linux Express start screen.
The data disc options are displayed.
- Click the option you require: Data CD, Data DVD, or Data Blu-ray Disc.
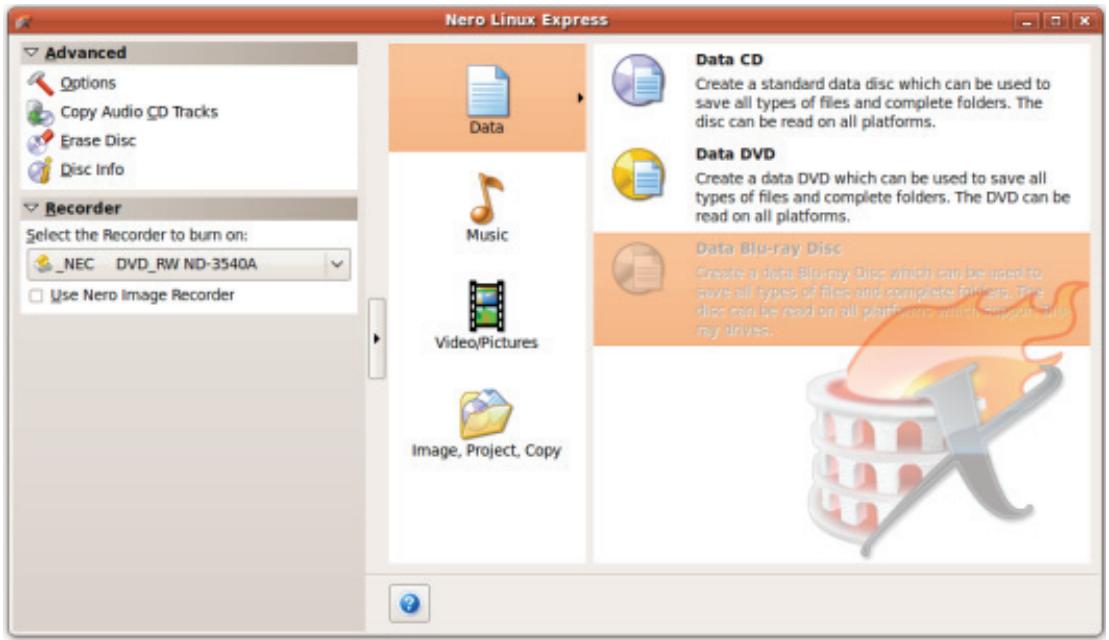
The Disc Content compilation screen for data discs is displayed.
- Click the Add button.
The Add files and folders window is opened.
-
Select the files that you want to add to the compilation and click the Add button.
-
Repeat the previous step for all files that you want to add.
-
Click the Close button.
The files are added to the compilation and displayed in the compilation screen.
- Click the Next button.
You have successfully compiled a data disc and can now burn this compilation.
4 Music
4.1 Compiling Audio CDs
| ○ Some of the functions mentioned here are restricted or not available in the Essentials version. You can always upgrade your Essentials version at www.nero.com to get the full version with all the functions. | |
| With Nero Linux Express you can create an Audio CD that contains music files. It can be played using all standard CD players. To compile an Audio CD, source files with different audio formats are automatically converted into Audio CD format before being burned. | |
| ○ Some CD players cannot play CD-RWs. Use CD-R discs to burn Audio CDs. | |
| ○ The encoding and decoding formats in the Essentials version are limited. You can always upgrade your Essentials version at www.nero.com to get the full version with all the functions. |
To create an Audio CD, proceed as follows:
- Click the Music menu icon in the Nero Express start screen.
The compilation methods for music are displayed. - Click the Audio CD button.
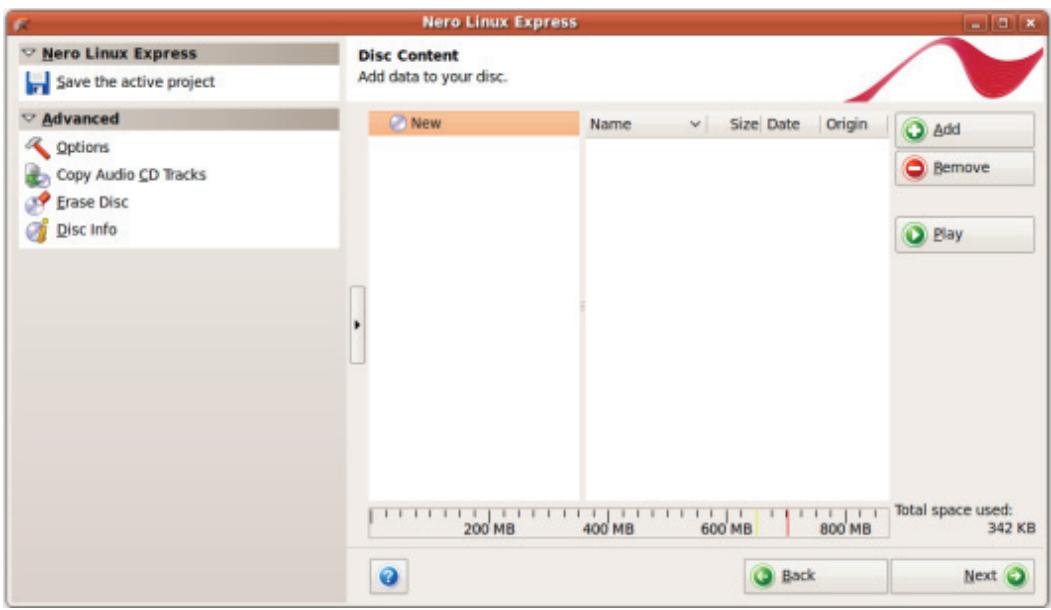
The My Audio CD compilation screen for Audio CDs is displayed.
My Audio CD compilation screen
- Click the Add button.
The Add files and folders window is opened.
- Select the audio files that you want to add to the compilation and click the Add button.
- Repeat the previous step for all audio files that you want to add.
- Click the Close button.
The audio files are added to the compilation and displayed in the compilation screen.
-
Customize the properties of the audio files to suit your requirements.
-
Click the Next button.
You have successfully compiled an Audio CD and can now burn this compilation.
4.2 Copy Audio CDs to Hard Drive

Some of the functions mentioned here are restricted or not available in the Essentials version. You can always upgrade your Essentials version at www.nero.com to get the full version with all the functions.
With Nero Linux you can save audio files from an Audio CD on the hard drive. In the process, the files are encoded, i.e. converted into a format that the computer can read. The audio file is usually compressed.
The Audio CD can be automatically identified with freedb. That way you have audio files that are accurately and fully named after the encoding process.

Internet Database freedb.org
Nero AG is not responsible for the www.freedb.org website, but just provides an interface to it.

Audio files from copy-protected Audio CDs cannot be saved.

The encoding and decoding formats in the Essentials version are limited. You can always upgrade your Essentials version at www.nero.com to get the full version with all the functions.
To save audio files, proceed as follows:
- Click the Save Tracks button in the extended area of the screen.
The Save Tracks window is opened. The Audio CD content is displayed.
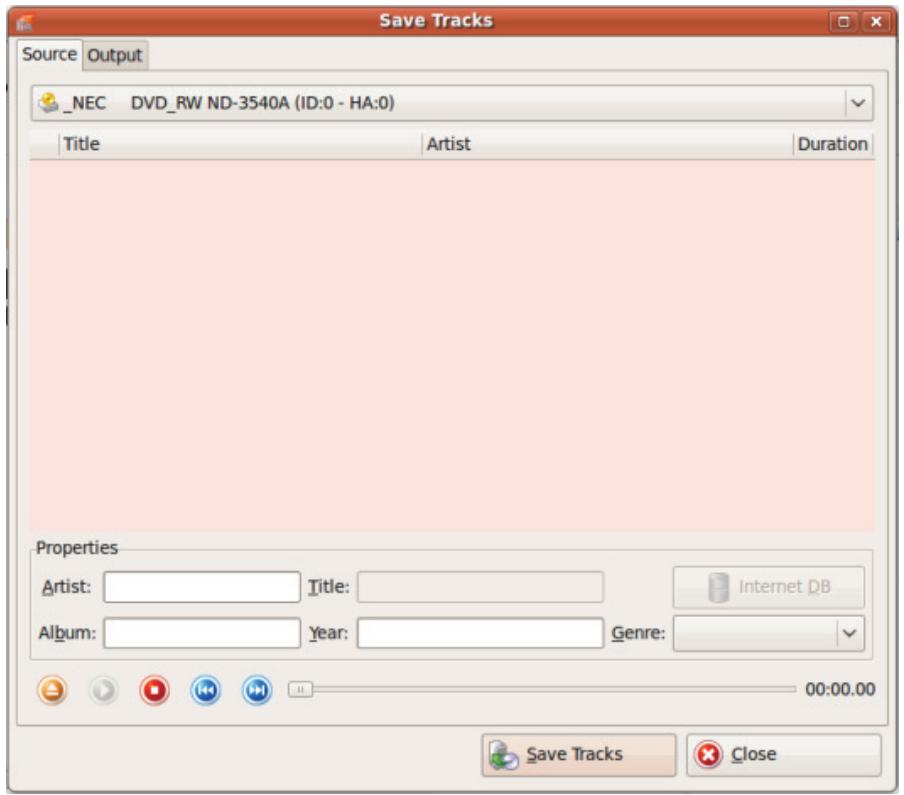
Save tracks
- If you want the metadata to be filled out automatically, click the Internet DB button.
The disc is analyzed and the required information is sent to freedb. If a matching entry is found then that metadata will be used and displayed. - If necessary, edit the metadata (title, artist, album title, year, genre).
- Click the Output tab.
The Output tab is opened.
- Select the target file's audio format in the File Format drop-down menu
- Select a method for creating the file name in the File name creation mode drop-down menu.
- Define other settings according to your preferences.
- Click the Save Tracks button.
Conversion starts. A folder with the name of the album is created inside the desired folder. The audio files are saved in this folder and named according to the method you chose.
If you had chosen the file name creation mode Manuel, a window is opened for every track in which you can enter the individual name.
The Progress window indicates the saving progress. When the save process is complete, this window closes automatically.
- Click the Close button.
The Save Tracks window is closed. You have saved your audio files.
4.3 Encoding Options
Nero Linux Express can encode audio files in different formats.

This function is only available in the full version. You can always upgrade your Essentials version at www.nero.com to get the full version with all the functions.
Set options in the respective window that you can open via the Settings button. Settings are available for the MP3, Nero Digital Audio, OGG Vorbis, and WAV output file format.
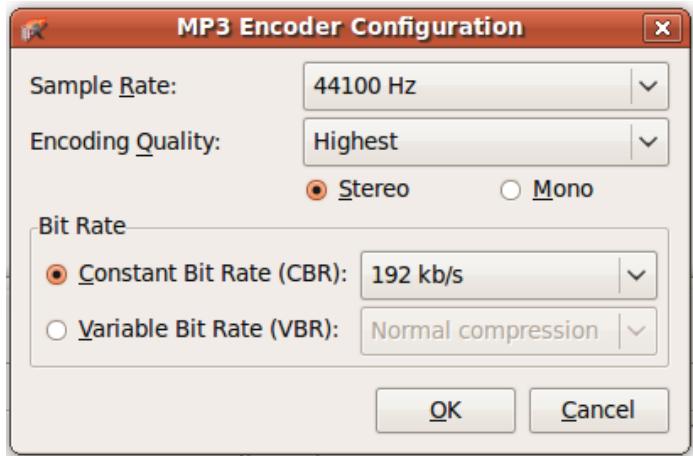
MP3 Configuration options
The following setting options are available:
| Drop-down menu Sample Rate | Specifies the scan rate per second and thus determines the frequency of scanning. The higher the frequency, the more frequently scanned. |
| Drop-down menu Encoder quality | Specifies the encoder quality. Fast and Highest are available. These settings specify whether you place more value on fast encoding (Fast) or more value on a superior psychoacoustic encoder model for the very best results (Highest). Only available for MP3. |
| Drop-down menu Constant Bit Rate | Selects a constant bit rate, i.e. the data flow per unit of time and the quality of the saved data are the same over the entire audio file. If the bit rate is small, less data is transferred. The file is then small, but quality is lower. If the bit rate is high, more data is transferred. The file size is then large, but the quality is high. Not available for WAV Encoder. |
Music
| Drop-down menu Variable Bit Rate | Selects variable bit rate, i.e. the data flow per unit of time - and thus the quantity of the saved data - adapts to the dynamics of the audio file. The bit rate, for example, can be lowered at quieter points in the track. Select your desired quality level in the drop-down menu. Not available for WAV Encoder. |
| Drop-down menu Bits | Specifies the scan accuracy and thus determines the quality of the individual scanner. The higher the bit sign, the more accurate. Only available for WAV Encoder. |
| Option buttons Stereo / Mono | Specifies which channels are recorded. |
5 Compiling DVD-Videos

This function is only available in the full version. You can always upgrade your Essentials version at www.nero.com to get the full version with all the functions.
With Nero Linux Express you can burn DVDs made up of DVD-Video files from your hard drive. You can show your burned DVDs on almost all DVD players. You can use Nero Linux Express to burn a DVD if the DVD video title, i.e. a complete DVD folder structure, is already available.
To compile a DVD-Video, proceed as follows:
- Click the Videos/Pictures menu icon in the Nero Linux Express start screen.
The video options are displayed.

You can also create a miniDVD. The miniDVD is burned to CD. It uses the specification of a DVD and therefore has the same technical options and qualities as a DVD. However, playback is not guaranteed on all standalone DVD players.
- Click the DVD-Video Files option.
The DVD-Video files compilation screen is displayed.
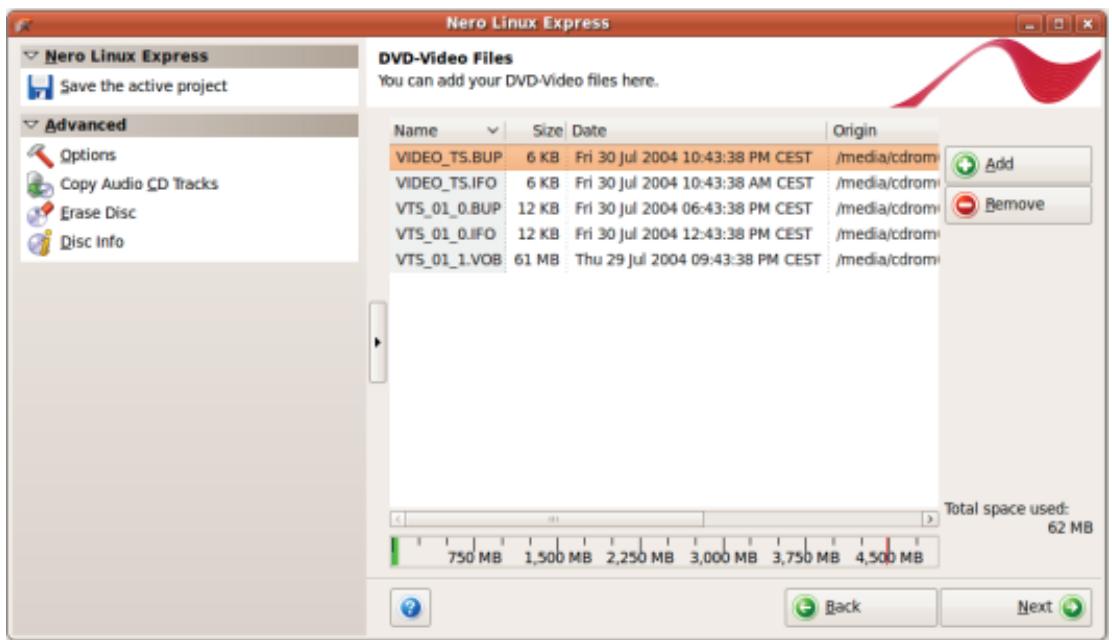
DVD-Video files compilation screen
- Click the Add button.
The Add files and folders window is opened.
-
Select the DVD-Video files that you would like to add to the compilation and click the Add button.
-
Repeat the two previous steps for all DVD-Video files that you want to add to the compilation.
- Click the Close button.
The DVD-Video files are added to the compilation and are displayed in the compilation screen.

If the DVD-Video files selected are larger than 4483 MB and if a DVD recorder which can burn DVDs with 2 layers (DVD DL) is installed, you can select the DVD9 (8152MB) option in the drop-down menu.
- Click the Next button.
You have successfully compiled a DVD-Video and can now burn this compilation.
6 Loading a Disc Image or Saved Project
With Nero Linux Express you can burn a disc from a disc image or compilation that you have previously saved on the hard drive.
To load an image file or a saved compilation for the burn process, proceed as follows:
- Click the Image, Project, Copy menu icon in the Nero Linux Express start screen.
The copy and disc image options are displayed.
- Click the Disc Image or Saved Project option.
The Open dialog window is opened.
- Select the image file (.nrg, e.g.) or saved compilation you want and click the Open button.
The selected file loads and the Final Burn Settings screen is displayed.
You have successfully loaded the image file or compilation and can now burn it.
7 Burn Compilation
7.1 Choice of Burner
If multiple recorders are installed, you can select the recorder that you want to use for burning from the Recorder drop-down menu. Immediately before burning a project, you can change the recorder you selected again in the Final Burn Settings window.
| o | Creating and burning a Blu-ray Disc is only available in the full version. You can always upgrade your Essentials version at www.nero.com to get the full version with all the functions. |
In addition to the installed recorders, Nero Image Recorder is also available in Nero Linux Express. Nero Image Recorder can be used to create and save an image file to burn later. In order to use Nero Image Recorder, you can select the Use Nero Image Recorder check box in the extended area of the start screen.
| The Image Recorder is only available in the full version. You can always up-grade your Essentials version at www.nero.com to get the full version with all the functions. |
| ○ | Please note that Nero Image Recorder can only be activated in the extended area of the start screen. |
| The Image Recorder is also suitable for creating an image of a disc type not supported by the connected recorder. For example, you can therefore create a DVD image without having installed a DVD recorder. You can then write the image to a disc at any time. |
7.2 Starting the Burn Process
To select one of the available recorders, to define the burn settings for your project according to your requirements, and to start the burn process, proceed as follows:
- Compile a project of your choice.
The Final Burn Settings screen is displayed. - Insert a suitable blank disc in the selected drive.
- Select the recorder you want from the Recorder drop-down menu.
- Add to the desired values in the input fields as necessary and select the required check boxes.
-
Add to the desired settings in the extended area.
-
Click the Burn button.
The Burn Process screen is displayed and the burn process starts. You can follow the process status in the status bar. As soon as the burn process has finished, a window is opened and displays a message about the result of the burn process.
7. Click the OK button.
8. If you would like to save a log of the burn process, click the Save button.
9. Click the Next button.
You have successfully burned a project and can now continue by selecting another option from the final screen or by exiting Nero Linux Express.
7.3 Final Burn Settings Screen
In the Final Burn Settings screen you can define the burn settings to suit your requirements, use Nero Image Recorder to save a project to the hard drive as an image file, or start the burn process.
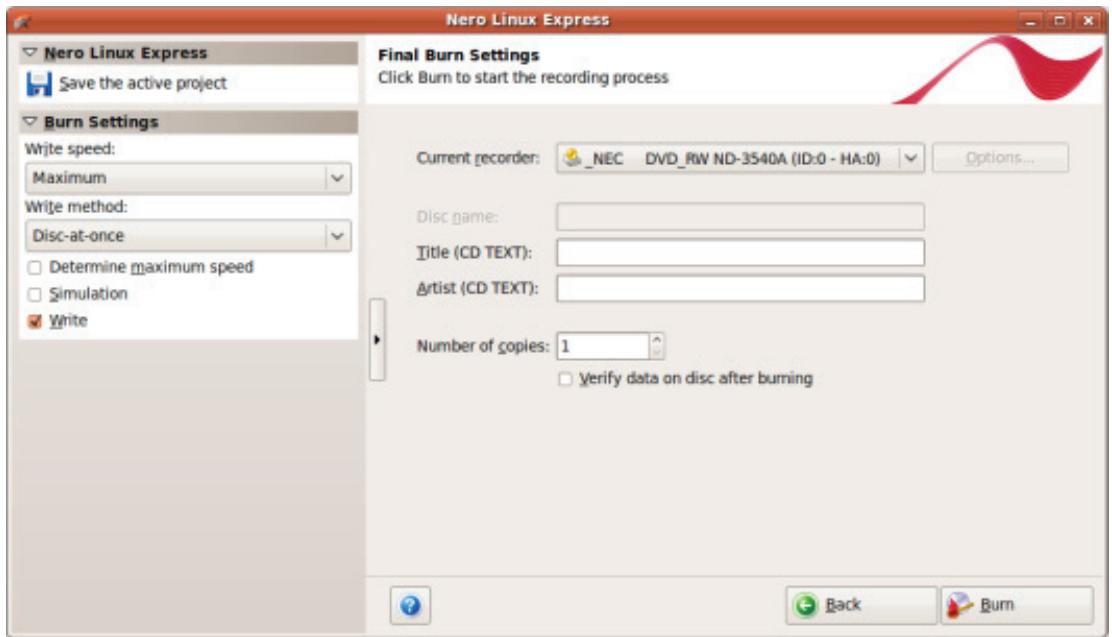
Final Burn Settings screen
The following configuration options are available in the Final Burn Settings screen:
| Button Options | Opens the Recorder Information window. You will find additional information here on the selected recorder and the media types that can be burned with it. Additional options can be enabled/disabled. In some recorders you can change the Book Type settings. Not available when saving with Nero Image Recorder. |
| Input field Disc name | Defines the name of the disc. |
| Input field Title (CD TEXT) | Defines the title of the Audio CD if CD Text is supported. |
| Input field Artist (CD TEXT) | Defines the artist on the Audio CD. |
| Input field Number of copies | Defines the number of copies you require. Not available when saving with Nero Image Recorder. |
| Check box Verify data on disc after burning | Compares the burned data to the original data. With compilations of multisession discs, only the data that was added during the last burn process is compared. Not available when saving with Nero Image Recorder. |
| Check box Allow files to be added later (multisession disc) | Enables the option to write additional files to the disc. The disc is not finalized. Multisession discs do not have to be written in a single burn process. You can burn projects repeatedly to a disc until it is completely burned. Only available for data discs. |
7.3.1 Extended Area (Burn Settings)
You can access additional burn settings in the extended area of the Final Burn Settings screen by clicking the button in the left margin of the window.

An extended area with additional options and features is available in all Nero Linux Express screens.
The following setting options are available:
| Button Saves the active project | Opens the Save As dialog box. You can save your compilation here. |
| Selection list Writing speed | Defines the speed at which the disc is burned. Only the burn speeds that are supported by the selected recorder are displayed. Not available when saving with Nero Image Recorder. |
| Selection list Write method | Defines the Disc-at-once or Track-at-once write method. Using the disc-at-once method the entire disc can be burned without the write laser having to stop. With the track-at-once method the laser turns off after each track. Available for CD compilations only. By default DVDs are burned using the disc-at-once method. |
| Check box Determine maximum speed | Checks how fast the compiled data can be accessed and reduces the selected writing speed if necessary. This prevents a buffer overrun. Recorders with a feature to prevent buffer underruns do not require a speed test. Not available when saving with Nero Image Recorder. |
| Check box Simulation | Performs all steps in the burn process without using the laser beam. We recommend running a simulation if you are de-compressing data before burning, e.g. when burning an Audio CD from MP3 files. You can assume that if simulation is successful, the burn process will also be successful. Not available when saving with Nero Image Recorder. |
| Check box Write | Starts the actual physical burn process (e.g. after a simula-tion). This box is checked by default. |
7.4 Creating an Image File

This function is only available in the full version. You can always upgrade your Essentials version at www.nero.com to get the full version with all the functions.

Nero Image Recorder must be activated before it appears in the drop-down menu.
To set the burn settings according to your requirements and to save your project as an image file to the hard drive using the Image Recorder, proceed as follows:
- Compile a project of your choice.
The Final Burn Settings screen is opened.
- Select the Image Recorder option from the Current Recorder drop-down menu.
- Add to the required values in the input fields.
- Add to the required settings in the extended area as necessary.
- Click the Burn button.
The Burning Process screen is displayed and the Save Image File dialog box is opened.
-
Enter a name for your image file in the File Name input field.
-
Select the desired storage location in the navigation tree and click the Save button.
The burn or save process starts. You can follow the process status in the status bar. As soon as the burn or save process is finished, a window is opened and displays a message about the result of the burn process.
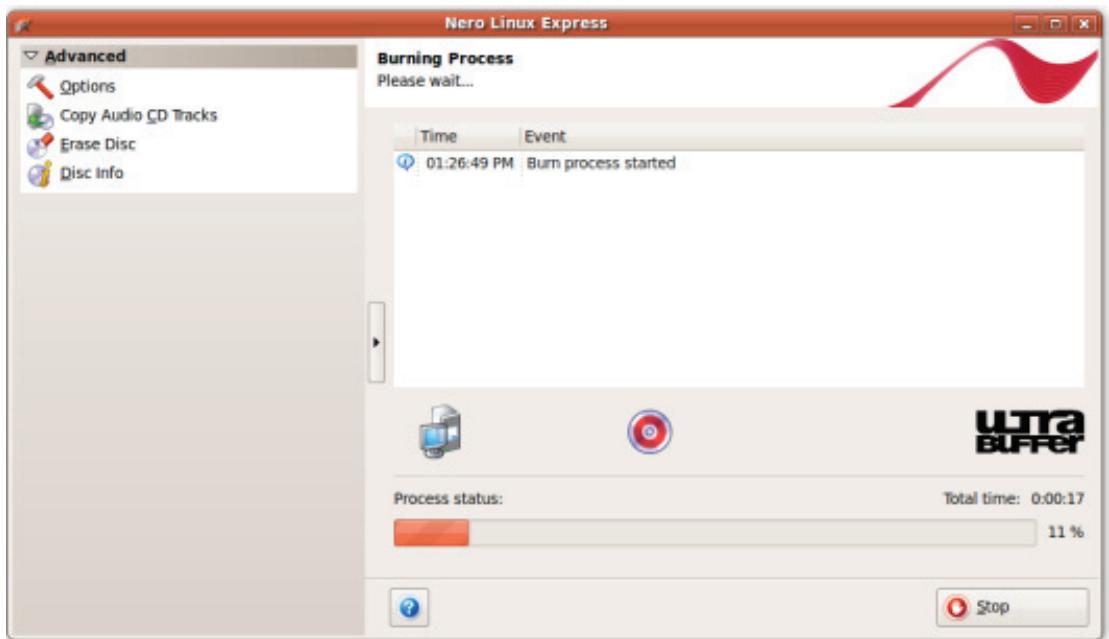
Burn progress window
- Click the OK button.
-
If you would like to save a log of the burn process, click the Save button.
-
Click the Next button.
You have successfully saved a project with Nero Image Recorder and can now continue by selecting another option from the final screen or by exiting Nero Linux Express.
8 Copying a Disc
8.1 Methods of Copying
Nero Linux Express can be used for copying discs. There are two methods for this:
On-the-fly
Copy Over Image
Each method has advantages and disadvantages which will depend on your requirements.
8.1.1 On-the-fly Copying
When using the on-the-fly method, insert the original disc into a drive and a recordable disc into the drive. The original disc in the drive is copied immediately without any time delay to the blank disc in the recorder. The on-the-fly method allows you to copy discs very quickly, and does not require any additional space on the disc.
In order to be able to use the on-the-fly method, you will need at least two drives: one for reading the disc and a disc burner for writing. The following requirements apply to the read drive and disc burner:
- The disc burner must feature buffer overrun protection, or the drive must be capable of delivering the data sufficiently quickly. The read speed should be at least twice as fast as the write speed.
The read drive must be capable of delivering information on the number and type of sessions, otherwise Nero Linux Express may not be able to produce an exact copy.
If you want to copy Audio CDs, we recommend the copy image method because the quality of the read audio files can suffer depending on the drive.
8.1.2 Copy Over Image
With the copy over image method, an image of the original disc is saved to a file first. The image file is then burned to a blank disc. Copying using copy over image takes longer, but it often produces better results.
You must have sufficient storage space to use the copy over image method.
The copy over image method is particularly suitable in the following situations:
Only one drive is available.
You would like to make several copies of the same disc.
- You think it likely that read errors may have occurred on the source CD (for example because it is scratched).
- You attach importance to the best possible reproduction (particularly in relation to index positions and the quality of Audio CDs).
8.2 Copying a Disc
| The Image Recorder is only available in the full version. You can always upgrade your Essentials version at www.nero.com to get the full version with all the functions. | |
| Creating and burning a Blu-ray Disc is only available in the full version. You can always upgrade your Essentials version at www.nero.com to get the full version with all the functions. | |
| If you are not in possession of the copyright for the relevant CD/DVD and do not have authorization from the owner of the copyright, unauthorized copying of CDs violates national and international legislation. | |
| Some CDs/DVDs are copy-protected and cannot be copied. If you are not sure whether your CD/DVD can be copied, activate simulation before commencing the actual physical burn process. |
To copy a disc, proceed as follows:
- Click the Image, Project, Copy menu icon in the Nero Linux Express start screen.
The corresponding copy options are displayed. - Click the option you require, Copy Entire CD, Copy Entire DVD, or Copy Entire Blu-ray Disc.
The Select source and destination screen is displayed.
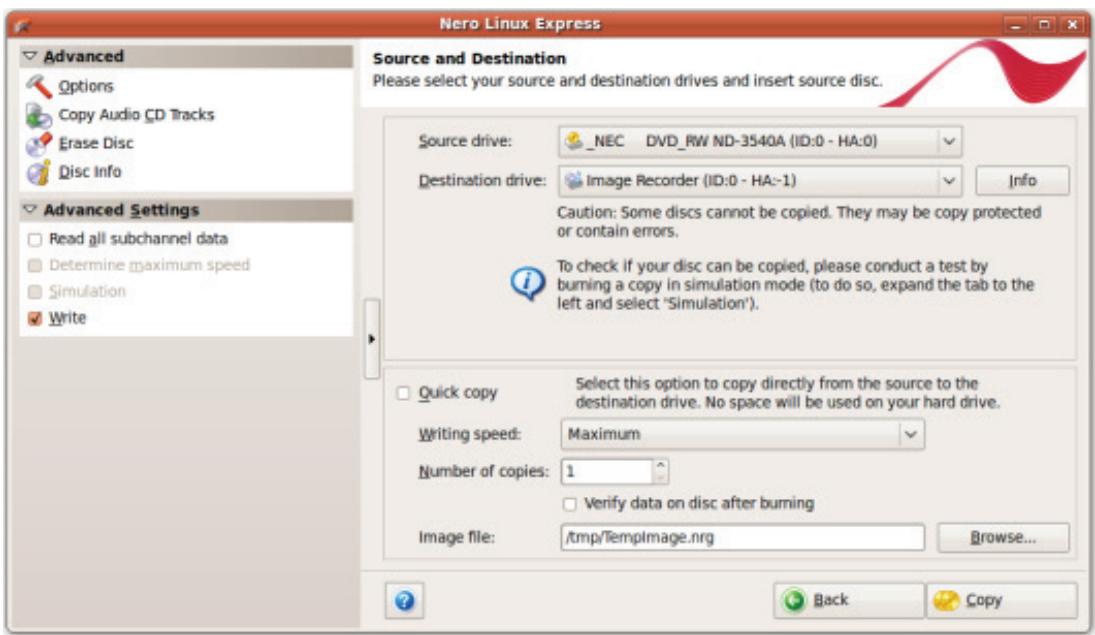
Source and Destination
- Make the desired settings in this screen and, if required, in the extended area of the window.
-
If you want to copy discs using the Image Copy method:
-
Clear the Quick copy box.
-
Insert the disc that you want to copy into the recorder.
-
If you want to copy discs using the on-the-fly method:
-
Select the Quick copy check box.
- Select the Source drive and the Destination drive.
- Insert the disc that you want to copy into the selected drive.
-
Insert a blank disc into the target drive.
-
Click the Copy button.
If you are copying via the drive, the copy process starts. If you are using Nero Image Recorder, the Save Image File window is opened.
- Enter a name for your image file in the File Name input field.
- Select the relevant storage location in the Save to navigation tree and click the Save button.
The copy and/or save process starts. You can follow the process status in the status bar. If you are using a single drive for copying, you will be prompted to remove the source disc and to insert a suitable blank disc after the image file has been written. The burn process then starts automatically.
- Click the Next button.
You have successfully copied a disc and can now continue by selecting another option from the final screen or by closing Nero Linux Express.
8.3 Copy Settings
Source and Destination screen
The following configuration options are available in the Source and destination screen:
| Selection list Source drive | Defines the drive from which the source information is read. Insert the CD or DVD that you want to copy into the drive. |
| Selection list Destination drive | Creates the destination drive. Insert a blank disc into this drive. |
| Button Options | Opens the Recorder Information window. This contains information on the selected destination drive. |
| Check box Quick Copy | Enables direct copying from the source to the destination drive. Data is not buffered on the hard drive during this process. The option On-the-fly is only available if there are at least two drives connected (does not apply for Nero Image Recorder). If this check box is not selected, an image file will be created first, which is then burned. |
| Selection list Write speed | Defines the speed at which the disc is burned. Only the burn speeds that are supported by the selected recorder are displayed. Not available for Nero Image Recorder. |
| Input field Number of copies | Defines the number of copies you require. |
| Check box Verify data on disc after burning | Verifies whether the burned data is identical to the original data. Not available for Nero Image Recorder. |
| Button Image file | Defines the folder where the image file is stored. You can change the name of the image file and target folder. Not available for Nero Image Recorder. |
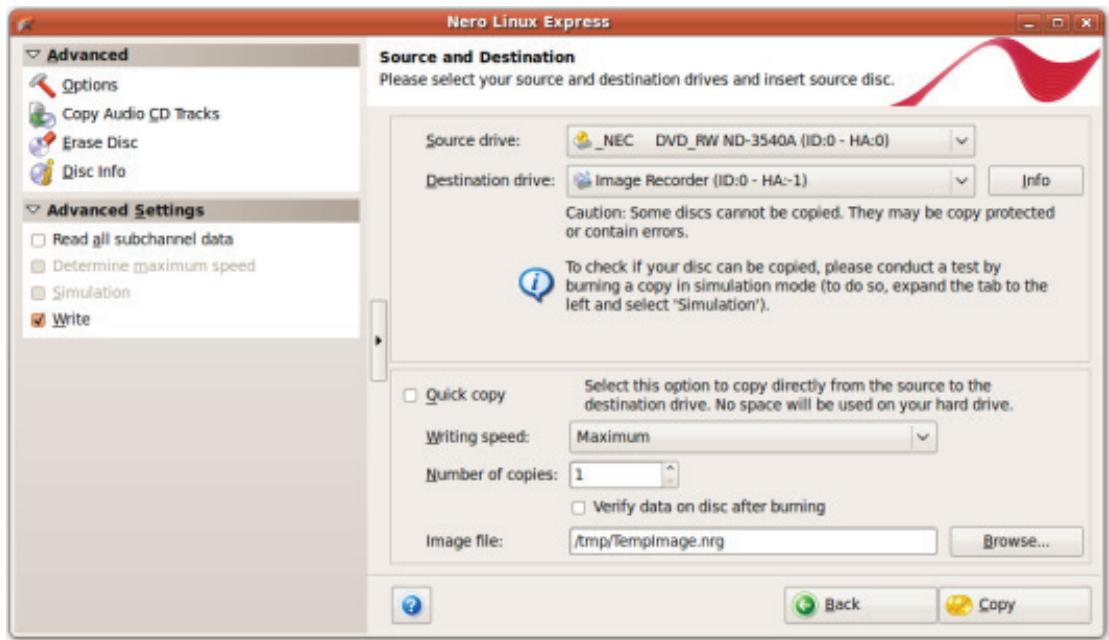
The following configuration options are available in the extended area:
| Check box Read all subchannel data | Reads all subchannel data during copying. Subchannel data is used to save additional information, e.g. CD Text. |
| Check box Determine maximum speed | Finds out the maximum burn speed. Not available for Nero Image Recorder. |
| Check box Simulation | Performs all steps in the burn process without using the laser beam. You can assume that if simulation is successful, the burn process will also be successful. Not available for Nero Image Recorder. |
| Check box Write | Starts the actual physical burn process (e.g. after a simula-tion). This check box is selected by default. |
9 Erase Rewritable Disc Window
Nero Linux Express can be used to erase rewritable discs, i.e. discs with the RW specification, as long as your recorder supports this feature. Two erase methods are available for this purpose:
Quick erasing does not remove the data physically from the disc, but instead only makes it inaccessible by erasing the references to existing content. The data can be restored! Full erasing removes the data from the disc by overwriting it with zeroes. The contents cannot be restored with conventional methods. Repeated full erasing increases the probability that third parties will not be able to reconstruct the contents.
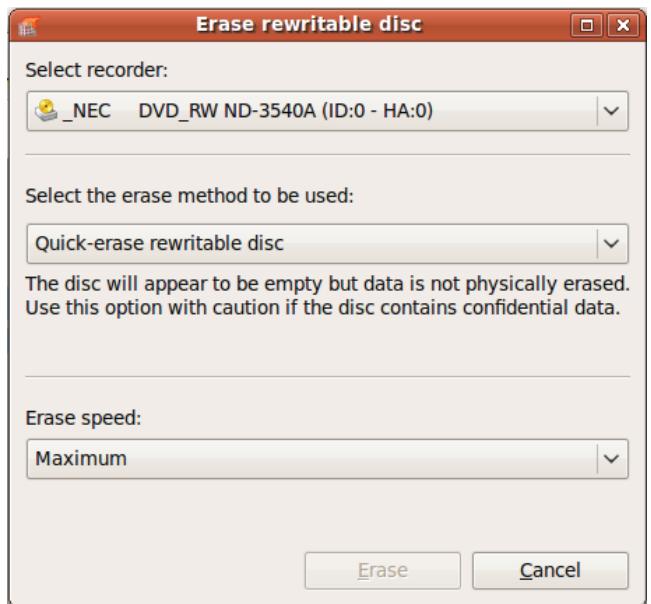
Erase Rewritable Disc window
The following configuration options are available in the Erase Rewritable Disc window:
| Selection list Select recorder | Defines the desired recorder. |
| Selection list Select the erase method to be used | Defines the erase method. Two options are available: The Quick-erase rewritable disc method does not physically erase all data from the disc, but only the references to the contents. The disc will appear to be empty even though the data is still physically available. Erasing a disc using this method takes between one and two minutes. The Full-erase rewritable disc method physically erases all data from the disc. The contents cannot be restored with conventional methods. Repeated full erasing increases the probability that third parties will not be able to reconstruct the contents. Erasing the disc using this method takes longer than the other method, depending on the type of disc involved. |
| Selection list Erase speed | Defines the erase speed. |
| Button Erase | Starts the erase process. |
| Button Cancel | Cancels the action and closes the window. |
10 Final Screen
Once you have successfully concluded the burn or save process with Nero Linux Express, the final screen is displayed with the options Burn same project again, New project, and Save Project. You can select one of these options to continue working with Nero Linux Express or you can click the × button to exit the program.
The following setting options are available:
| Entry | Returns to the Final Burn Settings screen. |
| Burn the same project again | You can burn the same project again with the same or different settings. |
| Entry | Opens the Nero Express start screen. |
| New project | You can create a new project here. |
| Entry | Opens the Save As window. |
| Save project | You can save the current project if you want to access it again later. |
11 Configuration Options
You can define options for working with Nero Linux Express in the Options window.

Some of the functions mentioned here are only available in the full version. You can always upgrade your Essentials version at www.nero.com to get the full version with all the functions.
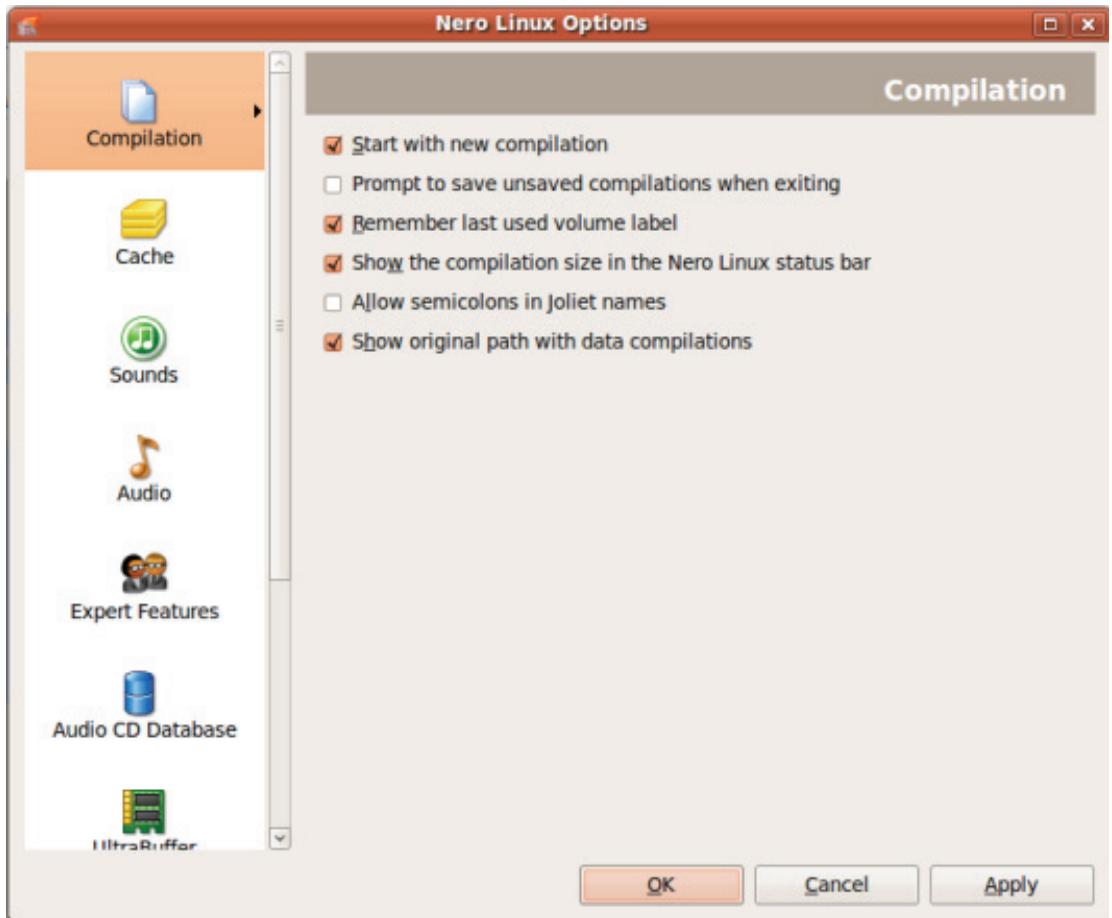
Options Window
The following tabs are available:
| Compilation | Contains options for the compilation and the selection screen. |
| Cache | Contains options for the cache. |
| Sounds | Contains selection options for sounds in connection with burn tasks. |
| Audio | Displays the directory for the audio plug-ins. |
| Expert Features | Contains options for configuring overburning and burning.We recommend that you retain the default settings. |
| Audio CD Databa-se | Provides the option to use the Internet database. |
| Ultrabuffer | Defines the size of the RAM buffer. |
| System Configura-tion | Allows the system settings to be checked when the program is star-ted. |
| Misc. | Contains options for configuring compilations, burning, the data-base, the user interface, as well as advanced settings. |
11.1 Expert Features
The following configuration options are available on the Expert Settings tab:
| Check box Enable Disc-at-once CD over-burning | Enables additional options and defines settings for the entire burn process. |
| Option button Relative/Absolute maximum overburning size | Defines how much a disc can be overburned. |
| Check box Enable DVD overburning | Enables the option that DVDs can be overburned. |
| Check box Enable generation of short lead-out | Enables the option to write additional data to your CD. This feature is only available if the Enable Disc-at-once CD overburning option is enabled. |
| Check box Do not eject disc after burning | Enables the option that your disc remains in the re-corder and is not ejected when the burn process is fin-ished. |
| Check box Reload the disc after the burn is complete | Enables the option that the disc is automatically re-loaded after the burn process. |
| Check box Allow to disable finalizing for burning a disc image | Disables finalizing when an image file is saved. |
| Check box Enable all supported recorder formats for image recorder | Enables the option that all supported recorder formats for the Image Recorder are available. It is now possible to create compilations that the installed recorder cannot burn. For instance, you can create a Blu-ray compilation without a Blu-ray recorder and create an image file with Nero Image Recorder. |
12 Technical Information
12.1 System Requirements
Nero Linux Express is installed together with Nero Linux. Its system requirements are the same. You can find more detailed information on the system requirements in the Nero Linux manual.
12.2 Formats Supported
12.2.1 Disc Formats
Audio CD
miniDVD
DVD-Video
Nero Image (NRG)
CUE-Image
ISO-Image
12.2.2 Disc Types
CD
DVD
Blu-ray - burning only

The actual entries that are available and the actual disc types (e.g. DVD) to which can be written depend on the used recorder.
12.2.3 Audio Formats and Codec
MP3 / mp3PRO
- Moving Picture Experts Group-1 Audio Layer 3 (MP3)
OGG Vorbis (OGG, OGM)
Resource Interchange File Format WAVE (WAV, WAVE)
Free Lossless Audio Codec (FLAC)
Musepack (MPC) - only decoding
13 Glossary
AIFF
The Audio Interchange File Format is an uncompressed audio file format from Apple® and represents a sort of counterpart to the WAV format from Microsoft. Files are larger than when using a compressed format, but the quality is higher. AIFF compressed is the compressed variation.
Audio CD
An Audio CD can contain up to 74 minutes of audio sequences and individual tracks in hi-fi quality. The storage capacity is 747 MB at a sample depth of 16 bit and a scan rate of 44.1 kHz.
Block
A block refers to the smallest information unit on a CD-ROM or hard drive that is addressable in one access and that is indicated in bits or bytes. Several blocks are combined into a sector.
Book Type
The book type defines the specification (e.g. DVD-, DVD+, DVD-ROM) of a DVD. In order to ensure correct playback, the DVD specifications are defined in books so that all media can be read correctly. The specifications are defined in the so-called Rainbow Books, which are distinguished by means of their color (e.g. Yellow Book).
Buffer Underrun
A buffer underrun is an interruption in the data flow in the internal memory (e.g. of the recorder). A buffer underrun results from an interruption in the data flow to the internal buffer. The buffer continues to deliver data until it is finally empty. When recording, data is fed continuously to the recorder's buffer in order to keep a steady flow of data. If the steady flow of data is interrupted, the media becomes unusable. Most modern recorders have a protective mechanism against buffer underruns.
CD-R
Compact Disc-Recordable is a technology for write-once media. The Orange Book standard defines the storage of audio data and other computer-readable data.
Disc-At-Once
Disc-At-Once refers to a method in which the laser in your recorder burns straight through in one session without turning off and on between each track. This method is best when recording Audio CDs you would like to play in your home or car stereo.
Image
An image refers to a single file on the hard drive that contains the image of a complete disc. A disc image can be used to create exact copies on media at a later point in time if problems occur during the write process or if no recorder is connected to your PC. The image requires as much free space on the hard drive as the contents of the original disc take up.
MP3
The MPEG-1 Audio Layer 3 audio format is used to reduce the size of audio files to a fraction of their original size (factor 1:10) with little loss of quality. You can estimate about 1 MB per minute as opposed to 10 MB for the original files. This value and the quality can vary depending on the complexity of the audio signal. The bit rate used can be used as a measure of quality. The higher the bit rate, the better the quality, but also the more memory required.
Multisession
A multisession refers to completing a disc in multiple cycles. After a first session has been written to the disc, information can then be added in another record because the disc has not been finalized.
On-the-fly
On-the-fly refers to a method for copying to a disc. The data is transferred directly from the original storage location to the disc to be burned. To do this, Nero uses a compilation, a small file that simply refers to the transferred data.
Track-At-Once
Track-At-Once refers to a write method in which each track is written to the disc individually. The writing process is interrupted briefly after each track, i.e. the laser starts again for each track. With this write method, it is only possible to continue writing to a DVD sometimes and at a later stage. There is a pause of at least 27ms between tracks, which can be disruptive for Audio CDs.
WAV
The WAV audio format, also called WAVE or Waveform audio format, is an audio format from Microsoft and uses no data compression. WAV is the counterpart to the AIF format from Apple.
14 Index
A
Audio CD
Copy tip 24
Creating 11
Identify with freedb 12
Ripping 12
B
Burning
Burn settings. 20
Chooseburner 19
Overburning 33
Start the burn process 19
Use Image Recorder 19, 20, 22
C
Compilation
Create Audio CD 11
Create Data disc. 10
Create DVD Video 16
Create miniDVD 16
Data 8
Image, Project, Copy 8
Load disc image 18
Load saved project 18
Music 8
Video/Pictures 8
Configuration options 32
Conventions, manual 5
Copy
Copy a disc 25
Copy over image 24
On-the-fly 24
Quickcopy 26
Select source and destination 27
E
Essentials 6
Exit the application 31
F
First start 5
1
Image
Create image file 22
Load image file. 18
Image Recorder 19
Activate Image Recorder 19
Create image file 20, 22
Enable all supported formats. 33
M
Manual, conventions 5
Music
Compile Audio CD 11
Encoding options 14
Rip Audio CD 12
Save audio files. 12
N
Nero Linux Express
Use of the application 5
Versions 6
R
Rewritable disc
Erase. 29
Erase method. 29
S
Screen
Disc content 10
DVD-Video Files 16
Final Burn Settings. 20
Final screen 31
Main screen 8
My Audio CD. 11
Source and Destination. 25, 27
Serial number 5
System requirements 34
W
Window
Encoder Configuration 14
Erase Rewritable Disc. 29
Work overview. 6
15 Contact
Nero Linux Express is a Nero AG product.
Nero AG
Glendale, CA 91203-2335
USA
Internet: www.nero.com
Help: http://support.nero.com
Fax: (818) 956 7094
E-mail: US-CustomerSupport@nero.com
Nero KK
Rover Center-kita 8F-B, 1-2-2
Nakagawa-chou Tsuraki-ku
Yokohama, Kanagawa
Japan 224-0003
Internet: www.nero.com
Help: http://support.nero.com
Copyright © 2009 Nero AG and its licensors. All rights reserved.