
LINUX 3 - Linux Distribution NERO - Free user manual and instructions
Find the device manual for free LINUX 3 NERO in PDF.

User questions about LINUX 3 NERO
0 question about this device. Answer the ones you know or ask your own.
Ask a new question about this device
Download the instructions for your Linux Distribution in PDF format for free! Find your manual LINUX 3 - NERO and take your electronic device back in hand. On this page are published all the documents necessary for the use of your device. LINUX 3 by NERO.
USER MANUAL LINUX 3 NERO
Copyright and Trademark Information
This document, like the software described therein, is provided as a license and may only be used or reproduced in accordance with the licensing agreement. The contents of this document, as well as the associated software, is subject to change without prior notice. Nero AG rejects any responsibility for the correctness of the contents of this document and rejects any claims that transcend the clauses of the guarantee agreement.
This document and all of its contents are protected by copyright and are the property of Nero AG. All rights reserved. In addition, this document contains material that is protected by internationally valid copyright. This document may not be reproduced, transmitted, or transcribed in whole or in part without the express written permission of Nero AG.
Please keep in mind that existing graphics, pictures, videos, music titles or other materials that you may wish to insert or transcribe into projects may be protected by copyright. The unauthorized use of this type of material in your projects may violate the rights of the owner of the copyright. Make sure that you obtain all necessary authorizations from the owner of the copyright.
Unless you own the copyright, have permission from the copyright owner or your actions fall under the "fair use" provisions of copyright law, you may be violating national or international copyright laws. The transcribing, re-formation, modification or publication of copyright-protected material may lead to claims for damages and the enforcement of other legal measures against you. If you are unsure of your rights, you should contact your legal advisor.
Nero Linux requires technologies developed by third party manufacturers, some of which are contained in Nero Linux as demo versions. These applications can be activated online free of charge or by sending an activation fax to have unlimited use of the version. Only the data necessary for activation of technology licensed from third parties will be transmitted. For unlimited use of Nero Linux, it is therefore necessary to have an Internet connection or a fax machine.
Copyright © 2006 - 2008 Nero AG and its licensors. All rights reserved.
Nero, the Nero logo, Nero Digital, Nero Essentials, Nero Express, Nero ImageDrive, Nero LiquidTV, Nero MediaHome, Nero PhotoSnap, Nero Recode, Nero RescueAgent, Nero ShowTime, Nero SecurDisc, Nero StartSmart, Nero Vision, InCD, Move it, and UltraBuffer are trademarks or protected trademarks of Nero AG.
Adobe, Acrobat, Acrobat Reader and Premiere are trademarks or protected trademarks of Adobe Systems, Incorporated.
AMD Athlon, AMD Opteron, AMD Sempron, AMD Turion, ATI Catalyst and ATI Radeon are trademarks or registered trademarks of Advanced Micro Devices, Inc.
ATSC is a trademark of the Advanced Television Committee.
ICQ is a registered trademark of AOL, LLC.
Apple, iPhoto, iPod, iTunes, iPhone, FireWire, and Mac are brands or registered trade names of Apple, Inc.
ARM is a registered trademark of ARM, Ltd.
AudibleReady is a registered trademark of Audible, Inc.
BenQ is a trademark of the BenQ Corporation.
Blu-ray Disc is a brand of Blu-ray Disc Association
CyberLink is a registered trademark of CyberLink Corp.
DLNA is a registered trademark of Digital Living Network Alliance.
DivX and DivX Certified are registered trademarks of DivX, Inc.
Dolby, Pro Logic and the double-D symbol are brands or registered trademarks of Dolby Laboratories, Inc.
DTS and DTS Digital Surround are trademarks or registered trademarks of DTS, Inc.
DVB is a registered trademark of the DVB Project.
Freescale is a trademark of Freescale Semiconductor, Inc.
Google and YouTube are trademarks of Google, Inc.
WinTV is a registered trademark of Hauppauge Computer Works, Inc.
Intel, Pentium and Core are trademarks or registered trademarks of Intel Corporation.
Linux is a registered trademark of Linus Torvalds.
Memorex is a registered trademark of Memorex Products, Inc.
ActiveX, ActiveSync, DirectX, DirectXShow, Internet Explorer, Microsoft, HDI, MSN, Outlook, Windows, Windows Mobile, Windows
NT, Windows Server, Windows Vista, Windows Media, Xbox, Xbox 360, the Windows Vista start button and the Windows logo are trademarks or registered trademarks of Microsoft Corporation.
My Space is a trademark of MySpace, Inc.
NVIDIA, GeForce and ForceWare are brands or registered trademarks of NVIDIA Corporation.
Nokia is a registered trademark of Nokia Corporation.
CompactFlash is a registered trademark of SanDisk Corporation.
Sony, Memory Stick, PlayStation, PLAYSTATION and PSP are brands or registered trademarks of Sony Corporation.
HDV is a trademark of Sony Corporation and Victor Company of Japan, Limited (JVC).
UPnP is a registered trademark of the UPnP Implementers Corporation.
Labelflash is a registered trademark of Yamaha Corporation.
The trademarks mentioned here are named for information purposes only. All trade names and trademarks are the property of their respective owners.
Nero AG, Im Stoeckmaedle 13-15, D-76307 Karlsbad, Germany
Table of contents
1 Start Successfully 5
1.1 About Nero Linux 5
1.2 Working with the program 5
1.3 About the manual 6
2 Installing Nero Linux 7
3 Main Screen 8
4 Compilation screen 10
4.1 New Compilation Window 10
4.2 Selection Screen 12
5 Data Disc 15
5.1 Compiling Data CDs/DVDs 15
5.2 Defining options 17
5.2.1 Multisession Settings 17
5.2.2 ISO Settings 18
5.2.3 UDF Settings 19
6 Audio CD and Audio Files 20
6.1 Compiling Audio CDs 20
6.1.1 Audio CD Settings 21
6.2 Mixed Mode CD and CD EXTRA 21
6.3 Save Tracks Window 22
6.3.1 Source tab 23
6.3.2 Output 24
6.4 Encode Files Window 25
7 Video and Slide Show 27
7.1 Compiling DVD-Video or miniDVDs 27
8 Bootable Disc 28
8.1 Requirements for Booting from a Disc 28
8.2 Bootable disc template 28
8.3 Creating and Burning a Bootable Disc 29
9 Load image file 30
10 Burn Compilation 31
10.1 Choosing a Recorder 31
10.2 Burn Compilation Window 32
10.3 Settings for Burning 33
10.4 Start the Burn Process - Burning Discs with the Drive 34
10.5 Burning with Image Recorder - Creating an Image File 34
11 Copying CDs/DVDs 36
Table of contents
11.1 Copying methods 36
11.2 Copy Disc 36
11.3 Copy settings 37
12 Erase Rewritable Disc window 39
13 Configuration options 41
13.1 Expert Features 42
14 Technical Information 43
14.1 System requirements 43
14.1.1 General System Requirements 43
14.1.2 Linux kernel requirements 43
14.1.3 Advanced system requirements 44
14.1.4 Supported Distributions 48
14.2 Formats supported 48
14.2.1 Disc formats 48
14.2.2 Disk types 48
14.2.3 Audio formats and codecss 49
15 Glossary 50
16 Index 52
17 Contact 54
1 Start Successfully
1.1 About Nero Linux
The powerful burning software Nero Linux allows you to burn your data, music and videos to disc. Nero Linux gives you full, customized control of your burning projects. You can – among other things – define the file system, the length of the file name, and the character set; you can also change the disc label.
Despite its wide range of features, Nero Linux has remained an easy-to-use burning program that creates discs in just a few steps. You select the disc type to be burned, define the project type, add the required data and then start burning.
Nero Linux includes a graphical user interface that used Nero Burning ROM, the well-known burn program under Windows, as a basis.
Nero Linux is therefore the burning solution for the Linux community.
1.2 Working with the program
The main function of Nero Linux is to select files and folders and to burn them to a disc. This is done in three basic steps:
In the New Compilation window, select a disc type and the disc format and set the options on the tabs.
In the selection screen, select files that you want to burn.
Start the burn process.
See also:
Compilation screen 10
New Compilation Window 10
Burn Compilation 31
1.3 About the manual
This manual is intended for all users who want to learn how to use Nero Linux. It is process-based and explains how to achieve a specific objective on a step-by-step basis.
To make best use of this documentation, please note the following conventions:
| ○ | Indicates warnings, preconditions or instructions that have to be precisely followed. |
| ○ | Indicates additional information or advice. |
| 1. Start ... | The number at the beginning of a line indicates a prompt for action. Carry out these actions in the order specified. |
| → | Indicates an intermediate result. |
| → | Indicates a result. |
| OK | Indicates text passages or buttons that appear in the program interface. They are shown in boldface. |
| (see...) | Indicates references to other chapters. They are executed as links and are shown in red and underlined. |
| [...] | Indicates keyboard shortcuts for entering commands. |
2 Installing Nero Linux
Nero Linux is packaged in the RPM and Debian format. These formats are used by the majority of Linux distributions.
To install Nero Linux, proceed as follows:
- Open a terminal.
- Go to where your package is located.
-
Enter the following command to install the RPM package:
-
rpm -i nerolinux--
-- .rpm -
Enter the following command to install the Debian package:
-
dpkg -i nerolinux--
-- .deb

You can also use your distribution's software installer tool to install .
Some shortcuts will be added in the KDE and GNOME programs menu. The Debian package will also add a shortcut to Nero Linux in the Debian menu subsystem repository. You can now easily start Nero Linux over the created shortcut.

If you do not get a shortcut, you can copy the generic one that is located in /usr/share/applications/nerolinuxdesktop.
3 Main Screen
The main screen of Nero Linux is the starting point for all actions. It consists of a menu bar and a toolbar with buttons and a drop-down menu.
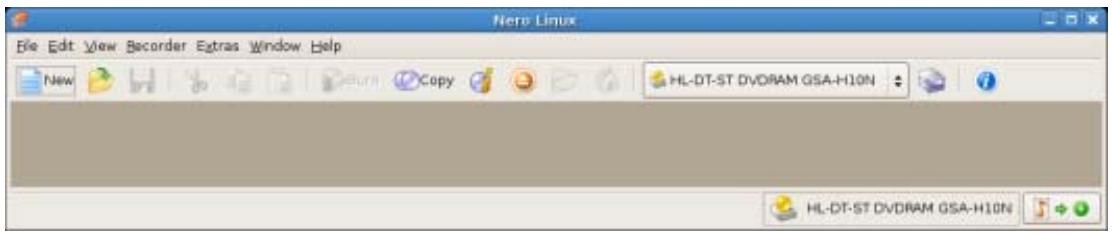
Main window with menu and toolbar
The following configuration options are available in the menu bar of the main screen:
| Menu File | Opens the File menu containing file functions such as opening, saving and closing that you are already familiar with. You can also show the configura- tion options for the compilation, update the compilation and define configura- tion options. |
| Menu Edit | Opens the Edit menu which contains the file editing functions in the selec- tion screen such as cutting, copying and deleting that you are already fami- iar with. You can also display the properties of a selected file. You can also search directly for files within a compilation. |
| Menu View | Opens the View menu where you can customize the toolbar and the brow- ser area. You can also refresh the file browser here. |
| Menu Recorder | Opens the Recorder menu containing functions for the recorder. You can select the recorder here, start the burn process and erase a rewritable disc. You can also display information about the disc and eject it. |
| Menu Tools | Opens the Tools menu containing the functions for converting audio files in- to other formats and for saving the songs of an Audio CD to the hard disc. In addition, the data tracks can be displayed as hexadecimal data. |
| Menu Window | Opens the Window menu which enables you to alter the position of the compilation area and browser area. |
| Menu Help | Opens the Help menu which contains the help options you are familiar with. You can also update your antivirus scanner and enter a new serial number if necessary. |
The following configuration options are available in the tool bar of the main screen.
| Opens the New Compilation window where you can set options for a burn or copy process. | |
| Opens an existing compilation. | |
| Saves the active compilation. | |
| Cuts selected elements in the compilation (selection). | |
| Copies selected elements of the compilation (selection). | |
| Pastes a selection that was cut or copied beforehand. | |
| Starts the burn process by opening the Burn Compilation window containing the Burn tab. | |
| Starts the copy process by opening the New Compilation window containing the Burn tab. | |
| Displays information on the disc inserted, such as contents (if any) and capacity for instance. | |
| Opens the selected drive. | |
| Shows or hides the file browser. | |
| Displays the user's home folder contents in the file browser. | |
| Recorder selection menu | Displays available recorders. |
| Opens the Choose recorder window where you select an available recorder for the burn process from a list. | |
| Displays information on the program and version number. |
4 Compilation screen
4.1 New Compilation Window
In the New Compilation window select the disc type and configure the options for the disc format on the tabs. The window basically looks the same for all disc types. The only difference is the tabs that are available. When you launch Nero Linux, the New Compilation window opens automatically. If the window is not open, click on the New button. The window consists of a drop-down menu, a selection list, various tabs, and four buttons.
Only those disc types supported by the recorder are displayed in the drop-down menu. If the recorder can only burn CDs, the drop-down menu is grayed out.

Using Nero Linux you can create image files for disc types that the installed recorder cannot burn. You can enable this function via the File > Options > Expert Features menu, Enable all supported recorder formats for image recorder check box. The drop-down menu in the Compilation window then makes available all supported disc types.
The following entries are available in the selection list:
| Entry CD/DVD-ROM (ISO) | Creates a data CD/DVD, each file type can be burned. The burned data complies with the ISO standard. |
| Entry Audio CD | Creates a standard Audio CD that can be played on all (audio) CD players at least. |
| Entry Mixed Mode CD | Creates a CD with data and audio files in a single session. Usually a data file is followed by one or more audio files for instance (e.g. soundtrack for PC games). Older Audio CD players are often not capable of recognizing the data file as such and attempt to play it. |
| Entry CD EXTRA | Creates a multisession CD with audio and data files that are stored in two sessions. The first session contains the audio files and the second session the data. Common CD players play the first session as audio CDs. The second session can only be used by PCs with a CD-ROM drive, it cannot be 'seen' by a normal CD player. |
| Entry Copying CDs/DVDs | Copies a source disc to a CD/DVD disc. |
| Entry miniDVD | Creates a CD that uses the specifications of a DVD. The miniDVD has the same technical options and qualities as a DVD. It can easily be played on a PC, whereas there is no guarantee that it can be played in all DVD players. You can use Nero Linux to burn a miniDVD if the DVD video title, i.e. a complete DVD folder structure, is already available. |
| Entry CD/DVD-ROM (Boot) | Creates a bootable CD. |
| Entry CD/DVD-ROM (UDF) | Creates a data disc; all file types can be burned. The burned data complies with the UDF standard. |
| Entry CD/DVD-ROM (UDF/ISO) | Creates a data disc; all file types can be burned. The burned data complies with the ISO and UDF standards. |
| Entry DVD-Video | Creates a DVD that delivers high-quality playback of video and/or picture files on DVD players. You can use Nero Linux to burn a DVD if the DVD video title, i.e. a complete DVD folder structure, is already available. |

The actual entries that are available, and the actual disc types (e.g. DVD) that can be written to depend on the recorder used.

You can find more information on Blu-ray support at www.nero.com/link.php?topic_id=416.
The following buttons are available:
| Button Open | Opens a file browser where you can find and open a saved compila- tion. |
| Button New | Opens the selection screen where you can select the files for burn- ing. |
| Button Cancel | Closes the New Compilation window. |
You can set the options for the respective disc format on the tabs in the New Compilation window.
The following tabs are available:
| Tab Info | Shows statistical information on the compilation. |
| Tab Multisession | Contains options for configuring multisession discs. This tab is only available if a burner is installed. |
| Tab ISO | Contains options for configuring the ISO file system. |
| Tab UDF | Contains options for configuring the UDF file system. |
| Tab Title | Defines the label of the CD. |
| Tab Date | Allows you to define the date of the compilation and of the associated files. You can also specify a validity period for the disc. (You can access the data regardless of the validity period specified) |
| Tab Misc | Defines whether and which files are stored in the buffer memory. |
| Tab Audio CD | Contains options for configuring audio files. You can also enter additional information about the CD. |
| Tab Boot | Contains options for configuring a bootable disc. |
| Tab Writing | Contains options for configuring burning. |
See also:
Multisession Settings 17
ISO Settings 18
UDF Settings 19
Audio CD Settings 21
Burn Compilation Window 32
Settings for Burning 33
Copy settings 37
4.2 Selection Screen
The selection screen is the starting point for work that you want to do on compilations. The selection screen appears in the main screen after you select the disc type and format and click the New button. The selection screen consists of the Compilation Area, the Browser Area and a capacity scale.
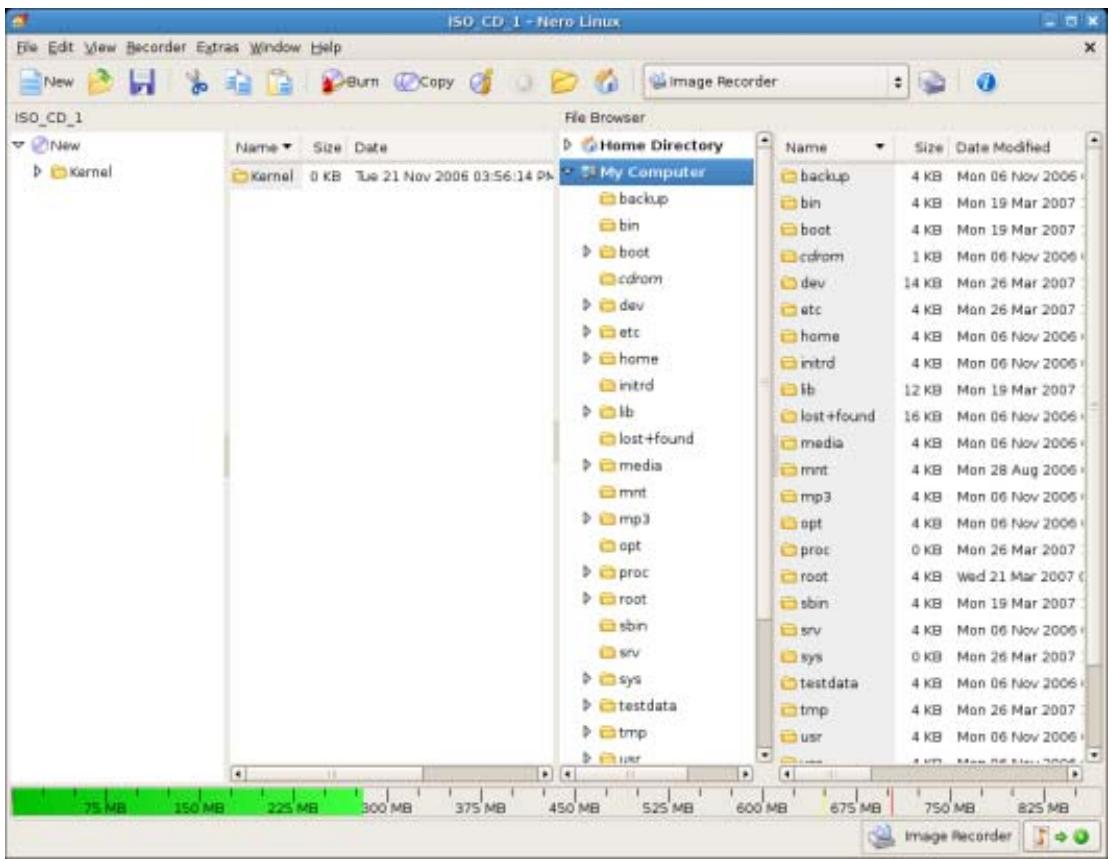
Selection Screen
The Compilation Area is named after the relevant compilation. Files and folders are compiled here for burning. In the browser area (Browser), you can find the elements that you want to burn. The File Browser is similar to other file browsers and provides a toolbar and address bar with typical functionality.
The bottom margin of the screen contains a capacity scale in MB for data discs or minutes (min) for Audio CDs. The exact size of the scale will depend on which disc type you have selected.

If the Browser Area is hidden, you can show it again using the button.
When you are compiling files, a capacity bar indicates how much space the files need on the disc. The color of the capacity bar indicates whether the data will fit on the disc or not:
| Green capacity bar | The data will fit on the disc. |
| Yellow capacity bar (from the yellow mark on the scale) | The data might fit on the disc. The size of the disc that has been inserted will determine whether the data will fit or not. |
Red capacity bar (from the red mark on the scale)
The data will not fit on the disc.
(unless you have inserted an oversize disc.)
The yellow and red marks are set by default for discs that are commercially available. The disc type you have selected will determine the exact scale value.

Capacity of the CD recordable disc
For example, blank CDs are available with a capacity of 650 MB or 700 MB. Therefore the yellow mark is set for CDs at 650 MB and the red at 700 MB.

Display the Capacity Bar
If the capacity scale is hidden, you can show it again by clicking on the File > Options > compilation size menu and by checking the box Show compilation size.
5 Data Disc
5.1 Compiling Data CDs/DVDs
Using Nero Linux you can compile and burn all types of files and folders. If a DVD recorder is installed on your computer, you can burn both data CDs, and data DVDs. If you have a CD recorder, you can only burn data CDs and the option for burning a DVD is already grayed out in the start screen. The procedure for both compilation methods is identical.

The Image Recorder is also suitable for creating an image of a disc type not supported by the connected recorder. You can therefore create a DVD image, for instance, without having installed a DVD recorder. You can write the image to a disc at any time.

You can find more information on Blu-ray support at www.nero.com/link.php?topic_id=416.
To create a data CD/DVD, proceed as follows:
- From the drop-down menu in the New Compilation window, select the desired CD format (CD, DVD). (In the case that the New Compilation window does not appear, it can be displayed by pressing the New button on the main screen.)
The selection list shows the compilation types that can be burned.
New Compilation Window
- Choose the desired compilation type for a data disc from the selection list (CD/DVD-ROM (ISO), CD/DVD-ROM (UDF), or CD/DVD-ROM (UDF/ISO).
The tabs with the configuration options that are valid for this compilation type are displayed.
- Click the New button.
The New Compilation window is closed and the selection screen is opened.

Compilation screen
- Select the files/folders that you want to burn from the browser area.
- Drag the required files/folders into the compilation area on the left side.
- The files are added to the compilation and displayed in the compilation screen. The capacity bar indicates how much space is required on the disc.
- Repeat the previous step for all files that you want to add.
- Click the Burn button.
The Burn Compilation window is opened.
- Set the options you require in the tabs.
You have successfully compiled a data CD/DVD and can now burn this compilation.
See also:
Burn Compilation 31
5.2 Defining options
5.2.1 Multisession Settings
The Multisession tab provides the option to create multisession discs for data discs. Multisession discs can be burned in multiple sessions until you have reached the maximum disc capacity. A session is a self-contained data area that is burned using a single process, and consists of a lead-in (with the table of contents), one or more tracks, and a lead-out. Discs without the multisession option, e.g. Audio CDs, are burned in a single session.
If a new multisession disc is being started, Nero Linux also saves (if possible) the point of origin for the files. This information is used when continuing the multisession disc.
If a multisession disc is being continued, Nero Linux automatically sets a cross reference to the imported session, i.e. the table of contents for the imported session is copied to the table of contents for the current session. You must define which session is being imported at the start of the burn process. The files in the previous sessions are retained and continue to take up space.
In this case Nero Linux automatically verifies whether the correct multisession disc has been inserted for continuation. If not, the disc is ejected.

If you disable the Finalize disc check box on the Burn tab, you can always burn additional sessions on the disc, but then only the last session will be visible and you will only be able to access data from the final session.

Multisession disc
Multisession discs are particularly suitable for backing up important files burned on a regular basis.
The following configuration options are available on the Multisession tab in the Multisession area:
| Option button Start Multisession disc | Burns the selected compilation in one session to the disc. If the disc already contains sessions, you can also select this option. Sessions are then not imported and cross references are not set. |
| Option button Continue Multisession disc | Continues a multisession disc by burning an additional session to a disc with at least one session. Cross references to the im- ported session are set in the process. |
| Option button No Multisession | Creates a disc without a multisession. |
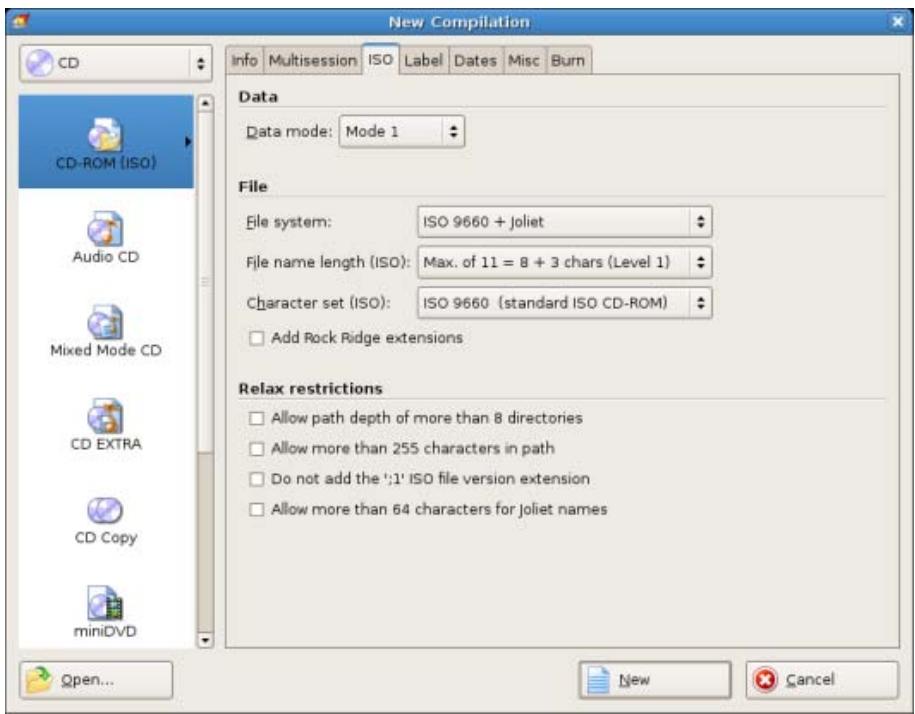
5.2.2 ISO Settings
The ISO tab provides options for configuring the ISO file system.
ISO 9660 is a system-independent standard. It can be read on all operating systems. The following features apply:
Permits eight characters (Level 1) or 31 characters (Level 2) for the file name.
Permits eight characters for the folder name.
- Restricts the maximum directory depth to eight levels (including root folder).
The characters A-Z, 0-9 and the underscore (_ are permitted.
In the ISO tab, in the area Relax Restriction, the restrictions imposed by the selected file system can be relaxed. For example, you can allow a higher path level or more than 64 characters for the Joliet name.

If it is to be possible to read the disc on all operating systems, select ISO 9660 as the file system and uncheck all boxes in the Relax restrictions area.
An advisory message appears in the ISO tab in the Information area if the disc cannot be read on all operating systems.

If the disc is to be used mainly on Windows® computers and you want to use lowercase letters and foreign language characters for the file names, select ISO 9660 + Joliet as the file system.
The following configuration options are available on the ISO tab in the Data and File areas:
| Drop-down menu Data mode | Selects the mode for the data. Mode 1 and Mode 2/XA are available. Newer drives can easily read Mode 1 and Mode2/XA CDs. However, some older drives cannot read mode-1 discs correctly. In the case that the disc is to be able to be read in any case on older drives, select the Mode-2/XA format. |
| Drop-down menu File system | Selects the file system that is used for the data. ISO 9660 only and ISO 9660 + Joliet are available. ISO 9660 only: ISO format alone is used. ISO 9660 + Joliet: ISO format is used and is enhanced by the Joliet standard. |
| Drop-down menu Length of file name | Defines the possible length of the file name. Level 1 and Level 2 are available. In level 1 the file name can be eight characters long and the file name extension (e.g. *.doc) three characters. In Level 2 the file name can be 31 characters long. |
| Drop-down menu Character set | Defines the font used. |
| Drop-down menu Add Rock Ridge extension | Adds a Rock Ridge extension on Unix systems to add POSIX rights to the items. |
5.2.3 UDF Settings
The UDF tab provides options for configuring the UDF file system. The UDF standard was developed by Osta (Optical Storage Technology Association) in response to the requirements of DVDs. The standard works on all platforms.
The following setting options are available in the Options drop-down menu:
| Entry Automatic Settings | Sets options automatically for the UDF file system. We recommend that you select this entry. |
| Entry Manual Settings | Enables you to manually define the UDF partition type and the file system version. |
| Entry Enable Xbox compatibility mode | Creates a disc that is compatible with Xbox. This entry is available if the No Multisession tab is selected on the Multisession option button. |
6 Audio CD and Audio Files
6.1 Compiling Audio CDs
Using Nero Linux you can create an Audio CD that contains music files. It can be played using all standard CD players. To compile an Audio CD, source files with different audio formats (e.g. MP4, MP3 or WMA) are automatically converted into Audio CD format before being burned.

Please not that some CD players cannot play CD-RWs. Use CD-R discs to burn Audio CDs.
To create an Audio CD, proceed as follows:
- From the drop-down menu in the New Compilation window, select the CD entry. (In the case that the New Compilation does not appear, it can be displayed with the New button of the main screen.)
- Choose the Audio CD compilation type from the selection list.
The tabs with the configuration options that are valid for this compilation type are displayed.
3. Click the New button.
The New Compilation window is closed and the selection screen is opened.
4. Select the audio files that you want to burn from the browser area on the right side. The audio file can come from the hard drive or from an Audio CD. You can also choose an M3U playlist as a source.
5. Drag the desired audio files into the compilation area on the left side.
The files are added to the compilation and displayed in the compilation screen. The capacity bar indicates how much space is required on the disc.
- Repeat the previous step for all audio files that you want to add.
- Customize the properties of the audio file to suit your requirements.
- Click the Burn button.
The Burn Compilation window is opened.
- Set the desired options in the Audio CD and CD-DA Options tabs.
You have successfully compiled an Audio CD and can now burn this compilation.
See also:
Burn Compilation 31
6.1.1 Audio CD Settings
The Audio CD tab provides options for setting the Audio CD.
The following configuration options are available on the Audio CD tab in the General area:
| Check box Normalize all audio fi-les | Enables a filter that brings the volume of the audio files to be burned into line with one another. This is particularly recommended if the audio files originate from different sources. |
| Check box No pause between tracks | Allows the audio files to merge into one another on the audio CD without a pause (just like in live recordings). If the box is unchecked, there are pauses of two seconds between the audio files. |
The following configuration options are available on the audio CD tab in the CD Text area:
| Check box Write on CD | Enables the option for writing CD text. With CD players that support CD text, the title of the CD, the name of the audio file as well as the name of the artist appear in the display. |
| Input field Title | Defines the label of the audio CD. |
| Input field Artist | Defines the artist. |
In the Additional Information tab you can enter additional information about the Audio CD such as the producer or comments.
6.2 Mixed Mode CD and CD EXTRA
With Nero Linux you can compile CDs that include both audio and data files.
The following compilation methods are available:
Mixed Mode CD
CD EXTRA
A Mixed Mode CD includes the data and the audio files in one session. CD EXTRA includes the audio files in the first session and the data files in the second session.
The procedure for compiling the audio and data files is basically the same as the procedure for compiling data or music CDs. Please be sure to select the corresponding entry in the New Compilation window. The selection screen includes a compilation area for audio files and one for data files.
See also:
Burn Compilation 31
6.3 Save Tracks Window
In the Save Tracks window you can define the settings for the audio files that are to be stored on the hard drive. You can open the window by clicking on the Extras > Save Tracks menu.
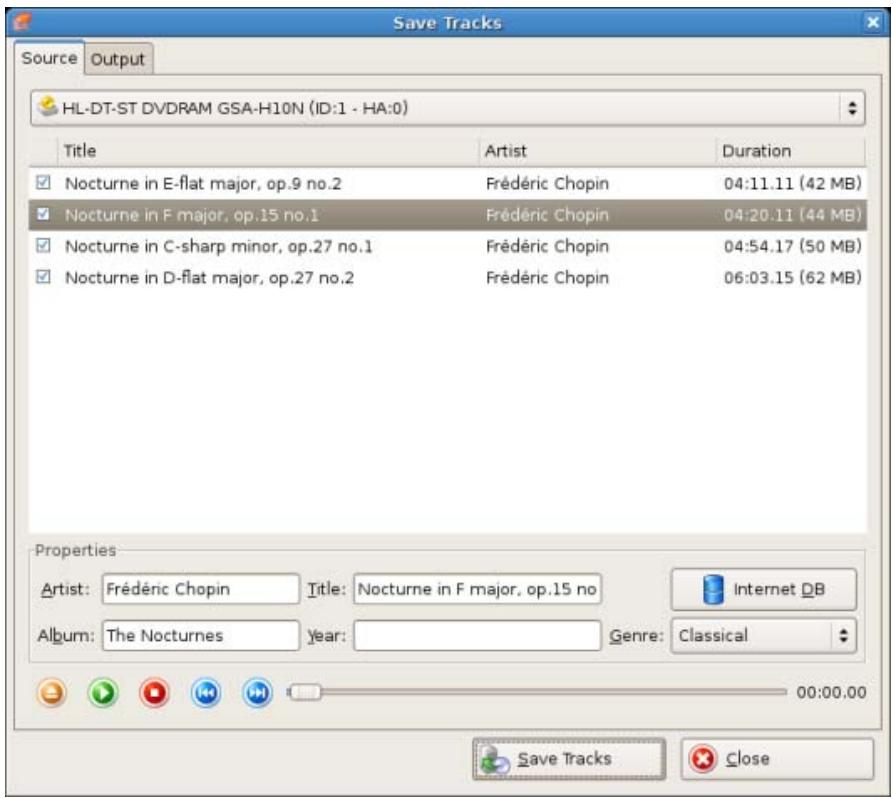
Save Tracks - Source
The following setting options are available:
| Tab Source | Specifies settings for the source of the audio data. |
| Tab Output | Sets output files configuration options. |
| Button Audio Ripping | Starts the save process. |
| Button Close | Closes the window. The audio files will not be saved. |
6.3.1 Source tab
The Source tab displays the audio files on the Audio CD. The functions of the control buttons correspond to the familiar control buttons on CD players.
The following setting options are available:
| Drive drop-down menu | Selects the drive in which the Audio CD is inserted. |
| Area Title | Displays the audio files on the Audio CD. |
| Area Properties | Displays the properties of the selected audio track. |
| Button Internet DB | Sends a query to the Internet database www.freedb.org and completes the properties of the Audio CD such as title name, if an appropriate entry exists in the Internet database. |

Internet Database freedb.org
Nero AG is not responsible for the www.freedb.org website, but just provides an interface to it.
6.3.2 Output
You can define the properties of the audio files to be created on the Output tab.
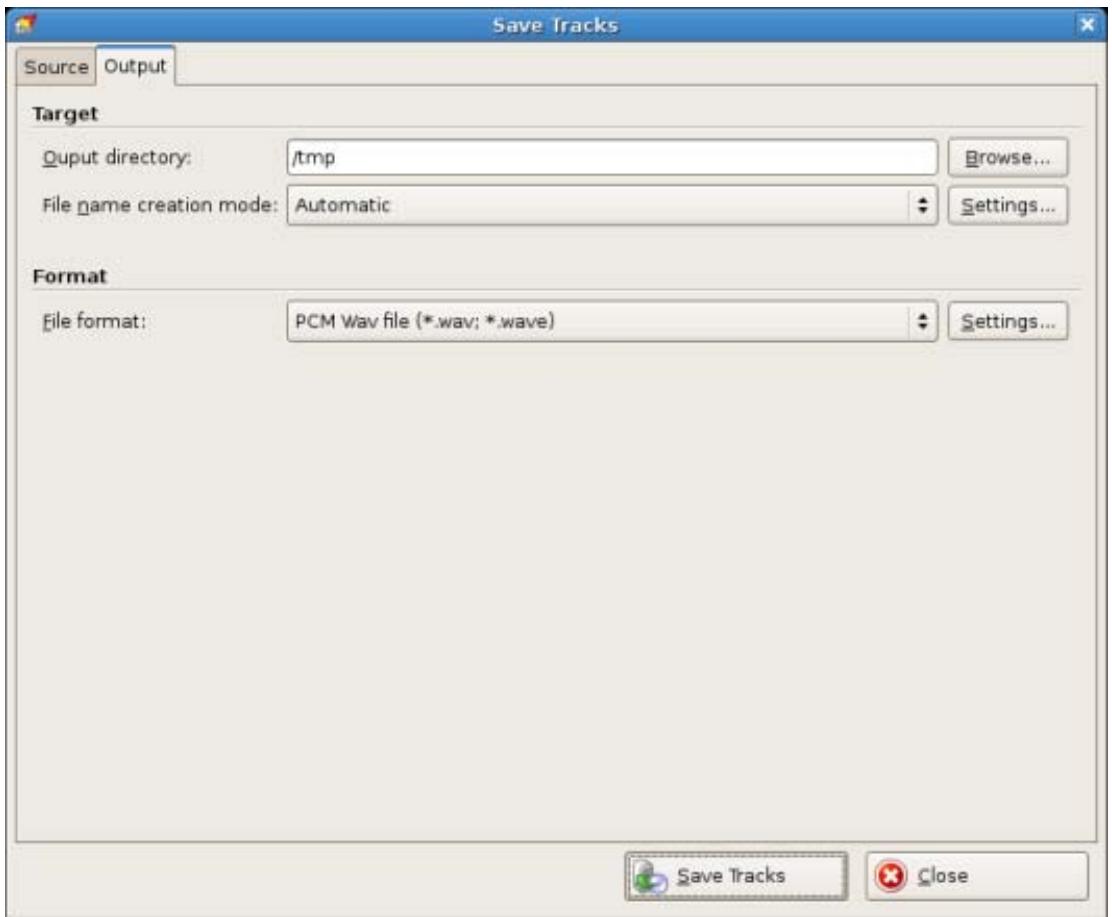
Save tracks - Output
The following setting options are available:
| Input window Output directory | Selects the storage location for the output file. |
| Button Browse | Opens a browser window where you can select a storage location. |
| Selection list Mode for creating file name | Selects the method to be used for creating the name of the output file. |
| Button Settings | Opens a window where you can specify how the file name should be created. The methods Automatic and User Defined are avail- able. |
| Selection list File format | Selects the output audio format for the selected audio file. |
| Button Settings | Opens a window where you can define options such as bit rate and frequency for the output audio file. |
6.4 Encode Files Window
In the Encode Files window, the audio files that are to be encoded are selected and the properties for the output defined. You can open the window via the Extras > Encode Files menu. The window consists of a selection area and the Properties area.

Encode Files Window
The following configuration options are available in the selection area:
| List Files to be encoded: | Displays the selected files. |
| Check box Show full paths | Displays the full source and destination paths for the files in the Files to be encoded list. |
| Button Add | Opens the browser window where you can select a file to add it to the list of files to be encoded. |
| Button Delete | Removes the selected file. |
| Button Remove All | Removes all files from the list of Files to be encoded. |
| Button Reset Status | Reset the status of the selected file to do. |
| Button Start | Starts the encode process. |
| Button Close | Closes the window. |
The following configuration options are available in the Properties area:
| Output file drop-down menu | Selects the output audio format for the selected audio file. |
| Button Settings | Opens a window where you can define options such as bit rate and frequency for the output audio file. |
| Display panel Target file/Target directory | Displays the storage location of the output file or output files. |
| Button Browse | Opens a browser window where you can select a storage location. |
| Display panel Source file info | Displays information on the selected audio file. |
7 Video and Slide Show
7.1 Compiling DVD-Videos or miniDVDs
Using Nero Linux you can burn DVDs made up of DVD-Video files from your hard drive. You can show your burned DVDs on almost all DVD players.
The miniDVD is burned to CD. It uses the specification of a DVD and therefore has the same technical options and qualities as a DVD. However, playback is not guaranteed on all DVD players.
You can use Nero Linux to burn a DVD Video and miniDVD if the DVD video title, i.e. a complete DVD folder structure, is already available.
To compile a DVD-Video or miniDVD, proceed as follows:
- From the drop-down menu in the New Compilation window, select the DVD or CD entry. (In case that the New Compilation window does not appear, it can be displayed by pressing the New button on the main screen.)
- Choose the DVD Video or miniDVD compilation type from the selection list.
The tabs with the configuration options that are valid for this compilation type are displayed.
3. Click the New button.
The New Compilation window is closed and the selection screen is opened. It includes a compilation area for video and image files and an area for data.
4. Select the video file that you want to burn from the browser area on the right side.
5. Drag the existing DVD folder structure of the video title (Video TS) into the video compilation area on the left side.
The file is added to the compilation and displayed in the compilation screen. The capacity bar indicates how much space is required on the disc.
6. Click the Burn button.
The Burn Compilation window is opened.
7. Set the options you require in the tabs.
You have successfully compiled a DVD-Video or miniDVD and can now burn this compilation.
See also:
Burn Compilation 31
8 Bootable Disc
Using Nero Linux you can create a bootable disc with which the computer can be started without having to access the hard drive. For this reason a bootable disc is often used as an "emergency disc" to start the computer if it is not possible to access the hard drive.
Bootable discs are created in accordance with the "El Torito" standard, an extension to the ISO-9660 standard, which defines the structure of data discs. The disc contains a boot image and an ISO part. The boot image contains all files that are required to load the operating system and to start the computer. The ISO part can contain any number of data files that you can back up using this method.
8.1 Requirements for Booting from a Disc
To ensure that a computer can boot from disc, the start sequence must be set in the BIOS of the computer in such a way that the drive is addressed first as the boot drive (start sequence CD-ROM, C, A for instance). In the case of an SCSI CD-ROM drive, this drive must be connected to an SCSI adapter with a separate BIOS in which settings can be modified accordingly. (This will only work if there are no IDE hard drives present, as these come before the SCSI adapter in the boot sequence.)
When booting from a disc, you can only start an operating system that does not write to the medium, such as "MS DOS" or "Linux". During booting Microsoft Windows 2000 and Microsoft Windows XP write to the medium from which they are being booted. This is not possible with a disc and so the process is canceled and the PC cannot be started.
8.2 Bootable disc template
For Nero Linux, the template for creating a bootable disc can be either a logical drive (e.g. the C: drive) or a drive image file which contains the contents of a drive as a file sector for sector. If the template for the bootable disc is a logical drive, the bootable disc will emulate this when the system is booting. There are three emulation types:
- Floppy emulation: This requires a bootable floppy disc for creating the bootable disc. At startup the bootable disc emulates a floppy disk in drive A.: In the process, the drive letters increment, so that Drive A: corresponds to the bootable disc. The volume of the start data is limited by the capacity of the floppy disk (e.g 1 MB).
- Hard drive emulation: A bootable hard drive is required to create the bootable disc. At startup the disc emulates Drive C. All drive letters from Drive C increment by one. The volume of the start data is limited by the capacity of the CD (e.g. 700 MB) or DVD (8.5 GB). If, for instance, you have a 200 GB hard drive with only one (200 GB) partition, you cannot create a bootable disc from it without repartitioning your hard drive accordingly beforehand.
- No emulation: In this process the drive names are not changed. This type is used for bootable installation CDs. This setting is intended for users who do not require a floppy or hard drive emulation and who want to install their own device driver.
8.3 Creating and Burning a Bootable Disc
To create a bootable disc, proceed as follows:
- Click the New button in the main Nero Linux screen.
The New Compilation window is opened.
- If you want to create a bootable CD, select the entry CD from the combo box and the entry CD-ROM (Boot) from the selection list.
If you want to create a bootable DVD, select the entry DVD from the combo box and the entry DVD-ROM (Boot) from the selection list.
The tabs for the bootable disc are displayed; the Boot tab is in front.
-
If the template data for the bootable disc should originate from a logical drive:
-
Select the Bootable logical drive option button in the Source of boot image data area.
-
Select the entry you want from the drop-down menu.
-
If the template data for the bootable disc should originate from an image file:
-
Select the Image file option button in the Source of boot image data area.
- Click on the Browse button and select the desired image file.
- Select the language that should appear while the system is booting from the Boot locale drop-down menu.
-
Check the Enable expert features box and select the emulation type for the image file from the Emulation type drop-down menu.
-
Select any other options required on the tabs.
-
Click the New button.
The selection screen is displayed.
7. Select the files/folders that should be written to the ISO part of the bootable disc and drag them into the compilation area.
The files/folders are displayed in the compilation area and the capacity bar indicates how much storage space is required on the disc. You have now created the bootable disc and can start the burn process.
See also:
Burn Compilation 31
9 Load image file
You can use Nero Linux to burn a disc from a disk image that you have previously saved on the hard drive.
To load a saved image file, proceed as follows:
- Select a recorder from the drop-down menu.
- Click the button in the main screen.
The Open window is opened.
- Select the desired image file and click the Open button.
The Burn Compilation window is opened. - Set the desired options.
You have successfully loaded the image file and can now burn it.
See also:
Burning with Image Recorder - Creating an Image File 34
10 Burn Compilation
10.1 Choosing a Recorder
If you have installed multiple recorders, select a suitable recorder.
Proceed as follows:
- Click the icon.
The Choose recorder window appears.
- Select the desired recorder.
-
If you would like to burn to a blank DVD, you can define the Book Type settings on some recorders.
-
Click the Options button.
- Select the required option from the Book Type Settings drop-down menu.

Four Book Type settings are available:
Automatic: Automatically selects the most suitable book type for this DVD.
DVD-ROM: sets the Book Type to DVD-ROM. Select this option if the DVD is meant to play on multiple DVD players. Select this setting if the DVD is to be played on several DVD players or your DVD player has difficulties with self-burned DVDs or of the DVD, DVD+ or DVD-RW specification.
Physical disc type: Selects the book type which is specified on the DVD.
Current recorder setting: Leaves the Book Type setting to the recorder.
- Click the OK button.
The selected recorder is accepted and the Choose Recorder window is closed.
10.2 Burn Compilation Window
In the Burn Compilation window you can set or check the required burn options and then start the actual burn process. The window consists of a drop-down menu, a selection list, various tabs, and buttons.
Burn Compilation
The selected disc format is displayed in the list box. If multiple disc types are available for this disc format, and if you have installed a suitable burner, you can select another disc type from the combo box.
The following buttons are available:
| Button Disc Info | Displays information on the disc inserted, such as contents (if any) or available capacity for instance. |
| Button Writing | Starts the burn process if a burner is connected. If a burner is not connected, the Save Image File window is opened. This button is only available if the Burn check box is enabled. |
| Button OK | Accepts all changes and closes the window. This button is only available if the Burn box is unchecked. |
| Button Cancel | Closes the Burn Compilation window. |
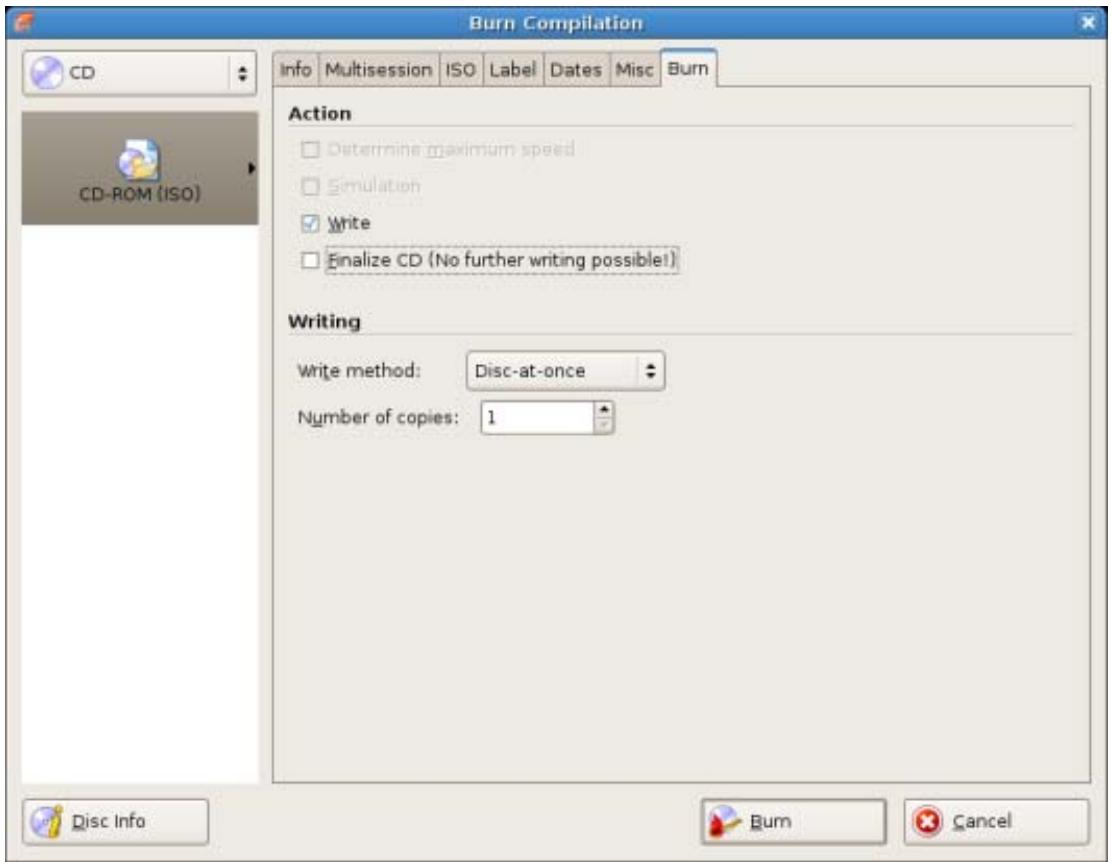
10.3 Settings for Burning
The Burn tab on the Burn Compilation window provides options for the burn process.
The following check boxes are available in the Action area
| Check box Determine maximum speed | Determines how quickly the compiled files can be accessed. |
| Check box Simulation | Simulates burning. In the process the simulation performs all steps that are also carried out during burning with the exception of setting the laser beam. A test determines whether there is a constant flow of data. |
| Check box Writing | Enables the Burn button. |
| Check box Finalizing a Disc | Closes the disc so that you cannot write to this disc anymore. Depending on the disc format, finalizing may be necessary. Nero Linux automatically checks the box for the relevant disc formats. |
The following configuration options are available in the Writing area:
| Drop-down menu Write method | Selects the method used to burn the disc. Disc-at-once and Track-at-once are available. Disc-at-once: burns the entire disc in one go without having to switch off the laser between individual audio files. Track-at-once: Burns each audio file (track) separately onto the disc, i.e. the laser is switched off and switched on again after each audio file. |
| Input field Number of copies | Defines the number of discs that are to be burned. The default is set to one disc. |
| Check box Buffer underrun protection | Provides buffer underrun protection. This check box is only available if the selected burner supports a method which offers buffer underrun protection. |
Check box Verify written data
- Checks the data written to the disc after the burn process.
- You can use this option particularly when burning backups to ensure that all data has been written correctly.
- This check box is only available if the selected recorder is not the Nero Image Recorder.

The speed test and simulation are not required for recorders that have a function for protecting against buffer underruns.
10.4 Start the Burn Process - Burning Discs with the Drive

Many CD players cannot read rewritable CDs (CD-RW). You should therefore use normal CD-ROMs for burning Audio CDs.
To start the burn process, proceed as follows:
- Click the Burn button in the main screen.
The Burn Compilation window appears; the Burn tab is in front.
- Check or select the options on the individual tabs.
- Insert an appropriate blank disc and click the Burn button.
The burn process is started. On the screen a progress bar indicates the progress being made by the burn process.
- If you want to shut down the PC when done (as long as this is technically feasible), enable the Shut Down PC after Completion of Burn check box.
- If you want to check the written data after burning, enable the Verify written data option.
When the burn process has finished, a dialog box appears.
- If you would like to display the extended area with the event log, click the Details button.
- If you would like to start another burn process with the same compilation, click the Burn Again button.
- Click the OK button.
The burning process is complete. You can now remove the burned disc from the recorder.
10.5 Burning with Image Recorder - Creating an Image File
To create an image file, proceed as follows:
- Click the New button.
- Create a new compilation of your choice.

Using Nero Linux you can create image files for disc types that the installed recorder cannot burn. You can enable this function via the File > Options > Expert Features menu, Enable all supported recorder formats for image recorder check box. The drop-down menu in the Compilation window then makes available all supported disc types.
- Select the files that you want to burn.
- If you have installed multiple recorders, select Nero Image Recorder from the drop-down menu.
- Click the Burn button.
The Burn Compilation window appears; the Burn tab is in front.
- Click the Burn button.
The Save Image File window appears.
- Specify a file name and a storage location for the image file and click the Save button.
The image file is created and saved in the selected storage location. On the screen, a progress bar indicates the progress made while the file is being created. Once the creation process is over, a dialog box appears. - Click the OK button.
The dialog box is closed and you have successfully created the image file.
See also:
Expert Features 42
Load image file 30
11 Copying CDs/DVDs
11.1 Copying methods
Nero Linux can be used for copying discs. There are two methods for this:
On-the-fly
Copy Over Image
Each method has advantages and disadvantages which will depend on your requirements.
11.2 Copy Disc
To copy a disc, proceed as follows:

If you are not in possession of the copyright for the relevant CD/DVD and do not have authorization from the owner of the copyright, unauthorized copying of CDs violates national and international legislation.

Copy-protected Audio CDs cannot be copied using Nero Linux.

Some CDs/DVDs are copy-protected and cannot be copied. If you are not sure whether your CD/DVD can be copied, activate simulation before commencing the actual physical burn process.
- Click the Copy button in the main screen.
The New Compilation window appears.
- Select the disc type you want from the drop-down menu.
- Carry out the desired settings in the tabs.
-
If you want to copy discs using the Image Copy method:
-
Uncheck the On the fly box on the Copy Options tab.
-
Insert the disc that you want to copy into the recorder.
-
If you want to copy discs using the on-the-fly method:
-
Enable the On-the-fly check box on the Copy Options tab.
- Select the drive that is to contain the disc to be copied from the Drive drop-down menu.
- Insert the disc that you want to copy into the selected drive.
-
Insert a blank disc.
-
Click the Copy button.
If you are copying via the drive, the copy process starts. If you are using Nero Image Recorder, the Save Image File dialog box appears:
-
Enter a name for your image file in the File Name text box.
-
Select the relevant storage location in the Save to directory tree and click the Save button.
The copy and/or save process starts. You can follow the process status in the status bar. If you are using a single drive for copying, you will be prompted to remove the source disc and to insert a suitable blank disc after the image file has been written.
- Click the Next button.
You have successfully copied a disc.
11.3 Copy settings
In the New Compilation window, define the options for copying at the beginning of the copy procedure. You can use the Copy button in the main screen to open the window. The New Compilation window consists of a drop-down menu, various buttons, and tabs.
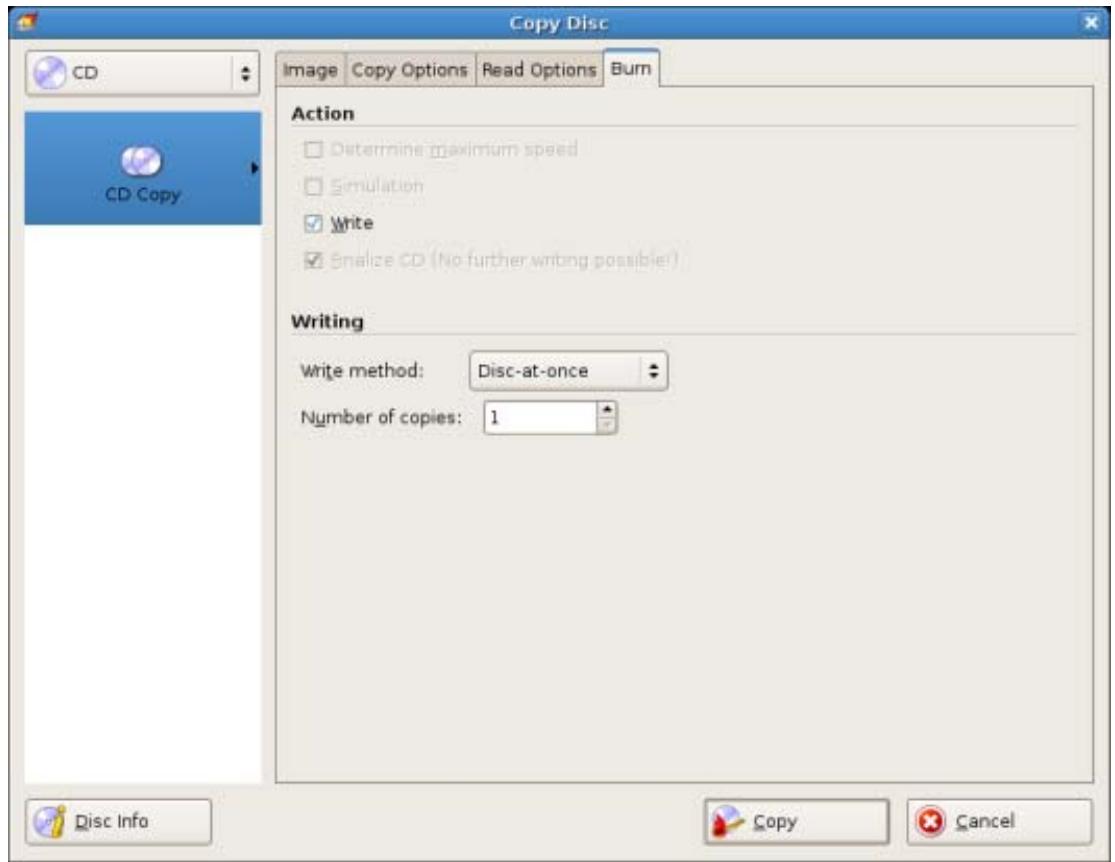
Copy settings
Only those disc types supported by the recorder are displayed in the drop-down menu. If the recorder can only burn CDs, the drop-down menu is grayed out.

Using Nero Linux you can create image files for disc types that the installed recorder cannot burn. You can enable this function via the File > Options > Expert Features menu, Enable all supported recorder formats for image recorder check box. The drop-down menu in the Compilation window then makes available all supported disc types.
The following configuration options are available:
| Button Disc Info | Displays information on the disc inserted, such as contents (if any) or available capacity for instance. |
| Button Copy | Starts the copy process. |
| Button Cancel | Closes the New Compilation window. |
The following tabs are available:
| Image | Gives the path to the temporary image file and provides information on the speed of the hard drive. |
| Copy Options | Contains options for configuring copying. |
| Read Options | Contains options for configuring reading of the original disc. |
| Writing | Contains options for configuring the burn process. |
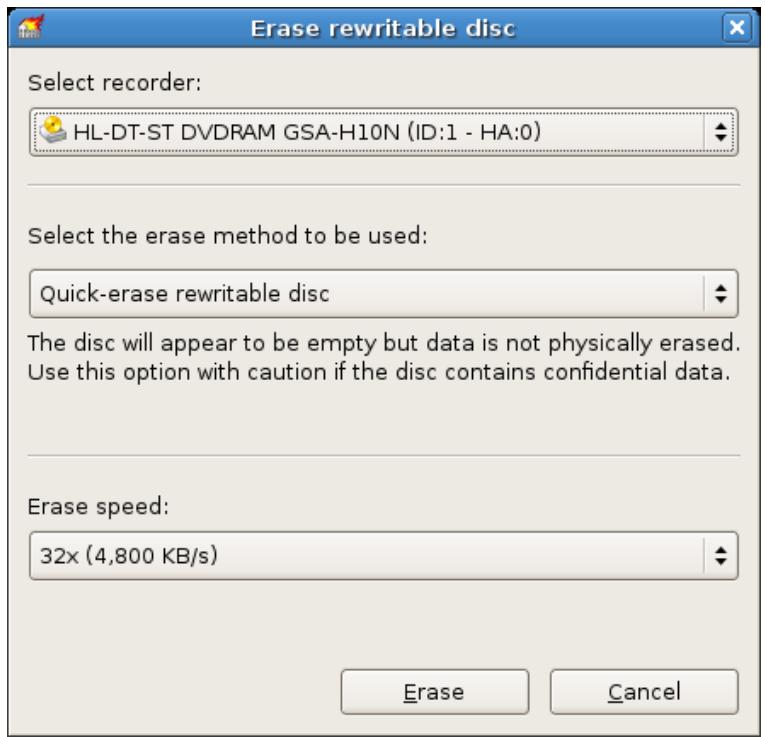
12 Erase Rewritable Disc window
Nero Linux can be used to erase rewritable discs, i.e. discs with the RW specification, as long as your recorder supports this feature. Two erase methods are available for this purpose:
Quick erasing does not remove the data physically from the disc, but instead only makes it inaccessible by erasing the references to existing content. The data can be restored!
Full erasing removes the data from the disc by overwriting it with zeroes. The contents cannot be restored with conventional methods. Repeated full erasing increases the probability that third parties will not be able to reconstruct the contents.
Erase Rewritable Disc window
The following configuration options are available in the Erase Rewritable Disc window :
| Selection list Select recorder | Defines the desired recorder. |
| Selection list Select the erase method to be used | Defines the erase method. Two options are available: The Quick-erase rewritable disc method does not physically erase the disc fully, but only the references to the contents. The disc will appear to be empty even though the data is still physically available. Erasing a disc using this method takes between one and two minutes. The Full-erase rewritable disc method physically erases all data from the disc. The contents cannot be restored with conventional methods. Repeated full erasing increases the probability that third parties will not be able to reconstruct the contents. Erasing the disc using this method takes longer than the other method, depending on the type of disc involved. |
| Selection list Erase speed | Defines the erase speed. |
| Button Erase | Starts the erase process. |
| Button Cancel | Cancels the action and closes the window. |
13 Configuration options
You can define options for working with Nero Linux in the Options window.
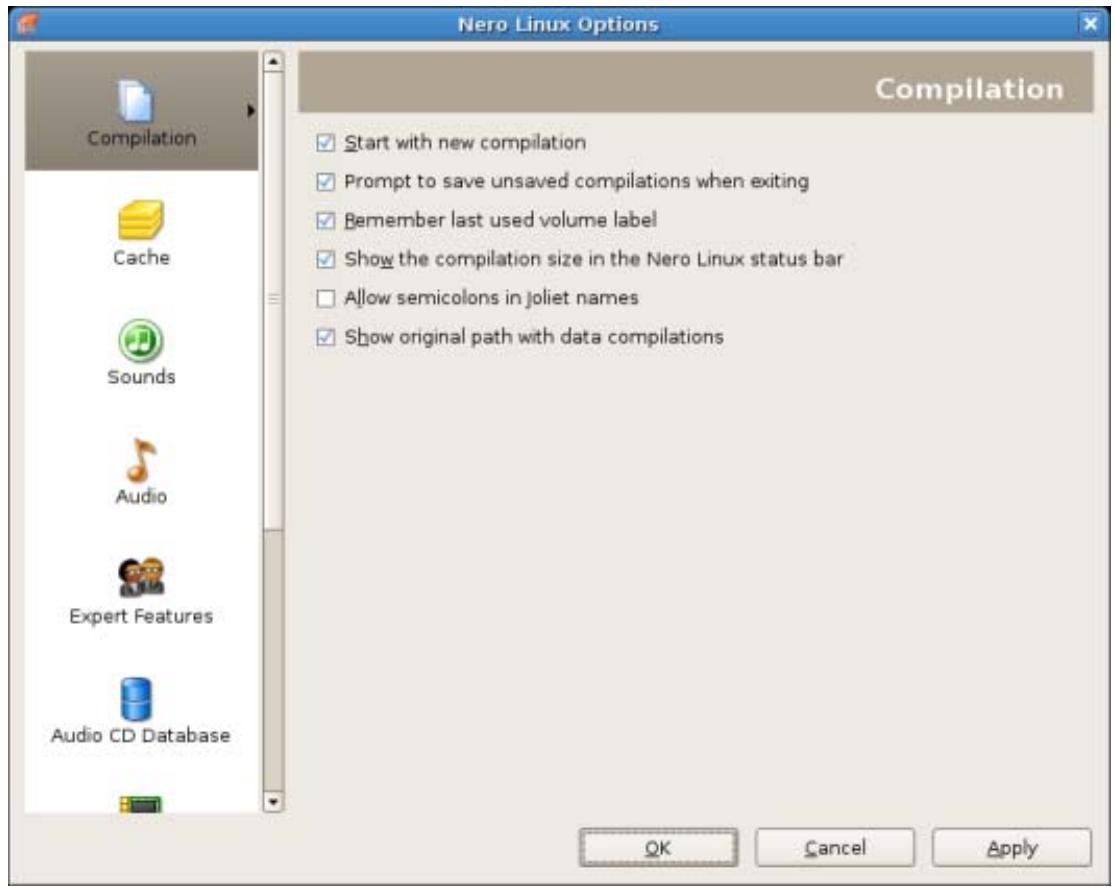
Options Window
The following tabs are available:
| Compilation | Contains options for the compilation and the selection screen. |
| Cache | Contains options for the cache. |
| Font | Contains selection options for the font. |
| Sounds | Contains selection options for sounds in connection with burn tasks. |
| Audio | Displays the directory for the audio plug-ins. |
| Expert Features | Contains options for configuring overburning and burning.We recommend that you retain the default settings. |
| Audio CD Database | Provides the option to use the Internet database. |
| Ultrabuffer | Defines the size of the RAM buffer. |
| System Settings | Allows the system settings to be checked when the program is started. |
| File Browser | Contains options for configuring the file browser. |
| Misc. | Contains options for configuring compilations, burning, the data-base, the user interface as well as advanced settings. |
13.1 Expert Features
The following configuration options are available on the Expert Settings tab:
| Check box Enable Disc-at-once CD over-burning | Enables additional options and defines settings for the entire burn process. |
| Option button Relative maximum/minimum overburning size | Defines how much a disc can be overburned. |
| Check box Enable DVD overburning | Enables the option that DVDs can be overburned. |
| Check box Enable generation of short lead-out | Enables the option to write additional data to your CD. This feature is only available if the Enable Disc-at-once CD overburning option is enabled. |
| Check box Do not eject disc after burning | Enables the option that your disc remains in the recorder and is not ejected when the burn process is finished. |
| Check box Enable all supported recorder formats for image recorder | Enables the option that all supported recorder formats for the Image Recorder are available. |
14 Technical Information
14.1 System requirements
14.1.1 General System Requirements
To install Nero Linux you need administrator rights.
For writing audio and data discs:
800 MHz Intel Pentium III processor, AMD Sempron 2200+ processor or equivalent
At least 128 MB RAM or more
Hard Drive Space:
700 MB free hard drive space for CD images and temporary files
Up to 9 GB free hard drive space for DVD images and temporary files
Up to 50 GB free hard drive space for Blu-ray Disc BD-R/RE dual layer disc images
Optical Device:
CD and/or DVD/DVD-RAM recorder
Optional:
16-bit sound card and speakers
14.1.2 Linux kernel requirements
Linux kernel version
Kernel version 2.4 or higher
Together with Serial ATA recorders, we recommend kernel version 2.6 or higher

How to get the Linux kernel version
To find out which Linux kernel you are using you can enter uname -r into a terminal.

About the Linux kernel version
The kernel is the heart of your Linux system. It provides, for example, the low-level drivers used to access your devices.
In order to identify your devices file names clearly, you need to first know the version of the Linux kernel you are currently using.
14.1.3 Advanced system requirements
Under Linux, all the devices are associated with specific files called device files. All device files that are available on your machine are located inside the /dev directory. Depending on the version of the Linux kernel you are using, your recorder device file name may differ, due to the low-level driver it is using.
In this chapter you will find explanations on how to find your device file names and how to set access on them. In any case, if Nero Linux detects that something is misconfigured on your system, it will warn you when starting.
14.1.3.1 Explanation to device filenames under Linux
Currently, you can have many different interfaces on a recorder: IDE, SCSI, USB, FireWire (IEEE 1394) or Serial ATA.
Most internal recorders are connected to the IDE bus. Linux assigns them a device file according to their position on this bus (bus number and master/slave settings). Basically, you should have the following naming convention:
/dev/hda : Primary Master device
/dev/hdb:Primary Slave device
/dev/hdc:Secondary Master device
/dev/hdd:Secondary Slave device

If you have an additional IDE controller on your motherboard, the filenames scheme is the same, using the remaining letters (for example /dev/hde and /dev/hdf)
SCSI recording devices are handled by two different drivers under Linux, and so two different device files are created to handle one physical device:
/dev/srX or /dev/scdX : Used only to read data from media
/dev/sgX:Used by Nero Linux to communicate with the device
(X is a number identifying your device)
If your recorder is correctly recognized by the Linux kernel it should appear in the file /proc/scsi/scsi. Unfortunately, there is no way to determine the X number from the SCSI coordinates of your recorder. But usually, the numbers are used incrementally, starting from 0, corresponding to the position of the device in the /proc/scsi/scsi file.
Usually all distributions are shipping a kernel configured with these options. Sometimes, depending on your kernel configuration, one of these files can be unavailable. In order to have both, you should make sure that your kernel is configured with the following options:
- CONFIG_SCSI (SCSI support)
- CONFIG_BLK_DEV_SR (SCSI CD-ROM support : provides /dev/scdX)
- CONFIG_CHR_DEV_SG (SCSI generic support : provides /dev/sgX)
For more information about how to configure your kernel for recording CD or DVD, you can refer to the generic Linux HOWTOs, for example see
- CD-Writing HOWTO: http://www.ibiblio.org/pub/Linux/docs/HOWTO/other-formats/html_single/CD-Writing-HOWTO.html
- CDROM-Writing HOWTO: http://www.ibiblio.org/pub/Linux/docs/HOWTO/other-formats/html_single/CDROM-HOWTO.html
14.1.3.1.3 External devices
As all external devices are associated with a virtual SCSI device, the filename scheme is the same as for real SCSI devices (see SCSI devices).
If you do not see your external device in the /proc/scsi/scsi file after you plugged it in, make sure that the kernel is correctly configured. For more information please refer to your Linux distribution documentation.

If your external device is inside the /proc/scsi/scsi file and not present in the recorders list of Nero Linux, make sure you have the SCSI generic support enabled. Most of the time, loading the 'sg' kernel module fix this problem.
14.1.3.1.4 Serial ATA devices
Some new recorders are now coming with a Serial ATA connector instead of the old IDE one. These devices are correctly handled with the 2.6 kernel libata. However we strongly recommend to use a kernel 2.6.19 or higher to use such devices without problems.
Serial ATA devices controlled by the libata are – like external devices – associated with a virtual SCSI device, so they should also appear in the /proc/scsi/scsi file.
14.1.3.2 IDE Devices Configuration
14.1.3.2.1 IDE Devices configuration with 2.4 kernels
With 2.4 kernels, all IDE devices that you want to be available in Nero Linux must use the ide-scsi driver (even CD/DVD readers). This driver associates a virtual SCSI device with a standard IDE device.
Usually, Linux distributions automatically configure everything so that only recorders use this driver. In such cases, you will not be able to use your CD or DVD readers inside Nero Linux and you have to make the device use the ide-scsi driver.
Before you configure a device, make sure that you have configured your kernel with the following options:
- CONFIG_BLK_DEV_IDESCSI (SCSI emulation support)
- CONFIG_SCSI (SCSI support)
- CONFIG_BLK_DEV_SG (SCSI generic support)
Configuring a device, so that it will use the ide-scsi driver, is done by providing a specific argument hdx=ide-scsi to the kernel command line. For example, if the device file corresponding to your recorder is /dev/hdb, you will have to provide hdb=ide-scsi to the kernel command line.
If you do not know how to do this, please refer to your distribution documentation to find out how to pass options to the kernel at boot time. Please also note that most of the actual distributions provide some graphical frontends to modify the boot loader parameters:
- For Red Hat Linux run ksconfig (this application is called Kickstart Configurator). When the application is running, click on Boot Loader Options and fill the Kernel Parameters field.
- For SuSE Linux run YaST2, select System in the left pane and then double-click on Boot Loader Configuration. Once the module is launched, click on Edit Configuration Files to set up the device parameters.
14.1.3.2.2 IDE Devices configuration with 2.6 kernels
With 2.6 kernels, the native IDE CD-ROM driver, called ide-cdrom, has been completely rewritten to use the latest technologies available and permit optical disc recording. This driver includes DMA acceleration that lets you use high-speed devices (like DVD recorders).
Accordingly, the ide-scsi driver (that has been used with lower version kernels) has been deprecated. If you continue using this driver with a 2.6 kernel, your devices will not be available with Nero Linux (note that you will also have a warning message from the kernel at boot time).
In order to use an IDE device with Nero Linux under a 2.6 kernel, you must associate it with the ide-cdrom driver. Therefore, the kernel command line must not be associated with the "old", ide-scsi driver (no hdXX=ide-scsi parameter).
If you do not know how to do this, please refer to your distribution documentation.
14.1.3.3 Setting correct permissions on the devices files
14.1.3.3.1 Setting permissions for static "/dev" support
If you want to give other users access to all disc devices you can do this in Linux by setting correct permissions for corresponding device file names. (Please note: this occurs in the control of the operating system, not in Nero Linux.)
Requirements:
You have enough privileges to do so.
To setup correct permissions on your device files, proceed as follows:
- Open a terminal.
-
Type the following command (where X is the letter corresponding to the IDE device):
-
chmod o+r+w /dev/sg*
-
chmod o+r+w /dev/hdX
-
You can run the last command more that once if you have multiple IDE devices.
Users are given read and write permission on all your SCSI generic devices (CD-ROM for example) and your IDE disc devices.

If you only want to give access to some users, another possibility is to create a new group called for example "nero" and change the group of the device files corresponding to your disc devices with it. Then give read/write permission to the group on these device files and finally, just add all the users that are allowed to use to the newly created group
14.1.3.3.2 udev support
Nero Linux supports udev, the new /dev file system implementation that are used in actual Linux distributions.
With this file system, all permissions is set during boot time using some specific configuration files. In order to make your modifications permanent, you have to change the files located in /etc/udev/rules.d. For more details, you can have a look to udev FAQ.
In some rare cases, an hotplug device that gets plugged in when Nero Linux is already started might not be recognized directly. In such cases, restart Nero Linux.
14.1.3.4 Setting up DMA acceleration on IDE devices
DMA acceleration provides an improvement in throughput for the disc drives, and let you safely use all your recording devices. Depending on your Linux kernel and distribution configuration, you might have DMA acceleration that is automatically enabled on startup.
If your hardware supports it, we recommend enabling DMA acceleration not only for IDE hard disk drives, but also for disc drives such as CD/DVD readers and recorders.
If one of your devices has no DMA acceleration, Nero Linux will warn you when starting the application.
Proceed as follows to activate the DMA acceleration on a device (please note that this setting is performed in the operating system, not in Nero Linux):
- Carry out the following command as root: hdparm -d1 /dev/hdX (where X stands for the letter that corresponds to the IDE device)
DMA acceleration is activated.

This setting is not permanent. If you want to enable DMA at boot time, you can add the command above in one of your startup scripts. As these scripts are distribution dependant, please refer to your distribution documentation to find out how to do this. Please note that most of the distributions have some graphical frontends to configure this.
14.1.4 Supported Distributions
Nero Linux supports the following distributions:
Red Hat Enterprise Linux 4
SuSE Linux 10.0
Fedora 4
Debian GNU/Linux 3.1
Ubuntu 5.10
Linspire 6.0.x
The distributions are supported as of the indicated versions.
14.2 Formats supported
14.2.1 Disc formats
Audio CD
Mixed mode CDs
CD EXTRA
miniDVD
DVD-Video
14.2.2 Disk types
CD
DVD
Blu-ray
HD DVD

You can find more information on Blu-ray support at www.nero.com/link.php?topic id=416.

The actual entries that are available, and the actual disc types (e.g. DVD) that can be written to depend on the recorder used.
14.2.3 Audio formats and codecs
MP3 / mp3PRO
- Moving Picture Experts Group-1 Audio Layer 3 (MP3)
OGG Vorbis (OGG, OGM)
Recourse Interchange File Format WAVE (WAV, WAVE)
Free Lossless Audio Codec (FLAC)
Linear Pulse Code Modulation (LPCM, PCM, L16)
15 Glossary
Blu-ray
Blu-ray technology refers to burning on special data carriers. In comparison to DVD's, which use a red laser in order to read and write data, Blu-ray discs are written with a blue laser. The shorter wavelength (405 nm) of this blue laser makes it possible to position the laser with greater accuracy. Data can be written in a more compact manner and takes up less space on the disc. A Blu-ray disc can store up to 25 GB on a single layer disc and up to 50 GB on a dual layer disc.
Book Type
The book type defines the specification (e.g. DVD-, DVD+, DVD-ROM) of a DVD. In order to ensure correct playback, the DVD specifications are defined in books so that all media can be read correctly. The specifications are defined in the so-called Rainbow Books, which are distinguished by means of their color (e.g. Yellow Book).
Bootable CD
Booting refers to loading the operating system when a computer is started. This is normally done from the hard drive. However, if you do not want to boot or cannot boot your computer from your hard drive for whatever reason, you can load an operating environment from the drive with a boot CD.
CD-R
Compact Disc-Recordable is a technology for write-once media. The Orange Book standard defines the storage of audio data and other computer-readable data.
Image
An image refers to a single file on the hard drive that contains the image for a complete disc. A disk image can be used to create exact copies on media at a later point in time if problems occur during the write process or if no recorder is connected to your PC. The image requires as much free space on the hard drive as the contents of the original disc.
Joliet
Joliet refers to an extension of the ISO-9660 standard for file names. Joliet was designed by Microsoft in order to represent more characters. The file name can be up to 64 characters long and contain the letters A-Z, a-z, umlauts and the .
MP3
The MPEG-1 Audio Layer 3 audio format is used to reduce the size of audio files to a fraction of their original size (factor 1:10) with little loss of quality. You can estimate about 1 MB per minute as opposed to 10 MB for the original files. This value and the quality can vary depending on the complexity of the audio signal. The bit rate used can be used as a measure of quality. The higher the bit rate, the better the quality, but also the more memory required.
MPEG-1
The Moving Picture Experts Group defined this industry standard for video and audio codecs. MPEG-1 is part of the MPEG compression family and has the highest compression rate. MPEG-1 is the format for video CDs.
MPEG-2
The Moving Picture Experts Group defined this industry standard for video and audio c- decs. There is little difference between MPEG-1 and MPEG-2: MPEG-2 is a broadcast stan- dard and better for televisions that are interlaced. MPEG-2 is used as a video format for DVDs.
Multisession
A multisession refers to completing a disc in multiple cycles. After a first session has been written to the disc, information can then be added in another record because the disc has not been finalized.
16 Index
A
Audio
Creating an audio CD 20
Audio CD 10
Configuration options. 21
convert 22
Save to Computer 22
Audio file
Edit 8
Normalize 21
Audio tracks
Fill Titles 23
B
Backup 17
Book Type setting: 31
Bootable Disc 11, 28
burn 29
Booting
Conditions 28
Buffer Underrun. 33
Burn Settings
conduct 32
C
Capacity bar. 13
CD EXTRA 10,21
CD Text 21
Character set
Defining 18
Compilation area. 13
Conventions, manual 6
Copy 36
Copy option 37, 38
D
Data
Create CD/DVD 15
Data disc 10
Data mode. 18
Debian package
Installing 7
Define data 12
Device file. 44
devices
external 45
IDE 44
SCSI. 44
Serial ATA. 45
Disc
Finalize. 33
Disc format. 11
Disc-at-Once 33
DMA acceleration 46
set 47
DVD-Video 11,27
E
El Torito 28
Emulation 28
External devices 45
F
File system 18
1
IDE devices 44
IDE devices
configure 2.4 kernel 45
IDE devices
configure 2.6 kernel 46
Image File
burn. 30
Create 34
Image Recorder 15
Internet Database. 23
ISO 18
L
Length of file name 18
Linux kernel version 43
to find out 43, 44, 45
M
Main Screen 8
Menu Bar 8
Toolbar 8
Manual, conventions 6
Method of working
Basic. 5
Basic Steps. 5
miniDVD 27
Mixed Mode CD 10
Mixed mode CDs. 21
Multisession Disc 17
Continue 17
Starting 17
N
Nero Linux
Installation 7
Installing 7
New Compilation 10
0
Options
Configure 41
Set 41
R
Recorder
Select. 31
Requirements
Memory 43
Rewritable disc 34
Delete 39
Erase method 40
Erasing a Disc 39
RPM package
Installing 7
S
SCSI devices 44
Selection screen. 12
Serial ATA devices. 45
Session
Importing 17
Setting correct permissions on the
device's files
set 46
Simulation 33
T
Track-At-Once 33
Tracks
Save 22
U
udev 47
UDF 19
V
Video
DVD-Video file 27
W
Web browser area. 13
Writing
Burn options. 33
Starting. 34
Write method. 33
X
Xbox™
Create compatible disc 19
17 Contact
Nero Linux is a Nero AG product.
Nero AG
Glendale, CA 91203-2335
USA
Internet: www.nero.com
Help: http://support.nero.com
Fax: (818) 956 7094
E-mail: US-CustomerSupport@nero.com
Nero KK
Rover Center-kita 8F-B, 1-2-2
Nakagawa-chou Tsuraki-ku
Yokohama, Kanagawa
Japan 224-0003
Internet: www.nero.com
Help: http://support.nero.com
Copyright © 2008 Nero AG and its licensors. All rights reserved.