PHO-111 - Audio Amplifier VINCENT - Free user manual and instructions
Find the device manual for free PHO-111 VINCENT in PDF.


User questions about PHO-111 VINCENT
0 question about this device. Answer the ones you know or ask your own.
Ask a new question about this device
Download the instructions for your Audio Amplifier in PDF format for free! Find your manual PHO-111 - VINCENT and take your electronic device back in hand. On this page are published all the documents necessary for the use of your device. PHO-111 by VINCENT.
USER MANUAL PHO-111 VINCENT
Instructions for use
english

Eingangsimpedanz (MC):
Verzerrung:
We thank you for the confidence you prove in purchasing our product. It will match your high demands towards sound and manufacturing quality.
Though it is understandable that you want to plug and play this product instantaneously, we encourage you to read this manual carefully before installation. It will help you in handling and operating this machine in your system and obtaining the best possible performance, even if it was installed by your dealer.
Please follow the security precautions, though some instructions may seem obvious. If there are open questions your audio specialist dealer will help you. He also represents your contact person in case of needed warranty service or repairs after the warranty period and is interested to hear from your experiences with Vincent products.
Your PHO-111 meets the high demands towards analogue audio playback. It performs the correction of the RIAA distortion with highest precision and thus allows you to connect a record player to an amplifier without special Phono input. The highest manufacturing quality and excellent value for money go without saying.
We wish you plenty of joy with your product,
your Vincent-Team
CONTENTS
(SOMMAIRE)
Contents 17
Safety Guidelines 18
Other Instructions 20
Included in Delivery 21
Description of the device 22
Cable Connections and setup 24
Technical Specifications 29
starting at page 16

english
This appliance was produced under strict quality controls. It complies with all established international safety standards. Nonetheless, the following instructions should be fully read and observed in order to prevent any hazard:

Do not open the appliance! Risk of electric shock!
There are no parts in the appliance that require maintenance by the user.

All equipment that is connected to the domestic mains voltage can be dangerous to the user if not handled properly. Use the delivered AC adaptor exclusively. In case of a failure have your specialist replace it by an appropriate substitute. Leave repair work to qualified professionals. Altering the product or manipulating its serial number voids the warranty.
The AC power supply adaptor must not be opened. The device is only permitted for the connection to AC 230V / 50Hz , for grounded mains sockets and for indoor use. Always pull the adaptor casing and never the power cable if you want to disconnect the power supply from the mains power. Make sure when setting up the appliances that the power cable is not squashed, severely bent or damaged by sharp edges.
Unplug the power supply from the mains before you establish or remove cable connections, leave the units unused for a longer period or want to clean its surface. On all amplifiers and receivers, wait approx. 1 minute after this before disconnecting or reconnecting the cable.
SAFETY GUIDELINES
Do not use abrasives, solvents, thinners, flammable chemicals, polishes and other cleaning products that leave stains. Although both appliances only generate heat on a small scale make sure that the surrounding air can circulate.
Always connect the AC adaptor to the mains before you switch on the amplifier/preamplifier!
Take special attention that both appliances do not come in contact with liquids, moisture, rain or water vapour. Keep them in safe distance towards water containers, vases etc. Never expose the appliances to high temperatures (direct sunshine) or strong vibration.
We strongly recommend that you keep the original packaging in case you need to transport the equipment again at a later date.
Explanation of the symbols

The lightening bolt tells you that dangerous voltages are present in the appliance, which can cause an electric shock.

This symbol brings your attention to particularly important information regarding operation and maintenance.

This symbol identifies useful information and advice about how to handle the appliance.
OTHER INSTRUCTIONS
Old electronic equipment

This appliance is subject to the conditions set out in the European Directive 2002/96/EC. This is identified by the symbol of a crossed out waste bin on the appliance. All old electrical and electronic equipment that is no longer used must be disposed of separately from domestic waste using places provided by the authorities. For further information about disposing your old appliance, please consult your local authority, waste disposal agency or the shop where you bought the product.
CE sign

This appliance complies with the current EU directives that are obligatory for the admission to print the CE logo and thus meets the requirements for electrical and electronic equipment (EMC regulations, Safety regulations and regulations for low voltage equipment).
Vincent works continually to improve and develop its products. Therefore, the appearance and technical design of the appliances are subject to changes, as long as they are in the interest of progress. The content of these instructions is for information purposes only. It can be changed at any time without prior notice and does not constitute any obligation on the part of the trademark's owner. The latter assumes no responsibility or liability for errors or inaccuracies, which may be included in these operating instructions.
OTHER INSTRUCTIONS
Vincent is a registered trademark of Sintron Vertriebs GmbH, 76473 Iffezheim.
This document was written by Andreas Boer. It is a product of Sintron Vertriebs GmbH, 76473 Iffezheim and may not be copied or distributed partly or in full without express, written consent.
INCLUDED IN DELIVERY
Please check the contents of the packaging, which in addition to the appliance should contain the following accessories:
1 power supply "AC ADAPTOR"
this manual
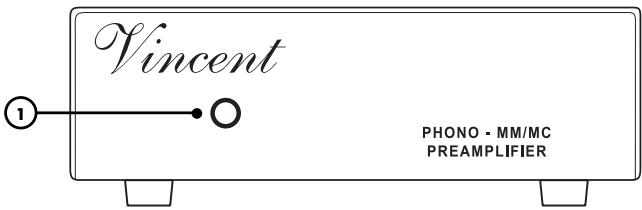
FRONT VIEW
REAR VIEW
1. POWER LED
This LED is lit as long as the PHO-111 is connected to its power supply that is connected to the mains and ready for use.
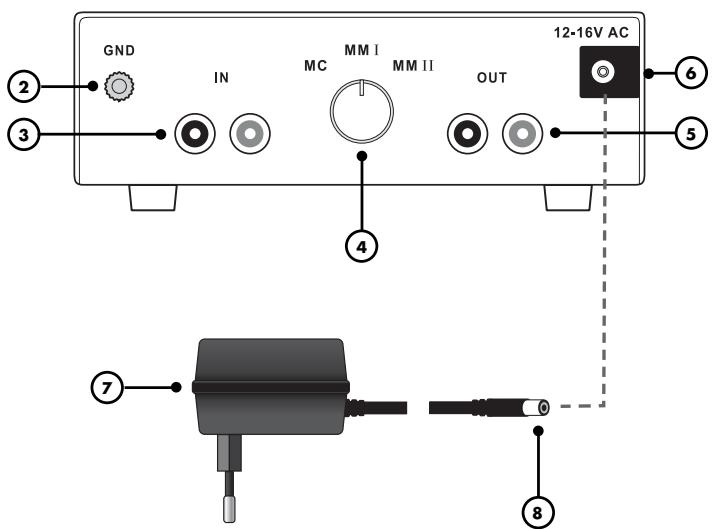
2. GND: Ground clamp for the record player
In addition to the stereo signal connection cable most record players are equipped with a grounding cable that can be recognized by the cable lug at the end of the cable. This lug has to be fitted to the clamp "GND".
3. IN: signal input from the record player
The audio output (or as well an attached audio cable) of the record player must be connected to these input sockets.
4. MC/MM I/MM II: pickup type switch
At this switch the type of record player pickup system has to be selected to adapt the phono preamplifier PHO-111 to that system. See section "Setting the type and electrical capacity of the pickup system".
5. OUT: signal output to the amplifier
A pair of RCA input sockets of your system's audio amplifier must be connected with these output sockets.
6. 12-16V AC: power supply input of the PHO-111
Plug in the power connector at the end of the cable (8) of the supplied AC adaptor (7). Connect the AC adaptor to the mains voltage. Always connect the AC adaptor to the mains before you switch on the amplifier/preamplifier!
Power Supply
7. AC ADAPTOR: power supply with power plug
This power supply adaptor is supplied with the PHO-111 and converts the mains voltage to a more suitable supply voltage. After you made the connection to the PHO-111, plug it into a mains socket as the last step of the Installation.
8. Power Supply Cable
Make a connection to the PHO-111 back plate power socket (6).
CABLE CONNECTIONS AND SETUP
Establish the cable connections in the order specified below. Never make changes to the cable connections while the devices are switched on!
Mechanically identical RCA plugs are available for input and output connections. Make sure that you do not get these connections confused during installation! Also make sure that you do not mix up the analogue inputs for right and left. The RCA plugs for these are frequently colour coded as follows: red for the right channel, black or white for the left channel. Make sure that all plugs fit tightly. Inadequate connections can cause noise interference, failures and malfunctions.
Place the device on a suitable, stable surface. Do not keep it hanging at its cables. Make sure that the weight of the cabling does not cause the PHO-111 to lose contact to its base. The phono preamplifier processes very sensitive electric signals. That is why you should place both appliances at maximum distance to potential sources of disturbance like mains cables, mobile phones, switching power supplies, transformers, computers and main amplifiers. To make the most of your system's sound quality, we recommend placing the equipment on Vincent racks and not putting them on top of each other.
Connect the audio cable of the record player to the RCA sockets "IN" (3) of the PHO 111. Establish a tight connection of the grounding cable at the clamp "GND" (2). Some record players are not equipped with a separate grounding cable.

RCA connection
CONNECTION OF THE AMPLIFIER
Connect the output sockets "OUT" (5) of the PHO 111 to a standard line level input of your integrated amplifier or preamplifier. These kind of inputs are in most cases named "CD", "TUNER", "AUX", "S1" or "LINE1". Do never connect an amplifier input that is named "PHONO"!

RCA connection
SETTING THE TYPE AND ELECTRICAL CAPACITY OF THE PICKUP SYSTEM
Depending on the construction principle of the record player pickup system the PHO-111 must be adjusted to the correct operating mode using the switch "MC/MM I/MM II" (4). The two pickup types that are used in most cases are named "MM" (moving magnet) and "MC" (moving coil). All information you need should be written in the pickup system data sheet or the record player user manual. In case of doubt ask your local HiFi specialist.
If your record player is equipped with an MC system that is no "high output MC system", the mode switch "MC/MM I/MM II" (4) must be set to "MC". Any additional adaption to the pickup system is not possible.

High output MC systems are MC systems with a nominal output voltage of more than 1.5mV .
If your record player is equipped with an MM system or a "high output MC system", the mode switch "MC/MM I/MM II" (4) must be set to one of the options "MM". They both differ in the electrical capacity of the input "IN". This capacity value must harmonize with the record player pickup system. If the input capacity is set too low, you will experience a continuous attenuation with rising frequency. If the input capacity is set too high, there will be a local gain maximum in the audible frequency range and a continuous attenuation with rising frequency, starting from the local maximum.
SETTING THE TYPE AND ELECTRICAL CAPACITY OF THE PICKUP SYSTEM
In the setting "MM I" the effective capacity value of the input "IN" is 100 pF, in the setting "MM II" it will be 300 pF. To make a decision you can choose the value that is nearest to the capacity value given in the data sheet of the record player pickup system or in the user manual of the record player. Regarding the fact that the audible effect is perceived differently by different persons and that it depends on personal preference it is possible that the other setting will prove more suited. You are encouraged test both options and choose the setting that leads to the playback result you like most (sound colour, spatiality). There is no hazard in switching between "MM I" and "MM II". Any additional adaption to the pickup system is not possible.
If your record player is equipped with a crystal pickup system or if it contains a phono preamplifier then the record player must be connected to the amplifier's line level input directly and an external phono preamplifier is not necessary.
Your local HiFi specialist will assist you if there is any help needed. He will set up your record player if you let him.
CONNECTION OF THE POWER SUPPLY
Plug in the power supply cable (8) to the PHO-111 power socket "12-16 V" (6). Check whether the wall mains socket provides the appropriate mains power, which is the case if it is supplied with 230VAC50Hz . After all other cable connections have been made push the power supply into a mains socket. By doing this the PHO-111 is switched on. As long as the PHO-111 is connected to a live mains supply the Power LED (1) is lit. The preamplifier PHO-111 is not equipped with a power switch. It should not be separated from the mains except if you intend not to use it for one or more weeks. By doing this you make sure the circuitry keeps a constant temperature to guarantee the best audio quality.

Always connect the AC adaptor to the mains before you switch on the amplifier/preamplifier!
TECHNICAL SPECIFICATIONS
RIAA tolerance/deviation:
Output Voltage:
Input Impedance (MM I+II):
Input Impedance (MC):
Input Impedance (MM I):
Input Impedance (MM II):
Input Impedance (MC):
Distortion:
Signal-Noise-Ratio:
External Power Supply:
Inputs:
Outputs:
Dimensions (W× H× D)
Weight:
Colour:
20 Hz - 20 kHz (max. 0.5 dB)
200 mV (1 kHz)
4 mV (1 kHz)
0.45 mV (1 kHz)
47 kΩ (100 pF)
47 kΩ (300 pF)
100Ω (100 pF)
< 0.0005%
MM I and MM II > 88 dB
MC >78dB
12 V-16 V AC, 150 mA
1x RCA stereo
1x RCA stereo
145× 55× 125mm
0.5 kg
black / silver
Chers client !
Please keep the receipt, store it together with this manual. The receipt is your proof for the beginning of the warranty period. Note the serial number in the following box, you can read it from the rear side of the device.
www.sintron-audio.de
© Mai 2009
International Distributor: