
HSC 171 - Headphones AKG - Free user manual and instructions
Find the device manual for free HSC 171 AKG in PDF.

| Product type | Professional headset |
| Brand | AKG |
| Model | HSC 171 |
| Microphone | Electret condenser |
| Microphone polar pattern | Cardioid |
| Microphone frequency response | 20 - 20,000 Hz |
| Microphone sensitivity | 25 mV/Pa |
| Maximum sound pressure level (microphone) | 126 dB SPL (1% THD) |
| Equivalent noise level | 22 dB(A) |
| Microphone impedance | ≤ 200 Ω |
| Microphone power supply | Phantom power 9 - 52 V |
| Microphone current consumption | ≤ 2 mA |
| Headphone type | Closed-back dynamic, on-ear |
| Headphone frequency response | 18 - 26,000 Hz |
| Sound pressure level (headphone) | 94 dB SPL/mW |
| Nominal input power (headphone) | 200 mW |
| Nominal headphone impedance | 55 Ω |
| Total harmonic distortion (headphone) | < 0.4 % |
| Headset connector | 6-pin mini-XLR |
| Cable | 3 m, partially coiled, detachable (2x3 pins) with 6-pin mini-XLR, 6.35 mm stereo jack (headphone) and 3-pin male XLR with HSC-PA adapter (microphone) |
| Weight | 250 g |
| Finish | Matte black |
| Care instructions | Clean with a slightly damp cloth; do not use solvents or abrasive cleaners |
| Safety | Ensure the connected device complies with safety regulations and has a ground connection |
| Available spare parts | Ear pads (ECV 171: velour, part no. 2955Z2501; ECL 171: smooth, part no. 2908Z1301), windscreen W 44 (part no. 2344Z0101), replacement cable MK HSC with adapter (part no. 2397Z0015) |
Frequently Asked Questions - HSC 171 AKG
User questions about HSC 171 AKG
0 question about this device. Answer the ones you know or ask your own.
Ask a new question about this device
Download the instructions for your Headphones in PDF format for free! Find your manual HSC 171 - AKG and take your electronic device back in hand. On this page are published all the documents necessary for the use of your device. HSC 171 by AKG.
USER MANUAL HSC 171 AKG
User Instructions 12
Please read the manual before using the equipment!
Mode d'emploi 22
- Please make sure that the piece of equipment your microphone will be connected to fulfills the safety regulations in force in your country and is fitted with a ground lead.
1.2 Environment
- When scrapping the equipment, separate the case, circuit boards, and cables, and dispose of all components in accordance with local waste disposal rules.
- The packaging of the equipment is recyclable. To dispose of the packaging, make sure to use a collection/recycling system provided for that purpose and observe local legislation relating to waste disposal and recycling.

2 Description
2.1 Introduction
Thank you for purchasing an AKG product. This Manual contains important instructions for setting up and operating your equipment. Please take a few minutes to read the instructions below carefully before operating the equipment. Please keep the Manual for future reference. Have fun and impress your audience!
2.2 Unpacking
Table 1: Headsets and standard accessories.
| HSC 171 | HSC 271 | HSD 171 | HSD 271 | HSD 271 Single |
| 1 x HSC 171 headset | 1 x HSC 271 headset | 1 x HSD 171 headset | 1 x HSD 271 headset | 1 x HSD 271 Single headset |
| 1 x connecting cable with HSC-PA phantom power adapter for microphone | 1 x connecting cable | |||
| 1 x W 44 windscreen for microphone | 1 x W HSD windscreen for microphone | |||
| 2 x velour ear pads for headphones | 1 x velour ear pad for head-phones | |||
Check that the packaging contains all of the items listed for your model. Should any item be missing, please contact your AKG dealer.
2.3 General Description
Each of the professional headsets HSC 171, HSC 271, HSD 171, HSD 271, and HSD 271 Single combines a pair of AKG Studio line headphones or a single earphone with a high quality dynamic or condenser microphone mounted on a flexible microphone arm. The frequency response of each microphone has been designed specifically for speech reproduction and ensures excellent audio quality. The microphones are shock mounted to minimize handling noise.
The microphone arm features a microphone mating function and swivels through a 270-degree arc so you can wear the headset with the microphone on your left or right.
The 10-foot (3-m) connecting cable has a coiled section and interfaces with the headset through a 6-pin mini XLR connector. This connection allows you to replace the cable quickly and easily.
All models are suited for any radio or TV application requiring optimum speech reproduction.
Table 2: Distinguishing features of each model.
| HSC 171 | HSC 271 | HSD 171 | HSD 271, HSD 271 Single | |
| Microphone | condenser | condenser | dynamic | dynamic |
| Headphones | supraaural | circumaural | supraaural | circumaural |
| Headphone ON/MUTE function | - | ✓ | - | ✓ |
2.4 Differences between Models
3 Setting Up

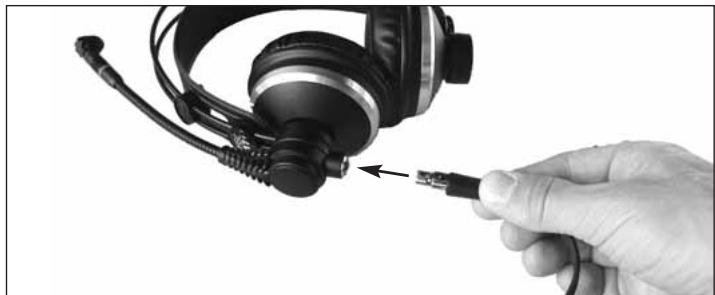
Fig. 1: Plugging the connecting cable into the headset.
- Insert the 6-pin mini XLR connector (1) on the connecting cable into the matching socket (2) on the headset and push home to the point that the connector will lock with an audible click.
3.1 Plugging in the Connecting Cable
Refer to fig. 1.
3.2 Connecting to Audio Equipment 3.2.1 HSC 171, HSC 271
Table 3: HSC 171 and HSC 271 connector pinouts.
| 6-pin mini XLR connector | 1/4" jack plug | XLR connector on phantom power adapter | |||
| 1 | Microphone | shield, ground, audio return, neg. supply vol- age | 1 | shield, ground | |
| 5 | audio inphase, pos. supply vol- age | 2 | audio inphase, pos. phantom vol- age | ||
| 6 | mute signal | 3 | audio return, neg. phantom voltage | ||
| 2 | Headphones | shield, ground | shaft | ||
| 3 | audio left | ring | |||
| 4 | audio right | tip | |||
- Switch power to the mixer OFF.
- Plug the jack plug into the desired headphone output.
- Plug the XLR connector into the desired microphone input.
- Switch power to the mixer ON.
- Switch phantom power ON.
3.2.2 HSD 171, HSD 272, HSD 272 Single
Table 4: HSD 171, HSD 271, and HSD 271 Single connector pinouts.
| 6-pin mini XLR connector | 1/4" jack plug | XLR connector on phantom power adapter | |||
| 1 | Microphone | shield, ground | 1 | shield, ground | |
| 5 | audio inphase | 2 | audio inphase | ||
| 6 | unused | 3 | shield, ground | ||
| 2 | Headphones | shield, ground | shaft | ||
| 3 | audio left | ring | |||
| 4 | audio right | tip | |||
- Switch power to the mixer OFF.
-
Plug the jack plug into the desired headphone output.
-
Plug the XLR connector into the desired microphone input.
- Switch power to the mixer ON.
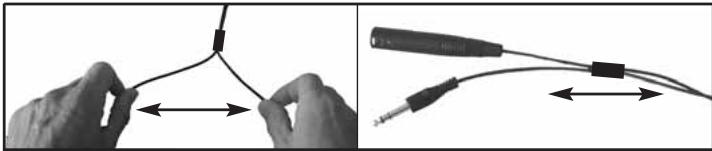
The microphone cable is welded to the headphone cable. If the headphone output is too far away from the microphone input, you can simply pull the microphone cable away from the headphone cable. The sliding bush lets you bundle the separated cables together again.
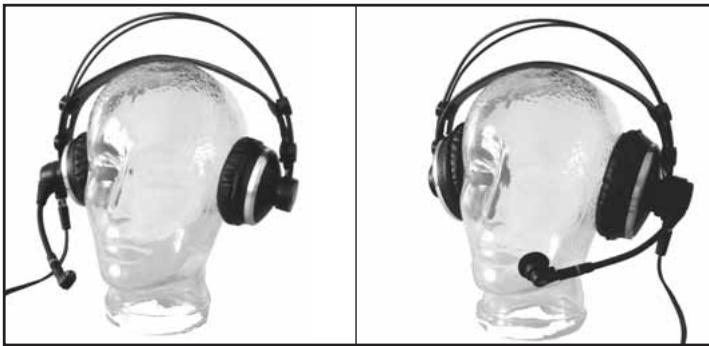
The microphone arm swivels through an arc of 270 degrees, allowing you to put the headset on with the microphone sitting in front of either the left or right corner of your mouth as required by the job at hand or dictated by available space.
The microphone arm of each model features an automatic ON/MUTE switch.
3.2.3 Connecting Cable
Fig. 2: Separating microphone and headphone cables.
Refer to fig. 2.
3.3 Putting the Headset On
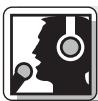
Fig. 3: Two ways of wearing the headset.
Refer to fig. 3.
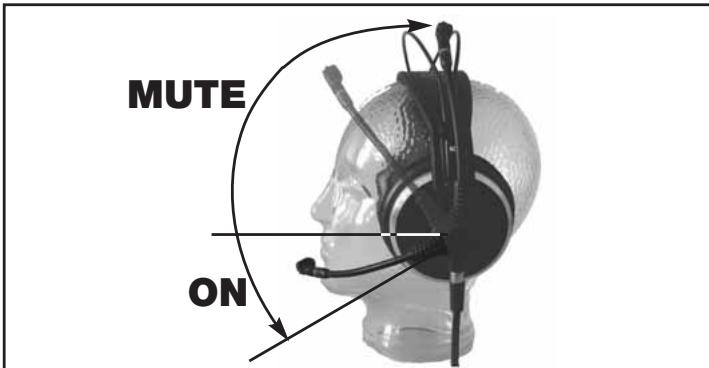
3.4 Switching the Microphone ON/OFF and Testing It
Fig. 4: The microphone arm of each model switches the microphone ON or MUTEs it.
Refer to fig. 4.
- To switch the microphone ON, move the microphone arm down far enough to place the microphone in front of the corner of your mouth. The microphone will switch ON as soon as the microphone arm reaches a position lower than horizontal.
- Talk into the microphone.
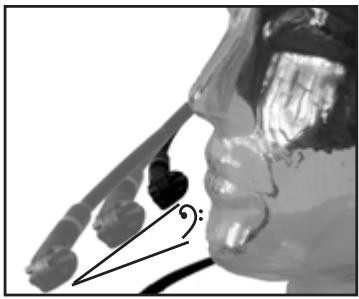
Fig. 5: The microphone sound depends on the microphone's distance from the mouth.
Refer to fig. 5: The flexible microphone arm allows you to adjust the microphone sound by varying the working distance. As you move the microphone away from your mouth, the bass content (and overall level) of the audio signal will decrease.
3.5 Switching Headphones ON/OFF (HSC 271, HSD 271, HSD 271 Single)
- To mute the microphone, move the microphone arm up into its detented center position. The microphone will be muted as the microphone arm reaches a position higher than horizontal.
The headphones on models HSC 271, HSD 271, and HSD 271 Single will switch ON automatically as you put the headset on. When you take the headset off, the headphones will switch OFF automatically. This prevents the headphone signal from leaking into the microphone on taking the headset off.
Note: The on/off switch is actuated by the headband. If you hang the headset up by the headband, the headphones may switch ON.
Note: The headphones on models HSC 171 and HSD 171 feature no automatic on/off switch.
4 Operating Notes
4.1 Windscreens
W44
(HSC 171/271), W HSD
(HSD 171/271/271 Single)
If you use the headset in the open or need to place the microphone extremely close to your mouth, we recommend using the supplied foam windscreen.
- Slide the windscreen onto the microphone capsule.
- Pull the windscreen over the outer edge of the microphone capsule.
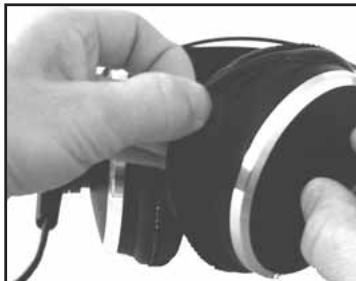
Refer to fig. 6:
- Pull the ear pad(s) off the earphone(s).
- To attach the new ear pad(s), pull the elastic hem of each ear pad over the rim of the earphone base plate all around.
4.2 Replacing Ear Pads
Fig. 6: Replacing ear pads.
Refer to fig. 7:
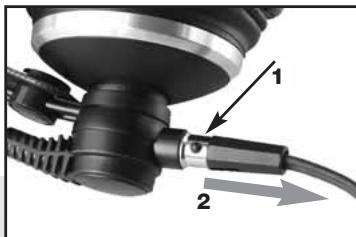
- Grasp the connector, depressing the locating button.
- Pull the connecting cable off the headset.
Note: When you connect the cable again, the connector will lock automatically.
4.3 Unplugging the Connecting Cable
Fig. 7: Unplugging the connecting cable.
- To prevent the microphone from picking up unwanted signals or causing feedback (models HSC 171 and HSD 171 provide no headphone muting function), be sure to move the microphone arm into its vertical center position every time before taking the headset off. This keeps the microphone signal muted even if the microphone channel remains open.
The HSC-PA phantom power adapter features a bass cut filter to suppress low-frequency noise and reduce proximity effect. The headsets are delivered with the bass cut filter deactivated. To activate the bass cut filter:
4.4 Unwanted Noise, Feedback
4.5 Bass Cut Filter (HSC 171, HSC 271)
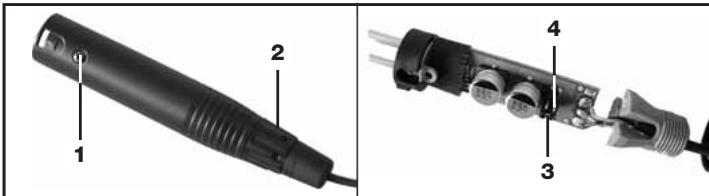
Fig. 8: Opening the phantom power adapter.
- Disconnect the phantom power adapter from the mixer input.
- Remove the fixing screw (1) from the phantom power adapter.
- Unscrew the cable bushing (2).
- Pull the pcb out of the shell WITH EXTRA CARE.
- Remove the jumper (3) from the contact pins (4) to activate the bass cut filter.
In order not to lose the jumper (3), place it on any two contact pins (4) in a position at right angles to the ON position.
Refer to fig. 8.
Refer to Table 5.
- To deactivate the bass cut filter, place the jumper (3) on any two contact pins (4) as per Table 5 below.
Table 5: Jumper positions for activating and deactivating the bass cut filter.
| Bass cut filter ON | Bass cut filter OFF | ||||
- Push the pcb into the shell, replace and tighten the fixing screw (1), and screw the cable bushing (2) onto the blue strain relief (5).
4.6 Deactivating the Microphone Muting Function
Refer to fig. 8.
- Disconnect the phantom power adapter from the mixer input.
- Remove the fixing screw (1) from the phantom power adapter.
- Unscrew the cable bushing (2).
- Pull the pcb out of the shell WITH EXTRA CARE.
Fig. 9: Microphone muting function ON (a) and OFF (b).
| a | b |
Refer to fig. 9.
Refer to fig. 8.
- Unsolder the green wire from the pcb and insulate the stripped end with insulating tape.
- Push the pcb into the shell, replace and tighten the fixing screw (1), and screw the cable bushing (2) onto the blue strain relief (5).

5 Cleaning
5.1 Headphones, Microphone, Connecting Cable
Important!
- Disconnect the headphone and microphone cables from the mixer.
- Use a cloth moistened (not wet!) with water to clean the surfaces of the equipment.
5.2 W 44, W HSD Windscreens Important!
- Never use caustic or scouring cleaners or cleaning agents containing alcohol or solvents since these may damage the enamel or plastic parts.
- Remove the windscreen from the microphone.
-
To avoid damaging the windscreen fixed on the microphone, be extremely careful in removing the W HSD from the HSD 171/271/271 Single microphone!
-
Wash the windscreen in soap suds.
- Allow the windscreen to dry overnight.
- Slide the windscreen onto the microphone capsule.
- Pull the windscreen over the outer edge of the microphone capsule.
6 Specifications

| HSC 171 | HSC 271 | |
| Microphone | ||
| Type: | prepolarized condenser micro- phone | prepolarized condenser micro- phone |
| Polar pattern: | cardioid | cardioid |
| Frequency range: | 20 Hz to 20 kHz | 20 Hz to 20 kHz |
| Sensitivity: | 25 mV/Pa | 25 mV/Pa |
| Max. SPL for 1% THD: | 126 dB | 126 dB |
| Equivalent noise level: | 22 dB(A) | 22 dB(A) |
| Signal/noise ratio (A-weighted): | 72 dB | 72 dB |
| Electrical impedance: | ≤200 ohms | ≤200 ohms |
| Recommended load impedance: | ≥2000 ohms | ≥2000 ohms |
| Power requirement: | 9 to 52 V phantom power | 9 to 52 V phantom power |
| Current consumption: | ≤2 mA | ≤2 mA |
| Headphones | ||
| Type: | closed-back, supraaural dynamic headphones | closed-back, circumaural dynamic headphones |
| Sensitivity: | 94 dB SPL/mW | 94 dB SPL/mW |
| Frequency range: | 18 Hz to 26 kHz | 16 Hz to 28 kHz |
| Power rating: | 200 mW | 200 mW |
| Rated impedance: | 55 ohms | 55 ohms |
| THD: | <0.4% | <0.3% |
| System | ||
| Connector: | 6-pin mini XLR connector | 6-pin mini XLR connector |
| Cable: | 2 x 3-conductor; separable; 10 ft. (3 m) long; coiled section; with 6-pin female mini XLR connector, 1/4" TRS jack plug (headphones), and 3-pin XLR connector w/integrated HSC-PA phantom power adapter (microphone) | 2 x 3-conductor; separable; 10 ft. (3 m) long; coiled section; with 6-pin female mini XLR connector, 1/4" TRS jack plug (headphones), and 3-pin XLR connector w/integrated HSC-PA phantom power adapter (microphone) |
| Finish: | matte black | matte black |
| Weight: | 250 g (8.8 oz.) | 300 g (10.6 oz.) |
| HSD 171 | HSD 271, HSD 271 Single | |
| Microphone | ||
| Type: | dynamic | dynamic |
| Polar pattern: | hypercardioid | hypercardioid |
| Frequency range: | 60 Hz to 17 kHz | 60 Hz to 17 kHz |
| Sensitivity: | 1 mV/Pa (-60 dBV) | 1 mV/Pa (-60 dBV) |
| Max. SPL for 1%/3% THD: | 124/128 dB | 124/128 dB |
| Equivalent noise level: | 15 dB(A) | 15 dB(A) |
| Electrical impedance: | ≤600 ohms | ≤600 ohms |
| Recommended load impedance: | ≥2000 ohms | ≥2000 ohms |
| Headphones | ||
| Type: | closed-back, supraural dynamic headphones | closed-back, circumaural dynamic headphones |
| Sensitivity: | 94 dB SPL/mW | 94 dB SPL/mW |
| Frequency range: | 18 Hz to 26 kHz | 16 Hz to 28 kHz |
| Power rating: | 200 mW | 200 mW |
| Rated impedance: | 55 ohms | 55 ohms |
| THD: | <0.4% | <0.3% |
| System | ||
| Connector: | 6-pin mini XLR connector | 6-pin mini XLR connector |
| Cable: | 2 x 3-conductor; separable; 10 ft. (3 m) long; coiled section; with 6-pin female mini XLR connector, 1/4" TRS jack plug (headphones), and 3-pin XLR connector (microphone) | 2 x 3-conductor; separable; 10 ft. (3 m) long; coiled section; with 6-pin female mini XLR connector, 1/4" TRS jack plug (headphones), and 3-pin XLR connector (microphone) |
| Finish: | matte black | matte black |
| Weight: | 255 g (9 oz.) | HSD 271: 305 g (10.8 oz.)HSD 271 Single: 265 g (9.4 oz.) |
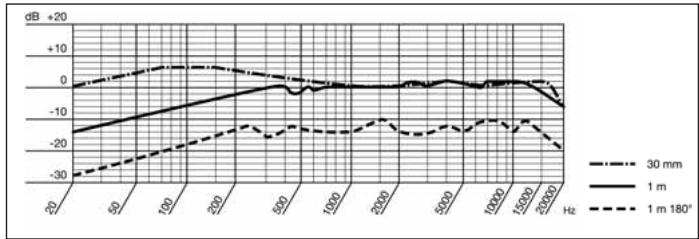
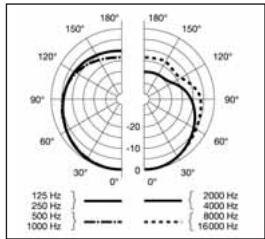
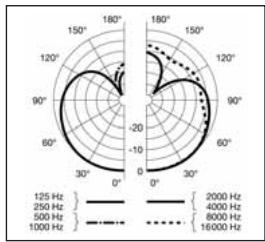
HSC 171, HSC 271 Frequency Response and Polar Diagram
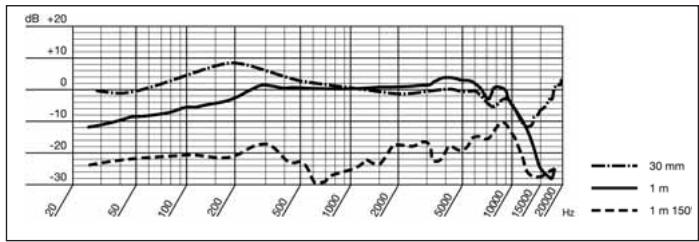
HSD 171, HSD 271, HSD 271 Single Frequency Response and Polar Diagram
This product conforms to the standards listed in the Declaration of Conformity. To order a free copy of the Declaration of Conformity, visit http://www.akg.com or contact sales@akg.com.
6.1 Standards
6.2 Spare Parts List
Spare parts are available from AKG Acoustics GmbH, Serviceabteilung, Lemböckgasse 21-25, A-1230 Wien, Austria. When ordering, be sure to state the appropriate item number for each item.
| Item | Description | Item number |
| ECV 171 | 171 velour ear pad | 2955Z2501 |
| ECV 271 | 271 velour ear pad | 2955Z2601 |
| ECL 171 | 171 smooth ear pad | 2908Z1301 |
| ECL 271 | 271 smooth ear pad | 2058Z1001 |
| W HSD | Windscreen for HSD 171/271/Single | 2955Z2401 |
| W 44 | Windscreen for HSC 171/271 | 2344Z0101 |
| MK HSC | Replacement cable with phantom power adapter for HSC 171/271 | 2397Z0015 |
| MK HSD | Replacement cable with 3-pin XLR connector for HSD 171/271/Single | 2542K0001 |
1.1 Sécurité
3.2.2 HSD 171, HSD 271, HSD 271 Single
Tableau 4: Brochage connecteurs HSD 171, HSD 271, HSD 271 Single
5.2 Bonnettes anti-vent W 44, W HSD Important!
3.2.2 HSD 171, HSD 271, HSD 271 Single
3.2.2 HSD 171, HSD 271, HSD 271 Single
3.2.2 HSD 171, HSD 271, HSD 271 Single
3.3 Colocar o headset
H A Harman International Company
AKG Acoustics GmbH
Bodenseestra 228, D-81243 München/GERANY, Tel: (+49 89) 87 16-0, Fax: (+49 89) 87 16-200, www.akg.com/de, e-mail: infofe@akg.com, Hotline: (+49 89) 87 16-22 50, hotline@akg.com
AKG ACOUSTICS, U.S.
914 Airpark Center Drive, Nashville, TN 37217, U.S.A., Tel: (+1 615) 620-3800, Fax: (+1 615) 620-3875, www.akgusa.com, e-mail: akgusa@harman.com
For other products and distributors worldwide see our website: www.akg.com

- Environment
- Description
- Introduction
- Unpacking
- General Description
- Differences between Models
- Setting Up
- Plugging in the Connecting Cable
- Connecting Cable
- Putting the Headset On
- Switching the Microphone ON/OFF and Testing It
- Operating Notes
- Windscreens
- Refer to fig. 6:
- Refer to fig. 7:
- Deactivating the Microphone Muting Function
- Cleaning
- Headphones, Microphone, Connecting Cable
- W 44, W HSD Windscreens Important!
- Specifications
- Standards
- Spare Parts List
- Sécurité
- Colocar o headset
- AKG Acoustics GmbH
- AKG ACOUSTICS, U.S.
Brand : AKG
Model : HSC 171
Category : Headphones