
HEARO 777 QUADRA - Headphones AKG - Free user manual and instructions
Find the device manual for free HEARO 777 QUADRA AKG in PDF.

| Product type | Wireless headphone with transmitter |
| Brand | AKG |
| Model | HEARO 777 QUADRA |
| Category | Headphones |
| Headphone weight | Approx. 320 g (with batteries) |
| Transmitter weight | Approx. 500 g (HEARO 777 QUADRA) |
| Transmitter power supply | 9 V DC, 500 mA via included power adapter |
| Headphone power supply | 2 NiMH rechargeable batteries 1.2 V or 2 alkaline batteries 1.5 V, AAA size |
| Battery life | Approx. 20 hours with NiMH batteries |
| Maximum range | Approx. 100 meters (open field) |
| Frequency response | 18 Hz - 24 kHz |
| Max. sound pressure level | ~125 dB SPL |
| Distortion | < 1% |
| Headphone type | Dynamic semi-open |
| Modulation | FM |
| Carrier frequency band | 864 MHz (LPD band) |
| Audio features | IVA (virtual acoustics), Dolby Pro Logic, LOGIC7, 3 carrier frequencies, Autotuning |
| Listening modes | Stereo, IVA Stereo, IVA Pro Logic, IVA LOGIC7 |
| Cleaning | Slightly damp cloth, no abrasive or solvent-based products |
| Replaceable parts | Earpads (DELUXE model), rechargeable batteries |
| Warranty | 2 years (subject to conditions) |
Frequently Asked Questions - HEARO 777 QUADRA AKG
User questions about HEARO 777 QUADRA AKG
0 question about this device. Answer the ones you know or ask your own.
Ask a new question about this device
Download the instructions for your Headphones in PDF format for free! Find your manual HEARO 777 QUADRA - AKG and take your electronic device back in hand. On this page are published all the documents necessary for the use of your device. HEARO 777 QUADRA by AKG.
USER MANUAL HEARO 777 QUADRA AKG
H A Harman International Company
AKG Acoustics GmbH
Lemböckgasse 21-25, P.O.B. 158, A-1230 Vienna/AUSTRIA, Tel: (43 1) 86 654-0*, Fax: (43 1) 86 654-516, http://www.akg.com, e-mail: sales@akg.com
AKG Acoustics GmbH
BodenseestraBe 228, D-81243 Munchen/GERMANY, Tel: (089) 87 16-0, Fax: (089) 87 16-200, http://www.akg-acoustics.de, e-mail: info@akg-acoustics.de
AKG ACQUSTICS, U.S.
914 Airpark Center Drive, Nashville, TN 37217, U.S.A., Tel: (615) 620-3800, Fax: (615) 620-3875, http://www.akgusa.com, e-mail: akgusa@harman.com
For other products and distributors worldwide see our website: http://www.akg.com
User Instructions. p. 10
Please read the manual before using the equipment!
AKG Acoustics GmbH hereby declares that the product HEARO 777 (Receiver + Transmitter) complies with the essential requirements and other relevant provisions of Directive 1999/5/E/C.
Connect the AUDIO IN L and AUDIO IN R jacks on the transmitter rear panel to the headphone output or LINE output on your amplifier or CD player. Connecting cables are included with your HEARO 777.
Connect the cable on the supplied AC adapter to the DC 9 V jack on the transmitter rear panel and the adapter to a convenient power outlet.
Remove the protective foil from the left earcup of the headphones and charge the batteries inside the headphones. Refer to section 4.2.
4 Switch the transmitter on by pressing the ON switch.
Switch the headphones on by pressing the POWER switch.
Staying near the transmitter, push the AUTOTUNING button on the headphones to tune the receiver to the transmitter frequency.

Contents
Page
1 Safety and Environment. 11
1.1 Safety 11
1.2 Environment 11
2 Description 11
2.1 Introduction 11
2.2 Unpacking 11
2.3 Optional Accessories 11
2.4 General Description 11
2.5 IVA Individual Virtual Acoustics 11
2.6 Dolby Surround Pro Logic Decoder 12
2.7 LOGIC7 Decoder 12
2.8 Controls 12
13
3 Audio and Power Connections 13
3.1 Connecting the Transmitter to Your Audio Source 13
3.2 Connecting the Transmitter to AC Power 13
4 Operating Notes 13
4.1 Important Notes 13
4.2 Charging the Batteries in the Headphones 13
4.3 Replacing Batteries 14
4.4 Setting Up the System 14
4.5 MODE Key 15
4.6 Replacing Ear Pads (HEARO 777 QUADRA DELUXE) 15
5 Cleaning. 15
6 Troubleshooting 16
7 Specifications. 17
7.1 System Performance 17
7.2 Transmitter 17
7.3 Headphones 17
7.4 Standards. 17
7.5 Dolby, Lexicon 17
8 Warranty Conditions 17
- Operate the headphones with two AAA size 1.2 V rechargeable (supplied) or 1.5 V dry batteries only.
- Never try to charge dry batteries using the transmitter's charging feature.
- Before charging the headphones batteries, always make sure that the batteries in the headphones are rechargeable types.
- Dispos of spent dry or rechargeable batteries conforming to local waste disposal rules. Never throw batteries into the fire.
- Operate the transmitter with the supplied 9 VDC, 500mA AC adapter only. Check that the AC voltage stated on the AC adapter is the same as that available in your country. Using the transmitter with a different AC adapter voids the warranty.
- Always switch the headphones OFF after use.
- Never try to open the headphone or transmitter case. Refer servicing to qualified service personnel only.
- Never place the equipment near heat sources such as radiators or electric heaters, or expose it to direct sunlight, excessive dust, humidity, rain, vibrations, or impacts.
- Never use alcohol, petroleum-based cleaners, or paint thinners to clean the headphone or transmitter case.
10.If you do not use your transmitter for an extended period of time (e.g., when traveling), disconnect the AC adapter from the AC outlet. -
Also refer to section 4.1 Important Notes.
-
Be sure to dispose of used batteries as required by local waste disposal rules. Never throw batteries into a fire (risk of explosion) or garbage bin.
- When scrapping the equipment, remove the batteries, separate the case, circuit boards, and cables, and dispose of all components in accordance with local waste disposal rules.
1.1 Safety
1.2 Environment
2 Description

Dear Customer:
Thank you for purchasing an AKG product. This Manual contains important instructions for setting up and operating your equipment. Please take a few minutes to read the instructions below carefully before operating the equipment.
Please keep the Manual for future reference. Have fun and impress your audience!
If you have any questions beyond the scope of this Manual, do not hesitate to visit our website at: http://www.akg.com
Your headphones system comprises the following components:
HEARO 777 QUADRA
1 pair of headphones
1 transmitter with integrated battery charger
2 stereo connecting cables with gold plated connectors: 1 RCA cable, 1 jack cable (mini jack to 2 x RCA connectors)
1 mini jack to 1 / 4 jack adapter
19 VDC, 500 mA AC adapter for powering the transmitter
2 1.2 V AAA size NiMH rechargeable batteries for powering the headphones (inside the headphones)
1 pair of headphones
1 transmitter with integrated battery charger
2 stereo connecting cables with gold plated connectors: 1 RCA cable, 1 jack cable (mini jack to 2 × RCA connectors)
1 mini jack to 1 / 4^ jack adapter
1 9 VDC, 500mA AC adapter for powering the transmitter
2 1.2 V AAA size NiMH rechargeable batteries for powering the headphones (inside the headphones)
2 velour replacement ear pads
Check that the package contains all the parts listed above. If anything is missing, please contact your AKG dealer.
External charger for headphones
This headphone system
- uses state-of-the-art UHF radio transmission technology;
- connects to any audio, video, TV set, or PC with a headphones or line output;
- provides perfect sound reproduction, full mobility, and signal transmission through walls and ceilings over a distance of up to 330 feet (100 m);
- provides three selectable carrier frequencies and an "Autotuning" function that automatically tunes the headphones to the transmitter frequency for optimum reception;
- uses proprietary IVA technology for exceptionally realistic, three-dimensional listening;
- features an integrated Dolby Surround Pro Logic decoder for perfect reproduction of hi-fi, TV, PC, or video sound in Dolby surround format;
- provides a LOGIC7 decoder for adaptive simulation of up to eight loudspeakers with automatic adjustment to the input signal format and full compatibility to Dolby Surround.
The HEARO 777 QUADRA systems let you share your listening enjoyment with other persons. You can operate your transmitter with several headphones simultaneously. HEARO 777 headphones are also available separately.
One drawback of headphone listening is the psychoacoustic phenomenon of "inside localization": the orchestra seems to play inside your head rather than in the room. AKG developed a binaural audio processing technique called IVA (Individual Virtual Acoustics) that models the way the head and pinnae change the arriving sound waves (ear matching function). Thus, the various sound sources will seem to be located outside your head even when you are using headphones.
2.1 Introduction
2.2 Unpacking
2.3 Optional Accessory
2.4 General Description
2.5 IVA - Individual Virtual Acoustics
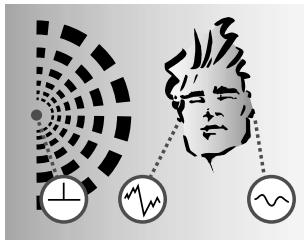
A: Natural hearing: Due to the effect of the head and pinnae, sound waves arriving at one ear differ from those arriving at the other. Amplitude and phase differences create a sense of spatial hearing.
B: Listening through headphones: Amplitude and phase differences are eliminated. Sound sources are localized inside the head rather than in the room.
C: Listening through headphones with IVA processing: The ear matching function modifies the audio signals at the ears to resemble diagram A. This restores natural, spatial hearing.
2.6 Dolby Surround Pro Logic Decoder
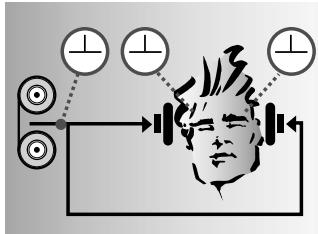
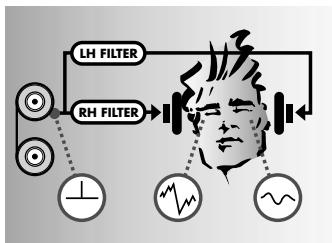
The Dolby Surround Pro Logic decoder integrated in the transmitter uses the stereo input signal to derive two additional signals, a center and a surround channel. The IVA circuitry generates from these signals a binaural signal equivalent to reproduction through five high quality loudspeakers (three front, two rear speakers). This allows you to enjoy all the benefits of Dolby surround sound even through headphones.
2.7 LOGIC7 Decoder
The integrated LOGIC7 decoder allows recordings in all audio formats (mono, stereo, Dolby Surround, and LOGIC7) to be accurately reproduced through headphones. Depending on the momentary signal configuration, two to eight loudspeakers are simulated at any time. Accordingly, the number of simulated speakers may even change automatically during the same piece. Also, the LOGIC7 decoder will derive a surround signal from a stereo input signal and is fully compatible to Dolby Surround.
2.8 Controls
2.8.1 Headphones
Refer to figs. 1 and 12.
- POWER: On/off button surrounded by an annular bicolor status LED (1a).
The status LED will light green to indicate the headphones are ON.
The status LED will light red while the batteries inside the headphones are being charged. - Charging contacts for charging the batteries on the transmitter.
2a Charging jack for the optional external charger. - Battery compartments (beneath the detachable left-hand ear pad): The battery compartments hold two NiMH rechargeable batteries electrically isolated from the receiver circuitry by a protective foil. You cannot charge the batteries before removing the protective foil.
- AUTOTUNING switch: activates the automatic tuning function
- VOLUME control
2.8.2 Transmitter Front Panel
Refer to fig. 2.
- ON: Switches the transmitter on (switch illuminates green) and off (switch extinguishes).
- DISPLAY: Switches the backlighting for all labels except the ON switch and the CHARGE label on and off.
If you switch the backlighting off, it will come back on automatically as soon as you push any front panel switch.
If you switch the transmitter off and back on later, the backlighting will come on again, even if you switched the backlighting off.
- FREQ: Steps through three fixed carrier frequencies within the frequency band of your headphones system.
The labels FREQ 1, FREQ 2, or FREQ 3 will illuminate to indicate the selected frequency.
- MODE: Steps through normal stereo, IVA stereo, IVA plus Dolby Surround Pro Logic, and IVA plus LOGIC7 modes.
The STEREO, IVA, PRO LOGIC, and LOGIC7 labels will illuminate to indicate the selected mode:
| Mode | Label |
| Stereo | STEREO |
| IVA Stereo | STEREO + IVA |
| IVA Pro Logic | PRO LOGIC + IVA |
| IVA LOGIC7 | LOGIC7 + IVA |
- LEVEL: As long as audio signal is present at the transmitter input, the green LEVEL label will flicker in step with the signal level.
Since signal levels are controlled automatically, the transmitter has no input gain knob.
- Charging contacts: The transmitter provides charging contacts in the left-hand earphone receptacle.
When you place the headphones in the receptacles, the batteries inside the headphones will be charged automatically.
- CHARGE: This label indicates the charging function status:
The CHARGE label illuminates to indicate the batteries inside the headphones are being charged. Since the charging circuitry operates independently from the rest of the transmitter circuitry, the CHARGE label will light even if the transmitter is OFF.
The CHARGE label will remain dark when no current flows from the transmitter through the charging contacts to the batteries inside the headphones (transmitter is not connected to power, no headphones resting on the transmitter, no batteries inside the headphones, batteries inserted incorrectly, contaminated charging contacts).
- AUDIO IN L/R: Left and right RCA audio input jacks.
- DC 9 V: Input jack for the AC adapter.
- (1) TRS mini jack input for audio sources.
Rear Panel
Refer to fig. 3.
3 Audio and Power Connections

- Before connecting the transmitter to your audio source, switch the audio source OFF.
- Plug the red RCA connector (right channel) on the supplied jack cable into the red AUDIO IN R socket (13) and the white RCA connector (left channel) into the white AUDIO IN L socket (13) on the transmitter rear panel.
- Connect the stereo mini jack plug of the jack cable to the headphones output of your audio source.
- If the headphones output on your equipment is a 1/4" jack, plug the supplied mini jack to 1/4" adapter jack onto the jack cable. Connect the adapter jack to the headphone output.
3.1.1 Connecting to a
Headphone Output
Refer to fig. 4.
- Before connecting the transmitter to your audio source, switch the audio source OFF.
- Use the supplied RCA cable to connect the white LINE OUT L or REC OUT L jack on your audio source to the white AUDIO IN L jack (13) on the transmitter rear panel and the red LINE OUT R or REC OUT R jack to the red AUDIO IN R jack (13).
3.1.2 Connecting to a LINE or REC Output
Refer to fig. 5.
Alternatively, you can use the supplied jack cable:
- Plug the white RCA connector (left channel) on the jack cable into the white LINE OUT L or REC OUT L socket on your audio source and the red RCA connector (right channel) into the red LINE OUT R or REC OUT R socket.
- Plug the mini jack plug on the jack cable into the jack (15) on the transmitter rear panel.
Refer to fig. 6.
Never connect two audio sources simultaneously to the transmitter inputs. Playing back two audio signals at the same time may cause severe distortion.
Check that the AC voltage stated on the supplied AC adapter is identical to the AC voltage available where you will use your system. Using the AC adapter with a different AC voltage may cause damage to the unit.
- Connect the cable on the supplied AC adapter to the DC 9 V jack (14) on the transmitter rear panel.
- Connect the AC adapter to a convenient AC outlet.
Important!
3.2 Connecting the
Transmitter to AC Power Important!
Refer to fig. 7.

4 Operating Notes

Your HEARO 777 is a radio frequency device that conforms to the strict European and FCC standards. For physical reasons that are not related to the quality of the product, extremely strong interference sources may affect reception. In order to maintain interference-free listening pleasure, do not operate your HEARO 777 in the close vicinity of radio equipment, cellular telephones, or directly above TV or computer monitor picture tubes. The supplied connecting cables are long enough to allow the transmitter to be placed at a safe distance from interference sources.
Reflections off metal surfaces may reduce the range of your transmitter. Therefore, be sure to place the transmitter at least 8 inches (20 cm) away from any kind of metal surface.
Operating switches on or connecting the transmitter to your audio source may cause clicks which at high volume settings may affect your hearing. Therefore, be sure to set the VOLUME control on the headphones to minimum before switching between different sources (tuner, turntable, CD player, etc.) or connecting the transmitter.
Listening over headphones at high volume levels, particularly over extended periods of time, may damage your hearing.
Interference caused by other users of the same LPD band are beyond AKG's control.
If you operate the headphones on dry batteries, never try to charge the batteries using the transmitter's charging feature. This would cause serious damage to your headphone system. Dispose of dead batteries conforming to local waste disposal rules.
4.1 Important Notes
Placing the transmitter:
Refer to fig. 8.
Refer to fig. 9.
Switching noise:
High volume levels:
Interference:
4.2 Charging the Batteries in the Headphones
Warning!

Important! In order to ensure the longest possible service life for the rechargeable batteries, we deliver them uncharged. Therefore, charge the supplied batteries before first operating your headphones system.
- Before first charging the batteries inside the headphones, pull the protective foil out of the left-hand
earphone following the direction of the arrow. The batteries will make electrical contact with the electronic circuitry of the headphones. - Check that the headphones are OFF. If the status LED (1a) is shining green, push the POWER button (1) to switch power to the headphones off. The status LED (1a) will extinguish. As long as the headphones are ON, the batteries will not be charged.
Note:
Charging on the transmitter:
- Check that the transmitter is connected to a power outlet.
Since the charging function operates independently of the rest of the transmitter circuitry, you do not need to press the ON key (6) to charge the batteries.
Refer to figs. 10, 1, and 2:
- Place the headphones on the transmitter The charging contacts on the transmitter and those on the headphones will automatically close the charging circuit and charging will start.
The CHARGE label (12) on the transmitter and the status LED (1a) on the headphones will illuminate red to indicate the batteries are being charged.
The batteries will be fully charged after approximately 14 hours. (The CHARGE label (12) on the transmitter and the status LED (1a) on the headphones will continue shining red.)
- Remove the headphones from the transmitter to stop the charging. (The charging contacts will open and the CHARGE label (12) on the transmitter and the status LED (1a) on the headphones extinguish.)
If you forget to remove the headphones, do not panic. You can leave the headphones on the transmitter for as long as you like without risking to overcharge the batteries.
Using the optional external charger:
Important: Check that the AC voltage stated on the optional charger is identical to the AC voltage available where you will use your system. Using the charger with a different AC voltage may cause damage to the unit.
Refer to figs. 11, 1, and 2:
- Plug the charging cable on the charger into the charging jack (2a) on the headphones.
- Plug the charger into a convenient power outlet.
The status LED (1a) on the headphones will illuminate red.
The batteries will be fully charged after approximately 14 hours. (The status LED (1a) on the headphones will continue shining red.)
- Disconnect the charging cable from the charging jack (2a) on the headphones to stop the charging.
The status LED (1a) on the headphones will extinguish.
If you forget to disconnect the charging cable, do not panic. You can leave the headphones connected to the charger for as long as you like without risking to overcharge the batteries.
4.3 Replacing Batteries The capacity of any rechargeable battery will decrease over time. If you feel that you need to recharge the supplied batteries more often than would be convenient, you may consider replacing the batteries with new AAA size 1.2 V rechargeable or 1.5 V alkaline dry batteries.
Refer to fig. 12. 1. Rotate the ear pad on the left-hand earphone approximately 10^ CCW to unlock the bayonet mount and remove the ear pad.
- Remove the dead rechargeable or dry batteries.
- Insert the new batteries aligning them with the polarity symbols inside the battery compartments (3) in the earphone.
- Replace the ear pad on the earphone and rotate the ear pad approximately 10^ CW to the point that you can feel it has locked.
4.4 Setting Up the System 1. Remove the headphones from the transmitter.
- Remove the headphones from the transmitter.
- Switch ON the audio source to which your transmitter is connected.
- Press the ON switch (6) to switch the transmitter on.
The ON switch (5) will illuminate green.
The MODE and FREQ settings will be the same as those you have selected before switching the transmitter off. (As delivered, the transmitter is set to STEREO mode and FREQ 1.)
The label backlighting will come on every time you switch the transmitter on even if you switched the backlighting off before.
If there is audio signal present at the transmitter input, the LEVEL label (10) will flicker in step with the signal.
- Switch the headphones on by pushing the POWER button (1).
The status LED (1a) will illuminate green. - Press the AUTOTUNING switch (4) on the headphones.
The Autotuning function will automatically tune the receiver to the carrier frequency set on the transmitter. After a few seconds, you should hear the signal in the headphones clearly and free of interference.
If your first try fails, press the FREQ key (8) on the transmitter front panel to select a different carrier frequency and press AUTOTUNING (4) again. Be sure to stay near the transmitter during this operation.
- Set the VOLUME control (5) on the headphones to the desired volume level.
Note: If the transmitter signal is disturbed, e.g., by reflections (multipath reception) or shadow effects, the headphones will automatically mute. This function eliminates interference-related noise.
As delivered, the transmitter is set to STEREO mode.
Press the MODE key (9) to step though the playback modes of your headphones system:
4.5 MODE Key
| IVA LOGIC7: The LOGIC7 decoder is on and constantly monitors the input signal. Depending on the input signal format, the decoder will generate the required number of audio signals. The IVA processor will simulate the corresponding number of loudspeakers (up to eight for LOGIC7 input signals). We recommend this mode for all types of audio signals (music, movies, games). | Labels LOGIC7 and IVA are illuminated. |
| IVA PRO LOGIC: The Dolby Surround Pro Logic decoder, in conjunction with the IVA processor, simulates five loudspeaker channels (front left, center, right and rear left and right) for surround sound in the headphones. This channel configuration will not change. We recommend this mode for movies and Dolby Surround recordings. | Labels PRO LOGIC and IVA are illuminated. |
| IVA STEREO: The IVA processor converts the stereo input signal to a binaural signal. The ear matching function provides a natural sonic perspective with no inside localization. We recommend this mode for natural reproduction of stereo music and speech signals. | Labels IVA and STEREO are illuminated. |
| STEREO: The Pro Logic decoder, the LOGIC7 decoder, and the IVA processor are deactivated and you will hear the unchanged stereo input signal in the headphones. | The STEREO label is illuminated. |
- Rotate the ear pad on each earphone approximately 10^ CCW to unlock the bayonet mount and remove the ear pad.
- Place one velour ear pad on each earphone and rotate the ear pad approximately 10^ CW to the point that you can feel it has locked.
4.6 Replacing Ear Pads
(HEAR0 777 QUADRA DELUXE)
5 Cleaning

- Disconnect the AC adapter from the power outlet.
- Use a cloth moistened (not wet!) with water to clean the surfaces of the mixer.
Never use caustic or scouring cleaners or cleaning agents containing alcohol or solvents since Important! these may damage the enamel or plastic parts.
| Symptom | Possible Cause | Remedy |
| No sound. | 1. AC adapter is not connected to transmitter and/or AC outlet. 2. Transmitter is OFF or not connected to audio source. 3. Connected audio source is switched off. 4. Volume control on audio source is set too low. 5. Batteries are low. 6. Headphones are OFF. 7. Volume control on headphones is at zero. | 1. Connect AC adapter to transmitter and/or AC outlet. 2. Switch transmitter on or connect to audio source. 3. Switch audio source on to feed signal to transmitter input. 4. Increase volume to the point that LEVEL illuminates. 5. Charge batteries. 6. Switch headphones on. 7. Set volume control to desired level. |
| CHARGE label does not light. | 1. Transmitter is not connected to AC power. 2. No batteries inside the headphones. 3. Batteries are not correctly aligned with polarity marks. 4. Headphones are incorrectly positioned on transmitter. 5. Headphones are ON. | 1. Connect transmitter to AC power. 2. Insert batteries. 3. Check orientation of batteries in battery compartment. 4. Place headphones on transmitter correctly. 5. Switch headphones OFF. |
| Mono sound. | 1. Connected audio source operates in mono mode. 2. Transmitter is not correctly connected to audio source. | 1. Switch audio source to stereo mode. 2. Check cable connection between transmitter and audio source. |
| Noise. | 1. Transmitter and receiving frequencies are not identical. 2. Audio level at transmitter input is too low. 3. Input signal is noisy. 4. Batteries are low. | 1. Near the transmitter, press AUTOTUNING switch on headphones or use FREQ key on transmitter to select different carrier frequency and press AUTOTUNING on headphones. 2. Turn up audio source volume control and/or INPUT LEVEL control on transmitter. 3. Check audio source. 4. Charge batteries. |
| Distorted sound. | 1. Batteries are low. | 1. Charge batteries. |
| Intermodulation noise. | 1. Electrical appliances with poor interference protection. 2. Audio source or sound carrier defective. | 1. Switch off any "suspicious" appliances (if possible). 2. Check audio source or sound carrier. |
| Headphones receive unwanted transmitters. | 1. A neighbor uses similar UHF headphones. | 1. Use FREQ key on transmitter to select different carrier frequency and, staying close to transmitter, press AUTOTUNING switch on headphones. |
| Overemphasized bass or treble range. | 1. Bass or treble control settings on audio source. | 1. Readjust bass or treble controls. |
| Modulation: | FM | 7.1 System Perf |
| Carrier frequency band: | 864 MHz or 915 MHz (USA only) (LPD band) | |
| Power supply: | 9 VDC, 500 mA | 7.2 Transmitter |
| Radiation angle: | 360° | |
| Weight: | HEARO 777 QUADRA: approx. 17.6 oz. (500 g) HEARO 777 QUADRA DELUXE: approx. 33.5 oz. (950 g) | |
| Max. range: | approx. 330 ft. (100 m) | |
| Power supply: | 2 x 1.2 V AAA size NiMH rechargeable batteries (supplied) or 2 x 1.5 V AAA size dry batteries | 7.3 Headphones |
| Battery life: | approx. 20 hours (NiMH rechargeable batteries) | |
| Frequency range: | 18 Hz to 24,000 Hz | |
| Max. SPL: | ~125 dB SPL | |
| Weight: | approx. 11.3 oz. (320 g) | |
| Distortion: | <1% | |
| Type: | semi-open dynamic headphones | |
| This equipment conforms to standards EN301357-2 (7-2000), EN301487-09 (9-2000), EN 60950:1992 + A1:1993 + A3:1995 + A4:1997 + A11:1997. | 7.4 Standards | |
Manufactured under license from Dolby Laboratories. "Dolby", "Pro Logic", and the double-D symbol are trademarks of Dolby Laboratories.
LOGIC7 and the LOGIC7 logo are registered trademarks of Lexicon, Inc., A Harman International Company.
7.1 System Performance
7.2 Transmitter
7.3 Headphones
7.5 Dolby, Lexicon
8 Warranty Conditions
AKG warrants AKG products against evident defects in material and workmanship for a period of two years from the date of original purchase for use. This Warranty does not cover damage resulting from misuse or abuse, or lack of reasonable care, or inadequate repairs performed by unauthorized service centers. Performance of repairs or replacements under this Warranty is subject to submission of the sales slip. Shipment of defective items for repair under this Warranty will be at the customer's own risk. This Warranty is valid for the original purchaser only.
Limited Warranty (valid in the United States only)
AKG warrants AKG products against evident defects in material and workmanship for a period of one year and agrees to repair or, at our option, replace any defective unit without charge for either parts or labor.
This Warranty does not cover dry or rechargeable batteries.
Important: This Warranty does not cover damage resulting from accident, misuse or abuse, lack of reasonable care, the affixing of any attachment not provided with the product, loss of parts, or connecting the product to any but the specified receptacles. This Warranty is void unless service or repairs are performed by an authorized service center. No responsibility is assumed for any special, incidental, or consequential damage. However, the limitation of any right or remedy shall not be effective where such is prohibited or restricted by law. Simply take or ship your AKG products prepaid to our service department. Be sure to include your sales slip as proof of purchase date. (We will not repair transit damage under the no-charge terms of this Warranty.)
Note: No other warranty, written or oral, is authorized by AKG Acoustics.
This Warranty gives you specific legal rights, and you may also have other rights which vary from state to state. Some states do not allow the exclusion or limitation of incidental or consequential damage or limitations on how long an implied warranty lasts, so the above exclusion and limitations may not apply to you.
4.6 Substituir as almofadas
(HEAR0 777 QUADRA DELUXE)
5 Limpeza

DECLARATION OF CONFORMITY
Document No.272 / 10 - 2001
replaces No.
Type of Product: Wireless Dolby Stereo Surround Headphone Set
Brand, Model No.: Hearo 777 Quadra (Receiver and Transmitter) and Hearo 777 Quadra Deluxe (Receiver and Transmitter) (Including Power Supply)
Drawing No.: 6000 H ....
Manufacturer: AKG Acoustics GmbH A-1230 Wien, Lemböckgasse 21 - 25 AUSTRIA
We declare that the above mentioned product is in conformity with the following European Directive:
No. 99/5 EC; Radio Equipment and Telecommunications Terminal Equipment
The conformity is achieved by fulfilling the following European Standard(s):
EN 301489-9, EN 61000-3-2 + A1 + A2 + A14, EN 61000-3-3, EN 301357-2, EN 60950 + A1 + A2 + A3 + A4 + A11
Product examination was carried out by: TÜV-Österreich, Notified Body 0408 Deutschstraße 10 A-1230 Wien
Manufacturer's Signature:
uluaio
Managing Director
Dr. Hugo Lenhard-Backhaus
This declaration certifies the accordance with the above mentioned EC-Directive but does not assure certain attributes of the product.
Hiermit erklart AKG Acoustics GmbH, dass das Produkt HEARO 777 (Receiver + Transmitter) die wesentlichen Anforderungen und sonstigen einschlagigen Bestimmungen der Richtlinie 1999/5/EG erfüllt.
AKG Acoustics GmbH hereby declares that the product HEARO 777 (Receiver + Transmitter) complies with the essential requirements and other relevant provisions of Directive 1999/5/EC.
AKG Acoustics GmbH déclare que le produit HEARO 777 (Receiver + Transmitter) satisfait aux exigences essentielles et autres dispositions y relatives de la Directive 1999/5/CE.
Con la presente AKG Acoustics GmbH dichiarare che il prodotto HEARO 777 (Receiver + Transmitter) A conforme alle richieste essenziali e alle other dispositions pertinenti della Direttiva 1999/5/CE.
AKG Acoustics GmbH declares that the product of HEARO 777 (Receiver + Transmitter) complies with the requisitos esenciales y other dispositions aplicables de la Directiva 1999/5/CE.
A AKG Acoustics GmbH declares que o produits HEARO 777 (Receiver + Transmitter) cumpre os requisitos essenciais e as outras disponções relevantes da Directa 1999/5/CE.
H ειαρεια AKG Acoustics GmbH δηλωνει με το παρόν, ὄτι το παροῖν HEARO 777 (Receiver + Transmitter) ανταποκρίνεια έτις βασικές απαίτησείς και λοιπές σχετικές διαταξείς της δόγηίας 1999/5 EOK.
AKG Acoustics GmbH verkaart hiermee dat het product HEARO 777 (Receiver + Transmitter) aan de essentiele eisen en overige desbetreffende bepalingen van de richtlijn 1999/5/EG voldoet.
AKG Acoustics GmbH erklærer herved atproduktet HEARO 777 (Receiver + Transmitter) overholde de vAESentlige krav samt andre relevante bestemmelser fra Direktiv 1999/5/EF.
Härmed förklar AKG Acoustics GmbH att Produkten HEARO 777 (Receiver + Transmitter) uppyller de väsentliga krav och andra relevanta bestämelser som framgår av Direktiv 1999/5/EC.
AKG Acoustics GmbH vakuuttaa,etta tuotteemme HEARO 777 (Receiver + Transmitter) tayttarvittavat 1999/5/EC direktiivin mukaiset vaatimukset.
AKG Acoustics erkker med dette, at produktet HEARO 777 (Receiver + Transmitter) oppfyller de vesentlige krav og andre relevante bestemmelse som fremgår av Direktiv 1999/5/EF.
AKG Acoustics GmbH staßfestir hér með áð samkvæmt skilgreiningu 1999/5/E, uppfyllir aftirfarandi vara HEARO 777 (Receiver + Transmitter) ban skilyröi sem krafist er, auk annara ákvæða sem við eiga áð hverju sinni.
Zur Verwendung in / For use in / Pour l'usage en / Per l'uso in / Para el uso en / Para o uso em / Éρησιμοποιησιος Στης / Voor het gebruik in / Ma anvendes i / Fár användas i / Käyttoën seuraavissa maissa / Ma anvendes i/Til natkunar i
AT, BE, CH, DE, DK, FI, FR, GB, IE, IS, IT, LI, LU, NO, NL, PT, SE

- Contents
- Safety
- Environment
- Description
- Dear Customer:
- Your headphones system comprises the following components:
- HEARO 777 QUADRA
- External charger for headphones
- This headphone system
- Introduction
- Unpacking
- Optional Accessory
- General Description
- IVA - Individual Virtual Acoustics
- Dolby Surround Pro Logic Decoder
- LOGIC7 Decoder
- Controls
- Headphones
- Transmitter Front Panel
- Audio and Power Connections
- Operating Notes
- Charging on the transmitter:
- Using the optional external charger:
- Cleaning
- Warranty Conditions
- Limited Warranty (valid in the United States only)
- DECLARATION OF CONFORMITY
Brand : AKG
Model : HEARO 777 QUADRA
Category : Headphones