
CD224PE - CD Player TEAC - Free user manual and instructions
Find the device manual for free CD224PE TEAC in PDF.
| Product type | CD player |
| Brand | TEAC |
| Model | CD224PE |
| Dimensions (W x H x D) | 430 x 100 x 300 mm |
| Weight | 3.5 kg |
| Power supply | Mains 230 V / 50 Hz |
| Power consumption | 15 W |
| Supported formats | CD audio (CD-DA), CD-R, CD-RW |
| Playback functions | Normal playback, repeat, random, program |
| Audio outputs | 1 x RCA stereo, 1 x headphones (3.5 mm jack) |
| Signal-to-noise ratio | ≥ 100 dB |
| Frequency response | 20 Hz – 20 kHz (± 0.5 dB) |
| Harmonic distortion | < 0.005 % |
| Maintenance and cleaning | Clean the casing with a soft dry cloth. Do not use chemical products. Clean the lens with a CD lens cleaner. |
| Safety | Do not expose to moisture. Disconnect before cleaning. Use only on a stable surface. |
| Spare parts and repairability | Repairability index: 6.5/10. Parts available via TEAC after-sales service. |
| General information | Designed for domestic use. Do not open the device. Contains a class 1 laser diode. |
Frequently Asked Questions - CD224PE TEAC
User questions about CD224PE TEAC
0 question about this device. Answer the ones you know or ask your own.
Ask a new question about this device
Download the instructions for your CD Player in PDF format for free! Find your manual CD224PE - TEAC and take your electronic device back in hand. On this page are published all the documents necessary for the use of your device. CD224PE by TEAC.
USER MANUAL CD224PE TEAC
Portable CD-ROM Drive
CD-224PEK
User's manual
To ensure the smooth handling of your warranty please write the serial number of your drive into the box. In the case of warranty you are expected to send it together with a copy of your invoice to your nearest TEAC sales representative.
CONTENTS
INTRODUCTION 24
1. TO THE USER 24
1.1 Handling Disks 24
1.2 Handling the Portable Drive CD 25
1.3 Inserting/Removing Disks 25
1.4 Daily Maintenance 26
2. BEFORE USING 28
2.1 Checking the Components 28
2.2 Operating Environment 29
3. NAMES AND FUNCTIONS 30
4. INSTALLATION 32
4.1 Connecting the PCMCIA card to the TEAC CD-224PE 32
4.2 Connecting the PCMCIA card to a Notebook-PC 33
4.3 Important instructions for Users of Windows95/98 34
4.4 Important Instructions for Users of Windows NT 4.0 34
4.5. Important Instructions for Users of Win 3.1/MS-DOS 35
5. SPECIFICATION 36
WARRANTY 37
- Changes in specifications and features may be made without notice or obligation.
Copyright © 1999, 2000, TEAC Corporation Ltd. All rights reserved. Second Edition: April 2000
- Company and product names provided herein are trademarks of their respective companies.
INTRODUCTION
The TEAC CD-224PE is a world class high performance portable CD-ROM drive kit. With this drive you have bought one of the most powerful portable CD products on the market.
1. TO THE USER
1.1 Handling Disks
- Do not place the disc in direct sunlight or expose it to moisture and extreme temperatures. Never leave the disc in a closed car during summer season.
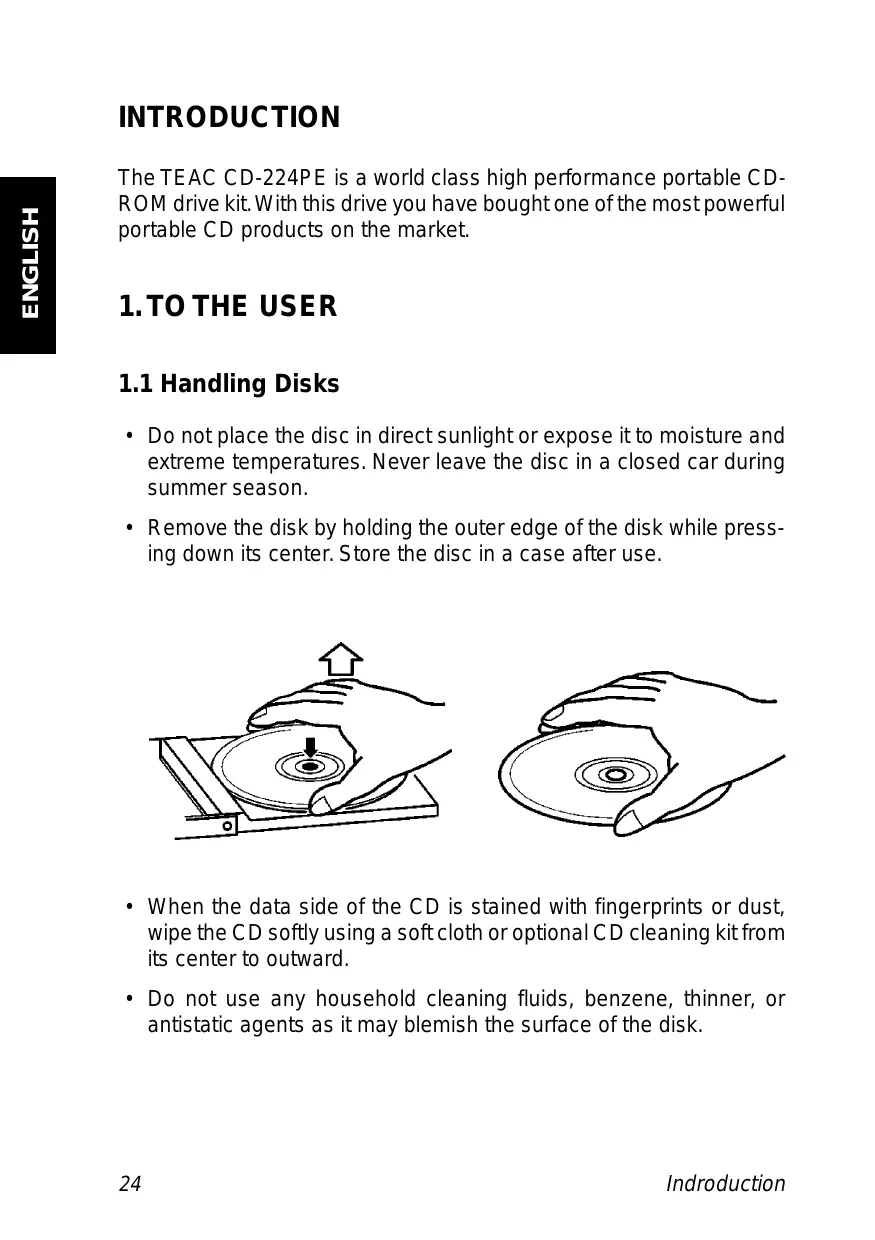
- Remove the disk by holding the outer edge of the disk while pressing down its center. Store the disc in a case after use.
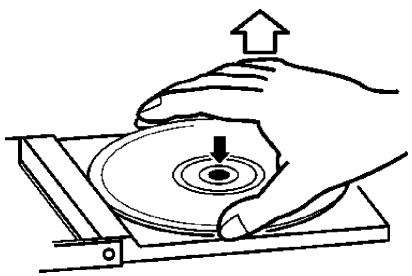
- When the data side of the CD is stained with fingerprints or dust, wipe the CD softly using a soft cloth or optional CD cleaning kit from its center to outward.
- Do not use any household cleaning fluids, benzene, thinner, or antistatic agents as it may blemish the surface of the disk.
1.2 Handling the Portable Drive CD
- Do not use a cracked or deformed disc.
- Do not touch the pickup lens. Clean the stained lens using a blower for camera lenses (commercially available). Always keep the cover of the unit closed except when inserting or removing the disc.
- Wipe the stain on the unit off using a cloth damp with diluted neutral detergent. Do not apply solvents such as alcohol, benzene, or thinner as it may blemish the surface of the unit.
- When the unit is moved from a cool place to a warm place or when a cool room is warmed rapidly, condensation occurs on the internal lens which prevents the normal operation. In that case, remove the disc and leave the unit for about an hour before use.
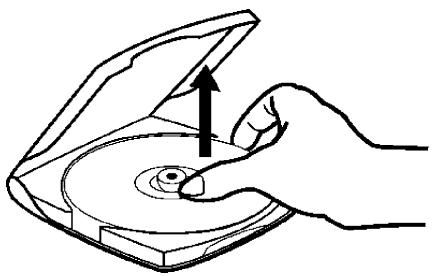
1.3 Inserting/Removing Disks
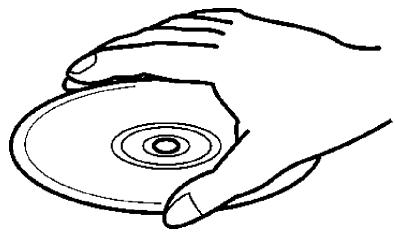
- Place the disc on the center disc table with the label side upward and press the disc lightly.
- Remove the disc by lifting the edge of the disc while lightly pressing down the center of the disc.
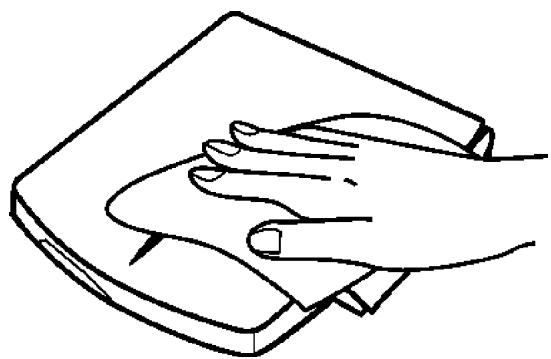
1.4 Daily Maintenance
(1) Wipe the surface of the drive using a soft cloth. Use a cloth damp with diluted neutral detergent for heavy stains.
(2) When a sound is skipped or data cannot be read while using the drive, wipe the CD softly using a soft cloth from its center to outward.

(3) When stains cannot be removed, use the optionally provided cleaning kit or a cloth damp with water or neutral detergent. The lens may also be cleaned using a blower for camera lenses (commercially available).
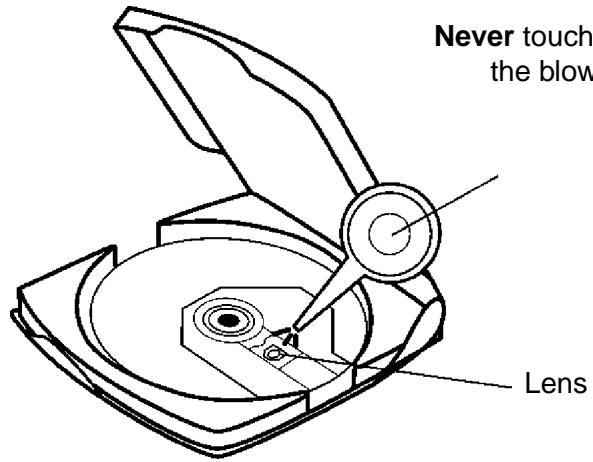
Never touch the lens. Use the blower for camera lenses.
2. BEFORE USING
2.1 Checking the Components
Check if you have the following components in your package before use. Contact the sales office if anything is missing.
Portable CD-ROM drive CD-224PE
TEAC PCMCIA card with cable

TEAC Driver CD

User's manual

2.2 Operating Environment
The following notebook PC system is required to use the portable CD-ROM drive kit:
- DOS/V computer with a CPU of i386x or higher
- Hard disk space of 500KB or more
PC card slot - Windows 98, Windows 95, Windows NT4.0, Windows 3.1 (MS-DOS ver. 6.2/V or higher), MS-DOS ver. 6.2/V or higher
-
FD
-
Microsoft, MS-DOS, Windows, and Windows NT are registered trademarks of Microsoft Corporation in U.S. and other countries.
3. NAMES AND FUNCTIONS
The names of parts and their functions are described below.
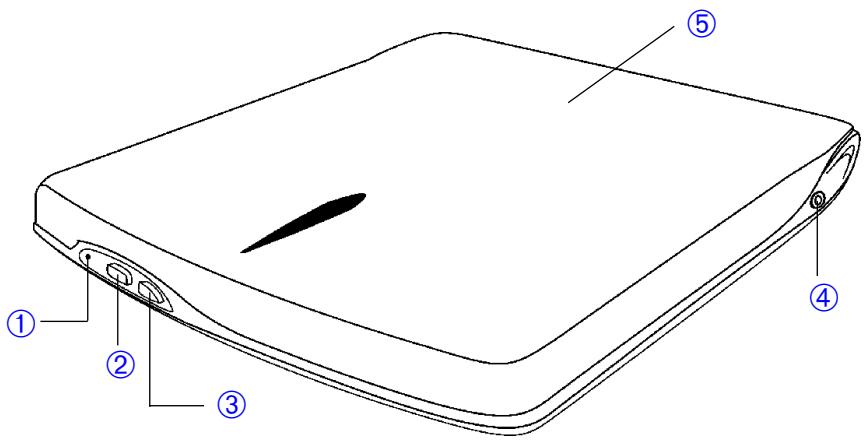
① BUSY indicator
This indicator lights in amber during seek, play and read. It lights in green when the power is on.
② STOP button
Stops CD playback when used as a standalone unit.
③ PLAY button
Starts CD playback when used as a standalone unit.
④ External connector
In the actual version of the drive the external jack is not connected.
⑤ Cover
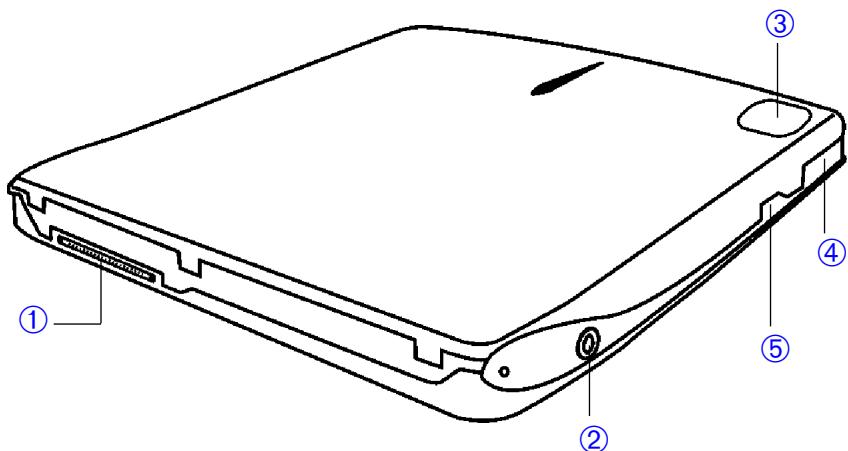
① Interface connector Connect to the provided interface cable of the PCMCIA card.
② Headphone jack Audio output jack for stereo headphone. Use a 3.5mm-diameter stereo mini plug. (A headphone is optional)
③ Push here to close the disc cover.
④ EJECT button Pull forward to open the disc cover. When the disc cover is closed, it will be locked automatically.
Volume Adjusts headphone's volume.
4. INSTALLATION
This chapter describes how the device can be connected to a personal computer (notebook).
Caution:
Do not insert the PC card into the PC card slot yet..
4.1 Connecting the PCMCIA card to the TEAC CD-224PE
Connect the interface cable of the interface connector on the back of the TEAC CD-224PE CD-ROM drive. The CD-ROM drive will be supplied and switched on and off by the notebook computer if the PCMCIA card is inserted in the respective slot.
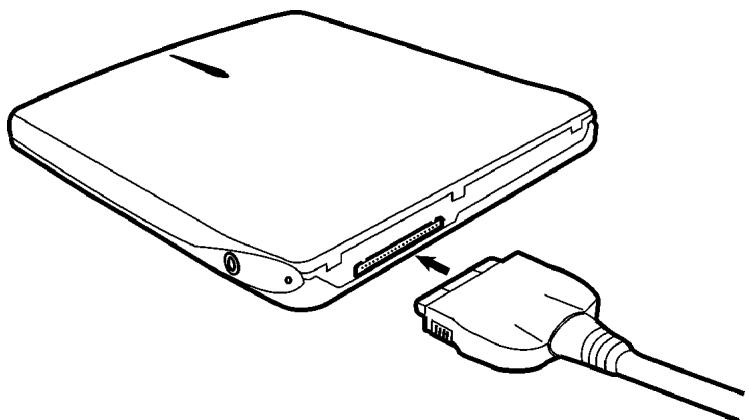
Important:
Please ensure regardless of the used operating system to set the power supply function of the PCMCIA slot to on if your notebook computer supports this functionality.
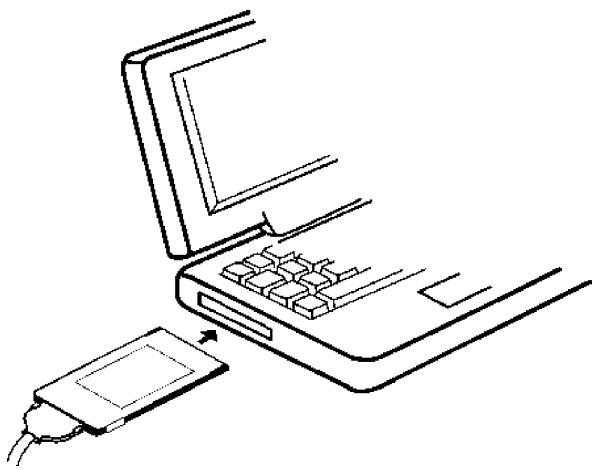
4.2 Connecting the PCMCIA card to a Notebook-PC
To be able to use the PCMCIA card with your notebook computer you have to activate the PCMCIA system of your notebook and you must install any necessary driver in accordance to the manuals of your operating system and your computing platform.
Important:
Normally the installation of the drivers and the activating of the PCMCIA system is carried out without inserting the PCMCIA card into the respective slot. Please refer to your manual of DOS/Windows and your hardware platform for further details.
Insert the PCMCIA card connected to the TEAC CD-224PE into the respective slot of your notebook after completing the software installation (PCMCIA system, card drivers etc.). The golden contact pins must be oriented towards top to achieve this operation.
Important:
Please follow the following instructions for each of the operating systems in question carefully. To insert/remove the card the notebook computer usually has to be switched off. Only Windows 95/98 allows under some certain circumstances depending on the PCMCIA cards firmware to remove-insert the card while running the computer. Please refer to the manuals of your operating system and your computing platform.
4.3 Important instructions for Users of Windows95/98
Important:
It is essential to install the driver of your PCMCIA card to run the portable CD-ROM drive. Please refer to the manual of your PCMCIA card respectively to the documentation of Windows 95/98.
Your drive is recognized automatically by Windows 95/98 if any of the installation steps are carried out correctly and any configuration like the one for the power supply is correct.
Caution:
Removing the PCMCIA card from the PC card slot without terminating the PC card operation process may result in unexpected failures.
4.4 Important Instructions for Users of Windows NT 4.0
Important:
It is essential to install the driver of your PCMCIA card to run the portable CD-ROM drive. Please refer to the manual of your PCMCIA card respectively to the documentation of Windows NT 4.0. You may find further details within the documentation of your PCMCIA card and in the manuals of Windows NT 4.0.
If any of the installation steps are carried out correctly and any of the settings, as in example the setting of the power supply is correct, Windows NT 4.0 will automatically detect and recognize the CD-ROM drive connected to your PCMCIA card.
Caution:
(1) Since Windows NT 4.0 does not conform to hot swapping, be sure to insert the PC card before turning on the power of your PC.
(2) Set the PC card slot mode to PCIC Compatible if such setting is possible. Refer to the instruction manual of your PC for the setting method.
(3) SP4 or more for Windows 4.0 is required. (SP4 = Service Pack 4).
When the Connected CD-ROM drive is not Recognized
- Check the cable and the connection.
- Check if the power is turned on.
- A resource conflict may be the cause. Attempt to change resources referring to Changing resources below.
Caution:
To change the values of resources you must be logged in with an Windows NT 4.0 administrator account usually.
4.5. Important Instructions for Users of Win 3.1/MS-DOS
As far as Windows 3.1 and MS-DOS are concerned installations are normally carried out under MS-DOS. Installing basically means to install the driver of your PCMCIA card correctly. Please refer to the documentation of your PCMCIA card, your DOS manuals, and the manual of your notebook computer for further details.
To insert/remove the PCMCIA card your notebook computer has to be switched off. After inserting the card the notebook PC may be switched on. If the driver of your PCMCIA card is loaded correctly the operating system will recognize automatically the TEAC CD-224PE. Now it may be used under MS-DOS and Windows 3.1 without any limitations.
5. SPECIFICATION
| 1. Disk | |
| Applicable disk | CD-DA, CD-ROM (Mode-1, Mode-2), CD-I, Video-CD CD-ROM XA Mode-2 (Form-1, Form-2) Photo-CD (multisession), CD Extra (CD Plus) |
| Disk Diameter | 12cm, 8cm |
| 2. Drive performance | |
| Data transfer rate | Sustained: 1,546 (10.3x) to 3,600KB/s (24x) (FULL-CAV) Burst: 8.33MB/s max. (PIO Mode 2) |
| Access time | 130ms typ. |
| Starting time from power on | 10s max. (excluding the multisession photo CD) |
| Data buffer capacity | 128KB |
| 3. Error rate | |
| Data read error rate | Once per 1012 bits or less (Mode-1 and Mode-2 Form-1) Once per 109 bits or less (Mode-2 Form-2 and CD-DA) |
| 4. Front panel | |
| Button | PLAY and STOP |
| Indicator (BUSY LED) | LED green: ON LED amber: SEEK, PLAY and READ Mode |
| 5. Side panel | |
| Volume | Adjust headphone's volume |
| Audio output | Headphone jack (ø 3.5 mm) 10 mW |
| 6. Rear panel | |
| Power requirements | DC +6V±10% (via PCMCIA slot) |
| Interface connector | ATAPI (drive side) PCMCIA Card Type II 16 bit or CardBus 32 bit |
| 7. Operating environment | |
| Place of operation | Temperature 5 to 40 °C, humidity 8 to 80 % (noncondensing) |
| Place of storage | Temperature -20 to 60 °C, humidity 5 to 90 % (noncondensing) |
| 8. Dimensions/weight | |
| Dimension (WxHxD) | 130 x 16 x 146mm |
| Weight | 250g |
| 9. Safety standards | UL, CSA, TÜV, FCC, CE |
| 10. Reliability (MTBF) | 50,000 POH (dutoy 10%) |
WARRANTY
Model
CD-224PEK
Serial No.
Owner's name
Address
Dealer's name Date of purchase
Dealer's address
Warranty Period
TEAC Corporation, hereinafter called TEAC, warrants this product against any defect in material and workmanship for one (1) year from the date of purchase by the original retail purchaser. According to the following terms this TEAC product will be repaired without charge of labor and materials by the authorized TEAC service stations, by the authorized TEAC dealers and/or their authorized service stations. TEAC, the authorized TEAC service stations, the authorized TEAC dealers and/or their authorized service stations may decide wether the defective product will be repaired or replaced as a whole or partially. The TEAC dependencies, the authorized TEAC service stations, the authorized TEAC dealers and/or their authorized service stations will also honour this warranty in the other EC and EFTA member states based on the terms in this warranty conditions.
What is Covered and What is Not Covered.
Except as specified below, this warranty covers any defects in materials and workmanship of this product. The following are not covered by the warranty:
- Damage to or deterioration of the external cabinet.
-
Any unit that has been altered or on which the serial number has been defaced, modified, or removed.
-
Damage, deterioration or malfunction resulting from:
(a) accident, misuse, abuse or neglect;
(b) failure to follow instructions supplied with the product;
(c) any shipment of the product. Any damage arising of transportation is the liability of the freight company. Any damage arising of transportation and any implicit and explicit risks are the liability of the freight company. This is expressly not a liability of TEAC;
(d) repair or attempted repair by anyone not authorized by TEAC to repair this product;
(e) causes other than product defects, including lack of technical skill, competence or experience of the user. Especially damages which may arise of incidental use respectively by improper ventilation,
(f) damages caused by improper or incorrect installation of software,
(g) periodic check-ups,
(h) maintenance respectively repair of parts due to normal wear and tear,
(i) adoptions or adjustments to the product in order to conform to different national technical or safety standards of any country other than the one for which the product was originally designed and manufactured.
Who May Enforce the Warranty
This warranty may be enforced only by the original retail purchaser.
What We Will Pay For
We will pay all labor and material expenses for items covered by the warranty. Payment of shipping and insurance charge is discussed in the next section of this warranty.
How You Can Get Warranty Service
-
If your unit needs service during the warranty period, please contact the local authorized distributor for this product. If you are unable to locate such a distributor, please contact the TEAC facility.
-
After identifying the nearest authorized service station for this product, the product or any parts believed to be defective must be shipped freight and insurance prepaid to such service station, together with
a copy of this warranty certificate and a copy of your sales receipt, showing the date of purchase. Please ensure to fill out the warranty certificate correctly (do not forget the serial number of the product). TEAC reserves the right to refuse the guarantee service if the documents are missing or incomplete in the understanding of this terms. If the necessary repairs are covered by the warranty, and if you have sent the product or parts of it to the nearest authorized service station, the return freight and insurance charges will be prepaid. Please do not return your unit to the TEAC factory without out prior authorization (see also RMA form)!
Limitations of Liability and Exclusion of Implied Warranties
Unless considered unenforceable or unlawful under the applicable national law:
-
TEAC's liability for any defective product is limited to repair or replacement of the product, at TEAC's option and the option of authorized service stations, authorized dealers and their authorized service stations. No one is authorized to assume any greater liability on TEACs behalf. TEAC shall not be liable for any damage to any other properties independant of their virtual or real nature especially there is no liability for any damage to any kind of software and/or any kind of databases caused by TEAC products. Furthermore TEAC is not liable for damages arising out of loss of use, loss of revenue or profits, or any other damages, wether incidental, consequential, or otherwise.
-
All implied warranties or conditions, including but not limited to warranties or conditions of merchantability and fitness for a particular purpose, hereby are excluded.
These warranty terms do not affect any statutory rights of consumers which were granted by the respective national laws.
TEAC UK LIMITED DATA STORAGE PRODUCTS DIVISION:
5 Marlin House, Marlin Meadow, Croxely Business Park,
Watford, Hertfordshire, WD18 8TE, U.K.
TEAC FRANCE S.A.
92182 ANTONY CEDEX, France
GARANTIE
TEAC UK LIMITED DATA STORAGE PRODUCTS DIVISION:
5 Marlin House, Marlin Meadow, Croxely Business Park,
Watford, Hertfordshire, WD18 8TE, U.K.
TEAC FRANCE S.A.
17 rue Alexis de Tocqueville, CE 005, 92182 ANTONY CEDEX, France
- Portable CD-ROM Drive
- CD-224PEK
- User's manual
- CONTENTS
- INTRODUCTION 24
- TO THE USER 24
- BEFORE USING 28
- NAMES AND FUNCTIONS 30
- INSTALLATION 32
- SPECIFICATION 36
- WARRANTY 37
- INTRODUCTION
- TO THE USER
- Handling Disks
- Handling the Portable Drive CD
- Inserting/Removing Disks
- Daily Maintenance
- BEFORE USING
- Checking the Components
- Operating Environment
- NAMES AND FUNCTIONS
- INSTALLATION
- Caution:
- Connecting the PCMCIA card to the TEAC CD-224PE
- Important:
- Connecting the PCMCIA card to a Notebook-PC
- Important instructions for Users of Windows95/98
- Important Instructions for Users of Windows NT 4.0
- When the Connected CD-ROM drive is not Recognized
- Important Instructions for Users of Win 3.1/MS-DOS
- SPECIFICATION
- WARRANTY
- Warranty Period
- What is Covered and What is Not Covered.
- Who May Enforce the Warranty
- What We Will Pay For
- How You Can Get Warranty Service
- Limitations of Liability and Exclusion of Implied Warranties
- GARANTIE
Brand : TEAC
Model : CD224PE
Category : CD Player