ZE-MC194 - Car multimedia system ZENEC - Free user manual and instructions
Find the device manual for free ZE-MC194 ZENEC in PDF.

| Product Type | Car Multimedia System |
| Brand | ZENEC |
| Model | ZE-MC194 |
| Power Supply | 12V DC (negative ground) |
| Fuse | 10A |
| Screen | TFT LCD color, tilting, motorized opening |
| Remote Control | Infrared, CR2025 battery (3V) |
| Playback Sources | FM/AM Radio, CD/DVD, USB, iPod, AUX, DVB-T (optional), Navigation (optional), Rear View Camera |
| Radio Functions | RDS (AF, PTY, TA, CT), local search, automatic and manual memory |
| Disc Formats | CD, CD-R/RW, DVD, DVD±R/RW, VCD, MP3, WMA, JPEG, MPEG |
| Equalizer | Presets (Rock, Hip Hop, Dance, etc.) and User mode, adjustment of bass, midrange, treble, subwoofer |
| Image Settings | Image format, zoom, rotation, brightness, contrast, color |
| Security | Parental lock, anti-theft code (unlock by authorized center), phone mute, handbrake for video |
| Connections | Audio/video RCA outputs, AUX input, camera input, ILLUMI wire, MUTE wire, handbrake wire, reverse wire |
| Maintenance | Soft, clean cloth with mild detergent; avoid alcohol and rough fabrics |
| Warranty | 2 years (parts and labor) |
| DVD Region Code | Region 2 (Europe, Japan, Middle East, etc.) |
| Dimensions | Standard 2 DIN (approx. 178 x 100 mm) |
| Weight | Approximately 1.5 kg |
Frequently Asked Questions - ZE-MC194 ZENEC
User questions about ZE-MC194 ZENEC
0 question about this device. Answer the ones you know or ask your own.
Ask a new question about this device
Download the instructions for your Car multimedia system in PDF format for free! Find your manual ZE-MC194 - ZENEC and take your electronic device back in hand. On this page are published all the documents necessary for the use of your device. ZE-MC194 by ZENEC.
USER MANUAL ZE-MC194 ZENEC
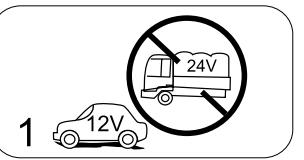
- Only connect this unit to a 12V DC power supply with negative grounding.
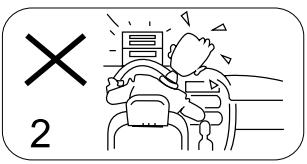
- Never install this unit where the operation for safe driving is restrained.
- Never use the video display function in the front when driving to prevent the violation of laws & regulations and also to reduce the risk of traffic accident, except when using the rear view video camera.
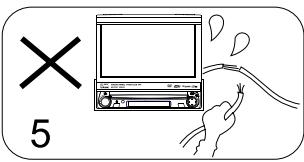
- Never expose this unit, amplifier, speakers to moisture or water to prevent electronic sparks or fires.
- Please don't change the fuse in the power cord without professional guidance, improper fuse may cause damage to this unit or may even cause fire.
- Please power off this unit at once and send it back to the after-sales service center or the dealer/distributor you purchased from if one of the following symptoms is found:
(a) No audio output;
(b) No image output;
(c) Water or other obstacle entered the unit;
(d) Smoke;
(e) Peculiar smell.
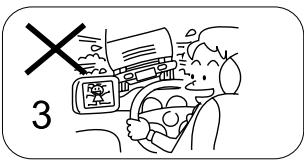
- To ensure safe driving, please adjust the volume to a safe and comfort level in case of emergency situations.
PRECAUTIONS
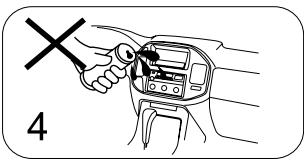
- Never disassemble or a djust the unit without any professional guide. For details, please consult an authorized ZENEC dealer for inquiry.
- If the front panel or TFT monitor is squalid, please use a clean silicone cloth and neutral detergent to wipe off the spot. Using a rough cloth and non-neutral detergent such as alcohol for cleaning may result in scratching or discoloration.
- If any abnormal behavior of the unit is found, please refer to trouble shooting guide of this manual. If no relevant information is found, please press the [RESET] key on the front panel to resume factory default.
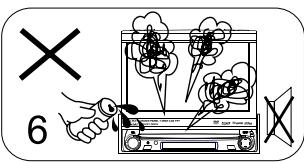
- If you have parked the car in hot or cold weather for a long time, please wait until the temperature in the car becomes normal before operating the unit.
- Using in-car heater in low temperature environment may result in condensation inside the unit. DO NOT use the unit in this situation, eject the disc and wipe off the condensation on the disc. If the unit still doesn't work after a few hours, please contact with after-sales service center.
- No fierce mechanical impact to the LCD monitor when it is in open position for preventing the damage to any mechanisms inside.
- To prevent damage to the screen, avoid touching it with sharp objects.
- The monitor employs auto motorizing mechanism, please don't push, pull, or swivel the monitor manually to prevent damage to the core mechanism.
- To provide a clear demonstration and an alternative for easy understanding to the operation of this unit, graphic illustrations are used. However, these illustrations may be different from the actual images displayed on the screen.
- During operating the unit, " " will display if the current operation is not available or illegal.
- Operate the unit correctly according to this manual to prevent unnecessary problems. The guarantee won't be valid if the problem is caused by inappropriate operation.
DECLARATION
This product incorporates copyright protection technology that is protected by U.S patents and other intellectual property rights. Use of this copyright protection technology must be authorized by Macrovision, and is intended for home and other limited viewing uses only unless otherwise authorized by Macrovision.
Reverse engineering or disassembly is prohibited.
BEFORE USING
START CODE: 012345 (Description: Page 35)
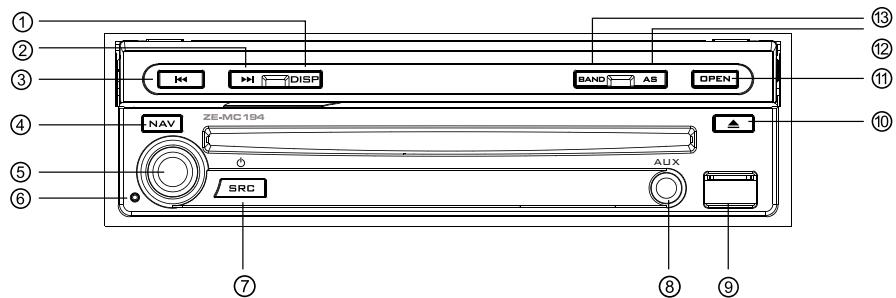
FRONT PANEL
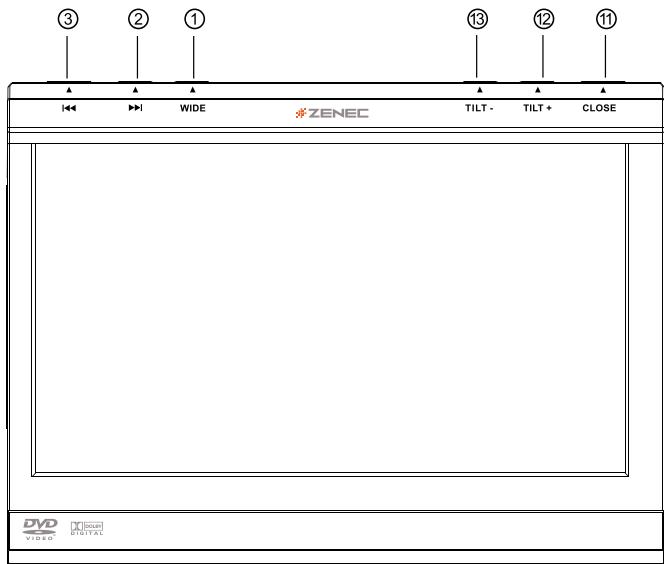
- [WIDE] Key: Change display mode
- [▶] Key: Next/Move cursor to the right
- [1] Key: Previous/Move cursor to the left
- [NAV] Key: Enter/exit NAV source
- [VOL] Knob: Adjust volume/active/deactive mute function
- [Reset] Button: Reset the unit
- [SRC] Key: Unit power/Change operating mode/Open source menu
- AUX IN jack
- USB Slot
BEFORE USING
- [▲] Key: Eject disc
- [OPEN/CLOSE] Key: Open/Close the TFT monitor
- [AS/TILT+] Key: Auto save/Preview scan/Increase display angle
- [BAND/TILT-] Key: Change radio band/Decrease display angle
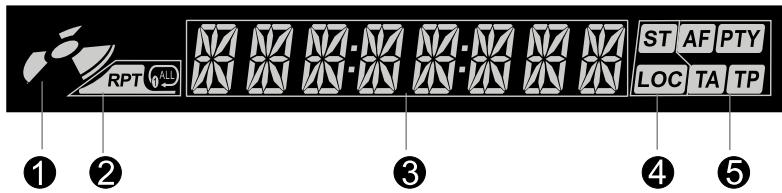
AUXILIARY LCD
- Disc indicator
Light up when one disc is inside; Light off when no disc is inside. -
Repeat mode indicator
Light up when repeat mode is on; Light off when repeat mode is off. -
Main display area
Display characters, playback time, tuning frequency, clock and other text information.
4. Radio status indicators
- Stereo indicator lights up when the radio broadcast is in stereo. Local indicator lights up when the local seeking function is activated.
- RDS function indicators
AF: Alternative Frequency
PTY: Program Type
TA: Traffic Announcement
TP: Traffic Program
NOTES:
Most information can be displayed on this LCD only when the TFT monitor is closed.
Only English font support on this LCD.
BEFORE USING
REMOTE CONTROL
Introduce of key functions
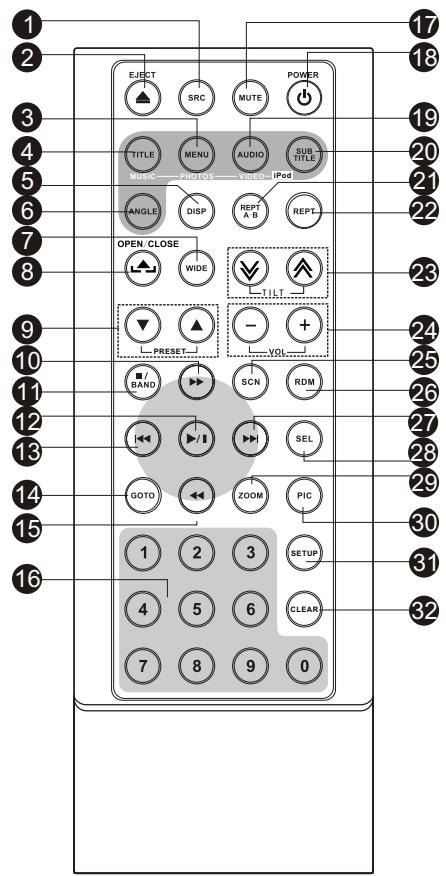
NOTE:
-
Your remote control may differ slightly from the one pictured here. The above diagram is for illustrative purpose only.
-
[SRC] Key: Select playing source
2 [EJECT] Key: Eject disc - [MENU] Key: DVD MENU/PBC
- [TITLE] Key: DVD TITLE
- [DISP] Key: Display information
- [ANGLE] Key: Select view angle
- [WIDE] Key: Change display mode
- [OPEN/CLOSE] Key: Open/Close the TFT monitor
- [PRESET / ] Key: Select preset radio station
- [ ] Key: Fast forward/Move cursor up
- [■/BAND] Key: Select radio band/stop playback
- [▶/II] Key: Play/Pause/Enter
- [Key: Auto search/Previous/Move cursor to the left
- [GOTO] Key: GOTO search
- [Key: Fast reverse/Move cursor down]
- [0-9] Key: Numeric keys
- [MUTE] Key: Mute audio outputs
- [POWER] Key: Unit power
- [AUDIO] Key: Select DVD dialogue language
- [SUBTITLE] Key: Select DVD subtitle language
- [REPT A-B] Key: A-B repeat
- [REPT] Key: Repeat playback
- [TILT / ] Key: Adjusting display tilting angle
- [VOL+/-] Key: Adjust volume
- [SCN] Key: Scan playback
- [RDM] Key: Random playback
- [▶] Key: Auto search/Next/Move cursor to the right
- [SEL] Key: (EQ)
- [ZOOM] Key: Image zoom in/out
- [PIC] Key: Image setting
- [SETUP] Key: Setup menu
- [CLEAR] Key: Clear information
BEFORE USING
NOTES FOR REMOTE CONTROL USE
- Aim the remote control at the remote sensor on the unit.
- Remove the battery from the remote control or insert a battery insulator if the battery has not been used for a month or longer.
- DO NOT store the remote control under direct sunlight or in high temperature environment, or it may not function properly.
- The battery can work for 6 months under normal conditions. If the remote control does not work, please change the battery.
- Use "button shaped" lithium battery "CR2025" (3 V) only.
- DO NOT recharge, disassemble, heat or expose the battery in fire.
- Insert the battery in proper direction according to the (+) and (-) poles.
- Store the battery in a place where children cannot reach to avoid the risk of accident.
Uninstall Battery
- Slide out the battery compartment tray at the bottom on the back of the remote control.
Install Battery
Use button-shaped lithium battery "CR2025" (3V) only. Insert the battery to the battery tray with proper direction according to the (+) and (-) poles.

PULL OUT
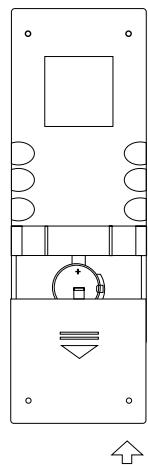
PULL IN
BASIC OPERATIONS
POWER ON/OFF
Press any key on the front panel or the [POWER] key on the remote control to turn on the power under standby mode. The unit goes back to the last status after power on.
Press and hold the [SRC] key on the front panel or press the [POWER] key on the the remote control to turn off the power under work mode.
NAV
Press the [NAV] key on the front panel to enter or exit navigation source. The current audio channel will keep playing, except the navigation voice comes up when navigation source is active.
VOLUME ADJUSTMENT
Turn the volume knob on the front panel or press the [VOL] key on the remote control.
The adjustable range of volume is 0 to 40.
Press [VOL] key or mute key on remote to active or deactive [MUTE] function.
#
NOTES:
Doing the operation above again or adjusting volume will release muting.
Mute icon blinks on the TFT during muting.
OPEN SOURCE MENU
Press the [SRC] key on the front panel or remote control or touch the top left corner of the screen to open the SOURCE MENU. Do the above operation again to return to the original source.
PLAYING SOURCE SELECTION
- Open the SOURCE MENU, and then touch the source you desired or select one source by moving the cursor and then confirm.
#
NOTES:
- Playing source selection means selecting work mode, such as DVD mode, Radio mode, Camera mode, etc.
When some devices are not ready or connected, they cannot be selected.
BASIC OPERATIONS
DISPLAY SYSTEM TIME
Press and hold the [DISP] key on the front panel to switch the display information between system time and playing source when the TFT monitor is closed.
USING THE TFT MONITOR
Open/Close monitor
Press the [OPEN/CLOSE] key on the front panel or remote control to push the display panel out or in.
Change the monitor tilt angle
Due to the inherent character of LCD panels, you will get different vision impressions when you watch it from different angles. The display angle of this unit can be changed; hence you can select the best angle where you can get the best vision impression.
Press the [TILT] key on the display panel or the remote control to adjust the tilt angle one step at a time.
Press and hold the [TILT] key on the display panel or the remote control to adjust the tilt angle continuously.
Change aspect ratio
Press the [WIDE] key on the display panel or remote control to adjust the aspect ratio.
Image setting
- Enter image setting mode
Press the [PIC] key on the remote control. - Select one item to adjust
Press the [ ] / [ ] keys on the remote control. - Adjust the value
Press the [ ] / [ ] keys on the remote control. - Exit image setting mode
To exit image setting mode, repeat the first step or stop operation for some seconds.
RESET THE UNIT
If the unit can not work correctly, you should reset the unit by pressing the [RESET] button on the front panel.
RADIO MODE
SELECT RADIO AS PLAYING SOURCE
- Open the SOURCE MENU and then touch the RADIO icon.
Press the [BAND] key on the display panel or on the remote control or touch the [BAND] icon on the user interface to select one radio band among FM1, FM2, FM3, AM1 and AM2.
AUTO TUNING
Press the [ ] / [ ] key on the display panel or on the remote control or touch the [ ] / [ ] icon on the user interface to seek a higher/ lower station. To stop searching, repeat the operation above or press other keys having radio functions.
NOTE:
- When a station is received, searching stops and the station is played. If the unit receives a stereo broadcasting, the indicator light of stereo 'ST' on the TFT or on the LCD display will be lighted.
MANUAL TUNING
During manual tuning, the frequency will be changed in steps. Press the [ ] / [ ] key on remote control or touch the [ ] / [ ] icon on the user interface to tune in a higher/ lower station.
- Touch the numeric keypad icon [ ] and then touch the numeric buttons to input the radio station frequency numbers.
AUTO SAVE
- Only stations with sufficient signal strength will be detected and stored in the memory. When the monitor is closed, press and hold the [AS/PS] key on the display panel.
When the monitor is opened, touch the [AS] icon on the user interface.
To stop auto save, press other keys having radio functions.
NOTES:
After auto save, the previous saved stations will be overwritten.
The unit has 5 bands, such as FM1, FM2, FM3, AM1, AM2, and each band can store 6 stations; hence the unit can store 30 stations in total.
RADIO MODE
MANUAL SAVE
When one expected radio station has been detected ...
- Press the [MEM] icon on the user interface and the preset menu will be opened.
- Press one preset button among P1~P6.
- If you want to abort, press the [Exit] button.
PREVIEW SCAN
Preview scan searching is such a process that the searching pauses when a station is received and then played for 5-10 seconds. After being played, the unit continues the process until the whole band is detected.
When the monitor is closed, press the [AS/PS] key on the display panel.
- When the monitor is opened, touch the [PS] icon on the user interface. To stop the process, press other keys having radio functions.
RECALL THE STORED STATIONS
Press one numeric key among 1 to 6 on the remote control or touch an onscreen station button to select the corresponding stored station.
LOCAL SEEKING
When LOCAL seeking is on, only those radio stations with strong radio signal could be received.
To open or close LOCAL function, press and hold the [NAV] key on the front panel.
NOTES:
- When the local radio station searching is on, the indicator light 'LOC' lights up; where as the light goes off.
The number of radio stations that can be received will decrease after the local seeking mode is on.
RDS OPERATIONS
The unit provides basic functions of RDS, including PI (Program Identification), radio station name, RT (Radio Text), CT (Clock Time), AF (Alternative Frequency), TA (Traffic Announcement) and PTY (Program Type) selection.
AF FUNCTION
Alternative frequencies lists are used for the same program service and used in conjunction with the PI code (Program Identification code) to assist automatic tuning. Using this information, a radio can automatically search another station that is playing the same material. This is useful when the station you are listening to is fading out.
To activate AF function, touch the [AF] button on the user interface.
To cancel this function, do the operation above again.
NOTE:
During auto switching radio frequency, some interference may be heard. Turning off AF function can settle this issue at the expense of AF switching.
TA FUNCTION
The TA (Traffic Announcement flag) function lets the unit receive traffic announcements automatically no matter what media source is playing back. The TA function can be activated by a TP (Traffic Program) station broadcasting traffic information.
- When TA is activated and a traffic announcement is received, the current playing source will be overridden by the traffic announcement if the current radio band is FM and the 'TA' indicator lights up, indicating that the unit is waiting for traffic announcements.
The unit returns to the original source after the traffic announcement has ended.
To activate TA function, touch the [TA] button on the user interface.
To cancel this function, do the operation above again.
RDS OPERATIONS
PTY FUNCTION
- PTY is the abbreviation for Program Type which is a code defining the type of program being broadcasted (e.g. News or Rock).
Six PTY options will display on the screen. To view more PTY options, touch the scroll bar and arrows on the screen. - When one PTY option is touched (e.g. News), auto search for next available PTY by increasing tuning frequency will take place, until the PTY of the next station matches the current. If no matched PTY has been found, the unit will return to the original radio frequency.
PROGRAM SERVICE (PS)
Used for receiver displays of an 8 character alpha numeric Program Service name which may use Upper or Lower case characters, e.g {BBC_4_FM}, {Classic_.}.
CT (CLOCK TIME)
Some stations broadcast the time and date within the encoded RDS signal. The clock time is automatically adjusted when 'CT' is set to 'On'.
RT (RADIO TEXT)
- When this function is activated, the unit will display short message data transmitted from the provider, such as station information, the name of the current broadcasting song and the artist name.
DISC MODE
INSERT A DISC
Upon inserting a disc, the unit will switch to disc mode automatically.
NOTES:
Please confirm whether there is a disc in the unit before you insert another one.
Some recorded discs, such as CD-R, CD-RW, DVD-R, DVD+R, DVD-RW, DVD+RW cannot be played back because of different recording status. Otherwise, the discs without being "finalized" can not be played back.
About the cautions of disc using, please refer to the appendix.
EJECT THE DISC
Press the [EJECT] key on the front panel or remote control to eject the disc.
You can eject a disc after the unit has been powered off. The unit remains off after the disc is ejected.
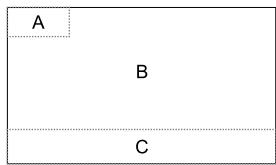
The touch key areas for DVD playback are outlined below.
| A | B |
| C | |
A - Open SOURCE MENU
B - Display playback information
C - Display onscreen control menu
DISC MODE
ONSCREEN CONTROL BUTTONS
| Disc type/Icon | MP3/WMA | CD | VCD | DVD | MPEG | Picture |
| Numeric keypad | Numeric keypad | Numeric keypad | Numeric keypad | Numeric keypad | Numeric keypad | |
| Setup menu | Setup menu | Setup menu | Setup menu | Setup menu | Setup menu | |
| → | / | Fast forward | Fast forward | Fast forward | Fast forward | / |
| ← | / | Fast rewind | Fast rewind | Fast rewind | Fast rewind | / |
| | | | Previous | Previous | Previous | Previous | Previous | Previous |
| | | | Next | Next | Next | Next | Next | Next |
| | / | | Play/Pause | Play/Pause | Play/Pause | Play/Pause | Play/Pause | Play/Pause |
| ■ | Stop | Stop | Stop | Stop | Stop | Stop |
| 01/2 02/2 | / | / | A second menu | A second menu | A second menu | / |
| ← | Repeat | Repeat | Repeat | Repeat | Repeat | Repeat |
| × | Random | Random | Random | Random | Random | / |
| ○ | / | / | / | / | / | Rotate |
| ○ | / | / | Zoom | / | / | Zoom |
| EQ | EQ setup | EQ setup | EQ setup | EQ setup | EQ setup | EQ setup |
| PBC | / | / | PBC | / | / | / |
| A-B | / | / | A-B repeat | A-B repeat | / | / |
| Back | / | / | Exit menu | Exit menu | Exit menu | Exit menu |
| AUDIO | / | / | Channel switching | Dialog language | Dialog language | / |
| SUBTITLE | / | / | / | Subtitle language | Subtitle language | / |
| DISP | / | / | Display information | Display information | Display information | Display information |
| MENU | / | / | / | DVD menu | / | / |
| TITLE | / | / | / | DVD title | / | / |
| DIR+ | Next folder | / | / | / | / | Next folder |
| DIR- | Previous folder | / | / | / | / | Previous folder |
DISC MODE
SUSPEND PLAYBACK
Press the [ / ] key on the front panel or remote control or open the onscreen control buttons menu and then touch the [ / ] button. To resume normal playback, repeat the above operation.
STOP PLAYBACK
- To stop playback, press the [■] key on the remote control or open the onscreen control buttons menu and then touch the [■] button. When the above operation is executed for the first time, the current playback is paused and the break point is memorized and the playback will resume when you start playback again or switch back from other playing sources. The current playback will cancel if the above operation is executed twice and the playback will start over when you start playback again.
DISPLAYFILELIST
To display the file list of a recorded disc, stop current playback.
FAST PLAYBACK
Press the [ ] / [ ] key on the remote control repeatedly or open the onscreen control buttons menu and then touch the [ ] / [ ] button repeatedly, to change the rate of fast forward/fast reverse.
PREVIOUS/NEXT
Press the [K][J] key on the display panel or remote control or open the onscreen control buttons menu and then touch the [K][J] button to play the next or previous file.
CHANGE FOLDER
Press the [DIR+]/[DIR-] icon on the user interface (you should stop playback first if a video or picture file is played back) to change folder during the playback of a recorded disc containing more than one folder.
DISC MODE
REPEAT PLAYBACK
Press the [RPT] key on the remote control repeatedly or open the onscreen control buttons menu and then touch the [C] button repeatedly to alter repeat mode according to the following table.
| Disc type | Repeat mode |
| DVD | Repeat Chapter → Repeat Title → Repeat Off |
| VCD (PBC off) | Repeat Single → Repeat All →Repeat Off |
| CD | Repeat Single → Repeat Off |
| MP3/WMA | Repeat Single → Repeat Folder → Repeat Off |
| MPEG | Repeat Single → Repeat Folder → Repeat Off |
| Picture | Repeat Single → Repeat Folder → Repeat Off |
NOTES:
When a VCD is played back, this function is prohibited if the PBC function is active.
- Turning off the power or switching playing source to other modes and back will cancel this function.
REPEAT A-B
- When a DVD, VCD or CD disc is played back, you can play back the contents between the time points from A to B repeatedly.
Press the [RPT A-B] key on the remote control or open the onscreen control buttons menu and then touch the [A-B] button to set the start point (A) of the repeated section.
Do the above operation again to set the end point of the repeated section. The selected portion will repeat continuously.
- Do the above operation for the third time to cancel this function.
RANDOM PLAYBACK
When this function is on, the contents in the disc will be played back randomly.
Press the [RDM] key on the remote control repeatedly or open the onscreen control buttons menu and then touch the [x] button repeatedly to alter random playback mode among 'Random', 'Random repeat', 'Repeat Off'.
DISC MODE
INTRO PLAYBACK
- When this function is on, the unit will play back the first 10 seconds of each track of a VCD or CD disc. You can search the file you desired using this function.
Press the [SCN] key on the remote control to activate this function. Do the above operation again to cancel this function.
DIRECT SEARCH
- When a DVD, VCD or CD disc is played back, you can search for a particular chapter/ track by pressing the numeric keys of the remote control. For example, if you want to select the 15^th track, you should press numerical key [1] and [5].
GOTO SEARCH
1. Enter [GOTO] search mode
Press the [GOTO] key on the remote control to open search menu.
For DVD, you can search according to title, chapter and time.
For VCD, if PBC function is off, you can search according to time; if PBC function is on, you can search according to track, time and disc time.
For CD, you can search according to track.
For MPEG files, you can search according to track and time.
For record discs containing MP3 and/or JPG files, you can search according to track (file number).
2. Enter search information
- Select items by pressing the direction keys on the remote control and enter search information by pressing the numeric keys, such as title, chapter and time.
3. Confirm
Press the [Enter] key on the remote control to confirm.
4. Exit GOTO search mode
Repeat the above operation until the search menu disappeared or touch the [Exit] button on the menu.
DISC MODE
DVD MENU AND TLTLE
This function is only available for the DVD discs having "MENU/TITLE". Press the [MENU] key on the remote control or open the onscreen control buttons menu and then touch the [MENU] button to open DVD MENU. You can select audio language, subtitle language and so on for playback. Press the [TITEL] key on the remote control or open the onscreen control buttons menu and then touch the [TITEL] button to open DVD TITLE. You can select a different title for playback.
SELECT SUBTITLE LANGUAGE
Press the [SUBTITLE] key on the remote control repeatedly or open the onscreen control buttons menu and then touch the [SUBTITLE] button repeatedly to choose a subtitle language.
SELECT MULTI-ANGLE VIEWS
Press the [ANGLE] key on the remote control repeatedly to choose a shooting angle during the playback of a DVD disc or video file containing multi-angle views.
SELECT AUDIO CHANNEL
For DVD containing multi-language audio files, press the [AUDIO] key on the remote control repeatedly or open the onscreen control buttons menu and then touch the [AUDIO] button repeatedly to change dialogue language.
For VCD and CD, press the [AUDIO] key on the remote control repeatedly or open the onscreen control buttons menu and then touch the [AUDIO] button repeatedly to alter audio channel modes among Left vocal, Right vocal, Mono left, Mono right, Stereo.
NOTE:
- Left channel and right channel cannot work properly if the audio files are not recorded correctly.
PBC FUNCTION
This function is available for the VCD discs with PBC function (Ver 2.0 or higher).
Press the [MENU] key on the remote control to activate this function.
Press again to cancel.
DISC MODE

NOTES:
When PBC is on, playback goes back to the track list and starts from the first track.
- When PBC is on, fast motion playback, slow motion playback or skip search is available but repeat playback and searching for a particular chapter or track is prohibited.
If you do the operation of random playback, scan playback or searching playback when PBC is on, PBC will be turned off automatically.
ZOOM IN/OUT
To zoom in/out the image being played, press the [ZOOM] key on the remote control or open the onscreen control buttons and then touch the [Q] icon.
ROTATE PICTURE
- When one picture file is played back, you can rotate the picture to get proper view angle by pressing the [U] icon on the onscreen control buttons.
PLAYBACK INFORMATION
- Touch the top center area of TFT LCD when playing back DVD and VCD discs and the playback information will be displayed on the top area of the TFT.
For DVD

- Disc type.
- DVD Title information. "5/8" indicates that this DVD has 8 titles and the title playing back now is the fifth title.
- DVD Chapter information. "2/18" indicates that current title has 18 chapters and the chapter playing back now is the second chapter.
- Elapsed time of the current title.
- ".... 2/6 Eng" indicates that the subtitle of this DVD has been recorded in 6 languages and the language displayed now is the second, that is English.
DISC MODE
For VCD

- Disc type.
- PBC function indicator. "PBC On" indicates that PBC function has been activated.
- VCD Track information. "6/18" indicates that this VCD has 18 tracks and the track playing back now is the sixth title.
- Elapsed time of the current track.
USB MODE
SELECT USB AS PLAYING SOURCE
Open the SOURCE MENU and then touch the USB icon.
NOTES:
The unit switches to USB mode once an USB device has been inserted.
The unit supports hot swap.
USB storage devices formatted with FAT 16/32 are supported by this player, but not NTFS format.
The operation is the same as disc mode.
ONSCREEN CONTROL BUTTONS
■ Onscreen control buttons under SD/USB mode are the same as disc mode.
SUSPEND PLAYBACK
The operation is the same as disc mode.
STOP PLAYBACK
The operation is the same as disc mode.
DISPLAYFILELIST
The operation is the same as disc mode.
FAST PLAYBACK
The operation is the same as disc mode.
PREVIOUS/NEXT
The operation is the same as disc mode.
USB MODE
CHANGE FOLDER
The operation is the same as disc mode.
REPEAT PLAYBACK
The operation is the same as disc mode.
RANDOM PLAYBACK
The operation is the same as disc mode.
INTRO PLAYBACK
The operation is the same as disc mode.
DIRECT SEARCH
The operation is the same as disc mode.
GOTO SEARCH
The operation is the same as disc mode.
ZOOM IN/OUT
The operation is the same as disc mode.
ROTATE PICTURE
The operation is the same as disc mode.
PLAYBACK INFORMATION
The operation is the same as disc mode.
IPOD MODE
SELECT IPOD AS PLAYING SOURCE
The unit will switch to iPod mode automatically when an iPod player is plugged into the unit.
To return to the iPod mode from any other sources, open the SOURCE MENU and then touch iPod.
MUSIC PLAYBACK
- Enter iPod music mode
Press the [TITLE] key on the remote control or touch the music icon on the user interface. - Select one music file
Press the [Left]/[Right] key on the remote control. - Play back the music file
Press the [Down] key on the remote control or touch the button on the user interface. - Return to the previous menu
Press the [UP] key on the remote control or touch the button [MENU] on the user interface.

NOTE:
In the Music mode, the buttons on the iPod are disabled.
PHOTO PLAYBACK
- Enter iPod photo mode
Press the [MENU] key on the remote control or touch the picture icon on the user interface. - Control photo files playback
Use the keys on the iPod to control playback.

NOTES:
To exit PHOTO mode, press the [MENU] button on the iPod.
Pictures can be displayed on the screen just when the picture playback mode of iPod player is set to "slide show".
IPOD MODE
VIDEO PLAYBACK
- Enter iPod video mode
Press the [AUDIO] key on the remote control or touch the video icon on the user interface. - Control video files playback
Use the keys on your iPod player to control playback.

NOTES:
To exitVIDEO mode, press the [MENU] button on the iPod.
To transmit the images (including videos and pictures) from your iPod to the TFT screen, you must set the following options through the iPod video settings menu: TV Out = On, TV Signal = NTSC.
FAST PLAYBACK
To access fast forward or fast reverse playback, you should press and hold the [Left]/[Right] key on the remote control or the [ ] / [ ] button on the user interface for 1 second and continue to hold the corresponding key. To resume normal play, release them.
DIRECT SEARCH
To select a file directly, touch the numeric button on the user interface to open the direct entry menu. Enter the desired file using the number pad of this menu. Touch the [Enter] button to confirm. To exit this menu, touch the [Exit] button.
To clear the numbers you have entered, touch the [Clear] button.
You can also use the numeric keys on the remote control to select files directly.
DVB-T MODE
SELECT DVB-T AS PLAYING SOURCE
- Open the SOURGE MENU and then select DVB-T, and touch the screen to POP UP control menu.
Press the [ ] button to increase volume or press the [ ] button to decrease volume.

MENU
EXIT
The touch key areas for DVB-T mode are outlined below:
A - Open the SOURCE MENU
B-POP UP control menu
C-POPUPSETUPandEQ
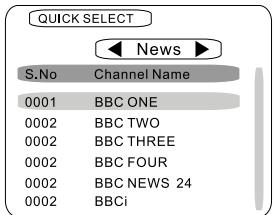
QUICK SELECT
Press the [OK] button to POP UP the [QUICKSELECT] menu and press the [ ] or [ ] buttons, to shift cursor to select channel, or press the [ ] or [ ] buttons to select source mode.
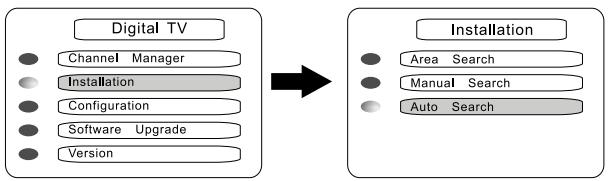
SEARCH CHANNEL
Press MENU to POP UP [MAIN MENU], and press [ ] and [ ] buttons to shift cursor to select source and press the [OK] button to get in the sub menu. Press [EXIT] to exit.
OTHER MODES
AUX
External peripheral devices with RCA audio and video outputs can be connected with the unit.
To enter AUX IN mode, open the SOURCE MENU and then touch AUX IN.
CAMERA
This player is "camera ready". Before accessing any camera features, you must purchase and install a rear video camera. Once the rear camera is connected and operating properly, the CAMERA source mode will become active. While the camera is not installed, the CAMERA option appears gray, indicating the function is not available.
The playing source will change to 'CAMERA' mode automatically when you reverse your car.
NAV
This player is "navigation ready". Before accessing any navigation features, you should purchase and install the suited navigation module. Once the navigation module is connected and operating properly, the NAV source mode will become active. While the navigation module is not installed, the NAV option appears gray, indicating the function is not available. All installation and operating instructions are included with the navigation module.
SETUP
SETUP PROCEDURES
1. Enter setup mode
Press the [SETUP] key on the remote control or touch the setup icon [× ] on the user interface.
The following menu appears after entering the setup mode.
The GENERAL sub-menu is highlighted by default.
| SETUP MENU | ||||
| RDS | General | Language | Audio | Back |
| Rating | Clock Mode | 12Hr | ||
| Hardware | Clock | 11:18 AM | ||
| P.VOL | Tuner Region | Europe | ||
| TS Cal | Beep | On | ||
2. Select one sub-menu
Press the direction keys on the remote control.
3. Select one item
Press the [ ] / [ ] key on the remote control to select one item and then press the [ / ] key to confirm.
4. Select one value
Press the [ ] / [ ] key on the remote control to select one suitable value and then press the [ / ] key to confirm.
NOTE:
All following settings can be done by touching the option directly.
SETUP
GENERAL
Clock mode
12 Hr: the clock displays in the type of 12 hours such as 11:18 AM.
24 Hr: the clock displays in the type of 24 hours such as 20:18.
Clock
Adjust the clock displayed on the top right corner of the TFT screen.
Tuner Region
The unit supports several radio systems and you can select a correct radio system according to your country.
Beep
On: Background sound of key-press is on. Off: Background sound of key-press is off.
LANGUAGE
OSD
Select one language of system menu display.
DVD Audio
Select one dialogue language of DVD disc.
NOTE:
If the DVD disc does not contain the selected language, the dialogues you listening to will be in default language.
DVD Subtitle
Select one subtitle language of DVD disc.
NOTE:
If the DVD disc does not contain the selected language, the subtitle will be displayed in default language.
Disc Menu
Select one language of DVD MENU display.
NOTE:
If the DVD disc does not contain the selected language, the DVD MENU will be displayed in default language.
SETUP
AUDIO
DRC
Set the dynamic range of Dolby digital DVD discs.
On: Playback more dynamic audio with Bass.
Off: Normal output.
Loudness
On: Loud mode is on.
Off: Loud mode is off.
Subwoofer
On: Open the subwoofer speaker.
Off: Close the subwoofer speaker.
Sub Filter
You can get different bass effect when you set different cut off frequency of subfilter. According to the acoustics surroundings of your car, select a proper frequency. 80Hz, 120Hz, 160Hz are available.
RDS
RDS
On: RDS function is active.
Off: RDS function is inactive.
CT
On: The clock time is on.
Off: The clock time is off.
TA VOL
Set the relative volume of Traffic Announcements.
RATING
Some DVD discs have built-in parental lock which prevents children to watch some scenes containing violence or adult content especially.
Set Password
The original password of the unit is "0000".
SETUP
You should set a new password ASAP.
METHOD OF CHANGING PASSWORD:
- Locate the cursor on the 'password' option, press the numeric keys on the remote control or touch the 'Password' option directly to open the onscreen keypad, touch the numeric buttons to enter your password (original password for the first time) and then confirm.
- Repeat the operation above to enter a new 6-digit password and then confirm. The new password becomes effective and the parental lock is closed.
RATING
The unit has some watching level as followings:
- Kid safe: A movie rating that is condign to children.
- G: A movie rating that allows admission to persons of all ages.
- PG: A movie rating that allows admission of persons of all ages but suggests parental guidance in the case of children.
- PG-13: A movie rating that allows admission of persons of all ages but suggests parental guidance in the case of children under the age of 13.
- PG-R: PG-related.
- R: A movie rating that allows admission only to persons of a certain age, usually 17, unless accompanied by a parent or guardian.
- NC-17: A movie rating that allows admission to no one under the age of 17.
- Adult: A movie rating that is suitable to adult audiences only.
PROCEDURES OF CHANGING THE RATING:
- Enter password to unlock the parental lock
- Locate the cursor on the 'password' option, press the numeric keys on the remote control or touch the 'Password' option directly to open the onscreen keypad, touch the numeric buttons to enter your password and then confirm.
- Change the rating
Select an appropriate rating from the 'rating' list.
SETUP
- Close the parental lock
Repeat the operation of the first step to enter a 6-digit password (old or new) and then confirm.
The parental lock is closed.
Load Factory
To restore the default settings relating with DVD playback (e.g.: DVD Audio, DVD Subtitle), press the [RESET] option.
HARDWARE
Camera In
Normal: Actual scenes shot by the camera display on the TFT monitor while reverse driving (just like what you are watching).
Mirror: The mirror images of actual scenes display on the TFT monitor while reverse driving (just like observing things over the rearview mirror).
TFT Auto Open
Auto: The TFT panel automatically opens when the unit is turned on.
Manual: When the ignition is turned off, the TFT panel remains open if it was opened previously.
Off: The TFT panel opens only by pressing OPEN button when the unit is turned on.
Video input
NTSC: Set the color system of the TFT screen to NTSC.
PAL: Set the color system of the TFT screen to PAL.
AUTO: Set the color system of the TFT screen automatically by the unit according to the input video formats.
■ Parking
On: Image displays only after your car has been parked.
Off: Image displays at all times.
P.VOL
P.VOL means Programmable Volume.
You can balance the volume among different audio sources using this function.
SETUP
Source
Select one playing source that you want to set relative volume.
Level
You can set relative volume level from 0 to 6.
METHOD OF CHANGING PASSWORD
- Locate the cursor on the "Anti-PSW" option, press the numeric keys on the remote control or touch the "Anti-PSW" option directly to open the onscreen keypad. Touch the numeric buttons to enter the factory default code "012345" to deactivate the anti theft function.
- Repeat the operation above to enter a new 6 digit password and confirm by pressing the enter button. Your new personal password becomes effective and the unit will be locked when disconnected from power.
PLEASE NOTE:
- Do use a code you can easily remember. Unlock the unit is not free of charge and can only be done by an authorized ZENEC service center.
TS CAL
- When the touch function is not sensitive or valid, you should calibrate the touch screen by this function.
- Calibrate the touch screen just following the screen introductions after entering the TS CAL mode.
E
■ Audio control allows you to easily adjust the audio system to get the best possible sound effect.
1. Enter the EQ setup mode
Press the [SEL] key on the remote control or touch the EQ icon in the user interface and the following interface will display on the screen.
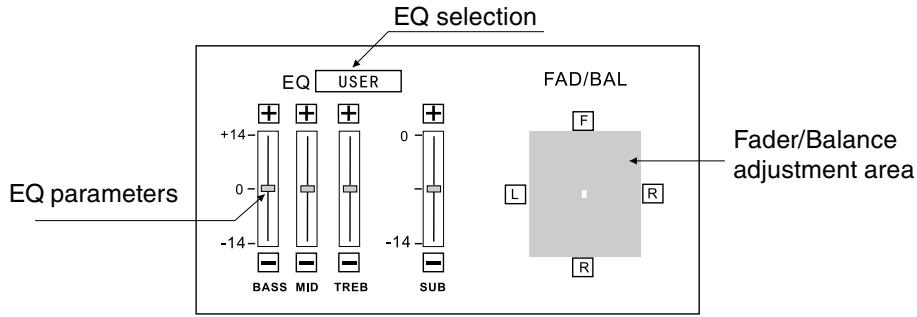
- Select EQ mode
Touch the EQ selection bar repeatedly and the EQ mode will change. - Adjust EQ parameters
To adjust EQ parameters, touch and drag the EQ parameters adjustment bar. - Adjust Front/Rear/Left/Right fader and balance
- You can adjust front/back/left/right balance of the speaker to a desirable listening effect according to the surroundings and your preference.
To adjust Front/Rear/Left/Right fader and balance, touch and drag the small white point in the Fader/Balance adjustment area.
NOTES:
The unit provides some EQ modes: User, Rock, Hip Hop, Dance, Latin, Rave, Urban, Acoustic.
Different EQ reflects in different Bass, Treble and Mid level. The parameters of the EQ modes has been preset and you can not change them besides 'User'.
The EQ mode will change to 'User' automatically when you adjust the value of BASS, TREB or MID under the modes besides 'User'.
The value of SUB is independent of EQ mode and can be adjusted solely.
TROUBLESHOOTING
What appears to be trouble is not always serious. Please check the following points before calling a service center.
| Problem | Cause | Corrective action |
| General | ||
| Unit can not power on. | Unit fuse blown. | Install new fuse with correct rating. |
| Car battery fuse blown. | Install new fuse with correct rating. | |
| Illegal operation. | Reset the unit. | |
| Remote control does not work. | Battery depleted. | Change the Battery. |
| Battery installed incorrectly. | Install the battery correctly. | |
| No/low audio output. | Improper audio output connection. | Check wiring and correct. |
| Volume set too low. | Increase volume level. | |
| Speakers damaged. | Replace speakers. | |
| Heavily biased volume balance. | Adjust the channel balance to center position. | |
| Speaker wiring is in contact with metal part of car. | Insulate all speaker wiring connections. | |
| Poor sound quality or distortion. | Pirated disc is in use. | Use original disc. |
| Speaker. | Replace speakers. | |
| Wrong connections. | Check wiring and correct. | |
| Speaker is shorted. | Check wiring and correct. | |
| Tel-Mute malfunction. | MUTE wire is grounded. | Check the 'MUTE' wiring and correct. |
| Unit resets itself when engine is off. | Incorrect connection between ACC and BATT. | Check wiring and correct. |
| TFT monitor | ||
| Monitor does not open automatically. | TFT Auto Open is turned off. | Turn TFT Auto Open on. |
| Warning information is shown at all times. | Parking break wiring is not correct. | Check wiring and correct. |
| Flashing image or interference appears on screen. | The color system of DVD disc does not match the monitor. | Adjust the color system of the DVD disc playing back or the monitor in us. |
| Pirated disc is in use. | Use original disc. | |
| Video cable damaged. | Replace cables. | |
| Improper video signal connections. | Check wiring and correct. | |
TROUBLESHOOTING
(Continued)
| Problem | Cause | Corrective action |
| Disc playback | ||
| Cannot insert disc. | A disc inside the unit already. | Eject current disc and insert new one. |
| Disc does not play back. | Disc is warped or scratched. | Use disc in good condition. |
| Disc is dirty or wet. | Clean disc with soft cloth. | |
| Incompatible disc is used. | Use compatible disc. | |
| Disc is inserted upside down. | Insert disc with label side up. | |
| Disc region code is not compatible with unit. | Use disc with proper region code. | |
| PBC cannot be used during VCD playback. | PBC is not available on the disc. | Use disc with PBC available. |
| Repeat or search function is invalid during VCD playback. | PBC is on. | Turn PBC off. |
| Error messages | ||
| No disc. | Disc is dirty. | Clean disc with soft cloth. |
| Disc is upside down. | Insert disc with label side up. | |
| No disc inside. | Insert disc. | |
| Bad disc. | Disc is dirty. | Clean disc with soft cloth. |
| Disc is upside down. | Insert disc with label side up. | |
| Unknown disc. | Disc format is not compatible. | Use disc with compatible format. |
| Region Error. | DVD region code is not compatible with this unit. | Use disc with compatible region code. |
DEVICE CONNECTIONS
NOTES OF CONNECTION
This unit is designed to be used in a vehicle with a 12-volt battery and negative grounding. Before installing this unit to a mobile home, a bus, or a truck, make sure the battery voltage is appropriate for this unit to be used, otherwise, install a transformer to convert the output voltage to 12V .
- To avoid short circuit in the electrical system, ensure that the negative battery cable is disconnected before installation.
- To prevent short circuit in the wiring and damaging to this unit, secure all wirings with cable ties or adhesive tape. Route the wirings in a secured, out of heating place without touching any moving parts such as gear shift, handbrake, and seat rails to prevent the wiring insulation being melted/wore off.
- Never pass the yellow power cord through the installation hole into the engine compartment and connect to the car battery. Otherwise, a high possibility of serious short circuit to the electrical system may occur.
- Replacing a new fuse with 10 A rating when the old one is broken, using no fuse or fuse with improper rating may cause damage to this unit or even fires. If a proper fuse is installed and electrical problems still occur, please contact with any professional car shops for inquiry.
DO NOT connect other equipments with the car battery to avoid battery overheating.
Please make sure all the wiring connections and the cables of the speakers are well-insulated. Otherwise, this unit may be damaged by short circuit.
If there is no ACC available, please connect ACC lead to the power supply with a switch.
If an external power amplifier is connected, please don't connect P.CONT lead to the power lead of the external power amplifier, otherwise, electric spark or other damage may be resulted.
Never ground the speaker output to prevent the damage to the built-in power amplifier.
The minimum rating of the speakers connected to this unit is 50 W with 4 to 8 Ω impedance.
DEVICE CONNECTIONS
CONTROL CABLES
Auto Brightness Control
To avoid the display being too bright at night time, if the headlight cable is connected to ILLUMI, turning on the head light will dim the backlight of the TFT LCD and vice versa.
TELEPHONE MUTE
If the MUTE cable is connected to a car phone, other audio outputs mute when one call is received by the car phone.
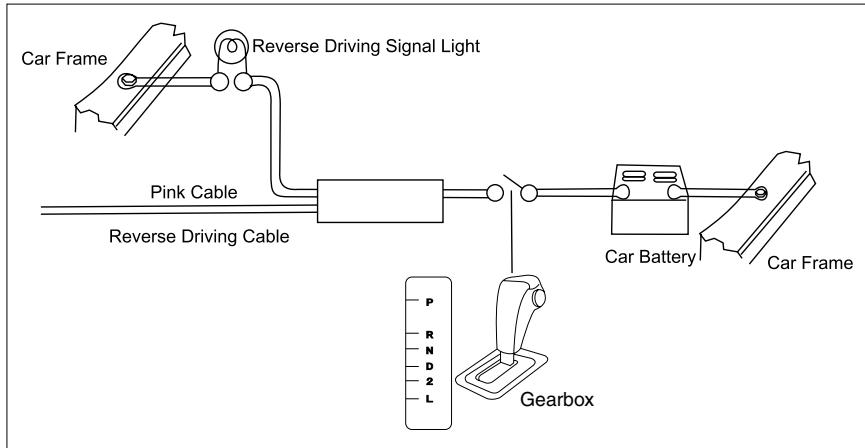
REVERSE DRIVING
If a rear view camera is connected with the unit, the playing source switches to CAMERA automatically when you start reverse driving. With the reverse driving over, the playing source switches to the previous source.
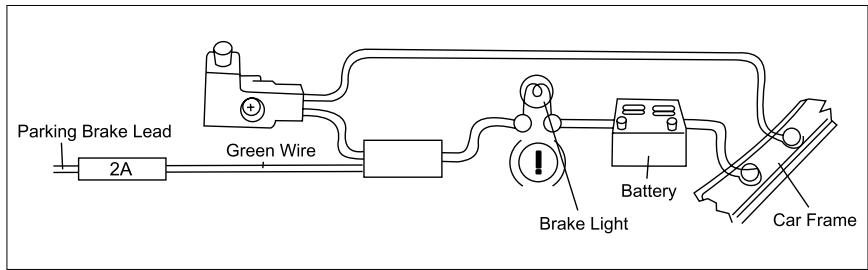
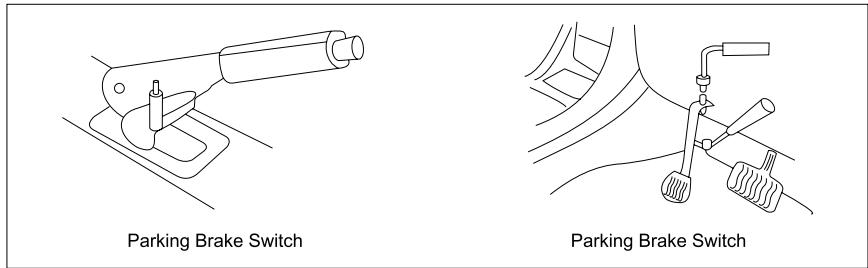
PARKING BRAKE
- If "PRK SW" cable is connected to hand brake switch, video display on the TFT monitor will be controlled by this function. Parking cable function ceases when the playing source is CAMERA.
- The monitor displays the blue screen with warning information to prevent the driver watching video contents during driving, but the passengers at the rear seat can watch video content normally, when headrest monitors are installed.
DEVICE CONNECTIONS
PARKING BRAKE CABLE CONNECTIONS
REVERSE DRIVING CABLE CONNECTIONS
INSTALLATION AND UNINSTALLATION
NOTES OF INSTALLATION
- Before installation, please make sure proper connections are conducted and the unit operates normally. Improper connection may result in damage to the unit.
- Use only accessories designed and manufactured for this unit and other unauthorized accessories may result in damage to the unit.
- Before installation, please fasten all power cables.
- DO NOT install the unit in the place where close to hot area to prevent damage to electrical components such as the laser head.
- Install the unit horizontally. Installing the unit more than 30 degree inclined may result in worse performance.
- To prevent electric spark, connect the positive pole first and then the negative pole.
- DO NOT block the cooling fan exit to ensure sufficient heat dissipation of this unit, or it may result in damage to this unit.
UNIT INSTALLATION
Method A
- Insert mounting bracket into dash board, choose appropriate mounting tab according to the gap width, bending the mounting tab outwards with a screw driver to fix the mounting bracket in place.
- Use 2 pieces of M5 x 5 cone shaped screw to fix two assemble bars on both sides of the unit (see picture 1).
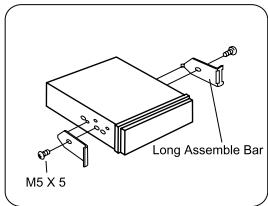
(Picture 1)
- Screw in 1 piece of M5 x 24 to the hole of the unit back and put on a rubber sheath over the screw (see picture 2).
INSTALLATION AND UNINSTALLATION
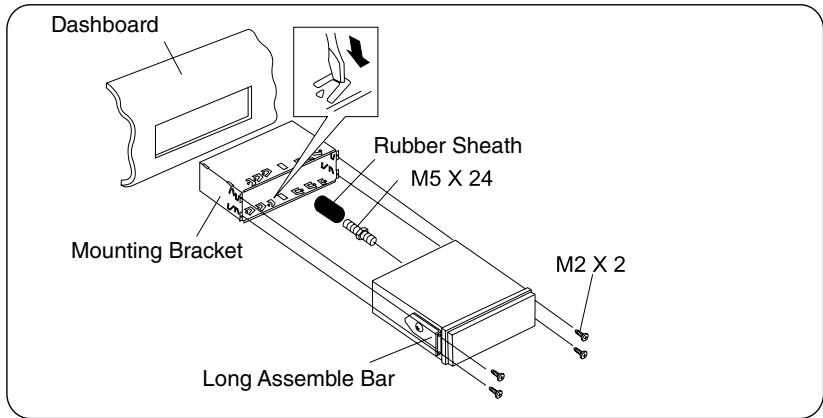
(Picture 2)
- Insert the unit into the bracket, fasten the M4 x 6 screw to the fireproofing board available at the back of the dashboard, and use 4 pieces of M2 x 2 screw to lock the assemble bars and the mounting bracket in position.
NOTE:
According to the depth of the opening, use different length of assemblebar accordingly. If the opening is too shallow, the monitor may be extended out 10mm from the dashboard.
METHOD B
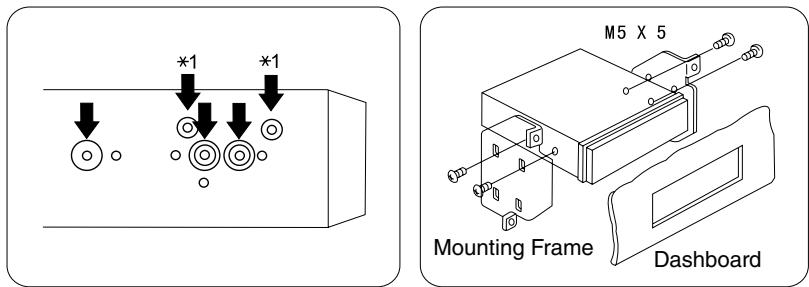
- Insert this unit directly to the opening of the dash board.
- Place M4 x 3, M5 x 5 cylindrical screw or M5 x 5 cone shaped screw through the holes of the mounting frame located inside the opening to holes of the unit and fasten the screws to left & right.
INSTALLATION AND UNINSTALLATION
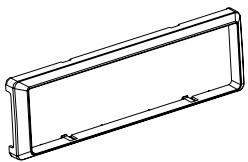
TRIM RING INSTALLATION
- Attach the trim ring around the front panel with two indentions on one side facing upwards.
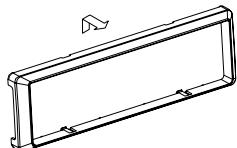
UNINSTALL Disassemble trim ring
- Push the trim ring upward and pull out the upper part.
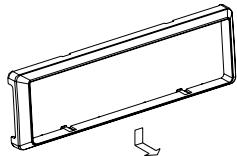
- Push the trim ring downward and pull out the lower part.
DISASSEMBLE THE UNIT
- Unscrew the 4 pieces M2 x 2 screws.
- Use a screw driver to bend straight the bended mounting tab and tip out the unit from the mounting bracket.
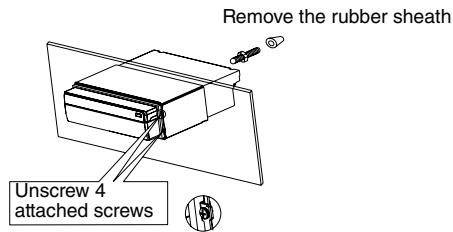
- Pull out the unit from the mounting bracket with both hands.
SPECIFICATIONS
General
Reference Supply Voltage. 12V (DC)
Operating Voltage Range. 10.5~15.8V (DC)
Max Operation Current 10A
Grounding System. Car Battery Negative Pole
Installation Dimension (WxHxD) 178mm x 50mm x (165+25) mm
Installation Angle 0^ 30^
Net Weight 2.3kg
FM
Signal Noise Ratio 55dB
Residual Noise Sensitivity (S/N=30dB) .20dBμV
Frequency Response (±3dB) 40Hz~12.5KHz
Station Seeking Level 20~30dBμV
Distortion 1.5%
Stereo Separation (1 KHz) 20dB
Antenna Impedance 75Q
AM
Residual Noise Sensitivity (S/N=20dB) .40dBμV
Selectivity (±9KHz) 50dB
DVD Player
Signal/Noise Ratio 90dB
Dynamic Range 90dB
Distortion (line out) 0.1%
Frequency Response (±3dB) 20Hz~20KHz
Max Output Power 4x40W
Load Impedance 40
AUX IN
Distortion 0.5%
Frequency Response (±3dB) 20Hz~20KHz
Audio Input Level 0.4Vrms
Audio
Audio Output Impedance 200Ω
Audio Output Level 2Vrms (Max)
(Under normal audio input level and maximum volume)
SPECIFICATIONS
Video
Normal Video Input Level (CVBS) 1.0±0.2V
Video Input Impedance 75Ω
Video Output Impedance 75Ω
Video Output Level 1.0±0.2V
TFT Monitor
Screen Diagonal 7 inches
Usable Display Area 154.1(W) x 87.0 (H)
Resolution. 1440 (W) x 234 (H)
Brightness 400cd/m2 (Measure the centre brightness after 30 minutes)
Contrast 300(TYP.)
Response Time
Rise 12ms
Fall 18ms
Viewing Angle From Top 40°
From bottom 65°
Horizontally. ± 65^
LCD Life Cycle. 10000 hours (at 25^ )
Environment
Operating Temperature. -10^ +60^
Storing Temperature -20°C~ + 70°C
Operating Humidity. 45%~80%RH
Storing Humidity. 30%~90%RH
- Specifications are subject to possible modifications for improvement without further notice.
RoHS
COMPLIANT
2002/95/EC

If at any time in the future you should need to dispose this product please note that waste electrical products should not be disposed of with household waste. Please recycle where facilities exist. Check with your Local Authority or retailer for recycling advice (Waste Electrical and Electronic Equipment Directive).
This unit is manufactured under license from Dolby Laboratories. "Dolby" and the double-D symbol are trademarks of Dolby Laboratories.
APPENDIX
REGION CODE
According to DVD sale region, the whole world is divided into six regions. A DVD disc can be played back only when its region code is compatible with that of the player in use.
Region 1: USA, Canada, East Pacific Ocean Islands;
Region 2: Japan, West Europe, North Europe, Egypt, South Africa, Middle East;
Region 3: Taiwan of China, Hong Kong of China, South Korea, Thailand, Indonesia, South East Asia;
Region 4: Australia, New Zealand, Mid & South America, South Pacific, Ocean Islands/Oceania;
Region 5: Russia, Mongolia, India, Middle Asia, East Europe, North Korea, North Africa, North West Asia;
Region 6: Chinese Mainland.
CAUTIONS OF DISC USING
- DO NOT use irregular shaped disc
- Disc Cleaning
Use a dry, soft cloth to wipe the disc from center to edge, only neutral detergent can be used.
- When playing a new disc
New disc may have some rough spots around the inner and outer edges. If such a disc is used, remove these rough spots with a pencil or ball-point pen, etc.
APPENDIX
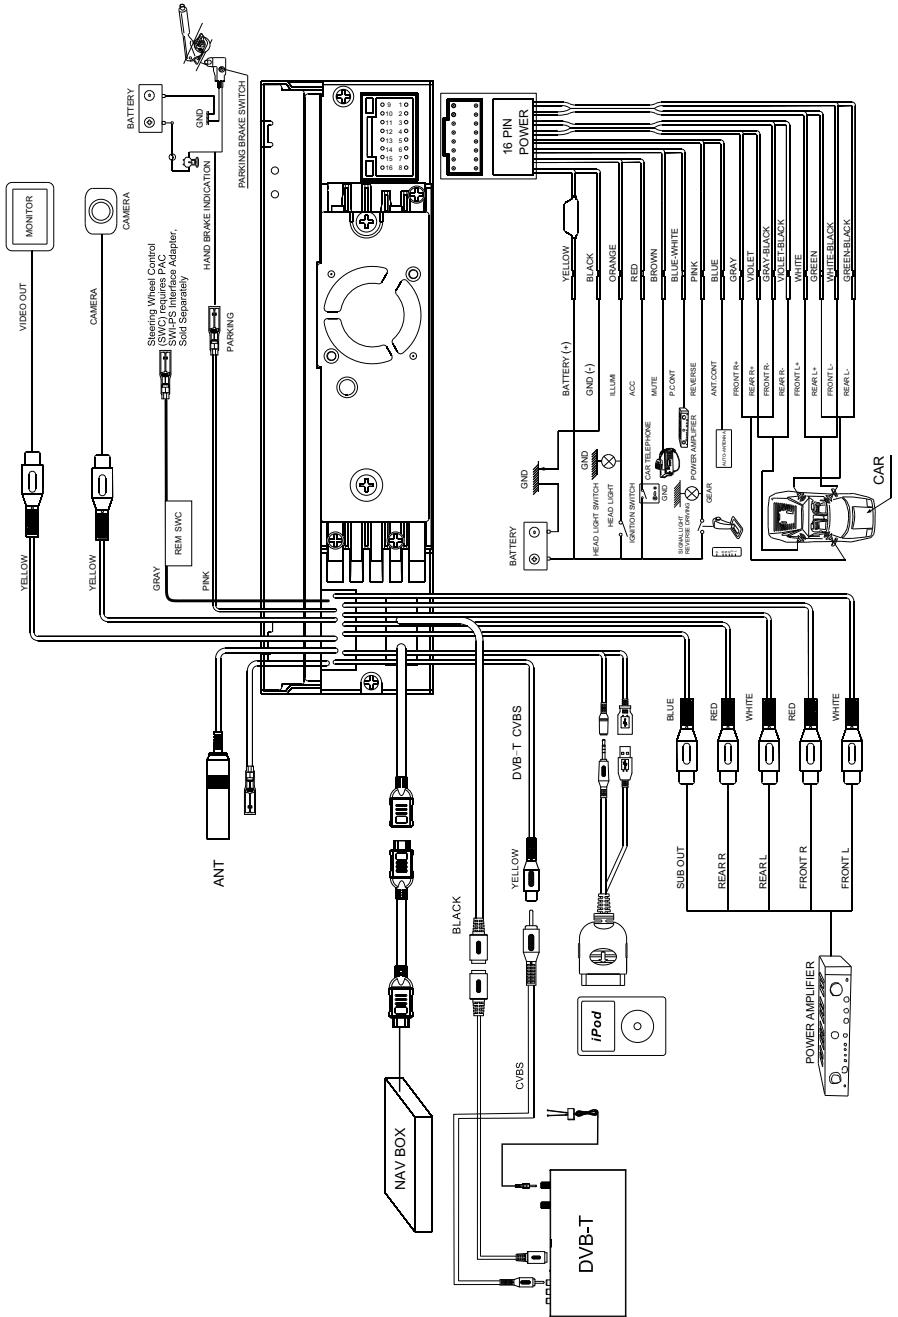
WIRING CONNECTIONS
2 YEARS LIMITED WARRANTY
Dear customer
Thank you for purchasing this ZENEC product. It is advisable to keep the original packing material for any future transporting of the product.
Should your ZENEC product require warranty service, please return it to the retailer from whom it was purchased or the distributor in your country.
This ZENEC product is warranted against defective materials or workmanship for a period of TWO years from date of purchase at retail.
Warranty Limitations
This warranty does not cover any damage due to:
- Improper installation, incorrect audio or mains connection(s).
- Exposure to excessive humidity, fluids, heat sun rays or excessive dirt or dust.
- Accidents or abuse, unauthorized repair attempts and modifications not explicitly authorized by the manufacturer.
This warranty is limited to the repair or the replacement of the defective product at the manufacturer's option and does not include any other form of damage, whether incidental, consequential or otherwise. The warranty does not cover any transport costs or damages caused by transport or shipment of the product. Warranty work will not be carried out unless this warranty certificate is presented fully completed with model, serial number, purchaser's address, purchasing date and dealer stamp together with the original sales slip!
ZENEC MODEL: ZE-MC194
Serial number:
Date of purchase:
Your name:
Your address:
City:
State: ZIP or postal code
Country:
Dealer's address & stamp
CONTENU
PANNEAU DE COMMANDES
START CODE 54
PANNEAU AVANT 54
AFFICHAGE LCD AUXILIAIRE 55
TELECOMMANDE 56
OPÉRATIONS DE BASE
SOUS/HORS TENSION 58
NAV. 58
RÉGLAGE DU VOLUME 58
MENUSOURCE 58
SELECTION DE LA SOURCE DE LECTURE 58
AFFICHAGE DE L'HEURE 59
UTILISATION DE L'ECRAN TFT 59
RÉINITIALISATION DE L'APPAREIL 59
MODE RADIO
SELECTIONNER LA RADIO COMME SOURCE DE LECTURE 60
SELECTIONNER UNE BANDE RADIO 60
RECHERCHE AUTOMATIQUE 60
RECHERCHE MANUELLE 60
MÉMORISATION AUTOMATIQUE 60
MÉMORISATION MANUELLE 61
BALAYAGE 61
INDIQUER LES STATIONS MÉMORISÉES 61
RECHERCHE LOCALE 61
FONCTIONNEMENT DU RDS
FONCTION AF 62
FONCTION TA 62
FONCTION PTY 63
PROGRAM SERVICE (PS) 63
CT (CLOCK TIME) 63
RT (RADIO TEXT) 63
MODE DISQUE
INSERER UN DISQUE 64
EJECTERLEDISQUE 64
COMMANDES DE L'ECRAN TACTILE 64
COMMANDES DU MENU À LÉCRAN (OSD) 65
SUSPENDRE LA LECTURE 66
ARRÉTER LA LECTURE 66
AFFICHER LA LISTE DES FICHIERS 66
LECTURE ACCELEREE 66
PRÉCÉDENT/SUIVANT 66
SELECTIONNER UN DOSSIER 66
REPETER LA LECTURE 67
REPETER A-B 67
LECTURE ALÉATOIRE 67
LECTURE D'INTRODUCTION 68
RECHERCHE DIRECTE 68
RECHERCHE « GOTO » 68
DVD MENU ET TITRE 69
SELECTIONNER LA LANGUE DES SOUS-TITRES 69
SELECTIONNER LES PRISES DE VUES MULTI-ANGLES 69
SELECTIONNER LE CANAL AUDIO 69
FONCTION PBC 69
ZOOM IN/OUT 70
ROTATION DE L'IMAGE 70
INFORMATIONS DE LECTURE 70
MODE USB
SELECTIONNER L'USB COMME SOURCE DE LECTURE 72
COMMANDES DE L'ECRAN TACTILE 72
COMMANDES DU MENU À LÉCRAN (OSD) 72
SUSPENDRE LA LECTURE 72
ARRÉTER LA LECTURE 72
AFFICHER LA LISTE DES FICHIERS 72
LECTURE ACCELERREE 72
PRECEDENT/SUIVANT 72
SELECTIONNER UN DOSSIER 73
REPETER LA LECTURE 73
LECTURE ALÉATOIRE 73
LECTURE D'INTRODUCTION 73
RECHERCHE DIRECTE 73
RECHERCHE GOTO 73
ZOOM IN/OUT 73
ROTATION DE L'IMAGE 73
INFORMATIONS DE LECTURE 73
MODE IPOD
SELECTIONNER LIPOD COMME SOURCE DE LECTURE 74
LECTURE DE MUSIQUE 74
LECTURE DE PHOTO 74
LECTUREVIDEO 75
LECTURE ACCELEREE 75
RECHERCHE DIRECTE 75
AUTRES MODES
Reference Supply Voltage. 12V (DC)
Operating Voltage Range. 10.5~15.8V (DC)
Max Operation Current. 10A
Grounding System............ Car Battery Negative Pole
Installation Dimension (WxHxD) 178mmx50mmx (165+25) mm
Installation Angle 0^ 30^
Net Weight 2.3kg
FM
Signal Noise Ratio 55dB
Residual Noise Sensitivity .(S/N=30dB) 20dBuV
Frequency Response (±3dB) 40Hz~12.5KHz
Station Seeking Level 20~30dBuV
Distortion 1.5%
Stereo Separation (1 KHz) 20dB
Antenna Impedance 75Q
AM
Residual Noise Sensitivity (S/N=20dB) 40dBuV
Selectivity (±9KHz) 50dB
DVD Player
Signal/Noise Ratio 90dB
Dynamic Range 90dB
Distortion (line out) 0.1%
Frequency Response (±3dB) 20Hz~20KHz
Max Output Power 4x40W
Load Impedance 4Ω
AUX IN
Distortion 0.5%
Frequency Response (±3dB) 20Hz~20KHz
Audio Input Level 0.4Vrms
Audio
Audio Output Impedance 200Ω
Audio Output Level . 2Vrms (Max)
(Under normal audio input level and maximum volume)
CHARACTERISTIQUES TECHNIQUES
Video
Normal Video Input Level (CVBS) 1.0±0.2V
Video Input Impedance. 75Ω
Video Output Impedance 75Ω
Video Output Level 1.0±0.2V
(Under normal video input level)
TFT Monitor
Screen Diagonal 7inches
Usable Display Area 154.1(W) * 87.0 (H)
Resolution. 1440 (W) * 234 (H)
Brightness 400cd/m2 (Measure the centre brightness after 30 minutes)
Contrast 300(TYP.)
Response Time
Rise 12ms
Fall 18ms
Viewing Angle From Top 40°
From bottom 65"
Horizontally. ± 65^
LCD Life Cycle. 10000 hours (at 25^ )
Environment
Operating Temperature. -10^ + 60^
Storing Temperature -20°C- + 70oC
Operating Humidity. 45%-80%RH
Storing Humidity. 30%-90%RH
ZENEC MODELE: ZE-MC194
Numéro de série :
Date de l'achat :
Votrer nom :
Votre adresse :
Ville :
Reference Supply Voltage. 12V (DC)
Operating Voltage Range. 10.5~15.8V (DC)
Max Operation Current 10A
Grounding System . Car Battery Negative Pole
Installation Dimension (WxHxD) 178mm x 50mm x (165+25) mm
Installation Angle 0^ 30^
Net Weight 2.3kg
FM
Signal Noise Ratio 55dB
Residual Noise Sensitivity (S/N=30dB) 20dBμV
Frequency Response (±3dB) 40Hz~12.5KHz
Station Seeking Level 20~30dBμV
Distortion 1.5%
Stereo Separation (1 KHz) 20dB
Antenna Impedance 75Q
AM
Residual Noise Sensitivity (S/N=20dB) .40dBμV
Selectivity (±9KHz) 50dB
DVD Player
Signal/Noise Ratio 90dB
Dynamic Range 90dB
Distortion (line out) 0.1%
Frequency Response (±3dB) 20Hz~20KHz
Max Output Power 4x40W
Load Impedance 4Ω
AUX IN
Distortion 0.5%
Frequency Response (±3dB) 20Hz~20KHz
Audio Input Level 0.4Vrms
Audio
Audio Output Impedance 200Ω
Audio Output Level 2Vrms (Max)
(Under normal audio input level and maximum volume)
Video
Normal Video Input Level (CVBS) 1.0±0.2V
Video Input Impedance 75Ω
Video Output Impedance 75Ω
Video Output Level 1.0±0.2V
TFT Monitor
Screen Diagonal 7 inches
Usable Display Area 154.1(W) x 87.0 (H)
Resolution. 1440 (W) x 234 (H)
Brightness 400cd/m² (Measure the centre brightness after 30 minutes)
Contrast 300(TYP.)
Response Time Rise 12ms
Fall 18ms
Viewing Angle From Top 40°
From bottom 65°
Horizontally ± 65^
LCD Life Cycle 10000 hours (at 25^ )
Environment
Operating Temperature. -10^ +60^
Storing Temperature -20°C~ + 70°C
Operating Humidity. 45%~80%RH
Storing Humidity 30%~90%RH
Thank you for purchasing this ZENEC product. It is advisable to keep the original packing material for any future transporting of the product.
Should your ZENEC product require warranty service, please return it to the retailer from whom it was purchased or the distributor in your country.
This ZENEC product is warranted against defective materials or workmanship for a period of TWO years from date of purchase at retail.
Warranty Limitations
This warranty does not cover any damage due to:
- Improper installation, incorrect audio or mains connection(s).
- Exposure to excessive humidity, fluids, heat sun rays or excessive dirt or dust.
- Accidents or abuse, unauthorized repair attempts and modifications not explicitly authorized by the manufacturer.
This warranty is limited to the repair or the replacement of the defective product at the manufacturer's option and does not include any other form of damage, whether incidental, consequential or otherwise. The warranty does not cover any transport costs or damages caused by transport or shipment of the product. Warranty work will not be carried out unless this warranty certificate is presented fully completed with model, serial number, purchaser's address, purchasing date and dealer stamp together with the original sales slip!
GARANTIE 2 ANS
[FR]
Cher client.
State: ZIP or postal code
Country:
Dealer's address & stamp