
CALYPSO 1300 - Vacuum Cleaner PROGRESS - Free user manual and instructions
Find the device manual for free CALYPSO 1300 PROGRESS in PDF.
| Product Type | Canister Vacuum Cleaner |
| Brand | PROGRESS |
| Model | CALYPSO 1300 |
| Power Supply | 220-230 V ~ 50/60 Hz, fuse 10 A |
| Power | Not specified |
| Primary Filter Type | Paper bag (Progress P60) |
| Additional Filter | Microfilter |
| High Performance Filter | HEPA filter class S (replaceable) |
| Filter Saturation Indicator | Yes, red window |
| Power Control | Electronic or secondary air regulator on handle |
| Cable Rewind | Automatic rewinder by pedal |
| Included Nozzles | Floor + carpet nozzle, crevice tool, upholstery nozzle |
| Integrated Accessory Storage | Yes, integrated compartment |
| Parking System | Parking rail for tube and nozzle |
| Motor Thermal Protection | Yes, automatic stop in case of overload |
| Noise Level | Not specified |
| Weight | Approximately 5 kg (estimate) |
| Dimensions (L x W x H) | Approximately 40 x 25 x 30 cm (estimate) |
| Maintenance | Clean the casing with a damp cloth; vacuum the brushes |
| Spare Parts | Paper bags, microfilter, HEPA filter available from Progress |
| Warranty | Not specified |
Frequently Asked Questions - CALYPSO 1300 PROGRESS
User questions about CALYPSO 1300 PROGRESS
0 question about this device. Answer the ones you know or ask your own.
Ask a new question about this device
Download the instructions for your Vacuum Cleaner in PDF format for free! Find your manual CALYPSO 1300 - PROGRESS and take your electronic device back in hand. On this page are published all the documents necessary for the use of your device. CALYPSO 1300 by PROGRESS.
USER MANUAL CALYPSO 1300 PROGRESS
natural_image
Simple line drawing of a smiling car (no text or symbols)Bodenstaubsauger Vacuum Floor Cleaner Aspirateur-traîneau Bodemstofzuiger Aspirapolvere Aspirador de polvo para suelos Aspirador de pó para chão Ηλεκτρικές σκούπες δαπέδου Odkurzacz Pölynimuri Diamant ...
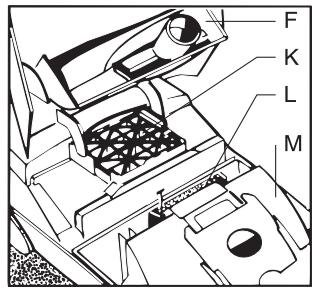
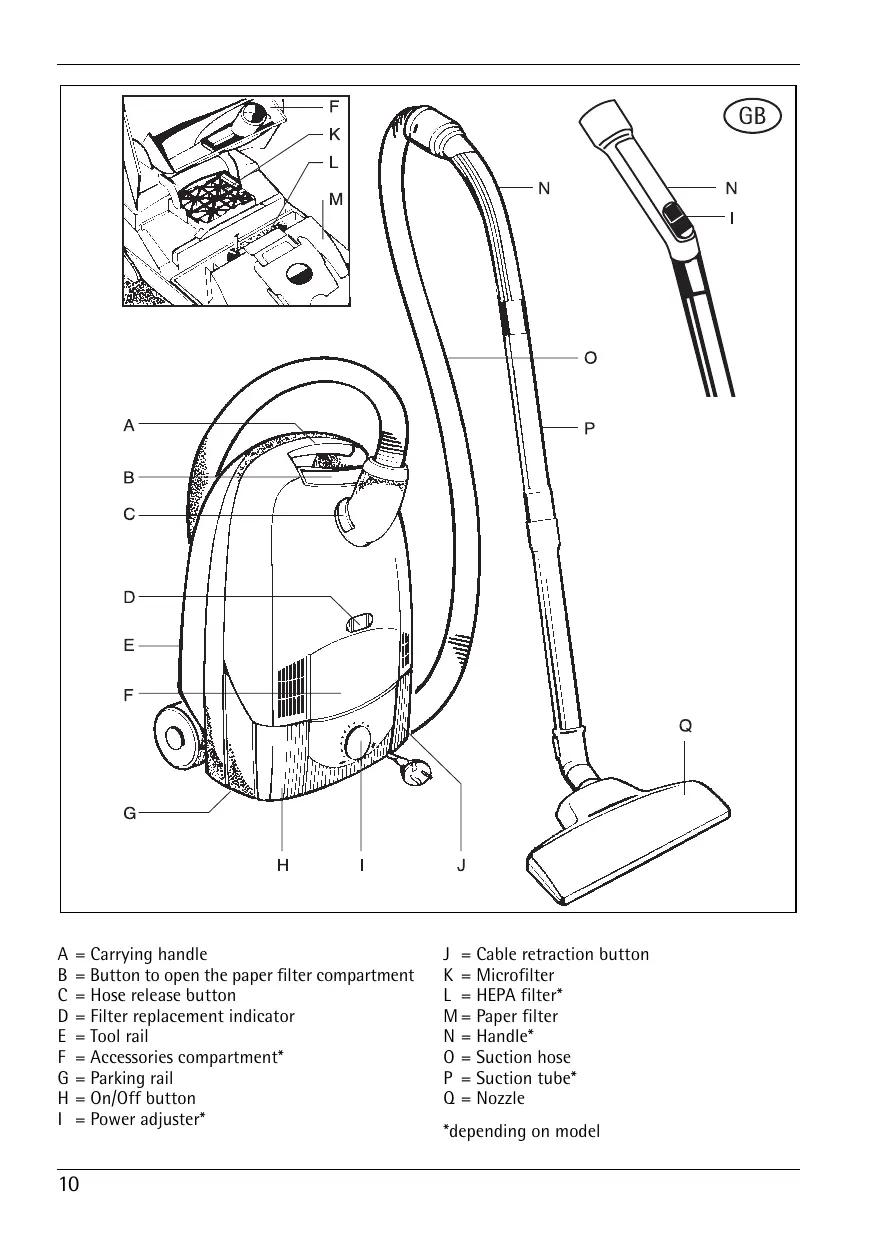
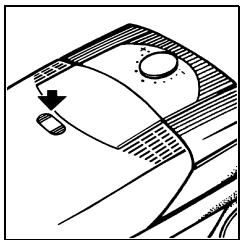
A = Carrying handle
B = Button to open the paper filter compartment
C = Hose release button
D = Filter replacement indicator
E = Tool rail
F = Accessories compartment*
G = Parking rail
H = On/Off button
I = Power adjuster*
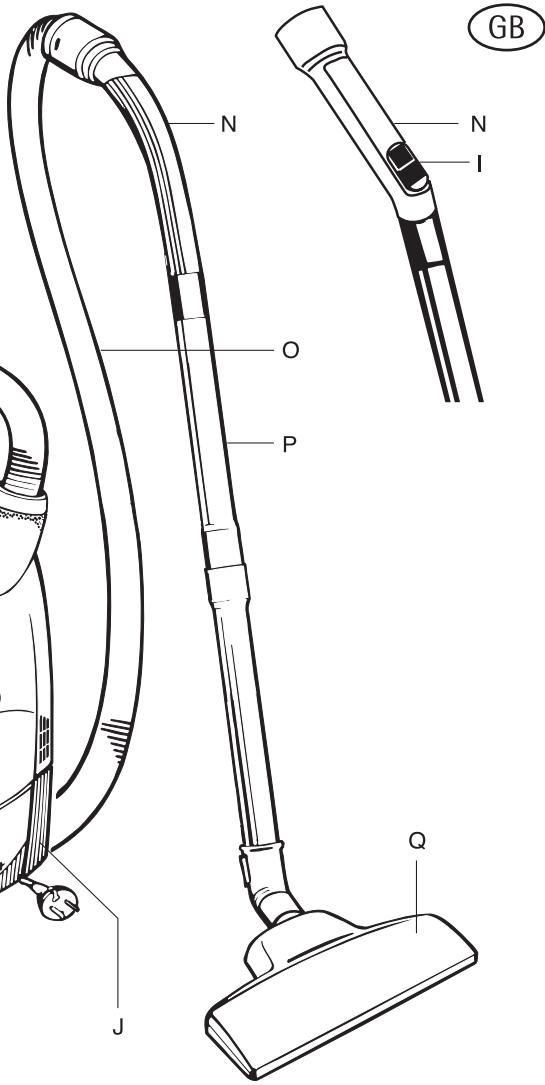
J = Cable retraction button
K = Microfilter
L = HEPA filter*
M = Paper filter
N = Handle*
0 = Suction hose
P = Suction tube*
Q = Nozzle
*depending on model
Contents
Appliance description....8
Before using for the first time....9
Protecting the environment....9
Safety instructions for the user.....9
Preparing the vacuum cleaner for use .... 10
Using the nozzles....10
Switching on 11
Maintenance and cleaning....12
Paper filter....13
What do I do, if....13
Before using for the first time
Please read the following information carefully. It provides important information on the safety, use and maintenance of the appliance. Keep the operating instructions in a safe place and pass them on to any subsequent owners.
Protecting the environment
Do not simply throw away packaging material and old appliances.
Equipment packaging:
- The cardboard packaging can be deposited at a waste paper recycling point.
- Deposit the recyclable polyethylene (PE) bag at a PE recycling point.
Recycling the appliance at the end of its life:
- The plastic components all carry a material identification marking so that, like the other materials, they can be recycled at the end of the life of the appliance.
Please ask your local authority about your local recycling centre.
Safety instructions
CE This appliance complies with the following EC directives: - 73/23/EC dated 21. 02. 1973 - Low Voltage Directive - 89/336/EEC dated 03. 05. 1989 (including Amending Directive 92/31/EEC) - EMC Directive.
- Only connect the appliance to - 220/230 Volt - alternating current.
- The mains circuit for the socket used must be protected with a fuse with a rating of at least 10 A.
-
Never remove the mains plug from the socket by pulling on the cable.
-
Do not use the appliance if:
- the cable is damaged.
– the housing shows visible signs of damage. - Avoid running over the mains lead with the appliance or the vacuum brush. The insulation could be damaged.
- The cover cannot be closed unless a paper filter has been inserted. Please do not use force!
- Always ensure that a paper filter as well as a MICROFILTER and a HEPA filter are inserted.
- Toner dust from laser printers and copiers must not be vacuumed using normal household vacuum cleaners.
- This is a domestic vacuum cleaner and should only be used to vacuum dry dust. People and animals must not be vacuumed using the appliance.
Keep children away from electrical appliances. - The manufacturer is not liable for any damage caused by incorrect use or operation.
- Leave wet shampooed carpets to dry completely. Otherwise the vacuum cleaner will be damaged. Such action might also reduce protection against electric shock.
- Do not vacuum matches, glowing ashes or cigarette ends using the appliance. Avoid picking up hard, pointed objects as these may damage the appliance or the paper filter.
- Do not expose the appliance to the effects of the weather, humidity or sources of heat.
- Should the mains lead be defective, the complete cable roller must be replaced by PROGRESS customer service or an authorised repair centre.
- Repairs to electrical appliances may only be carried out by qualified specialists. Improperly effected repairs may result in significant risk to the user.
- For this reason, if there is a malfunction in your appliance please contact your specialist dealer or PROGRESS customer service directly.
Preparing the vacuum cleaner for use
The accessories can be connected by pushing and twisting, and can be disconnected by pulling them apart and twisting.
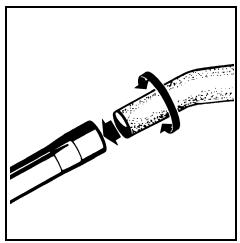
natural_image
Diagram of a mechanical joint or connector with directional arrows indicating movement (no text or symbols)Connecting the suction hose and suction tube.
Join the suction hose handle firmly to the suction tube.
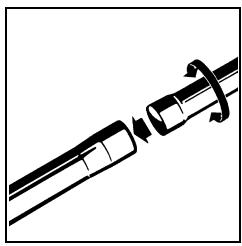
natural_image
Mechanical assembly diagram showing a shaft and housing with directional arrows indicating motion (no text or symbols)Connecting the suction tubes
Join the two tubes.
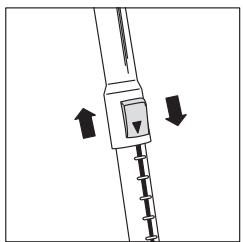
natural_image
Diagram of a mechanical device with two directional arrows indicating movement or force (no text or symbols present)Adjust the Telescopic Tube
(depending on model)
Push down the button on the tube and adjust the tube to the desired working position.
natural_image
Illustration of a hand holding a tool with arrows indicating motion or force direction (no text or symbols)Attaching the suction hose
Insert the suction hose connector in the suction inlet. It locks in place and can be rotated all the way around.
Press the release button and pull out the connector in order to remove the suction hose.
natural_image
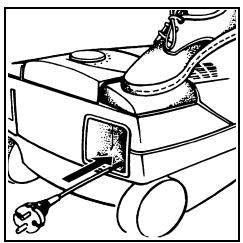
Line drawing of a mechanical device with gears and a handle (no text or symbols)Mains connection/Cable rewind
The mains cable is in the cable compartment. Pull out the cable and insert the plug into the mains socket. Remove plug from the mains socket. Press the foot button; the cable rewinds automatically when vacuuming has been completed.
Using the nozzles
natural_image
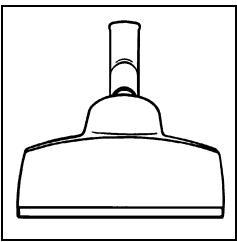
Simple line drawing of a mechanical component with a cylindrical shaft and base (no text or symbols)Using the floor nozzle\*
For the daily care of carpets and hard floors.
Without being changed over manually, the floor nozzle is entirely suited for daily vacuuming of carpets and hard floor surfaces such as parquet, tiles, linoleum, etc.
natural_image
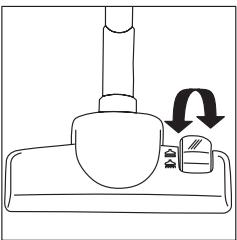
Diagram of a mechanical device with a lever and base, showing a rotation arrow (no text or symbols)Using the floor nozzle\*
For the daily care of carpets and hard floors. The floor nozzle may be changed over manually. The brushes can be extended for smooth floors and retracted for carpets.
natural_image
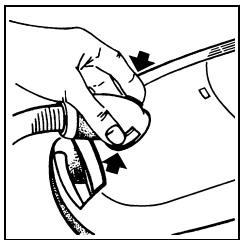
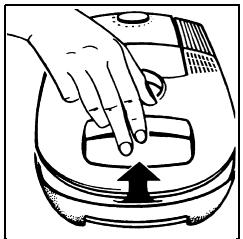
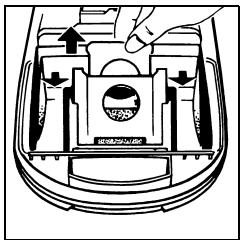
Line drawing of a mechanical device with a circular component and internal components (no text or symbols)Crevice and upholstery nozzle stored in the appliance
For specific cleaning requirements, two additional parts are included with the vacuum cleaner in an integrated accessories compartment*. Open the compartment by pressing gently as shown in the figure.
The nozzles may be attached to the suction tube or the handle on the suction hose, depending on requirements.
natural_image
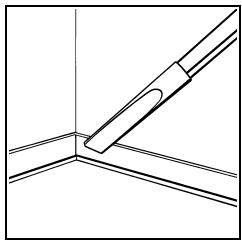
Pure technical line drawing of a mechanical component without any text, numbers, or symbolsCrevice nozzle
For vacuuming crevices, gaps and corners.
natural_image
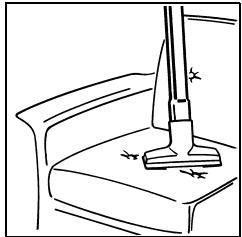
Line drawing of a vacuum cleaner on a desk with a lamp (no text or symbols)Upholstery nozzle
For vacuum cleaning all upholstered furniture, mattresses, etc.
The thread lifting strips on the nozzle even pick up thread and lint.
Switching on
Switching on and off

You can switch the appliance on and off by pressing the On/Off button.
Power adjustment:
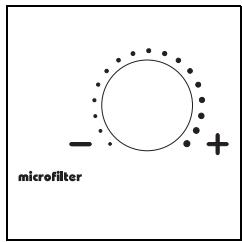
Power adjustment - Rotary control\*
The suction power can be varied to suit individual vacuuming requirements using the electronic power adjuster.
natural_image
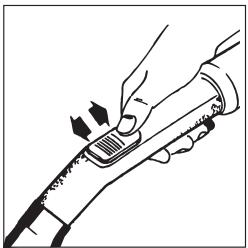
Illustration of a hand using a tool to press or adjust a component (no text or symbols visible)Power adjuster – Secondary air regulator\*
Using the regulator on the handle, you can reduce the suction power, e.g. when vacuuming light items (net curtains, rugs). The wider you open the regulator, the lower the suction power at the nozzle becomes
Maintenance and cleaning
Prior to maintenance or cleaning, ensure that the appliance is switched off and that the mains plug has been removed from the socket:
natural_image
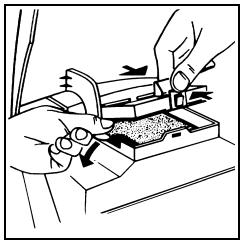
Technical line drawing of a mechanical component with no visible text or symbolsChanging the paper filter
The paper filter must be replaced if the window on the filter replacement indicator is completely red when the appliance is operating at maximum power and the nozzle is raised from the floor.
The paper filter should be replaced even if it does not appear to be full because fine dust can block the pores in the surface of the filter.
natural_image
Illustration of a hand pressing down on a small electronic device with an arrow indicating press direction (no text or symbols)The cover can be opened by pressing the button and folding back until it locks.
Hygienic filter change: When removing the full filter bag, pull the closing tab to automatically close the opening. There will be slight resistance when the tab is pulled.
Bags full of normal household dust may be disposed of with household waste.
Insert the new paper filter as far as it will go in the guide rails; only then can the lid be closed. The cover cannot be closed unless a paper filter has been inserted. Please do not use force!
Changing the microfilter
We recommend replacing the microfilter at each fifth paper filter replacement, and at the latest when there is a clean dust bag and the dust level indicator is completely red with the nozzle raised.
natural_image
Illustration of hands using a tool on a mechanical component (no text or symbols visible)Open the lid and fold up. Remove the used microfilter by means of the clean hygienic tabs (figure) and dispose of it with the household waste. Insert the new microfilter and close the cassette.
natural_image
Diagram showing a hand pressing down on a mechanical component with an upward arrow (no text or symbols)HEPA filter
A highly effective special filter belonging to Class "S". This filter offers relief and assistance to allergy sufferers. The HEPA filter should be replaced after one year.
HEPA filter – further supplies available from Progress customer service.
Cleaning
As required, wipe the housing and the paper filter compartment with a damp cloth. Do not use any scourers or any solvents. Occasionally vacuum the floor nozzle and brush-heads with the crevice nozzle.
Paper filter
Progress P60
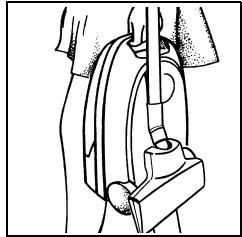
Carrying and Storage
natural_image
Line drawing of a person using a vacuum cleaner device (no text or symbols)To make the appliance easier to store and carry, slide the floor nozzle into the tool rail.
natural_image
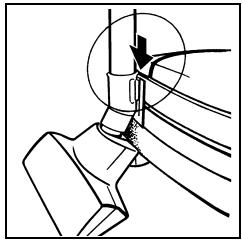
Technical line drawing of a mechanical joint or bracket with an arrow indicating direction (no text or symbols present)Parking System
For storing the suction pipe and nozzle during short pauses in vacuuming. The bracket on the nozzle is slid into the parking rail on the appliance.
What do I do, if ...
... it is difficult to push the nozzle
Reduce the power setting on the appliance. This will not reduce cleaning efficiency.
... the motor thermal cut-out is activated
If the motor is overloaded, e.g. due to a full filter bag or blocked accessory, the thermal cut-out shuts down the motor. In this case, switch off the appliance, unplug from the mains, and leave the motor to cool down.
Check paper filter bag, suction tube and suction hose; remove any blockage.
The appliance can be switched on again after approximately 30 minutes.
... the fuse has blown
The fuse may blow if you use other electrical appliances with high power consumption on the same electric circuit at the same time as the vacuum cleaner is in use.
This can be avoided if you set the electronic power adjuster to the lowest power level and then select a higher level after switching the appliance on.
Your vacuum cleaner can be fitted with a gentle start-up control which reduces the starting current to the motor and therefore prevents the electric circuit cut-out being triggered under normal conditions. It is possible that there will be a delay of about 4 seconds in the appliance starting up on the lowest power level.
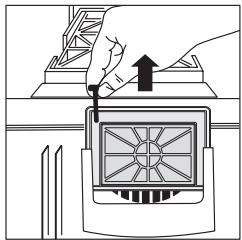
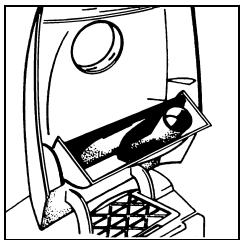
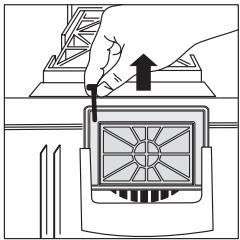
natural_image
Illustration of a hand using a tool to press or install a device with a grid pattern (no text or symbols)... the paper filter is damaged at some stage and the HEPA filter is dirtied
Remove the HEPA filter, clean (tap out) and replace.
Insert new paper filter.
- Contents
- Before using for the first time
- Protecting the environment
- Equipment packaging:
- Recycling the appliance at the end of its life:
- Safety instructions
- Preparing the vacuum cleaner for use
- Connecting the suction hose and suction tube.
- Connecting the suction tubes
- Adjust the Telescopic Tube
- Attaching the suction hose
- Mains connection/Cable rewind
- Using the nozzles
- Using the floor nozzle\*
- Crevice and upholstery nozzle stored in the appliance
- Crevice nozzle
- Upholstery nozzle
- Switching on
- Switching on and off
- Power adjustment:
- Power adjustment - Rotary control\*
- Power adjuster – Secondary air regulator\*
- Maintenance and cleaning
- Changing the paper filter
- Changing the microfilter
- HEPA filter
- Cleaning
- Paper filter
- Progress P60
- Parking System
- What do I do, if ...
- ... it is difficult to push the nozzle
- ... the motor thermal cut-out is activated
- ... the fuse has blown
- ... the paper filter is damaged at some stage and the HEPA filter is dirtied
Brand : PROGRESS
Model : CALYPSO 1300
Category : Vacuum Cleaner