
DHA-718 - Built-in oven TEKA - Free user manual and instructions
Find the device manual for free DHA-718 TEKA in PDF.

| Product type | Built-in oven |
| Brand | TEKA |
| Model | DHA-718 |
| Dimensions (W x H x D) | Approximately 59.5 x 59.5 x 54.8 cm |
| Weight | Approximately 35 kg |
| Power supply | 230 V / 50 Hz / 3 kW (estimated) |
| Oven type | Double (upper and lower) or single depending on configuration |
| Cooking functions | Conventional, Bottom heat, Maxigrill, Maxigrill with fan, Turbo, Defrost |
| Number of functions | 6 (according to model DHA-718) |
| Electronic clock | With duration programming, end of cooking, alarm and duration+end combination |
| Heating indicator light | Yes, indicates that heat is being transferred |
| Interior lighting | Lamp remains on during all cooking functions |
| Door | Must remain closed during Grill, Maxigrill and Maxigrill with fan functions |
| Included accessories | Removable handle with tray (short and long), baking tray, deep tray, grid, drip pan (not exhaustive) |
| Maintenance and cleaning | Clean with a damp cloth and mild detergent; avoid abrasive products |
| Safety | Automatic shut-off at the end of programmed cooking; power failure erases settings |
| Spare parts | Available from TEKA customer service (handle, heating elements, etc.) |
| Repairability | Repairability index not provided; standard parts accessible |
| User manual | Available for PDF download at notice-facile.com |
Frequently Asked Questions - DHA-718 TEKA
User questions about DHA-718 TEKA
0 question about this device. Answer the ones you know or ask your own.
Ask a new question about this device
Download the instructions for your Built-in oven in PDF format for free! Find your manual DHA-718 - TEKA and take your electronic device back in hand. On this page are published all the documents necessary for the use of your device. DHA-718 by TEKA.
USER MANUAL DHA-718 TEKA
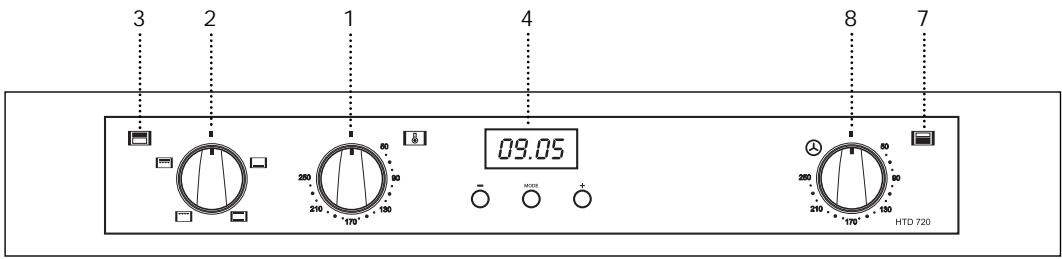
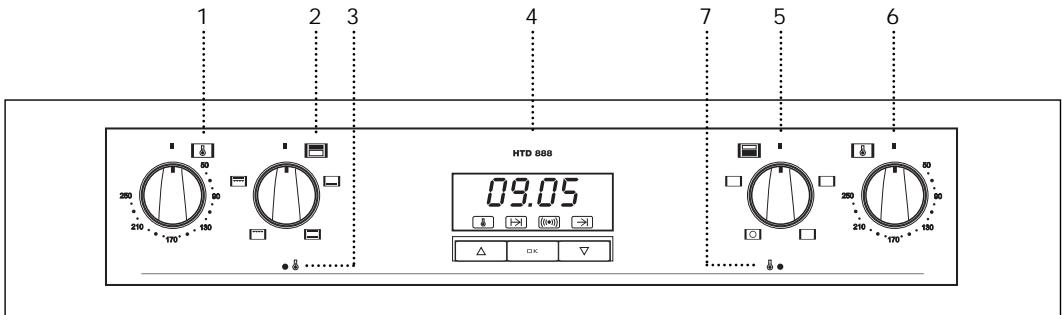
1 Temperature selector.
2 Function selector.
3 Heating indicator light. Indicates that the heat is going to the food and it goes out when the set temperature is reached.
Main cavity
4 Electronic clock.
5 Function selector.
6 Temperature selector.
7 Heating indicator light.
8 Fan oven + temperature selector.
Oven Functions
Model DHA-718
Top cavity: / / /
Main cavity:
Model DHA-888
Top cavity: / / /
Main cavity: /
Switch off oven
Conventional
It is used for sponges and cakes where the heat received must be uniform to achieve a spongy texture.
Lower Element
Heats only from beneath. Suitable for heating dishes and raising pastry and similar.

MaxiGrill
Allows greater surfaces to be prepared, than with the grill, together with higher power reducing the time required for browning of the food.

Grill
For preparing dishes with superficial roasting. It allows the outer layer to be browned without affecting the inside of the food. Ideal for flat food, such as steaks, ribs, fish, toast.

MaxiGrill with fan
Allows uniform roasting at the same time as surface browning. Ideal for grills. Special for large volume pieces, such as poultry game etc. It is recommended to put the item on a rack with a tray beneath to collect the stock and juices.
Caution
While using the Grill, MaxiGrill or MaxiGrill with fan, the door must be kept closed.

Turbo
The fan distributes the heat produced by an element located at the rear of the oven. Due to the uniform heat distribution, it allows roasting and baking to take place on two levels at the same time.

Defrosting
This cooking mode is suitable for gentle defrosting of delicate food to be consumed unheated, e.g.: cream, custard, pastry, tarts, cakes, fruit,...
Note
The pilot light remains on in any cooking function.
Use of the Oven
Model DHA-718
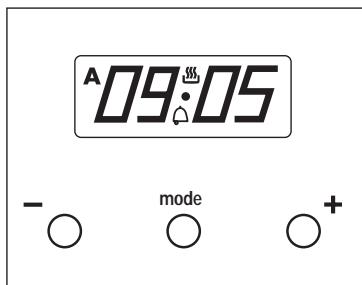
Setting the Time on the Clock
On connecting the oven you will notice that daytime flashes on the display, starting from 0:00 and the auto symbol A flashes.
Press the "+" and "-" buttons simultaneously and then pressing the "+" or "-" buttons the correct time can be set on the display.
Manual Use
After setting the correct time, the oven is ready for use. The 出 symbol is illuminated on the display. Select a temperature and a cooking function.
To switch off the oven, set the controls to the position.
Warning Function
This function generates a buzzer interval alarm signal at a specified time.
1 Press the MODE button until the symbol begins to flash.
2 Choose the time when you want the alarm to sound, pressing the "+" or "-" buttons.
3 Subsequently, the symbol will remain on indicating that the alarm is programmed.
4 At the end of the programmed time, an acoustic interval signal will sound and the symbol will begin to flash.
5 Press any button to turn off the acoustic signal.
The buzzer signal frequency can be changed by MINUS in 3 circular steps. For listening to the actual valid signal, press " - " button for some seconds while the display reads the time of the day. Every new key press within the time window changes the buzzer signal. Now this tone is valid as program end alarm signal.
Programming the Cooking Time
This function allows to programme the oven to cook for a specified time, after which it will switch itself off.
1 Press the MODE button until the display automatically switches over between "dur" display and duration time setting mode. The symbol A is flashing.
2 Select the duration, pressing the "+" or "-" buttons.
3 Subsequently, the symbol A that was flashing will light, indicating that the oven will switch itself off automatically.
4 The display will then show the current time.
5 Select a temperature and cooking function.
6 When the set time has elapsed the oven will disconnect, the symbol will switch off, an acoustic interval signal will sound and the symbol A will begin to flash.
7 Press any button to switch off the acoustic signal, reconnecting the oven.
8 Set the controls in the position to switch off the oven.
Programming the End of Cooking Time for the Oven
This function allows to establish the exact hour, after which the oven will switch itself off.
1 Press the MODE button until the display automatically switches over between "End" display and end time setting mode. The symbol A is flashing.
2 Select the time that cooking is to finish, pressing the +^ or - buttons.
3 Subsequently, the symbol A that was flashing will light, indicating that the oven will switch itself off automatically.
4 The display will then show the current time.
5 Select a temperature and cooking function.
6 When the programmed time is reached the oven will disconnect, the symbol will switch off, an acoustic interval signal will sound and the symbol A will begin to flash.
7 Press any button to switch off the acoustic signal and the oven will reconnect.
8 Set the controls to the position to switch off the oven.
This function may be used even though you are already cooking in your oven. To do so, follow the instructions given except N° 5.
Programming the Duration and Automatic Stop
This function is used to control the duration and the time at which the oven will turn itself off. This function allows the oven to start and stop automatically.
1 Press the MODE button until the display automatically switches over between "dur" display and duration time setting mode. The symbol A is flashing.
2 Select the duration, pressing the "+" or "-" buttons.
3 Subsequently, the symbol A that was flashing will light, indicating that the oven will switch itself off automatically.
4 Press the MODE button until the display automatically switches over between "End" display and end time setting mode. The symbol A is flashing.
5 Select the time that cooking is to finish, pressing the "+" or "-" buttons.
6 Subsequently, the symbol A that was flashing will light, the symbol 出 will switch off and the oven will remain disconnected. Your oven is programmed.
7 Select a function and cooking temperature.
8 When the time to begin cooking is reached, the oven will switch itself on and will continue cooking during the programmed time.
9 When the programmed finishing time is reached, the oven will disconnect, an acoustic interval signal will sound and the symbol A will begin to flash.
10 Press any button to switch off the acoustic signal and the oven will reconnect.
11 Set the controls to the position [ ] to switch of the oven.
Caution
Pressing the MODE button the display on the screen shows any function programmed. It can be changed by pressing the "+" or "-" buttons. Program times for automatic programs can be cleared by pressing "+" and "-" simultaneously. For clearing warning function, first you must be select the warning function in the display.
Model DHA-888
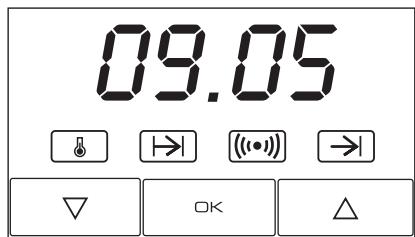
Setting the Time on the Electronic Clock
When the oven is connected to the power supply, the indication 00:00 flash on the display. Press or to set the time on the clock. The clock beeps twice to confirm the selected time.
If you wish to modify the time, press or until the current time flash on the screen. Press OK. Then press or to modify the time. The clock beeps twice to confirm the modification.
Manual Operation
The oven is ready to be used when the clock has been set. Select a cooking function and a temperature.
Set the controls to to turn the oven off.
Functions of the Electronic Clock
Alarm: Creates an alarm signal when the period of time finishes; the oven does not need to be in use in order to use this function.
Cooking Time: To cook for a selected length of time; the oven turns itself off automatically when the time finishes.
End Cooking Time: To cook until a set time; the oven turns itself off automatically when the time finishes.
Cooking time and End Cooking Time: To cook for a selected length of time and end at a set time. When this function is set, the oven comes on automatically at the time required in order to cook for the set length of time (Cooking time) and end automatically at the indicated time (End Cooking Time)
Programming the Alarm
1 Press until symbol ( ) lights up. Press OK.
2 Set the period of time after which you wish the alarm to sound by pressing or .
3 The clock beeps twice, the current time is displayed and symbol (()) lights up permanently to indicate that the alarm has been set.
4 When the set period of time comes to an end, the alarm sounds and symbol ([10]) starts to flash.
5 Press any button to stop the alarm; symbol () goes out.
You can consult the remaining time at any moment by pressing or until symbol ( ) flashes and then pressing OK. You can also modify the set time at this point by pressing or . The clock beeps twice to confirm the change.
If you wish the remaining time to be displayed until the end of the set period of time, press or until symbol (()) flashes and then press OK and keep it pressed in. Symbol (()) flashes. Keep OK pressed in again to return to the real time.
Setting the Cooking Time
1 Press or until symbol lights up. Press OK.
2 Select the period of time you wish to cook for by pressing or .
3 The clock beeps twice, the current time is displayed and symbol 1 lights up permanently to indicate that the oven will turn itself off automatically.
4 Select a cooking function and temperature.
5 When the cooking time comes to an end, the oven turns itself off, the alarm sounds and symbol l flashes.
6 Press any button to stop the alarm and turn the oven back on again.
7 Set the controls to to turn the oven off. You can consult the remaining cooking time at any moment by pressing or until symbol flashes and then pressing OK. You can also modify the set time at this point by
pressing or . The clock beeps twice to confirm the change.
If you wish the remaining time to be displayed until the end of the set period of time, press or until symbol flashes and then press OK and keep it pressed in. Symbol flashes. Keep OK pressed in again to return to the real time.
Setting the End Cooking Time
1 Press or until symbol lights up. Press OK.
2 Select the time you wish the cooking process to finish at by pressing or .
3 The clock beeps twice, the current time is displayed and symbol lights up permanently to indicate that the oven will turn itself off automatically.
4 Select a cooking function and temperature.
5 When the set time is reached, the oven turns itself off, the alarm sounds and symbol flashes.
6 Press any button to stop the alarm and turn the oven back on again.
7 Set the controls to to turn the oven off.
You can consult the end cooking time at any moment by pressing or until symbol flashes and then pressing K . You can also modify the end cooking time at this point by pressing or . The clock beeps twice to confirm the change.
This function can be used even when you are already using the oven. To do this, follow the instructions indicated above except point number 4.
Setting the Cooking Time and the End Cooking Time
1 Press or until symbol + lights up. Press OK.
2 Select the period of time you wish to cook for by pressing or .
3 The clock beeps twice, the current time is displayed and symbol 1 1 lights up permanently.
4 Press or until symbol lights up. Press OK.
5 Select the time you wish the cooking process to finish at by pressing or .
6 The clock beeps twice, the current time is displayed and symbol lights up permanently.
7 Select a cooking function and temperature.
8 The oven remains off with symbols and lit up. Your oven is set.
9 When the time to start cooking is reached, the oven starts up and cooks for the set period of time.
10 When the set end cooking time is reached, the oven turns itself off, the alarm sounds and symbols and flash.
11 Press any button to stop the alarm and turn the oven back on again.
12 Set the controls to to turn the oven off.
You can modify the end cooking time by pressing or until symbol lights up and then pressing OK. You can now modify the end cooking time by pressing or . The clock beeps twice to confirm the change.
Important
In the event of a power cut, all the electronic clock settings are deleted and the indication 00:00 flashes on the display. It is necessary to set the time and programme the clock again.
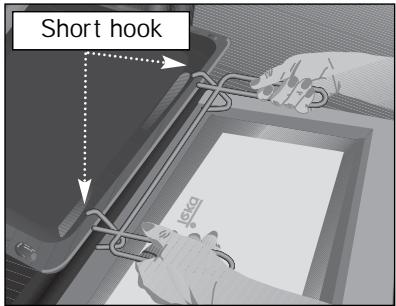
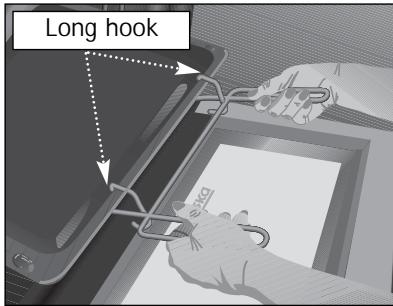
Tray Handle
The tray handle is used when you need to remove the tray to check the food. See figures. To lift the tray out of the oven, you need to use gloves to protect yourself.
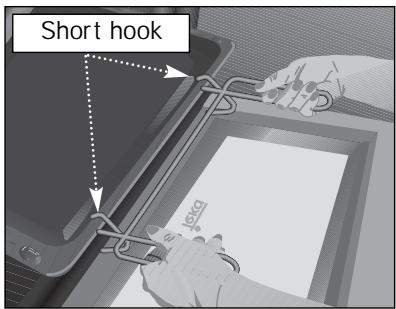
Cake tray handle position. You must put the short hook over the tray.
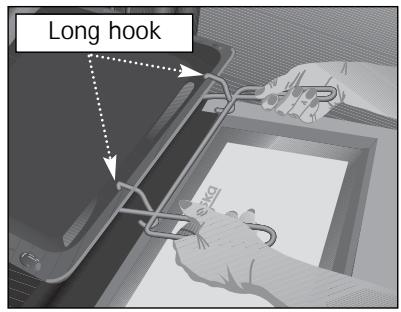
Roasting tray handle position. You must put the long hook over the tray.
Panneau Frontal de Commande
Modèle DHA-718
Modèle DHA-888
Four superieure
The tray handle is used when you need to move the tray to check the cook. See figures. To handle the tray out the oven, you need to use gloves to protect yourself.
Cake tray handle position. You must put the short hook over the tray.
Roasting tray handle position. You must put the long hook over the tray.
| Fabricante | Fabricante | Manufacturer | Fabricant | Hersteller | TEKA | TEKA |
| Modelo | Modelo | Model | Modèle | Modell | DHA-718 | DHA-888 |
| Clase de eficiência energetica, en una escalae que abarca de A (más eficiente) a G (menos eficiente). | Classe de eficiência energetica, numa escalae de A (efficiente) a G (ineficiente). | Energy efficiency class on a scale of A (more efficient) to G (less efficient). | Classement selon son efficacité energetique sur une échelle allant de A (économe) à G (peu économique). | Energieeffizienz-klasse auf einer Skala von A (niedriger Verbrauch) bis G (hoher Verbrauch). | A | A |
| Função de calentamento. | Função de aquecimento. | Heating function. | Fonction chauffage. | Beheizung. | ||
| Calentamento convencional. | Concevção | Conventional. | Classique. | K conventionelle Beheizung. | ||
| Conveção forzada. | Conveção forçada de ar. | Forced air convection. | Convection forçée. | Umluft / HeiBluft. | ← | ← |
| Consumo de energia. | Consumo de energia. | Energy consumption. | Consummation d'énergie. | Energiever-brauch. | ||
| Calentamento convencional. | Concevção | Conventional. | Classique. | K conventionelle Beheizung. | --- | --- |
| Conveção forzada. | Conveção forçada de ar. | Forced air convection. | Convection forçée. | Umluft / HeiBluft. | 0,68 Kwh | 0,79 Kwh |
| Volumen neto (litros). | Volumeutil (litros). | Usable volume (litres). | Volume utile (litres). | Netto-volumen (liter). | 37 | 53 |
| Tipo: Pequeço Medio Grande | Tipo: Pequeno Medio Grande | Size: Small Medium Large | Type: Faible volume Volume moyen Grand volume | Typ: Klein Mittel Groß | ← | ← |
| Tiempo de coçcion conarga normal. | Tempo de cozedura daarga-padrão. | Time to cook standard load. | Temps de cuisson en charge normale. | Kochzeit bei Standardbela-dung. | ||
| Calentamento convencional. | Conveção | Conventional. | Classique. | K conventionelle Beheizung. | ---- | ---- |
| Conveção forzada. | Conveção forçada de ar. | Forced air convection. | Convection forçée. | Umluft / HeiBluft. | 39 min. | 43 min. |
| Superficie de coçcion. | Zona de cozedura. | Baking area. | Surface de cuisson. | Backfläche | 1250 cm2 | 1250 cm2 |
| Ruido (dB (A) re 1 pW). | Nivel de ruido dB(A) re 1 pW. | Noise (dB (A) re 1 pW). | Bruit (dB (A) re 1 pW). | Gerausch (dB (A) re 1 pW). | --- | --- |
| COUNTRY | CITY | COMPANY | CC | PHONE | FAX |
| Australia | Victoria | TEKA AUSTRALIA Pty. Ltd. | 61 | 3 9550 6100 | 3 9550 6150 |
| Austria | Wien | KÜPPERSBUSCH GesmbH | 43 | 1 866 800 | 1 866 8082 |
| Belgium | Zellik | B.V.B.A. KÜPPERSBUSCH S.P.R.L. | 32 | 2 466 8740 | 2 466 7687 |
| Bulgaria | Sofia | TEKA BULGARIA EOOD. | 359 | 2 9768 330 | 2 9768 332 |
| Chile | Santiago de Chile | TEKA CHILE, S.A. | 56 | 2 4386 000 | 2 4386 097 |
| China (Pop. Rep.) | Shanghai | TEKA INTERNATIONAL | |||
| TRADING (Shanghai) | 86 | 21 511 688 41 | 21 511 688 44 | ||
| Czech Republic | Liběž | TEKA CZ S.R.O. | 420 | 2 84 691940 | 2 84 691923 |
| Ecuador | Guayaquil | TEKA ECUADOR, S.A. | 593 | 4 2251174 | 342 250 693 |
| France | Cergy Pontoise | TEKA FRANCE S.A.S. | 33 | 1 343 01597 | 1 343 01598 |
| Germany | Haiger | TEKA KÜCHENTECHNIK GmbH | 49 | 27718141-0 | 771 814 110 |
| Greece | Athens | TEKA HELLAS A.E. | 30 | 210 9760283 | 210 9712725 |
| Hungary | Budapest | TEKA HUNGARY KFT | 36 | 1 3542110 | 1 3542115 |
| Indonesia | Jakarta | PT TEKA BUANA | 62 | 21 390 5274 | 21 390 5279 |
| Italy | Frosinone | TEKA ITALIA S.P.A. | 39 | 0775 898271 | 0775 294681 |
| Korea (Rep. South) | Seoul | TEKA KOREA CO. LTD. | 82 | 2 599 4444 | 222 345 668 |
| Malaysia | Selangor Darul Ehsan | TEKA KÜCHENTECHNI | |||
| (MALAYSIA) SDN. | 60 | 3 7620 1600 | 3 7620 1626 | ||
| Mexico | Mexico D.F. | TEKA MEXICANA S.A. de C.V. | 52 | 555 133 0493 | 55 5762 0517 |
| Pakistan | Lahore | KÜPPERSBUSCH- | |||
| TEKA PAKISTAN Pvt. Ltd. | 92 | 42 631 2182 | 42 631 2183 | ||
| Poland | Pruszków | TEKA POLSKA SP. ZO.O. | 48 | 22 7383270 | 22 7383278 |
| Portugal | Ílhavo | TEKA PORTUGAL, S.A. | 351 | 234 329 500 | 234 325 457 |
| Russia | Moscow | TEKA RUS LLC | 7 | 095 737 4690 | 095 737 4689 |
| Singapore | Singapore | TEKA SINGAPORE PTE. LTD. | 65 | 67342415 | 67346881 |
| Spain | Santander | TEKA INDUSTRIAL, S.A. | 34 | 942 355050 | 942 324499 |
| Thailand | Bangkok | TEKA (THAILAND) CO. LTD. | 66 | 2 6933237 | 2 6933242 |
| Turkey | Istanbul | TEKA TEKNIK MUTFAK | 90 | 212 288 3134 | 212 274 56 86 |
| Ukraine | Kiev | TEKA UA | 380 | 44 272 33 90 | 44 279 58 54 |
| United Arab Emirates | Dubai | TEKA KÜCHENTECHNIK | |||
| MIDDLE EAST FZE | 971 | 4 887 2912 | 4 887 2913 | ||
| United Kingdom | Milton Abingdon | TEKA PRODUCTS LTD. | 44 | 1235 861916 | 1235 835107 |
| USA | Tampa | TEKA USA, INC. | 1 | 813 2888820 | 813 2888604 |
| Venezuela | Caracas | TEKA ANDINA, S.A. | 58 | 2 1229 12821 | 2 1229 12825 |

KÜCHENTECHNIK
Teka industrial, S.A.
C/Cajo,17
39011 Santander (Spain)
Tel.: 34-942-355050
Fax: 34-942-347694
http://www.teka.es
35708 Haiger (Germany)
Tel.: 49-2771-8141-0
Fax: 49-2771-8141-10
http://www.teka.com