
HP-740 - Built-in oven TEKA - Free user manual and instructions
Find the device manual for free HP-740 TEKA in PDF.
| Product type | Built-in oven |
| Brand | TEKA |
| Model | HP-740 |
| Dimensions (H x W x D) | 59.5 x 59.5 x 56.5 cm |
| Interior volume | 70 liters |
| Power supply | 230 V / 50 Hz |
| Total power | 3000 W |
| Energy type | Electric |
| Cooking functions | Convection, Grill, Natural convection, Defrost |
| Cleaning | Pyrolytic (high-temperature cleaning) |
| Door | Removable cold glass for cleaning |
| Interior lighting | Halogen bulb |
| Child safety | Control lock |
| Automatic shut-off | Yes, programmable |
| Timer | With delayed cooking end |
| Display | Touch digital screen |
| Net weight | 35 kg |
| Energy class | A+ |
| Spare parts | Available through TEKA after-sales service |
| Repairability | Repairability index: 8.2/10 |
| Warranty | 2 years (parts and labor) |
Frequently Asked Questions - HP-740 TEKA
User questions about HP-740 TEKA
0 question about this device. Answer the ones you know or ask your own.
Ask a new question about this device
Download the instructions for your Built-in oven in PDF format for free! Find your manual HP-740 - TEKA and take your electronic device back in hand. On this page are published all the documents necessary for the use of your device. HP-740 by TEKA.
USER MANUAL HP-740 TEKA
SELF-CLEANING PYROLITIC BUILT-IN OVEN
EINBAUBACKÖFEN MIT SELBSTREINIGERFUNKTION

This appliance is marked according to the European directive 2002/96/EC on Waste Electrical and Electronic Equipment (WEEE). By ensuring this product is disposed of correctly, you will help prevent potential negative consequences for the environment and human health, which could otherwise be caused by inappropriate waste handling of this product.
The symbol on the product, or on the documents accompanying the product, indicates that this appliance may not be treated as household waste. Instead it shall be handed over to the applicable collection point for the recycling of electrical and electronic equipment.
Disposal must be carried out in accordance with local environmental regulations for waste disposal.
For more detailed information about treatment, recovery and recycling of this product, please contact your local city office, your household waste disposal service or the shop where you purchased the product.

Thank you for the trust you have shown in purchasing one of our high quality products Our company sincerely hopes you obtain the very best performance from this appliance which fully satisfies the needs behind your choosing it.
For this purpose, we kindly ask that you carefully read the instructions in this manual, with particular attention to the paragraphs concerning the accessories and instruments provided with the appliance. The manufacturer will not in any way be held liable for any accidents caused by improper installation or use of the appliance.
In order to produce appliances that are up-to-date with modern technology and/or to ensure continuous improvement in the quality of its products, TEKA reserves the right to make modifications with no advance notice.
GENERAL INFORMATION
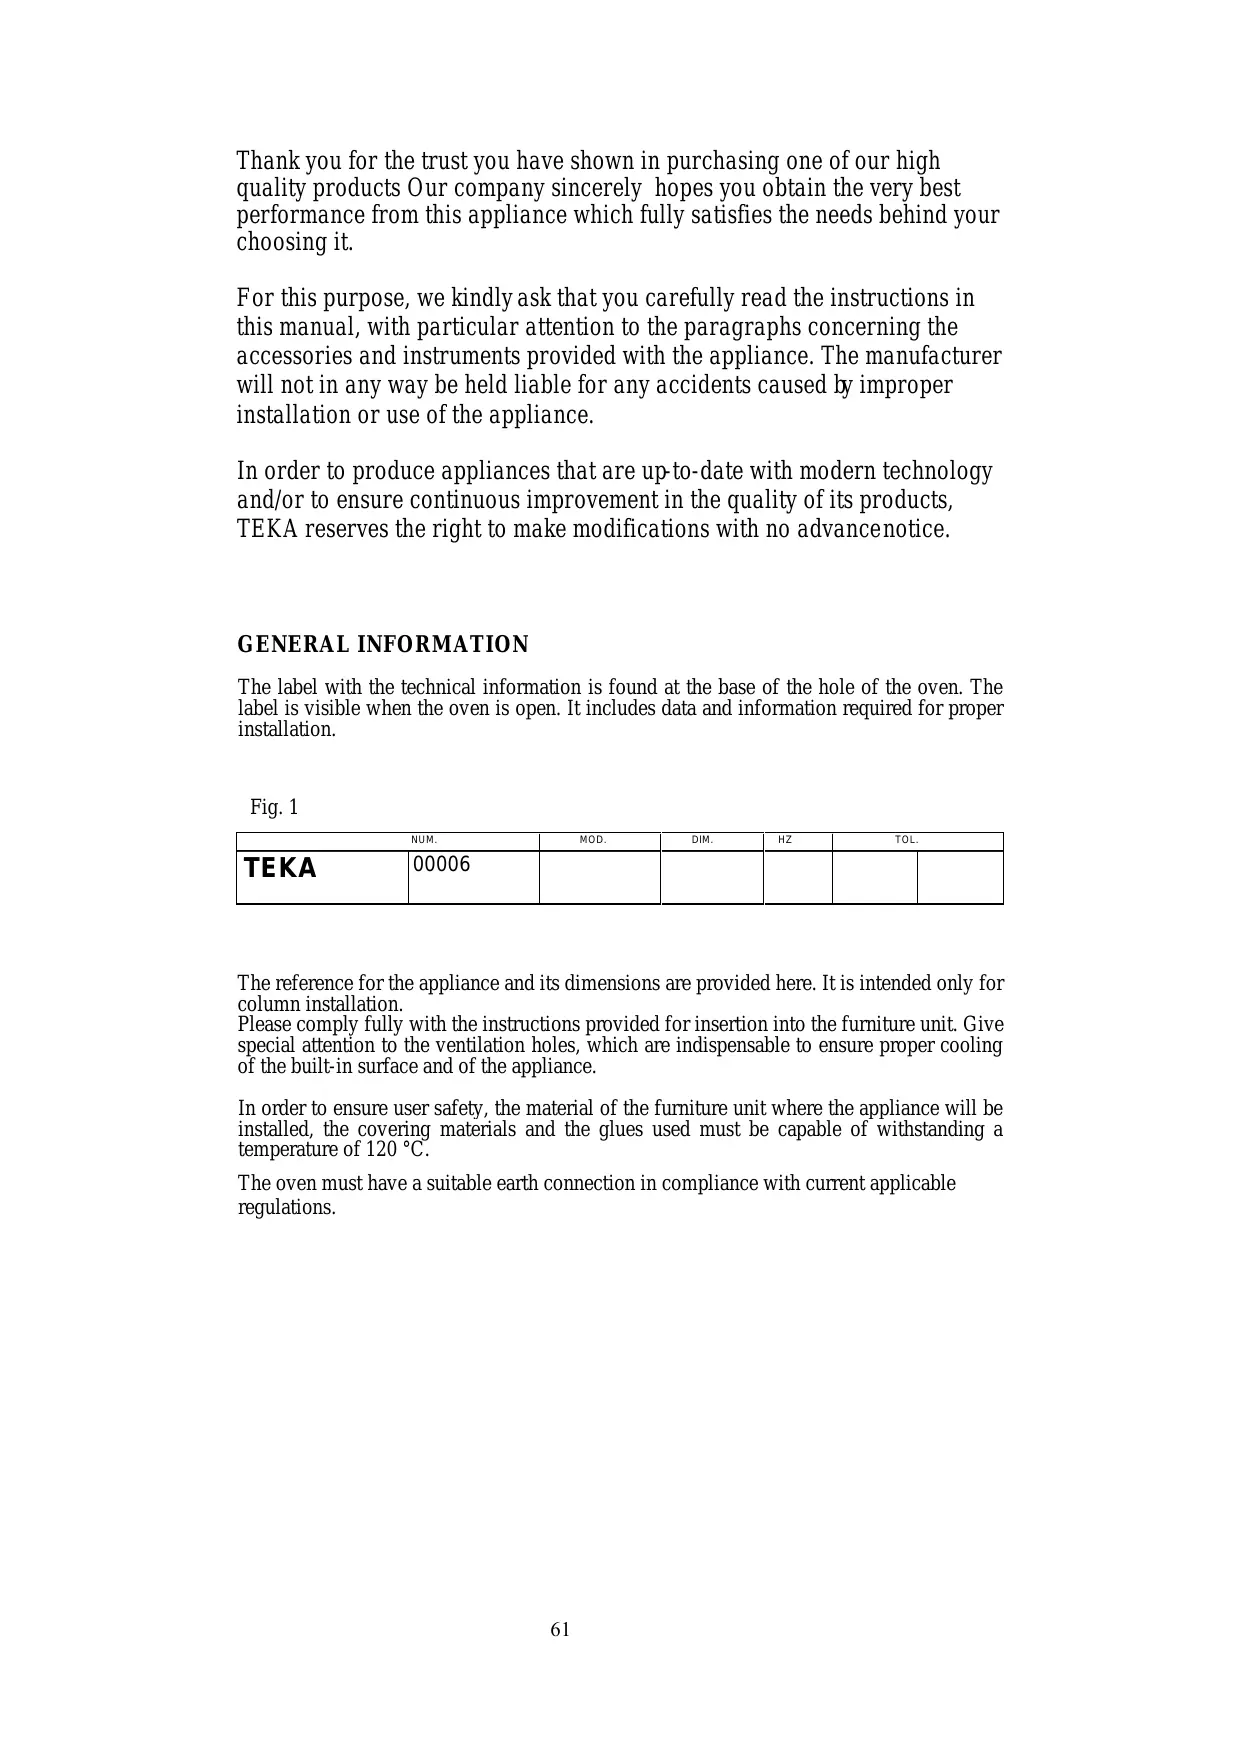
The label with the technical information is found at the base of the hole of the oven. The label is visible when the oven is open. It includes data and information required for proper installation.
Fig. 1
| NUM. | MOD. | DIM. | HZ | TOL. | ||
| TEKA | 00006 | |||||
The reference for the appliance and its dimensions are provided here. It is intended only for column installation.
Please comply fully with the instructions provided for insertion into the furniture unit. Give special attention to the ventilation holes, which are indispensable to ensure proper cooling of the built-in surface and of the appliance.
In order to ensure user safety, the material of the furniture unit where the appliance will be installed, the covering materials and the glues used must be capable of withstanding a temperature of 120^ .
The oven must have a suitable earth connection in compliance with current applicable regulations.
ELECTRICAL CONNECTION
Check that the nominal voltage corresponds to that on the characteristics label.
Connection to the power mains must be made via an omni-polar switch that corresponds to the installed power. The distance of separation of the contacts must be at least 3mm and allow disconnection of the appliance in case of emergency or for maintenance and cleaning. Provide an earth connection to ensure the safety of the installer.
The oven must have a suitable earth connection in compliance with current applicable regulations.
The appliance is supplied complete with a power cord. If it needs to be replaced, it will be necessary to run the cable through the cable passage and make the connection as shown in the provided diagram. The earth connection of the power cord must be longer than the other wires to ensure that it disconnects in the event of traction with the cable passage open. Tighten the screws of the cable passage, then close the cover.
ATTENTION: always make sure that the power supply is disconnected before cleaning the oven in any way.
INSTRUCTIONS FOR USE
General instructions
ATTENTION: the door of the oven may be quite hot during operation. Keep children away from the oven.
During cooking, the accessories (grill, drip pan) get hot. The use of protective gloves is advisable.
Do not use the appliance to heat the room.
When connecting other electrical devices near the oven, check that their power cords do not come into contact with the oven.
In order to ensure and preserve the safety of the oven, any maintenance work, especially on the electrical components, must be performed exclusively by specialized personnel.
Wait for the oven to cool off to lukewarm before cleaning it. In this way, it will be possible to eliminate dirt before they build up on the inside.
To cook roasts and cakes, use only pans that are made of refractory material. The size of pans to be used depends on the size and amount of food to be cooked. It is advisable to use stainless steel pans which absorb and spread the heat evenly.
To replace the light bulb of the oven, make sure you disconnect the electrical power supply first.
Prior to start-up
Before turning on the oven after it has been inserted in the furniture unit, make sure that no electrically live parts are accessible and that all packing materials have been properly disposed of.
Once this has been done, you will be able to turn on the oven, following the proper instructions.
First start-up
Before turning on the oven for the first time, clean the inside carefully with a delicate detergent and lukewarm water. Then leave the oven on for 30 minutes at full power to get rid of any unpleasant odours which may be caused by residual grease or oil from the manufacturing process. Once these steps are complete, the oven is ready for use.
ATTENTION: always make sure that the power supply is disconnected before cleaning the oven in any way.
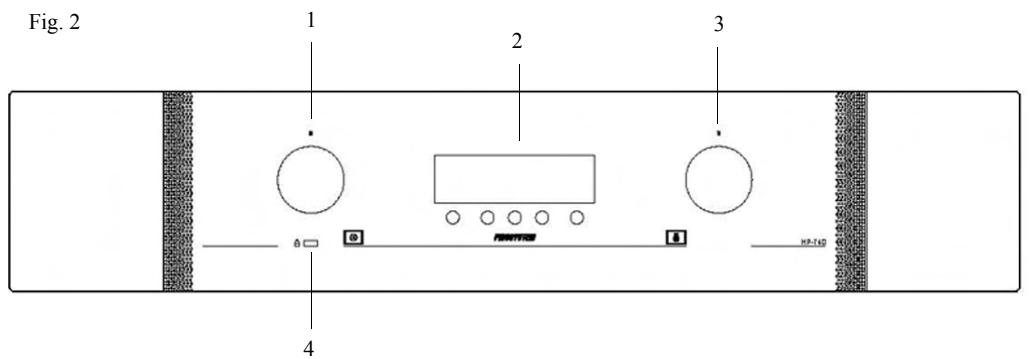
- Function selector
- Electronic programmer
- Thermostat
- Door locked
OVEN FUNCTIONS

OVEN LIGHT
With this function the thermostat must be on "0" position.

GRILL
Select your temperature; use this function to grill foods. Keep the oven door closed.

BOTTOM ELEMENT ONLY
It is recommended for slow cooking.

TRADITIONAL OVEN COOKING
traditional cooking, it is recommended to preheat the oven.

VENTILATED TRADITIONAL OVEN COOKING
This cooking mode integrates natural convection and ventilation.
Keep the door closed.
It is recommended that the oven be pre-heated.

MULTIFUNCTION
The fan and the circular element come on.
The heat is diffused by the fan to give an even temperature in the oven. It is not necessary to pre-heat the oven before introducing the food.

DEFROST
The oven light will stay on during this function.
The fan motor comes on, but there is no heat. The oven door should be kept closed.
This function will help cut down the defrosting time by about onthird of the normal time.

VENTILATED GRILL
The fan and the grill element allow a fast and deep cooking for particular food.
It is recommended that the oven be pre-heated for a few minutes.

PYROLITIC CLEANING
Select this function with the selector. See the instructions on the electronic programmer paragraph.
Oven cooking chart
| Food | Temp. °C | Shelf Position (*) | Cooking time (mins). |
| Cake | |||
| Bun | 180 | 2 | 55-65 |
| Fruit Cake | 200 | 1 | 30-40 |
| Buttermilk curd cake | 180 | 2 | 35-40 |
| Mould leaven cake | 200 | 1 | 25-35 |
| Choux pastry | 190 | 2 | 20-30 |
| Puff or flaky pastry | 200 | 2 | 15-25 |
| Biscuits | 190 | 3 | 15-20 |
| Lasagna | 225 | 2 | 40-50 |
| Meat | |||
| Fillet beef | 225 | 2-3 | 50-80 |
| Roast beef | 225 | 2-3 | 50-80 |
| Roast veal | 225 | 2-3 | 60-80 |
| Roast pork | 170-180 | 2 | 45-60 |
| Roast lamp | 225 | 2 | 45-55 |
| Roast.beef | 225 | 2-3 | 50-60 |
| Roast hare | 200 | 2 | 60-90 |
| Roast turkey | 180 | 2 | 240ca. |
| Roast goose | 200 | 2 | 150-210 |
| Roast duck | 200 | 2 | 120-180 |
| Roast chicken | 200 | 2 | 60-90 |
| Thigh roe deer | 200 | 2-3 | 90-150 |
| Thigh stag | 180 | 2-3 | 90-180 |
| Fish | 180 | 2-3 | 10-40 |
| Vegetable | |||
| Stewing vegetable | 170-190 | 2-3 | 40-50 |
| Pizza | 240 | 1 | 15-25 |
| Grill cooking | |||
| Chop | 4 | 8-12 | |
| Pork sausage | 4 | 10-13 | |
| Grill ckichen | 3 | 25-35 | |
| Spit chicken | 50-65 | ||
| Spit roast veal | 50-65 | ||
Note :
(^*) = The start shelf position number is button oven
the oven should be preheated before use.
How to use the grill
Lay the food in the wire shelf or, in a tray in case of small pieces.
The rack must be positioned in the highest runner possible and the grease drip pan in the runner below. Close the door and turn on the element as follows:
| Dishes for grilling | Cooking time in minutes | ||
| Top side | Under side | ||
| Slices of thin meat | 6 | 4 | |
| Slices of meat of medium thickness | 8 | 5 | |
| Slices of thin descaled fish | 10 | 8 | |
| Fish (e.g. trout ,salmon) | 15 | 12 | |
| Sausages | 12 | 10 | |
| Toast | 5 | 2 | |
ELECTRONIC PROGRAMMER
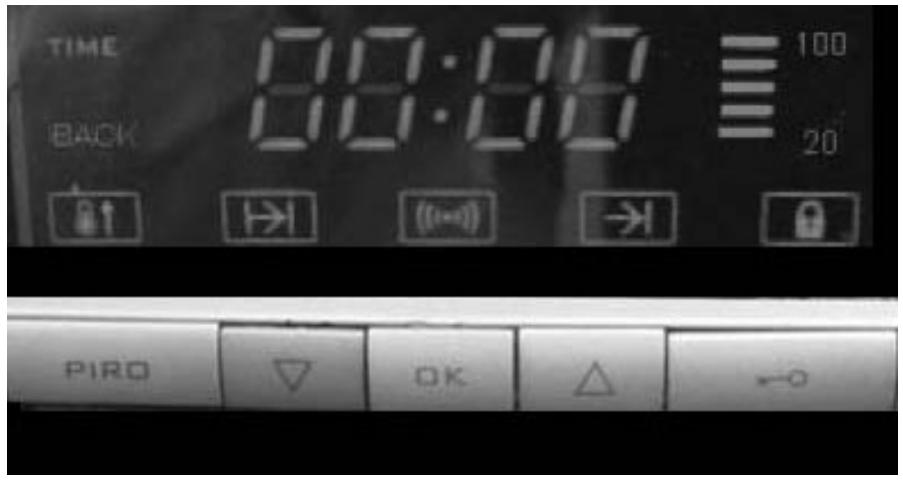
Key functions:
PIRO lets you change the time of pyrolysis (from a minimum of one and a half hours up to a maximum of three hours)
Key for selecting the function you want to recall and to decrease the time shown on the display
OK Key to confirm the selection you want to modify
Key for selecting the function you want to recall and to increase the time shown on the display.
Keypad lock key
OPERATION
CONNECTION TO THE ELECTRICAL MAINS
When the oven is connected to the electrical mains, all the function symbols light up to confirm that the programmer is operating properly.
The oven cannot be turned on in this phase.
The programmer will then show the flashing message "TIME", while the keys light up steady.
Setting the time
To set the time, press the key "▲"; the figures shown will increase.
If you exceed the current time, you can decrease the figures on the display by pressing the key "▼".
If the time displayed is 00:00 it is not possible to go any further back to set the time.
As a confirmation of acceptance of the modifications you have made to the current time, the programmer will emit a short beep two seconds after you release the previously pressed key.
You can now turn on the oven.
Note: each time you press the OK key, at any time, the oven will emit a beep.
The acoustic signal will continue for 1 minute if not interrupted before that by pressing any key.
Changing the time
Press the key or as an alternative key until the time shown on the display and the message start flashing simultaneously. Press the OK key to confirm the time change.
The numerals on the display will flash as before, while the message TIME will flash faster. You can now update or change the time.
Press the keys or to change and set the desired time. The programmer will start using the new time two seconds after the last command is given.
Note: if there is a power outage, the current time shown on the display is lost.
When the power comes back on, you will need to re-programme the time.
Night light function
The programmer reduces the luminosity of the display between 00.00 and 06.00
ALARM FUNCTION
This function is only to remind the user of a certain event.
The maximum time which can be set is 23 hours and 59 minutes.
When the set time has elapsed, the system activates an acoustic signal for a maximum of 65 seconds and the symbol starts to flash.

To silence the buzzer, press any key.
Programming and modification:
Press the key or the key until the symbol on the display lights up.
The symbol will start to flash.
Press the OK key to confirm.

starts to flash more rapidly than before.
Press the keys or to set the desired time. The maximum time which can be set is 23 hours and 59 minutes.
The oven will emit a double beep for confirmation and will start counting two seconds after the last command is given.
As an alternative, after setting the alarm you can press the OK key. The oven will emit a first sound since the OK key was pressed, followed by two beeps to confirm that the countdown has started.
The display will go back to showing the current time and the symbol will stay on steady.
Viewing the remaining time:
Press the key or the key until the symbol on the display lights up. The symbol will start flashing.
Press the OK key.
The display will show the time remaining until activation of the buzzer.
The symbol will flash.
The information will continue to be displayed for 4 seconds. Then the display will go back to showing the current time and the symbol will stay on steady.
N.B. if the time remaining is less than 10 minutes, the time display format changes from HH MM (hours and minutes) to M SS (minutes and seconds)
Permanent display of countdown
Press the key or the key until the symbol on the display lights up. The symbol will start flashing.
Press and hold the key OK until the display shows the message "Back";
the message "TIME" will go off and the countdown is shown for the time remaining until activation of the buzzer.
This function makes it possible to keep the oven on for a previously programmed length of time.
When the time is up, the oven will shut off.
The programmer activates an alarm buzzer and the symbol | | flashes.
The maximum time which can be set for cooking is 23 hours and 59 minutes.
Programming and modification:
Press the key or the key until the symbol “ || ” on the display lights up.
The symbol will start to flash.
Press the OK key to confirm that you want to set a time for cooking duration.
The symbol “ ” will start flashing more rapidly than before and the programmer will display the flashing message “00:00”
Press the keys or to set the COOKING DURATION time. The maximum time which can be set is 23 hours and 59 minutes.
The oven will emit a double beep for confirmation and will start the countdown two seconds after the last command is given.
As an alternative, after setting the cooking duration, you can press the OK key. The oven will emit a first sound since the OK key was pressed, followed by two beeps to confirm that the countdown has started.
The display will go back to showing the current time and the symbol | | will stay on steady.
Viewing:
Press the key or the key until the symbol | | on the display lights up.
The symbol will start to flash.
Press the OK key.
The display will show the remaining time until cooking time is complete.
The symbol will flash.
The information will continue to be displayed for 4 seconds. The display will then go back to showing the current time and the symbol || will stay on steady.
N.B. if the time remaining is less than 10 minutes, the time display format changes from HH MM (hours and minutes) to M SS (minutes and seconds)
Permanent display of the time of cooking duration
Press the key or the key until the symbol | | ov . The symbol will start to flash.
Press and hold the key OK until the display shows the message "BACK";
the message "TIME" goes off, and the display shows the countdown of the time remaining until the end of cooking which was previously set.
END OF COOKING FUNCTION
This function lets you keep the oven on until reaching a previously programmed time.
Once the end of cooking time is reached, the oven will shut off.
The maximum time which can be set for end of cooking is 23 hours and 59 minutes.
Programming and modification:
Press the key or the key until the symbol “ ® ” on the display lights up.
The symbol will start to flash.
Press the OK key to confirm that you want to set a time for cooking duration.
The symbol “ ” will start flashing more rapidly than before and the programmer will display the current time.
Press the keys or to set the COOKING DURATION time. Maximum time which can be set: 23.59.
The oven will emit a double beep for confirmation and will start counting two seconds after the last command is given.
As an alternative, if you press the OK key during cooking, the system will emit a first sound because the OK key has been pressed followed by two beeps to confirm the countdown.
The system will go back to showing the current time and the symbol | | will stay on steady.
Viewing:
Press the key or the key until the symbol | | on the display lights up.
The symbol will start to flash.
Press the OK key.
The display will show the remaining time until cooking time is complete.
The symbol will flash.
The information will continue to be displayed for 4 seconds. The display will then go back to showing the current time and the symbol || will stay on steady.
AUTOMATIC COOKING FUNCTION
This function lets you have the oven turned on at a certain time, and leave it on for a previously programmed length of time.
The time the oven is on is equal to the programmed end-of-cooking time minus the length of the cooking time.
Once the end of cooking time is reached, the oven will shut off.
Programming and modification:
you can programmed automatic cooking in two modes, 1 and 2
Mode 1
Press the key or the key until the symbol “ || duration of cooking” on the display lights up.
The symbol will start to flash.
Press the OK key to confirm that you want to set a time for cooking duration.
The symbol “ ” will start flashing more rapidly than before and the programmer will display the current time.
Press the keys or to set the COOKING DURATION time. The maximum time which can be set is 23 hours and 59 minutes.
The oven will emit a double beep for confirmation and will start counting two seconds after the last command is given.
The display will go back to showing the current time and the symbol | | will stay on steady.
Press the key or the key until the symbol “ ® ” on the display lights up.
The symbol will start to flash.
Press the OK key to confirm that you want to set a time for cooking duration.
The symbol “ ” will start flashing more rapidly than before and the programmer will display the current time.
Press the keys or to set the END OF COOKING time. The maximum time which can be set is 23 hours and 59 minutes.
The display will emit a double beep for confirmation and will start counting two seconds after the last command is given.
The system will go back to showing the current time. The symbols | | and | will stay on steady.
The oven will shut off at the programmed end of cooking time, and there will be an acoustic signal.
The icons | | and | will flash.
If no key is pressed, after 1 minute the buzzer will shut off on its own.
Icons | | | continue to flash until any key is pressed.
Mode 2
Press the key Press the key until the symbol “ ” on the display lights up.
(end of cooking)
The symbol will start to flash.
Press the OK key to confirm.
The symbol “ ” will start flashing more rapidly than before and the programmer will display the current time.
Press the keys or to set the END OF COOKING time. The maximum time which can be set is 23 hours and 59 minutes.
A double beep will be emitted for confirmation and the countdown will start two seconds after the last command is given.
The display will go back to showing the current time and the symbol will stay on steady.
Press the key or the key until the symbol “ || ” on the display lights up.
The symbol will start to flash.
Press the OK key to confirm that you want to set a time for end of cooking.
The symbol “ ” will start flashing more rapidly than before and the programmer will display the current time.
Press the keys or to set the COOKING DURATION time. The maximum time which can be set is 23 hours and 59 minutes.
The oven will emit a double beep for confirmation and will start counting two seconds after the last command is given.
Attention: the DURATION OF COOKING time cannot be greater than the time remaining between the current time and the time for END OF COOKING.
The display will go back to showing the current time. The symbols | | and | will stay on steady.
The oven shuts off, and it will come back on to start cooking at the time established by the difference between the end of cooking time and the cooking duration time.
The oven will shut off at the programmed end of cooking time, and there will be an acoustic signal.
The icons | | and | will flash.
If no key is pressed, after 1 minute the buzzer will shut off on its own.
Icons | | | continue to flash until reset by pressing any key.
PROGRAMME DELETION
To delete a cooking programme, set the cooking duration to zero, or if the end of cooking function is active, select it and decrease the time down to the current time.
If an automatic programme is active, it is sufficient to set the cooking duration time to zero.
PIRO FUNCTION
If you use the selector to select the PIRO function, the programmer will show the following symbols
and the message PIRO. The latter will be displayed for 15 seconds. After that, the remaining pyrolysis time will be shown and the message BACK will come on to indicate that countdown is occurring.
PIRO lets you change the time of pyrolysis (from a minimum of one and a half hours up to a maximum of three hours).
To set the time, you will first need to disable the keypad lock by pressing the "keysymbol" button; the icon
will go off. Then press the PIRO key, and increase the time with the key or decrease it with the key .
If a PIRO cycle is activated and, after the display of the remaining pyrolysis time, another cooking function is set or the oven is shut off, the programmer will delete the pyrdysis. An alarm signal is sounded an the icon flashes.
To activate the oven and to de-activate the alarm, press any key.
If the countdown reaches its end, the oven will shut down and an alarm will sound. The icon will also flash.
To activate the oven and to de-activate the alarm, press any key.
CHILD SAFETY FUNCTION
After setting a programme, it is possible to de-activate the keypad of the programmer by pressing the "key" button until the symbol comes on.
N.B. You can stop cooking at any time by setting the selector to zero.
When the oven is off, if you press the "KEY" button and then you turn the selector knob to a cooking position, the oven will not come on.
With the selector in any position other than zero (PIRO cycle excluded), the oven will shut down if the "key" button is pressed.
TEMPERATURE INDICATOR
This consists of a vertical bar composed of 5 segments and 2 luminous messages.
Initially, all the segments will be off. When the oven starts working, the segments of the scale will come on one at a time, from lowest to highest in a certain time while the oven is on.
In order for the last segment to light up, the thermostat must determine that the desired temperature has been reached.
During pyrolysis operation, the segments will come on in the same manner but at different times.
The segments switch off when the oven is shut down. The segments shut down at intervals of five minutes from one another.
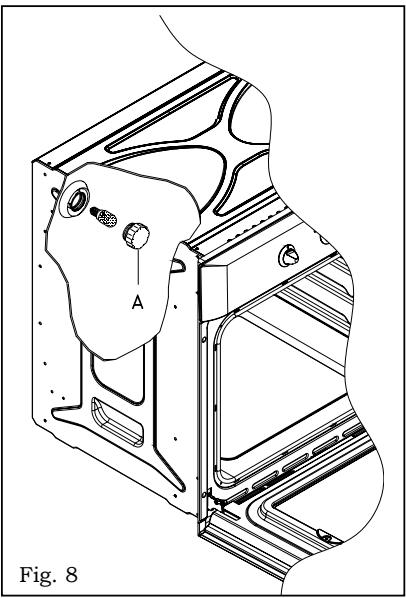
Replacing the oven light - Fig. 8
The oven is equipped with a lamp having the following features:
25W
screw cap E-14
T 300^
WARNING: disconnect the appliance from the power supply.
If the oven light needs to be replaced, the protective cover «A» must be removed by turning it anticlockwise. After the light has been replace, refit the protective cover «A». (Fig. 8).
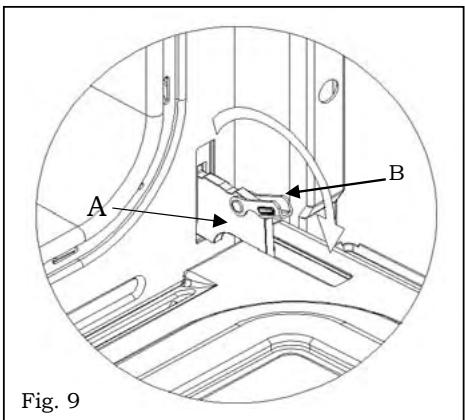
Removing the oven door - Fig. 9
To aid cleaning and make access to the oven interior easier, the oven door can be simply removed.
To facilitate cleaning of the oven, the door can be removed via the hinges as follows:
hinges with movable bolt
The hinges A are provided with two movable bolts B.
When bolt B is raised, the hinge is released from its housing.
Having done this, the door must be lifted upwards and removed, sliding it towards the outside;
grip the sides of the door near the hinges when performing these operations.
To refit the door, firstly slide the hinges into their slots.
Before closing the door, remember to rotate the two movable bolts B used to hook the two hinges.
TECHNICAL SPECIFICATIONS
Appliance compliant with current standards concerning the elimination of radio-electrical interference. Power supply: 220V 50Hz
HP-740I
Oven light bulb 0,025kW
Pyrolysis smoke catalyser 0,150kW
Upper heating element 0,900kW
Lower heating element 1,300 kW
Fan heating element 2,300 kW
Grill heating element 1,600 kW
Maximum absorbed power: 3,100kW
Electrical cable: H05 RR-F cross section 3 x 2,5 mm²
Usable oven dimensions:
Width: 440mm
Depth: 390mm
Height: 340mm
Volume: 59 litres
INSTALLATION
ATTENTION: THIS APPLIANCE MUST BE INSTALLED BY A TECHNICIAN IN COMPLIANCE WITH THE INSTRUCTIONS PROVIDED BY THE MANUFACTURER.
BEFORE DOING ANY WORK ON THE APPLIANCE, MAKE SURE IT IS DISCONNECTED FROM THE POWER SUPPLY.
Legislative standards, technical regulations and directives
Installation of the device must be carried out in compliance with current legal standards and with applicable safety standards
Oven installation:
The oven must be installed in a module with dimensions of 600~mm , built into a set of furniture. It is necessary to provide an opening of at least 85 / 90mm both above and below the furniture unit to allow proper ventilation of the appliance (see figure 5).
During installation, do not lift the oven by the door. Generally speaking, do not subject the oven to any sort of stress.
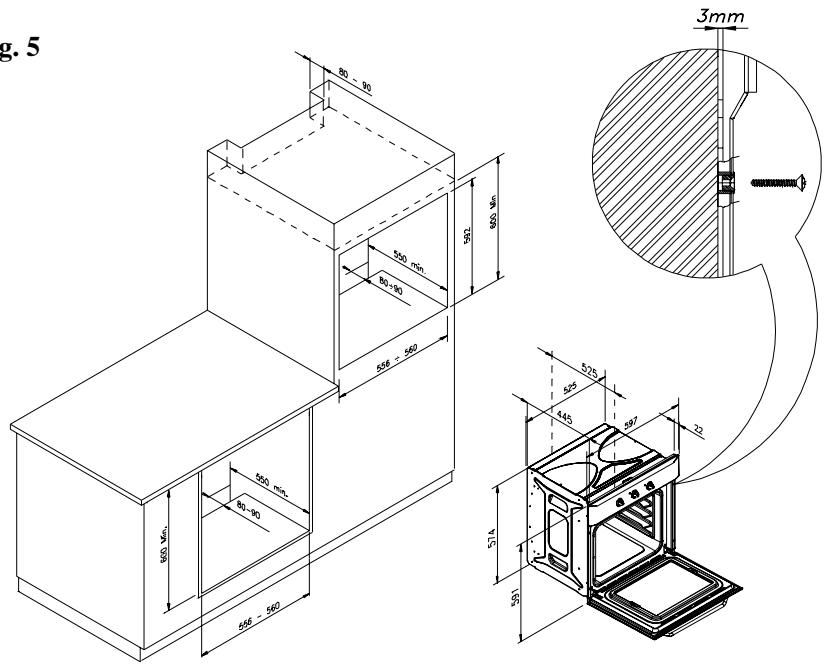
Fig. 5
GUARANTEE CERTIFICATE
This appliance was manufactured with the utmost care.
In the twenty-four months immediately after purchase, TEKA FRANCE will replace defective components free of charge. The guarantee conditions are included in the sales conditions in the invoice from TEKA FRANCE.
The guarantee does not cover the following: light bulbs and glass, or any other component that has undergone damage or shocks due to improper handling, use, or installation, or after work has been performed by unauthorized personnel.
TEKA will in no way be held liable for damage to persons or property due to incorrect handling or installation, or operator negligence. Only the sales conditions of TEKA in effect at the date of delivery by TEKA govern the relationship between the two parties.
RETAILER STAMP
AND DATE:
MODEL: PYROLYSIS OVEN.
NAME OF USER.
In order to render this guarantee effective, the purchase invoice must be included with the certificate of guarantee.
| COUNTRY | CITY | COMPANY | CC | PHONE | FAX |
| Austria | Wien | KÜPPERSBUSCH GES.M.B.H. | 43 | 1 - 86680 - 0 | 1 - 86680 - 72 |
| Belgium | Zellik | B.V.B.A. KÜPPERSBUSCH S.PR.L. | 32 | 2466-8740 | 2466-7687 |
| Chile | Santiago de Chile | TEKA CHILE S.A. | 56 | 2 - 273.19.45 | 2 - 273.10.88 |
| China | Shanghai | TEKA CHINA LTD. | 86 | 21 - 6236 - 2375 | 21 - 6236 - 2379 |
| Czech Republic | Brno | TEKA - CZ, S.R.O. | 42 | 05 - 4921 - 0478 | 05 - 4921 - 0479 |
| France | Paris | TEKA FRANCE S.A.R.L. | 33 | 1 - 5836 - 4830 | 1 - 5836 - 4831 |
| Greece | Athens | TEKA HELLAS A.E. | 30 | 210-9760283 | 210-9712725 |
| Hungary | Budapest | TEKA HUNGARY KFT. | 36 | 1 - 354-21-10 | 1 - 354-21-15 |
| Indonesia | Jakarta | P. T. TEKA BUANA | 62 | 21 - 39052 -74 | 21-39052 -79 |
| Malaysia | Kuala Lumpur | TEKA KUCHENTECHNIK (MALAYSIA) SDN. BHD. | 60 | 3 -762.01.600 | 3 - 762.01.626 |
| Mexico | Mexico D.F. | TEKA MEXICANA S.A. DE C.V. | 52 | 555 - 762.04.90 | 555 - 762.05.17 |
| Poland | Pruszków | TEKA POLSKA SP ZO.O. | 48 | 22-738.32.80 | 22-738.32.89 |
| Portugal | Ilhavo | TEKA PORTUGUESA LTDA. | 351 | 234 - 32.95.00 | 234 - 32.54.57 |
| Russia | Moscow | TEKA RUS LLC | 7 | 095 - 737 - 4689 | 095 - 737 - 4690 |
| Singapore | Singapore | TEKA SINGAPORE PTE LTD. | 65 | 6 - 73-42415 | 6 - 73-46881 |
| Thailand | Bangkok | TEKA (THAILAND) CO. LTD. | 66 | 2 - 5164954 | 2 - 9021484 |
| The Netherlands | Zoetermeer | TEKA B.V. | 31 | 79 - 345.15.89 | 79 - 345.15.84 |
| Turkey | Istanbul | TEKA TEKNIK MUTFAK A.S. | 90 | 212 - 274.61.04 | 212 - 274.56.86 |
| U.K. | Abingdon | TEKA PRODUCTS (UK) LTD. | 44 | 1235 - 86.19.16 | 1235 - 83.51.07 |
| U.S.A. | Tampa | TEKA USA, INC. | 1 | 800-419-9344 | 813-228-8604 |
| Venezuela | Caracas | TEKA ANDINA, S.A. | 58 | 212 - 291.28.21 | 212 - 291.28.25 |

KÜCHENTECHNIK
Teka Industrial S.A.
Cajo 17
39011 Santander (Spain)
Tel.: 34-942-355050
Fax: 34-942-347694
http://www.teka.net
35708 Haiger (Germany)
Tel.: 49-2771-8141-0
Fax: 49-2771-8141-10
http://www.teka.net