
HF-659 - INSTALLATION MANUAL - Built-in oven TEKA - Free user manual and instructions
Find the device manual for free HF-659 - INSTALLATION MANUAL TEKA in PDF.
| Product type | Built-in oven |
| Brand | TEKA |
| Model | HF-659 |
| Dimensions (W x H x D) | 595 x 595 x 565 mm |
| Usable volume | 70 L |
| Power supply | 230 V - 50 Hz |
| Maximum power | 2.5 kW |
| Energy efficiency class | A+ |
| Number of functions | 8 |
| Main functions | Natural convection, Fan forced, Grill, Fan-assisted grill, Defrost, Keep warm, Pyrolysis, Rapid cooking |
| Door material | Tempered glass |
| Cleaning type | Pyrolysis (self-cleaning) |
| Safety features | Child lock, Automatic shut-off, Cooling fan |
| Display | Touch LED screen |
| Number of shelf levels | 5 |
| Temperature probe | Yes (meat probe) |
| Net weight | 35 kg |
| Included accessories | Grill rack, Baking tray, Temperature probe, Pizza stone |
Frequently Asked Questions - HF-659 - INSTALLATION MANUAL TEKA
User questions about HF-659 - INSTALLATION MANUAL TEKA
0 question about this device. Answer the ones you know or ask your own.
Ask a new question about this device
Download the instructions for your Built-in oven in PDF format for free! Find your manual HF-659 - INSTALLATION MANUAL - TEKA and take your electronic device back in hand. On this page are published all the documents necessary for the use of your device. HF-659 - INSTALLATION MANUAL by TEKA.
USER MANUAL HF-659 - INSTALLATION MANUAL TEKA
The Cooking Tables show examples of temperature ranges and approximate cooking times. The cooking mode depends on the model, so consult the oven Feature list. For the best results we recommend the oven to be preheated with the function l or l . The preheating time finish when the heating pilot light switches off (Consult the Feature list).
FRANÇAIS
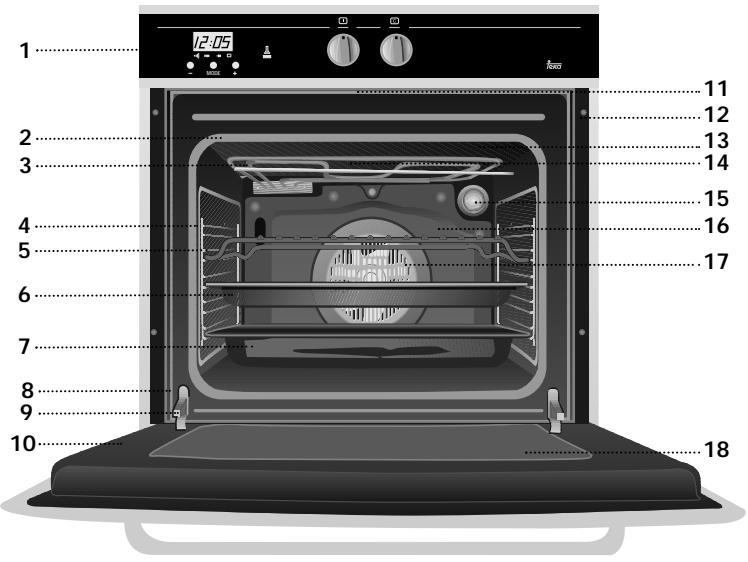
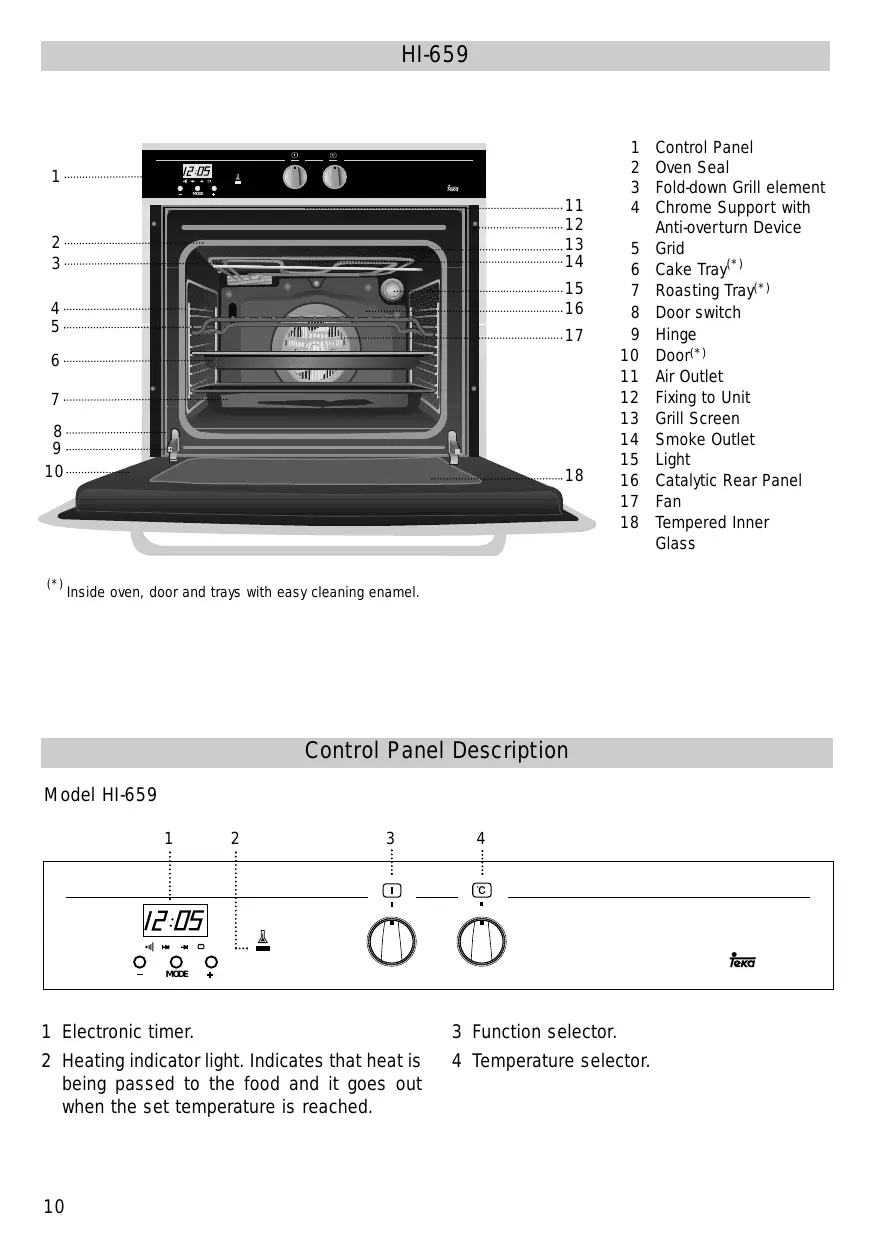
(*) Inside oven, door and trays with easy cleaning enamel.
1 Control Panel
2 Oven Seal
3 Fold-down Grill element
4 Chrome Support with Anti-overturn Device
5 Grid
6 Cake Tray*
7 Roasting Tray*
8 Door switch
9 Hinge
10 Door*
11 Air Outlet
12 Fixing to Unit
13 Grill Screen
14 Smoke Outlet
15 Light
16 Catalytic Rear Panel
17 Fan
18 Tempered Inner Glass
Control Panel Description
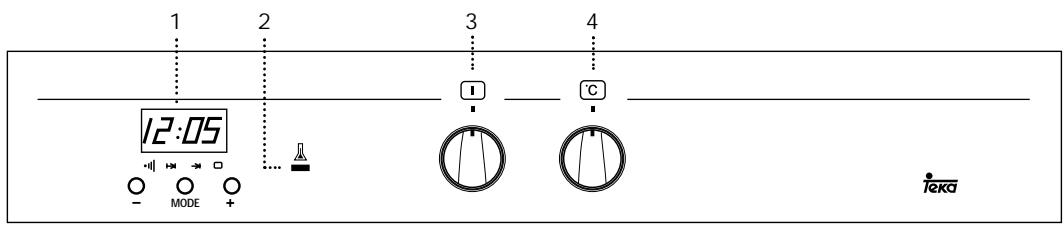
Model HI-659
1 Electronic timer.
2 Heating indicator light. Indicates that heat is being passed to the food and it goes out when the set temperature is reached.
3 Function selector.
4 Temperature selector.
Switch off oven
Conventional
It is used for sponges and cakes where the heat received must be uniform to achieve a spongy texture.
Conventional with fan
Appropriate for roasts and cakes. The fan spreads the heat uniformly inside the oven.
Grill
For preparing dishes with superficial roasting. It allows the outer layer to be browned without affecting the inside of the food. Ideal for flat food, such as steaks, ribs, fish, toast.
MaxiGrill
Allows greater surfaces to be prepared, than with the grill, together with higher power reducing the time required for browning of the food.
MaxiGrill with fan
Allows uniform roasting at the same time as surface browning. Ideal for grills. Special for large volume pieces, such as poultry, game etc. It is recommended to put the item on a rack with a tray beneath to collect the stock and juices.
Caution
While using the Grill, MaxiGrill or MaxiGrill with fan, the door must be kept closed.
Turbo
The fan distributes the heat produced by an element located at the rear of the oven. Due to the uniform heat distribution, it allows roasting and baking to take place at two heights at the same time.
Lower element
Heats only from beneath. Suitable for heating dishes and raising pastry and similar.
Lower element with fan
It distributes the heat from the lower part of the oven and is ideal for cakes with jam or fruit filling, which only require heating from beneath. Pre-heating is always necessary.
Grill and Lower element
Special for roasts. It can be used for any piece, whatever its size.
Note
The pilot light remains on in any cooking function.
Setting the time on the clock
On connecting the oven, you will notice that 12:00 appears on the clock and that a light begins to flash above the symbol. Pressing the "+" and "-" buttons the correct time can be set on the clock, which is subsequently stored and the flashing light goes out.
Manual use
After setting the correct time, the oven is ready for use. Select a temperature and a cooking function.
To switch off the oven, set the controls to the position .
Functions of the Electronic Clock Programmer
Warning function: This function generates a warning tone at a specified time.
Cooking time: This function allows to programme the oven to cook for a specified time, after which it will switch itself off.
End of cooking time: This function allows to establish the exact hour, after which the oven will switch itself off.
Duration and automatic stop: This function is used to control the duration and the time at which the oven will turn itself off. This function allows the oven to start and stop automatically.
Clock light: The clock light can be switched off when the oven is not in use.
Warning function
1 Press the MODE button until the signal above the symbol begins to flash.
2 Choose the time when you want the alarm to sound, pressing the "+" or "-" buttons.
3 Subsequently, the light will remain on indicating that the alarm is programmed.
4 At the end of the programmed time, an alarm will sound and the light will begin to flash.
5 Press any button to turn off the alarm and the screen shows the current time again.
Programming the cooking time
1 Press the MODE button until the indicator above the symbol begins to flash.
2 Select the length of time, pressing the "+" or "-" buttons.
3 Subsequently, the indicator that was flashing will light, indicating that the oven will switch itself off automatically.
4 The clock will then show the current time.
5 Select a temperature and cooking function.
6 When the set time has elapsed, the oven will disconnect, an alarm will sound and the indicator will begin to flash.
7 Press any button to switch off the alarm, reconnecting the oven.
8 Set the controls in the position to switch off the oven.
Programming the end of cooking time for the oven
1 Press the MODE button until the indicator above the symbol begins to flash.
2 Select the time that cooking is to finish, pressing the "+" or "-" buttons.
3 Subsequently, the indicator that was flashing is lit, indicating that the oven will switch itself off automatically.
4 The clock will then show the current time.
5 Select a temperature and a cooking function.
6 When the programmed time is reached, the oven will disconnect, an alarm will sound and the indicator will begin to flash.
| Fabricante | Fabricante | Manufacturer | Fabricant | Hersteller | TEKA |
| Modelo | Modelo | Model | Modèle | Modell | HI-659 |
| Clase de eficiência ener-gética, en una escalae que abarca de A (más eficiente) a G (menos eficiente). | Classe de eficiência ener-gética, numa escalae de A (eficiente) a G (ineficiente). | Energy efficiency class on a scale of A (more efficient) to G (less efficient). | Classement selon son efficacité energetique sur une échelle allant de A (économe) à G (peu économique). | Energieeffizienz-klasse auf einer Skala von A (niedriger Verbrauch) bis G (hoher Verbrauch). | B |
| Função de calentamento. | Função de aquecimento. | Heating function. | Fonction chauffage. | Beheizung. | |
| Calentamento convencional. | Concevçao forçada de ar. | Conventional. | Classique. | K conventionelle Beheizung. | ← |
| Conveção forzada. | Forced air convection. | Convection forçée. | Umluft / HeiBluft. | ||
| Consumo de energia. | Consumo de energia. | Energy consumption. | Consummation d'énergie. | Energiever-brauch. | |
| Calentamento convencional. | Concevçao forçada de ar. | Conventional. | Classique. | K conventionelle Beheizung. | 0,99 Kwh |
| Conveção forzada. | Forced air convection. | Convection forçée. | Umluft / HeiBluft. | 1,09 Kwh | |
| Volumen neto (litros). | Volumeutil (litros). | Usable volume (litres). | Volume utile (litres). | Netto-volumen (liter). | 56 |
| Tipo: Pequeño Medio Grande | Tipo: Pequeno Médio Grande | Size: Small Medium Large | Type: Faible volume Volume moyen Grand volume | Typ: Klein Mittel Groß | ← |
| Tiempo de cocción conarga normal. | Tempo de cozedura daarga-padrão. | Time to cook standard load. | Temps de cuisson en charge normale. | Kochzeit bei Standardbela-dung. | |
| Calentamento convencional. | Concevçao forçada de ar. | Conventional. | Classique. | K conventionelle Beheizung. | 51 min. |
| Conveção forzada. | Forced air convection. | Convection forçée. | Umluft / HeiBluft. | 59 min. | |
| Superficie de cocción. | Zona de cozedura. | Baking area. | Surface de culsson. | Backfläche | 1300 cm2 |
| Ruido (dB (A) re 1 pW). | Nivel de ruido dB(A) re 1 pW. | Noise (dB (A) re 1 pW). | Bruit (dB (A) re 1 pW). | Geräusch (dB (A) re 1 pW). | 55 |
Nuestra aportacion a la proteccion del medio-ambiente:utilizamos papel reciclado. A.nossa contribucao para a protecao do ambiente:utilizamos papel reciclado.
Our contribution to enviromental protection: we use recycled paper.
Notre contribution à la protection de l'environnement : nous utilisons du papier recyclé.
Unser Beitrag zum Umweltschutz: wir verwenden umweltfreundliches Papier.
Cod.: 3172054/3172054/ABB00