USER MANUAL MP14NE CUISINART
- Introduction 17
- Assembling your appliance 17
- The machine parts 18
- Operating instructions 19
A. Operating instructions for the chopping and dough blades 19
B. Operating instructions for the discs 19
C. Operating instructions for the whisk with planetary action 20
- The machine functions 21
A. Pulse function 21
B. On/Off function 21
C.Dough function 21
6.Tips for use. 21
A. Chopping or puréeing 21
B.Slicing and shredding 22
C. Making dough 22
D Beating or whisking 23
Recommended quantities of various ingredients 24
Slicing and shredding cheese 24
- Questions and answers 25
- Cleaning and storage 27
- Safety cautions 27
INHALTSVERZEICHNIS
3. CHARACTERISTIQUES DU PRODUIT
8. QUESTIONS/RESPONSES
You have just acquired a Cuisinart® professional food processor. Constant research into improvements and the care taken in developing this product guarantee you a quality appliance that allows you to create all sorts of preparations quickly and easily.
Easy to use and maintain, this appliance allows you to create all kinds of simple and original preparations.
In addition to its powerful and ultra-quiet motor, equipped with two safety switches, and its very large work bowl, it has the following features:
- An extra-large feed tube, perfect for slicing and shredding large pieces of food. A chopping/mixing blade to perfect your preparations.
- Four balanced and sturdy discs.
- An exclusive system for making dough. We have designed for you a blade made of surgical steel and a motor that computes an optimal rotation speed for processing the dough, allowing you to prepare all types of dough in just seconds.
- An integrated whisk with planetary action. While the body of the whisk attachment rotates in one direction around the bowl, the two whisks spin round themselves, thereby reproducing the planets' movement around the sun. This action allows for continuous aeration of the food and will give your preparations unequalled lightness.
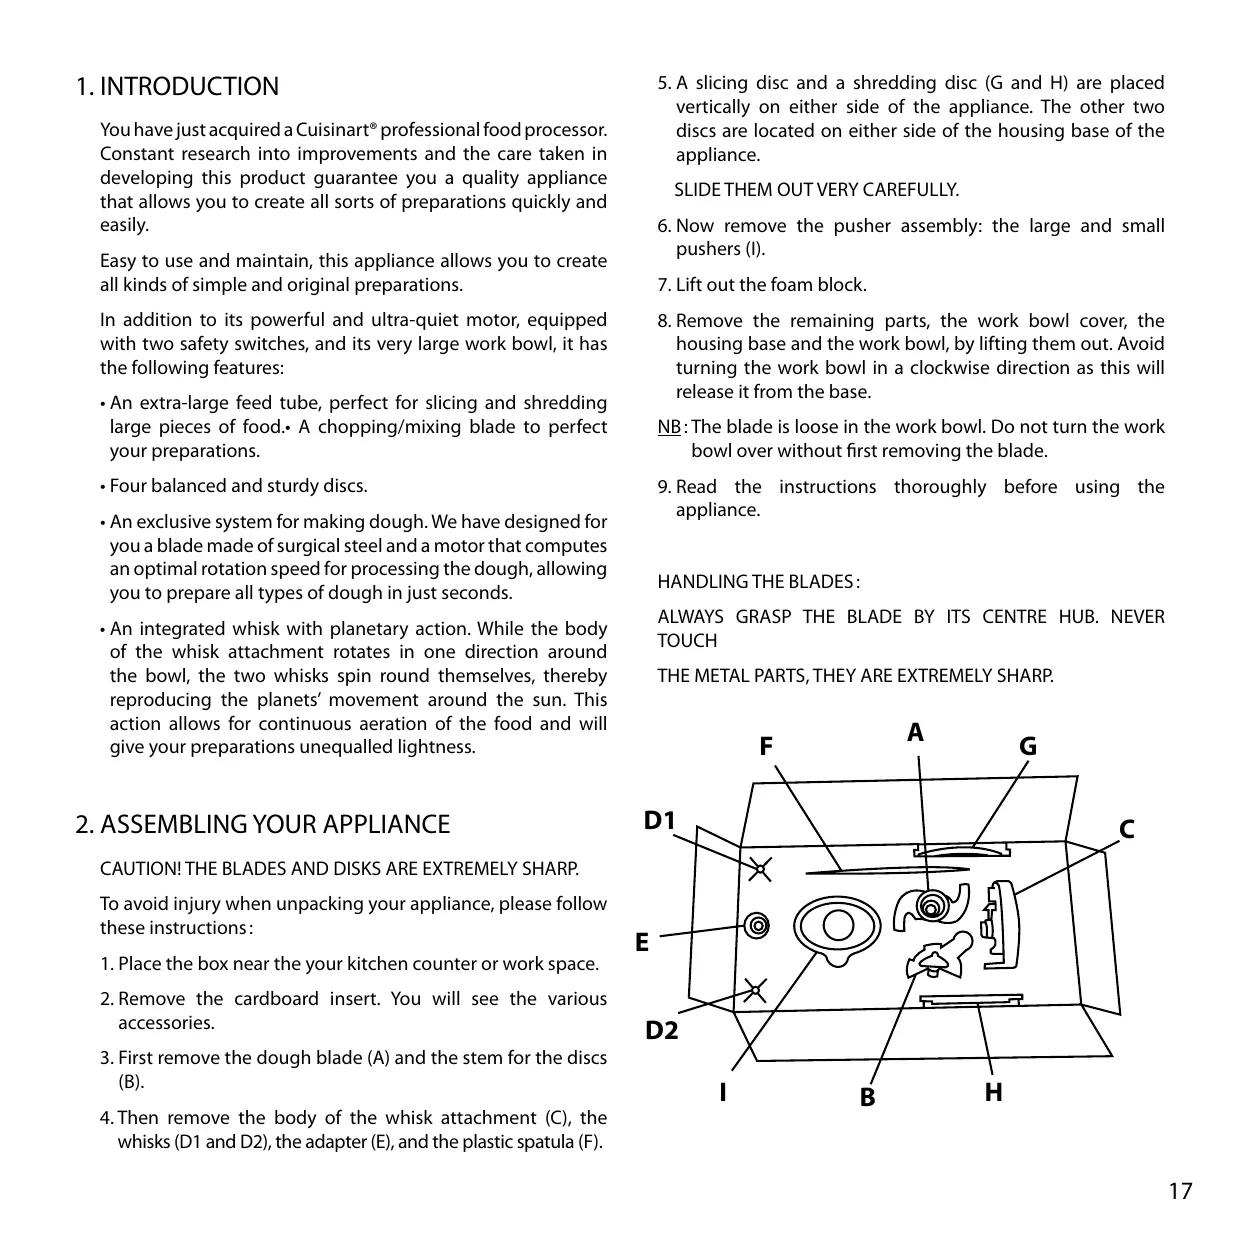
2. ASSEMBLING YOUR APPLIANCE
CAUTION! THE BLADES AND DISKS ARE EXTREMELY SHARP.
To avoid injury when unpacking your appliance, please follow these instructions:
- Place the box near the your kitchen counter or work space.
- Remove the cardboard insert. You will see the various accessories.
- First remove the dough blade (A) and the stem for the discs (B).
-
Then remove the body of the whisk attachment (C), the whisks (D1 and D2), the adapter (E), and the plastic spatula (F).
-
A slicing disc and a shredding disc (G and H) are placed vertically on either side of the appliance. The other two discs are located on either side of the housing base of the appliance.
SLIDE THEM OUT VERY CAREFULLY.
- Now remove the pusher assembly: the large and small pushers (I).
- Lift out the foam block.
- Remove the remaining parts, the work bowl cover, the housing base and the work bowl, by lifting them out. Avoid turning the work bowl in a clockwise direction as this will release it from the base.
NB:Thebladeislooseintheworkbowl.Do not turn the work bowl overwithoutfirstremovingtheblade.
- Read the instructions thoroughly before using the appliance.
HANDLING THE BLADES:
ALWAYS GRASP THE BLADE BY ITS CENTRE HUB. NEVER TOUCH
THE METAL PARTS, THEY ARE EXTREMELY SHARP.
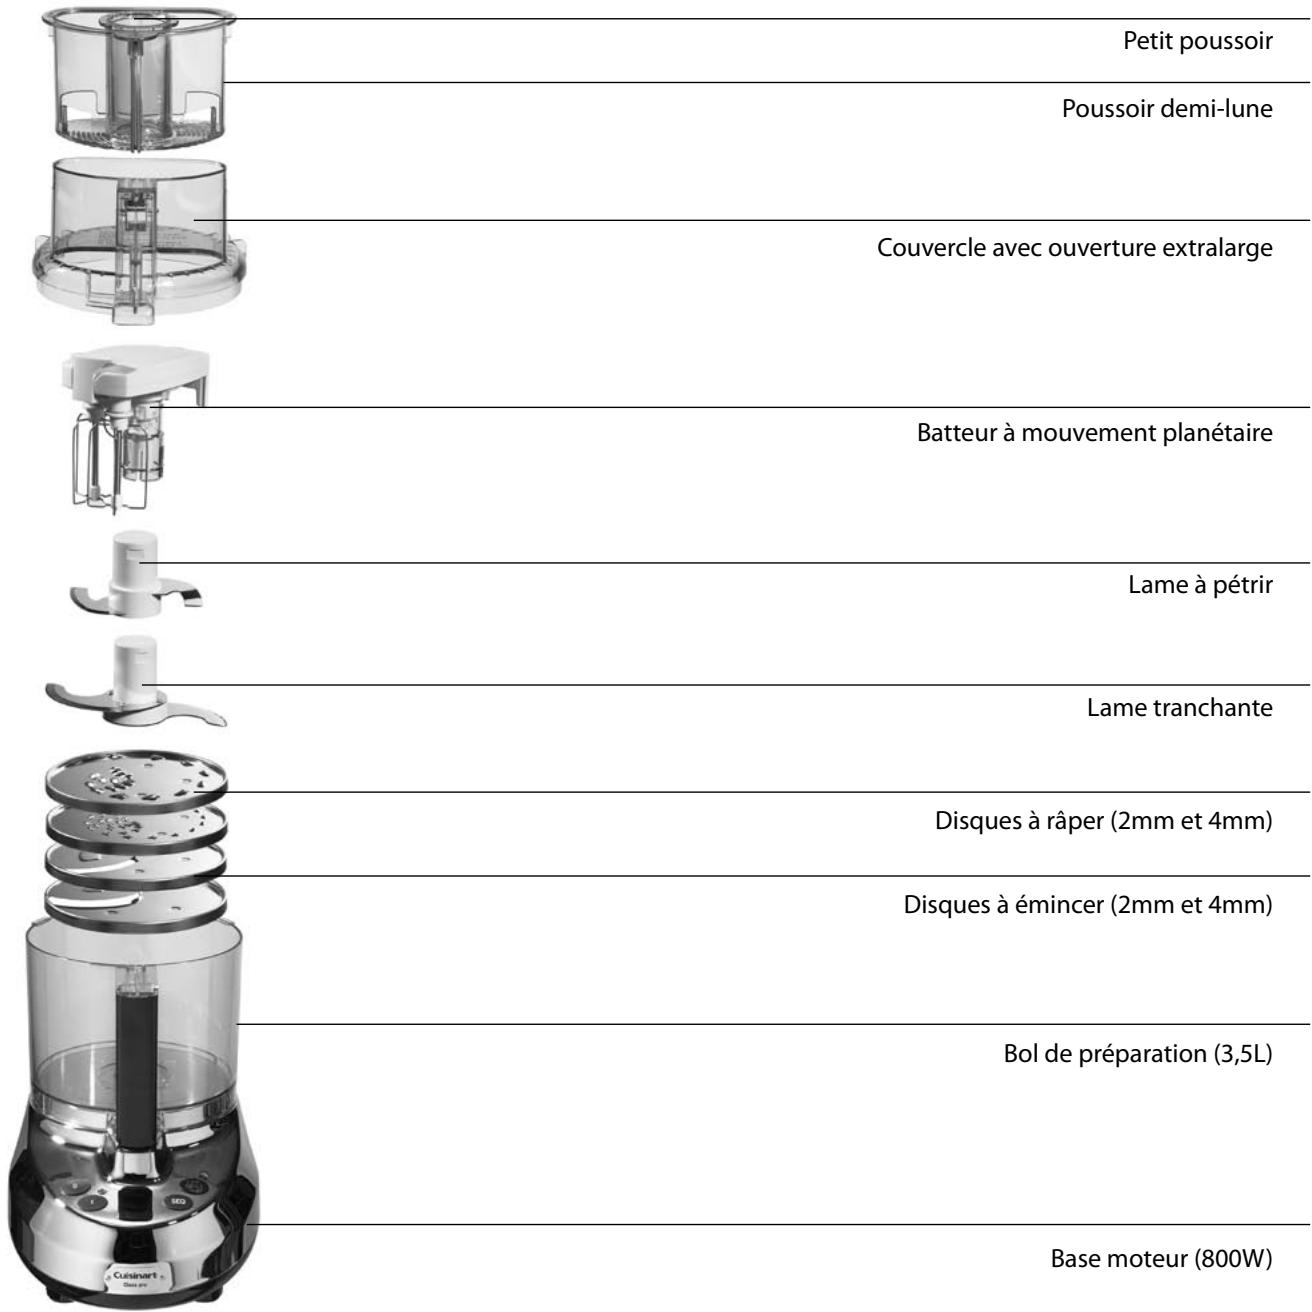
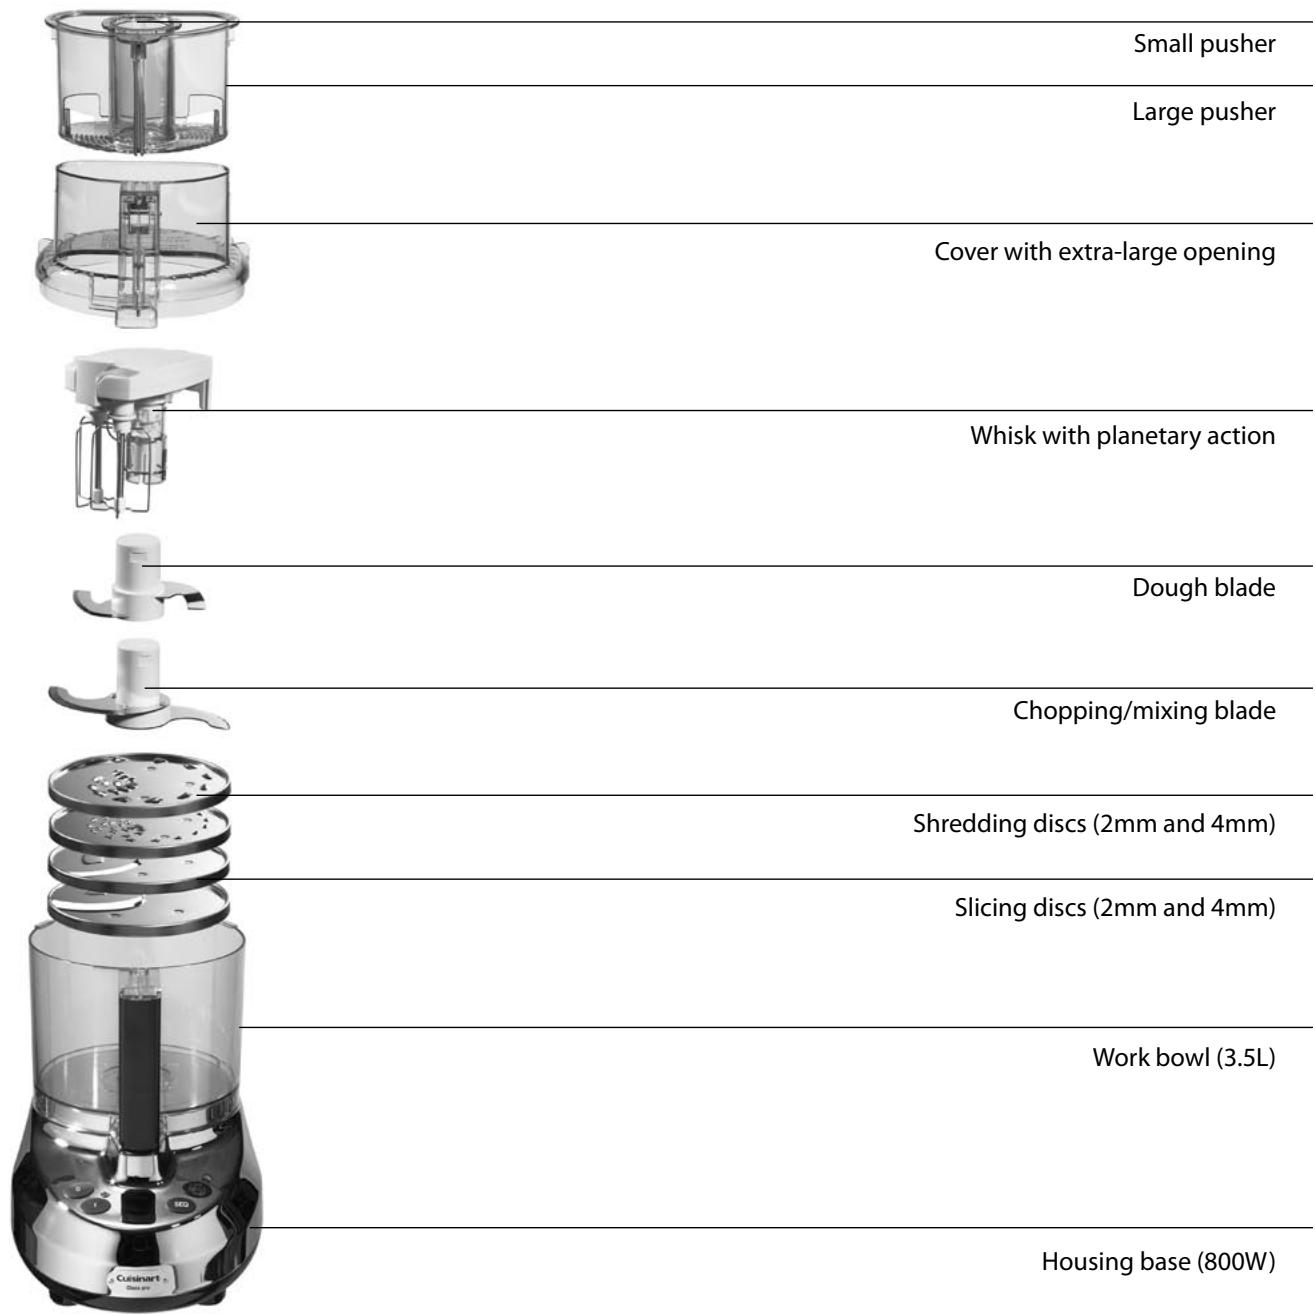
3. THE MACHINE PARTS
Your food processor motor operates on standard line operating current. The appropriate voltage and frequency for your appliance are shown on the bottom of the housing base. This appliance is equipped with an automatic thermostat that will protect it against overheating. In fact, if the processor runs for an exceptionally long time or mixes or kneads a very thick dough or several successive batches, the motor may overheat and it will stop automatically thanks to the internal safety switch. If this happens, turn your machine off and wait for the motor to cool before turning it on again. The motor will usually cool within 15 minutes. In extreme cases, it could take up to an hour.
The work bowl cover has a second safety switch. In fact, the motor will only turn on if the cover is locked into position and the large pusher is inserted firmly. It is then impossible to remove the work bowl from the housing base. In order to remove the work bowl, first lift the large pusher out. During use, the motor will stop instantly if the large pusher is separated from the cover.
The machine's pusher assembly has two parts:
- A large pusher for larger foods. It deactivates the motor's safety mechanism.
- A small pusher located within the large pusher. This pusher is designed for longer vegetables (carrots, cucumbers, etc.), for continuously adding liquids and small foods while the appliance is running.
4. OPERATING INSTRUCTIONS
A. Operating instructions for the chopping/mixing or dough blade
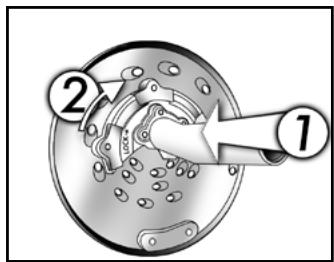
- Place the work bowl over the motor shaft, with the handle facing you just left of centre. Turn the work bowl counterclockwise to lock into position.
- Holding it by its central hub, carefully place one of the two blades on the central shaft in the work bowl. Carefully align the blade hub with the motor shaft. It should fit snugly and rest on the bottom of the work bowl.
- Place the ingredients in the bowl.
- Place the work bowl cover onto the work bowl by holding the cover handle slightly to the left. Then turn it counterclockwise to lock it into position.
- Place the large pusher in the food opening, sliding its metal
activation rod in the cover's safety mechanism. The machine is now ready to be used.
The chopping/mixing blade allows you to chop, crush, grind, purée, and blend such foods as:
- Fresh herbs
- Onions, garlic, shallots
Spices
- Raw or cooked meat and fish
- Raw or cooked fruit and vegetables
- Some cheeses
Chocolate and coffee
Dried fruit (nuts, almonds, etc.)
Ice
- Sauces (mayonnaise, rouille, béarnaise, vinaigrettes)
- Soups and vegetable or fruit coulis
- Certain batters (waffle, pancake, cake, doughnut, etc.)
The dough blade allows you to create thick doughs in just seconds:

- It is always used with the button
- Bread dough
- Pizza dough
- Shortcrust pastry
Sweet pie pastry
- Puff pastry
- Choux pastry
- Savarin dough
Brioche
B. Operating instructions for the discs
- Place the work bowl over the motor shaft, with the handle facing you and sitting just left of centre. Turn the work bowl counter-clockwise to lock into position.
- Place the disc on a flat surface. Place the detachable stem into the mounting plate on the disc. The 'lock' indicator located on the left of the part should be left of the mounting plate on the disc.
- Push the stem down and turn to the right, so the locking tabs are covered by the metal supports. A 'click' indicates the stem is locked in place. (To unlock the stem, slide the white button up and turn counter-clockwise).
- Turn the disc over and place the stem on the motor shaft. It should fit snugly and rest on the bottom of the work bowl.
- Place the cover on the work bowl with the cover handle slightly to the left, then turn it counter-clockwise to lock in place.
- Place the large pusher into the feed tube, sliding its metal activation rod into the cover's safety mechanism. The machine is now ready to be used.
The slicing/chopping discs (2mm and 4mm) cuts into strips or slices (small feed tube) or cuts into large pieces (large feed tube). The following are some examples of foods you can use these discs for:
- All sorts of uncooked vegetables
- All sorts of uncooked fruit
- Some cheeses (firm)
- Raw meat or fish (place the pieces in freezer to harden before chopping)
Cooked meats (always cold)
- Cooked fish (only firm fish like tuna and swordfish)
Cooked and cold langoustine or lobster tails
- Shellfish, slightly frozen or cooked and chilled (scallops)
- Leeks in lengths for making julienne strips
The shredding disc (2mm and 4mm) shreds the food finely or thickly (large feed tube):
- Uncooked vegetables (carrots, celery, courgettes, potatoes, etc.)
Cooked vegetables for puree (potatoes, carrots, celery)
Cooked fruit (apples, pears)
Firm cheeses (gruyere, comte, etc.)
- Semi-soft or semi-firm cheese (partially frozen)
Chocolate
C. Operating instructions for the whisk with planetary action
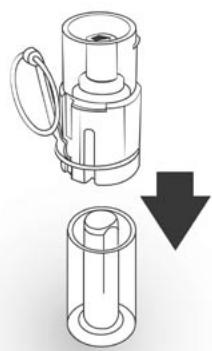
- Lock the two whisks in place by holding the body of the whisk attachment with the underside facing up. Insert the stems of the whisks into the openings designed for them simply by pressing them in while gently rotating until they click into a locked position.
- Place the work bowl on the base, with the handle pointing toward you and slightly left of centre. Turn the work bowl counter-clockwise to lock it into position on the housing base.
- To lock the adapter to the motor shaft, push the fixed ring as far down as possible to the bottom. Be sure that the other ring (attached to the metal sheath) is loose. Once the adapter is in place, snap the free ring over the top of the adapter.
- Lock the whisk attachment onto the adapter.
- Place the cover on the work bowl with the cover handle slightly to the left, then turn it counter-clockwise to lock it in place.
- Place the large pusher into the feed tube, sliding its metal activation rod into the cover's safety mechanism. The machine is now ready to be used.
NB: To remove the whisks after use, simply press the whisk ejector tab on top of the whisk attachment as far as possible.
You can use the whisk attachment to beat preparations such as:
- Egg whites
- Whipped cream (chantilly, crème montée, tiramisu, etc.)
- Mayonnaise (béarnaise, rouille, mousseline, etc.)
- Meringue
- Batters (pancake, sabayon, waffle, cake, marble cake, genoese cake, etc.)
Vinaigrette
Butter cream
5. THE MACHINE FUNCTIONS
A. Pulse function
This button allows you to control the operation of the appliance as desired. With the ingredients in the work bowl, simply press the button (SEQ) repeatedly as many times as needed. The motor stops when the button is released.
B. On/off function ( 0 & 1\ 0 & 1 )
The buttons 0 and 1 allow you to start and stop the motor. With the ingredients in the work bowl or the feed tube, simply press the button 1 , and then the 0 button to stop the motor.
NB: The appliance starts when the cover is locked in place and the large pusher is in its proper position. It stops immediately when the pusher is taken out or the cover is opened.
The button is used with the button I or SEQ This button sets the machine speed specifically for dough. Press the button and a light will come on. Then press either the button or as often as needed to process the dough.
6. TIPS FOR USE
For chopping food, use the chopping/mixing blade. Install it following the instructions in the section on 'Operating instructions for the chopping/mixing or dough blade'. Cut the food into pieces before placing them in the feed tube. Press and release the button several times, allowing the
food to fall back to the bottom each time. Use the spatula to scrape the sides of the bowl if necessary. Following this procedure allows you to chop food perfectly. Check the texture regularly so as not to chop too much.
For puréeing, chop the food roughly then press the button 1 and allow the appliance to run until the food is the desired texture (NOTE: this process cannot be used for mashing potatoes).
IMPORTANT
- Do not use quantities greater than those recommended in this booklet.
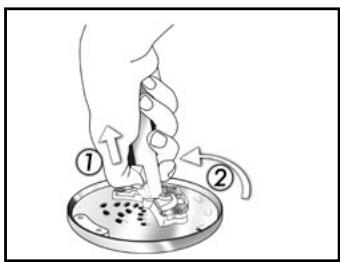
- Always wait until the blade has stopped completely before taking the cover off.
- Never try to take the pusher, cover and bowl off at the same time. The pusher must be removed first, then the bowl and the cover may be taken off together.
- Remove the blade before emptying the bowl. If the mixture has a liquid consistency, hold the blade shaft in place with a finger and empty the bowl.
CAUTION! THE BLADE IS EXTREMELY SHARP. Never touch the metal parts and always grasp the blade attachment by its central hub.
Chopping hard foods
For chopping hard foods, remove the small pusher, press the button 1 and then place the food in the opening. Small foods can be placed in the feed tube whole. Cut other foods into pieces of about 3cm
Chopping fresh herbs
For herbs, the bowl and the blade must be thoroughly cleaned and dried. Remove the stems from the herbs to use only the tender parts. Place the herbs in the bowl and press the button SEQ several times, until the herbs are chopped as finely as desired.
If completely dry when chopped, the herbs can be stored for four to five days in the refrigerator.
Chopping meat, poultry, fish and shellfish
These foods should be very cold, but not frozen. Cut the food into pieces of about 3cm. Press the button seq to chop roughly. Do not exceed the recommended quantities. For chopping finely, press the 'on' button and let the motor run for a few seconds. If necessary, use the spatula to scrape the sides of the bowl.
Chopping nuts
Place the nuts in the bowl and press the button several times, checking frequently to avoid nuts clumping together in the bowl. Use the spatula to distribute the nuts around the bowl.
B. Slicing and shredding
Slicing whole fruit and vegetables
For slicing onions, apples or other round, medium-sized fruit and vegetables, cut the bottom ends flat so that the food lies stable on the disc. Choose fruits or vegetables that are firm and not too ripe. Remove seeds and large, hard pits from fruits before processing.
Fill the feed tube according to desired results:
- For long slices or shreds, cut the food in feed-tube widths and place the pieces horizontally in the feed tube. Do not exceed the MAX level indicated on the cover.
- For round slices (carrots, cucumber and other long vegetables), cut the food in feed-tube heights and place them in the feed tube vertically. Do not exceed the MAX level indicated on the cover.
IMPORTANT
- Never pack the feed tube too tightly so as not to block the pusher. Never push down hard on the pusher so as not damage the appliance. For shredding or slicing bananas, mushrooms, strawberries, tomatoes or other soft fruit or vegetables, push very gently to avoid crushing the fruit or vegetable.
- Always use the pusher for shredding or slicing food. Never put your fingers or the spatula in the feed tube.
Slicing raw meat or poultry
Cut the food to the size of the width of the feed tube opening. Place them in the freezer until they are hard to the touch, but can still be pierced easily with the tip of a sharp knife. Pack the food in the opening with the flat side of the meat or poultry on the disc and press on the pusher to slice.
Slicing cooked meat or poultry
The food should be cold, if possible cut into pieces the size of the width of the feed tube opening. For slicing sausages, use the small feed tube. Put the pieces in vertically, packing them so that they cannot fall sideways when the disc starts turning.
Slicing cheese
Not all cheese can be sliced. Usually, soft cheeses will not slice successfully and attempting to slice very hard cheeses can damage the disc or the appliance itself. Never try to slice cheese that is too hard to cut with a knife. Please refer to the chart and the comments in section 7 of this booklet, 'Advice from Chefs'.
C. Making dough
This appliance is designed to prepare dough in very little time.
There are two types of dough:
- Typical bread dough is made with yeast and a mixture of flours containing at least 50% white flour. It is usually prepared with water. It is uniform, soft and slightly sticky to the touch. When it is properly processed, it forms a ball.
- Dough for sweet or salty preparations contains a greater proportion of sugar, butter and/or eggs and is often prepared with milk. It is a rich and sticky dough that does not always form a ball after processing.
The two types of dough are prepared using the 'dough' button. All you need to do is press the button and a light will come on, indicating that you have selected the setting

Maximum capacity
The maximum capacity for white flour is 700g and the capacity for whole wheat flour is 420g.
IMPORTANT
Use the dough blade for quantities greater than 400g . Because this blade does not extend to the outer rim of the work bowl, it cannot mix in all the flour if there is not enough. For this reason, it is recommended that you use the chopping/mixing blade to prepare quantities of dough less than 400g .
Bread dough recipe
Ingredients · 700 g type 45 flour (pastry flour)
- 10g salt
- 15g bakers'yeast
- 420ml cold water (NB: the amount of water may vary depending on the quality of the flour used)
Mix all ingredients together in the machine's work bowl.
Press the button then the button 1 , letting the motor run until you have a consistent dough.
Remove the dough from the bowl, knead it by hand until it is elastic, about 20 times (add flour if necessary).
Allow to rise in a warm, draft-free place for one to one and a half hours. It should double in volume.
Knead the dough by hand again a few times.
Divide the dough into balls of about 50g each for baking in the oven. Allow the dough to rise for 30 minutes.
Put in an oven preheated to 240^ . Place a pan of water at the bottom of the oven for humidity.
Let the bread bake for 20 minutes until it is browned.
Hint: use very cold water for making the dough.
IMPORTANT
- Always use the recommended quantities.
- The dough should be soft enough to be processed. A dough that is too stiff may damage the machine.
D. Beating or whisking
You can use the whisk with planetary action to beat egg whites. Place the whites in the work bowl and press the button. Allow the motor to run until the whites hold their shape.
Hint: for best results, add a pinch of salt or a few drops of lemon juice.
You can use the whisk with planetary action to prepare such foods as:
- Whipped cream (chantilly, crème montée, tiramisu, etc.)
- Mayonnaise (béarnaise, rouille, mousseline, etc.)
- Meringue
- Batters (pancake, sabayon, waffle, cake, marble cake, genoese cake, etc.)
Vinaigrette
Butter cream
7. Advice from Chefs

- The extra-large feed tube lets you put your food horizontally across the width of the opening allowing you to create different cuts in complete safety.
- The pusher allows you to feed the food processor in many ways. Either through the small opening for small amounts of solid or liquid ingredients, or by the pusher itself for liquids (making breads or soups). This allows you to distribute the liquids better.
- Cut larger foods into pieces of roughly 3cm before chopping them. The result will be better. Moreover, the bigger the size of the pieces, the longer the preparation time will be.
- For slicing whole peppers perfectly, pull the stem and the seeds out from the top. Leave the other end whole so that it remains firm.
- It is preferable to use the button SEQ for chopping. Because this will allow the food to fall to the bottom of the bowl between each pulse, the food will be perfectly chopped. Check the texture frequently to avoid overprocessing. This principle also applies to crushed ice. To chop herbs, the bowl and the machine's blade must be dry. The more herbs you place in the bowl, the finer they will be chopped. The herbs can be frozen in airtight packages.
- To mash potatoes, use the shredding disk (4mm). The consistency of the mashed potatoes will be ideal. Using the shredding disc for ice will produce very finely flaked ice for cocktails.
- Use the whisk with planetary action to obtain lighter
preparations (less sugar in meringues).To make mayonnaise and other sauces, dribble the various liquids through the small feed tube. Use the button SEQ for sauces to prevent the liquids from spraying the whisk attachment. Carry out this operation in two batches if there is too much of the mixture. To make a thicker sauce like butter cream, soften the butter to prevent clogging the whisk. The whisk cannot be used to make heavy doughs, to crush ice or to crush solid foods.
- Use cold water to make bread dough; the dough will have a finer texture and you will make a high quality bread. Bread dough is ready when it forms a ball and no longer sticks to the sides of the bowl. The amount of water will vary depending on the quality of the flour used.
RECOMMENDED QUANTITIES FOR VARIOUS INGREDIENTS
SLICING AND SHREDDING CHEESE
| INGREDIENTS | QUANTITY |
| Short crust or sweet gastr | 1,5 kg |
| Brioche dough | 800g |
| Shredded or sliced fruits and vegetables | 1,5 kg |
| Soup, velouté sauce | 1,5 litre |
| Egg whites | 3 à 10 eggs |
| Whipped cream | 0,5 litre |
| TYPE OF CHEESE | CHOP/PUREE | GRATE | SLICE |
| Soft (at room temperature) | yes | no | no |
| Semi-soft (partly frozen) | yes | yes | no |
| Semi-hard (partly frozen) | yes | yes | yes |
| Hard (at room temperature) | yes | yes | no |
Not all cheeses can be chopped. Usually soft cheeses cannot be chopped successfully and trying to chop very hard cheeses may damage the disc or the machine itself.
It is possible to grate most cheeses except soft cheeses. The only exception is mozzarella which can be grated after having been placed in the freezer until it is hard. This allows for perfect grating. Hard cheeses, like parmesan, can only be grated at room temperature.
8. QUESTIONS/ANSWERS
| What do I do if: | Answer: |
| The ingredients are not chopped enough, there are process using the still large pieces? | • Cut large foods into pieces before chopping and pulse mode for best results |
| Can I exceed the maximum amounts? | • No, this may damage the machine and you will not get the results. |
| The ingredients do not mix properly? | • Liquid ingredients should only be added when the motor is running. Pour them through the feed tube, never directly into the work bowl. Check to ensure that the liquid is being properly mixed into the other ingredients. If not, stop pouring, but do not stop the motor. Wait until the ingredients are mixed before adding the remaining liquid.
• Unless it is melted, butter should be diced before adding. Allow the butter to warm to room temperature before adding. |
| The blade rises in the bowl? | • The blade is not properly set. Check that it has been pushed down as far as possible
• The amount of dough exceeds the recommended quantity. Remove some of the dough and process in two batches.
• The blade might rise in the bowl if the dough is very sticky. In this case reposition the blade, start the motor and immediately add 40g flour through the feed tube. |
| The dough does not form a ball? | • The quantity of dough exceeds the maximum recommended quantity. Remove some of the dough and process in two batches.
• The dough is too dry. If it feels lumpy, add water, 15ml at a time, while the motor is running, until the dough forms a ball that cleans the inside of the bowl.
• The dough blade was designed to process at least 400g of dough. For quantities of dough less than 400g use the chopping/mixing blade. |
| Balls of dough form on top of the blade, the dough is not consistent? | • Stop the motor, remove the dough, separate into three and distribute them around the bowl. Start the appliance again and process until the dough is soft and pliable. Check that it is neither too dry nor too moist. |
| What do I do if | Answer |
| The dough feels hard after processing? | ·Separate the dough into two or three equal parts and distribute them in the bowl. Process until they are soft and pliable. Add water if necessary. |
| The dough is runny at the bottom of the machine? | ·Always start the motor before adding liquid ingredients. Dribble the liquid slowly while it is being absorbed by the other ingredients. |
| The motor slows down? | ·You have too much dough in the bowl. Remove some of the dough and process in two batches.
·Do not process dough too long once all the ingredients have been added. Thirty seconds should be enough for richer doughs. |
| The motor stops? | ·The cover has come loose.
·The machine has been unplugged.
·Excessive strain can cause the motor to overheat and stop. This machine has a safety protector that stops the motor if it overheats. If this happens, let the motor cool for 15 minutes, then separate the dough into two equal parts and start processing again. Make sure that the dough is not too hard. If it is, add a little water and start processing again. |
| The dough does not rise? | ·Check the expiry date of the yeast.
·Do not use warm water to prepare the dough or overheat the dough by overprocessing it. The ideal temperature for dough is 26℃.
·Allow the dough to rise in a warm, draft-free environment.
·Dough made of whole-wheat flour takes more time to rise than dough made of white flour. Allow the dough enough time to rise. |
| The bread is too heavy? | ·Next time, make sure the dough is uniform, soft, pliable and slightly sticky before setting it aside to rise. Let dough fully double in bulk before punching it down and shaping it. Allow it to double a second time after shaping it. |
9. CLEANING AND STORAGE
This appliance can be left out on the kitchen counter. Leave it unplugged when it is not in use.
The blades and discs should be stored out of the reach of children.
All the appliance's parts, except the housing base and the body of the whisk with planetary action, are dishwasher safe. It is recommended that you rinse the work bowl, cover, pushers, blades, discs and whisks immediately after use so food won't dry on them.
If you wash the blades and the discs by hand, do so carefully. Avoid leaving them in soapy water. Always handle them very carefully.
The work bowl is not microwave safe, since the mechanism in the pusher that activates the motor is metal.
Use a sponge and soft soap to clean the base of the appliance.
Never use
an abrasive sponge.
IMPORTANT
Never leave a blade or disc on the motor shaft when the appliance is not in use.
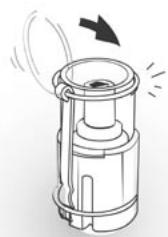
Once the whisk attachment has been removed from the work bowl, it can be quickly and easily washed. The body of the whisk cannot be immersed in water or any other liquid. Clean with a damp sponge or cloth. Dry immediately.

Before storing the whisk, make sure that all the pieces are perfectly clean and that there is no trace of oil or grease. Traces of either of these will slow
the beater down next time you use it.
10. SAFETY CAUTIONS
Like all electrical household appliances, this professional food processor should be handled with care. Follow these guidelines to avoid injury.
1. EINLEITUNG