
GR4E - Multifunction Cooker CUISINART - Free user manual and instructions
Find the device manual for free GR4E CUISINART in PDF.

| Product type | Multifunctional cooking appliance (grill, panini, barbecue, griddle, sandwich) |
| Brand | CUISINART |
| Model | GR4E |
| Dimensions (L x D x H) | 36,8 x 33 x 17,8 cm |
| Weight | 5,4 kg |
| Power supply | 220-240 V, 50 Hz, 1800 W |
| Body material | Brushed stainless steel |
| Plate material | Non-stick |
| Plate types | 2 grill plates + 2 griddle plates, interchangeable |
| Dishwasher compatibility | Plates, drip trays and spatula (top rack) |
| Opening | 180° with adjustable hinge |
| Maximum food thickness | 8 cm |
| Temperature settings | Grill/Panini/Sandwich: positions 1 to 5 (100°C to 200°C); Barbecue/Griddle: from 100°C to 230°C |
| Indicator lights | Red power and preheat indicator light |
| Included accessories | 2 drip trays, 1 grill spatula, 1 cleaning scraper |
| Cleaning | Plates, drip trays and spatula dishwasher safe; body with damp cloth and mild detergent |
| Safety | Heat-insulated handle, plate locking system, auto shut-off not specified |
| Repairability | Repairs reserved to manufacturer or after-sales service; cord replaceable only by professional |
Frequently Asked Questions - GR4E CUISINART
User questions about GR4E CUISINART
0 question about this device. Answer the ones you know or ask your own.
Ask a new question about this device
Download the instructions for your Multifunction Cooker in PDF format for free! Find your manual GR4E - CUISINART and take your electronic device back in hand. On this page are published all the documents necessary for the use of your device. GR4E by CUISINART.
USER MANUAL GR4E CUISINART
A. Assembling your appliance 13
B. Instructions for use 13
Grill option 13
Panini option 14
Barbecue option 14
Plancha option 14
Brunch sandwich option 14
Combined option 14
C. Table of cooking methods and times 15/16/17
- Advice from Chefs 18
- Questions/answers 18
- Cleaning and storage 19
- Safety instructions 19
INHALT
2. CHARACTERISTIQUES PRODUIT
5. QUESTIONS / REPONSES
You have just acquired a Cuisinart® multifunction grill and griddle. Constant research into improvements and the care taken in developing This product guarantee you a quality appliance. Easy to use and maintain, this appliance lets you create all kinds of simple and original preparations.
The multifunction grill and griddle has five different cooking methods: Grill, panini, barbecue, plancha and finally toasted sandwich. It will let you cook and grill food as varied as meat, fish, vegetables, fruits, pasta, eggs and toasted sandwiches. This appliance lets you grill or cook quickly without additional fat while collecting cooking juices in the cups provided.
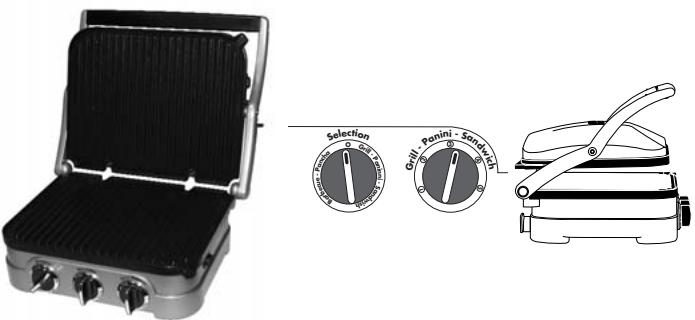
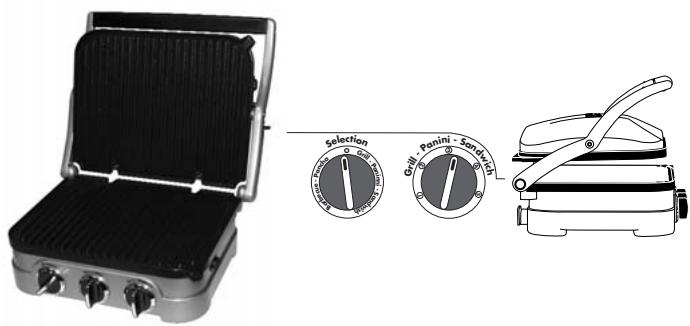
2. FEATURES
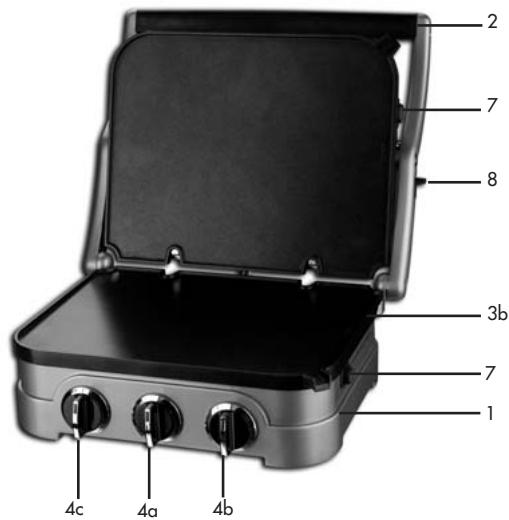
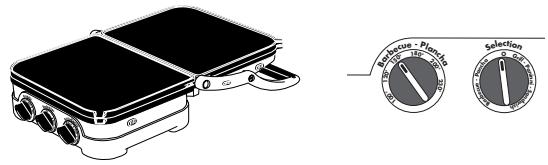
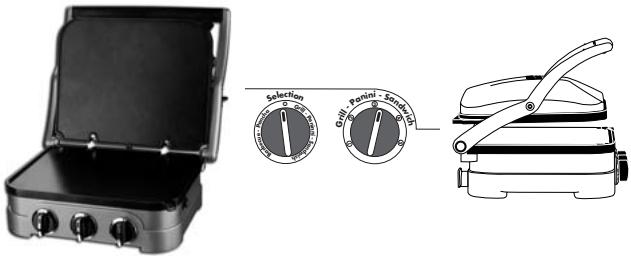
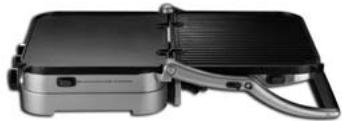
- Sturdy brushed stainless steel housing with floating hinges
- Cool touch press handle
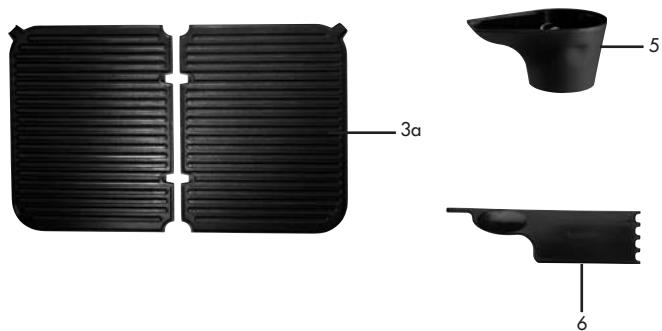
- Interchangeable cooking plates, non-stick and dishwasher-compatible for easy clean-up
3a. Grill plates: ideal for grilling meat, panini and vegetables
3b. Plancha plates: for cooking crêpes, eggs, thinly-sliced meat, toasted sandwiches, fish, shellfish. - Control knobs:
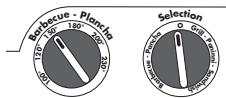
4a. Selector knob with red on/off and preheating indicator light: to select Grill - Panini - Sandwich or Barbecue-Plancha options
4b. Grill - Panini - Sandwich control knob with green indicator light to let you know the plates have reached the desired temperature: temperature settings from 1 to 5 (1. Keep warm (100^) ; 2. Reheat (120^) ; 3. Brown (140^) ; 4. Grill (160^) ; 5. Sear (200^))
4c. Barbecue - Plancha control knob with green indicator light to let you know the plates have reached the desired temperature: temperature settings from 100^ to 230^ . - Cups for collecting cooking juices, dishwasher compatible
- Special cleaning tool
- System to lock/unlock the plates
- Opens fully to 180^
3. USE
A. ASSEMBLING YOUR APPLIANCE
Before using your Cuisinart® multifunction grill and griddle for the first time, clean the housing, lid and control knobs of the appliance with a damp cloth. Wash the cooking plates, cooking juice cups and cleaning tool in warm soapy water or in the dishwasher. Read the section "Cleaning and Maintenance" for more information.
INSERTING THE COOKING PLATES
2 interchangeable cooking plates, non-stick and dishwasher compatible for easy clean-up:
Grill plates: ideal for grilling steaks, hamburgers, chicken and vegetables.

Plancha plates: for cooking crêpes, eggs and thinly-sliced meat
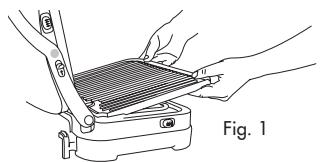
To install the plates, insert the plate into the notches at the rear of the appliance (Fig. 1).
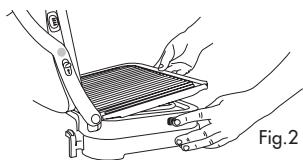
To remove the plates, release them by pressing the small button on the side of the appliance (Fig.2).
NOTE: Insert one plate at a time. The plates are intended for either the lower part ("LOWER"), or for the upper part ("UPPER").
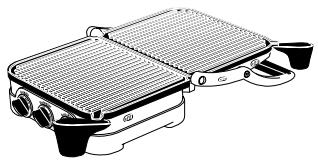
When using the grill and griddle in the closed position, only 1 drip cup is required. Place it directly beneath the drain while cooking. When using the grill and griddle in the open position, use both drip cups, place them on either side of the appliance below the drains. Plug the power cord in. The grill and griddle is ready for use.
B. INSTRUCTIONS FOR USE
NOTE: always place the grill and griddle on a flat, level surface.
KEEP THE LID IN THE CLOSED POSITION TO HEAT THE GRILL AND GRIDDLE
GRILL OPTION
- Insert the non-stick grill plates.
- Turn the Selection knob to Grill - Panini - Sandwich and the Grill - Panini - Sandwich knob to the desired cooking method (see table on pp. 15/16/17). When the appliance has preheated, the indicator light will go on.
- Once the appliance has preheated, place the food on the lower plate. The distance between the two cooking plates will adjust automatically to the thickness of the food (up to 8cm ).
- Close the grill and griddle and cook for the time recommended in the table.
PANINI OPTION
- Insert the non-stick grill plates.
- Turn the Selection knob to Grill - Panini - Sandwich and the Grill - Panini - Sandwich knob to the desired cooking method (see table on pp. 15/16/17). The indicator light will go on when the appliance has reached the desired temperature.
- Once the appliance has preheated, place the food on the lower plate. The distance between the two cooking plates will adjust automatically to the thickness of the food (up to 8 cm).
- Close the grill and griddle and cook for the time recommended in the table.
BARBECUE OPTION
- Insert the non-stick grill plates and open the grill and griddle fully by pulling the button on the side of the handle.
2 Turn the Selection knob to the Barbecue - Plancha position and the Barbecue - Plancha knob to the desired temperature. The indicator light will go on when the appliance has reached the desired temperature. - Once the appliance has preheated, distribute the food evenly on the plates and cook for the time recommended in the table (see pp. 15/16/17).
PLANCHA OPTION
- Insert the non-stick plancha plates and open the grill and griddle fully by pulling the button on the side of the handle.
- Turn the Selection knob to the Barbecue - Plancha position and the Barbecue - Plancha knob to the desired temperature (see table on pp.
15/16/17). The indicator light will go on when the appliance has reached the desired temperature.
- Once the appliance has preheated, place the food on the plates and cook for the time recommended in the table.
BRUNCH SANDWICH OPTION
- Insert the smooth, non-stick plates.
- Turn the Selection knob to the Grill - Panini - Sandwich position and the Grill - Panini - Sandwich knob to the desired cooking method. The indicator light will go on when the appliance has reached the desired temperature.
- Once the appliance has preheated, place the food on the lower plate. The distance between the two cooking plates will adjust automatically to the thickness of the food (up to 8 cm).
- Close the grill and cook for the time recommended in the table (See pp. 15/16/17).
COMBINED OPTION
- Insert one of each of the non-stick plates in the appliance and open the grill fully by pulling the button on the side of the handle.
- Turn the Selection knob to the Barbecue - Plancha position and the Barbecue - Plancha knob to the desired temperature (see table at pp 15/16/17). When the appliance has reached the desired temperature, the indicator light will go on.
- Once the appliance has preheated, place the food on the plates intended for the desired cooking method and cook for the time recommended in the table.

C. TABLE OF COOKING METHODS AND TIMES
The cooking times are for reference only and will vary depending on the amount of food being cooked or the size or thickness of the food!
| Meats | Selection | Method or temperature | Cooking time |
| 1 Kg ribs | Panini Grill | 4 | 15 minutes |
| Tournedos | Panini Grill | 4 | 5 minutes |
| Barbecue | 200° | 10 minutes | |
| Rump steak - Undercut | Panini Grill | 4 | 5 minutes |
| Barbecue | 200° | 10 minutes | |
| Rib steak - Faux filet | Panini Grill | 4 | 4 minutes |
| Barbecue | 200° | 10 minutes | |
| Steak haché | Panini Grill | 5 | 3 minutes |
| Barbecue | 200° | 8 minutes | |
| Beef brothette | Panini Grill | 4 | 6 minutes |
| Barbecue | 200° | 18 minutes | |
| Veal chop | Panini Grill | 4 | 6 minutes |
| Veal escalope | Barbecue | 220° | 8 minutes |
| Veal brothette | Barbecue | 200° | 18 minutes |
| Brochette of offal | Plancha | 200° | 18 minutes |
| Veal kidney | Panini Grill | 4 | 10 minutes (whole) |
| Barbecue | 200° | 15 minutes (sliced) | |
| Pork chops | Panini Grill | 4 | 6 to 7 minutes |
| Pork mignon | Panini Grill | 4 | 10 minutes (whole) |
| Sausage | Barbecue | 200° | 18 to 20 minutes |
| Black pudding, whole sliced | Barbecue | 180° | 20 minutes |
| Plancha | 200° | 5 minutes | |
| Andouillette | Panini Grill | 3 | 15 minutes |
| Pork brothette | Barbecue | 200° | 20 to 22 minutes |
| Lamb chop | Barbecue | 200° | 6 to 8 minutes |
| Slice off joint | Barbecue | 200° | 15 minutes |
| Panini grill | 4 | 5 minutes | |
| Merguez | Barbecue/Plancha | 200° | 10 minutes |
| Lamb brothette | Panini Grill | 4 | 5 minutes |
| Fillet of duck | Panini Grill | 3 | 10 minutes |
| Saddle of hare | Panini Grill | 3 | 18 minutes |
| Poultry breasts | Panini Grill | 4 | 5 minutes |
| Chicken thighs | Panini Grill | 4 | 15 minutes |
| Chicken brothette | Panini Grill | 4 | 4 minutes |
| Rashers of bacon | Plancha | 200° | 2 minutes |
| Frogs' legs | Plancha | 200° | 6 minutes |
| Panini Grill | 5 | 4 minutes |
| Fish | Selection | Method or temperature | Cooking time |
| Filet of sole | Barbecue/Plancha | 220° | 5 to 6 minutes |
| Filet of turbot | Barbecue/Plancha | 200° | 10 minutes |
| Whole sardine | Barbecue/Plancha | 200° | 6 minutes |
| Thickly-cut salmon steak | Plancha | 180° | 12 minutes |
| Small shrimp | Plancha | 200° | 5 minutes |
| Tuna steak | Barbecue/Plancha | 200° | 10 minutes |
| Grill/Panini | 4 | 5 minutes | |
| Whole mullet | Plancha | 200° | 12 minutes |
| Filet of St Pierre | Plancha | 200° | 6 minutes |
| Filet of monkfish | Plancha | 200° | 7 minutes |
| Grill/Panini | 4 | 5 minutes | |
| Scallops | Plancha | 200° | 4 minutes |
| Grill/Panini | 5 | 2 minutes | |
| White calamari | Plancha | 220° | 6 minutes |
| Large prawns | Plancha | 200° | 6 minutes |
| Whole fish | Grill/Panini | 4 | 15 to 20 minutes |
| Sea bass filet | Plancha | 200° | 8 minutes |
| Pikeperch filet | Plancha | 200° | 10 minutes |
| Whole trout | Plancha | 200° | 18 minutes |
| Grill/Panini | 4 | 10 minutes |
| Vegetables | Selection | Method or temperature | Cooking time |
| Mushrooms, small large | Barbecue/Plancha | 180° | 10 minutes |
| Grill/Panini | 4 | 5 minutes | |
| Tomato (half) | Barbecue/Plancha | 180° | 8 minutes |
| Courgette (half) | Barbecue/Plancha | 180° | 10 minutes |
| Grill/Panini | 4 | 8 minutes | |
| Aubergine (half) | Grill/Panini | 4 | 8 to 10 minutes |
| Pepper (half) | Barbecue/Planhca | 180° | 15 minutes |
| Grill/Panini | 4 | 6 minutes | |
| Blanched asparagus | Plancha | 200° | 8 minutes |
| Artichoke | Grill/Panini | 5 | 6 minutes |
| Fruit | Selection | Method or temperature | Cooking time |
| Apple (half) | Barbecue/Plancha | 180° | 15 minutes |
| Banana (whole with skin) | Panini Grill | 4 | 6 minutes |
| Pineapple (slice) | Panini Grill | 3 | 6 minutes |
| Sandwiches and miscellaneous | Selection | Method or temperature | Cooking time |
| Panini | Panini Grill | 5 | 5 to 6 minutes |
| Grilled sandwich | Sandwich | 4 | 4 to 5 minutes |
| Hamburger | Sandwich | 4 | 5 minutes |
| Brunch muffins | Sandwich | 4 | 5 minutes |
| Pancakes | Plancha | 200° | 5 minutes |
| Crèpes | Plancha | 200° | 5 minutes |
| Blinis | Plancha | 200° | 5 minutes |
| Fried egg | Plancha | 200° | 2 minutes |
| Scrambled eggs | Plancha | 200° | 4 minutes |
4. ADVICE FROM CHEFS
- To preserve the non-stick quality of the cooking plates, do not let them remain heated and not in use for too long and do not use abrasives to clean.
- Use wooden or heat-resistant plastic utensils to turn your food and avoid cutting it on the plates.
- Cut the food evenly to obtain even cooking.
- With practice, you will become accustomed to the cooking times and settings necessary to cook food to taste.
- Prepare spice-based marinades or condiments for your meat or fish; grilled foods will be fragrant and plancha-cooked foods more tender.
5. QUESTIONS/ANSWERS
| What do I do if: | Answers |
| My appliance releases smoke when I use it for the first time? | It is normal for your appliance to release some smoke when it is first used; try cleaning it with a damp cloth before turning it on. |
| My food does not cook? | Make sure the plug is properly plugged into the outlet, that you selected a cooking method, and that the appliance has preheated properly. |
| The grilled food doesn't sear, cooking is difficult? | Check the temperature selected or the cooking method for the food and make sure the appliance is properly preheated. |
| I have different kinds of food to cook? | Use the grill in the barbecue or in the combined option position and cook each kind of food on a different plate, this way the food flavours won't mix. |
| I have trouble inserting the plates into the appliance? | The plates with "lower" inscribed in them are inserted into the lower part and those with "upper" inscribed on them are inserted into the upper part by simply clipping them in place. |
| Some cooking juice ran onto the appliance housing? | After letting the appliance cool, wipe with a hot, damp cloth but do not run water over it. |
| It releases a lot of smoke when I cook? | Avoid using too much fat when cooking (e.g.: shrimp in olive oil), the fat facilitates release of smoke. Brush a little fat/oil over your dry food. |
6. CLEANING AND STORAGE
When you have finished cooking, turn the button to "O" and unplug the appliance. Allow the appliance to cool completely (minimum 1/2 hour) before cleaning it.
- Use the cleaning tool to remove food residues that remain on the cooking plates.
- Discard fat that has run into the drip cup(s).
- Remove the plates from the appliance by pressing the ejection buttons. The cleaning tool, drip cups and plates can be washed in hot, soapy water or in the dishwasher (upper rack only).
- Do not use metal objects such as a knife or fork, or abrasive sponges or cleaning products that could damage the coating.
- If you grilled fish or shellfish on the plates, rub a little lemon juice on them with a cloth, this will prevent the characteristic odour from remaining on the plates the next time you use them.
- To clean the housing, lid and handle of the appliance, use a damp cloth and a little soft detergent. Do not use abrasive sponges or products.
- Cleaning the appliance regularly prevents substantial build-up. The multifunction grill and griddle remains easy to clean and it will continue to perform properly.
- The appliance can be left on your work surface when not in use. Insert one set of plates into the appliance and store the other set with the drip cups and the cleaning tool.
7. SAFETY INSTRUCTIONS
- Do not touch the appliance while in use, use oven or protective gloves.
- Do not place the appliance on or near a hot appliance. Do not use on heat sensitive surfaces or near inflammable materials.
- Do not put anything on the grill when it is on.
- Leave enough space between the grill and the walls or furniture. Do not place the grill below wall-mounted kitchen elements.
- Do not let cord hang over the edge of the work surface and do not let it touch hot surfaces.
- Do not immerse in water or any other liquid.
- Always unplug the appliance after use and before cleaning. Never leave the appliance unattended when plugged in. Pull on the plug to unplug, never on the cord.
- Close supervision is necessary when the appliance is being used near
children. Store out of reach of children. Do not let children use the grill.
- Do not use the appliance if it has fallen or if it appears damaged.
- Stop using the machine immediately if the cord is damaged. If the supply cord is damaged, it must be replaced by the manufacturer, its service agent or similarly qualified persons in order to avoid a hazard.
- Do not try to repair the appliance yourself.
- Using any accessories not recommended or sold by Cuisinart® may cause a fire, electrocution and risk of injury.
- This appliance meets the essential requirements of Directives 89/336/EEC (electromagnetic compatibility) and 73/23/EEC (safety of domestic electrical equipment), as amended by Directive 93/68/EEC (CE marking).
- Use this appliance for cooking only and follow the instructions in this manual.
- Do not use outdoors in bad weather.
- For household use only.

Discarding electrical and electronic equipment at the end of life In everyone's interest and to actively participate in the collective effort to protect the environment:
- Use the return and collection systems available in your area.
Some material can be recycled or recovered.