SIDEMOUNT - SEAC - Free user manual and instructions
Find the device manual for free SIDEMOUNT SEAC in PDF.


| Product type | Sidemount stabilizer vest |
| Brand | SEAC |
| Model | SIDEMOUNT |
| Reference standard | EN 1809 |
| Use | Scuba diving in sidemount configuration |
| Cylinder compatibility | Single cylinders up to 15 liters (220 mm diameter) |
| Connection | Low-pressure hose on the regulator first stage |
| Inflator | Ergonomic with inflation and deflation buttons |
| Oral inflation | Yes, via the mouthpiece |
| Overpressure valve | Yes, with integrated quick dump |
| Power supply | None (pneumatic equipment) |
| Maintenance | Complete rinsing (inside and outside) with fresh water after each dive |
| Storage | Partially inflated, in a cool and ventilated place |
| Safety | This is not a life jacket; does not guarantee head-out-of-water buoyancy |
| Required training | Sidemount diving certification issued by qualified instructors |
| Repairability | Repairs by a SEAC approved center |
| General information | Stabilizer vest designed for technical diving |
Frequently Asked Questions - SIDEMOUNT SEAC
User questions about SIDEMOUNT SEAC
0 question about this device. Answer the ones you know or ask your own.
Ask a new question about this device
Download the instructions for your in PDF format for free! Find your manual SIDEMOUNT - SEAC and take your electronic device back in hand. On this page are published all the documents necessary for the use of your device. SIDEMOUNT by SEAC.
USER MANUAL SIDEMOUNT SEAC
seac
Italiano 3
English 13
Français 23
Español 33
Deutsch 43

MANUALE D'ISTRUZIONI JACKET-SIDEMOUNT
FIG. 2
FIG. 3
4 Italiano
ATTENZIONE
FIG. 4
ATTENZIONE
FIG. 2
FIG. 3
FIG. 4
- VESTIZIONE
FIG. 1
FIG. 2
FIG. 3
FIG. 4
seac
• ASSEMBLAGGIO BOMBOLE:
MODALITÀ DI CONTROLLO PRIMA DELL'IMMERSIONE
SIDEMOUNT BC INSTRUCTIONS
Congratulations on having chosen the quality and reliability of a SEAC product. The equipment you have purchased was made with selected and tested materials. Development and constant research allow us to evolve continually.
Innovative production processes, constant controls and testing, as well as testing under real conditions as conducted in our research centre, guarantee the reliability that all SEAC products are known for.
GENERAL WARNINGS
WARNING
Carefully read the instruction manual before use and keep the manual for the life of the product.
⚠ WARNING
Before using the Sidemount BC or any other product for underwater diving, you should attend a course held by qualified instructors and obtain the relevant diving certificate. Use of diving equipment by people without a diving certificate is dangerous, and can cause serious, or even fatal, accidents for the diver and his/her companions.
- During assembly and tuning of the BC, every step was taken to ensure high reliability of the product over a period of time.
- However, these measures can be rendered ineffective if the product is not used correctly and if adequate maintenance is not performed.
- SEAC denies all responsibility for any problem resulting from a failure to observe the recommendations provided in this manual.
REFERENCES TO EN 1809 - OBJECT - DEFINITIONS - LIMITS
- OBJECT: The EN 1809 standard examines the minimum safety requirements and the performance of inflatable SIDEMOUNT buoyancy compensator vests.
- BUOYANCY COMPENSATOR VEST - Definition (EN 1809): A device allowing the diver to control his/her buoyancy during the dive.
- LIMITATIONS: The object of the EN 1809 Standard does not cover the requirements for floating devices or safety jackets. A SIDEMOUNT buoyancy compensator vest is not intended to guarantee, on the surface, a head-up position to an unconscious or a temporarily disabled diver.
In order to ensure maximum attention to safety, a label is sewn onto the BC with the following text:
This Sidemount BC vest is not a life vest, and does not guarantee that the diver will float on the surface with his or her face out of the water.
Before using this BC, divers must attend a course held by qualified instructors and obtain the relevant diving certificate for dives with Sidemount. The use of diving equipment by non-certified divers is dangerous and can lead to serious accidents, or even death, to the diver and his/her dive buddies.
This BC can be mounted on a single tank set up to 15 liters (diam. 220 mm). Read the attached Instruction Manual carefully. Check that the Sidemount BC operates correctly before every use. Carefully check that there are no air leaks and make sure that all components function correctly. Connect the LP hose on the Sidemount BC to a low pressure port on the regulator first stage while the regulator is not connected to the tank. If high pressure is introduced into the hose, it can cause ruptures and serious accidents.
After each dive, including dives in a pool, the Sidemount BC must be rinsed inside and out with fresh water. Store the BC partially inflated in a cool, ventilated location. A lack of maintenance can cause damage to the Sidemount BC and compromise its proper operation. The back side of the label shows the various buoyancy lift levels in kilograms and Newton.
seac
WARNING
The instructions in this handbook must be integrated with instructions for other component parts of your SCUBA equipment (assembled tank unit). Before using your assembled tank unit, carefully read all the instructions contained in the corresponding handbook.
TECHNICAL CHARACTERISTICS
• CONNECTING TO THE FIRST STAGE
Connect the Sidemount BC hose to a low pressure port on the regulator first stage.
WARNING
Be very careful to connect to the hose to a low pressure port. Connecting to high pressure can cause serious harm to people and can damage the equipment.
• INFLATOR UNIT
The Seac inflator unit was designed and manufactured to ensure quick and precise regulation of buoyancy in the water. Its ergonomic shape ensures manageability and practicality.
Its two buttons - inflation and deflation - are different shapes and in different positions, making it easy to identify the correct button and leaving no room for error. It also makes it unnecessary for the diver to look at the inflator unit.

FIG. 1
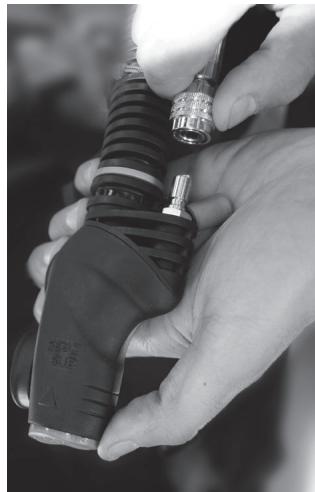
FIG. 2
Connect the quick coupler on the hose to the inflator unit (fig. 2).
Conduct this operation before you pressurize the first stage. This will make it easier to insert the quick coupler.
- BC INFLATION
To inflate your BC, simply press the C button (fig. 1).
The flow of air should stop as soon as you release the inflation button. If this does not happen, do not use the BC, and contact an authorized SEAC repair shop.
- BC DEFLATION
The air can be deflated using the inflator unit by pressing the E button (fig. 3).
• BC ORAL INFLATION
Your Sidemount BC can be inflated orally using the mouthpiece, C (fig. 1), on the inflator unit as follows:
1) Put the mouthpiece in your mouth.
2) Press the deflation button while blowing into the mouthpiece.
3) Release the deflation button.
4) Repeat as necessary to reach the desired level of inflation.

FIG. 3
WARNING
Your Sidemount BC should never be used as a source of breathable air.
Do not breath air through the inflator unit mouthpiece.
OVER-EXPANSION RELIEF/QUICK AIR DUMP VALVE
Your Sidemount BC features an over-expansion relief valve (fig. 4).
The valve automatically releases air from the Sidemount BC when the internal pressure exceeds the external pressure by a preset amount.
This valve is provided in order to prevent accidental over-expansion in the Sidemount BC, which can result in damage to the product.
This valve also operates as a quick air dump, by pulling the knob on the cord.
The EN 1809:2014 standard calls for the over-expansion relief valve to be placed on the upper section of the inflatable bag. Certain models are arranged so they can be configured this way, with the option to move the over-expansion relief valve and/or the inflator to the upper position of the Jacket-Sidemount.

FIG. 4
WARNING
If micro-bubbles leak from the Sidemount BC, this does not indicate that it is losing pressure; instead this could be air that was trapped in spaces between the fabric fibers.
TRIM POCKETS
The SEAC Sidemount BCs offer additional high-capacity pockets located under the backrest that have been specially designed to hold integrated weight.
WARNING
Carefully read the instructions provided below, because they are vital for your safety and the lasting performance of your equipment.
INSTRUCTIONS FOR USE
The purpose of a Sidemount BC is to make diving more comfortable by allowing the diver to maintain neutral buoyancy.
Before using your Sidemount BC in the ocean, you should test it in the pool, using the equipment you would use for an open water dive.
First of all, adjust the cummerbund and shoulder straps to fit your body shape. Correct adjustment helps ensure optimal comfort and stability.
• PRE-DIVE INSPECTION
1) Check that all connectors and valves are firmly secured, with the locking rings fully tightened.
2) Make sure that the straps fastening the tank are firmly fastened.
3) Fully inflate the Sidemount BC and wait about 15 minutes. If the Sidemount BC deflates, do not use it, and contact an authorized SEAC repair shop.
4) Check all the inflation and deflation functions of the inflator unit a few times. Carefully check the correct operation of the oral inflation system using the mouthpiece.
5) Carefully check that the over-expansion/quick air dump valve is functioning correctly.
6) Never leave the Sidemount BC in the sun, and do not lay it on sharp or rough surfaces that could damage it.
seac
• ADJUSTING BELTED SHOULDER STRAPS
The shoulder straps on the BC have been designed to be adjustable to two different positions: upper adjustment, backpack area (A), and direct adjustment, shoulder strap area (B).
• ADJUSTMENT SEQUENCE
Fig. 1: Move aside the two edges of the neoprene hose (Fig. 1) and let out the ends of the adjusting belt (Fig. 2).
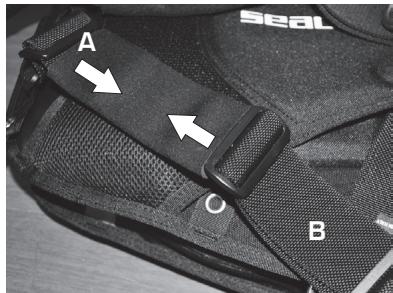
FIG. 1
Fig. 2: Adjust the belt to the desired length by sliding it through the plastic triglide buckle (C and D).

FIG. 2
Fig. 3: Adjust the D-Ring (E) to the desired position and adjust the belt through the plastic triglide buckle.

FIG. 3
Fig. 4: Move the neoprene hose back to its original position.

FIG. 4
• DONNING
- Put on the shoulder straps. We suggest that you put your left arm through first, being careful not to become entangled in the corrugated hose and LP hose.
- Firmly close the steel buckle on the cummerbund strap.
- Adjust the shoulder straps.
- Fasten the chest straps, if provided.
- Adjust the crotch strap buckle.
• TANK BUCKLE CLOSURE SEQUENCE
Fig. 1: Following the arrows, insert the end of the strap from the inside of the buckle outward (between the sewn bracket and the moving section) and pass it through slot 1.

FIG. 1
Fig. 2: Pass the end of the strap through loop 2. Pull firmly on the strap in the direction shown so that it holds snug against the tank.

FIG. 2
Fig. 3: Keep the strap taut while threading the end through slot 3. Pull firmly and let the buckle overturn.

FIG. 3
Fig. 4: The buckle will close with a sharp click, holding the backpack to the tank. Fasten the excess strap to the special Velcro fabric.

FIG. 4
seac
• ASSEMBLING THE TANKS:
To assembly the Sidemount BC tanks correctly, follow the diagrams provided below.

1) Tank
2) Tank strap
3) Metal carabiner with elastic and triglide (optional)
4) Elastic with metal carabiners
5) Sidemount BC
6) Fixed steel ring
7) Adjustable steel ring
• ASSEMBLING THE TANKS TO THE SIDEMOUNT:

1) Position the strap on the tank and fasten.
2) Clip metal carabiner 1 to adjustable ring 2 located on the cummerbund strap.
3) Unhook carabiner 3. Thread the elastic around neck of the tank and under the valves. Hook the carabiner to the ring on the end of the elastic.
4) Repeat the same steps for the second tank.
- CONFIGURATION ASSEMBLING THE TANKS TO THE SIDEMOUNT:

PRE-DIVE INSPECTION
- Check that all connectors and valves are firmly secured, with the locking rings fully tightened.
- Make sure that the tank and backpack are properly connected.
- Fully inflate the Sidemount BC and wait about 15 minutes. If the BC deflates, do not use it, and contact an authorized SEAC repair shop.
- Try all the inflation and deflation functions of the inflator unit a few times. Carefully check the correct operation of the oral inflation system using the mouthpiece.
- Carefully check that the over-expansion/quick air dump valve is functioning correctly.
- Never leave the Sidemount BC in the sun, and do not lay it on sharp or rough surfaces that could damage it.
DONNING
- Put on the shoulder straps. We suggest that you put your left arm through first, being careful not to become entangled in the corrugated hose and LP hose.
- Adjust the chest straps and firmly close the metal buckle.
- Adjust the sliding shoulder straps by pulling both straps at the same.
- Fasten the chest straps, if provided.
- Adjust the crotch strap buckle, threading it through the cummerbund strap.
⚠ WARNING
Your Sidemount BC is not a safety jacket or personal floatation device and is not designed to keep a diver on the surface in a head-up position should he/she become unconscious.
OPERATION
• ON THE SURFACE
To increase support on the surface, we suggest you blow up the Sidemount BC with the inflation button to increase your positive lift.
• DURING DIVE
Grip the inflator unit and press the deflation button. With this operation you'll trigger the gradual deflation button allowing the air to discharge.
You can also use the quick dump valve by pulling the inflator unit downward. The air will exit the valve rapidly. Once you have started your descent your speed will begin to increase. Compensate for this with quick presses on the inflator button.
• NEUTRAL BUOYANCY
When you reach your desired depth, adding and/or releasing the right amount of air in the Sidemount BC will allow you to achieve a comfortable neutral buoyancy.
- ASCENT
During your ascent, the air in your Sidemount BC will expand, causing an increase in positive lift and a consequent increase in speed. You can control your buoyancy by pressing lightly on the deflation button. If necessary you can use the inflator unit to limit and control the speed of your ascent.
PRE-DIVE INSPECTION
⚠ WARNING
During the ascent, it is crucial that the diver regulate hydrostatic balance to avoid ascending too quickly. Consult your instructor or dive manual for further information about a safe speed of ascent. Always abide by the standards dictated by your dive computer or decompression tables during all stages of the dive.
⚠ WARNING
We recommend that you use the Sidemount BC only as a compensator for your buoyancy. Using the Sidemount BC to lift heavy objects from the seabed can be extremely dangerous and lead to uncontrolled ascents that can result in serious accidents for the diver and his or her buddies.
MAINTENANCE
The following instructions are vital to keep your Sidemount BC operating perfectly:
- After every dive, both in the ocean or in the pool, always rinse the BC inside and out with fresh water, and make sure you have cleared out any remaining water using the over-expansion relief valve.
- Never store the Sidemount BC with other equipment or objects that are sharp and could puncture the buoyancy bag.
- Do not store the Sidemount BC wet or folded; always allow it to dry fully. Carefully wash the inside, drain out the water, and when the BC is completely dry store it in a cool, ventilated place.
- At the end of each dive, always replace the protective cap on the quick coupling after having disconnected the hose.
- Avoid leaving the Sidemount BC exposed to the sun for long periods.
- Carefully rinse all the inflation and deflation mechanisms with fresh water.
To clean the inside of the BC, proceed as follows:
- Unscrew the over-expansion relief valve and add fresh water (about 1/4 the volume of the BC).
- Replace the over-expansion relief valve.
- Inflate the BC, turning it upside down and shaking side to side to circulate the water around inside.
- Turn the bag so the corrugated hose points downward and press the inflation button. This will empty all the water through the mouthpiece.
⚠ WARNING
In cleaning the Sidemount BC, do not use any type of solvents or cleaning products.
USE OF THE SIDEMOUNT BCs WITH OXYGEN-RICH MIXTURES
WARNING
This product was designed and created for use with compressed atmospheric air or Nitrox blends up to a maximum percentage of 40% oxygen content.
The use of blends with an oxygen percentage greater than 40% and/or made with other gases (such as added helium), can cause damage or deterioration in the BC and compromise its proper operation.
WARNING
Do not use any SEAC Sidemount BC with oxygen rich mixtures (Nitrox - Maximum oxygen content: 40%) without having first received adequate training on their use: Failure to observe this warning may result in a serious accident.
WARNING
Do not use this SEAC Sidemount BC with other gases or with oxygen-rich mixtures. SEAC BCs are designed only for use with compressed atmospheric air. Failure to observe this warning may result in premature wear of the equipment, defective operation, or risk of explosion, resulting in potentially serious damage.
CERTIFICATE OF GUARANTEE
SEACSUB S.p.A. guarantees the correct operation of this product as described in this document.
The warranty has a duration of 2 (two) years in accordance with current European regulations.
The warranty herein can be exercised according to the conditions and limits expressly indicated below:
- The warranty has a duration of 2 (two) years starting from the time the product is purchased at a SEAC authorized dealer and requires no prior or subsequent formal validation.
-
The warranty is acknowledged only to the original buyer of the product at a SEAC authorized dealer.
The warranty is strictly personal, and cannot be transferred to a third party without express advance authorization from SEAC. -
The warranty covers all, and only, malfunctions due to:
-
Materials found to be unsuitable.
• Evident design errors. - Fabrication or assembly of the product or its parts.
-
Incorrect or inadequate instructions and recommendations for use.
-
The warranty terminates automatically, and with immediate effect, following any repairs, modifications, transformations, adjustments or tampering in general, carried out on the finished product or parts of it, that were not authorized in advance by SEAC or were carried out by non-authorized personnel.
-
The warranty entitles you to intervention and free repair in the shortest possible time, or to a full free replacement of the product (at the sole discretion of SEAC) or parts of it whenever a malfunctioning defect specifically described in item 3 above is acknowledged by SEAC.
- This warranty may also be exercised by shipping the product believed to be defective to SEAC.
The authorized intermediary for this operation must be the SEAC dealer where the product was purchased.
If this proves effectively impossible, SEAC may authorize any other SEAC dealer to forward the defective product. In order to exercise the warranty, the product must be accompanied by proof of purchase in the form of a copy of the receipt or invoice (or other equivalent fiscal record showing the name of the authorized SEAC dealer from which the product was purchased as well as the date of purchase).
If SEAC receives a product that:
- is not accompanied by proof of purchase having the above mentioned characteristics;
- is in such condition as to determine the termination of the warranty in accordance with the provisions of item 4 above;
- has defects resulting from external causes outside those specifically mentioned under item 3 above
- has been used improperly and/or for uses other than those for which the product was designed; SEAC will abstain from conducting any operations on the product, and will immediately notify the sender or authorized dealer.
If the sender still wishes an inspection to be performed, the sender will forward a request to SEAC within the subsequent fifteen working days; in this request he/she must expressly state that he/she is willing to bear all the costs relevant to said inspection (labor, spare parts, if any, forwarding charges).
Otherwise, SEAC will return the product at the recipient's expense.
TECHNICAL INFORMATION
| MODEL: KSO1 | |
| TYPE: | Sidemount |
| CERTIFICATION: | CE 0474 RINA - EN 1809 |
| INFLATOR UNIT: | Piston inflator with technopolymer buttons. |
| BAG TYPE: | Three-dimensional aircell |
| BUOYANCY BAG MATERIAL: | Cordura 500 Den PU |
| SEALING: | High frequency |
| BACKPACK: | No |
| HARNESS SYSTEM: | Independent strap harness with adjustable shoulder straps. |
| DUMP VALVES: | 1 over-expansion relief, mechanical |
| POCKETS: | No |
| INTEGRATED WEIGHT SYSTEM: | 2 pockets with velcro closure (Max 2 kg per pocket.) + 1 Pocket with zip (Max 2 kg) |
| D-RING: | 10 stainless steel rings, 50-mm |
| TRIM WEIGHT: | Optional |
| WEIGHT (KG): | One size: 2.0 Kg |
TECHNICAL INFORMATION
| MODEL: KS10 | |
| TYPE: | Sidemount |
| CERTIFICATION: | CE O474 RINA - EN 1809 |
| INFLATOR UNIT: | Piston inflator with technopolymer buttons. |
| BAG TYPE: | Traditional Aircell |
| BUOYANCY BAG MATERIAL: | Polyurethane |
| SEALING: | High frequency |
| BACKPACK: | No |
| HARNESS SYSTEM: | Independent strap harness with adjustable shoulder straps. |
| DUMP VALVES: | 1 over-expansion relief, mechanical |
| POCKETS: | No |
| INTEGRATED WEIGHT SYSTEM: | 1 pocket with velcro closure (Max 4 kg) + 1 pocket with zip closure (Max 2 Kg) |
| D-RING: | 7 stainless steel rings, 50 mm, + 2 stainless steel knobs, 70 mm. |
| TRIM WEIGHT: | Optional |
| WEIGHT (KG): | One size: 2.3 Kg |
| BUOYANCY LIFT: | ||
| MODEL: | KS01 | KS10 |
| SIZE: | ONE SIZE (from XS to XXL) | ONE SIZE (from XS to XXL) |
| KG | 12.2 | 11.0 |
| NEWTON | 120 | 108 |
| POUNDS | 26.9 | 24.2 |
GILET STABILISATEUR SIDEMOUNT - INSTRUCTIONS
FIG. 2
FIG. 3
⚠ AVERTISSEMENT
FIG. 4
AVERTISSEMENT
FIG. 2
FIG. 3
FIG. 4
- MISE EN PLACE
FIG. 1
FIG. 2
FIG. 3
FIG. 4
seac
INSPECTION AVANT LA PLONGÉE
FIG. 2

FIG. 3
ADVERTENCIA
FIG. 4
ADVERTENCIA
FIG. 2
FIG. 3
FIG. 4
• CÓMO PONERSE EL CHALECO
FIG. 1
FIG. 2
FIG. 3
FIG. 4
seac
• MONTAJE DE LAS BOTELLAS:
ABB. 2

ABB. 3
⚠️ WARNING
ABB. 4
⚠️ WARNING
Abb. 2
Abb. 3
Abb. 4
• ANZIEHEN
ABB. 1
ABB. 2
ABB. 3
ABB. 4
seac
• MONTAGE DER TANKS:
- SEAC
- MANUALE D'ISTRUZIONI JACKET-SIDEMOUNT
- ITALIANO
- ATTENZIONE
- VESTIZIONE
- ASSEMBLAGGIO BOMBOLE
- MODALITÀ DI CONTROLLO PRIMA DELL'IMMERSIONE
- SIDEMOUNT BC INSTRUCTIONS
- GENERAL WARNINGS
- WARNING
- ⚠ WARNING
- REFERENCES TO EN 1809 - OBJECT - DEFINITIONS - LIMITS
- TECHNICAL CHARACTERISTICS
- CONNECTING TO THE FIRST STAGE
- INFLATOR UNIT
- BC INFLATION
- BC DEFLATION
- BC ORAL INFLATION
- OVER-EXPANSION RELIEF/QUICK AIR DUMP VALVE
- TRIM POCKETS
- INSTRUCTIONS FOR USE
- PRE-DIVE INSPECTION
- ADJUSTING BELTED SHOULDER STRAPS
- ADJUSTMENT SEQUENCE
- DONNING
- TANK BUCKLE CLOSURE SEQUENCE
- ASSEMBLING THE TANKS
- OPERATION
- ON THE SURFACE
- DURING DIVE
- NEUTRAL BUOYANCY
- ASCENT
- MAINTENANCE
- USE OF THE SIDEMOUNT BCS WITH OXYGEN-RICH MIXTURES
- CERTIFICATE OF GUARANTEE
- GILET STABILISATEUR SIDEMOUNT - INSTRUCTIONS
- ⚠ AVERTISSEMENT
- AVERTISSEMENT
- MISE EN PLACE
- INSPECTION AVANT LA PLONGÉE
- ADVERTENCIA
- CÓMO PONERSE EL CHALECO
- MONTAJE DE LAS BOTELLAS
- ⚠️ WARNING
- ANZIEHEN
- MONTAGE DER TANKS
Brand : SEAC
Model : SIDEMOUNT