
TD 550 - Turntable THORENS - Free user manual and instructions
Find the device manual for free TD 550 THORENS in PDF.
| Product type | Turntable |
| Brand | THORENS |
| Model | TD 550 |
| Operation | Manual |
| Drive | External belt |
| Motor | Electronically regulated AC synchronous |
| Platter | 12" (30.48 cm) aluminum, 6.2 kg |
| Speeds | 33 1/3 and 45 rpm |
| Fine speed adjustment | Yes, via precision screws at the rear |
| Audio outputs | Unbalanced RCA and balanced XLR |
| Ground terminal | Yes |
| Power supply | External power supply 230/115 V, 50/60 Hz |
| Dimensions (W × H × D) | 532 × 183 × 421 mm |
| Weight | 22.0 kg |
| Dust cover | Yes, plexiglass |
| Included accessories | Belt, felt mat, bubble level, tracking force gauge, 17 cm adapter, RCA and XLR cables, ground cable |
| Tonearm adjustments | VTA, azimuth, offset angle, tracking force, antiskating |
| Maintenance | Clean with a soft damp cloth; replace belt every 2 years; lubricate pulley every 5 years |
| Safety | Do not expose to rain or moisture; do not open power supply; use transport screws for moving |
| Made in | Germany |
| Warranty | Contact dealer |
Frequently Asked Questions - TD 550 THORENS
User questions about TD 550 THORENS
0 question about this device. Answer the ones you know or ask your own.
Ask a new question about this device
Download the instructions for your Turntable in PDF format for free! Find your manual TD 550 - THORENS and take your electronic device back in hand. On this page are published all the documents necessary for the use of your device. TD 550 by THORENS.
USER MANUAL TD 550 THORENS
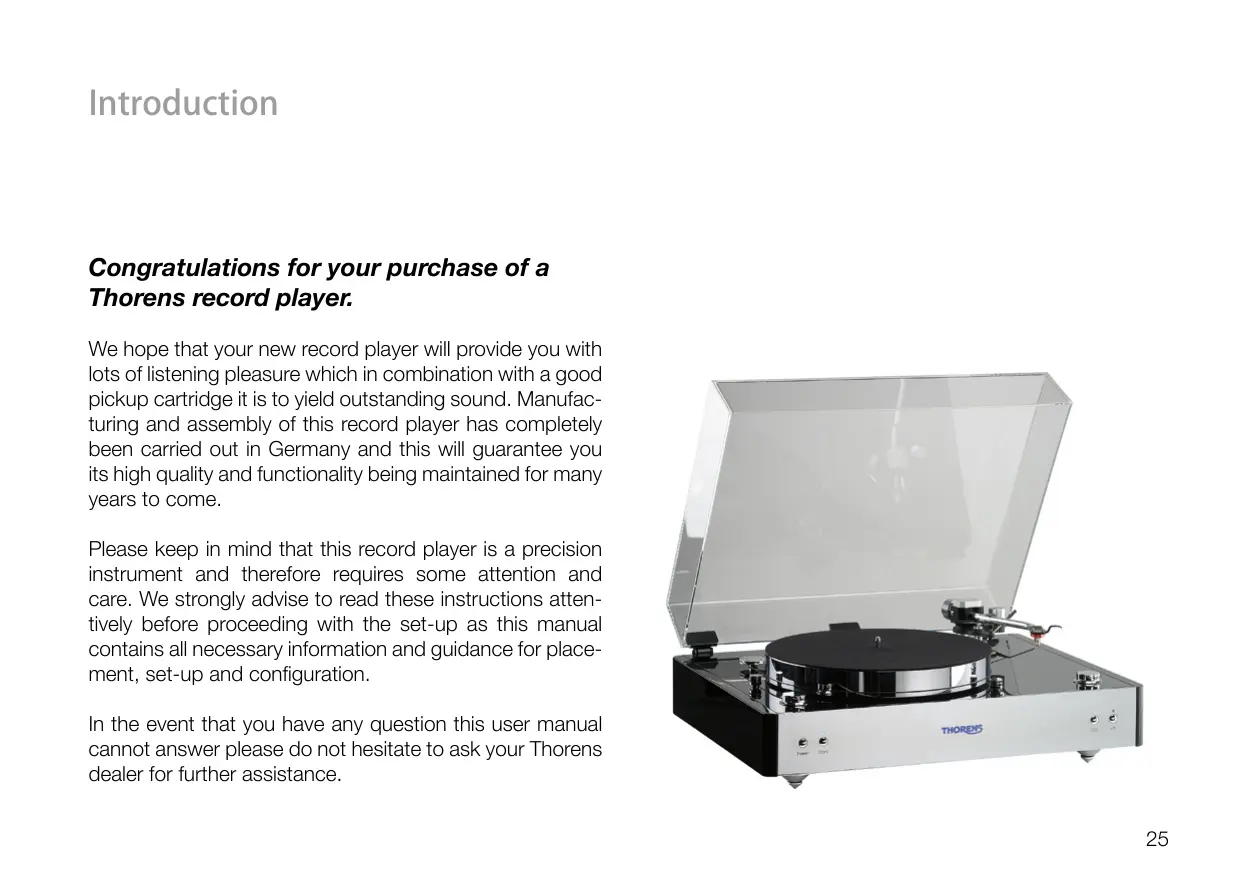
Congratulations for your purchase of a Thorens record player.
We hope that your new record player will provide you with lots of listening pleasure which in combination with a good pickup cartridge it is to yield outstanding sound. Manufacturing and assembly of this record player has completely been carried out in Germany and this will guarantee you its high quality and functionality being maintained for many years to come.
Please keep in mind that this record player is a precision instrument and therefore requires some attention and care. We strongly advise to read these instructions attentively before proceeding with the set-up as this manual contains all necessary information and guidance for placement, set-up and configuration.
In the event that you have any question this user manual cannot answer please do not hesitate to ask your Thorens dealer for further assistance.

Safety instructions
To reduce risk of electric shock, do not remove the cover (or back). No user-serviceable parts inside.
WARNING
TO PREVENT FIRE OR SHOCK HAZARD, DO NOT EXPOSE THIS APPLIANCE TO RAIN OR MOISTURE.

EXPLANATION OF GRAPHICAL SYMBOLS
The lightning flash with arrowhead symbol, within an equilateral triangle, is intended to alert you to the presence of uninsulated 'dangerous voltage' within the product's enclosure that may be of sufficient magnitude to constitute an electric shock to persons.
The exclamation point within an equilateral triangle is intended to alert you to the presence of important operating and maintenance (servicing) instructions in the literature accompanying the appliance.

This product was tested and complies with all the requirements for the CE Mark.
Compliant to 2002/95/EC (RoHS)

IMPORTANT: DISPOSAL OF WASTE EQUIPMENT BY USERS IN PRIVATE HOUSEHOLDS IN THE EUROPEAN UNION
This symbol on the product or on its packaging indicates that this product must not be disposed off with your other household waste. Instead, it is your responsibility to dispose of your waste equipment by handing it over to a designated collection point for the recycling of waste electrical and electronic equipment. The separate collection and recycling of your waste equipment at the time of disposal will help to conserve natural resources and ensure that it is recycled in a manner that protects human health and the environment. For more information about where you can drop off your waste equipment for recycling, please contact your local city office, your household waste disposal service or the shop where you purchased the product.
Connections and operational elements

Fig. 1
(1) On/Off switch
(2) Start-up button with LED indicator
(3) Illuminated Thorens-logo shows unit switched on
(4) Speed selector 33 rpm
(5) Speed selector 45 rpm
(6) RCA output connector right channel
(7) RCA output connector left channel
(8) Ground post
(9) XLR output connector right channel
(10) XLR output connector left channel
(11) Speed fine-adjust 33 rpm
(12) Dimmer (brightness) for display / LED
(13) Speed fine-adjust 45 rpm
(14) Receptacle for power supply
The following pin assignment is valid for balanced XLR connectors in this unit: (1) Ground, (2) Plus, (3) Minus
Mounting and set-up
Carefully remove the unit and its accessories from the packaging.
Supplied items: 1 x plinth (with/without tonearm)
1 x Thorens drive belt
1 x platter
1 x felt mat
1 x power supply with power cord
1 x ground lead
1 x set of RCA interconnecting leads
1 x acrylic dust cover
1 x sprint level (bubble)
1 x tonearm balancing gauge
1 x Allen-key SW3
3 x thumb screws for adjusting
1 x adaptor for single records
For the record player's mounting and set-up it is important to observe the following instructions.
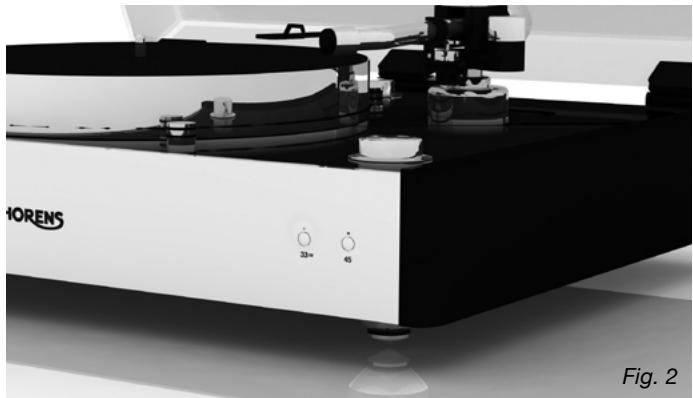
Put the plinth of the TD 550 onto a level surface as close as possible to your audio amplifier. You may verify its level position with the help of the supplied spirit level (bubble). By means of the three large thumb screws (Fig. 2) on top of the plinth the unit feet can be adjusted in height.
Continue by detaching the locking screws which have been factory-installed for safe transportation. Make sure the suspended chassis is freely oscillating after having removed the screws. IMPORTANT: it is highly recommended to save the locking screws and re-install them in case the record player needs to be transported again.
Now take the platter with both hands and hold its axle perpendicular over the hole in the bearing. Slowly and very carefully insert the axle into the bearing while making sure that it must not forcefully hit the bottom plate of the bearing.
After the platter has been put in place turn it manually to see if it runs smoothly and with ease. Take the belt from the packaging and carefully loop it around the outer rim of platter and motor pulley. Please check if the belt sits straight on platter and pulley and is not twisted.
Avoid any oil or greasy substance to get onto belt and the transmission area of platter and motor pulley. If necessary you may clean them with a lint-free tissue soaked in an alcoholic dilution (e.g. ethanol).
Put felt mat on platter. It is soft and will protect your records from damages that may occur during playback. If the felt mat is to stick against the record owing to static charges, you may discharge the record before playback by running a carbon fibre brush across. For best result this brush should be connected to ground by a lead. Frequently cleaning the records with a dedicated cleaning machine can also remedy static charges.
Take the three screws for adjusting the suspended chassis from the packaging and insert them into the prepared openings (Fig. 2) on top of the plinth. For sonic reason these screws cannot be firmly fixed.
With the help of the supplied spirit level you can now check if the suspended chassis also is in a perfectly horizontal level. If necessary, you can re-adjust by the three screws. Please take into consideration to adapt adjustments if a particularly heavy record weight is to be employed. After having achieved a perfect level the suspended chassis should be freely oscillating and should be precisely flush with respect to the plinth's top plate.
Connecting the record player
Insert the output lead of the power supply into the receptacle (14) at the rear panel of the TD 550. By means of the supplied power cord connect the IEC input at power supply with mains wall outlet.
ATTENTION: Never try to feed 230V mains voltage into the receptacle (14), as this will definitely destroy the electronic circuitry inside.
Press Power button (1) whereupon the blue-illuminated Thorens-logo (3) in the centre of the front panel and one of the speed-LEDs will light up.
The brightness of the Thorens-logo and LEDs can be changed at the dimmer potentiometer dubbed Ambience (12) at the rear panel with the help of a small bladed screwdriver (trimmer).
Proceed by inserting the supplied RCA interconnects (or any other suitable RCA/XLR interconnects of your choice) into the signal output jacks at the rear panel.
Connect the leads with the phono input at your amplifier. The TD 550 features balanced XLR-connectors (9 + 10) as well as unbalanced RCA-connectors (6 + 7) .
Note: nearly all vinyl records have been recorded according to the international RIAA standards and rules. For this reason they need a dedicated phono amplifier stage which is to equalize and amplify the usually low-level signals coming from the pickup cartridge. If the TD 550 is directly connected to a high-level input of the amplifier, the result will be a weak and distorted rendition of the music.
If you happen to own a preamplifier/amplifier with integrated phono stage which also features balanced (XLR) inputs, you should in any case use this high-grade connector for sonic reasons. In case your amplifier is not equipped with a phono stage or with one of rather mediocre quality, we can highly recommend to acquire the Thorens TEP 302.
Take the dustcover and carefully insert it into the hinges by the marked areas.
Take the supplied ground lead and connect the ground post (8) at the rear panel with the ground post on your preamplifier/amplifier or separate phono-preamplifier.
When placing your record player onto its final position make sure it is a fair distance away from other audio devices (e.g. amplifiers, receives or CD players). This measure is to avoid electro-magnetic interferences which can yield a distorting effect in the sensitive pickup cartridge which may be audible as hum during playback.
Electro-magnetic interferences however can be disclosed and eliminated by simply changing the position of the record player with respect to the other audio components.
Thorens record players are relatively insensitive when subject to foot-fall shocks or airborne vibrations. Nevertheless, a general problem remains when it comes to playing back vinyl records with a high-quality pickup cartridge. It is therefore highly recommended to go for a sturdy piece of furniture or rack for placement, whereby a close proximity of the record player to the loudspeakers is to be avoided.
Under certain circumstances all these precautions may not be good enough in older houses with wooden floor construction. Here, in most cases a solid shelf firmly mounted to a supporting wall can be very beneficial to the sonic properties of the record player if it is placed on such a shelf or console.
Mounting the tonearm
The TD 550 can be delivered as the so-called BC-version without tonearm whereupon you can install the tonearm of your choice. The TD 550 was made to take tonearms between 9-inch and 12-inch effective length. In the event that you are facing problems as to the mounting of your own tonearm please contact your Thorens dealer for assistance.
In order to facilitate laying the (fixed) tonearm leads the TD 550 features a detachable lid at the bottom plate. However you may as well drill appropriate holes into the lid and then fix it again.
If you have acquired your TD 550 with tonearm it will be delivered factory-installed and supplied with the respective instruction manual and adjustment gauge. In this case the tonearm leads (interconnects) are not routed through the bottom opening but directly attached to the RCA jacks (6 + 7) at the rear panel.
If you have acquired your TD 550 with tonearm and pickup cartridge you can be sure that both have been perfectly mounted and adjusted in the factory. You may therefore disregard the following chapter.
Mounting the pickup cartridge
You can now mount and adjust your pickup cartridge according to the instructions provided with the pickup. Proceed with making all necessary alignments.
In the following you will find some comprehensive instructions concerning the correct mounting and configurations. However if in doubt you should in any case resort to the original instructions provided by the manufacturer of the tonearm or pickup.
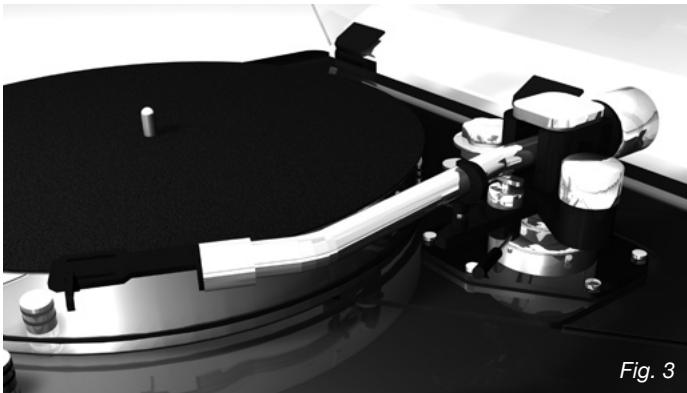
Mount the pickup cartridge to the slots in the tonearm's headshell. While doing this it is recommended to have - if possible - the stylus guard attached to the cartridge in order to avoid damaging the delicate stylus.
Tonearms supplied by Thorens will always accept pickup cartridges with standard fixing hole distance of 12.5 mm (1/2").
Carefully with the help of tweezers attach the colour-coded litz wires to the respective cartridge pins with identical colour:
R right channel, red (signal)
G right channel, green (ground)
L left channel, white (signal)
G left channel, blue (ground)
For the time being do not tighten the headshell screws. Fine-adjustments and fixing the cartridge is done after having determined tone arm height, off-set and overhang.
HINT: if cartridges from GRADO are to be employed it is recommended to fix them with screws "upside down". This means the screws are inserted from underneath through cartridge holes and headshell slots and the nuts are to fix the screws on top of the headshell.
Adjusting tonearm height (VTA)
If your TD 550 has come factory-equipped with tonearm you may disregard the following instructions.
VTA adjustment is as different as there are different tonearms. However Thorens can supply a special clamp mechanism for tonearms without the facility of adjusting VTA (e.g. Rega).
ATTENTION: great care is necessary for the following mounting and adjustment procedures, because the slightest mistake can damage stylus and cantilever!
Make sure the tonearm has been completely mounted. Carefully detach stylus guard from cartridge. Put (an old) record on the platter and lower cartridge onto record. The tonearm tube should then be parallel to the record (to be viewed from the side). If this is not the case VTA (Vertical Tracking Angle) needs to be adjusted by altering the tonearm height.
Alignment of pickup cartridge
Only a painstakingly aligned pickup is able to compliment the outstanding sonic capabilities and potential of this record player. If you consider the fine-alignment too difficult to be carried out by yourself, do not hesitate to ask your Thorens dealer for a helping hand.
ATTENTION: when aligning the cartridge great care is once again obligatory in order to avoid that the delicate stylus or sensitive parts of the tonearm are being damaged. If you are a newcomer without any experience it is better to leave this work to an expert who knows the specific characteristics of most pickups and tonearms. A badly aligned pickup will be well on the way to yield bad sound and to damage your precious records!
Azimuth: this is the angle between cantilever/stylus assembly and record groove. It should be exactly 90^ (excluding those cartridges in which the cantilever has purposely been installed with a slight tilt).
Offset: this is the angle between the longitudinal axis of the pickup and the tonearm's longitudinal axis. In all pivoted tonearms (like the ones from Thorens) the optimum value is to be found between 21^ and 24^ . We recommend to adjust the offset to 23^ .
Overhang: this is the distance between the stylus tip and the centre of the platter spindle. Depending on the individual effective length of the tonearm, overhang should be adjusted between 19 mm and 12 mm. Please refer to the specifications respectively instructions supplied with your tonearm.
Special pickup alignment gauges are required for the precise adjustment of the above parameters. They are available from your Thorens dealer. When you are through with the alignment you can finally tighten the cartridge screws.
Adjusting tracking force and bias
Tracking force as well as anti-skating (bias) are to be adjusted according to the instructions supplied by the manufacturer of the cartridge. Proceed as follows:
Set anti-skating (bias) to "0" (please refer to tonearm's user manual) and detach stylus guard. Move tonearm to a position in between tonearm rest and outer rim of platter. Lower tonearm by the lift lever. Now balance the tonearm by rotating the counterweight either clockwise or counter-clockwise until equilibrium has been achieved. Move tonearm back to rest and adjust tracking force. For this purpose the counterweight may either be turned clockwise (viewed from the rear) respectively shifted or tracking force is set by a special adjustment screw (please refer to tonearm's user manual).
As a rule of the thumb, tracking force is usually set between 10mN and 25mN .
We advise to have the tracking force adjusted rather towards the higher value of the manufacturer's recommendation because this would in any case ensure a better trackability of the cartridge, prevent your precious vinyl records from getting damaged and eventually would sound better, as many listening test have shown.
With the help of the supplied tonearm balance you can finally check the tracking force. Put balance on felt mat (record removed), move tonearm over it and carefully lower the stylus onto tracking force mark on balance. If balance shows equilibrium the tracking force of tonearm is correct. Adjust accordingly until equilibrium is achieved.
Adjust anti-skating (bias) close to the value of tracking force. Again, extended listening tests have revealed that a slightly lower value than the tracking force can lead to a better sonic rendition.
Operation
By pressing the Power button (1) the record player is switched on or off. If switched on the Thorens logo in the centre of the front panel will be illuminated as well as one of the speed indicator LEDs. Select the desired speed by means of the speed selector buttons (4 + 5) and press the Start button (2) in order to start the motor. The Start LED will then be lit. When the motor is running you may change between speed without having to stop the motor beforehand. If the Start button (2) is pressed once again the motor will stop and the respective LED goes off. If switched on the next time the previously selected speed will be indicated.
HINT: the TD 550 is equipped with an intelligent start-up control which within the first four seconds makes the motor initially running at half the selected speed and thus is reaching the rated speed more quickly than without this control. This applies also to the rated speed of 45 rpm.
Both 33 and 45 rpm have been factory-calibrated by means of a very precise 300-Hz stroboscope disk. The built-in motor control circuitry is capable to maintain precise rpm without any deviations for many years to come. In the event that you would like to fine-adjust the speeds yourself you can do this via the potentiometers (11+13) provided at the rear panel and by using a fine, bladed screwdriver (trimmer). However we recommend to keep the factory settings if you don't have access to a precise stroboscope disk and lamp in order to control the adjustments.
An explanation of operational elements and connections at the TD 550 is given in Figure 1 on page 25 of this manual.
For playing your records proceed as follows:
Open dustcover, take the record from its cover and inner sleeve and put it on platter. Never play your records without the protective felt mat! A special adaptor has been supplied for single records with large centre hole. It is highly recommended to always remove surface dust with the help of a special carbon brush or anti-static tissue before each playback. Older or very dusty records can be thoroughly cleaned with a dedicated record washing machine. This procedure will also improve sound quality.
Switch motor on and the select speed according to the record to be played. Unlock tonearm from its rest and move it over the desired piece to be played. By lowering the tonearm lift lever the tonearm is slowly descending.
You may have the dustcover closed during playback but sound waves from the speakers can excite the air beneath the cover and thus induce sonic distortions.
IMPORTANT: if you want to lift the tonearm up by the lever, do it smoothly in order to avoid that the tonearm is bouncing about the record.
This record player does not feature any automatic shut-off facility at the end of the record. Therefore, as soon as the stylus has reached the lead-out groove, the tonearm is to be lifted up manually by the lever and the motor switched off.
Maintenance and care
Your record player needs no particular or permanent maintenance.
If over the time dust has collected on the plinth or dust cover it can be wiped off with a soft, moistened cloth. HINT: a moistened cleaning tissue for glasses will do a good job here.

Refrain from using a dry cloth for cleaning because this will in any case generate undesired electrostatic charges.
The Thorens precision belt should be exchanged at least every other year. If the record player is not in use for a longer time, it is advisable to remove the belt in order to prevent a premature ageing under tension.
If this record player is used very often it is recommended to have the bearing checked and lubrication renewed after about 5 years.
Trouble shooting
Failure: the platter does not rotate although the unit has been switched on.
Possible cause:
- The record player/power supply is not connected to the mains.
- No mains voltage available.
- The belt is not correctly looped around platter and pulley, or it may have dropped off.
- There is too much slack in the belt.
- Motor or motor control circuitry are defective
Failure: there is wow and flutter audible.
Possible cause:
- The bearing is defective
- The motor control circuitry is defective
Failure: no signal in one or both channels.
Possible cause:
- The connection between record player and amplifier is interrupted.
- The input selector of the amplifier is in the wrong position, respectively has no contact
- The amplifier has not been switched on.
- The amplifier or the speakers may be defective.
- There is no contact at the cartridge pins or the connectors respectively jacks at amplifier or speakers have no contact.
If a failure could not be remedied in spite of having thoroughly examined the possible causes, please contact your Thorens dealer or distribution partner.
Technical specifications
Modell TD 550
Function manual operation
Drive system belt drive (via outer platter rim)
Motor electronically controlled AC synchronous motor
Speed 33 12 , 45 rpm
Speed change electronically
Platter 300 mm (12") aluminium platter; 6.2 kg
Tonearm optional
Anti-skating (bias) depending on tonearm
Automatic shut-off
Capacity of RCA leads 140 pF
Power supply external power supply
230/115 V, 50/60 Hz
Dimensions 532 × 183 × 421 ~mm(W × H × D)
Weight 22.0 kg
Technical modifications subject to change. Made in Germany.
Service information
Your Thorens dealer or distribution partner shall be pleased to assist you in the event that you have any further queries or need additional information concerning Thorens products.
You may contact Thorens also directly:
Thorens Export Company Ltd.
Im Huebel 1, CH-4304 Giebenach, Switzerland
www.thorens.com, info@thorens.com
In case of warranty claims you are kindly requested to first contact your Thorens dealer or distribution partner!
Further information may be obtained from: www.thorens.com
IMPORTANT: it is highly recommended to save the shipping box and all packing material in case the record player needs to be packed again for transportation. Thorens cannot be held responsible for any damage that may occur during transport on the ground that the record player has not been properly packed.
Never transport or ship the TD 550 without having the suspended chassis fixed by means of the locking screws!
Notes
Introduction
Vitesses 331/45 tr/mn
© 2007 Thorens Export Company AG