
PRIMO - DJ Controller Mixars - Free user manual and instructions
Find the device manual for free PRIMO Mixars in PDF.


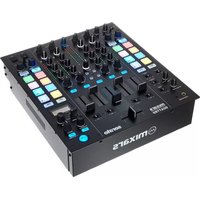
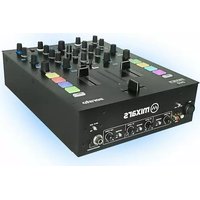
| Product type | Professional 2-channel DJ controller for Serato with 4-deck control |
| Manufacturer | Mixars |
| Model | PRIMO |
| Dimensions | 508.4 mm (W) x 330.7 mm (D) x 65.6 mm (H) |
| Weight | 4.2 kg |
| Power supply | DC power adapter (AC 100-240 V, 50/60 Hz) with 5 V/2 A or USB power supply with more than 1 A |
| Compatible software | Serato DJ (4-deck control) |
| Audio interface | 6 inputs / 12 outputs (USB) |
| Master output | Balanced XLR output and secondary RCA output |
| Booth output | Secondary TRS output (balanced) with volume control |
| Headphone output | TRS and mini jack output with cue/master mix control |
| Inputs | 2x phono/line (RCA) for Serato timecode, 1x mic (XLR/TRS combo), 1x aux (RCA) |
| Mixer functions | 2 channels with 3-band EQ, channel faders, crossfader with reversible curve |
| Effects | Sound structure FX (filter, noise, crush, echo), FX level, FX tap, FX beat encoder |
| Performance pads | 8 illuminated pads with modes: cue, roll, slicer, sampler, pitch play, loop |
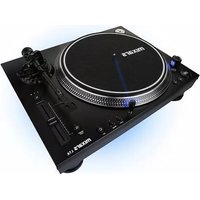
| Jog wheels | Touch-sensitive platters with blue LED ring and needle search function |
| Connections | USB port, DC adapter input, power switch |
| Included accessories | Hardware guide, USB cable, power adapter |
| Driver installation | Windows driver required (download from mixars.com); Mac OS X does not require a driver |
| Firmware update | Possible via USB with firmware update tool from Mixars |
| Cleaning | Only clean with a dry cloth |
| Repair | No user-serviceable parts; repairs only by qualified personnel |
Frequently Asked Questions - PRIMO Mixars
User questions about PRIMO Mixars
0 question about this device. Answer the ones you know or ask your own.
Ask a new question about this device
Download the instructions for your DJ Controller in PDF format for free! Find your manual PRIMO - Mixars and take your electronic device back in hand. On this page are published all the documents necessary for the use of your device. PRIMO by Mixars.
USER MANUAL PRIMO Mixars
PRIMO
2-DJ Controller for Serato DJ
User Manual (EN/ITA/FRA/ESP/DEU)
Safety Instructions
- Read these Instructions.
- Keep these Instructions.
- Heed all Warnings.
- Follow all Instructions.
- Do not use this apparatus near water.
- Clean only with dry cloth.
- Do not block any ventilation openings. Install in accordance with the manufacturer's instructions.
- Do not install near any heat sources such as radiators, heat registers, stoves, or other apparatus (including amplifiers) that produce heat.
- Do not defeat the safety purpose of the polarized plug. A polarized plug has two blades with one winder than the other. The wide blade is provided for your safety. If the provided plug does not fit into your outlet, consult an electrician for replacement of the obsolete outlet.
- Protect the power cord from being walked on or pinched particularly at plugs, convenience receptacles, and the point where they exit from the apparatus.
- Only use attachments/accessories specified by the manufacturer.
- Use only with the cart, stand, tripod, bracket, or table specified by the manufacturer, or sold with the apparatus. When a cart is used, use caution when moving the cart/apparatus combination to avoid injury from tip-over.
- Unplug this apparatus during lightning storms or when unused for long periods of time.
- Refer all servicing to qualified service personnel. Servicing is required when the apparatus has been damaged in any way, such as power-supply cord or plug is damaged, liquid has been spilled or objects have fallen into the apparatus, the apparatus has been exposed to rain or moisture, does not operate normally, or has been dropped.
- WARNING: To reduce the risk of fire or electric shock, do not expose this apparatus to rain or moisture.
- Since the appliance coupler is used as the disconnection device, the disconnect device shall remain readily operable.
- The ventilation should not be impeded by covering the ventilation openings with items, such as newspapers, table-cloths, curtains, etc.
- No naked flame sources, such as lighted candles, should be placed on the apparatus.
- The apparatus should be used in moderate climate.
- The apparatus shall not be exposed to dripping or splashing and that no objects filled with liquids, such as vases, shall be placed on the apparatus.

WARNING
To reduce the risk of fire or electric shock, do not expose this apparatus to rain or moisture. The apparatus shall not be exposed to dripping or splashing and that no objects filled with liquids, such as vases, shall be placed on the apparatus.
CAUTION
To reduce the risk of electric shock, do not remove any cover. No user-serviceable parts inside. Refer servicing to qualified service personnel only.

CAUTION
RISK OF ELECTRIC SHOCK DO NOT OPEN


The exclamation point within the equilateral triangle is intended to alert the user to the presence of important operation and maintenance (servicing) instructions in the literature accompanying this appliance.

The lightning flash with arrowhead symbol within the equilateral triangle is intended to alert the use to the presence of un-insulated “dangerous voltage” within the product’s enclosure that may be of sufficient magnitude to constitute a risk of electric shock.
CAUTION
To prevent electric shock, do not use this polarized plug with an extension cord, receptacle or other outlet unless the blades can be fully inserted to prevent blade exposure.
A. Accessories and Driver Installation
Check for the following parts included in the package with the main unit:
| Hardware guide x 1 | USB Cable x 1 | Power Adaptor x 1 |
Driver installation
The Mixars Primo is a class-compliant device for Mac OS X however will require drivers for Windows. Please make sure you have completed driver installation before use with Serato DJ.
Mac
No driver needed
Windows
Download the driver via our website: www.mixars.com
Double click on the .exe file to start installation and follow the on-screen instructions. Please note that you may have to reconnect Primo after installation.
B. Controls and functions Rear

1. Booth Output, TRS
Secondary TRS output (Bal.), controlled via the «Booth» knob
2. Master output, Balanced XLR
Main Balanced XLR output, controlled via the «Master» knob
3. Secondary Master output, RCA
Secondary RCA Master output (Unbal.), controlled via the «Master» knob
4. Phono/Line inputs (Serato Inputs)
Main Phono / Line Inputs for each channel. Use these inputs for Serato timecode Vinyls/ CDs in order to use with Serato DJ.
5. Phono/Line inputs switch
Select the right setting for the Phono/Line input the depending on the equipment used (Phono or Line sources).
6. Mic input
XLR / TRS Combo Microphone input, controlled via the «MIC/AUX» knob.
7. USB connector
Connect the mixer to your computer using the included USB cable for using it with Serato DJ. The Primo is capable of powering by a USB power that can provide more than 1A (1000mA) current. Please consult your computer manufacture for the current available from the USB port.
8. Power On/Off switch
Turn the power of the unit On and Off.
9. DC adaptor connector
Connect the supplied Power adaptor here.
Front

10. Mic / Aux switch
Select if using the Mic Input (switch towards left) or the Aux input (switch towards right). Center position turns the Mic/Aux Input off.
11. Aux input
Additional Aux input for connecting various Line signal sources, controlled via the «MIC/AUX» knob.
12. Mic / Aux Level
Adjust the level of the Mic or Aux input.
13. Mic / Aux Tone adjust
Adjust the tone of the Mic or Aux input.
14. Mic Echo adjust
Adjust the Echo effect of the Mic input.
15. Crossfader reverse switch
Reverses the Left with the Right Channel control on the crossfader.
16. Crossfader adjustment
Adjust the Crossfader curve from Hard (towards right) to Soft (towards left).
17. Headphones CUE/MASTER MIX
Turn for adjusting between Cue and Master signal on the headphones output.
18. Headphones Volume
Adjust the headphones volume.
19. Split Cue On/Off switch
If enabled, the headphones signal gets split: Master signal on one channel, and the enabled Cue signals selected via the «CUE» buttons on the other channel.
20. Headphones output
TRS and Mini-Jack Headphones output controlled via the «Headphones» knob.
Top

21. FX Deck2/4 Assignment switch
Press to assign corresponding FX to Deck 2.
Hold «Shift» and press to assign corresponding FX to Deck 4.
22. FX Deck1/3 Assignment switch
Press to assign corresponding FX to Deck 1.
Hold «Shift» and press to assign corresponding FX to Deck 3.
23. FX ON/OFF switch
Press to turn on/off FX.
Hold «Shift» and press to Select FX.
24. FX Level
Turn to adjust the FX level.
25. FX TAP
Press for tap tempo for the FX.
Hold «Shift» and press to Select FX modes.
26. FX BEATS encoder
Control FX beats.
27. Input/Deck selector
Select the input source:
At PH/LN1 (or PH/LN2 for the right deck) – Primo act also as a standalone mixer to mix the audio source connected to the PH/LN RCA inputs.
At Deck1/3 (or Deck 2/4 for the right deck) – Select the deck in Serato DJ to control.
28. LOAD button
Press to load the track in Serato DJ to the selected deck.
29. Channel level meter
Display the corresponding channel level signal
30. Master volume
Adjust the volume of the master level signal.
31. Library, Load controls
Library:
Scroll the Library by turning the knob and display the next level. Hold «Shift» and press for turning to the previous level.
32. Booth
Adjust the level of the «Booth» output.
33. Sampler Volume
Control sampler volume level in Serato DJ.
34. Channel Trim
Adjust the overall level for the corresponding channel.
35. Channel EQ
Adjust the equalizer settings for the corresponding channel.
36. Grid Adjust button
Press to adjust the grid.
Hold «Shift» and press to set.
37. Grid Slide button
Press to slide the grid.
Hold «Shift» and press to clear.
38. Slip button
Press to turn on/off slip mode.
Hold «Shift» and press to change the pitch fader range.
39. Pitch fader
Control the pitch of the current track.
40. Pitch bend buttons
Press to pitch bend up (+) or down (-) the current track.
If Serato DJ's Pitch 'n Time is enabled, hold «Shift» and press to change key.
- Key Lock button
Press to turn on/off key lock of the current track. If Serato DJ's Pitch 'n Time is enabled, hold «Shift» and press to turn on/off key sync. - Autoloop button
Press to turn on/off autoloop.
Hold «Shift» and press to active loop. - Loop halve/ double buttons
Press to halve of double the loop size.
Hold «Shift» and press to jump loop beat. - PLF button
Press to turn on/off PFL of the corresponding channel. - Channel faders
Adjust the volume level of the corresponding channel. - Master Level Meter
Display the Master Level Signal. - Crossfader
Crossfade between the Left and Right channels of audio signal. - Shift button
Hold for enabling the shifted functions of some controls - Sound Texture FX selection switch
Switch between Filter, Noise, Crush and Echo effect and control the FX parameter by «Channel Sound Texture FX knob» - Channel Sound Texture FX knob
Adjust the parameter/ level of the selected sound texture FX. - Parameters buttons
Press to adjust the parameter 1 of the performance pads.
Hold «Shift» and press to adjust the parameter 2 of the performance pads. -
Sampler Button
Switch the performance pads to Sampler Mode. If Serato DJ's Pitch 'n Time is enabled, hold «Shift» and press to switch to Pitch Play mode. -
Slicer Button
Switch the performance pads to Slicer Mode. Hold «Shift» and press to switch to Slicer Loop Mode.
- Roll Button
Switch the performance pads to Roll Mode. Hold «Shift» and press to switch to Manual Loop Mode.
- Cues Button
Switch the performance pads to Cues Mode. Hold «Shift» and press to switch to Cue Loop Mode.
- Performance Pads
Use to trigger cue points, samples, roll, slicer, cue loop, manual loop, slicer loop or pitch play in Serato DJ.
- Play Button
Press to play or pause the track.
- Cue Button
Press to cue.
- Sync Button
Press to turn on sync.
Hold «Shift» and press to turn off sync.
- Touch Needle search
Touch on the stripe to quickly search to the desired location of the current track.
- Censor Button
Press to turn on/off Censor mode.
Hold «Shift» and press to turn on/off Reverse.
- Touch sensitive performance platter
Touch on the touch sensitive area and turn the platter for scratching performance.
Turn the platter on the outer area for temporary pitch bend.
The middle illuminating logo and blue LED ring show the status of the scratch performance.
- Vinyl Button
Press to turn on/off Vinyl mode.
Hold «Shift» and press to turn on/off Quantize.
C. Audio Routing
There are 2 audio routing settings in Primo, namely the Serato routing and non-Serato routing. In Serato mode routing, the Primo acts as a controller and most of the mixing is done in Serato DJ software. It allows post-crossfader FX from Serato DJ. The Serato mode audio routing:
PRIMO Audio routing - Serato Mode

In non-Serato mode routing, the Primo works as a MIDI control with standalone external mixer that the mixing is done by Primo hardware.
The non-Serato mode Audio routing:
PRIMO Audio routing - non-Serato Mode (external mixer mode)

There are different ways to switch between the 2 audio routings:
- When Serato DJ software is open and initiated, it will trigger the connected Primo to change to Serato mode routing automatically.
-
Or, press and hold the NOSIE button and FILTER button and power on the Primo. Wait for a few seconds until the left or the right PFL button is lit in blue. Release SHIFT button.
-
Press either one PFL button to select the audio routing:
Right: Serato Mode
Left: Non-Serato Mode
The corresponding PFL button should be lit in blue
- Press SHIFT to confirm the choice and the Primo will be ready to use.
The audio interface is a 6-in 12-out interface with assignment:
| CH | Inputs | Outputs |
| 1 | Deck 1 in L (DVS) | Deck 1 out L |
| 2 | Deck 1 in R (DVS) | Deck 1 out R |
| 3 | Deck 2 in L (DVS) | Deck 2 out L |
| 4 | Deck 2 in R (DVS) | Deck 2 out R |
| 5 | Record in L | Deck 3 out L |
| 6 | Record in R | Deck 3 out R |
| 7 | NA | Deck 4 out L |
| 8 | NA | Deck 4 out R |
| 9 | NA | CUE out L |
| 10 | NA | CUE out R |
| 11 | NA | Sampler out L |
| 12 | NA | Sampler out R |
D. Firmware Update
Mixars will continue improve the product and fix bugs by releasing new firmware for the production. New firmware and firmware update software tool can be downloaded from Mixars website (http://www.mixars.com). Firmware update procedure:
- Download the firmware update tool and latest firmware from Mixars website.
- Connect the USB able to the computer.
- Press and hold the 2 PFL buttons and power on. The master level LED meter will be running from bottom to top repeatedly meaning the unit is in firmware update mode.
- Open the firmware update software and locate the firmware update file.
- Follow the on-screen instruction to start firmware update and wait for the prompt for update finish
- Power cycle the Primo after firmware update.
62. Piatto Touch sensitive performance platter
PRIMO Audio routing - Serato Mode

PRIMO Audio routing - non-Serato Mode (external mixer mode)

31. Library, commandes Load
Bibliothèque :
PRIMO Audio routing - Serato Mode

PRIMO Audio routing - non-Serato Mode (external mixer mode)

2. Salida Master, balanceada XLR
Salida principal balanceada XLR, controlada por el mando «Master»
3. Salida Master secundaria, RCA
8. Selector Power On/Off
PRIMO Audio routing - Serato Mode

PRIMO Audio routing - non-Serato Mode (external mixer mode)

PRIMO Audio routing - Serato Mode

PRIMO Audio routing - non-Serato Mode (external mixer mode)

2. STANDARD TEST CONDITION:
- Ambient Temperature 23 +/- 2 degC
• Relative Humidity 65% +/- 5%
NOTE: Measurements can be carried out between 5 degC to 35 degC and 45% to 85% relative humidity.
3. Audio Characteristics (Unbalance Output Load = 100K ohm, Balance Output Load = 600 ohm
Phones = 33 ohm, EQ/Filter Flat, Mic Echo at Min, Fader At Max. Unless Otherwise Noted)
4. INPUT/OUTPUT IMPEDANCE & SENSITIVITY: (1KHz INPUT, MIC/AUX, TRIM, MASTER AT MAX.)
4-1. INPUT IMPEDANCE AND REFERENCE INPUT LEVEL:
| (1)Low Band : (Low Band Reference Frequency is 70Hz) | |||
| Maximum level : | +12 | ± 1dB | ± 1.5dB |
| Minimum level : | -25 | ± 1dB | ± 1.5dB |
| (2) Middle Band : (Middle Band Reference Frequency is 1KHz) | |||
| Maximum level : | +12 | ± 1dB | ± 1.5dB |
| Minimum level : | -25 | ± 1dB | ± 1.5dB |
| (3) High Band : (Hi Band Reference Frequency is 13KHz) | |||
| Maximum level : | +12 | ± 1dB | ± 1.5dB |
| Minimum level : | -25 | ± 1dB | ± 1.5dB |
| MIC TONE : | Nominal | Limited | |
| MAX : | -28dB | -26dB | AT 100Hz |
| MIN : | -28dB | -26dB | AT 10KHz |
13. Fader Kill: (0dB 1KHz INPUT LEVEL, TRIM/MASTER AT 12 O'CLOCK. MIC SW OFF WITH A-w/ 20KHz LPF)
| Nominal | Limited | |
| Channel Fader : | -95dB | -91dB |
| Cross Fader : | -95dB | -91dB |
14. LEVEL DIFFERENCE L&R: (1KHz REFERENCE INPUT LEVEL, TRIM, MASTER AT MAX. WITH A-w/20KHz LPF)
| Nominal | Limited | ||
| LINE : | 0dB | ±0.5dB | ±1dB |
| PHONO : | 0dB | ±1dB | ±1.5dB |
| AUX : | 0dB | ±0.5dB | ±1dB |
15. USB Interface
| Channels : | 6 in/ 12 out |
| Sampling Rate : | 48kHz |
| Resolution : | 24-bit |
16. NOTES
(1)The specifications are subject to change to any improvement by negotiations in advance.
(2)The parts are subject to change to any improvement within the range of the specifications.
MIDI MAP
MIDI Channel Key
| Channel Category | MIDI Channel | Key |
| Deck 1 (Transport + Mixer) | 1 | N |
| Deck 2 (Transport + Mixer) | 2 | N |
| Deck 3 (Transport + Mixer) | 3 | N |
| Deck 4 (Transport + Mixer) | 4 | N |
| Deck 1 (Other Functions) | 5 | P |
| Deck 2 (Other Functions) | 6 | P |
| Deck 3 (Other Functions) | 7 | P |
| Deck 4 (Other Functions) | 8 | P |
| Effect Unit 1 | 9 | E |
| Effect Unit 2 | 10 | E |
| Global | 16 | G |
Mixer Controls - Channel
| Functionality | Control | Type | Output Lighting MIDI | MIDI Type | MIDI Channel Key | MIDI Control | MIDI Control (Shifted) |
| EQ HI | Rotary Pot | Absolute | -- | CC | N | 23 | |
| EQ MID | Rotary Pot | Absolute | CC | N | 24 | ||
| EQ LOW | Rotary Pot | Absolute | CC | N | 25 | ||
| Upfaders | Slider | Absolute | CC | N | 28 | ||
| Channel Trim | Rotary Pot | Absolute | CC | N | 22 | ||
| CUE Channel (PFL) | Button | Trigger | Yes. Lit blue = On. Dim blue = Off | Note | 27 | ||
| CUE Volume | Rotary Pot | Absolute | CC | G | 12 | ||
| CUE Mix | Rotary Pot | Absolute | CC | G | 13 | ||
| Split CUE | Switch | Selector | Note | G | 28 | ||
| Channel Filter | Rotary Pot | Absolute | CC | N | 26 | ||
| Crossfader | Slider | Absolute | CC | G | 8 | ||
| Master Volume | Rotary Pot | Absolute | CC | G | 10 | ||
| Channel Meter | N/A | LED | CC | N | 31 | ||
| Master Meter Left | N/A | LED | CC | G | 25 | ||
| Master Meter Right | N/A | LED | CC | G | 29 | ||
| Crossfader Curve | Rotary Pot | Absolute | CC | G | 9 | ||
| Crossfader Reverse | Switch | Selector | Note | G | 9 | ||
| Source Select Switch - PH/LN1 or PH/LN2 | Switch | Selector | CC | N | 50 | ||
| Source Select Switch - DECK1 to DECK4 | Switch | Selector | CC Note | N N | 34 8 | ||
| Sampler Volume | Rotary Pot | Absolute | CC | G | 26 |
Effects
| Functionality | Control | Type | Output Lighting MIDI | MIDI Type | MIDI Channel Key | MIDI Control | MIDI Control (Shifted) |
| FX 1 Depth | Rotary Pot | Absolute | CC | E | 0 | 11 | |
| FX 2 Depth | Rotary Pot | Absolute | CC | E | 1 | 12 | |
| FX 3 Depth | Rotary Pot | Absolute | CC | E | 2 | 13 | |
| FX BEATS (Turn) | Encoder (Turn) | Trigger | CC | E | 3 | ||
| FX BEATS (Press) | Encoder (Press) | Trigger | Note | E | 3 | ||
| FX 1 ON | Button | Trigger | Yes. Lit blue = On. Dim blue = Off | Note | E | 0 | 11 |
| FX 2 ON | Button | Trigger | Note | E | 1 | 12 | |
| FX 3 ON | Button | Trigger | Note | E | 2 | 13 | |
| FX TAP | Button | Trigger | Note | E | 4 | ||
| FX Assignment (Deck1) | Button | Trigger | Note | E | 7 | ||
| FX Assignment (Deck2) | Button | Trigger | Note | E | 8 |
Looping
| Functionality | Control | Type | Output Lighting MIDI | MIDI Type | MIDI Channel Key | MIDI Control | MIDI Control (Shifted) |
| LOOP | Button | Trigger | Note | P | 50 | ||
| LOOP X2 | Button | Trigger | Note | P | 53 | 55 | |
| LOOP 1/2 | Button | Trigger | Note | P | 52 | 54 |
Transport Controls
| Functionality | Control | Type | Output Lighting MIDI | MIDI Type | MIDI Channel Key | MIDI Control | MIDI Control (Shifted) |
| Sync | Button | Trigger | Yes. Lit blue = On. Dim blue = Off | Note | N | 2 | 3 |
| CUE | Button | Trigger | Yes. Lit red = On. Dim red = Off | Note | N | 1 | |
| Play | Button | Trigger | Yes. Lit blue = On. Dim blue = Off | Note | N | 0 | |
| Censor | Button | Trigger | Note | N | 16 | 17 | |
| Slip | Button | Trigger | Note | N | 15 | ||
| Pitch Bend Up | Button | Trigger | Note | N | 12 | 40 | |
| Pitch Bend Down | Button | Trigger | Note | N | 11 | 39 | |
| Key Lock | Button | Trigger | Note | N | 13 | 41 | |
| Vinyl | Button | Trigger | Note | N | 7 | ||
| Touch Needle | Touch Strip | Absolute | CC | N | 43 | ||
| Tempo Slider | Fader | Absolute | CC | N | 9 | ||
| Platter Touch | Button | Trigger | Note | N | 6 | ||
| Platter Position | Platter | Relative | CC | N | 6 | ||
| Channel Fader Start (Shift and move fader from minimum position, relative to channel reverse condition) | Shift + Fader | Trigger | Note | N | 49 |
Platter LED control
| Functionality | MIDI Type | MIDI Channel Key | MIDI Control | Control Value (HEX) |
| Platter Ring LED (24 LEDs in the Ring) | CC | N | 10 | 0x00: All LEDs OFF0x01 to 0x18: Single LED ON from 12 O’clock positon, other LEDs OFF0x21 to 0x38: Single LED OFF from 12 O’clock positon, other LEDs ON0x41 to 0x58: Accumulating LED ON from 12 O’clock position.0x7F: All LEDs ONOther value: ALL LEDs OFF |
| Platter Logo LED (Red) | CC | N | 12 | 0x00 to 0x05: LED OFF to LED brightest |
| Platter Logo LED (Green) | CC | N | 13 | 0x00 to 0x05: LED OFF to LED brightest |
| Platter Logo LED (Blue) | CC | N | 14 | 0x00 to 0x05: LED OFF to LED brightest |
Library Controls
| Functionality | Control | Type | Output Lighting MIDI | MIDI Type | MIDI Channel Key | MIDI Control | MIDI Control (Shifted) |
| Track Load A (Deck 1/3) | Button | Trigger | Yes. Lit blue(red) = On. Dim blue(red) = Off | Note | G | 4 | |
| Track Load B (Deck 2/4) | Button | Trigger | Yes. Lit blue(red) = On. Dim blue(red) = Off | Note | G | 5 | |
| Library Back | Encoder (Press) | Trigger | Note | G | 6 | 7 | |
| Library Scroll | Encoder (Turn) | Trigger | CC | G | 0 | 1 |
Performance Pads – Mode switching
| Functionality | Control | Type | Output Lighting MIDI | MIDI Type | MIDI Channel Key | MIDI Control | MIDI Control (Shifted) |
| HOT CUE | Button | Trigger | Yes. Lit blue = On. Dim blue = Off | Note | N | 1 | 3 |
| ROLL | Button | Trigger | Note | N | 7 | 14 | |
| SLICER | Button | Trigger | Note | N | 9 | 10 | |
| SAMPLER | Button | Trigger | Note | N | 11 | 15 |
Performance Pads
| 1 | 2 | 3 | 4 |
| 5 | 6 | 7 | 8 |
| Functionality | Control | Type | Output Lighting MIDI | MIDI Type | MIDI Channel Key | MIDI Control | MIDI Control (Shifted) |
| Pad 1 | Button | Trigger | Refer to pad light section | Note | N | 20 | 28 |
| Pad 2 | Button | Trigger | Note | N | 21 | 29 | |
| Pad 3 | Button | Trigger | Note | N | 22 | 30 | |
| Pad 4 | Button | Trigger | Note | N | 23 | 31 | |
| Pad 5 | Button | Trigger | Note | N | 24 | 32 | |
| Pad 6 | Button | Trigger | Note | N | 25 | 33 | |
| Pad 7 | Button | Trigger | Note | N | 26 | 34 | |
| Pad 8 | Button | Trigger | Note | N | 27 | 35 | |
| Parameter < | Button | Toggle | Note | N | 40 | 42 | |
| Parameter > | Button | Toggle | Note | N | 41 | 43 |
Other/ Special
| Functionality | Control | Type | Output Lighting MIDI | MIDI Type | MIDI Channel Key | MIDI Control | MIDI Control (Shifted) |
| SHIFT | Button | Trigger | Note | G | 0 |
Miscellaneous
| Functionality | Control | Type | Output Lighting MIDI | MIDI Type | MIDI Channel Key | MIDI Control | MIDI Control (Shifted) |
| Grid Addjust | Button | Trigger | Note | P | 70 | 71 | |
| Grid Slide | Button | Trigger | Note | P | 72 | 73 |
Lighting – Color of the pad vs MIDI value
| Color Name | MIDI value for pad display (HEX) | Dim Version MIDI value (HEX) |
| Off/ Black | 0x00 | |
| Red | 0x01 | 0x11 |
| Mango | 0x02 | 0x12 |
| Blue | 0x03 | 0x13 |
| Rioja | 0x04 | 0x14 |
| Lime | 0x05 | 0x15 |
| Magenta | 0x06 | 0x16 |
| Light Blue | 0x07 | 0x17 |
| Purple | 0x08 | 0x18 |
| Orange | 0x09 | 0x19 |
| Ferrari Red | 0x0a | 0x1a |
| Indigo | 0x0b | 0x1b |
| Cyan | 0x0c | 0x1c |
| Emerald | 0x0d | 0x1d |
| Grass Green | 0x0e | 0x1e |

mixars


- PRIMO
- DJ CONTROLLER FOR SERATO DJ
- SAFETY INSTRUCTIONS
- WARNING
- CAUTION
- ACCESSORIES AND DRIVER INSTALLATION
- DRIVER INSTALLATION
- MAC
- WINDOWS
- CONTROLS AND FUNCTIONS REAR
- BOOTH OUTPUT, TRS
- MASTER OUTPUT, BALANCED XLR
- SECONDARY MASTER OUTPUT, RCA
- PHONO/LINE INPUTS (SERATO INPUTS)
- PHONO/LINE INPUTS SWITCH
- MIC INPUT
- USB CONNECTOR
- POWER ON/OFF SWITCH
- DC ADAPTOR CONNECTOR
- FRONT
- MIC / AUX SWITCH
- AUX INPUT
- MIC / AUX LEVEL
- MIC / AUX TONE ADJUST
- MIC ECHO ADJUST
- CROSSFADER REVERSE SWITCH
- CROSSFADER ADJUSTMENT
- HEADPHONES CUE/MASTER MIX
- HEADPHONES VOLUME
- SPLIT CUE ON/OFF SWITCH
- HEADPHONES OUTPUT
- FX DECK2/4 ASSIGNMENT SWITCH
- FX DECK1/3 ASSIGNMENT SWITCH
- FX ON/OFF SWITCH
- FX LEVEL
- FX TAP
- FX BEATS ENCODER
- INPUT/DECK SELECTOR
- LOAD BUTTON
- CHANNEL LEVEL METER
- MASTER VOLUME
- LIBRARY, LOAD CONTROLS
- BOOTH
- SAMPLER VOLUME
- CHANNEL TRIM
- CHANNEL EQ
- GRID ADJUST BUTTON
- GRID SLIDE BUTTON
- SLIP BUTTON
- PITCH FADER
- PITCH BEND BUTTONS
- AUDIO ROUTING
- FIRMWARE UPDATE
- PIATTO TOUCH SENSITIVE PERFORMANCE PLATTER
- LIBRARY, COMMANDES LOAD
- SALIDA MASTER, BALANCEADA XLR
- SALIDA MASTER SECUNDARIA, RCA
- SELECTOR POWER ON/OFF
- STANDARD TEST CONDITION
- AUDIO CHARACTERISTICS (UNBALANCE OUTPUT LOAD = 100K OHM, BALANCE OUTPUT LOAD = 600 OHM
- INPUT/OUTPUT IMPEDANCE & SENSITIVITY: (1KHZ INPUT, MIC/AUX, TRIM, MASTER AT MAX.)
- INPUT IMPEDANCE AND REFERENCE INPUT LEVEL
- FADER KILL: (0DB 1KHZ INPUT LEVEL, TRIM/MASTER AT 12 O'CLOCK. MIC SW OFF WITH A-W/ 20KHZ LPF)
- LEVEL DIFFERENCE L&R: (1KHZ REFERENCE INPUT LEVEL, TRIM, MASTER AT MAX. WITH A-W/20KHZ LPF)
- USB INTERFACE
- NOTES
- MIDI MAP
- MIXARS
Brand : Mixars
Model : PRIMO
Category : DJ Controller