
ESCORT 2000 - Portable sound system PEAVEY - Free user manual and instructions
Find the device manual for free ESCORT 2000 PEAVEY in PDF.

User questions about ESCORT 2000 PEAVEY
0 question about this device. Answer the ones you know or ask your own.
Ask a new question about this device
Download the instructions for your Portable sound system in PDF format for free! Find your manual ESCORT 2000 - PEAVEY and take your electronic device back in hand. On this page are published all the documents necessary for the use of your device. ESCORT 2000 by PEAVEY.
USER MANUAL ESCORT 2000 PEAVEY
Intended to alert the user to the presence of uninsulated "dangerous voltage" within the product's enclosure that may be of sufficient magnitude to constitute a risk of electric shock to persons.

Intended to alert the user of the presence of important operating and maintenance (servicing) instructions in the literature accompanying the product.
CAUTION: Risk of electrical shock — DO NOT OPEN!
CAUTION: To reduce the risk of electric shock, do not remove cover. No user serviceable parts inside. Refer servicing to qualified service personnel.
WARNING: To prevent electrical shock or fire hazard, do not expose this appliance to rain or moisture. Before using this appliance, read the operating guide for further warnings.

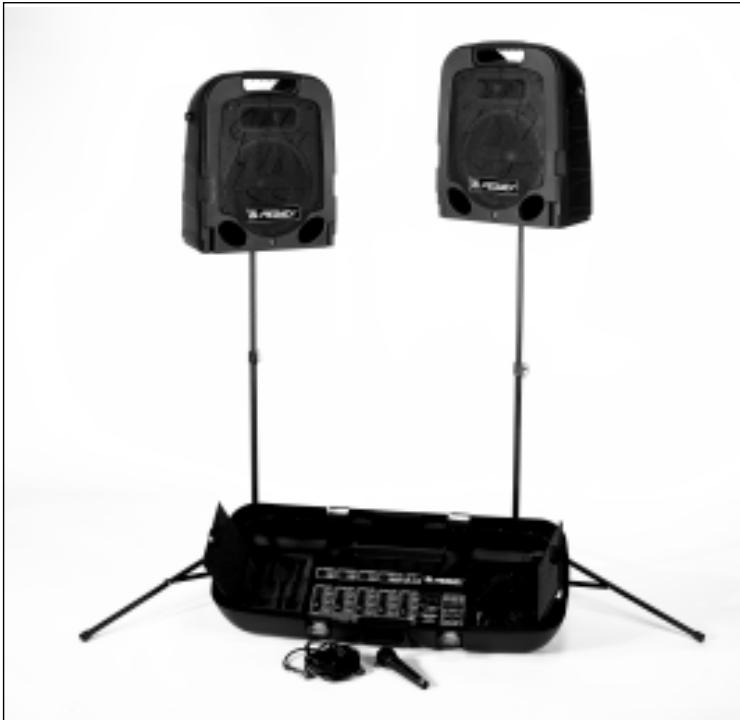
Congratulations! You have just purchased the world's finest packaged sound system, the Peavey Escort 2000^TM . The Escort's integrated design allows for ease of transportation, while its user-friendly controls offer ease of operation, combining to make it the perfect choice for schools, churches, civic organizations, and small musical groups. The Escort features two 2-way speakers driven by a 5-channel, 150-Watt stereo powered mixer, making it ideal for both vocal and musical applications. The system also includes a PVi^® unidirectional (cardioid pattern) dynamic microphone, 2 folding speaker stands, and all necessary connecting cables. Among many professional features, the mixer includes 60~mm faders, a 5-band graphic equalizer with FLS® (Feedback Locating System), and digital reverb. The carrying case provides storage for all the system components with ample room for additional mics and cables. This clever design incorporates the speakers into the package, allowing the unit to be easily carried or pulled along on its luggage-style wheels. We think you'll agree that the Escort 2000 raises portable sound to a new level!
Escort Features:
- Convenient package with luggage-style wheels
- 2-way speaker system with 10^ woofer and piezoelectric horn.
5-channel powered mixer
4 XLR mic inputs with 15V phantom power
2 stereo line inputs - 60 mm faders
High-quality digital reverb
150 Watts of output power (75 Watts per channel) with DDT™
Variable-speed cooling fan
5-band graphic equalizer with FLS
2 folding speaker stands
1 PVi cardioid dynamic microphone with cable - Two 25' speaker cables
Storage compartments for microphones, cables and accessories
Table of Contents
Quick Setup Guide. 4
Setting Up Speakers 4
Connecting Microphone(s). 5
Connecting CD, Tape, or Other Line Sources. 5
Connecting Power 5
Setting Controls and Turning Unit On . . . 6
Adjusting Gain and Volume Controls (Faders) 6
Adjusting Tone Controls. 6
Using the Graphic Equalizer. 6
Avoiding Acoustic Feedback 7
Microphone Usage Guidelines 7
Reverb 7
Stereo / Mono Operation 7
Main and Monitor Operation 8
Auxiliary Output (AUX OUT) Operation 8
Packing the Escort 2000. 8
Optional Accessories 8
Troubleshooting Guide 9
Specifications. 10

Quick Setup Guide
THINK SAFETY FIRST!
Much of the setup of the Escort™ 2000 is similar to the setup of other sound systems, and many aspects require plain common sense. Safety should always be your first concern. Always use grounded outlets and 3-wire extension cords. Run sound system cables in a way to prevent the danger of tripping, and tape them down where necessary. Place the speaker stands on a solid, level surface. Following these guidelines will help prevent personal injury and equipment damage.
Setting Up Speakers
Place the unit so that the speakers form the upper part of the case. Release the latches by lifting up until the latch disengages. Remove the speakers from the Escort package.
NOTE: The latches can be closed once the speakers are removed and it is recommended that they be closed to avoid interference with removal of components and to protect the latch. Close the latch by pushing in until it is flush with the side of the case, and then down until it locks.
Remove the speaker stands from the case. Be sure the legs on the stands are fully extended to provide a stable base for the speakers, and are positioned on a level surface. Tighten the thumbscrew on the base so that it is snug, but do not overtighten (Fig. 1). Raise the speaker stands to the desired height, tighten thumbscrew, and install the safety pin as shown (Fig. 2).
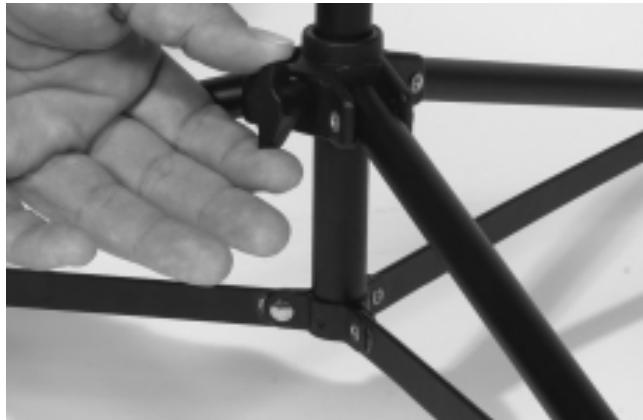
Fig. 1
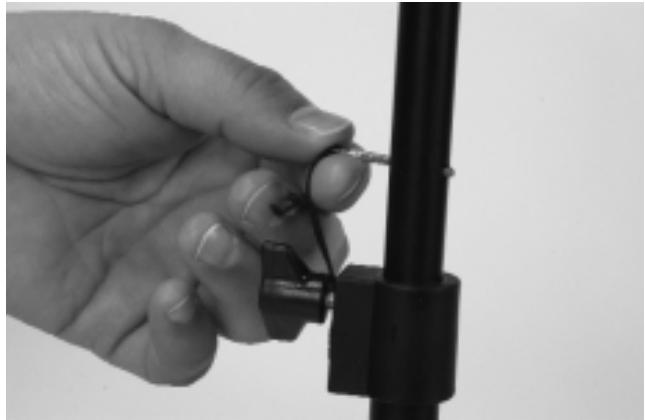
Fig. 2
Place speakers on stands and position them so that they will face the audience and face away from the microphones. Connect speaker cables from the jack on the lower front of each speaker to the powered mixer, connecting the left speaker to the LEFT OUTPUT and the right speaker to the RIGHT OUTPUT jacks on the rear panel of the unit (Fig. 3).
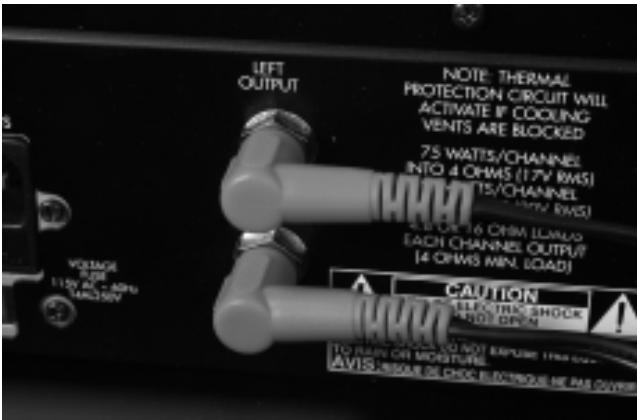
Fig. 3

Warning! Do not connect additional speakers to the Escort 2000 powered mixer. The system speakers provide the optimal load for the amplifier.
Connecting Microphone(s)
The Escort™ 2000 powered mixer is designed to work with any good-quality, balanced, dynamic or condenser microphone such as the PVi® microphone supplied. Connect the microphone(s) to the XLR (3-pin) input connectors as shown (Fig. 4). When using more than one mic, try to connect them to channels in the same order as they appear on stage to make them easier to control.
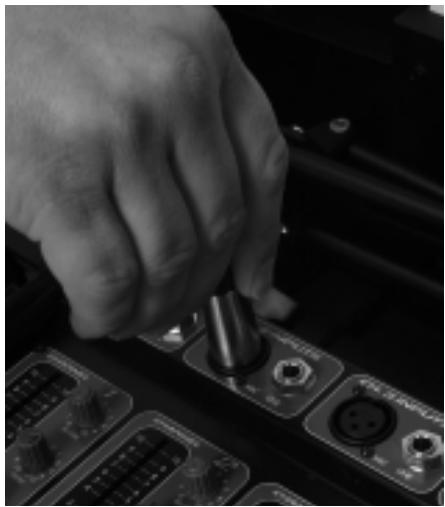
Fig. 4
Connecting CD, Tape, or Other Line Sources

Connect a CD or tape player to the CHANNEL 5 auxiliary input connectors (AUX IN) as shown (Fig 5). If you wish to connect an additional tape machine, CD or other line source to the Escort 2000, CHANNEL 5 also has stereo line inputs and CHANNELS 1-3 have monaural (MONO) line inputs. Additional cables for connecting to the Escort 2000 should be readily available at your Peavey dealer. Connecting only to the CHANNEL 4 LEFT/MONO jack automatically converts that channel for mono operation (the sound will come out of both speakers).
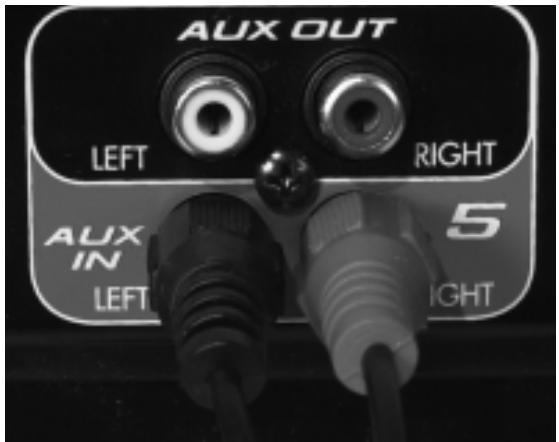
Fig. 5
Connecting Power

Before connecting power, make sure that the power switch is in the OFF position.
Connect the IEC power cord to the receptacle on the back panel of the unit as shown (Fig. 6), and then to a suitable electrical outlet. If an extension cord is used, be sure that it is a 3-wire cord with ground pin intact to preserve the safety ground.
NOTE: FOR UK ONLY

If the colors of the wires in the mains lead of this unit do not correspond with the colored markings identifying the terminals in your plug, proceed as follows: (1) The wire that is colored green and yellow must be connected to the terminal that is marked by the letter E, the earth symbol, colored green, or colored green and yellow. (2) The wire that is colored blue must be connected to the terminal that is marked with the letter N or the color black. (3) The wire that is colored brown must be connected to the terminal that is marked with the letter L or the color red.
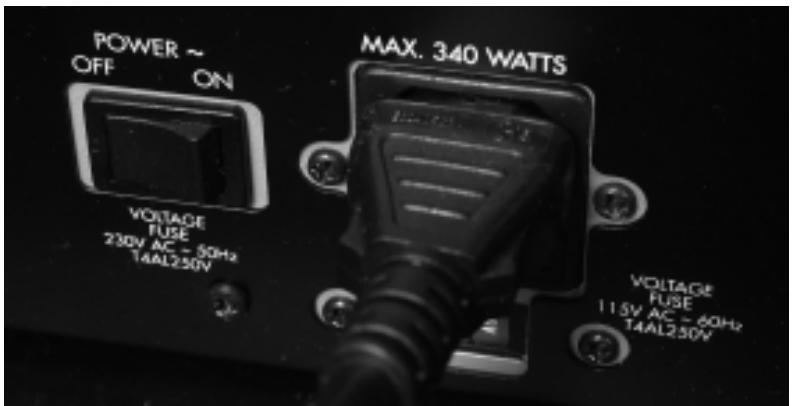
Fig. 6
Setting Controls and Turning Unit On
Set master controls to around 6 and all other controls to 0. Turn on power by placing the OFF/ON switch, located adjacent to the IEC cord receptacle (Fig.6), in the ON position.
Adjusting Gain and Volume Controls (Faders)
Adjust the channel GAIN controls (Fig. 7) for desired level from the speakers. If the desired level is reached with the channel GAIN at a low setting (1-3), lower the MASTER VOLUME controls (Fig.8). If the channel GAIN needs to be set at 9-10 for desired volume, raise the MASTER VOLUME controls. The L and R MASTER VOLUME controls adjust the left and right speakers.
Adjusting Tone Controls
Adjust the channel BASS and TREBLE controls (Fig. 7) as necessary to achieve desired sound. However, use moderation in setting channel tone controls. Extreme settings of these controls can adversely affect sound quality. Large amounts of boost (+) on these controls can also increase the chance of feedback on microphone inputs.
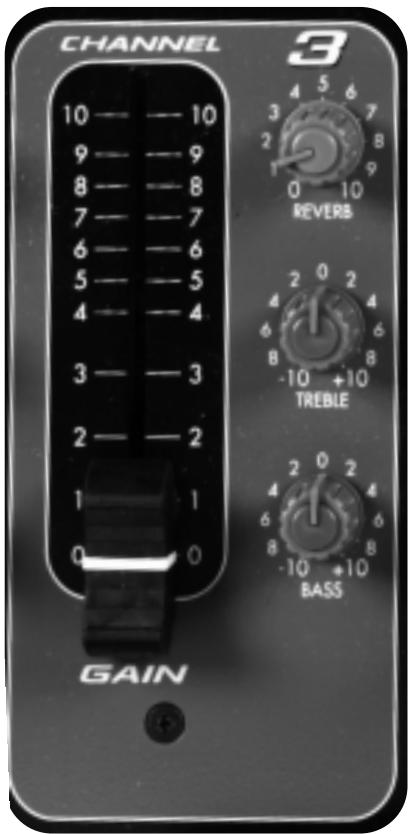
Fig.7
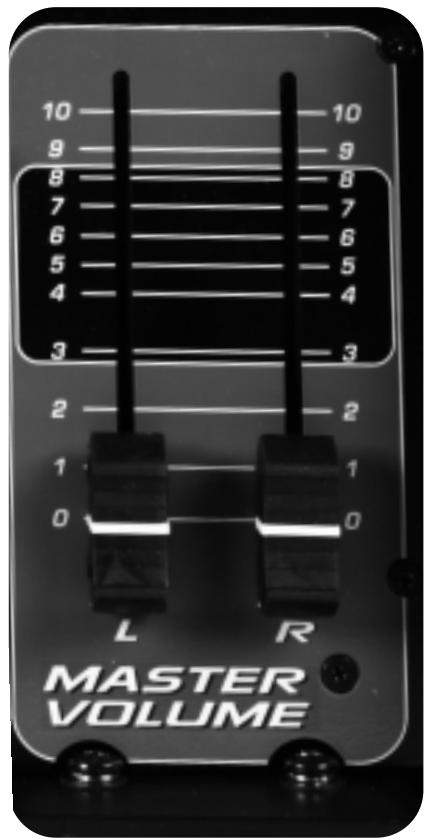
Fig. 8
Using the Graphic Equalizer
Unlike the BASS and TREBLE controls on each channel that adjust only the tone of their own input signals, the 5-band graphic equalizer adjusts the tonal balance of all the signals going through the powered mixer. This gives the user greater flexibility in adjusting the sound, but use moderation in making adjustments.
The FLS® (Feedback Locating System) LED indicators are invaluable tools in helping to reduce/eliminate feedback. To use the FLS feature, start by setting all graphic EQ sliders (Fig. 9) to 0. Then, before the audience arrives, increase the MASTER VOLUME and/or CHANNEL GAIN until feedback occurs. Note which LED illuminates and slightly lower the corresponding slider. This reduces the gain at the feedback frequency, and can be repeated if necessary to improve gain before feedback. However, only lower the sliders in small amounts to avoid adversely affecting sound quality.
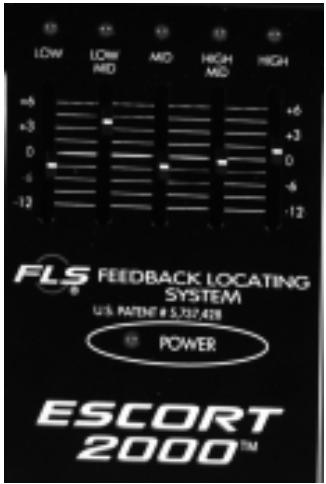
Fig. 9
Avoiding Acoustic Feedback
Acoustic feedback is the loud howl or squealing sound heard through sound systems as the result of sound from the speakers re-entering the microphones. Although it does an excellent job of getting the audience's attention, feedback should be avoided. When trying to deal with acoustic feedback it is always best to start looking at the placement of the mics and speakers in the system before resorting to equalization (EQ) adjustment. Make sure that the speakers are positioned to direct the sound toward the audience and away from the microphones. Position mics as close to the sound source as reasonable. Moving the mic closer increases the volume of the sound through the system without having to turn up the gain.
Microphone Usage Guidelines
When practical, a single microphone is preferred. Additional microphones pick up more sound from the speakers and each mic has to be turned down a little to prevent feedback. However, if you have difficulty balancing the level of different individuals with one mic, or if you still cannot get sufficient gain, using more mics can offer an advantage. Giving several singers their own microphones, for example, allows placement of the microphones much closer to each singer. This increases the volume of the sound at the mic and far outweighs any detrimental effect from using multiple mics. It also allows the volume of each mic to be adjusted separately for proper balance.
Reverb
Adding reverberation to music can enhance the sound of that music. To add reverb to a microphone, simply turn up the REVERB control (Fig. 7) on the appropriate input channel. Add reverb in moderation because too much reverb makes vocals hard to understand. In most cases, it is best not to add reverb to the spoken word.
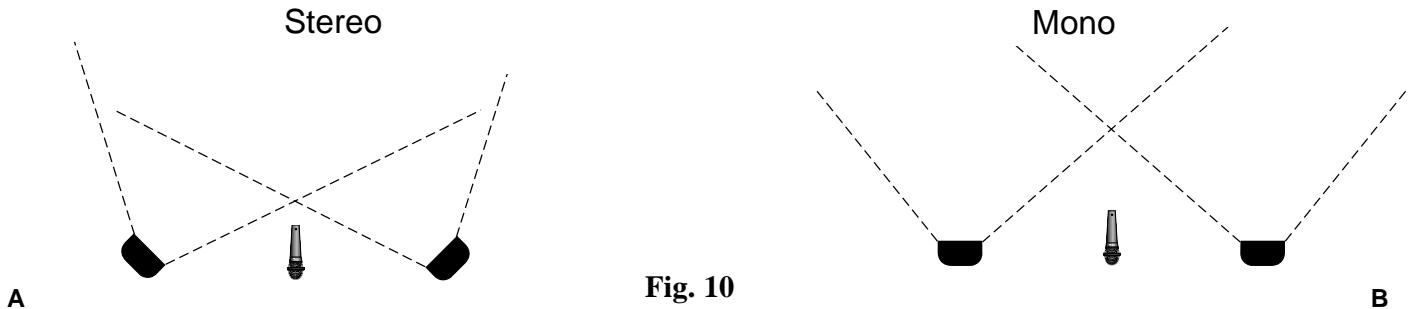
Stereo / Mono Operation
The Escort™ 2000 powered mixer has two input channels (4 & 5) for stereo line sources. If the speakers are situated so that most of the audience can hear both speakers (Fig. 10 A), it can be advantageous to run the system in stereo. If the audience primarily hears just one speaker (Fig. 10 B), or if you are using one speaker for the audience and the other for the stage performers, then it is best to run the system in mono.
The MODE switch on CHANNEL 5 sets that channel for STEREO or MONO operation. On CHANNEL 4, use the LEFT input only for MONO operation, or both LEFT and RIGHT inputs for STEREO. Inputs on CHANNEL 1-3 are MONO. The MODE switch on CHANNEL 5 is also very useful for playing tapes or CDs with "split tracks". Setting the switch to MONO allows the signal from a source connected to either the LEFT or RIGHT input to be directed to both speakers.
Main and Monitor Operation
The Escort™ 2000 can also be used in applications where stage monitoring is required. By operating the mixer in the mono mode, the right speaker can be used for providing sound to the audience (MAIN) and the left can be used for the performers (MON). The MASTER VOLUME controls (Fig. 8) allow the volume of these two speakers to be set independently. These controls are also labeled MAIN and MON for this purpose. If additional sound is required, the auxiliary output (AUX OUT) can be used to drive an auxiliary monitor amplifier or powered monitor speakers.
Auxiliary Output (AUX OUT) Operation
The AUX OUT is a line-level output from the mixer that can be used for recording, or driving an auxiliary amplifier.
Warning: Connecting a tape machine to the AUX OUT to record while simultaneously connecting the tape machine's output into the mixer inputs can create an electronic feedback loop. Connect only the tape machine's inputs or outputs to the mixer, never both.
Packing the Escort 2000
One of the Escort's many benefits is that the entire sound system can be packed inside its easily transportable case (Fig. 11). Begin by folding the speaker stands and securing them into their storage compartment using the two straps. Place the microphone(s) in their storage compartment, putting the cables in the other compartment or with the speaker stands. Lay the speakers face down on top of the bottom tray and secure the four latches. The Escort 2000 is now ready to be carried or pulled on its built-in, luggage-style wheels.
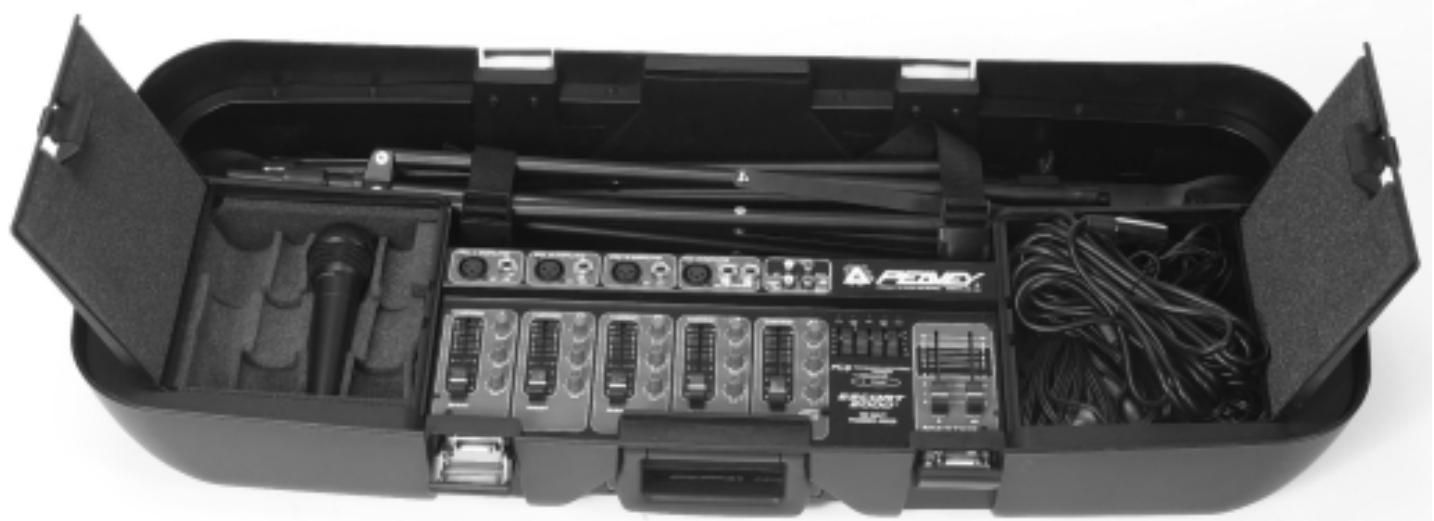
Fig. 11
Optional Accessories (available from Peavey dealers)
Microphone stand(s)
Additional microphones and cables
Microphone wind screens o
Long speaker cables
Tall speaker stands
Audio cables for CD and tape
Troubleshooting Guide
| Problem | Check | Correction |
| No sound (no power light) | Is power switch on? Is line cord connected to live power outlet? | Turn power switch on. Connect power cord to live outlet. |
| No sound (power light on) | Are MASTER and CHANNEL GAIN controls up? | Adjust both MASTER and CHANNEL GAIN controls upward to desired level. Check speaker connections. Turn mic switch on. Check mic or sound source connection. |
| Fan speed varies | This is normal. Speed varies with audio signal. | N/A |
| Only one speaker works | Are speaker cable connectors secure? Mono line source into CHANNEL 4 or 5? | Fully insert connector and/or swap speaker cables between left and right speakers and outputs to check for damaged cables. Set CHANNEL 5 MODE switch to MONO or use LEFT INPUT on CHANNEL 4. Are both MASTER controls turned up. |
| Loud howling or squeal from speakers | If it goes away when the CHANNEL or MASTER volume controls are lowered, it is acoustic feedback. | Reduce microphone gain. Reposition microphone behind or farther from speakers. Observe FLS light above EQ and reduce level of that band. |
| Sound is distorted | Is the CHANNEL GAIN at a very high setting? | Reduce CHANNEL GAIN and increase MASTER VOLUME |
EscortTM 2000 Specifications:
| Output Power: | 75 Watts per channel into 4 Ohm load |
| Frequency Response: | 30 Hz to 25 kHz +0/-3 dB measured at 1 Watt |
| Overload Protection: | DDT™ (Distortion Detection Technology) limits the power amplifier input to prevent clipping distortion that can damage speakers. |
| Tone Controls: | Bass: 100 Hz +/- 10 dB Treble: 10 kHz +/- 10 dB |
| Graphic Equalizer: | 5 bands: 100 Hz, 350 Hz, 1 kHz, 3 kHz and 8 kHz With FLS® (Feedback Locating System) |
| Input Impedance: | Mic Input: 2 K Ohms Line Input: 12 K Ohms |
| Distortion: | Less than 0.8% THD at rated output |
| Max Gain: | 86 dB mic input to speaker output |
| Signal/Noise Ratio: | 85 dB mic input typical |
| Reverb: | Digital |
| AC Power: | 115 VAC 60 Hz or 230 VAC 50/60 Hz |
| Weight Assembled: | 57 lbs.(25.9 Kg) |
| Dimensions: | 14.5" H x 36.75" W x 15.5" D (36.8H x 93.3W x 39.4D cm) |
| Speakers: | Woofer 10" (254 mm) Piezoelectric Horn Tweeter |
| Microphone: | Dynamic, Cardioid (Unidirectional) |
DEUTSCH
5-Band-EQ (100 Hz, 350 Hz, 1 kHz, 3 kHz, 8 kHz)
Connector le(s) Microphone(s)
EscortTM 2000 Specifications:
| Output Power: | 75 Watts per channel into 4 Ohm load |
| Frequency Response: | 30 Hz to 25 kHz +0/-3 dB measured at 1 Watt |
| Overload Protection: | DDT™ (Distortion Detection Technology) limits the power amplifier input to prevent clipping distortion that can damage speakers. |
| Tone Controls: | Bass: 100 Hz +/- 10 dB Treble: 10 kHz +/- 10 dB |
| Graphic Equalizer: | 5 bands: 100 Hz, 350 Hz, 1 kHz, 3 kHz and 8 kHz With FLS® (Feedback Locating System) |
| Input Impedance: | Mic Input: 2 K Ohms Line Input: 12 K Ohms |
| Distortion: | Less than 0.8% THD at rated output |
| Max Gain: | 86 dB mic input to speaker output |
| Signal/Noise Ratio: | 85 dB mic input typical |
| Reverb: | Digital |
| AC Power: | 115 VAC 60 Hz or 230 VAC 50/60 Hz |
| Weight Assembled: | 57 lbs.(25.9 Kg) |
| Dimensions: | 14.5" H x 36.75" W x 15.5" D (36.8H x 93.3W x 39.4D cm) |
| Speakers: | Woofer 10" (254 mm) Piezoelectric Horn Tweeter |
| Microphone: | Dynamic, Cardioid (Unidirectional) |
ESPAÑOL
Escort 2000
Effective Date: July 1, 1998
What This Warranty Covers
Your Peavey Warranty covers defects in material and workmanship in Peavey products purchased and serviced in the U.S.A. and Canada.
What This Warranty Does Not Cover
The Warranty does not cover: (1) damage caused by accident, misuse, abuse, improper installation or operation, rental, product modification or neglect; (2) damage occurring during shipment; (3) damage caused by repair or service performed by persons not authorized by Peavey; (4) products on which the serial number has been altered, defaced or removed; (5) products not purchased from an Authorized Peavey Dealer.
Who This Warranty Protects
This Warranty protects only the original retail purchaser of the product.
How Long This Warranty Lasts
The Warranty begins on the date of purchase by the original retail purchaser. The duration of the Warranty is as follows:
| Product Category | Duration |
| Guitars/Basses, Amplifiers, Pre-Amplifiers, Mixers, Electronic Crossovers and Equalizers | 2 years * (+ 3 years) |
| Drums | 2 years * (+ 1 year) |
| Enclosures | 3 years * (+ 2 years) |
| Digital Effect Devices and Keyboard and MIDI Controllers | 1 year * (+ 1 year) |
| Microphones | 2 years |
| Speaker Components (incl. speakers, baskets, drivers, diaphragm replacement kits and passive crossovers) and all Accessories | 1 year |
| Tubes and Meters | 90 days |
[denotes additional warranty period applicable if optional Warranty Registration Card is completed and returned to Peavey by original retail purchaser within 90 days of purchase.]
What Peavey Will Do
We will repair or replace (at Peavey's discretion) products covered by warranty at no charge for labor or materials. If the product or component must be shipped to Peavey for warranty service, the consumer must pay initial shipping charges. If the repairs are covered by warranty, Peavey will pay the return shipping charges.
How To Get Warranty Service
(1) Take the defective item and your sales receipt or other proof of date of purchase to your Authorized Peavey Dealer or Authorized Peavey Service Center.
OR
(2) Ship the defective item, prepaid, to Peavey Electronics Corporation, International Service Center, 412 Highway 11 & 80 East, Meridian, MS 39301 or Peavey Canada Ltd., 95 Shields Court, Markham, Ontario, Canada L3R 9T5. Include a detailed description of the problem, together with a copy of your sales receipt or other proof of date of purchase as evidence of warranty coverage. Also provide a complete return address.
Limitation of Implied Warranties
ANY IMPLIED WARRANTY, INCLUDING WARRANTYES OF MERCHANTABILITY AND FITNESS FOR A PARTICULAR PURPOSE, ARE LIMITED IN DURATION TO THE LENGTH OF THIS WARRANTY.
Some states do not allow limitations on how long an implied warranty lasts, so the above limitation may not apply to you.
Exclusions of Damages
PEAVEY'S LIABILITY FOR ANY DEFECTIVE PRODUCT IS LIMITED TO THE REPAIR OR REPLACEMENT OF THE PRODUCT, AT PEAVEY'S OPTION. IF WE ELECT TO REPLACE THE PRODUCT, THE REPLACEMENT MAY BE A RECONDITIONED UNIT. PEAVEY SHALL NOT BE LIABLE FOR DAMAGES BASED ON INCONVENIENCE, LOSS OF USE, LOST PROFITS, LOST SAVINGS, DAMAGE TO ANY OTHER EQUIPMENT OR OTHER ITEMS AT THE SITE OF USE, OR ANY OTHER DAMAGES WHETHER INCIDENTAL, CONSEQUENTIAL OR OTHERWISE, EVEN IF PEAVEY HAS BEEN ADVISED OF THE POSSIBILITY OF SUCH DAMAGES.
Some states do not allow the exclusion or limitation of incidental or consequential damages, so the above limitation or exclusion may not apply to you.
This Warranty gives you specific legal rights, and you may also have other rights which vary from state to state.
If you have any questions about this warranty or service received or if you need assistance in locating an Authorized Service Center, please contact the Peavey International Service Center at (601) 483-5365 / Peavey Canada Ltd. at (905) 475-2578.
Features and specifications subject to change without notice.
IMPORTANT SAFETY INSTRUCTIONS
WARNING: When using electric products, basic cautions should always be followed, including the following:
-
This unit should be checked by a qualified service technician if:
-
Read all safety and operating instructions before using this product.
- All safety and operating instructions should be retained for future reference.
- Obey all cautions in the operating instructions and on the back of the unit.
- All operating instructions should be followed.
- This product should not be used near water (i.e., a bathtub, sink, swimming pool, wet basement, etc.)
- This product should be located so that its position does not interfere with its proper ventilation. It should not be placed flat against a wall or placed in a built-in enclosure that will impede the flow of cooling air.
- This product should not be placed near a source of heat such as a stove, radiator, or another heat producing amplifier.
- Connect only to a power supply of the type marked on the unit adjacent to the power supply cord.
- Never break off the ground pin on the power supply cord. For more information on grounding, write for our free booklet "Shock Hazard and Grounding."
- Power supply cords should always be handled carefully. Never walk on or place equipment on power supply cords. Periodically check cords for cuts or signs of stress, especially at the plug and the point where the cord exits the unit.
- The power supply cord should be unplugged when the unit is to be unused for long periods of time.
- If this product is to be mounted in an equipment rack, rear support should be provided.
- Metal parts can be cleaned with a damp rag. The vinyl covering used on some units can be cleaned with a damp rag or an ammonia-based household cleaner if necessary. Disconnect unit from power supply before cleaning.
- Care should be taken so that objects do not fall and liquids are not spilled into the unit through the ventilation holes or any other openings.
a. The power supply cord or plug has been damaged.
b. Anything has fallen or been spilled into the unit.
c. The unit does not operate correctly.
d. The unit has been dropped or the enclosure damaged.
- The user should not attempt to service this equipment. All service work should be done by a qualified service technician.
- This product should be used only with a cart or stand that is recommended by Peavey Electronics.
- Exposure to extremely high noise levels may cause a permanent hearing loss. Individuals vary considerably in susceptibility to noise induced hearing loss, but nearly everyone will lose some hearing if exposed to sufficiently intense noise for a sufficient time. The U.S. Government's Occupational Safety and Health Administration (OSHA) has specified the following permissible noise level exposures.
Duration Per Day In Hours
8
6
4
3
2
1 1/2
1
1/2
1/4 or less
Sound Level dBA, Slow Response
90
92
95
97
100
102
105
110
115
According to OSHA, any exposure in excess of the above permissible limits could result in some hearing loss. Ear plugs or protectors for the ear canals or over the ears must be worn when operating this amplification system in order to prevent a permanent hearing loss if exposure is in excess of the limits as set forth above. To ensure against potentially dangerous exposure to high sound pressure levels, it is recommended that all persons exposed to equipment capable of producing high sound pressure levels such as this amplification system be protected by hearing protectors while this unit is in operation.
SAVE THESE INSTRUCTIONS!

PEAVY
Features and specifications subject to change without notice.
Peavey Electronics Corporation • 711 A Street • Meridian • MS • 39301
(601) 483-5365 • FAX (601) 486-1278 • www.peavey.com