
CD-GT1 - CD player with karaoke function TASCAM - Free user manual and instructions
Find the device manual for free CD-GT1 TASCAM in PDF.

| Product Type | CD Player with Karaoke Function |
| Brand | TASCAM |
| Model | CD-GT1 |
| Dimensions (W x D x H) | 232 x 138 x 40 mm (with feet) |
| Weight | 620 g (without batteries) |
| Power Supply | 9V DC AC adapter (PS-PS5) or 4 LR6 (AA) batteries |
| Power Consumption | 4 W (with AC adapter) |
| Compatible Discs | 8 cm (mini) and 12 cm CD |
| DA/AD Conversion | 24 bits |
| Digital Processing | 32 bits |
| Nominal Output Level LINE OUT | -10 dBV |
| Maximum Output Level LINE OUT | 0 dBV (1 Vrms) |
| Output Impedance | 1 kΩ |
| Maximum Headphone Output Level | >18 mW into 32 Ω |
| Nominal Input Level LINE IN | -10 dBV |
| Nominal Input Level MIC IN | -40 dBV |
| Nominal Input Level GUITAR IN | -15 dBV |
| CD Player Frequency Response | 20 Hz - 20 kHz ±1 dB |
| Signal-to-Noise Ratio | >88 dB |
| Dynamic Range | >88 dB |
| Harmonic Distortion | <0.01% |
| Main Functions | CD player, karaoke, built-in effects (distortion, chorus, reverb, etc.), chromatic tuner, transposition (KEY), slow-speed playback (SSA), pitch variation (PITCH), looping, line input, headphone output, external pedal |
| Maintenance and Cleaning | Clean with a dry cloth |
| Safety | Read instructions; do not expose to water; do not block vents; use only recommended adapter; unplug during storms |
| Repairability | For any maintenance, contact a qualified technician |
Frequently Asked Questions - CD-GT1 TASCAM
User questions about CD-GT1 TASCAM
0 question about this device. Answer the ones you know or ask your own.
Ask a new question about this device
Download the instructions for your CD player with karaoke function in PDF format for free! Find your manual CD-GT1 - TASCAM and take your electronic device back in hand. On this page are published all the documents necessary for the use of your device. CD-GT1 by TASCAM.
USER MANUAL CD-GT1 TASCAM
TEAC Professional Division
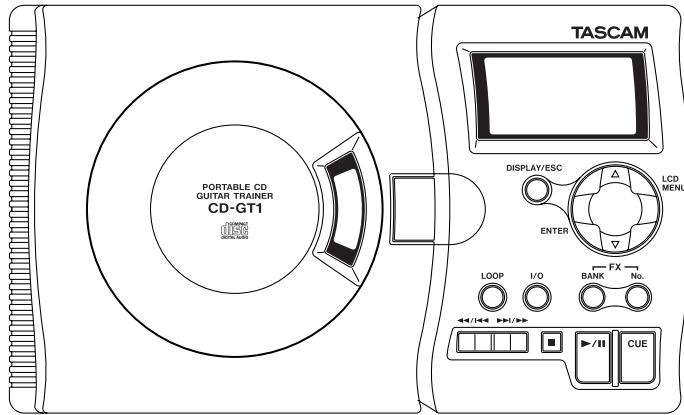
CD-GT1
Portable CD Guitar Trainer
This appliance has a serial number located on the rear panel. Please record the model number and serial number and retain them for your records.
Model number
Serial number
OWNER'S MANUAL (EN/F/D/I/E)

CAUTION
RISK OF ELECTRIC SHOCK DO NOT OPEN

CAUTION: TO REDUCE THE RISK OF ELECTRIC SHOCK,DO NOT REMOVE COVER (OR BACK). NO USER-SERVICABLE PARTS INSIDE.REFER SERVICING TO QUALIFIED SERVICE PERSONNEL.

The lightning flash with arrowhead symbol, within an equilateral trinagle, is intended to alert the user to the presence of uninsulated "dangerous voltage" within the product's enclosure that may be of sufficient magnitude to constitute a risk of electric shock to persons.

WARNING: TO PREVENT FIRE OR SHOCK HAZARD, DO NOT EXPOSE THIS APPLIANCE TO RAIN OR MOISTURE.
FOR U.S.A.
TO THE USER
This equipment has been tested and found to comply with the limits for a Class B digital device, pursuant to Part 15 of the FCC Rules. These limits are designed to provide reasonable protection against harmful interference when the equipment is operated in a commercial environment. This equipment generates, uses, and can radiate radio frequency energy and, if not installed and used in accordance with the instruction manual, may cause harmful interference to radio communications. However, there is no guarantee that interference will not occur in a particular installation. If this equipment does cause harmful interference to radio or television reception, which can be determined by turning the equipment off and on, the user is encouraged to try to correct the interference by one or more of the following countermeasures.
a) Reorient or relocate the receiving antenna
b) Increase the separation between the equipment and receiver.
c) Connect the equipment into an outlet on a circuit other from that to which the receiver is connected.
d) Consult the dealer or an experienced radio/ TV technician for help.
CAUTION
Changes or modifications to this equipment not expressly approved by TEAC CORPORATION for compliance could void the user's authority to operate this equipment.
1 Read these instructions.
2 Keep these instructions.
3 Heed all warnings.
4 Follow all instructions.
5 Do not use this apparatus near water.
6 Clean only with dry cloth.
7 Do not block any ventilation openings. Install in accordance with the manufacturer's instructions.
8 Do not install near any heat sources such as radiators, heat registers, stoves, or other apparatus (including amplifiers) that produce heat.
9 Do not defeat the safety purpose of the polarized or grounding-type plug. A polarized plug has two blades with one wider than the other. A grounding type plug has two blades and a third grounding prong. The wide blade or the third prong are provided for your safety. If the provided plug does not fit into your outlet, consult an electrician for replacement of the obsolete outlet.
10 Protect the power cord from being walked on or pinched particularly at plugs, convenience receptacles, and the point where they exit from the apparatus.
11 Only use attachments/accessories specified by the manufacturer.
12 Use only with the cart, stand, tripod, bracket, or table specified by the manufacturer, or sold with the apparatus. When a cart is used, use caution when moving the cart/apparatus combination to avoid injury from tip-over.

13 Unplug this apparatus during lightning storms or when unused for long periods of time.
14 Refer all servicing to qualified service personnel. Servicing is required when the apparatus has been damaged in any way, such as power-supply cord or plug is damaged, liquid has been spilled or objects have fallen into the apparatus, the apparatus has been exposed to rain or moisture, does not operate normally, or has been dropped.
- Do not expose this apparatus to drips or splashes.
- Do not place any objects filled with liquids, such as vases, on the apparatus.
- Do not install this apparatus in a confined space such as a book case or similar unit.
The apparatus draws nominal non-operating power from the AC outlet with its POWER switch in the off position.
NOTES
The CD-GT1 cannot play unfinalized CD-R/RW discs. In addition, some finalized CD-R/RW discs may be unplayable on the CD-GT-1.
To avoid the possibility of slight noise when you use the unit with the AC adapter, remove the batteries before connecting the AC adapter. If any batteries are accidentally left in the unit, you should always switch the unit off when changing between AC adapter and battery power.
The microphone input is unbalanced. Use an unbalanced microphone cable fitted with a 1/4" plug.
Ni-MH batteries may exhibit reduced performance in an environment under 10^ (50F). Also, if these batteries are not used for some time after charging, they may also exhibit reduced performance.
The performance of alkaline batteries also depends on temperature and time since manufacture (low temperatures and longer periods mean shorter battery life, regardless of the battery indicator as shown on the display).
Bear this in mind when operating the unit, and use freshly recharged Ni-MH batteries, new alkaline batteries or use an AC adapter if battery life seems inadequate.
Safety Information
This product has been designed and manufactured according to FDA regulations "title 21, CFR, chapter1, subchapter J, based on the Radiation Control for Health and Safety Act of 1968", and is classified as a class 1 laser product. There is no hazardous invisible laser radiation during operation because invisible laser radiation emitted inside of this product is completely confined in the protective housings. The label required in this regulation is shown here.
CAUTION
DO NOT REMOVE THE PROTECTIVE HOUSING USING A SCREWDRIVER.
- USE OF CONTROLS OR ADJUSTMENTS OR PERFORMANCE OF PROCEDURES OTHER THAN THOSE SPECIFIED HEREIN MAY RESULT IN HAZARDOUS RADIATION EXPOSURE.
- IF THIS PRODUCT DEVELOPS TROUBLE, CONTACT YOUR NEAREST QUALIFIED SERVICE PERSONNEL, AND DO NOT USE THE PRODUCT IN ITS DAMAGED STATE.
Optical pickup: Type KSM-900AAA
Manufacturer: SONY CORPORATION
Laser output: < 1 mW play on the objective lens
Wavelength: 775—816 nm
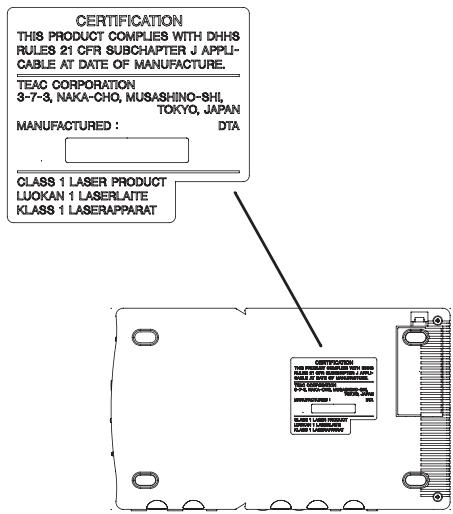
Table of contents. 5
First steps with your CD-GT1 6
Making connections 7
Adjusting the balance 8
Using the menu system 9
Using the CD player. 10
Pitch and tempo changes 11
Using effects. 12
Effect presets and parameters 13
Using the tuner. 14
Facts and figures (specifications) 15
First steps with your CD-GT1
About this manual
When we refer to a key or connector or control on the CD-GT1, we write it like this: PLAY.
When we refer to an item shown on the display, we write it like this: MENU.
Inserting batteries
The CD-GT1 uses four AA (SUM-3) batteries (not supplied). We recommend the use of rechargeable Ni-MH batteries (alkaline batteries may also be used).
Always use batteries of the same type.
Always replace all batteries together.
- If you are not going to use the CD-GT1 for some time, remove the batteries.
- Place the batteries following the + and - markings inside the battery compartment.
- Maximize battery life by using the unit in the following tempera
ture range: 10^ to 30^ (50^ to 86^)
Always dispose of used batteries as recommended by your local authorities.
When the battery level drops, the unit automatically shuts down and must be restarted with the POWER switch after the batteries have been replaced.
Note that the battery indicator on the display only provides a rough estimate of remaining battery life, and under some circumstances, there may not be enough power in the batteries to power the CD-GT1, despite the battery power indication on the display.
Using an AC adapter
Only use a TASCAM PS-PS5 adapter (not supplied). Using another type of AC adapter may damage your CDGT1.
Always make sure that the AC voltage matches the voltage written on the AC adapter.
Switching on the unit
The CD-GT1 has two power switches. Use the first POWER switch (sliding switch) to turn the power to the whole unit on and off.
The second switch, GUITAR, controls the power to the GUITAR/INPUT jack and effect unit. If this section is off, you cannot use this jack, or use any of the guitar/mic-related menu systems (effect and tuner).
Also note the HOLD switch that locks the CD-GT1's controls and keys when it is in the ON position.
Auto power-saving
If the unit is powered using batteries for more than 5 minutes in stop mode or with no disc loaded or opened, the CD player shuts down (the CD part of the display goes blank), but you can still use the guitar section.
Restart the CD player alone by using the PLAY key (or use the POWER switch if both the CD and guitar sections are turned off).
Inputs
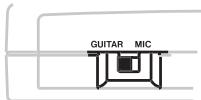
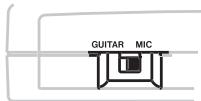
Connecting a guitar
To connect a guitar or bass guitar to the unit, simply connect one end of the guitar cord to the guitar, and connect the other to the GUITAR/MIC IN jack of the CD-GT1.
If you use effects pedals or stomp boxes, you can connect the output of these to the CD-GT1 (remember that the CD-GT-1 has its own effects).
Set the GUITAR/MIC switch to GUITAR.
Make sure the GUITAR power button is pushed in.
WARNING
NEVER connect a guitar amplifier to the CD-GT1's GUITAR/MIC input, as you will damage your equipment if you do this.
Connecting a microphone
Connect a suitable microphone (ask your TASCAM dealer if you are not sure) to the GUITAR/MIC IN jack of the CD-GT1.
Set the GUITAR/MIC switch to MIC.
Connecting a stereo line source
You can also connect a stereo line source such as the outputs from a synthesizer, a guitar preamplifier or rackmount effects unit or a cassette deck, etc. to the CD-GT1. Use the LINE IN mini-jack beside the GUITAR/MIC IN jack.
WARNING
You should NEVER connect the speaker outputs of a guitar amplifier to anything except speakers. If you are in any doubt at all about what you can connect to your CD-GT1, ask someone who knows.
Connecting a footswitch
You can connect a footswitch to the CD-GT1 to step through the effect slot settings, or to cue the CD player "hands-off" (see later in this manual for details).
To avoid problems with your CDGT1, use only a TASCAM RC-30P footswitch (or similar non-latching "push-to-make" footswitch) connected to the FOOT jack.
Outputs
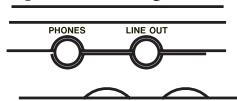
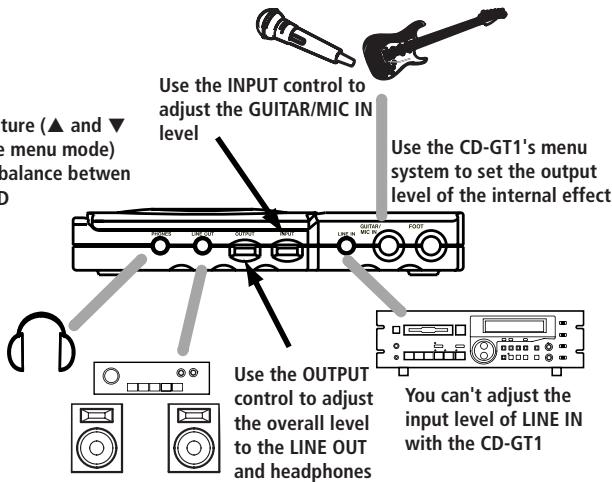
Connect the unit to a stereo system's AUX input, or mixer input, etc. using a suitable stereo cable (not supplied), connected to the CD-GT1's LINE OUT stereo mini-jack.
Connect a pair of headphones (not supplied) to the PHONES stereo mini-jack for private listening.
Adjusting the balance
Inputs
The CD-GT1 has three input sources:
the CD being played
the guitar or microphone connecte ed to the GUITAR/MIC IN jack
- any stereo input connected to the LINE IN jack.
The first and last of these cannot have their input levels changed by the CD-GT1 (but see below for details of how to balance the CD with the input).
Use the level control of the device connected to LINE IN to adjust the level of this source (remember that this source cannot be effected by the CD-GT1's effects).
- Use the CD-GT1's INPUT control to adjust the level of the guitar or mic before it is sent to the effect.
- When a menu is not selected, you can use the and keys to set the relative balance of the guitar or microphone (but not the LINE IN source) compared to the output from the CD player. This MIX value
The MIX feature (▲ and keys outside menu mode) adjusts the balance between input and CD
Use the INPUT control to adjust the GUITAR/MIC IN level
Use the CD-GT1's menu system to set the output level of the internal effect
can be set to between -5 and +5 .
Remember that this is only possible when not in menu mode.
- Use the CD-GT1's menu system to adjust the output level of the effect.
Outputs
There are two outputs: the line and the headphones. These cannot have their levels set separately—use the OUTPUT control to set the overall output level.
See the table on this page for details of the different menus and their settings.
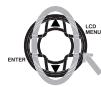
To enter the menu system, press the LCD MENU key until the menu you want appears (shown in a flashing reversed box) and the first menu item is shown on the main part of the screen.
Use the "up" or "down" keys (▲ and ) to set the value of the first menu item.
Note that you do not need to press ENTER to set the values. The settings change as soon as the key is pressed.
Press ENTER to move to the next menu item in the list.
Press MENU to move to the next menu and its first menu item.
Exit the menu system using the DISPLAY/ESC key.
NOTE
The TUNER menu requires you to press ENTER after the TUNER menu is shown on screen (as the effect sound is cut when the tuner is operational).
| Menu | Menu item | Values | Notes |
| EFFECT | EFF | ON/OFF | turns effect on or off |
| LIB | 00 to 42 | preset number | |
| Parameter | — | depends on effect type | |
| LVL | 0 to 64 | effect output level | |
| PITCH | PIT | 0 to -50% (pitch) or 0, -8, -16, -32 and -50 (SSA) | sets pitch shift or slow speed audition values |
| SSA | SSA ON/OFF | Sets slow speed audition on or off | |
| KEY | KEY | #6 to b6 (or SSA) | Sets pitch shift in semitones |
| FINE | -50 to +50 (or SSA) | sets pitch shift in cents | |
| MENU | PLAY | ALL/SGL | all or single play |
| CUE | CUE/FLS | cue or “flash play” operation | |
| FOOT | EFF/CUE | sets footswitch mode: either step through the effect slots, or cueing | |
| TUNER | AT/MT | E2 to E5 (when tuning) | |
| MODE | AT/MT | automatic or manual tuning | |
| CAL | 435 to 445 | calibration in Hz |
Using the CD player
The CD-GT1's CD player works in much the same way as other CD players, with a few minor differences and special features, as explained on this page.
Load CDs label side up (shiny side down) in the CD-GT1. Open and close the player door by hand.
Playback
Press the play/pause key ( / ) key to start playback and to pause playback.
Press the stop key (■) to stop playback.
When you use the player with batteries, starting and stopping playback take longer than under AC power (this saves battery power).
Display
Use the DISPLAY/ESC key to change the display between: track elapsed time, track remaining time and total remaining time (you cannot do this in menu mode).
Skipping between tracks
Use the two skip/search keys (marked as / and / ) to move back and forward a track at a time by pressing and releasing the appropriate key.
Searching within tracks
Use the skip/search keys to search within the disc by pressing and holding the appropriate key.
The CUE key
The CUE key is a special feature of the CD-GT1. When you press this key, the playback position returns to the last point where playback started.
What happens next depends on the CUE menu item setting (in the MENU menu). If this is set to CUE, playback is paused at the cue point, but if it is set to FLS, playback restarts from the cue point (if CUE is pressed from play or pause).
TIP
With a footswitch connected, you can use this instead of the CUE key for hands-free operation (set the FOOT menu item to CUE).
Looping (track)
Using the PLAY menu item, set SGL (single play). Press the LOOP key so that you see LOOP 1 on the display (bottom left). The current track will repeat.
Looping (disc)
Using the PLAY menu item, set ALL (play all the disc). Press the LOOP key so that you see LOOP alone on the display (bottom left). The whole disc will repeat.
Looping (I/O points)
Use the I/O key to set the start (in) point of the loop, then use the key to set the out point. The section between the points will repeat seamlessly.
Pressing the I/O key again clears the loop points and cancels loop mode.
With these points set (I-O shown on the display), you can restart the I/O loop mode (if it has been canceled) using the LOOP key.
Canceling looping
Press the LOOP key so that LOOP does not show on the display (bottom left).
There are three modes for changing the way a CD is played back.
NOTE
Only one of these modes can be active at a time.
These modes help you to play along at a different key or a different tempo so that you can learn your favorite riffs and licks.
TIP
Use these together with the looping function to help your practice.
KEYmode
The "key" mode changes the key of the music by six semitones up or down. The tempo does not change.
The value is set in semitones and cents (1/100ths of a semitone) shown as # 6 to #6. When both semitones and cents are 0, the KEY mode is off (if SSA is on, this is also off).
When this mode is on, the display shows KEY.
Use this mode when you find the key
of the CD track difficult to play or sing in.
SSA mode
The SSA (Slow Speed Audition) mode slows down the tempo without changing the key. The settings are 0 (off), -8, -16, -32 and -50 (all percent).
When this mode is active, the display (left side) shows SSA. Use this mode to practice difficult fast licks.
PITCH mode
The pitch mode changes both pitch and tempo in 1% steps, down to -50% . 0% is the "off" setting.
When this mode is active, the display shows PITCH.
Making settings
Use the menu system to turn SSA on or off (PITCH menu) and then set the value for the pitch or SSA settings (PITCH menu again), or with SSA off, choose KEY from the next (KEY) menu and make the KEY (semitone) and FINE settings.
Remember!
- Shift pitch alone=KEY
- Slow down and keep pitch = SSA
- Slow down and drop pitch = PITCH
How effects work
There are two effect "banks": A and B, each with five "slots" numbered from 1 through 5 where you can store your own effect settings.
Effects are created from the 43 preset effects available (30 guitar and 13 vocal). When a bank and slot are selected, if a preset effect is recalled and edited, that bank slot is automatically filled with the edited effect.
Storing your own effect settings in a bank slot

Press the BANK key to select either the A or B bank as shown on the display.
Press the No. key to select the bank slot (1 through 5) as shown on the display.

Press the LCD MENU key until EFFECT appears on the display.
Use the key to turn the effect ON.

Press ENTER, and then select the preset effect (00 through 42) with the and keys.
NOTE
If there were any settings in the selected bank slot to start with, they will be overwritten when you recall a library entry.
Press ENTER once more to start editing the parameters with the and keys (see the table later for details of these parameters).
The last parameter is always LVL (the output level from the effect unit (0 to 64). This is only available when the effect is active and is bypassed with the effect off.

Set the level and then press the DISPLAY/ESC key to exit the effect settings. The effect settings you have made are automatically stored in the bank slot you first chose.
Recalling an effect with your settings
When you have stored the effect settings in a bank slot as described above, you can recall them simply pressing the BANK and No. keys to select the appropriate bank slot (you should also make sure that the effect is switched on).
TIP
If you have a footswitch connected and the FOOT menu item is set to EFF, you can step through the bank slots by pressing the footswitch.
The preset effects can be divided into three categories:
| Distortion | Clean sound | Vocal |
| 00 DIST-TONE-FLA-REV | 15 COMP-TONE-FLA-REV | 30 De-esser |
| 01 DIST-TONE-FLA-DLY | 16 COMP-TONE-FLA-DLY | 31 Chorister |
| 02 DIST-TONE-PHA-REV | 17 COMP-TONE-PHA-REV | 32 Emphasis |
| 03 DIST-TONE-PHA-DLY | 18 COMP-TONE-PHA-DLY | 33 Shout |
| 04 DIST-TONE-EXC-REV | 19 COMP-TONE-EXC-REV | 34 Mood Vocal |
| 05 DIST-TONE-EXC-DLY | 20 COMP-TONE-EXC-DLY | 35 Response |
| 06 DIST-TONE-CHO-REV | 21 COMP-TONE-CHO-REV | 36 Proclaim |
| 07 DIST-TONE-CHO-DLY | 22 COMP-TONE-CHO-DLY | 37 Quivering Voice |
| 08 DIST-TONE-TRM-REV | 23 COMP-TONE-TRM-REV | 38 Duet |
| 09 DIST-TONE-TRM-DLY | 24 COMP-TONE-TRM-DLY | 39 Lo-Fi Vocal |
| 10 DIST-TONE-VIB-REV | 25 COMP-TONE-VIB-REV | 40 Megaphone |
| 11 DIST-TONE-VIB-DLY | 26 COMP-TONE-VIB-DLY | 41 Screaming |
| 12 DIST-TONE-WAH-REV | 27 COMP-TONE-WAH-REV | 42 Panning Vocal |
| 13 DIST-TONE-WAH-DLY | 28 COMP-TONE-WAH-DLY | — |
| 14 DIST-TONE-PIT-DLY | 29 COMP-TONE-PIT-DLY | — |
As this shows, each of the guitar (distortion and clean) presets has four components, each of which can be adjusted individually and are shown on the display as listed in the table here.
The vocal presets have one parameter each, shown on the display as PAR.
The parameters
DIST Distortion gain
COMP Compressor gain
TONE Tone control
FLA Flanger setting
REV Reverb setting
DLY Delay setting
PHA Phaser setting
EXC Exciter setting
PIT Pitch shifter setting
CHO Chorus setting
TRM Tremolo setting
VIB Vibrato setting
WAH Auto-wah setting
All presets also have a VL (level) setting from 0 to 64.
Using the tuner
The CD-GT1's built-in guitar tuner has two modes; an automatic mode, where the pitch of the incoming signal is detected and displayed automatically, and a manual mode, where you set the "target" and tune to it.
Press the MENU key until the display shows TUNER, and then press ENTER.

When you enter the tuner mode, any effect is automatically turned off.
If the tuner is in automatic mode (shown as AT on the display), just play a note on your guitar. The tuner guess the closest note and shows it on the display. Tune the string roughly so that the right note appears, and then adjust the tuning until the display shows a large center "blob".
If the tuner is in manual mode (shown as MT on the display), use the and keys to set the note on the display, and
then tune as above.
Calibrating the tuner.
Usually, the A above Middle C is tuned to 440Hz (in most Western music).
There may be times when you need to tune to a different standard (you are playing with another instrument or to a CD which does not use the 440Hz tuning). Use the tuner's CAL (calibration menu) to set the "reference A" to a tuning between 435Hz and 445Hz .
NOTE
Although you do not need to play a CD when you are tuning, the CD-GT1 must be switched on, and the GUITAR button must be pressed in to allow tuning of the guitar plugged into the CD-GT1.
| Disc types | 8 cm single, 12 cm CD |
| AD/DA | 16-bit |
| Digital signal processing | 32-bit |
| Nominal output level (LINE OUT) | -10 dBV |
| Maximum output level (LINE OUT) | 0 dBV (1 Vrms) |
| Output impedance | 1 kΩ |
| Maximum output level (PHONES) | > 18 mW (into 32 Ω |
| Nominal input levels | |
| LINE IN | -10 dBV |
| MIC IN | -40 dBV |
| GUITAR IN | -15 dBV |
| CD playback characteristics | |
| Frequency response | 20 Hz to 20 kHz ±1.0 dB |
| Dynamic range | > 88 dB |
| S/N ratio | > 88 dB |
| THD | < 0.01% |
| Voltage requirements | DC 9V (PS-PS5 AC adapter) |
| AA batteries x 4 (NiMH or alkaline) | |
| Power consumption | 4W (PS-PS5 AC adapter) |
| Dimensions (w x d x h) including feet | 232 x 138 x 40 (mm) / 9.1 x 5.4 x 1.6 (in) |
| Weight (excluding batteries) | 620 g / 1 lb, 6 oz |
CONSIGNES DE SECURITE IMPORTANTES
Mode KEY (transposition)
DIST Distortion (gain)
DIST Guadagno Distortion
COMP Guadagno Compressor
Alternatively, you can use the line of the stereo to connect a line into the stereo. Alternatively, you can use the line of the stereo to connect a line into the stereo. Alternatively, you can use the line of the stereo to connect a line into the stereo. Alternatively, you can use the line of the stereo to connect a line into the stereo. Alternatively, you can use the line of the stereo to connect a line into the stereo. Alternatively, you can use the line of the stereo to connect a line into the stereo. Alternatively, you can use the line of the stereo. Alternatively, you can use the line of the stereo to connect a line into the stereo. Alternatively, you can use the line of the stereo to connect a line into the stereo. Alternatively, you can use the line of the stereo to connect a line into the stereo. Alternatively, you can use the line of the stereo to connect a line into the stereo. Alternatively, you can use the line of the stereo to connect a line into the stereo. Alternatively, you can use the lines of the stereo to connect a line into the stereo. Alternatively, you can use the lines of the stereo to connect a line into the stereo. Alternatively, you can use the lines of the stereo to connect a line into the stereo. Alternatively, you can use the lines of the stereo to connect a line into the stereo. Alternatively, you can use the lines of the stereo to connect a line into the stereo. Alternatively, you can use the lines of the stereo to connect a line into the Stereo. Alternatively, you can use the lines of the stereo to connect a line into the stereo. Alternatively, you can use the lines of the stereo to connect a line into the stereo. Alternatively, you can use the lines of the stereo to connect a line into the stereo. Alternatively, you can use the lines of the stereo to connect a line into the stereo. Alternatively, you can use the lines of the stereo to connect a line into the stereo. Alternatively, you can use the lines ofthe stereo to connect a line into the stereo. Alternatively, you can use the lines ofthe stereo to connect a line into the stereo. Alternatively, you can use the lines ofthe stereo to connect a line into the stereo. Alternatively, you can use the lines ofthe stereo to connect a line into the stereo. Alternatively, you can use the lines ofthe stereo to connect a line into the stereo. Alternatively, you can use the lines ofthe stereo to connect a line into the stereo.
ATENCION
280 William St Melbourne Victoria 3000 AUSTRALIA
+61-3-9672-2400
www.teac.com.au
- CD-GT1
- FOR U.S.A.
- TO THE USER
- CAUTION
- NOTES
- Safety Information
- First steps with your CD-GT1
- About this manual
- Inserting batteries
- Using an AC adapter
- Switching on the unit
- Auto power-saving
- Inputs
- Connecting a guitar
- WARNING
- Connecting a microphone
- Connecting a stereo line source
- Connecting a footswitch
- Outputs
- Adjusting the balance
- NOTE
- Using the CD player
- Playback
- Display
- Skipping between tracks
- Searching within tracks
- The CUE key
- TIP
- Looping (track)
- Looping (disc)
- Looping (I/O points)
- Canceling looping
- KEYmode
- SSA mode
- PITCH mode
- Making settings
- Remember!
- How effects work
- Storing your own effect settings in a bank slot
- Recalling an effect with your settings
- The parameters
- Using the tuner
- Calibrating the tuner.
- CONSIGNES DE SECURITE IMPORTANTES
- Mode KEY (transposition)
- ATENCION
Brand : TASCAM
Model : CD-GT1
Category : CD player with karaoke function