
ZYWALL 100 - Firewall ZYXEL - Free user manual and instructions
Find the device manual for free ZYWALL 100 ZYXEL in PDF.

User questions about ZYWALL 100 ZYXEL
0 question about this device. Answer the ones you know or ask your own.
Ask a new question about this device
Download the instructions for your Firewall in PDF format for free! Find your manual ZYWALL 100 - ZYXEL and take your electronic device back in hand. On this page are published all the documents necessary for the use of your device. ZYWALL 100 by ZYXEL.
USER MANUAL ZYWALL 100 ZYXEL
VPN Administration Guide
Revision A
SafeNet/Soft-PK Version 5.1.3 Build 4
Sidewinder Version 5.1.0.02
Copyright Notice
This document and the software described in it are copyrighted. Under the copyright laws, neither this document nor this software may be copied, reproduced, translated, or reduced to any electronic medium or machine-readable form without prior written authorization of Secure Computing Corporation. Copyright © 2001, Secure Computing Corporation. All rights reserved. Made in the U.S.A.
Trademarks
Secure Computing, Sidewinder, Type Enforcement, and Strikeback are either registered trademarks or trademarks of Secure Computing Corporation. All other trademarks, tradenames, service marks, service names, product names, and images mentioned and/or used herein belong to their respective owners.
Secure Computing Corporation Software License Agreement
CAREFULLY READ THE FOLLOWING TERMS AND CONDITIONS BEFORE LOADING THE SOFTWARE. BY LOADING THE SOFTWARE, YOU ACKNOWLEDGE THAT YOU HAVE READ THIS AGREEMENT, UNDERSTAND IT, AND AGREE TO BE BOUND BY ITS TERMS AND CONDITIONS.
Secure Computing Corporation ("Secure Computing") provides its software and licenses its use either directly or through authorized dealers. You assume responsibility for the selection of the programs to achieve your intended results, and for the installation (unless installation is purchased from Secure Computing or an authorized dealer), use, and results obtained from the programs.
1. Grant of License
Secure Computing grants to you, and you accept, a non-exclusive, and non-transferable license (without right to sub-licensure) to use the Software Products as defined herein on a single machine.
2. Software Products
"Software Products" mean (i) the machine-readable object-code versions of the Software of Secure Computing contained in the media (the "Software"), (ii) the published user manuals and documentation that are made available for the Software (the "Documentation"), and (iii) any updates or revisions of the Software or Documentation that you may receive (the "Update"). Under no circumstances will you receive any source code of the Software. Software Products provided for use as "backup" in the event of failure of a primary unit may be used only to replace the primary unit after a failure in fact occurs. They may not be used to provide any capability in addition to the functioning primary system that they backup.
3.Use
You may not transfer any Software Products to any third party. You may not copy, translate, modify, sub-license, adapt, decompile, disassemble, or reverse engineer any Software Product in whole or in part except to make one copy of the Software solely for back-up or archival purposes.
4. Limited Warranty and Remedies
Secure Computing warrants that the disk(s) or tape(s) on which its Software is recorded is/are free from defects in material and workmanship under normal use and service for a period of ninety (90) days from the date of shipment to you.
Secure Computing does not warrant that the functions contained in the Software will meet your requirements or that operation of the program will be uninterrupted or error-free. The Software is furnished "AS IS" and without warranty as to the performance or results Licensee may obtain by using the Software. The entire risk as to the results and performance of the Software is assumed by Licensee. If Licensee does not receive media which is free from defects in materials and workmanship during the 90-day warranty period, Licensee will receive a refund for the amount Licensee paid for the Software Product returned.
5. Limitation of Warranty and Remedies
THE WARRANTY STATED HEREIN ARE IN LIEU OF ALL OTHER WARRANTYES, EXPRESS OR IMPLIED, INCLUDING ANY WARRANTYES OF MERCHANTABILITY OR FITNESS FOR A PARTICULAR PURPOSE. SOME STATES AND COUNTRIES DO NOT ALLOW THE EXCLUSION OF IMPLIED WARRANTYES, SO THE ABOVE EXCLUSION MAY NOT APPLY TO YOU. THIS WARRANTY GIVES YOU SPECIFIC LEGAL RIGHTS. YOU MAY HAVE OTHER RIGHTS WHICH VARY BY STATE OR COUNTRY.
SECURE COMPUTING'S AND ITS LICENSORS ENTIRE LIABILITY UNDER, FOR BREACH OF, OR ARISING OUT OF THIS AGREEMENT, IS LIMITED TO A REFUND OF THE PURCHASE PRICE OF THE PRODUCT OR SERVICE THAT GAVE RISE TO THE CLAIM. IN NO EVENT SHALL SECURE COMPUTING OR ITS LICENSORS BE LIABLE FOR YOUR COST OF PROCURING SUBSTITUTE GOODS. IN NO EVENT WILL SECURE COMPUTING OR ITS LICENSORS BE LIABLE FOR ANY INDIRECT, SPECIAL, CONSEQUENTIAL, INCIDENTAL, EXEMPLARY, OR OTHER DAMAGES WHEHER OR NOT SECURE COMPUTING HAS BEEN ADVISED OF THE POSSIBILITY OF SUCH LOSS OR DAMAGE.
6. Term and Termination
This license is effective until terminated. If you are using this license with a limited term, it shall expire at the end of the license term. You may terminate it at any time by destroying the Software Product, including all computer programs and documentation, and erasing any copies residing on computer equipment. This Agreement also will automatically terminate if you do not comply with any terms or conditions of this Agreement. Upon such termination, you agree to destroy the Software Product and erase all copies residing on computer equipment.
7. Ownership
All intellectual property rights including trademarks, service marks, patents, copyrights, trade secrets, and other proprietary rights in or related to the Software Products are, and will remain the property of Secure Computing or its licensors, whether or not specifically recognized or protected under local law.
8. Export Restrictions
You agree to comply with all applicable United States export control laws and regulations, including without limitation, the laws and regulations administered by the United States Department of Commerce and the United States Department of State.
9. U.S. Government Rights
Software Products furnished to the U.S. Government are provided on these commercial terms and conditions as set forth in DFARS 227.7202-1(a).
10. General
Any waiver of or modification to the terms of this Agreement will not be effective unless executed in writing and signed by Secure Computing. If any provision of this Agreement is held to be unenforceable, in whole or in part, such holding shall not affect the validity of the other provisions of this Agreement. In the event of any inconsistency between this Agreement and any other related agreements between you and Secure Computing, the terms of this Agreement shall prevail.
Technical Support Information
Secure Computing works closely with our Channel Partners to offer worldwide Technical Support services. If you purchased this product through a Secure Computing Channel Partner, please contact your reseller directly for support needs.
To contact Secure Computing directly or inquire about obtaining a support contract, refer to our "Contact Secure" Web page for the latest contact information at www.securercomputing.com. Or if you prefer, send us an email at support@securecomputing.com.
Comments?
If you have comments or suggestions you would like to make regarding this document, please send an email to techpubs@securecomputing.com.
Printing History
| Date | Part number | Software Release |
| March 2001 | 86-0935037-A | Soft-PK 5.1.3 Build 4 and Sidewinder 5.1.0.02 |
TABLE OF CONTENTS
Preface: About this Guide. .v
Who should read this guide? .
How this guide is organized vi
Where to find additional information vii
Chapter 1: Getting Started 1-1
About Soft-PK & Sidewinder VPNs 1-2
Requirements 1-3
Sidewinder and other network requirements 1-3
Soft-PK requirements 1-4
Roadmap to deploying your VPNs 1-5
Chapter 2: Planning Your VPN Configuration. 2-1
Identifying basic VPN connection needs 2-2
Identifying authentication requirements 2-3
Using digital certificate authentication 2-3
Understanding pre-shared key authentication 2-5
Extended authentication 2-6
Determining where you will terminate your VPNs 2-7
More about virtual burbs and VPNs 2-8
Defining a virtual curb 2-8
Understanding Sidewinder client address pools 2-9
Chapter 3: Configuring Sidewinder for Soft-PK Clients . 3-1
Enabling the VPN servers 3-2
Configuring ACL & proxies entries for VPN connections 3-3
Managing Sidewinder self-signed certs 3-4
Creating & exporting a firewall certificate 3-4
Creating & exporting remote certificate(s) 3-6
Managing CA-based certificates 3-9
Defining a CA to use and obtaining the CA root cert 3-9
Requesting a certificate for the firewall 3-10
Determining identifying information for client certificates 3-12
Defining remote client identities in Sidewinder 3-13
Managing pre-shared keys (passwords) 3-14
Configuring the VPN on the Sidewinder 3-15
Chapter 4: Installing and Working with Soft-PK. 4-1
Soft-PK installation notes 4-2
Starting Soft-PK 4-3
Determining Soft-PK status from icon variations 4-3
Activating/Deactivating Soft-PK 4-4
About the Soft-PK program options 4-5
Managing certificates on Soft-PK 4-6
Setting up Sidewinder self-signed certificates 4-6
Setting up CA-based certificates 4-7
Requesting a personal certificate from a CA on user's behalf 4-8
Importing certificate in Soft-PK 4-9
Configuring a security policy on the Soft-PK 4-13
Chapter 5: Deploying Soft-PK to Your End Users . . . . . . 5-1
Overview 5-2
Customizing the user worksheet 5-4
Specifying dial-up network instructions 5-4
Specifying installation instructions 5-4
Specifying certificate import/request instructions 5-5
Specifying security policy instructions 5-6
Specifying basic connection information 5-6
Appendix A: Troubleshooting .A-1
Soft-PK Log Viewer .A-1
Soft-PK Connection Monitor .A-2
More about the Connection Monitor A-3
To view the details A-3
Sidewinder troubleshooting commands .A-4
This guide provides the information needed to set up connections between remote systems running SafeNet/Soft-PK™ VPN client software and systems on a network protected by Secure Computing's Sidewinder firewall. SafeNet/Soft-PK is a Windows-compatible program that secures data communications sent from a desktop or laptop computer across either a public network or an existing corporate dial-up line.
Note: The SafeNet/Soft-PK product is referred to as simply "Soft-PK" throughout the remainder of this document.

IMPORTANT: This guide describes administration of VPNs between Soft-PK Version 5.1.3 Build 4 and Sidewinder Version 5.1.0.02. If you are working with a later version of either product, check our Web page at www.securecomputing.com for the latest documentation (select Downloads & Activations -> Product Documentation).
Who should read this guide?
This guide is written for the person assigned to administer Sidewinder-based VPN connections involving a Soft-PK VPN client. Setting up VPN connections involves procedures done on Sidewinder and procedures done using Soft-PK to pre-configure the VPN client security policy for each remote user (road warrior, telecommuter, etc.).
As a network administrator, you should read and understand all the procedures in this document. You will then be able to provide all remote users with the information, files, and software they need to set up Soft-PK software to communicate with your trusted network(s).
This guide assumes you are familiar with networks and network terminology. Because Soft-PK will use a security association with a Sidewinder firewall, you should be familiar with Sidewinder administration. Knowledge of the Internet and of Windows operating systems are also key requirements.
How this guide is organized
This guide contains the following chapters.
| Chapter Title | Description |
| Chapter 1:Getting Started | Presents an overview of the Soft-PK and the Sidewinder Virtual Private Network (VPN) environment and describes the requirements. It includes a checklist to guide you through the basic steps to setup and deploy a VPN. |
| Chapter 2:Planning your VPN Configuration | Provides information to help you understand key concepts and options that are involved in a VPN connection. |
| Chapter 3:Configuring Sidewinder for Soft-PK Clients | Provides a summary of Sidewinder procedures associated with setting up and configuring Soft-PK connections in your network. Note: Perform these procedures before you configure your Soft-PK clients. |
| Chapter 4:Installing and Working with Soft-PK | Includes Soft-PK installation notes and describes the basic Soft-PK procedures for managing certificates and creating a customized Soft-PK security policy for your remote clients. |
| Chapter 5:Deploying Soft-PK to Your End Users | Summarizes the steps for preparing and deploying the Soft-PK software, digital certificate files, and security policy to your end users. It is based on a worksheet (in MS Word format) that you edit and send to each remote end user. |
| Appendix A:Troubleshooting | Provides a summary of troubleshooting techniques available for resolving Soft-PK and Sidewinder VPN connection problems. |
Finding information
This guide is in Acrobat (softcopy) format only and does not contain an index. However, you can use Acrobat's Find feature to search for every instance of any word or phrase that you want.
Viewing and printing this document online
When you view this document online in PDF format, you may find that the screen images are blurry. If you need to see the image more clearly, you can either enlarge it (which may not eliminate the blurriness) or you can print it. (The images are very clear when printed out.)
For the best results, print this PDF document using a PostScript printer driver.
If your printer understands PostScript but does not have a PostScript driver installed, you need to install a PostScript driver. You can download one for your printer from www.adobe.com.
- If your printer is not a PostScript printer and this document does not print as expected, try one of the following:
If your printer has the option, Print as Image, enable this option and then try printing.
- Print specific page(s) at a time rather than sending the entire document to the printer.
Where to find additional information
Refer to the following for related information.
About Soft-PK
For additional information about configuring and troubleshooting Soft-PK software, refer to the online help that is integrated into the program's user interface. Soft-PK online help provides detailed step-by-step procedures for individual VPN client tasks.
About Sidewinder
For more information about setting up VPN connections on Sidewinder, refer to Chapter 11 in the Sidewinder Administration Guide. In addition, be sure to review documentation associated with patch releases.
About digital certificates
For information on digital certificates and Public Key Infrastructure (PKI) technology, see:
- Understanding Public-Key Infrastructure, by Carlisle Adams and Steve Lloyd (1999)
- Internet X.509 Public Key Infrastructure, Certificate and CRL Profile, RFC 2459, R. Housley, W. Ford, W. Polk, D. Solo (January 1999)
To contact Secure Computing directly or inquire about obtaining a support contract, refer to our Web site at www.securecomputing.com, and select "Contact Us." Or if you prefer, send us email at support@securecomputing.com (be sure to include your customer ID in the email).
CHAPTER 1
Getting Started
About this chapter
This chapter provides an overview of the Soft-PK™ and Sidewinder Virtual Private Network (VPN) environment and describes the requirements. It includes a checklist to guide you through the basic steps to setup and deploy a VPN.
This chapter addresses the following topics:
"About Soft-PK & Sidewinder VPNs" on page 1-2
"Requirements" on page 1-3
"Roadmap to deploying your VPNs" on page 1-5
About Soft-PK & Sidewinder VPNs
Soft-PK is security software for remote PC users. It is designed to provide data privacy between remote users and a corporate network. Industry-standard encryption and user verification routines protect the data sent over the connection. Soft-PK conforms to Internet Engineering Task Force (IETF) standards for TCP/IP and IP Security (IPSec) protocols.
Soft-PK works with the Secure Computing Sidewinder firewall to establish secure VPNs over public and private networks. Information passed across a VPN is encrypted, ensuring privacy and confidentiality.
Figure 1-1. Sidewinder VPN connection providing secure data transmission between a remote system running Soft-PK and your internal network(s)
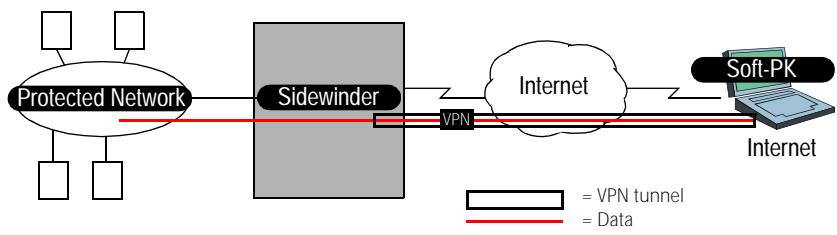
Note: In a VPN connection, keep in mind that the definition of "remote" depends on perspective. From the Sidewinder's point of view, the remote end is a system connecting from the Internet. From the Soft-PK system's point of view, the remote end is the Sidewinder (VPN gateway) and the protected network.
Using Soft-PK, a mobile employee or telecommuter can establish authenticated and encrypted access with networks protected by Secure Computing's fully IKE (Internet Key Exchange) compliant Sidewinder firewall. Remote users can access secure corporate resources using either public networks or corporate dial-up lines.
Requirements
To configure VPN communication between Sidewinder and Soft-PK clients, your Sidewinder must be configured with the proper VPN parameter settings and access rules. In addition, depending on your VPN connection set up, you may also need to define the proper digital certificates.
To run the Soft-PK VPN client, each remote system must meet minimum hardware and software requirements. In addition, the system must be able to make a connection with the Internet through any of a number of means (for example, a dial-up networking facility, an Ethernet LAN interface, DSL, cable modem, etc.).
Before starting your VPN setup, ensure that your environment meets the requirements listed in this section.
Sidewinder and other network requirements
The network over which Soft-PK and Sidewinder will be used must meet the basic requirements listed in Table 1-1.
Table 1-1. Network requirements for using Soft-PK with Sidewinder
| Category | Requirement |
| Network | ♦ A network infrastructure with at least one installed and operational Sidewinder. Note: You can protect more than one LAN with a single Sidewinder. |
| Sidewinder | ♦ Sidewinder Version 5.1 or latera ♦ VPN feature license |
| Remote client Internet connection | ♦ Connection to the Internet (via a dial-up line, DSL, cable modem, etc.) |
| If using digital certificate authentication | ♦ Digital certificates based on Sidewinder self-signed certificates, or ♦ Digital certificates from a public CA or your own CA server. (Registration over the network using SCEP is recommended.) |
a. This document is based on Sidewinder running Version 5.1.0.02.
Soft-PK requirements
Each system on which Soft-PK will be installed must meet the requirements listed in Table 1-2.

IMPORTANT: A remote system must only run one VPN client. If a VPN client program such as SecureClient was previously installed on the remote system, ensure it is properly uninstalled. See Chapter 4, "Installing and Working with Soft-PK" for details.
Table 1-2. System requirements for running Soft-PK
| Category | Requirement |
| Hardware | ◆ An IBM PC or compatible computer (portable or desktop) with at least a 75 Mhz Pentium microprocessor (or equivalent). ◆ A non-encrypting modem (for use with dial-up networking) or an Ethernet interface. ◆ At least 10 MB of free hard disk space. ◆ The recommended system RAM size: — Windows 95: 16 MB — Windows 98, NT: 32 MB — Windows 2000, Me: 64 MB |
| Software | ◆ Microsoft Windows 95, 98, Me, NT 4.0, or 2000 Professional. ◆ Dial-up Networking component of Microsoft Windows and/or Ethernet LAN interface. ◆ If the remote system uses a modem, the end user must have dial-up account with an Internet Service provider (ISP) or a private corporate dial-up account. TIP: Instruct Soft-PK users to follow the instructions provided by Microsoft to install Dial-Up Networking on their Windows machine. Also, create a dial-up networking profile for the ISP used to gain access to the Internet. ◆ Microsoft Internet Explorer 4.0 or later (for using help) |
Roadmap to deploying your VPNs
Because Secure Computing products provide network security, we recommend that, as the network administrator, you carefully oversee the installation and configuration of the Soft-PK client(s). Setting up VPN connections using Soft-PK and Sidewinder involves performing procedures on each remote system running Soft-PK AND on your Sidewinder.
If done properly, administrators can do most of the VPN configuration for both Soft-PK and Sidewinder, with little required of the end users. For example, you can set up the digital certificates and create a security profile that you include with Soft-PK's installation files. Users then simply need to install Soft-PK and import a few files.

TIP: A separate Soft-PK User's Guide is NOT provided for end users of Soft-PK. As an administrator, you should use the worksheet provided on the SafeNet/Soft-PK CD-ROM (in MS Word format) as the basis for providing the remote Soft-PK users with the appropriate installation and setup instructions. This way, Soft-PK users are required to follow only the instructions that have been customized for your firewall configuration. (Refer to Chapter 5, "Deploying Soft-PK to Your End Users" for details about the worksheet.)
Figure 1-2 provides a graphical overview of the Soft-PK and Sidewinder VPN deployment process. Each of the tasks depicted in Figure 1-2 are also reflected in the checklist starting on page 1-7.
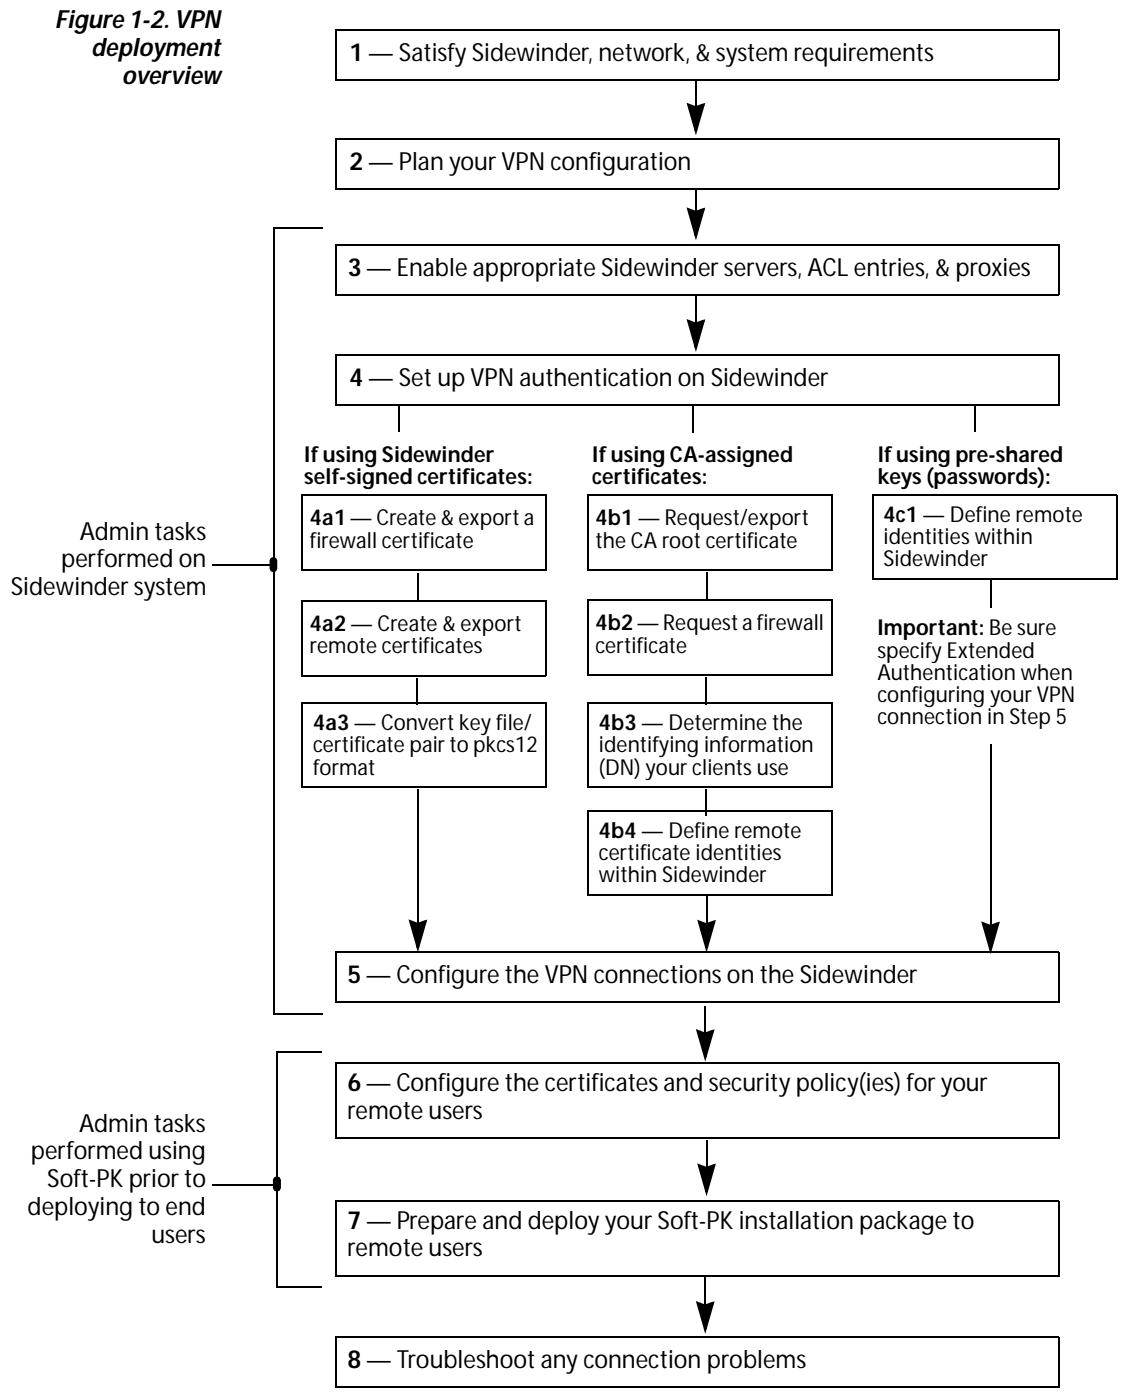
Soft-PK deployment checklist
The following checklist identifies each major step involved in the setup and deployment of your Soft-PK software (as shown in Figure 1-2). You can use the checklist as a reference point and mark off each item as you complete it to ensure a successful VPN rollout.

TIP: Each step provides an overview of the task and points you to specific documentation for more detailed information.
1—Satisfy Sidewinder, network, & system requirements
- Sidewinder/network: Verify that your Sidewinder is at Version 5.1.0.02 or later, licensed for VPN, and that your network is fully operational.
End-user systems: Verify that each system on which Soft-PK will be installed meets the requirements as described on page 1-4.
2 Plan your VPN configuration
Review Chapter 2 to become familiar with key concepts and options that are available when setting up VPNs.
Review Chapter 11 in the Sidewinder Administration Guide for additional background on VPN configuration.
Review theREADME.txt file located on the Soft-PK CD for additional information from Secure Computing.
3—Enable appropriate Sidewinder servers, ACL entries, & proxies
Note: For details, see "Enabling the VPN servers" on page 3-2 and "Configuring ACL & proxies entries for VPN connections" on page 3-3.
CMD server: The Certificate Management Daemon (CMD) server must be enabled before you can configure the certificate server.
EGD server: The Entropy Generating Daemon (EGD) server is used by ISAKMP. This server must be enabled before you can create VPN associations.
ISAKMP server: The ISAKMP server must be enabled and set to listen on the appropriate burb (typically, this will be the Internet burb).
More...
ISAKMP ACL entry: At a minimum, you must define and enable an ACL entry that allows ISAKMP traffic from the Internet to the Internet burb on Sidewinder (external IP address of Sidewinder).
Other ACL entries: Depending on where you terminate your VPN connections on Sidewinder (e.g., in a virtual curb), you may need to create ACL entries to allow traffic between burbs.
□ Proxies: Depending on where you terminate your VPN connections on Sidewinder (e.g., in a virtual curb), you may need to enable proxies to allow traffic between burbs.
4 — Create/Request the digital certificates
If using Sidewinder self-signed certificates:
Use Cobra to create and export a firewall certificate. See "Creating & exporting a firewall certificate" on page 3-4 for details.
Use Cobra to create and export remote certificates for each end user. See "Creating & exporting remote certificate(s)" on page 3-6 for details.
Use a command-line utility on Sidewinder to convert the key/file certificate pair to pkcs12 format. See "Converting the certificate file/private key file pair to pkcs12 format" on page 3-8 for details.
If using a CA -assigned certificates:
Use Cobra to define a CA and obtain the CA root certificate and export it for sending to client(s). See "Defining a CA to use and obtaining the CA root cert" on page 3-9 for details.
Use Cobra to request a certificate for the firewall from the CA. See "Requesting a certificate for the firewall" on page 3-10 for details.
Determine the identifying information (e.g., Distinguished Name settings) your clients will use in their personal certificates. See "Determining identifying information for client certificates" on page 3-12.
Use Cobra to specify the client certificate identity information to within Sidewinder. See "Defining remote client identities in Sidewinder" on page 3-13 for details.
If using pre-shared keys (passwords):
Use Cobra to specify the client identity information to within Sidewinder. See "Managing pre-shared keys (passwords)" on page 3-14 for details.
More...
5—Configure the VPN connections on the Sidewinder
Use Cobra to define the VPN security association configuration. See "Configuring the VPN on the Sidewinder" on page 3-15 for details.
Enable Extended Authentication.
6 — Configure the certificates and security policy(ies) for your remote users
Install your copy of Soft-PK. See "Soft-PK installation notes" on page 4-2 for details.
Use Soft-PK to set up the certificates needed by each end users. See
Use Soft-PK to create and save security policies that are customized for your end users. See "Configuring a security policy on the Soft-PK" on page 4-13 for details.
7 — Prepare and deploy your Soft-PK installation package to remote users
Prepare the files you will distribute to your end users. For details, see "Overview" on page 5-2.
Create Soft-PK installation and configuration instructions for your end users. For details, see "Customizing the user worksheet" on page 5-4.

TIP: Use the UserWorksheet.doc
file on the Soft-PK CD as a starting point to define the information each end user will need to install and quickly set up Soft-PK for your network.
If necessary, define configuration steps for the Windows Dial-Up Networking feature on each machine on which you are installing and using Soft-PK. For details, see "Specifying dial-up network instructions" on page 5-4.
- Specify the Soft-PK installation instructions. For details, see "Specifying installation instructions" on page 5-4.
- Specify the instructions for importing/requesting/setting up client certificates. For details, see "Specifying certificate import/request instructions" on page 5-5.
- Specify the instructions for establishing a security association. For details, see "Specifying security policy instructions" on page 5-6.
Send the Soft-PK deployment software and files to your end users.
More...
8—Troubleshoot any connection problems
Use the Soft-PK Log Viewer. See "Soft-PK Log Viewer" on page A-1.
Use the Soft-PK Connection Monitor. See "Soft-PK Connection Monitor" on page A-2.
Use Sidewinder commands. See "Sidewinder troubleshooting commands" on page A-4 and the Sidewinder Administration Guide for details.
CHAPTER 2
Planning Your VPN Configuration
About this chapter
This chapter provides information to help you understand key concepts and options that are involved in a VPN connection. It addresses the following topics:
"Identifying basic VPN connection needs" on page 2-2
"Identifying authentication requirements" on page 2-3
"Determining where you will terminate your VPNs" on page 2-7
"Understanding Sidewinder client address pools" on page 2-9
Identifying basic VPN connection needs
Before you actually begin configuring your Sidewinder or work with Soft-PK, ensure you have an understanding of the basic profile for your VPN connections.
Begin by doing the following:
List the remote users that need a VPN connection
List the internal/trusted systems to which users need access
Identify the important IP addresses
It may help to start a sketch that defines your basic requirements. Depending on your organization and network, this could be somewhat more complex than the diagram shown in Figure 2-1.
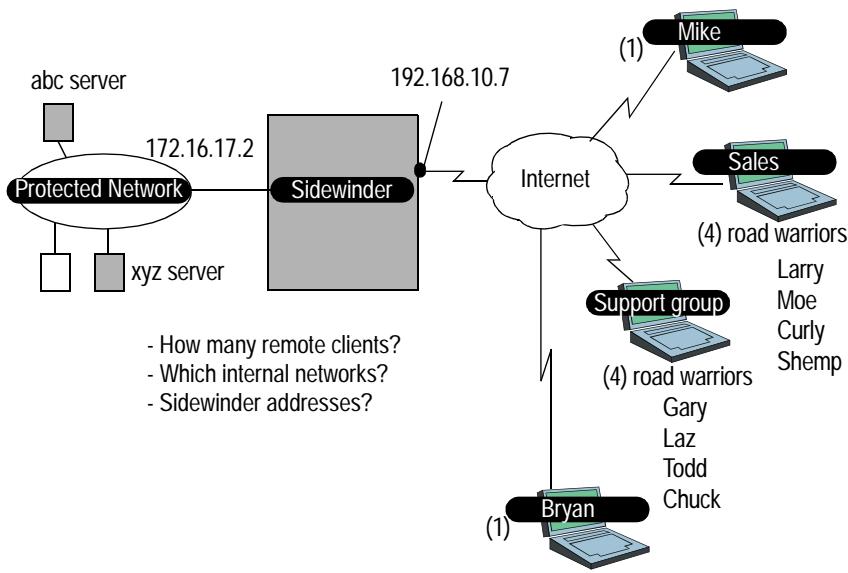
Figure 2-1. Identify remote users and the target internal systems in a sample diagram
Identifying authentication requirements
Determine how you will identify and authenticate the partners in your VPN. Sidewinder and Soft-PK both support using digital certificates and pre-shared key VPN configurations. In addition, when you use Sidewinder version 5.1.0.02 or later, you can set up Extended Authentication to provide increased security to your VPN network. The following summarizes VPN authentication methods.
Using digital certificate authentication
When using digital certificates (or "public key authentication"), each system in the VPN requires a unique private key file and a corresponding public key certificate file.
The private key file
A private key file is unique to each system in the network and kept secret by the holder (VPN client, firewall,etc.). It is used to create digital signatures and, depending upon the algorithm, to decrypt data encrypted with the corresponding public key.
The certificate file (with public key)
Certificates contain informational values such as the identity of the public key's owner, a copy of the public key itself (so others can encrypt messages or verify digital signatures), an expiration date, and the digital signature of creating entity (CA or firewall).
When using Sidewinder, the trusted source for authorizing key/ certificate pairs can be Sidewinder itself through "self-signed" certificates, or a public or private Certificate Authority (CA) server (for example; Netscape, Baltimore, Entrust, etc.). Digital certificate implementations using Sidewinder/Soft-PK follow the X.509 standard.

IMPORTANT: You must configure the necessary certificates before you configure the VPN connection parameters on Sidewinder or Soft-PK.
In addition, digital certificates have an "effective" date and an "expiration date." Before certificates expire, they must be retrieved and updated in the VPN gateway (i.e., Sidewinder firewall) to continue using them in a VPN.
If not already done, decide if you will use self-signed certificates generated by Sidewinder or a public/private CA server.
Table 2-1. Sidewinder self-signed certificates versus CA-based certificates
| Scenario | Profile |
| Using self-signed certificates (for a small number of VPN clients) | ◆ No CA needed ◆ Requires one VPN association for each client |
| Using CA-based certificates (for a medium to large number of VPN clients) | ◆ Uses a private or public CA ◆ Single VPN association for all clients ◆ Can make VPN deployment and management more efficient |
A closer look at self-signed certificates
A VPN implemented using Sidewinder self-signed certificates does not require an external certificate authority and is relatively easy to configure for a small number of (less than 10) clients. However, one VPN association must be configured on Sidewinder for each client. As the number of configured clients grows, so does the administrative time. Figure 2-2 shows the certificates involved in a VPN using Sidewinder self-signed certificates.
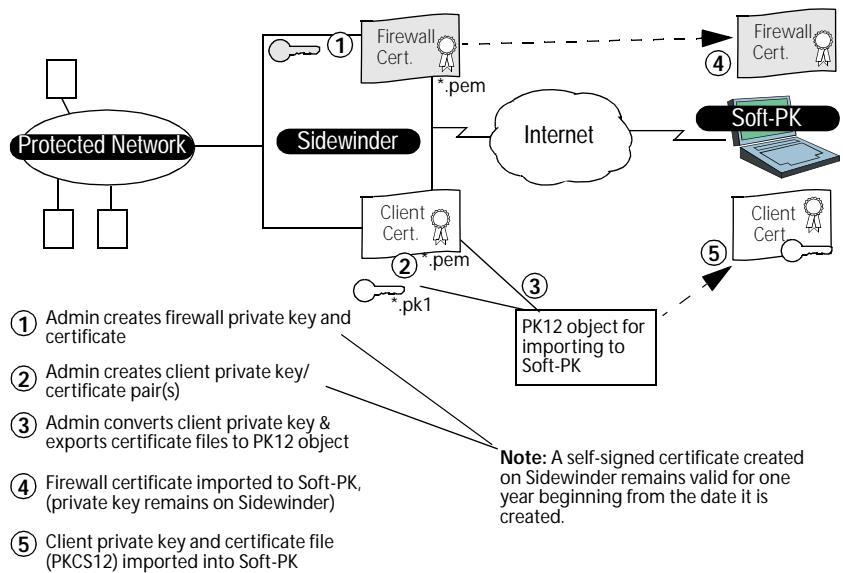
Figure 2-2. Sidewinder self-signed certificate summary
A closer look at CA-based certificates
A VPN implemented using CA-based certificates requires access to a private or public CA. Each end-point (client, firewall,etc.) in the VPN retains a private key file that is associated with a public certificate. In addition, each end-point in the VPN needs the CA root certificate on their system. Figure 2-3 shows the certificates involved in a VPN using CA-based certificates.
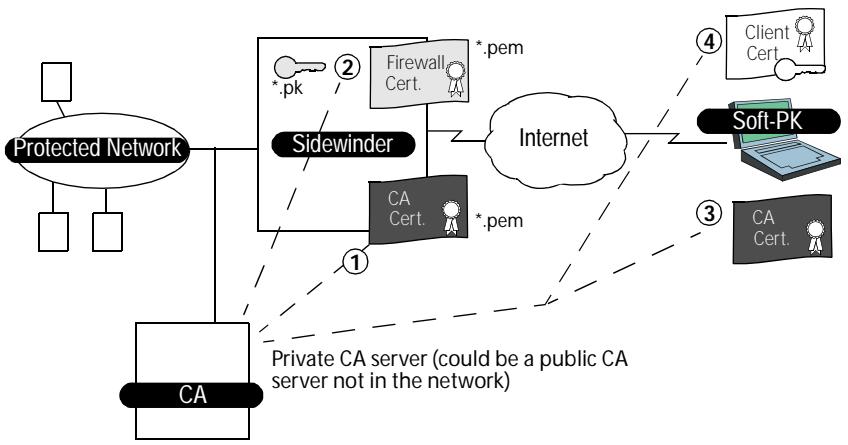
Figure 2-3. CA-based digital certificate summary
① Admin requests CA root certificate
② Admin requests firewall certificate
③ Admin provides CA root certificate to client (or instructions to obtain it)
4 Admin provides client key/certificate to client (or instructions to obtain it)
Understanding pre-shared key authentication
A pre-shared key (referred to as shared password by Sidewinder) is an alphanumeric string—from eight to 54 characters—that can replace a digital certificate as the means of identifying a communicating party during a Phase 1 IKE negotiation. This key/password is called "pre-shared" because you have to share it with another party before you can communicate with them over a secure connection. Once you both have this key/password, you would both have to enter it into your respective IPSec-compliant devices (e.g., firewall and software client). Using a pre-shared key/password for authentication is the easiest type of VPN association to configure.

IMPORTANT: You should only use this method along with Extended Authentication.
Extended authentication
In addition to the normal authentication checks inherent during the negotiation process at the start of every VPN association, Extended Authentication goes one step further by requiring the person requesting the VPN connection to validate their identity.
Depending on the authentication method you select, the person must provide a unique user name and password, a special passcode, or one-time password before the VPN association is established. For example, assume you configure a VPN association to use Extended Authentication and that you select the standard password process as the form of authentication. When a person attempts to establish a VPN connection, Sidewinder will perform the standard VPN negotiations but in addition will issue a request for the proper password. The person initiating the VPN connection request must then enter the proper password at their workstation before the connection will be made.
The Extended Authentication option is most useful if you have travelling employees that connect remotely to your network using laptop computers. If a laptop computer is stolen, without Extended Authentication it might be possible for an outsider to illegally access your network. This is because the information needed to establish the VPN connection (the self-signed certificate, etc.) is saved within the VPN client software. When Extended Authentication is used, however, the user is required to enter an additional piece of authentication information that is not saved on the computer—either a password, passcode, or PIN. This additional level of authentication renders the VPN capabilities of the laptop useless when in the hands of a thief.
Determining where you will terminate your VPNs
Figure 2-4. VPN tunnel terminating on trusted burb
You can configure a VPN security association on Sidewinder to terminate in any burb. For example, Figure 2-4 shows a VPN security association terminating in the trusted burb. It allows all network traffic to flow between the hosts on the trusted network and the VPN client. Other than an external-to-external ISAKMP ACL entry, you need no special ACL entries or proxy control.
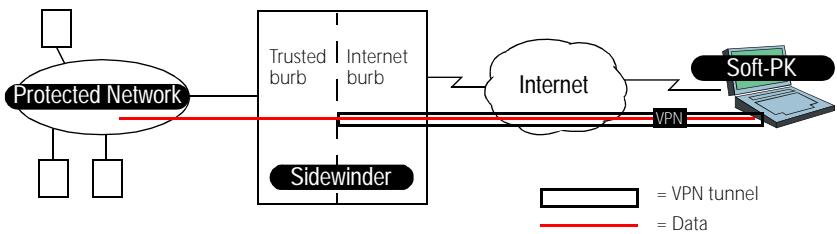
Figure 2-5 shows another option that allows you to terminate VPN traffic in a "virtual" burb. A virtual burb is a burb that does not contain a network interface card. The sole purpose of a virtual burb is to serve as a logical endpoint for a VPN association.
Figure 2-5. VPN tunnel terminating on a virtual burb
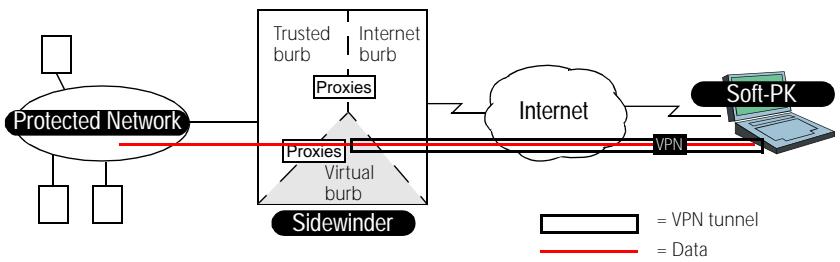
Terminating a VPN association in a virtual burb accomplishes two important goals:
Separation of VPN traffic from non-VPN traffic
Enforce a security policy that applies strictly to your VPN users
By terminating the VPN in a virtual burb you effectively isolate the VPN traffic from non-VPN traffic. Plus, you are able to configure a unique set of rules (via proxies and ACLs) for the virtual burb that allow you to control precisely what your VPN users can or cannot do.
Note: The VPN implementation depicted in Figure 2-5 represents a "proxied" VPN because proxies must be used to move VPN data between burbs. The use of proxies enables you to control the resources that a VPN client has access to on your internal network.
More about virtual burbs and VPNs
Consider a VPN association that is implemented without the use of a virtual curb. Not only will VPN traffic mix with non-VPN traffic, but there is no way to enforce a different set of rules for the VPN traffic. This is because proxies and ACLs, the agents used to enforce the rules on a Sidewinder, are applied on curb basis, not to specific traffic within a curb.
Note: Do not terminate VPN connections in the Internet curb.
You can define up to nine physical and virtual burbs. For example, if you have two distinct types of VPN associations and you want to apply a different set of rules to each type, simply create two virtual burbs, then configure the required proxies and ACLs for each virtual curb.
One question that might come to mind when using a virtual curb is: "How does VPN traffic get to the virtual curb if it doesn't have a network card?" The answer is found in the way that a VPN security association is defined on the Sidewinder. All VPN traffic originating from the Internet initially arrives in the Internet curb. A VPN security association, however, can terminate VPN traffic in any curb on the Sidewinder. By terminating the VPN in a virtual curb, the VPN traffic is automatically routed to that virtual curb within Sidewinder.
Defining a virtual curb
To create a virtual curb on the Sidewinder for terminating a VPN, do the following.
- Select Firewall Administration ->Burb Configuration.
- Click New and create the new virtual curb.
- Click Apply.
- Assign DNS to listen for the virtual burb. Enter the following command:
cf dns add listen burb=burbname
where: burbname = the name you have assigned your virtual burb - Verify that DNS is listening on the virtual curb by typing the following command:
cf dns query
Understanding Sidewinder client address pools
Figure 2-6. VPN association implemented using client address pool
You may choose to implement your VPN using Sidewinder client address pools. Client address pools are reserved virtual IP addresses, recognized as internal addresses of the trusted network. Addresses in this pool are configured on Sidewinder and assigned (or "pushed") to a VPN client (per VPN configuration) when the VPN connection is started. Client traffic within the protected network appears to come from the virtual IP address pool. Only Sidewinder knows the client's real IP address.
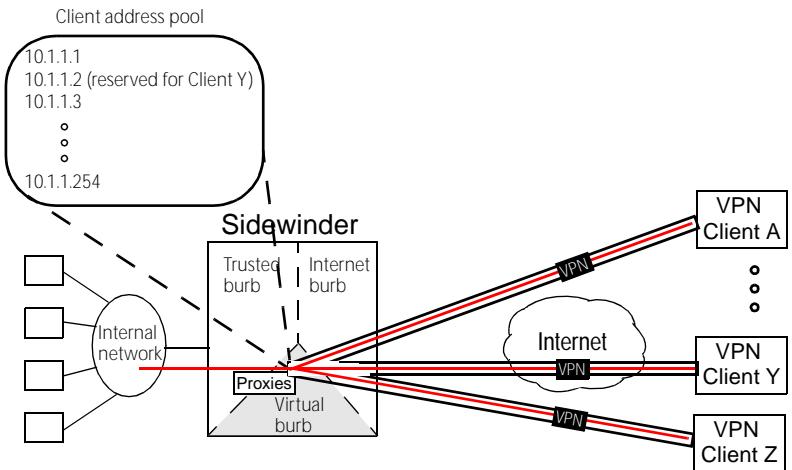
Virtual IP address mappings using this client address pool.
| VPN Client | Virtual IP Address |
| A | Next available within the pool |
| • | • |
| • | • |
| Y | 10.1.1.2 |
| Z | Next available within the pool |
One of the reasons for using client address pools is that they simplify the management of VPN clients. They allow the firewall to manage certain configuration details on behalf of the client. This enables a remote client to initiate a VPN connection even if the client has not preconfigured itself for the connection.
When using client address pool, all the Soft-PK client needs to initiate a VPN connection is:
Authentication information (e.g. a password or certificate)
Address of the firewall
Protected networks
The client does not need to define a virtual IP for use in the VPN connection, nor do they need to concern themselves with DNS issues on the trusted network.
In addition to simplifying the configuration process for your clients, client address pools give you the ability to place additional controls on VPN clients.
You can allow or restrict access on a client address pool basis.
For example, assume you create two client address pools. Client associations initiated from pool A might be granted access to certain networks that are off limits to clients from pool B.
- You can allow or restrict access on a client basis.
This is done by assigning a specific IP address within a client address pool to a specific user. By creating a network object for that IP address, you can then use the network object in an ACL entry to allow or restrict the client's access to additional services.

IMPORTANT: Client address pools are most useful when implemented in a VPN association between Sidewinder and clients or gateways whose IP addresses are assigned dynamically. Client address pools are not typically used in VPN associations between two peers that contain static IP addresses.
For more detailed information on client address pools, see the Sidewinder Administration Guide.
CHAPTER 3
Configuring Sidewinder for Soft-PK Clients
About this chapter
This chapter provides a summary of Sidewinder procedures associated with setting up and configuring Soft-PK connections in your network.

IMPORTANT: Perform these procedures before you configure your Soft-PK clients.
This chapter addresses the following topics:
"Enabling the VPN servers" on page 3-2
"Configuring ACL & proxies entries for VPN connections" on page 3-3
"Managing Sidewinder self-signed certs" on page 3-4
"Managing CA-based certificates" on page 3-9
"Managing pre-shared keys (passwords)" on page 3-14
"Configuring the VPN on the Sidewinder" on page 3-15
Enabling the VPN servers
Before you configure a VPN association on your Sidewinder, you must first enable the Sidewinder's EGD and CMD servers. In addition, you must enable the ISAKMP server and set it to listen on the Internet burb.
Do the following from the Sidewinder Cobra interface:
- Enable the cmd, egd, and isakmp servers.
a. Select Services Configuration -> Servers -> Control.
Figure 3-1. Services Configuration -> Servers -> Control
b. To enable a server, select it from the Server Name list and click Enable.
c. Click Apply.
- Configure the ISAKMP server.
a. Select VPN Configuration -> ISAKMP Server.
Figure 3-2. VPN Configuration -> ISAKMP Server
b. In the Burbs to Listen on list column, click the curb name associated with the Internet burb.
c. In the Available Authentication Method fields, specify the method(s) to use for Extended Authentication.
d. Click Apply.
Configuring ACL & proxies entries for VPN connections
Depending on where you decide to terminate your VPN tunnel, you must ensure that you have the appropriate ACL entries set up to allow ISAKMP traffic and allow/deny the appropriate proxy traffic. At a minimum, you must define and enable an ACL entry that allows ISAKMP traffic from the Internet to the external IP address of Sidewinder.
- Define (or ensure you have) an ACL entry that allows external-to-external ISAKMP traffic. Select Policy Configuration -> Access Control List. Check for these attributes:
Agent = Server
Service = ISAKMP
Action = Allow
Enabled = Enable
Source burb = Internet (all source addresses, *)
- Destination burb = Internet burb (external IP of Sidewinder)
Note 1: Ensure you have defined appropriate network objects/groups. To view the current network object configuration, select Shortcut to Network Objects from the Source/Destination tab.
Note 2: For details about configuring and managing network objects, see Chapter 4 in the Sidewinder Administration Guide.
- [Configuration dependent] Define (or ensure you have) ACL entries that allow access to and from any virtual burbs you may have. The virtual curb should be specified as either the source or destination curb, depending on the type of ACL entry being defined.
Note: For details about configuring and managing ACL entries, see Chapter 4 in the Sidewinder Administration Guide.
- [Configuration dependent] Enable the desired proxies in the appropriate virtual burb(s). Select Services Configuration -> Proxies.
Managing Sidewinder self-signed certs

If you are using Sidewinder to generate certificates, use the following procedure to create and export self-signed certificates that identify the firewall and each remote client.
TIP: Typically, a VPN configuration using Sidewinder self-signed certificates is suitable if the number of clients is small.
Note: A self-signed certificate created on Sidewinder remains valid for one year beginning from the date it is created.
Creating & exporting a firewall certificate
Use the following procedure on Sidewinder to create and export a firewall self-signed certificate that identifies the firewall. The firewall certificate file (with its embedded public key) will reside on the Sidewinder and must eventually be imported by each Soft-PK client system.)
From the Sidewinder Cobra interface:
- Select Services Configuration -> Certificate Management.
- Select the Firewall Certificates tab. Click New.
Figure 3-3. Sidewinder Certificate Management: Create New Firewall Certificate window
- Specify the following Firewall Certificate settings.
| Field | Setting |
| Certificate Name | Specify a name for the firewall certificate. |
| Distinguished Name | Specify a set of data that identifies the firewall.Use the following format:cn=,ou=,o=,l=,st=,c=where:◆cn=common name◆ou=organizational unit◆o=organization◆l=locality◆st=state◆c=countryIMPORTANT:The syntax for this field is very important.The above entries must be separated by commas,and contain no spaces.In addition,the order of the specified distinguished name fields must match the desired order to be listed in the certificate. |
| E-Mail Address, Domain Name, IP Address | Optional fields to identify information (in addition to DN). |
| Submit to CA | Select Self Signed. |
| Signature Type | Select RSA. |
Export the firewall certificate (for later transfer to each client system)
- Click Add to add the certificate to the Certificates list.
- Click Close to return to the Firewall Certificate window.
- Click Export and save the firewall certificate (containing the public key) to a file. Add a .pem extension (for example, "firewallicert.pem").
- Click OK when done.
Once you have finished creating the firewall certificate, you will typically copy it to an MS-formatted diskette for distribution to each remote Soft-PK client. You can do this using the mcopy command. For example:
% mcopy -t filename a:filename
Creating & exporting remote certificate(s)
Use the following procedure on Sidewinder to create a self-signed certificate file (with its embedded public key) and a private key file for each of your Soft-PK clients. Once a pair of certificate/private key files are created for a unique client, you must use Sidewinder's pkcs12.util command to combine each file pair into a PKCS12-formatted object. Each PKCS12-formatted object must be distributed to the respective Soft-PK client.
From the Sidewinder Cobra interface:
Note: Do this from the local Sidewinder console (not a remote Cobra interface).
- Select Services Configuration -> Certificate Management.
- Select the Remote Certificates tab. Click New.

Figure 3-4. Sidewinder Certificate Management: Create New Remote (Client) certificate window
- Specify the following Remote Certificate settings.
| Field | Setting |
| Certificate Name | Specify a name for the remote certificate. |
| Distinguished Name | Specify a set of data that identifies the client. Use the following format: cn=,ou=,o=,l=,st=,c= where: ◆ cn = common name ◆ ou = organizational unit ◆ o = organization ◆ l = locality ◆ st = state ◆ c = country IMPORTANT: The syntax for this field is very important. The above entries must be separated by commas, and contain no spaces. In addition, the order of the specified distinguished name fields must match the desired order to be listed in the certificate. |
| E-Mail Address, Domain Name, IP Address | Optional fields to identify information (in addition to DN). |
| Submit to CA | Select Self Signed. |
| Signature Type | Select RSA. |
| Generated Private Key File | Click Browse and specify where you want to save the private key associated with this certificate. You must use a .pk1 extension (for example, "clientprivate.pk1"). IMPORTANT: The private key files must be created as .pk1 objects. The conversion utility used starting in Step 6 will not work with .pk8 objects. |
| Generated Certificate File | Click Browse and specify where you want to save this certificate. Use a .pem extension (for example, "clientcert.pem"). |
- Click Add to add the certificate to the Certificates list.
Converting the certificate file/private key file pair to pkcs12 format
- Click Close to return to the previous window.
- To start the PKCS12 utility on the Sidewinder, from the command line, enter the following command:
pkcs12.util
The utility will prompt you for the name and location of the private key file, for the name and location of the associated certificate file, and for the name and location in which to store the resulting PKCS12-formatted object.
The following message appears:
Please put file extensions on all file names. Enter the name of the PKCS1 object (private key) file:
- Type the full path name of the private key file.
The following message appears:
Enter the name of the PEM signed public key (certificate) file:
- Type the full path name of the associated certificate file.
The following message appears:
Enter the name of the output PKCS12 object (*.p12):
- Type the full path name of the object file that will be created by the utility. Be sure to use a .p12 extension on the file name.
The following message appears:
pkcs12 encryption password for public key (it WILL be clear screen text):
- Type a password for this PKCS12 object.
You apply a password to the object because the object contains both the public and private keys. The password will be needed when importing this object into a Soft-PK client. The password can consist of any alpha-numeric characters.
Note: After typing the password, the utility creates the PKCS12 file in the directory you specified in Step 9.
- Return to Step 1 for each remote client.
Once you have finished creating the PKCS12 object(s), copy each object to its own diskette for distribution to the appropriate Soft-PK client. You can do this using the mcopy command. For example:
% mcopy -t filename a:filename
Copy the client key/ certificate object to a diskette
Managing CA-based certificates
If you are using a CA to authorize certificates, use the following procedures to define the CA, request the firewall and CA certificates, and define the remote identities of each client within Sidewinder (needed later when setting up your VPN connections).
Defining a CA to use and obtaining the CA root cert
To request a CA certificate for Sidewinder, do the following from Cobra.
- Select Services Configuration -> Certificate Management and click the Certificates Authorities tab. Click New.
Figure 3-5. Create New Certificate Authority window
- In the New Certificate Authority window, specify the name, type, and location of the CA.
- Click Add, then click Close.
- Click Get CA Cert to request the CA certificate and import it to the firewall
-
Click Get CRL to manually retrieve a new Certificate Revocation List (CRL) from the CA.
-
Click Export to save the CA certificate to a file for later importation into client system(s). Each user must then use Soft-PK to import the CA certificate you obtained for them.
Note: You can have the user request the CA certificate from the CA using Soft-PK. You must provide the necessary CA information/instructions to do so.
Requesting a certificate for the firewall
To request a firewall certificate from a CA, do the following.
- Select Services Configuration -> Certificate Management and click the Firewall Certificates tab. Click New.
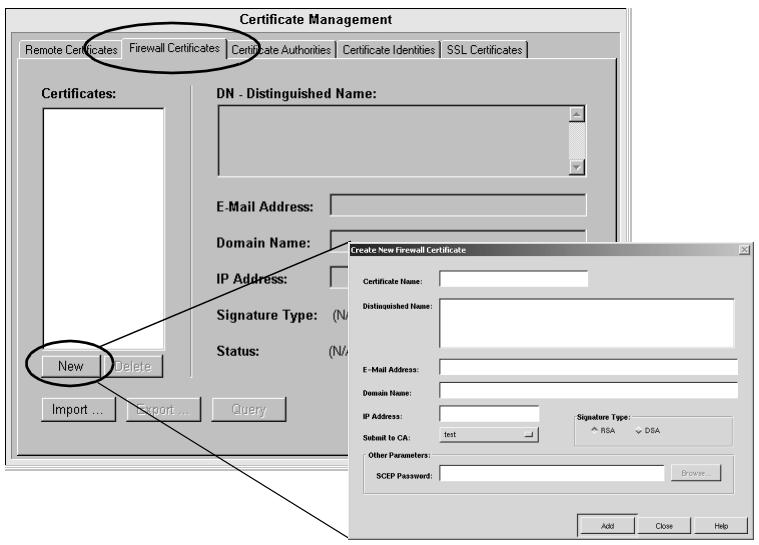
Figure 3-6. Create New Firewall Certificates window
- Specify the firewall certificate information.
| Field | Setting |
| Certificate Name | Specify a name for the firewall certificate. |
| Distinguished Name | Specify a set of data that identifies the firewall.Use the following format:cn=,ou=,o=,l=,st=,c=where:◆cn=common name◆ou=organizational unit◆o=organization◆l=locality◆st=state◆c=countryIMPORTANT:The syntax for this field is very important.The above entries must be separated by commas,and contain no spaces.In addition,the order of the specified distinguished name fields must match the desired order to be listed in the certificate. |
| E-Mail Address, Domain Name, IP Address | Optional fields to identify information (in addition to DN). |
| Submit to CA | Select the CA appropriate for your configuration. |
| Signature Type | Select RSA. |
| SCEP Password | Specify a password for managing the certificate (e.g., to retrieve the key,revoke,etc.) |
- Click Add to send the enrollment request.
IMPORTANT: After you send the enrollment request, the CA administrator must issue the certificate before you can continue. - On the Firewall Certificates tab, click Query to request the CA for a signed copy of the certificate. (Certificates are automatically submitted to its CA approximately every 15 minutes.)
- Record all firewall certificate information specified in Step 2. This information must be entered into each Soft-PK client.

Determining identifying information for client certificates
Define the identifying information that will be used for each remote client certificate. Typically, these are the values entered in the Distinguished Name (DN) fields when defining a certificate. This information will be needed in either of the following scenarios:
If you plan to direct remote users to request a remote certificate from the CA.
or
If you plan to request remote certificates from the CA on behalf of the end-user.
Use Table 3-1 as a template for defining this information.
Table 3-1. Client Distinguished Name (DN) information
| Distinguished Name fields | Setting |
| cn (common name) | |
| ou (organizational unit) Note: Soft-PK lists this field as "Department." | |
| o (organization) Note: Soft-PK lists this field as "Company." | |
| l (locality) Note: Soft-PK lists this field as "City." | |
| st (state) | |
| c (country) |
Defining remote client identities in Sidewinder
When using CA-based certificates, you must define an identity "template" in Sidewinder that matches all possible client identities used by the remote entities in your VPN.
To define remote certificate identities on Sidewinder, do the following.
- Select Services Configuration -> Certificate Management and click the Certificate Identities tab. Click New.
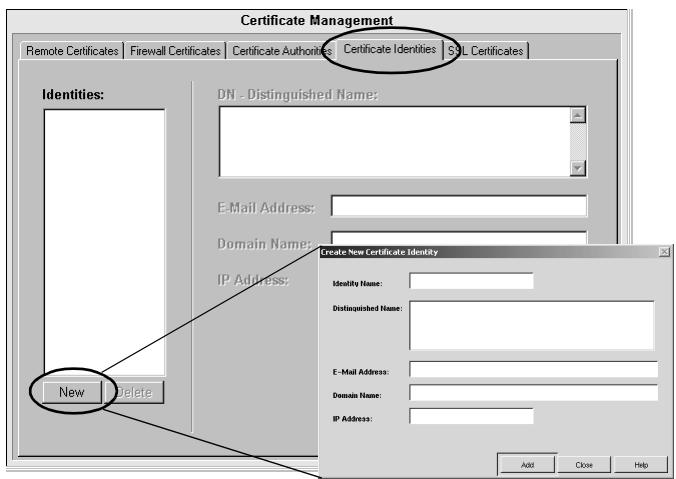
Figure 3-7. Certificate Identities defined on the firewall
- Specify an identify name and the Distinguished Name fields.
Note: An asterisk can be used as a wildcard when defining the fields on this window. (Other special characters are not allowed.) For example; *, O=acme, C=us represents all users at ACME.
- Click Add.
Managing pre-shared keys (passwords)
When using pre-shared keys (passwords), you must define an identity "template" in Sidewinder that matches all possible client identities used by the remote entities in your VPN.
To define remote certificate identities on Sidewinder, use the same procedure as defined in "Defining remote client identities in Sidewinder" on page 3-13.

IMPORTANT: Be sure to specify Extended Authentication, as described in the next section, when configuring the VPN on the Sidewinder.
Configuring the VPN on the Sidewinder
Figure 3-8. Sidewinder Security Associations window (defined VPNs)
Create a VPN security association for a Tunnel VPN using the newly created certificates. Do the following from the Sidewinder Cobra interface:
- Select VPN Configuration -> Security Associations. Click New.
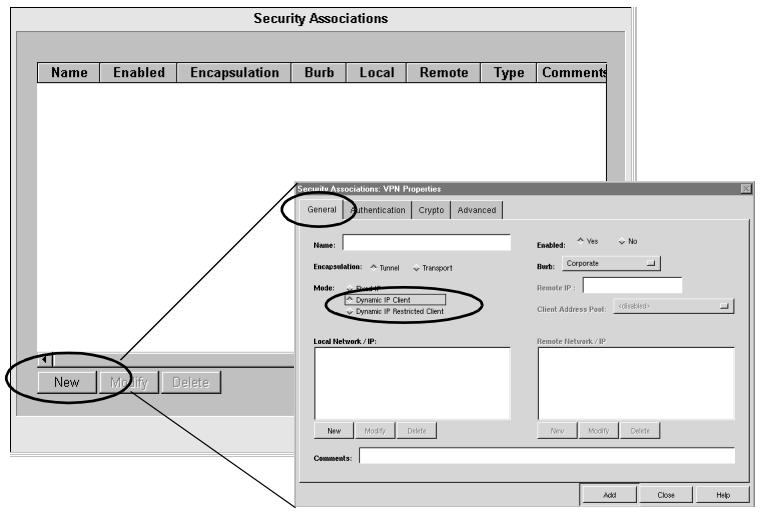
- Select the General tab and specify the following primary VPN settings.
| Field | Setting |
| Name | Enter the name of this VPN association. |
| Encapsulation | Select Tunnel. This is the more popular form of VPN encapsulation. Both the data and the source and destination IP addresses are encrypted within the encapsulated payload. |
| Mode | Select either Dynamic IP Client or Dynamic IP Restricted Client (the remote end is a device whose IP address is not fixed). Example: A salesperson that gains Internet access from a laptop. Note: For Dynamic IP Restricted Client, the remote end is assigned a virtual internal IP address using one of two methods. You specify the range of IP addresses available to the remote end by using either the Client Address Pool field or the Dynamic Virtual Address Range field. |
More...
| Field | Setting |
| Local Network/IP | Specify the network names or IP addresses to use as the destination for the client(s) in the VPN. Click the New button to specify the IP Address / Hostname and Number of bits in Netmask. The value specified identifies the network portion of the IP address. For example, if you specify 24 with an IP address of 10.10.10.0, all IP addresses that begin with 10.10.10 are accepted.Note: If you are using Client Address Pools, the local (destination for clients) is configured using different windows. |
| Enabled | Select Yes. |
| Burb | Click the dropdown list to assign this VPN to a curb.Sidewinder terminates each VPN in a curb so that access rules may or may not be applied to the VPN. |
| If you selected Dynamic IP Restricted Client in the Mode field, you will need to define one of the following mutually exclusive options. | |
| Client Address Pool | Determine if you want remote clients to be assigned only the IP addresses contained within one of the available client address pools. If so, use the dropdown list to select the client address pool you want to use.With this option, Sidewinder selects an IP address from the available pool and assigns it to the client for use during the VPN connection.Note: For information on creating Client Address Pools, see Chapter 11 in the Sidewinder Administration Guide. |
| Dynamic Virtual Address Range | Define the range of addresses a client can use when initiating a VPN connection. The addresses specified here do not represent a real network but are virtual addresses. With this option the client assigns their own IP address, although the address must be within the approved address range. |
- Select the Authentication tab. Choose the authentication method appropriate for your configuration.
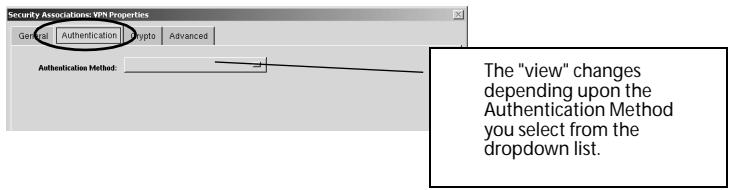
Figure 3-9. Sidewinder Security Associations Properties, Authentication tab
If you selected Single Certificate (Figure 3-10), specify the following self-signed certificate options.
Figure 3-10. "Single Certificate" options
Table 3-2. Single Certificate (self-signed) options
| Field | Setting |
| Firewall Certificate | Select the certificate used to authenticate the key exchange. |
| Remote Certificate | Select the certificate used on the remote end of the VPN from the list provided. |
| Firewall Identity Type | Select the type of identity to use when identifying the firewall to the remote client. |
| Value | Contains the actual value used as the firewall identity. This field cannot be edited. |
| Require Extended Authentication | Enable this checkbox. |
- If you selected Certificate & Certificate Authority (Figure 3-11), specify the following CA certificate options.
Figure 3-11. "Certificate & Certificate Authority" options
Table 3-3. Certificate + Certificate Authority options
| Field | Setting | |
| Firewall Credentials tab | Firewall Certificate | Select the certificate used to authenticate the key exchange. |
| Firewall Identity Type | Select the type of identity to use when identifying the firewall to the remote client. | |
| Value | Contains the actual value used as the firewall identity. This field cannot be edited. | |
| Require Extended Authentication | Enable this checkbox. | |
| Remote Credentials tab | Certificate Authorities | Select the certificate authority used to sign the digital certificates. |
| Certificate Identities | Select the certificate identity(ies) to recognize in VPN connections. |
If you selected Password (Figure 3-12), specify the following password options.
Figure 3-12. "Password" options
Table 3-4. Password options
| Field | Setting | |
| General | Enter Password/ Renter password | Select the certificate used to authenticate the key exchange. |
| Require Extended Authentication | Enable this checkbox. | |
| Identities | Firewall Identity | Specify the identity to use when identifying the firewall to the remote client. |
| Remote Identity | Specify the Certificate Identities and select the certificate identity(ies) to recognize in VPN connections. |
Save your settings!
- Click Add to save the settings.
- Click Close.

TIP: For typical Soft-PK configurations, you do not need to configure settings in the Crypto tab or Advanced tab windows. For details about those settings, refer to Chapter 11 in the Sidewinder Administration Guide.
About this chapter
This chapter includes Soft-PK installation notes. It also describes the basic Soft-PK procedures for managing certificates and creating a customized Soft-PK security policy for your remote clients.

IMPORTANT: As network administrator, you need to install your own copy of Soft-PK and become familiar with the software before you deploy setup instructions and the Soft-PK software to each end user.
This chapter addresses the following topics:
"Soft-PK installation notes" on page 4-2
"Starting Soft-PK" on page 4-3
"Managing certificates on Soft-PK" on page 4-6
"Configuring a security policy on the Soft-PK" on page 4-13

TIP: Chapter 5, "Deploying Soft-PK to Your End Users" describes how you should customize the UserWorksheet.doc file contained on the Soft-PK CD to specify the correct information your end users should follow.
Soft-PK installation notes
Note the following about installing, removing, or upgrading Soft-PK software. You can customize the UserWorksheet.doc file located on the product CD to specify detailed installation instructions to your end users. (See Chapter 5 for details.)
Table 4-1. Soft-PK install/uninstall task summary
| Task | Notes |
| Uninstall any existing VPN client programs | Prior to installing Soft-PK on any system, uninstall/remove any other VPN client programs that reside on the system. Uninstall using the Control Panel's Add/Remove program and reboot your computer before beginning the Soft-PK installation or upgrade. IMPORTANT: This applies to any previous copies of SecureClient software. |
| Installing Soft-PK | To install Soft-PK, run the Autorun program from the Soft-PK CD. (If Autorun is disabled, you can also run the setup.exe program in the SoftPK directory.) For Windows NT or 2000, be sure to log in as Administrator or equivalent. TIP: When setting up remote installations, you may elect to provide the installation Autorun/setup.exe program to your end users via other means (for example, provide a zip distribution or network-based installation). Note: Soft-PK may warn of an error on install when PPTP is already installed on the client system. This is not a concern when establishing Soft-PK to Sidewinder VPNs. Bypass the warning (press OK) and continue the installation normally (press next). |
| Uninstalling Soft-PK | To remove Soft-PK, follow the standard Windows Uninstall program. IMPORTANT: When you remove this software and its components, you have the option to keep your security policy, digital certificates, and private keys. This is recommended if you are uninstalling before an upgrade. |
| Upgrading Soft-PK | Before upgrading or reinstalling Soft-PK, uninstall any previous versions as noted above. |
Starting Soft-PK
Soft-PK starts automatically each time the computer on which it resides is started. It runs transparently at all times behind all other software applications including the Windows login. The Soft-PK icon in the taskbar changes color and image to indicate the status of system communications.
Figure 4-1. Soft-PK icon in the Windows taskbar
Determining Soft-PK status from icon variations
The following table summarizes all icon variations and their meaning.
Table 4-2. Soft-PK taskbar icons
| Icon | Description |
| SN | Grey — Indicates Windows did not start the Soft-PK service properly. |
| SN | Red — Indicates Soft-PK is installed correctly; no connection is established. |
| Red box — Indicates a non-secure connection established; transmitting non-secure communications. | |
| Yellow key — Indicates at least one secure connection established; no transmission. | |
| Yellow key/green box — Indicates at least one secure connection established; transmitting secure communications only. | |
| Yellow key/red box — Indicates at least one secure connection established; transmitting non-secure communications only. | |
| Yellow key/red and green box — Indicates at least one secure connection established; transmitting secure and non-secure communications. |
In summary, green means the computer is transmitting securely; red means it is transmitting insecure communications. Both red and green means that the computer is transmitting both secure and unsecure data simultaneously, on different channels.
Activating/Deactivating Soft-PK
The Soft-PK user interface defines the security mode and the action. Soft-PK takes when it detects packets of various protocols and various destinations. Once configured, users need to access the user interface only to view or modify these settings.
As shown in Figure 4-2, you can right-click on the Soft-PK icon in the taskbar to see all program options.
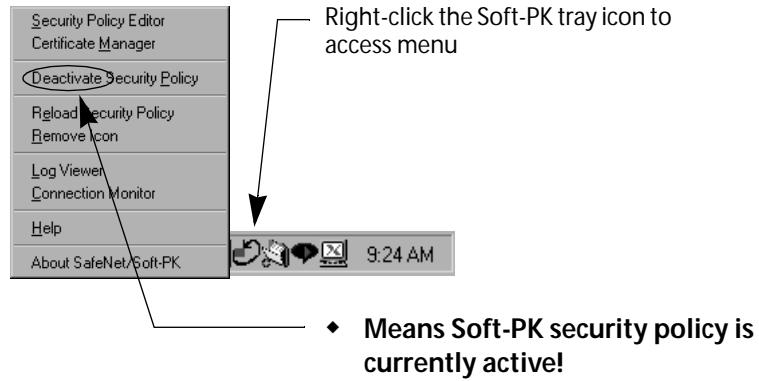
Figure 4-2. Soft-PK taskbar icon options

IMPORTANT: To deactivate the Soft-PK security policy, right-click on the Soft-PK icon in the taskbar and toggle the Activate/Deactivate Security Policy menu option. (When deactivated, the option shows Activate Security Policy.) If you deactivate the security policy, you must toggle this setting to reactivate.
Figure 4-3 shows the program options that are available when you launch the Soft-PK user interface from the Start menu.
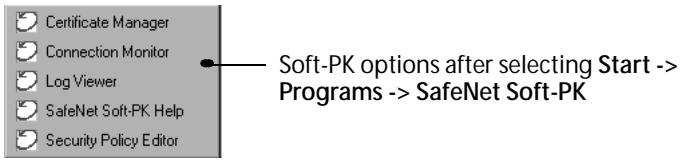
Figure 4-3. Soft-PK Start menu options

TIP: Browse the Soft-PK online help system to become familiar with client procedures.
About the Soft-PK program options
This section provides a brief description of the Soft-PK main program options. Use Soft-PK's comprehensive online help for detailed information.
Certificate Manager
The Certificate Manager allows you to request, import, and store the digital certificates received from certificate authorities (CAs). To communicate securely using digital certificates, users must have two digital certificates: a CA (or self-signed firewall) certificate and a personal certificate.
Security Policy Editor
The Security Policy Editor allows you to create connection policies and their associated proposals and list them in a hierarchical order that defines an IP data communications security policy.
Log Viewer
The Log Viewer displays the communications log, a diagnostic tool that lists the IKE negotiations that occur during the authentication phase.
Connection Monitor
The Connection Monitor displays statistical and diagnostic information for each active connection in the security policy. This utility is designed to display the actual security policy settings configured in the Security Policy Editor and the security association (SA) information established during Phase 1 IKE negotiations and Phase 2 IPSec negotiations.
Managing certificates on Soft-PK
If you are using digital certificate authentication in your VPN, you should provide your end users with the information and files needed to set up the necessary certificates on their Soft-PK client. This section provides a basic overview of what you need to do and includes (or provides cross-reference to) the appropriate procedures.

IMPORTANT: The firewall self-signed or CA root certificate should always be present on the Soft-PK client before configuring the client certificate.
Setting up Sidewinder self-signed certificates
If you are using Sidewinder self-signed digital certificates, as administrator, do the following.
- If not already done, create and export a firewall certificate. See "Creating & exporting a firewall certificate" on page 3-4 for details.
Note: You must have the firewall certificate configured in the Soft-PK system before you import the personal certificate. - If not already done for each end user, create and export a remote certificate and convert to PKCS12. See "Creating & exporting remote certificate(s)" on page 3-6 for details.
- Provide instructions for importing the self-signed firewall certificate. A copy of this procedure is provided in this chapter, see "Importing a CA root or self-signed firewall certificate into Soft-PK" on page 4-9 and included in the UserWorksheet.doc file.
- Provide instructions for importing the self-signed personal certificate. A copy of this procedure is provided in this chapter, see "Importing a personal certificate into Soft-PK" on page 4-11 and included in the UserWorksheet.doc file.
Setting up CA-based certificates
If you are using CA-based digital certificates, as administrator, do the following.
- If not already done, request and export the CA root certificate. See "Defining a CA to use and obtaining the CA root cert" on page 3-9 for details.
Note: You must have a CA certificate configured in the Soft-PK system before you can request a personal certificate online. - If not already done for each end user, create and export a remote certificate. See "Requesting a personal certificate from a CA on user's behalf" on page 4-8 for details.
- Provide instructions for importing the CA root certificate. A copy of this procedure is provided in this chapter, see "Importing a CA root or self-signed firewall certificate into Soft-PK" on page 4-9 and included in the UserWorksheet.doc file.
- Provide instructions for importing the personal certificate. A copy of this procedure is provided in this chapter, see "Importing a personal certificate into Soft-PK" on page 4-11 and included in the UserWorksheet.doc file.
Requesting a personal certificate from a CA on user's behalf
- Select Start -> Programs -> SafeNet/Soft-PK -> Certificate Manager (or right click the SafeNet icon and select Certificate Manager).
- Click the My Certificates tab.
- Click Request Certificate.... The Online Certificate Request dialog box appears.
- Select the Generate Exportable Key check box.
Note: You will only be able to export the private key associated with the personal certificate you are now requesting if you check this option now. For security reasons, no one can change it later. This is the only time the certificate can be exported.
- Click Advanced to select a certificate service provider.
- Under Enrollment method, click Online.
- Under Subject Information, enter all relevant personal information, pressing the Tab key to move through the dialog box.
Note: If you press Enter, the request will generate before you are finished.
- Under Online Request Information, enter or select these options:
a. In the Challenge Phrase box, enter any combination of numbers or letters you choose. For security reasons, only asterisks appear here.
b. In the Confirm Challenge box, enter the same phrase from the last step.
c. From the Issuing CA list, select a CA certificate.
-
Click OK. Certificate Manager now generates a public/private key pair, and then displays the Online Certificate Request dialog box to indicate that it is waiting for a response from the CA. When the CA accepts your request, the Certificate Manager dialog box appears. Click OK again.
-
Optional: To view your request, click the Certificate Requests tab. Select the request and click View. Click inside the certificate window to close it.
- Get your CA administrator to approve your request.
- Once your request is approved, select it under the Certificate Requests tab and click Retrieve.
- Click Yes when the Certificate Manager dialog box asks if you want to add this personal certificate. The request disappears, but the personal certificate now appears under the My Certificates tab.
Exporting a personal certificate

TIP: You should select the new certificate and click Verify to validate it.
- In the My Certificates tab, select a personal certificate.
- Click Export. The Export Certificate and Private Key dialog box appears.
- In the Filename box, enter the drive, directory, and filename for the personal certificate file. The default setting is C:\Temp\Cert.p12.
- In the Password box, type any password you choose.
- In the Confirm Password box, retype the password.
Note: The end user will need to know this password when import this file into their copy of Soft-PK.
Importing certificate in Soft-PK
Importing a CA root or self-signed firewall certificate into Soft-PK
Use the following procedures to import certificates into the Soft-PK system.
Note: These procedures are summarized on the UserWorksheet.doc file, customize as needed for your end users.
Use the following procedure to import a self-signed firewall or CA root certificate into the Soft-PK system. This procedure is done at the client system and assumes Soft-PK is already installed and you already have a diskette containing an exported self-signed firewall or CA root certificate.
- Select Start -> Programs -> SafeNet/Soft-PK -> Certificate Manager (or right click the SafeNet icon and select Certificate Manager).
- Click the CA Certificates tab.
- Click Import Certificate.... The Import CA Certificate window appears.
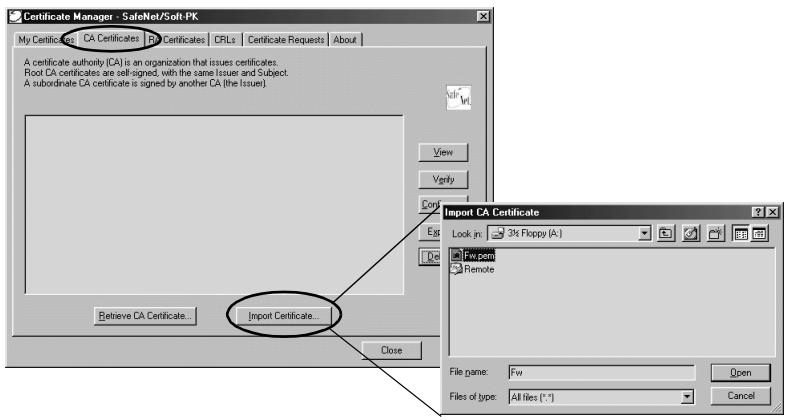
Figure 4-4. Soft-PK Certificate Manager: CA Certificates tab, Import CA Certificate
- Insert the diskette containing the self-signed firewall or certificate file.
- From the Files of type: field, select All Files (^.^) and then navigate to display the files located on the diskette.
- Select the appropriate certname.pem file and click Open. The following window appears prompting you to confirm you want to import the selected certificate.
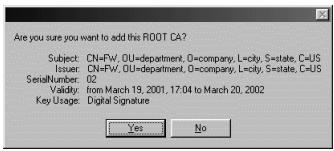
Figure 4-5. Verification window
- Click Yes.
- [Optional] From the CA Certificates tab, click View to see the information in the certificate.
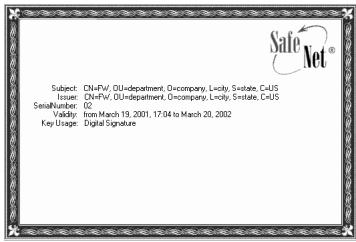
Figure 4-6. Viewing the certificate
Importing a personal certificate into Soft-PK
Use the following procedure to import a personal certificate into the Soft-PK system. This procedure is done at the client system and assumes Soft-PK is already installed.
Note: This procedure is summarized on the UserWorksheet.doc file, customize that procedure as needed for your end users.
- Select Start -> Programs -> SafeNet/Soft-PK -> Certificate Manager (or right click the SafeNet icon and select Certificate Manager).
- Click the My Certificates tab.
- Click Import Certificate....
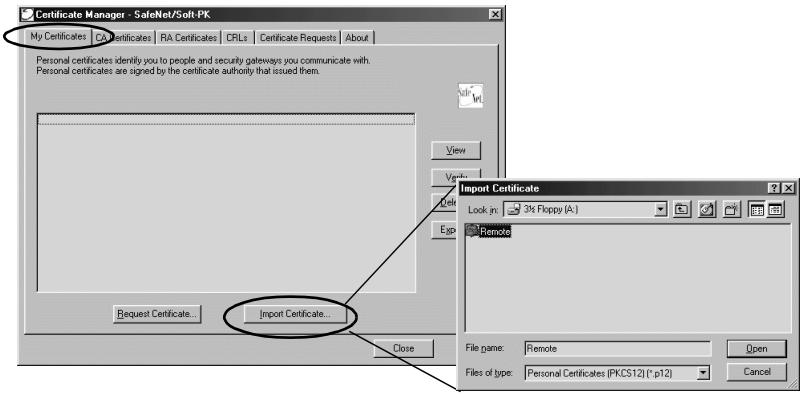
Figure 4-7. My Certificates tab: Import Certificate (and private Key) window
- Insert the diskette containing the remote key/certificate object file.
- From the Files of type: field, select All Files (^.^) and then navigate to display the files located on the diskette.
- Select the appropriate filename.p12 file and click Open. The following window appears.
Note: The file type must be a PKCS12 object. PKCS8 and PKCS1 objects cannot be used.
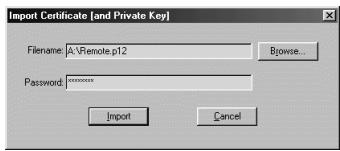
Figure 4-8.Import Certificate Password window
- Specify the password used when creating the p12 object (step 10 on page 3-8). You will not be allowed to import the certificate if the password is incorrect.
Note: You must provide this password to the end user so they can later import this certificate file.
- Click Import. A prompt appears to confirm you want to import the selected Personal Certificate.
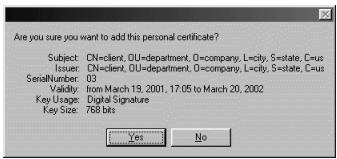
Figure 4-9. Verification window
- Click Yes.
- [Optional] From the My Certificates tab, click View to see the information in the certificate.
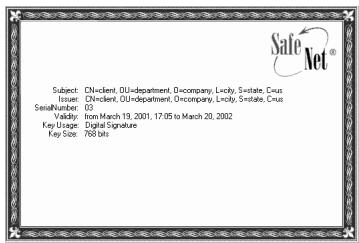
Figure 4-10. Viewing the certificate
Configuring a security policy on the Soft-PK
Basic connection options
As an administrator, you can configure end user security policies on your Soft-PK system, save them to a diskette, and distribute them to your users. Your end users then simply import the security policy you've set up.
When you configure a user policy on Soft-PK, you can specify to send all traffic over one VPN connection, or specify to send traffic over separate connections (some or all of which can be secured) for different traffic destinations. This choice is made by selecting Options -> Secure from the main menu.
All Connections — This allows you to configure one, and only one connection that secures all IP communications with the option to direct all connections to a specific gateway.
- Specified Connections — This option allows you to configure multiple simultaneous connections. This option includes a default connection configuration called "Other Connections," that controls traffic not covered by prior connection rules.
Setting up an Other Connections policy
The remainder of this section describes the setup of a single connection policy under the Specified Connections scenario. The connection settings you configure must coincide with configured settings/capabilities on the Sidewinder VPN Gateway.
Note: This procedure assumes your client system will not use this policy for every connection. That is, the system may sometimes be used in a local network where a VPN connection is not needed.
- Select Start -> Programs -> SafeNet/Soft-PK -> Security Policy Editor (or right click the SafeNet icon and select Security Policy Editor).
- Select Options -> Secure Specified Connections.
- Click on Other Connections. This is the catchall rule for all IP communications that do not conform to the proposals you will defined for individual connections. This policy will handle all traffic not defined in another policy.
Note: Configure this according to your site/user requirements. You can allow all traffic to pass through (Non-secure mode), configure a VPN policy (Secure mode), or stop all other traffic (Block mode).
- Start defining a new policy. Select Edit -> Add -> Connection to create a new policy.
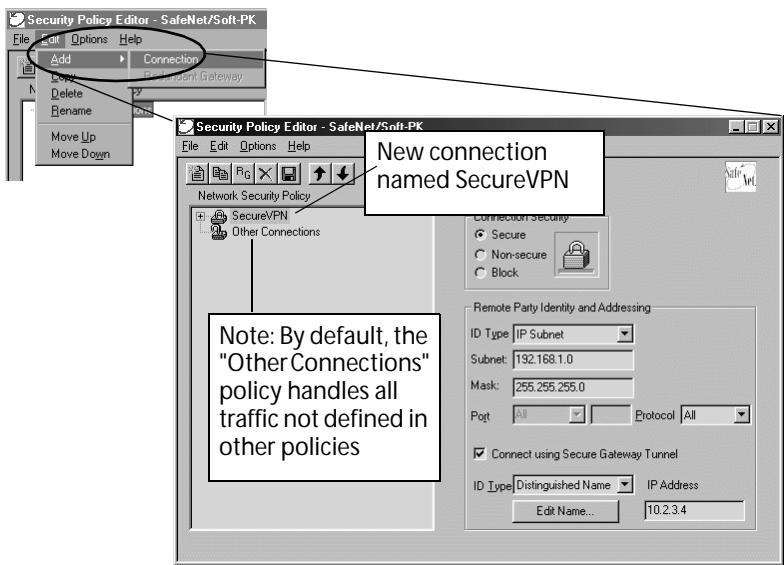
Figure 4-11. Soft-PK: Security Policy Editor
- Specify a descriptive name for the connection. (The name "SecureVPN" is used in this example.)
- Specify the connection type. In the Connection Security field, specify Secure.
- Specify the trusted network to which the client will be communicating. In the Remote Party Identity and Addressing fields:
Change the ID Type to IP Subnet.
Specify the Subnet and Mask of the trusted network.
- Specify the Sidewinder connection information.
a. Enable the Connect using Secure Gateway Tunnel box.
b. Specify the interface information:
If using shared password: Specify set the ID Type to IP Address and enter the IP Address of the Sidewinder's internet interface.
If using digital certificates:
Set the ID Type to Distinguished Name.
- Enter the IP Address of the Sidewinder's internet interface in the IP Address field.
- Click on the Edit Name button, in the window that appears (Figure 4-12, enter the Distinguished Name information. Input all fields from the Firewall Certificate and click OK.
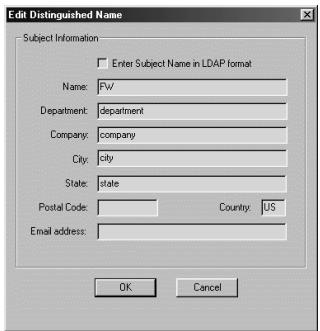
Figure 4-12. Soft-PK: Edit Distinguished Name window to specify Firewall public certificate
This is case sensitive, make sure it matches the certificate exactly.
- Select Security Policy and select the Phase 1 Negotiation Mode.
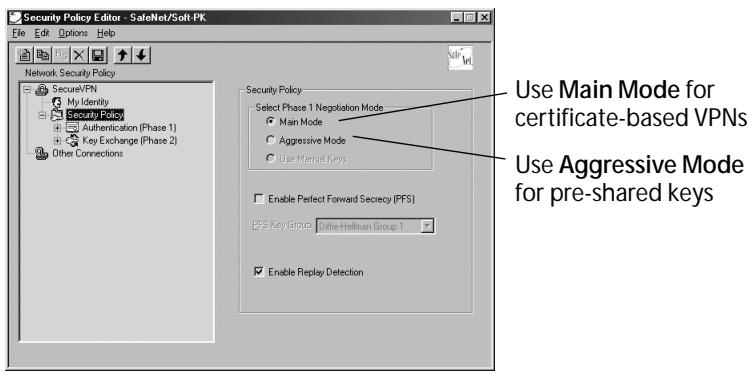
Figure 4-13. Soft-PK: Security Policy fields
- Specify how the user will be identified to the Sidewinder. Select My Identify.
Figure 4-14. Soft-PK: My Identity fields
a. Select the authentication method for this connection.
If using shared password: Click Pre-Shared Key and enter the shared password.
If using digital certificates: Select the personal certificate previously imported from the drop-down list. Notice the ID Type automatically changes to Distinguished Name.
b. In the Internet Interface selection drop-down box, specify which interface to use when creating the VPN. For our example, the default "Any" is adequate.
- Specify the Authentication settings. Select Authentication (Phase 1) -> Proposal 1.
Figure 4-15. Soft-PK: Authentication (Phase 1) -> Proposal 1 fields
a. In Authentication Method field, specify the method appropriate for your configuration. (For example, use RSA Signatures if using only digital certificate authentication, use RSA Signatures: Extended Authentication if using digital certificate authentication and extended authentication.)
b. In Encryption and Data Integrity/Algorithms fields:
Encrypt Alg: Select DES or Triple-DES (highest).
HashAlg: Select MD5 or SHA-1 (highest).
SA Life: Set this to 3500 seconds. The Phase 1 Lifetime on the Soft-PK should NOT be left as Unspecified. It should be set to some period of time slightly shorter than is configured on the Sidewinder SA definition (Advanced tab on the Sidewinder COBRA GUI).
c. In Key Group field, select at least Group 2. Group 5 (highest).
- Specify the Key Exchange settings. Select Key Exchange (Phase 2) -> Proposal 1.
Figure 4-16. Soft-PK: Key Exchange (Phase 2) -> Proposal 1 fields
SA Life: Select Unspecified to default to Sidewinder settings.
Compression should not be used.
Encapsulation Protocol: Select the same settings in the Encryption and Hash Algorithms fields as Phase I. Do not change Tunnel Encapsulation.
Do not use the Authentication Protocol (AH). (This does not encrypt traffic.)
- [Optional] Click Save to save the policy on this system.
IMPORTANT: You can export a policy without saving it, but the policy will then not be saved on the system on which it was configured
- Select File -> Export.
a. You will be prompted to protect your security policy. Your end users will then not be able to change the settings or create new policies. However, your end users will be able to change the My Identity fields.
b. Specify the location of the exported file.
- Provide a copy of this file to the appropriate end users (see Chapter 5 for details).

About this chapter
This chapter summarizes the final preparation steps for deploying the Soft-PK software, digital certificate files, and security policy to your end users. It is based on a worksheet that you edit and send to each remote end user.

IMPORTANT: This chapter assumes you have obtained the required certificates and have configured and saved a security policy.
This chapter addresses the following topics:
"Overview" on page 5-2
"Customizing the user worksheet" on page 5-4
Overview
You should deploy the Soft-PK installation program with a customized security policy and the necessary digital certificates. Custom installations are designed to make it easy to manage corporate security policies for tens, hundreds, or thousands of end users.
Along with the necessary software and files, you should provide specific Soft-PK installation and setup instructions for each end user. This facilitates management of corporate security policies for your end users and simplifies what the end user must do.
The Soft-PK product CD provided by Secure Computing includes a file (userworksheet.doc) in MS Word format that you can customize and send to users.

Figure 5-1. Sample user worksheet.doc file contained on Soft-PK product CD
Word format
This worksheet contains five main sections that you should edit and save before distributing to end users. These sections are based on the information presented in earlier chapters in this manual.
Dial-up network instructions
Soft-PK installation instructions
Certificate instructions
Security policy instructions
Basic connection instructions
Prior to customizing the worksheet, take a few minutes to organize the files and information you need to deploy to your end users.
Table 5-1. Organize the files/software for each client (end user)
| Deployment item | Notes |
| Soft-PK software program | Soft-PK setup.exe file and supporting files. |
| Digital certificate files | If deploying Sidewinder self-signed certificates: ◆ firewall certificate (.pem) ◆personal certificate, with private key (.p12) If deploying CA-based certificates: ◆CA root certificate (.pem) ◆personal certificate, with private key (.pk) IMPORTANT: Personal certificates must be unique to each individual; you cannot distribute one personal certificate to all of your end users. |
| Security policy | Include a locked security policy file (.spd) that end users cannot modify. |
Copy the Soft-PK software, certificate file, personal certificate file, and security policy file to an unzipped image of SafeNet/Soft-PK software.
Customizing the user worksheet
This section provides summary information about each section in the default UserWorksheet.doc file.
Specifying dial-up network instructions
Figure 5-2 shows the text in the initial UserWorksheet.doc file that pertains to setting up dial-up networking. Delete or change this text as needed for your end user's particular environment.
Figure 5-2. Sample text for specifying dial-up networking setup
Setting up Dial-Up Networking
[Administrator - If necessary, add here the configuration steps for the Windows Dial-Up Networking feature on your user's machine.]
**Specifying installation instructions**
Figure 5-3 shows the text in the initial UserWorksheet.doc file that pertains to Soft-PK installation instructions. The default text covers basic installation, one that installs only the Soft-PK. Change this text according to how you want users to install Soft.PK
Figure 5-3. Sample text for specifying Soft-PK installation instructions
Installing Soft-PK
[Administrator - Customize this procedure to specify a standard Soft-PK program installation.]
Note: If installing on a Windows NT/2000 system, log in as Administrator or equivalent. In addition, make sure to uninstall any VPN client software prior to installing Soft-PK. Uninstall using the Control Panel's Add/Remove program and reboot your computer before beginning the Soft-PK installation or upgrade.
- Exit all current open Windows programs on the system.
- Insert the product CD and launch the Autorun program or
- Start the Setup.exe program. [Administrator - delete the substeps that do not apply]
2a) Insert the Soft-PK CD. Select Start Run then click the Browse button. Locate and run the Setup.exe file. or
2b) Unzip the Soft-PK zip file. Select Start -> Run then click the Browse button. Locate and run the Setup.exe file.
or
2c) Using Explorer, browse to the network directory containing Soft-PK. Navigate to the appropriate subdirectory for your operating system and run the Setup.exe file.
- When prompted for the type of installation type, select Typical.
Note: Soft-PK may warn of an error on install when PPTP is already installed on the client system. This is not a concern when establishing Soft-PK to Sidewinder VPNs. Bypass the warning (press OK) and continue the installation normally (press next). - When the Setup Complete window appears:
Specifying certificate import/request instructions
Figure 5-4 shows the text in the initial UserWorksheet.doc file that pertains to digital certificates. The default text covers a basic instructions for importing certificate files from a disk you provide.
Change this text according to how you want users to set up digital certificates (or delete if not using certificates).
Figure 5-4. Sample text for specifying certificate instructions (if applicable)
Importing digital certificate
Include this procedure to instruct how to import the CA root certificate or a firewall certificate from a disk you provide.
- Select Start -> Programs -> SafeNet/Soft-PK -> Certificate Manager.
- Select the CA Certificates tab.
- Click Import Certificate... The Import CA Certificate window appears.
- Insert the diskette containing the firewall (or root CA) certificate file.
- From the Files of type: field, select All Files (.) and then navigate to display the files located on the diskette.
- Select the filename.pem file and click Open. A confirmation window appear
- Click Yes.
Include this procedure to instruct how to import a personal certificate from a disk you provide.
- Select Start -> Programs -> SafeNet/Soft-PK -> Certificate Manager.
- Select the My Certificates tab.
- Click Import Certificate.... The Import Certificate (and Private Key) window appears.
- Insert the diskette containing the remote key/certificate object file.
- From the Files of type: field, select All Files (^,^) and then navigate to display the files located on the diskette.
- Select the filename.p12 file and click Open.
- Specify ______ as the password. [Administrator: Provide the password you entered when you exported the personal certificate. You may want to send separate from these instructions.]
- Click Import. A prompt appears to confirm you want to import the selected Personal Certificate.
- Click Yes.
- [Optional] From the My Certificates tab, click View to see the information in the certificate.
Specifying security policy instructions
Figure 5-5 shows the text in the initial UserWorksheet.doc file that pertains to the Soft-PK security policy. The default text covers a basic instructions for importing a security policy from a disk you provide.
Change this text according to how you want users to set up the security policy.
Figure 5-5. Sample text for importing the security policy
Importing the Security Policy
- Select Start -> Programs -> SafeNet/Soft-PK -> Security Policy Editor.
- Select File Import Security Policy.
- Insert the diskette containing security policy file.
- Select the filename.spd file and click Open.
- Click Import. A prompt appears to confirm you want to import the selected policy.
- Click Yes.
Specifying basic connection information
Figure 5-6 shows the text in the initial UserWorksheet.doc file that pertains to starting the VPN. The default text covers basic activation of a security policy.
Figure 5-6. Sample text for starting the VPN
Starting the VPN Connection
To activate your VPN security policy, right-click the SafeNet icon in the taskbar and select Activate Security Policy.
APPENDIX A
Troubleshooting
About this appendix
This appendix provides a summary of troubleshooting techniques available for resolving Soft-PK and Sidewinder VPN connection problems. This appendix addresses the following topics:
"Soft-PK Log Viewer" on page A-1
"Soft-PK Connection Monitor" on page A-2
"Sidewinder troubleshooting commands" on page A-4
Soft-PK Log Viewer
The Log Viewer displays the communications log, a diagnostic tool that lists the IKE negotiations that occur during the authentication phase. This is a very useful tool when you cannot correctly establish a VPN connection. (However, a good log viewer does not replace a carefully set up VPN security association.)
Note: The Log Viewer shows only ISAKMP and IKE messages, it does not show audit messages for all traffic flow through the VPN.
To start the Log Viewer, right-click the Soft-PK icon or select it from the Start menu.
Figure A-1. Log Viewer window on Soft-PK

IMPORTANT: This information is not saved. Unless you freeze and save or print this information, it will be cleared by ongoing negotiations.
The following summarizes the tasks you can perform.
| Button | Summary |
| Clear | Cleared the communications log. IMPORTANT: You cannot retrieve this information once you clear it. |
| Freeze | Freezes/Unfreezes the communications log. Because the communications log scrolls through IKE negotiations as they occur, you may need to freeze the log in order to save or print specific messages. Since this button acts as a toggle, it will now read UnFreeze until you click it again to restart the log. |
| Print the current content in the communications log. TIP: You may want to freeze the log before you attempt to print it. | |
| Save | Print the current content in the communications log. TIP: You may want to freeze the log before you attempt to save it. |
| Close | Closes the log viewer. |
Soft-PK Connection Monitor
The Connection Monitor displays statistical and diagnostic information for each active connection in the security policy. This utility is designed to display the actual security policy settings configured in Security Policy Editor and the security association (SA) information established during Phase 1 IKE negotiations and Phase 2 IPSec negotiations.
To start the Connection Monitor, right-click the Soft-PK icon or select it from the Start menu.
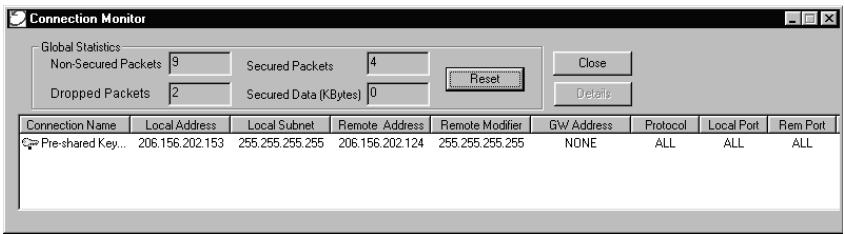
Figure A-2. Connection Monitor window
You will see an icon to the left of the connection name:
A key indicates that the connection has a Phase 2 IPSec SA, or both a Phase 1 and Phase 2 SA. When there is a single Phase 1 SA to a gateway that is protecting multiple Phase 2 SAs, there will be a single Phase 1 connection with the SA icon and individual Phase 2 connections with the key icon listed above that entry.
- An SA indicates that the connection has only a Phase 1 IKE SA. This occurs when connecting to a secure gateway tunnel or when a Phase 2 IPSec SA fails to establish or has not been established yet.
- A black mark moving beneath the key icon indicates that the client is processing secure IP traffic for that connection.
More about the Connection Monitor
Global Statistics are not real-time operations; they are updated every five seconds.
Dropped Packets include packets from connections that are configured as blocked.
Remote Modifier is either the remote party subnet mask or the end of the address range when IP Address Range is selected for the Remote Party Identity and Addressing ID Type.
To view the details
To see the details about a connection, click Details. The Security Association Details window appears as shown below.
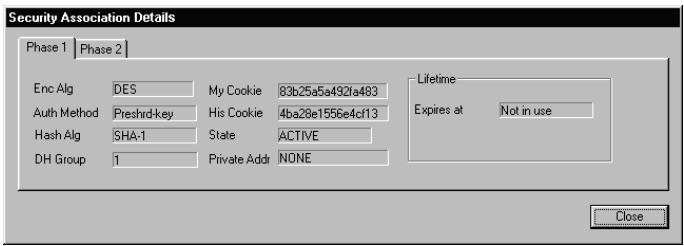
Figure A-3. Connection Monitor window
You will see a Phase 1 tab and/or a Phase 2 tab; these tabs indicate
Sidewindertroubleshootingcommands
that the selected connection has established SAs.
To view Authentication (Phase 1) security associations negotiated by IKE, click the Phase 1 tab.
To view Key Exchange (Phase 2) security associations negotiated by IPSec, click the Phase 2 tab.
In addition to standard logging, the Sidewinder also performs auditing of certain system events which allows you to generate information on VPN connections. Table A-1 shows some useful commands you can use to track VPN connections in real-time mode and check VPN settings/configuration.
Table A-1. Basic Sidewinder VPN troubleshooting commands
| Commands |
| tcpdump -npi ext-interface port 500 proto 50 To show IPSEC and ESP traffic arriving at the firewall |
| cf ipsec q To review VPN policies on Sidewinder console |
| cf ipsec policydump To determine if VPN is active |
| showaudit -v To show detailed audit trace information for VPN. |
Part Number: 86-0935037-A
Software Version : Soft-PK 5.1.3 Build 4 and Sideiwnder 5.1.0.02
Product names used within are trademarks of their respective owners.
Copyright © 2001 Secure Computing Corporation. All rights reserved.