
Multy Mini WSQ20 - Wi-Fi repeater ZYXEL - Free user manual and instructions
Find the device manual for free Multy Mini WSQ20 ZYXEL in PDF.


| Product type | Wi-Fi repeater (extender) |
| Model | Multy Mini WSQ20 |
| Wireless standard | 802.11a/b/g/n/ac |
| Bandwidth | 1750 Mbps (dual-band) |
| Frequency bands | 2.4 GHz and 5 GHz |
| Internal antennas | 3 (2.4 GHz), 3 (5 GHz), 1 (BLE) |
| USB port | Yes (Quick Charge support) |
| Ethernet port | 1 Gigabit Ethernet (Internet) |
| LED indicator | Multi-color LED (white, blue, red) |
| Reset button | Yes (rear panel, 5+ seconds) |
| Mounting | Wall/ceiling mountable (mounting holes) |
| App control | Zyxel Multy app (Android/iOS) |
| Guest WiFi | Yes (separate network) |
| Parental control | Yes (schedule profiles, device blocking) |
| Speed test | Yes (via app) |
| Alexa integration | Yes (voice commands) |
| Maximum devices per site | 4 (1 primary, up to 3 extenders) |
| Daisy chain support | No |
| Firmware upgrade | Via app |
| Safety warnings | Keep away from water, do not obstruct vents |
Frequently Asked Questions - Multy Mini WSQ20 ZYXEL
User questions about Multy Mini WSQ20 ZYXEL
0 question about this device. Answer the ones you know or ask your own.
Ask a new question about this device
Download the instructions for your Wi-Fi repeater in PDF format for free! Find your manual Multy Mini WSQ20 - ZYXEL and take your electronic device back in hand. On this page are published all the documents necessary for the use of your device. Multy Mini WSQ20 by ZYXEL.
USER MANUAL Multy Mini WSQ20 ZYXEL
Models: WSR30, WSQ50, WSQ20
Default Login Details
| Zyxel App Zyxel Multy | |
| myZyxelCloud Account | https://mycloud.zyxel.com |
Version 2.2.1 Edition 2, 01/2019
natural_image
Abstract geometric illustration of two stylized buildings with blue and white coloring, no text or symbols presentIMPORTANT!
READ CAREFULLY BEFORE USE.
KEEP THIS GUIDE FOR FUTURE REFERENCE.
Screenshots and graphics in this book may differ slightly from your product due to differences in your product firmware or your app version. Every effort has been made to ensure that the information in this manual is accurate.
Related Documentation
- Quick Start Guide
The Quick Start Guide contains information on setting up your Multy Device using the Zyxel Multy app.
- More Information
Go to support.zyxel.com to find other information on the Multy Device.
Table of Contents
Table of Contents....3
Chapter 1
Get to Know Your Multy WiFi System ....5
1.1 Overview 5
1.2 How to Manage Your Multy Sites 7
1.3 Getting Started .... 7
Chapter 2
Hardware 8
2.1 Hardware Connections 8
2.2 Hardware Installation 10
2.2.1 WSQ50/WSQ20 Installation 10
2.2.2 WSR30 Installation 12
2.3 Reset Button 13
2.3.1 Use the Rest Button 14
2.4 LED Light 15
Chapter 3
Set up Your Multy WiFi System ....18
3.1 Introduction ...... 18
3.2 Use the Zyxel Multy App 18
3.3 Add and Install Your First Multy Device 20
3.4 Test Your Mobile Phone Connection Speed 26
3.5 Test Your Multy Device Connection Speed 28
3.6 Measure Your WiFi Signal Strength 30
3.7 Enable or Disable Guest WiFi 32
3.8 Share WiFi Name and Password with a QR Code 34
3.9 Set a WiFi Schedule for Clients 35
3.10 Pause Internet Access for an Individual Client 39
3.11 Pause or Resume Internet Access for a Group 41
3.12 Check your Multy Device's Configuration Details 43
3.13 Use Custom DNS Server 44
3.14 Turn on or off the Multy Device's LED 46
3.15 Check Your Multy-to-Multy Signal Strength 46
3.16 Restart Your Multy Device 48
3.17 Remove a Multy Device 48
3.18 View Legal and Regulatory Information 49
3.19 Install a Second Multy Site 51
Table of Contents
3.20 Change the Name or Picture of a Multy Site 53
3.21 Remove a Multy Site 55
3.22 Enable or Add Port Forwarding Rules 57
3.23 Enable DMZ 60
3.24 Switch to NAT/Bridge Mode 62
3.25 Turn Notifications on or off 63
3.26 Enable or Disable Daisy Chain Network Topology 66
3.27 Report a Problem with the Zyxel Multy app 68
3.28 Log in with a myZyxelCloud Account 69
3.29 Manage Your Multy WiFi System with Amazon Alexa 71
Appendix A Customer Support 74
Appendix B Legal Information 80
CHAPTER 1
Get to Know Your Multy WiFi
System
1.1 Overview
Zyxel Multy WiFi System allows you to quickly set up and monitor your WiFi network using the Zyxel Multy app. You can install two or more Multy Devices in a Multy WiFi System, also called a Multy Site, to extend the range of your existing wired network without additional wiring.
Note: At the time of writing, a maximum of four Multy Devices (one primary Multy and up to three extender Multys) can be used in a Multy Site.
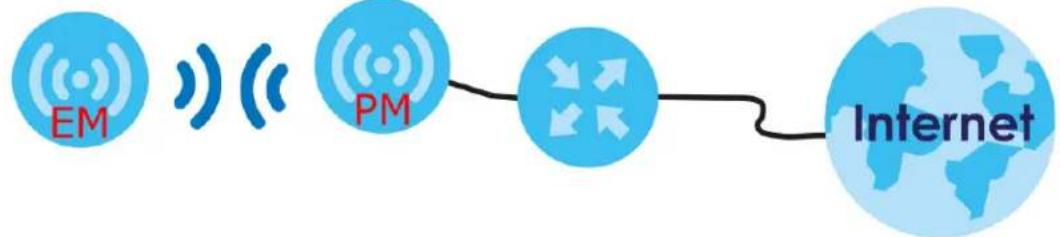
Multy Devices can act either as a primary Multy or an extender Multy. As shown in the next figure, a primary Multy (PM) is connected to a modem or router. An extender Multy (EM) connects wirelessly to the primary Multy to expand its range. See Table 2 on page 7 to know which Multy devices can be used as a primary Multy or extender Multy.
flowchart
graph LR
    EM["EM"] -->|Wireless Signal| PM["PM"]
    PM -->|Signal to| PM
    PM -->|Signal to| Internet["Internet"]
    Internet -->|Signal to| Internet
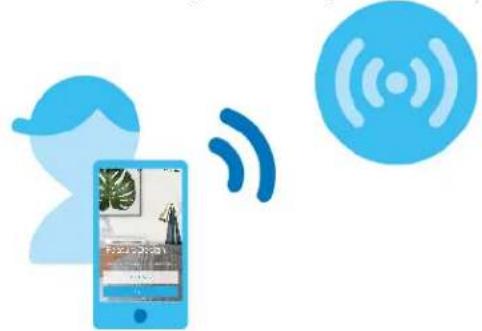
Users can manage their Multy Sites and Multy Devices using the Zyxel Multy app, as shown below.
natural_image
Illustration of a person using a smartphone with wireless signal icons (no text or symbols)In the following example, the first Multy Device connects to the router to act as the primary Multy (PM), while the other Multy Devices are extender Multys (E1 or E2) to expand wireless coverage. The extender Multys help relay communications from wireless clients to the primary Multy and router.
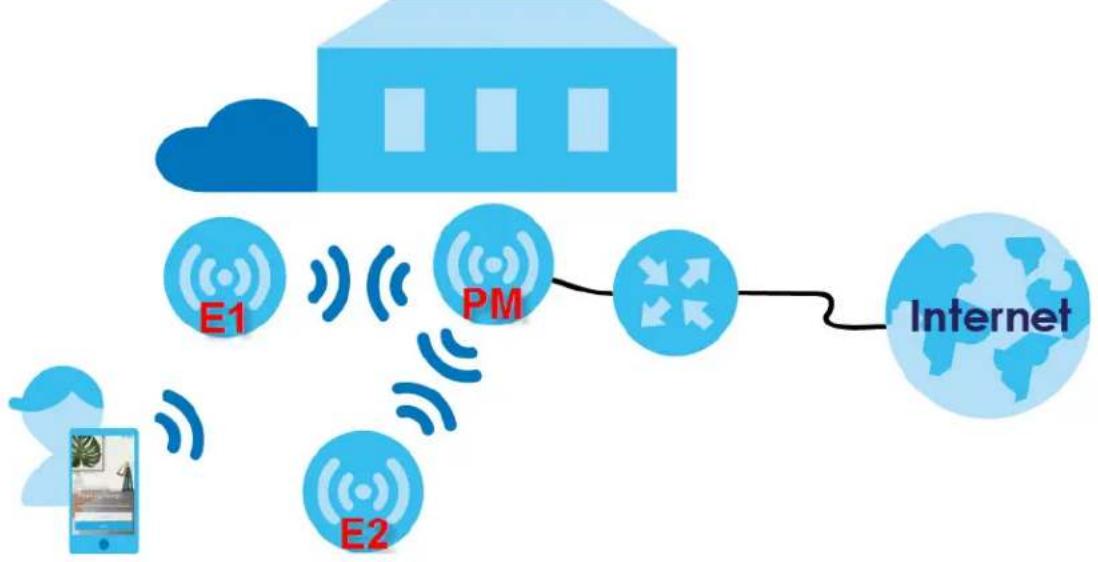
flowchart
graph TD
    A["Mobile Device"] -->|Wireless Signal| B["E1"]
    A -->|Wireless Signal| C["E2"]
    D["Internet"] -->|Signal Link| E["PM"]
    E --> F["Global Network"]
    style A fill:#cce5ff,stroke:#333
    style D fill:#cce5ff,stroke:#333
    style B fill:#cce5ff,stroke:#333
    style C fill:#cce5ff,stroke:#333
    style E fill:#cce5ff,stroke:#333
    style F fill:#cce5ff,stroke:#333
Multy devices include the following:
- WSQ60 (Multy Plus)
- WSQ50 (Multy X)
- WSQ20 (Multy Mini)
- WSR30 (Multy U)
Multy U is designed for home use while Multy X and its extender, Multy Mini, are designed for small businesses. Multy Plus is designed for medium-sized businesses. The differences between these devices are summarized in the next table.
Table 1 Differences between Multy devices
| FEATURE | MULTY PLUS (WSQ60) | MULTY X (WSQ50) | MULTY MINI (WSQ20) | MULTY U (WSR30) |
| Max. Bandwidth | 3000 (Tri-Band) | 3000 (Tri-Band) | 1750 (Dual-Band) | 2100 (Tri-Band) |
| Use as primary Multy YES YES NO YES | ||||
| Daisy Chain Topology YES YES NO NO | ||||
| USB Port YES YES YES NO | ||||
| N u | m | b | e | r |
| Number of internal antennas | ||||
| 5 G | 6 | 6 | 3 | |
| 2 . | 4 | G | 2 | |
| BLE (Bluetooth Low Energy) | 1 | 1 | 1 | 1 |
| E-label (see Section 3.18 on page 49) | NO NO YES YES | |||
A Tri-Band WiFi System emits one 2.4G wireless signal and two 5G wireless signals. Dual-Band WiFi Systems emit one 2.4G signal and one 5G signal. "Max. Bandwidth" refers to the sum of the bandwidths of all wireless signals (2.4G and 5G) emitted by the Multy Device.
The next table shows which Multy Device(s) you can use as extender Multys for a given primary Multy.
Table 2 Allowed Extender Multys for a Given Primary Multy
| EXTENDER MULTY | |||||
| MULTY PLUS (WSQ60) | MULTY X (WSQ50) | MULTY MINI (WSQ20) | MULTY U (WSR30) | ||
| PRIMARY MULTY | Multy Plus (WSQ60) | Y | S | N | O |
| Multy X (WSQ50) | NO YES YES NO | ||||
| Multy U (WSR30) | NO NO NO YES | ||||
1.2 How to Manage Your Multy Sites
You can use the following way to manage your Multy WiFi System.
Zyxel Multy App
The Zyxel Multy app allows Multy Site setup and management from your mobile device. This User's Guide provides information about key uses of the Zyxel Multy app.
1.3 Getting Started
To set up a Multy Site, you need to:
1 Have a broadband modem or router that is connected to the Internet.
2 Get at least one Multy Device. If you have multiple Multy Devices, the first one you install should be connected to the modem or router. Other Multy Devices can be placed in different rooms to extend WiFi range by wirelessly connecting to the first Multy Device.
3 Install the Zyxel Multy app and turn on Bluetooth on your smartphone. Make sure your phone also has Internet access.
4 Connect the first Multy Device (see Section 2.1 on page 8).
5 Use the Zyxel Multy app to set up the Multy Device and manage your Multy Site (see Chapter 3 on page 18).
CHAPTER 2 Hardware
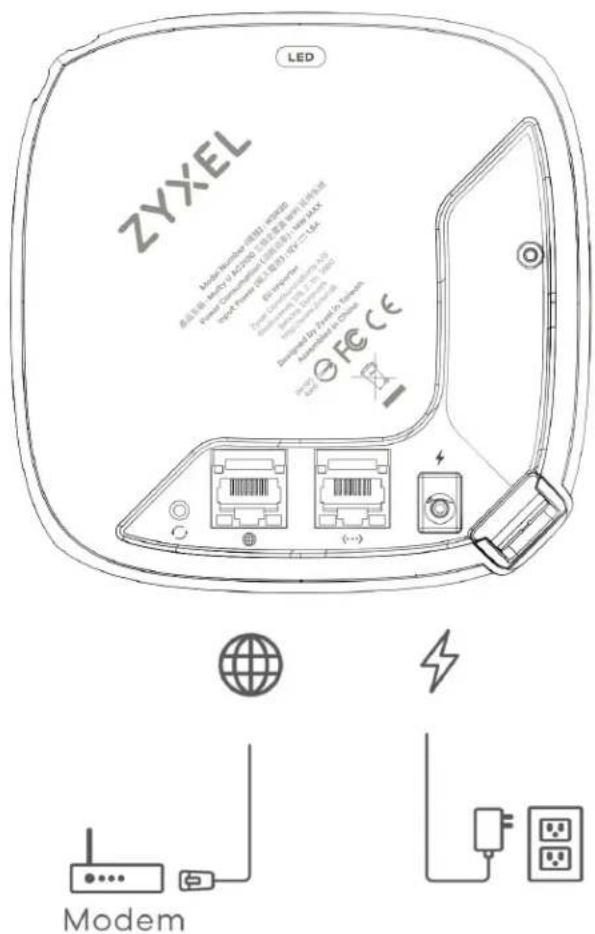
2.1 Hardware Connections
1 Use the included power cable to connect the Multy Device's power port to a power outlet.
2 If you are installing the first Multy Device, connect the Internet port of the Multy Device to a broadband modem or router that is connected to the Internet.
3 You may use Ethernet cables to connect other devices to your Multy Device.
4 The USB port on the WSQ20 device supports the Quick Charge function.
Figure 1 WSQ60/WSQ50 Rear Panel
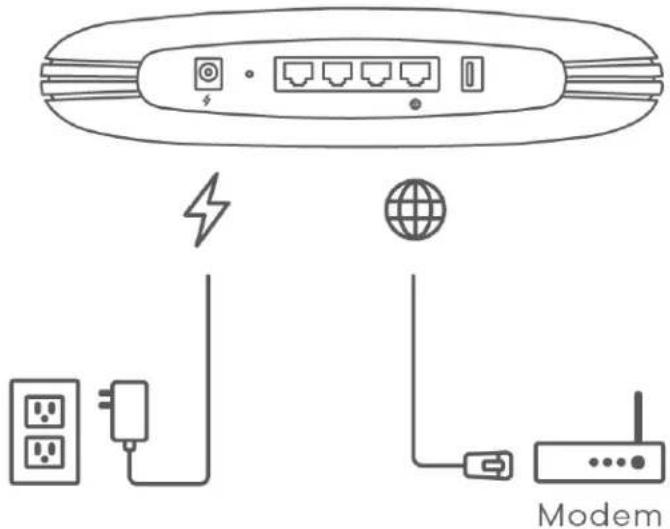
Figure 2 WSQ20 Rear Panel
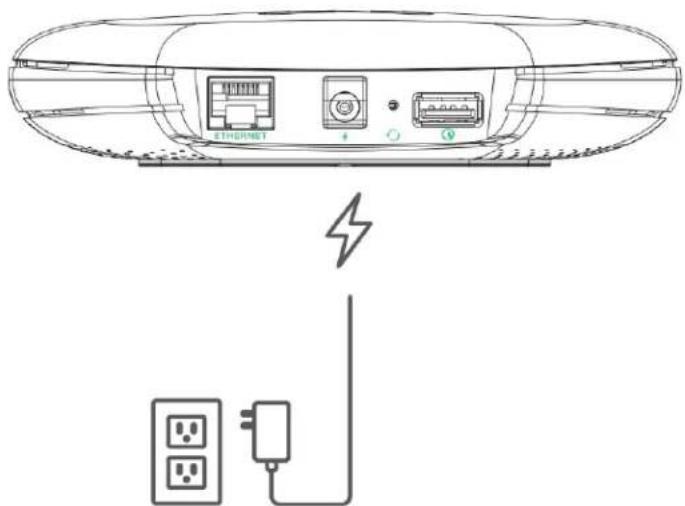
Figure 3 WSR30 Back Panel
2.2 Hardware Installation
This section describes how the hardware device can be installed.
2.2.1 WSQ50/WSQ20 Installation
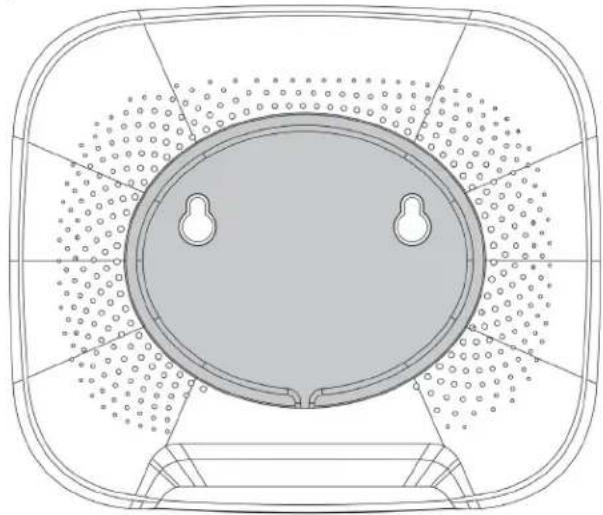
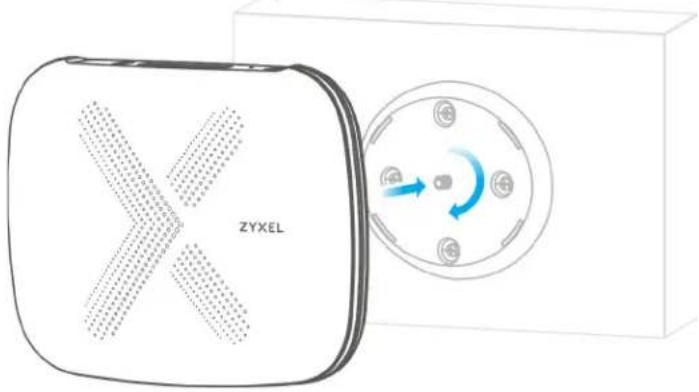
If your Multy Device comes with mounting holes at the bottom, you can use mounting brackets to attach it to a wall or ceiling. If not, you have to place it on a desk, table, shelf, etc.
Figure 4 WSQ50 Mounting Holes
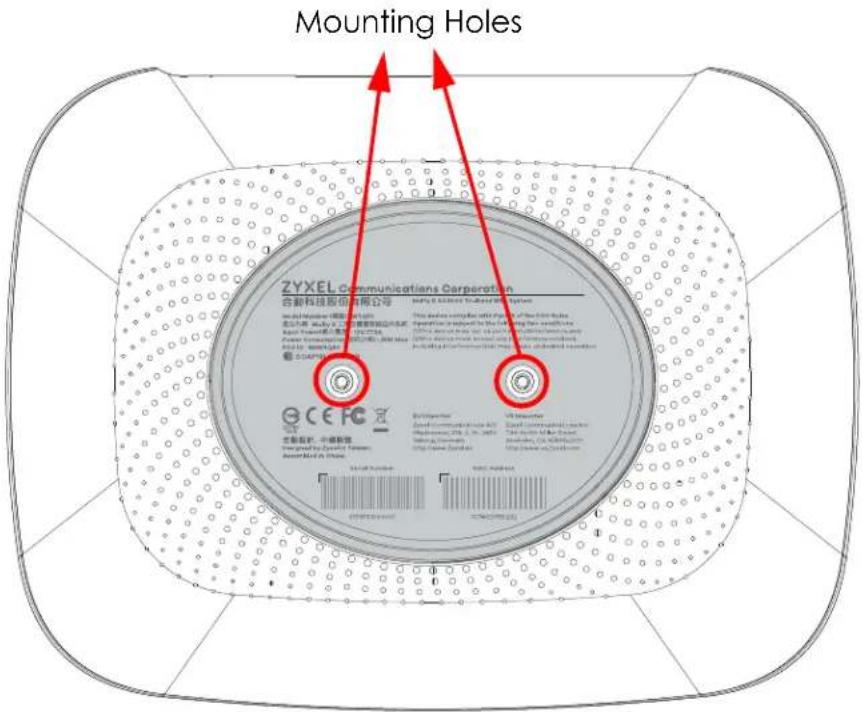
Figure 5 WSQ20 Mounting Holes
natural_image
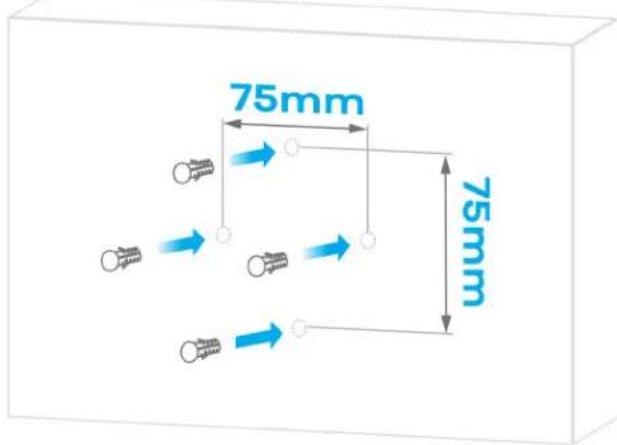
Top-down technical drawing of a circular mechanical component with mounting holes and textured surfaces (no text or symbols)Follow these steps for WSQ60/WSQ50/WSQ20 wall/ceiling mounting:
1 Use the mounting base to mark four holes in the wall/ceiling. Drill the holes and insert the anchors.
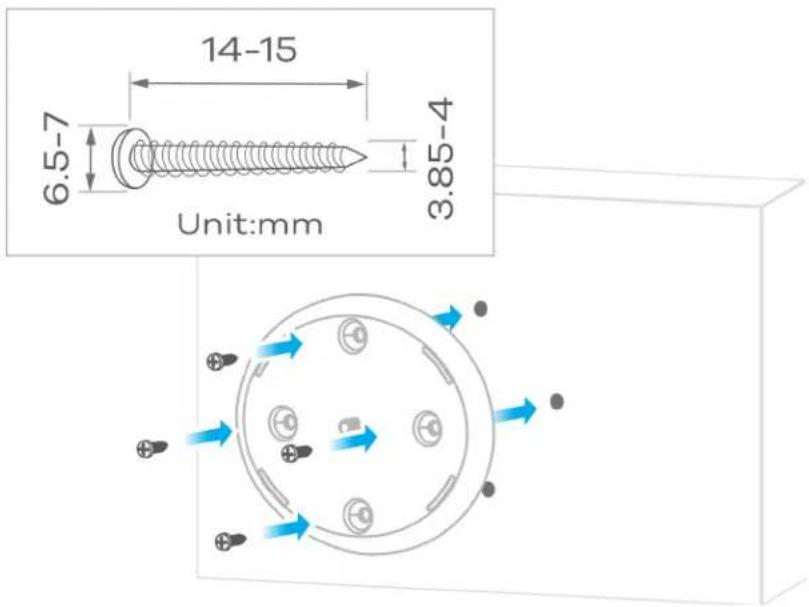
2 Screw the mounting base into the wall/ceiling.
Wall Mount Screw
3 Line up the Multy's base hole with the mounting base screw. Gently turn the Multy clockwise until it's secured to the mounting base.
2.2.2 WSR30 Installation
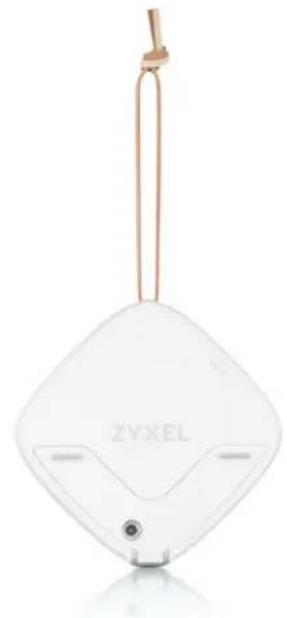
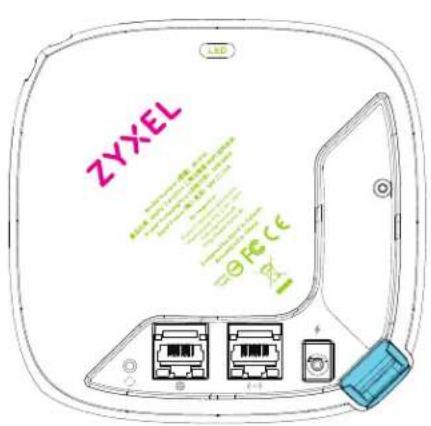
There are two ways to set up your WSR30 Multy Device:
- You can attach the leather strap to the hole at the top of your Multy Device to hang it to a wall or ceiling, as shown in Figure 6 on page 13.
- You can also use the back port cover as a stand by attaching it to the bottom of the Multy Device (shown blue in Figure 7 on page 13).
Figure 6 WSR30 Leather Strap
natural_image
White electronic device labeled 'ZYXEL' with a gold-colored vertical strap, shown against a white background (no readable text beyond brand name)Figure 7 WSR30 Stand
natural_image
White 3D cube-shaped device with a purple X-shaped logo on its front face (no text or symbols)2.3 Reset Button
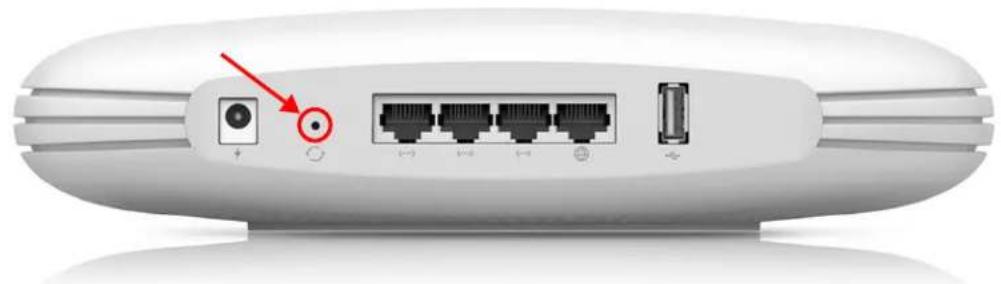
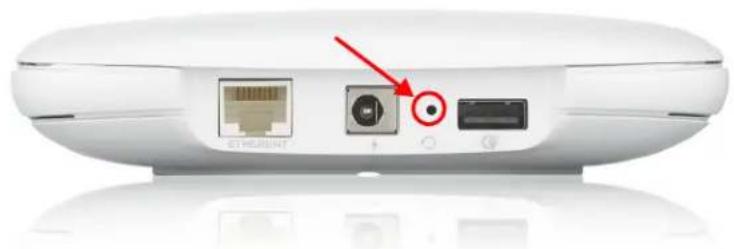
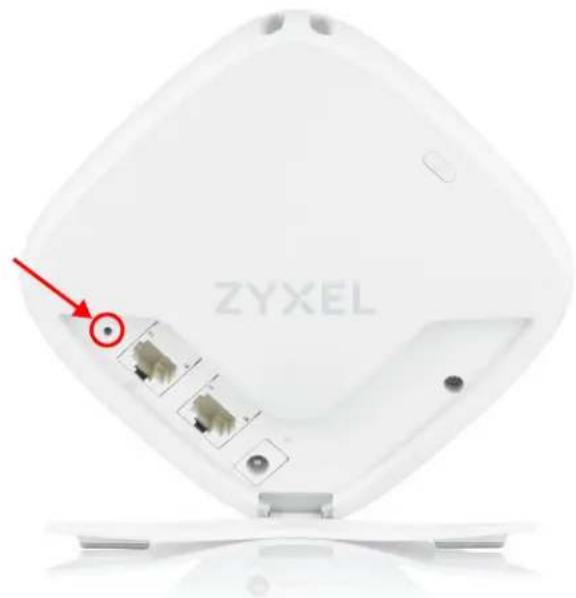
If you need to return the Multy Device to its default settings, use the reset button on the rear panel.
Figure 8 WSQ60/WSQ50 Reset Button
natural_image
Front view of a white wireless router with ports and indicator lights, no visible text or symbolsFigure 9 WSQ20 Reset Button
natural_image
Front view of a white wireless router with ports and an Ethernet icon, no visible text or symbolsFigure 10 WSR30 Reset Button
natural_image
Front view of a white ZYXEL wireless router with attached ports and a red arrow pointing to the port (no text or symbols on the device itself)2.3.1 Use the Rest Button
Follow the steps below for a factory reset.
WSQ60/WSQ50/WSQ20:
1 Make sure the LED light on the top panel is not blinking white.
2 Press the reset button for at least five seconds or until the LED starts to blink red.
WSR30:
Press the reset button for at least five seconds or until the LED starts to blink amber.
2.4 LED Light
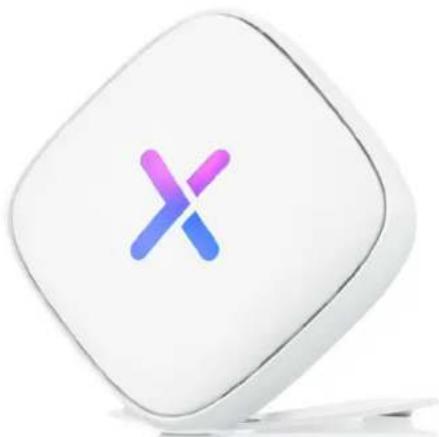
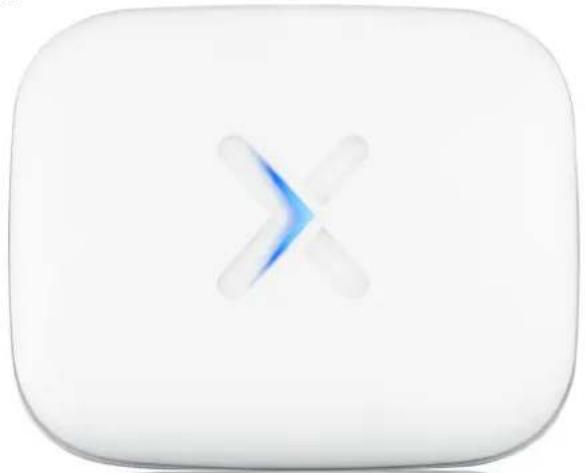
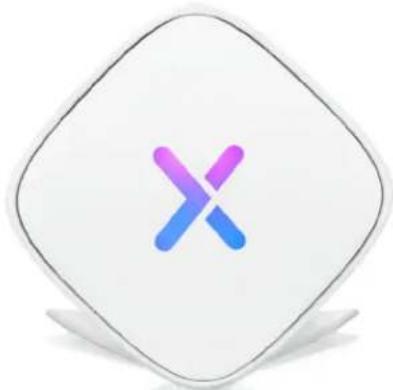
Look at the LED on the top (WSQ60/WSQ50/WSQ20) or front (WSR30) panel to determine the status of the Multy Device.
Figure 11 WSQ50/WSQ60 LED
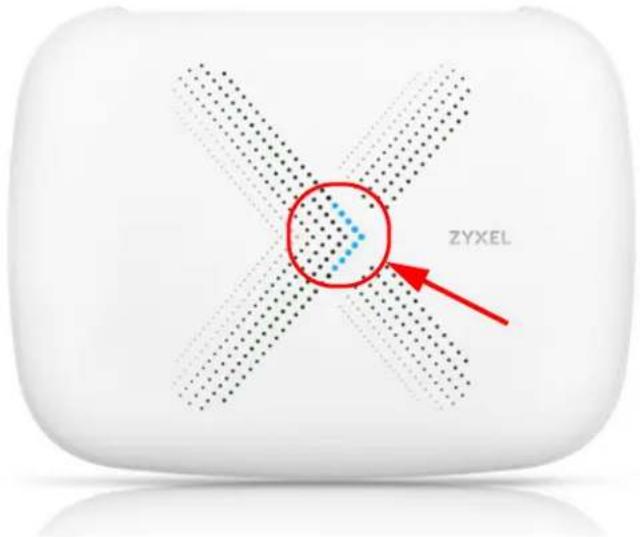
Figure 12 WSQ20 LED
natural_image
White rounded square button with a blue X-shaped arrow symbol in the center (no text or numbers)Figure 13 WSR30 LED
natural_image
Abstract geometric icon with two colored Xs inside a diamond shape (no text or symbols)The following are the LED descriptions for your Multy Device.
Table 3 WSQ60/WSQ50/WSQ20 LED Descriptions
| COLOR STATUS | US DESCRIPTION | |
| Off The Multy Device | is not receiving power. | |
| White Blinking | The Multy Device is booting up, undergoing firmware upgrade, or being configured. | |
| On The Multy Device | is on and connected to the Internet. | |
| Blue Blinking Bl | Bluetooth is enabled on the Multy Device. | |
| On | The Multy Device in extender mode is connecting to the primary Multy. | |
| COLOR | STATUS | DESCRIPTION |
| Red On The Multy Device in primary | Multy mode failed to connect to the Internet, the Multy Device in extender mode cannot connect to the primary Multy,Bluetooth is not working on the Multy Device, or the Multy Device encountered a system error. | |
| Slow Blinking An error occurred during firmware update. | ||
| Fast Blinking The Multy Device is in the process of restoring to default. | ||
Table 4 WSR30 LED Descriptions
| COLOR STATUS DESCRIPTION | ||
| Off The Multy Device is not receiving power. | ||
| White Blinking The Multy Device is booting up. | ||
| On The Multy Device power is on. | ||
| Blue Blinking The Multy Device Bluetooth is being configured. | ||
| On The Multy Device Bluetooth is ready. | ||
| Pink/Blue | Rotate | The Multy Device is ready for use. Rotate here means the pink light will move around the LED indicator while the blue light is stationary. |
| Amber Blinking The Multy Device is undergoing firmware upgrade. | ||
| Fast Blinking | The Multy Device is being reset. | |
| Red | On The Multy Device in primary AP —Multy mode failed to connect to the Internet or the Multy Device in extender mode cannot connect to the primary Multy. | |
CHAPTER 3
Set up Your Multy WiFi
System
3.1 Introduction
The Zyxel Multy app helps you install Multy Devices and manage your Multy Sites directly with your Android or iOS device.
Note: Your mobile device needs to have Internet access to configure the following settings.
Compatibility
- Android 5.0 or later
- iOS 9.0 or later.
3.2 Use the Zyxel Multy App
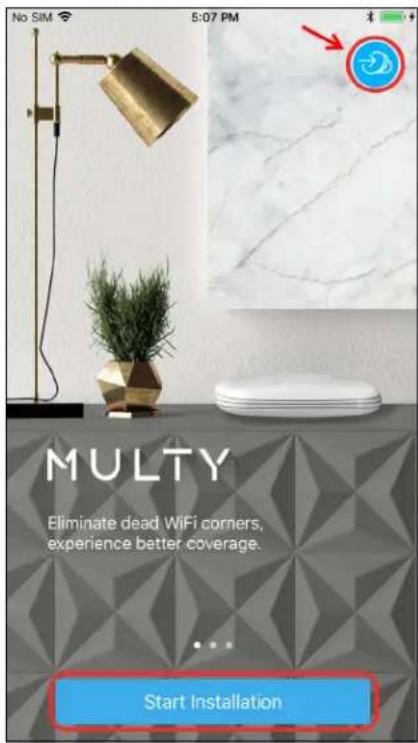
You can log in and use the Zyxel Multy app with or without a myZyxelCloud account.
With a myZyxelCloud account, all your configurations will be stored in the myZyxelCloud server. You then can log in and use the app on any mobile device to manage your Multy Sites once they have been set up. Moreover, Multy Devices can work with Amazon Alexa after the myZyxelCloud account is linked to Alexa (Section 3.29 on page 71).
1 Install the Zyxel Multy app from Google Play or the Apple App store. Tap the Multy icon to open it.
Figure 14 Zyxel Multy App Icon

2 The main menu will be displayed. Tap the login icon and see the next step to enter your myZyxelCloud account information. To use the app without logging into the myZyxelCloud server, tap Start Installation.
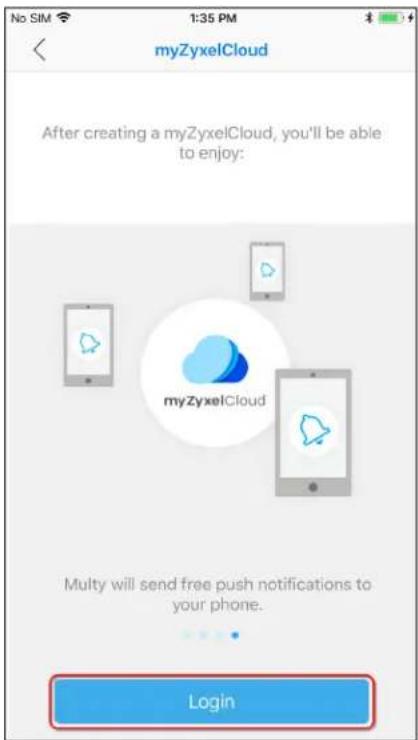
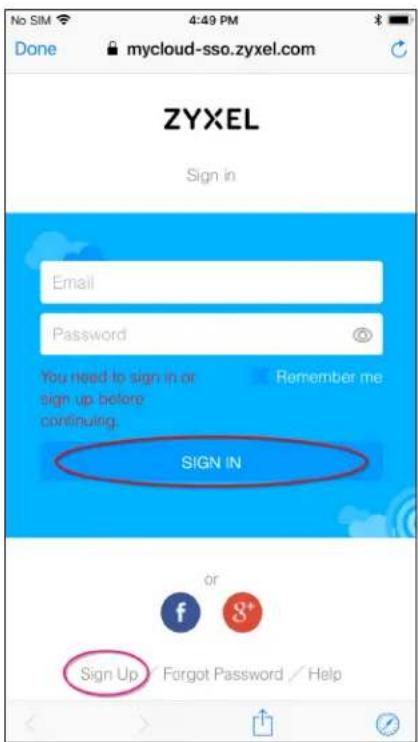
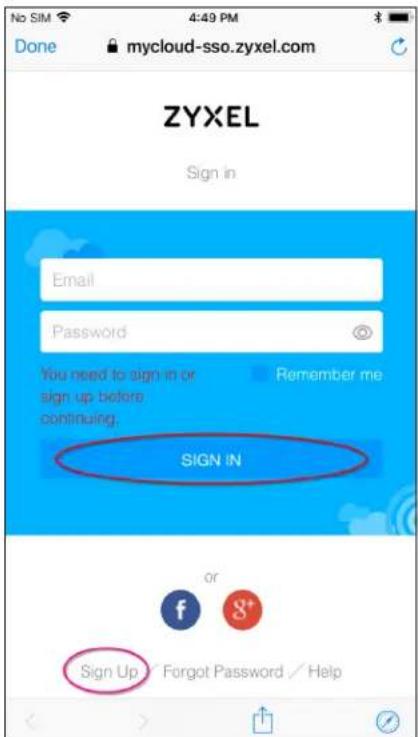
3 To log in with a myZxelCloud account, tap Login when the myZyxelCloud screen is displayed. Enter your existing account information and tap SIGN IN, or tap Sign Up to create a new myZyxelCloud account.
3.3 Add and Install Your First Multy Device
You need to install at least one Multy Device before you can manage a Multy Site. See Section 1.3 on page 7 to prepare for installation and Table 2 on page 7 to know which Multy Devices can be used as primary and extender Multys.
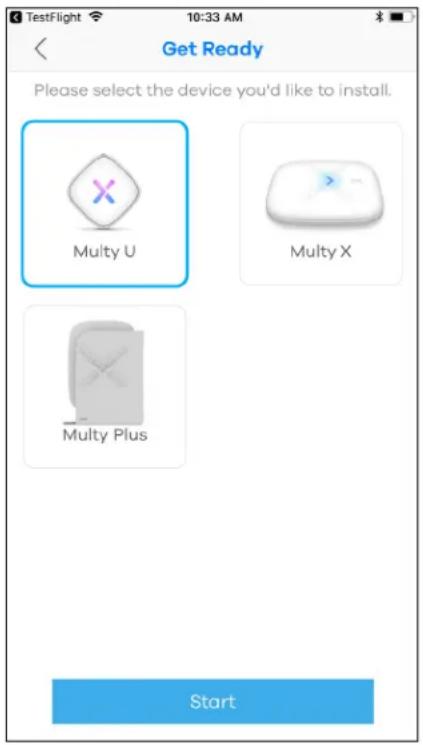
1 Sign in to your myZyxelCloud account or tap Start Installation, as shown in Section 3.2 on page 18. Choose the product model of your device and tap Start.
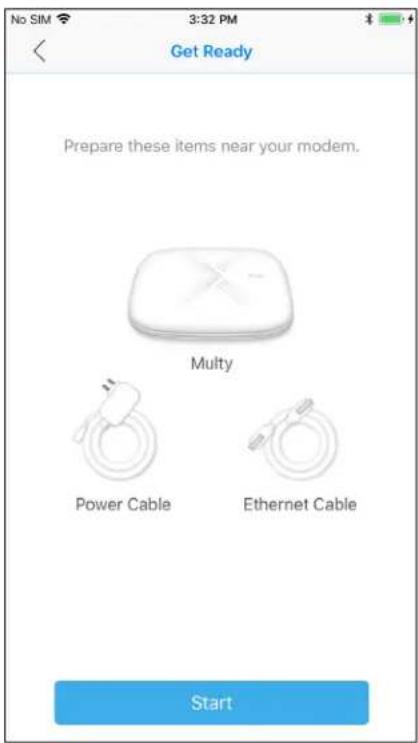
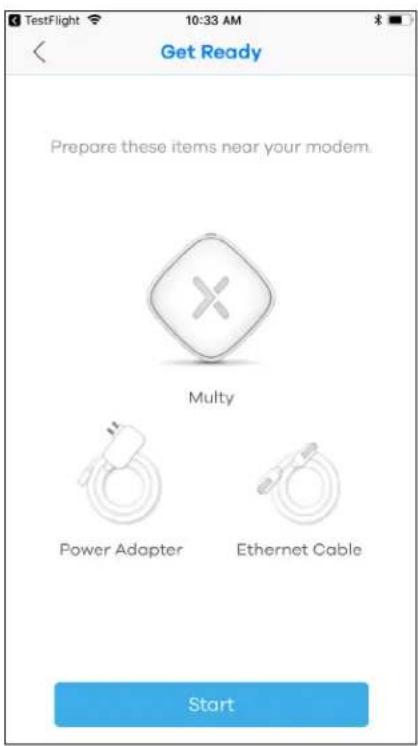
2 The Get Ready screen displays. Tap Start to install and add a Multy Device to your Multy Site. Follow the next steps that appear on your screen. Unplug and then plug your modem as instructed in the app to prevent errors.
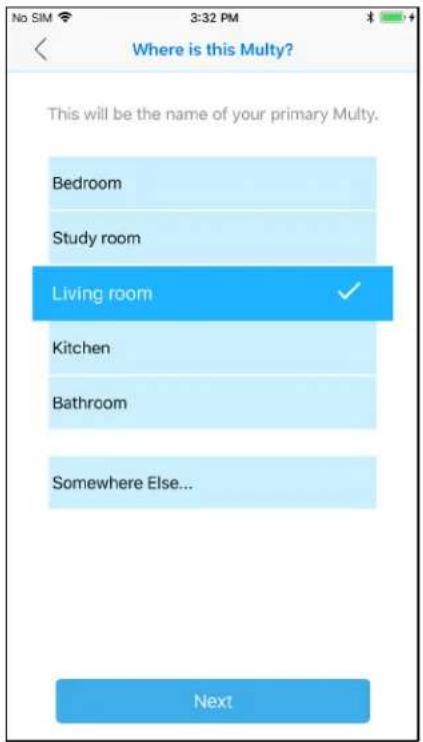
3 Select the location where you want to place your Multy Device, then tap Next.
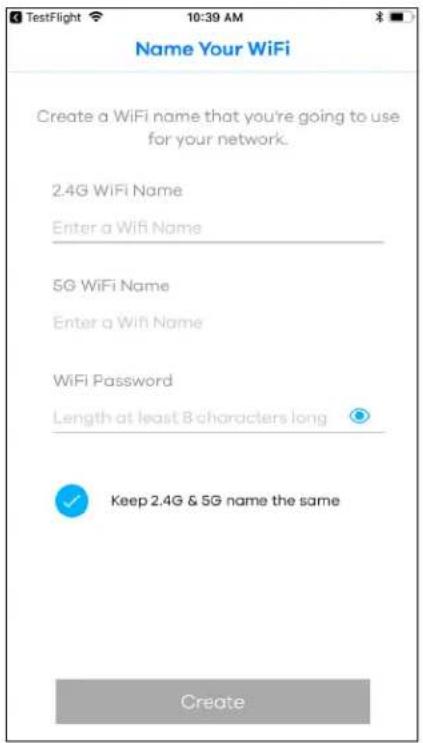
4 Enter your WiFi name and password, and then tap Create. Keeping 2.4G and 5G names the same allows you to seamlessly steer between the two wireless networks.
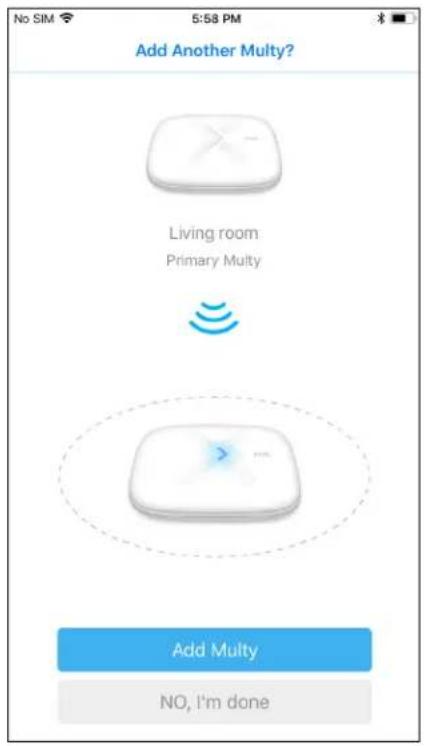
5 After the first Multy Device is installed, you can tap Add Multy to install an extender Multy.
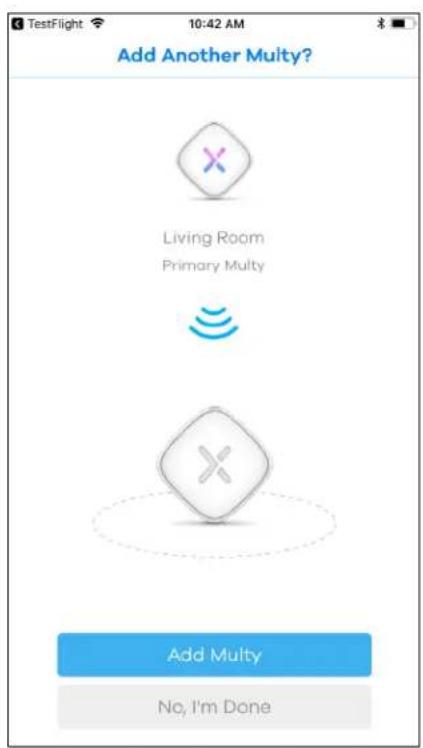
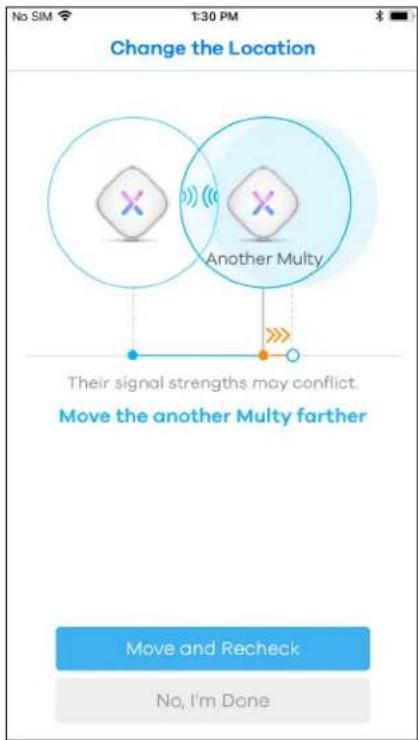
6 After adding another (extender) Multy Device, a test will be carried out to check the signal strength between the primary and extender Multys. Move your device to a different location if prompted to, then tap Move and Recheck.
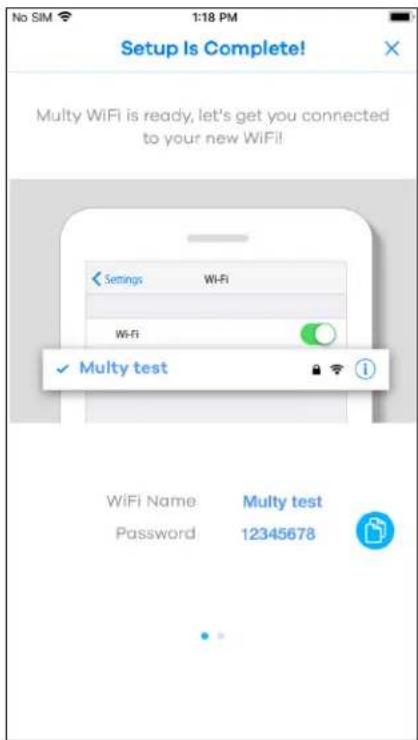
7 When the WiFi setup is completed for all your Multy Devices, you can copy the password by pressing the Copy icon (.) and use it with the WiFi name to connect your mobile phone to the Multy Site.
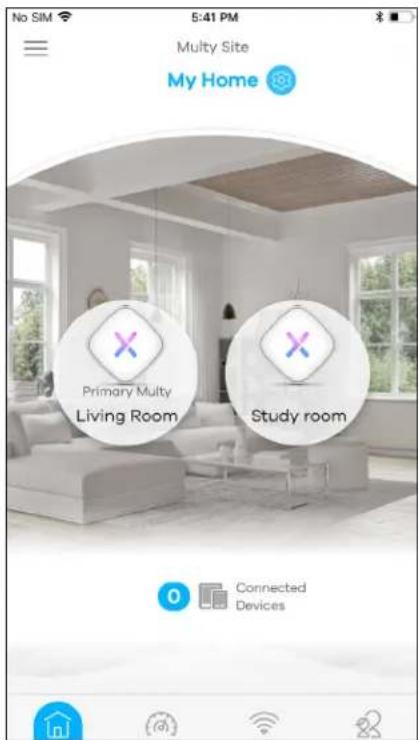
8 A Multy Site is a collection of Multy Devices with exactly one Multy Device acting as the primary Multy and the rest acting as extender Multys. After completing the setup, the Multy Site screen will be displayed, allowing you to monitor your Multy Devices and Multy WiFi System. It shows whether the Multy Devices in this Multy Site are on. It also shows the number of wireless clients currently connected to the Multy Devices.
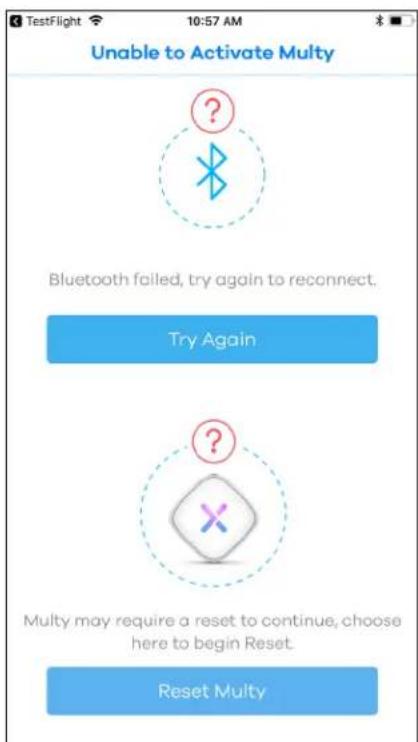
Note: If you can't connect to your Multy Device during the installation process, you may see the following screen. If your Bluetooth is disabled, enable it first and then tap Try Again. If your Multy Device needs to be reset, tap Reset Multy and follow the instructions.
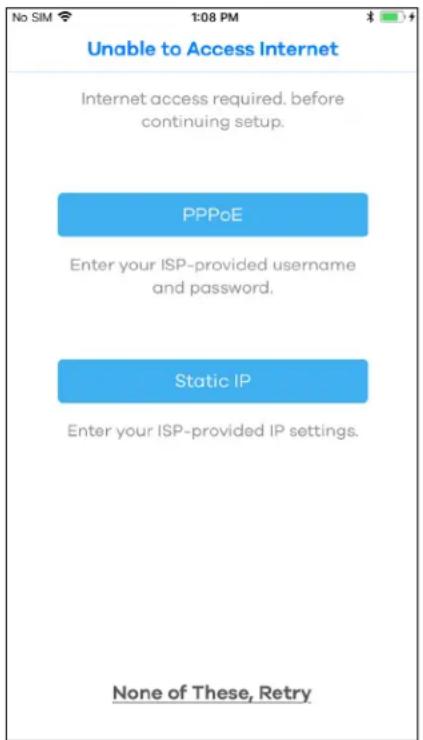
Note: If your Multy Device is connected to a modem or router but is unable to access the Internet during the installation process, you will see the following screen. Make sure your mobile device is connected to your broadband router's WiFi network and then tap None of these, Retry. If applicable, configure PPPoE or Static IP settings provided by your ISP.
3.4 Test Your Mobile Phone Connection Speed
You can run a speed test to check the Internet connection speed at which you send and receive data from your mobile phone via the Multy Device.
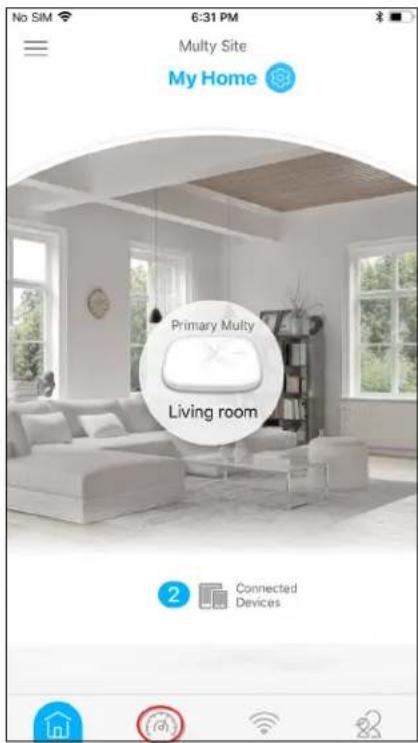
1 Tap the Speed Test icon ( ) of the Multy Site.
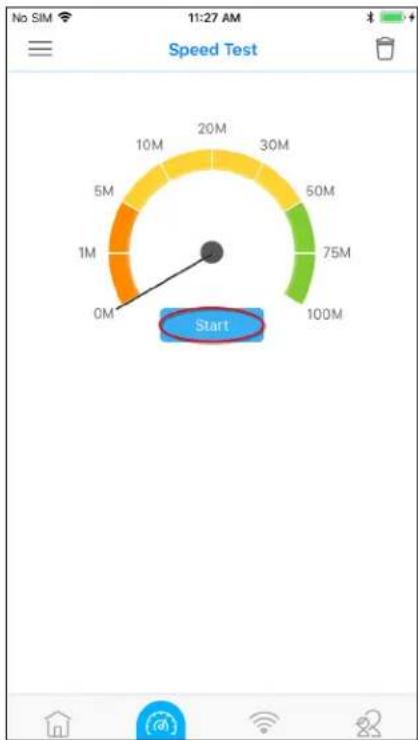
2 Tap Start to perform the test. The meter will show data rates for both upstream and downstream traffic.
gauge
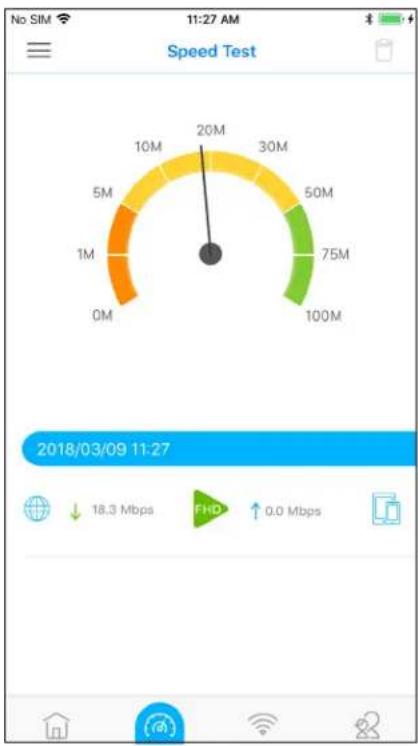
| Speed (M) | |-----------| | 0 | | 5 | | 10 | | 15 | | 20 | | 25 | | 30 | | 35 | | 40 | | 45 | | 50 | | 55 | | 60 | | 65 | | 70 | | 75 | | 80 | | 85 | | 90 | | 95 | | 100 |3 The following screens show the results. You can tap the Remove icon (☐) to delete all records.
gauge
Speed Test | Speed (m) | | :--- | | 0M | | 1M | | 5M | | 10M | | 20M | | 30M | | 50M | | 75M | | 100M | 2018/03/09 11:27 ↓ 18.3 Mbps FHD ↑ 0.0 Mbps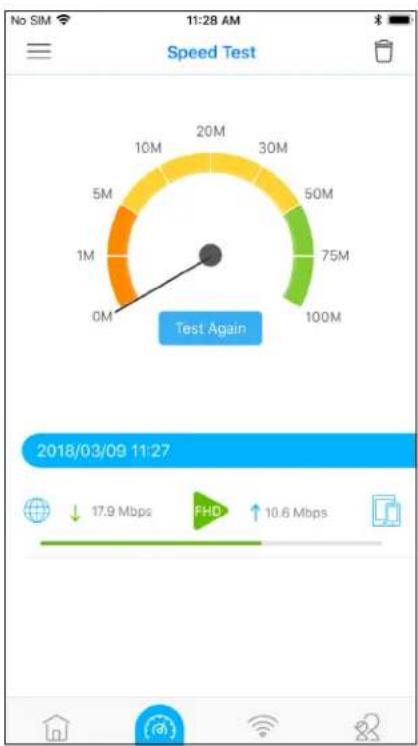
3.5 Test Your Multy Device Connection Speed
With the Zyxel Multy app, you can check the speed of the connection between your Multy Device and your broadband modem/router. You can also check the connection speed between two Multy Devices.
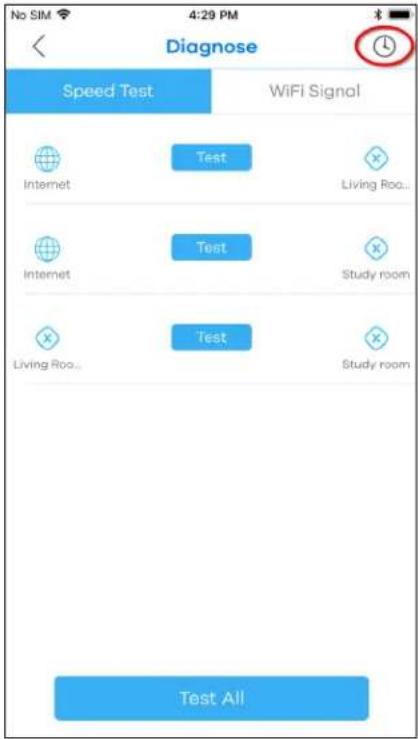
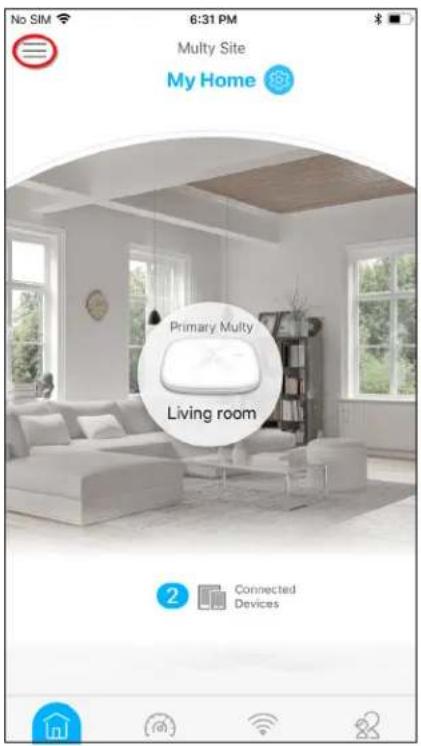
1 Tap the Menu icon in the upper-left corner to open the navigation panel. Tap Diagnose.
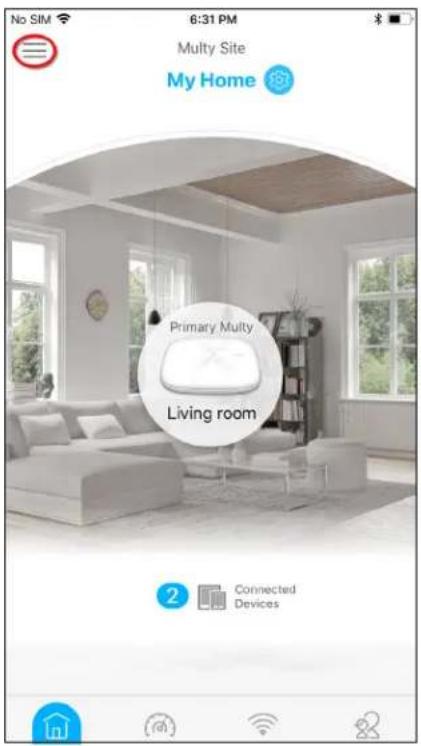
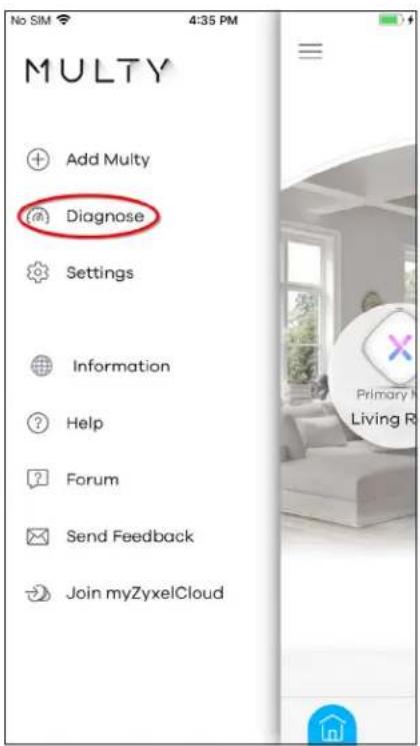
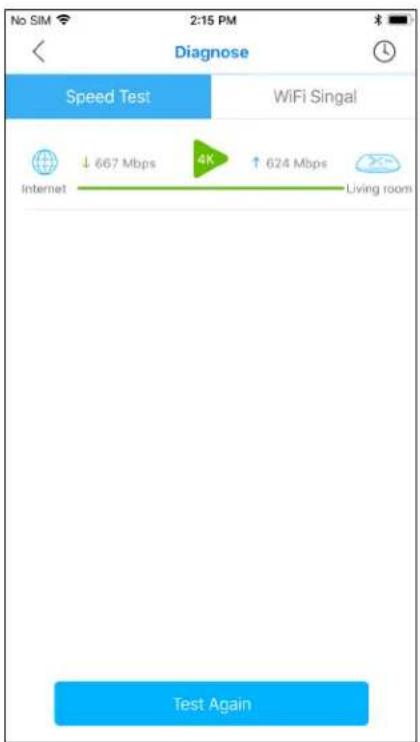
2 Tap Speed Test and the Test or Test All button to perform a test. The results will show data rates for both upstream and downstream traffic. Tap Test Again to show the Test buttons.
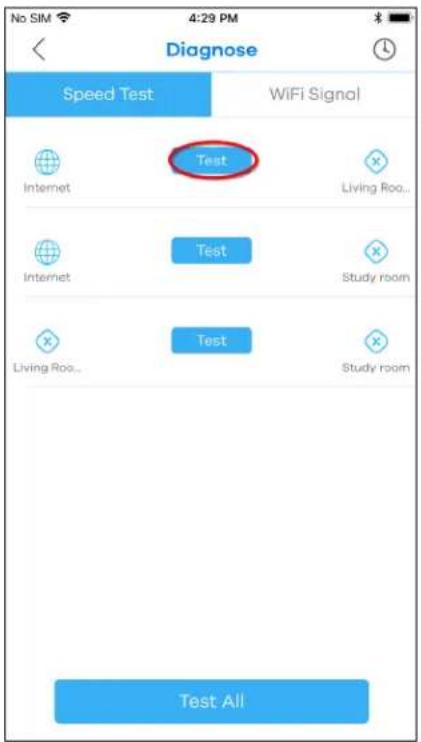
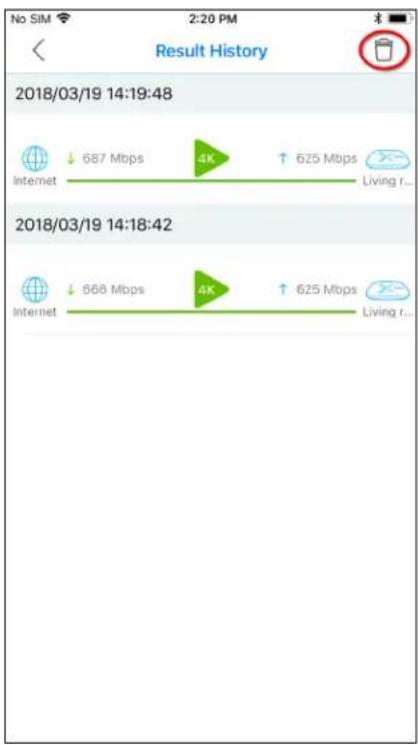
3 To view the previous test results, tap the History icon (☐). You can tap the Remove icon (☐) to delete all records.
3.6 Measure Your WiFi Signal Strength
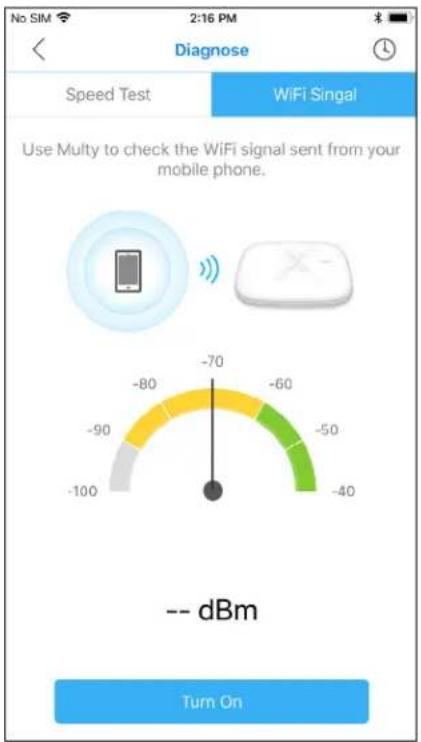
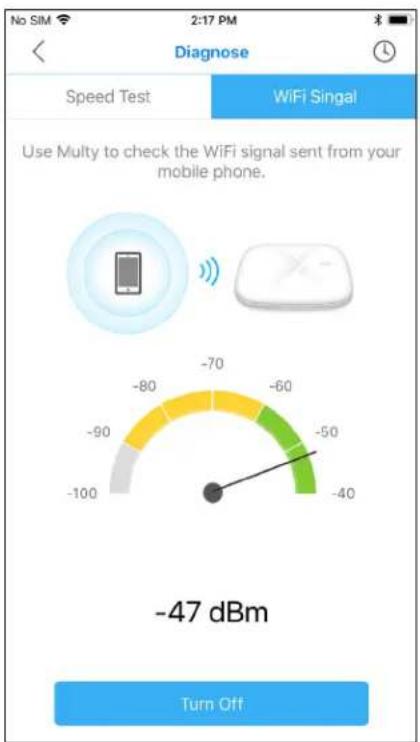
When you need to install a new Multy Device, you can perform a signal check to decide where to place it. To use your mobile phone to measure your WiFi signal strength, wirelessly connect the mobile phone to the Multy Site first. Generally, signal strength is better when you are closer to the WiFi source.
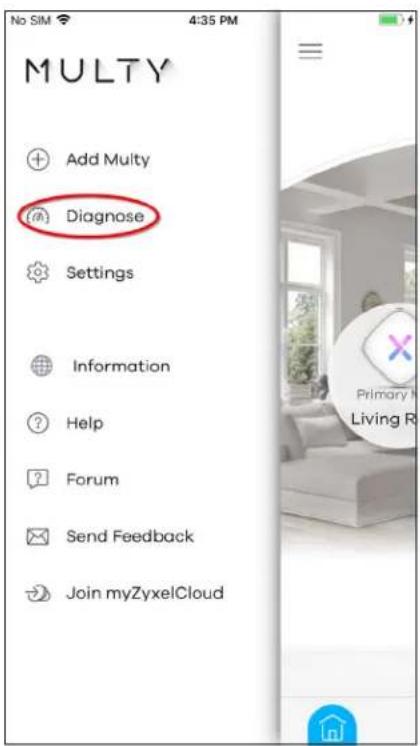
1 Tap the Menu icon in the upper-left corner to open the navigation panel. Tap Diagnose.
2 Tap WiFi Signal and then tap the Turn On button to perform a check. Tap Turn Off to stop the process. A decent WiFi signal would not go below -70 dBm (-70 dBm to -100 dBm).
3.7 Enable or Disable Guest WiFi
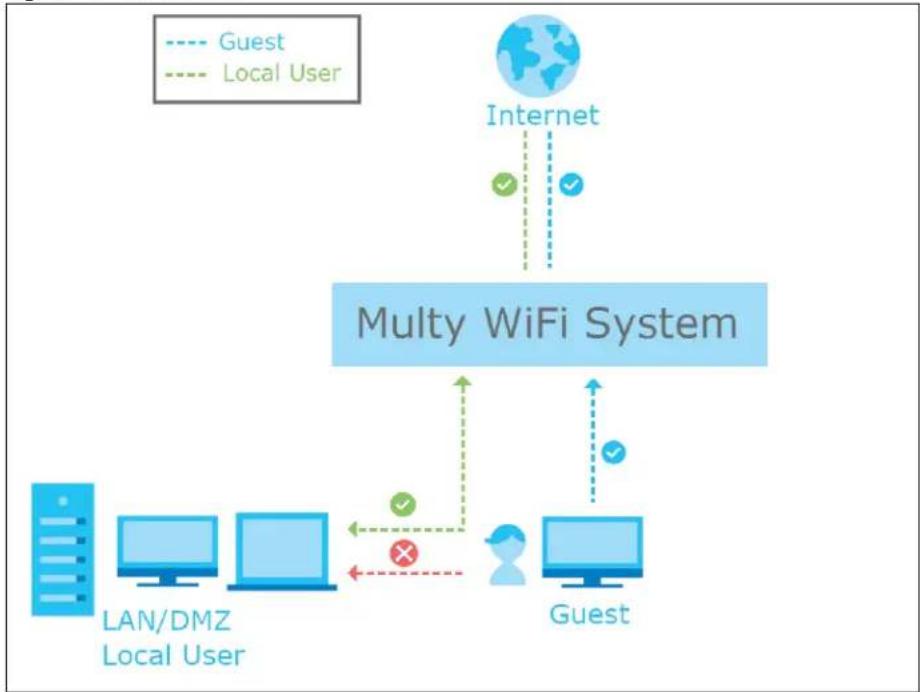
After the Multy Site is set up, you can create a separate WiFi network for your guests. These guest WiFi settings will be applied to all Multy Devices in the same Multy Site. Devices connected to the guest WiFi can access the Internet but they cannot access other devices connected to the Multy Site, as shown in the figure below.
Figure 15 Guest WiFi
flowchart
graph TD
    A["LAN/DMZ Local User"] -->|Local User| B["Multy WiFi System"]
    C["Guest"] -->|Local User| B
    B -->|Internet| D["Global Icon"]
    style A fill:#cce5ff,stroke:#333
    style C fill:#cce5ff,stroke:#333
    style B fill:#cce5ff,stroke:#333
    style D fill:#cce5ff,stroke:#333
1 Tap the Network Settings icon () of the Multy Site.
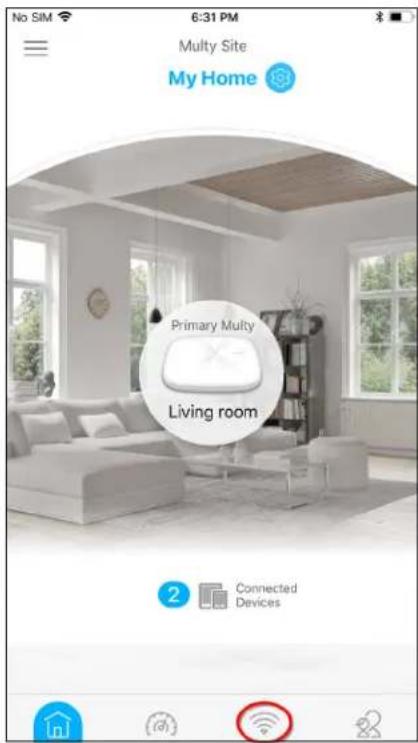
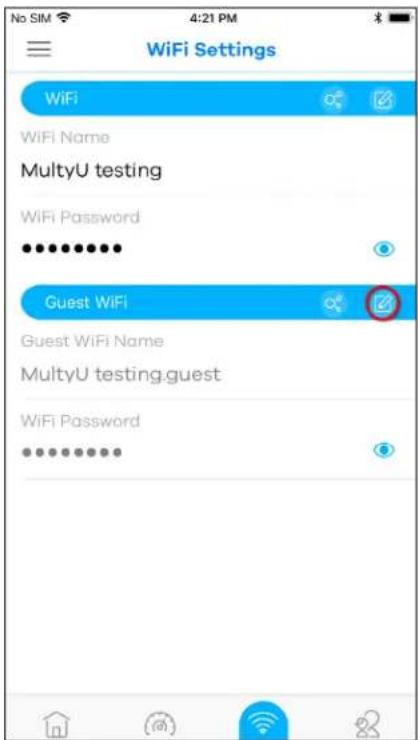
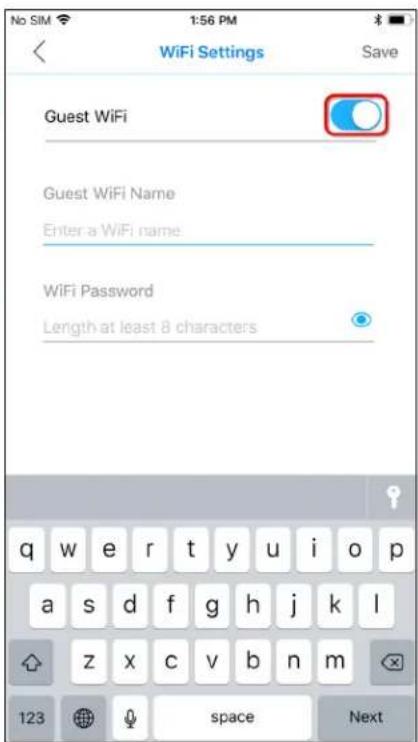
2 Tap the Edit icon ( ) of Guest WiFi. Enable Guest WiFi and enter the Guest WiFi Name (SSID) and WiFi Password. Tap Save.
3.8 Share WiFi Name and Password with a QR Code
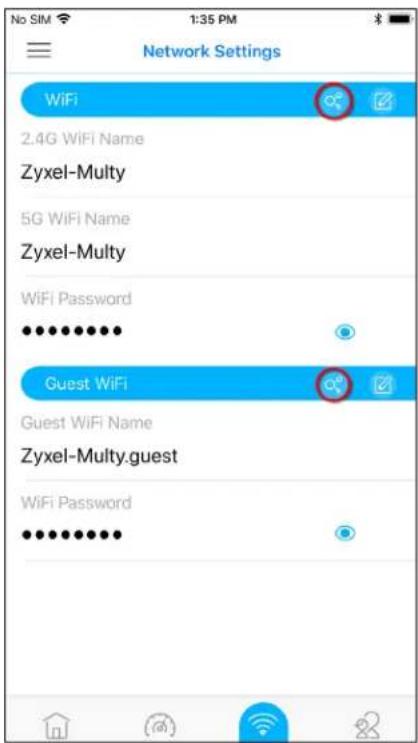
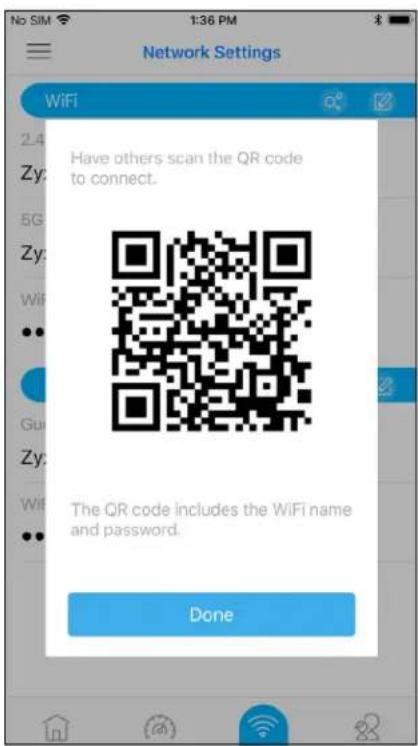
You can use the app to create a QR code with your WiFi network name and password. By printing and placing the QR code somewhere accessible, you can let your friends or guests scan the QR code and join the WiFi network directly without revealing your actual WiFi password.
1 Tap the Network Settings icon (

o f t h e M u l t y S i t e .
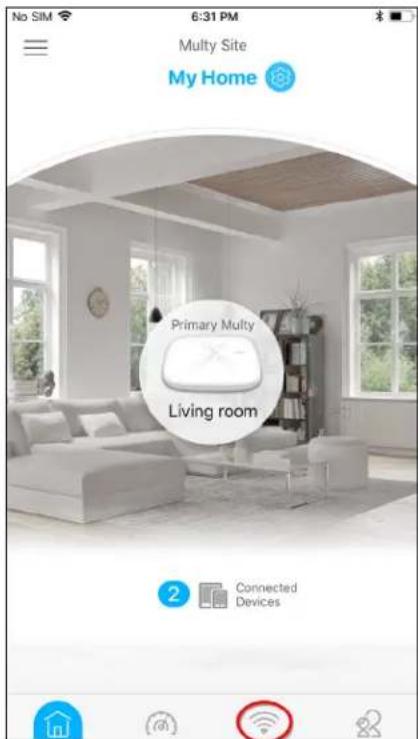
2 Tap the Share icon ( ) of a WiFi network to create a QR code of the WiFi network name and password which you can share with others. Take a screenshot of the QR code if you want to save and print it. Tap Done once you are finished.
Note: The Share icon ( ) is available after you enable WiFi or guest WiFi and set a WiFi name and password for this WiFi network.
3.9 Set a WiFi Schedule for Clients
By creating a schedule profile, you can schedule the Multy Site to automatically disable the WiFi access of selected clients for preset periods of time.
Note: You can group clients by applying the same schedule profile to them. This allows you to block/allow access or set a schedule for all client devices in the same group.
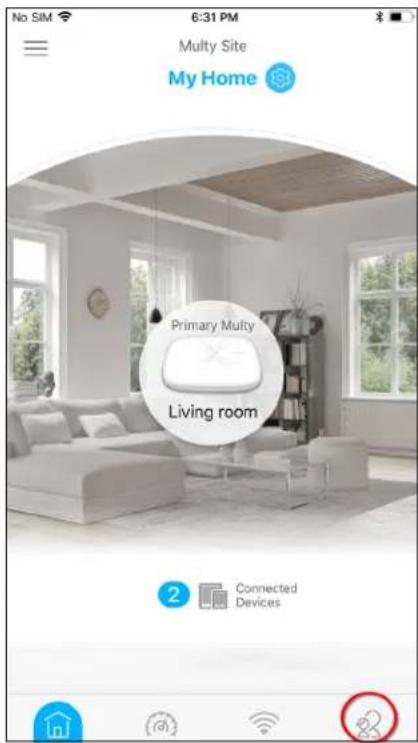
1 Tap the Parental Control icon () of the Multy Site.
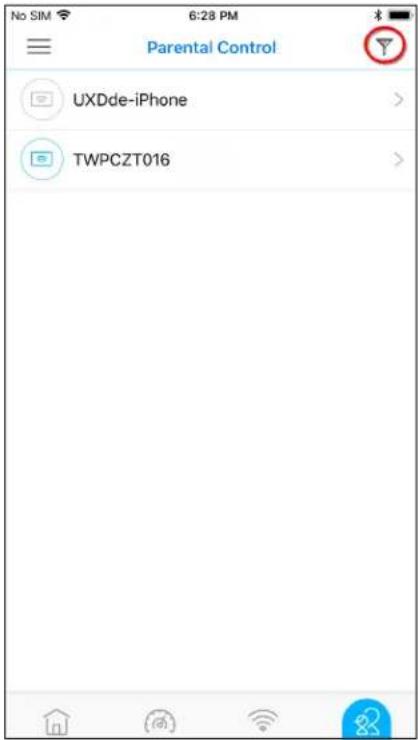
2 Tap the Filter icon and select how you want to sort the devices in the list.
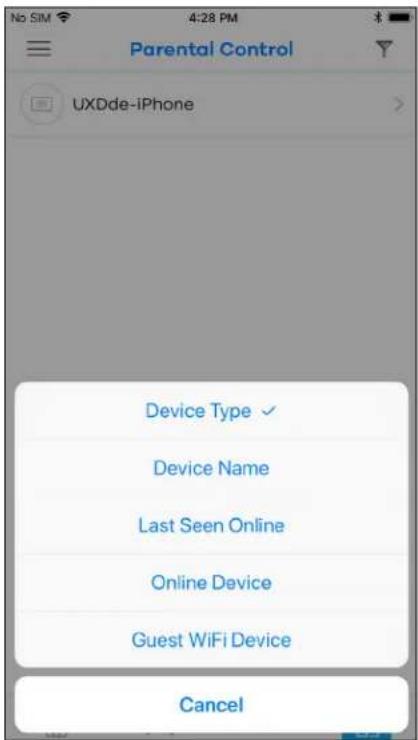
3 Tap a client from the device list to view the client device information. Tap Join Profile to create a new profile or apply a pre-configured schedule profile to the client.
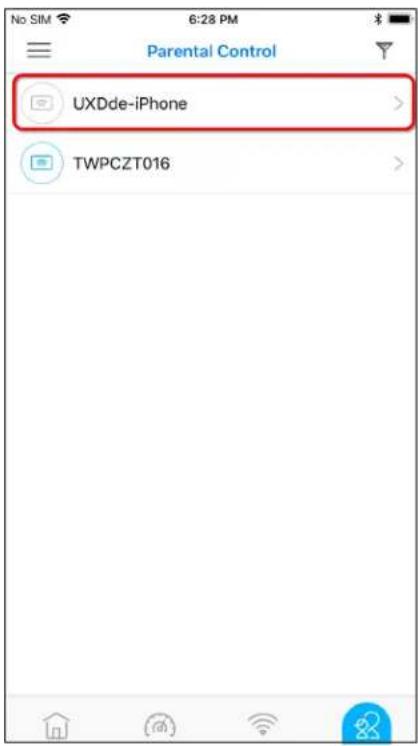
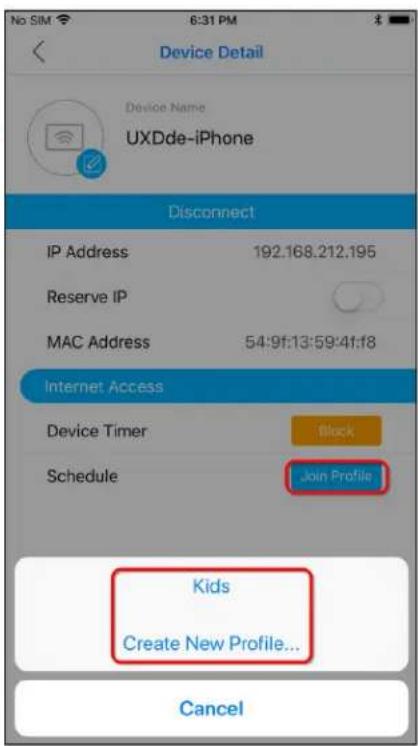
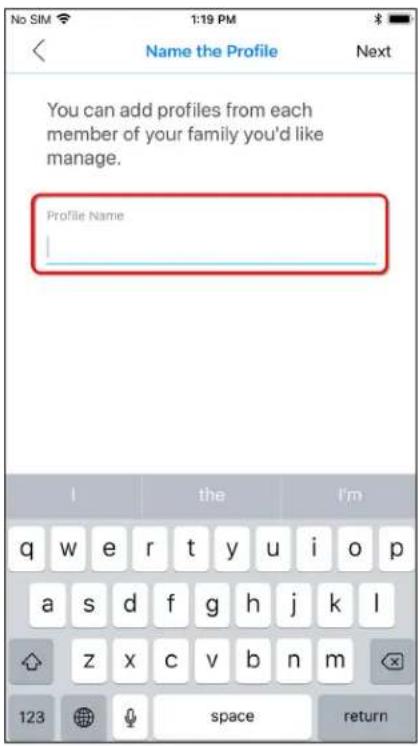
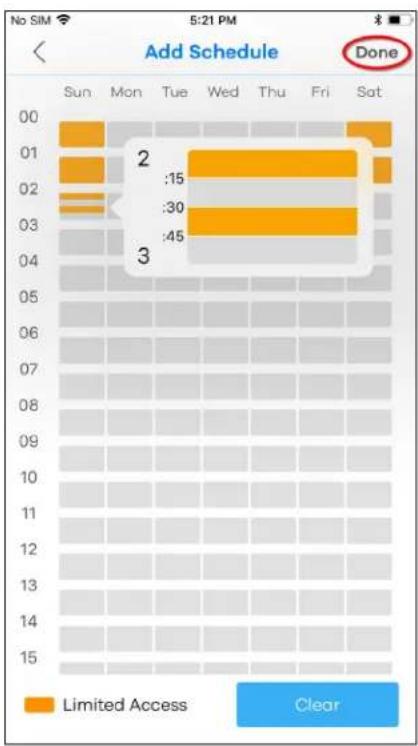
4 If you want to create a new schedule, tap Create New Profile shown in the previous step, name the profile, and tap Next. Tap the gray blocks to specify the time periods during which the client is blocked from accessing the Internet. If you want to plan a schedule in 15-minute intervals, tap a time slot and hold for 2 or 3 seconds until a small window pops up. To select an entire row or column, tap the row/ column label. Tap Done to save your settings.
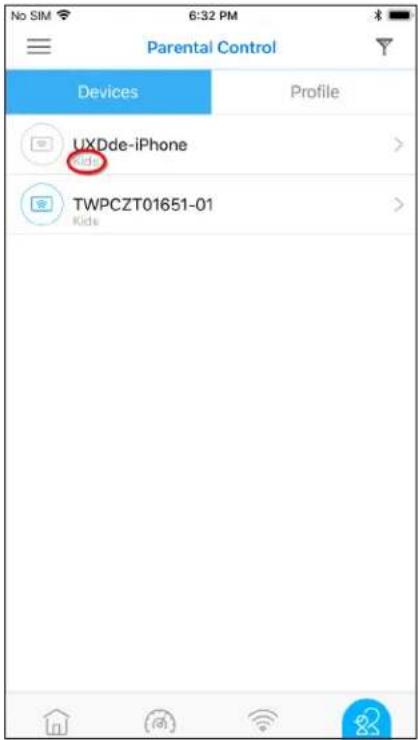
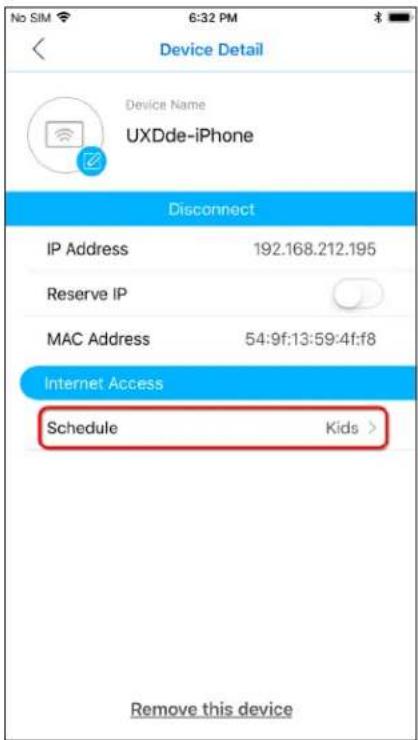
5 The applied profile name will then display in the Parental Control > Devices and Device Detail screens.
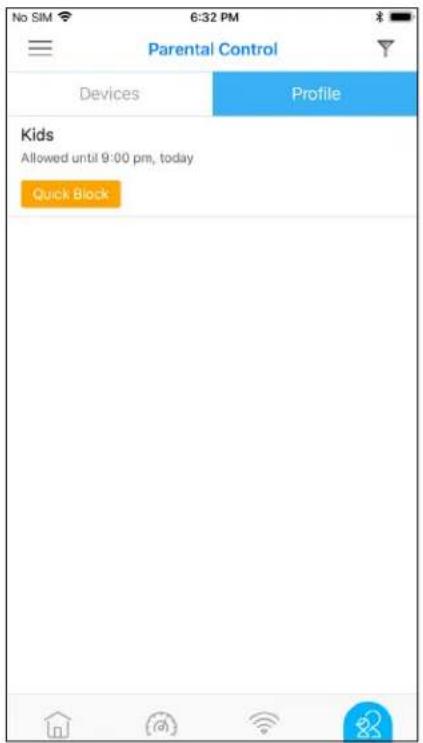
6 The Profile screen becomes available after a schedule profile is created.
3.10 Pause Internet Access for an Individual Client
You can set a timer to block a specific client from accessing the Internet without having to create a schedule. The timer is effective only once.
Note: You can only set a timer to block Internet access on the clients that do NOT belong to any schedule group.
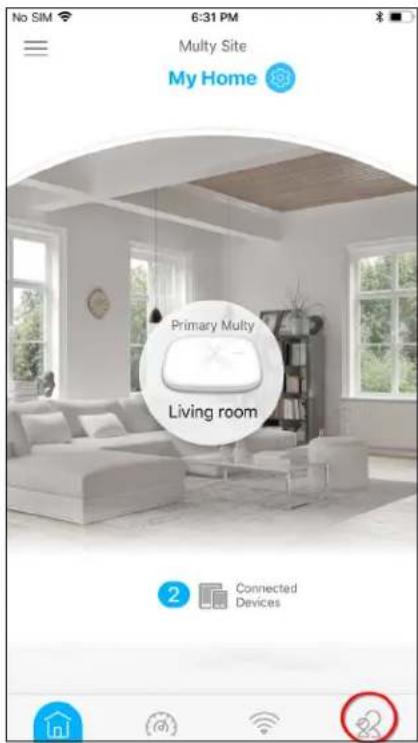
1 Tap the Parental Control icon ( ) of the Multy Site.
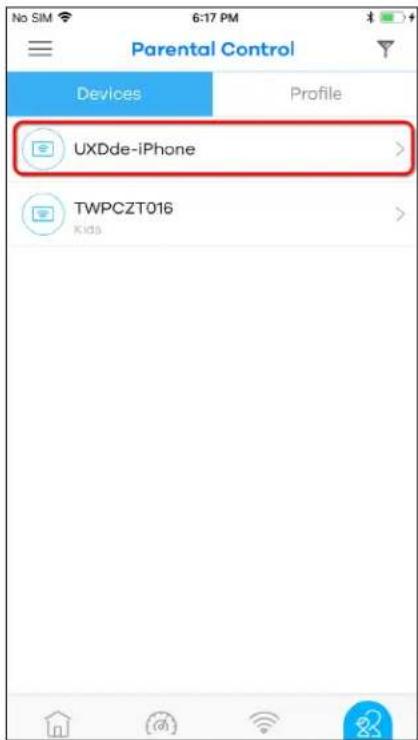
2 Tap a client from the Devices list to view the client device information.
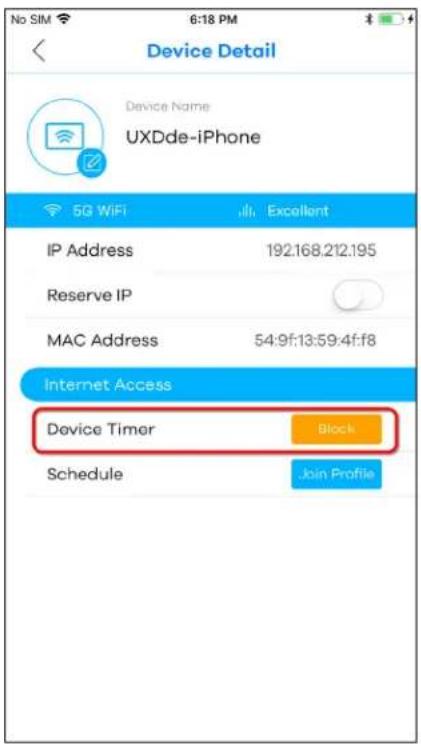
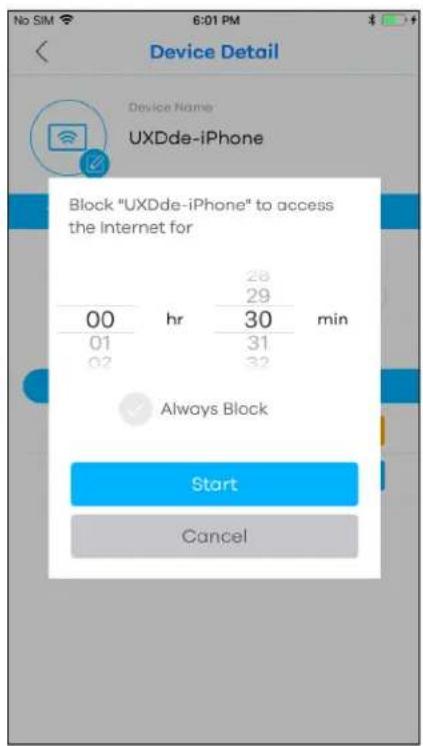
3 Tap Block and specify a time period in hours and minutes. Tap Start to start the timer and block the client immediately.
3.11 Pause or Resume Internet Access for a Group
You may want to manually block a group of client devices from accessing the Internet immediately and resume it later.
Note: You should already have created a schedule profile and applied the profile to client devices to group them.
1 Tap the Parental Control icon ( ) of the Multy Site.
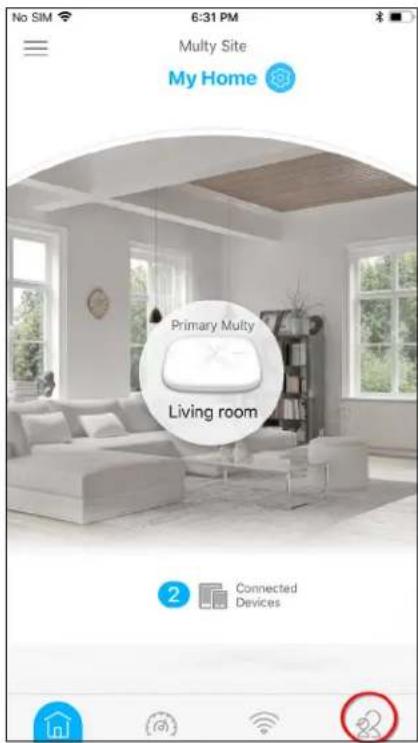
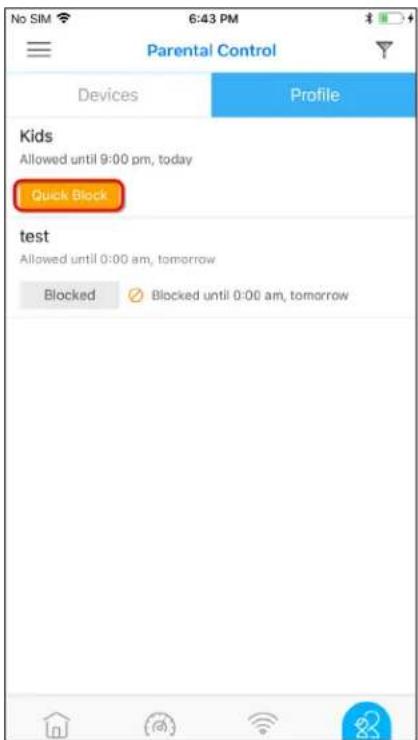
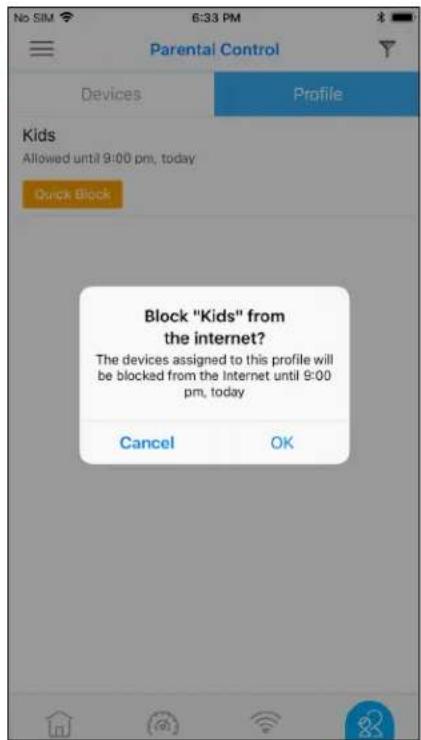
2 Tap Profile to view the schedule profiles previously created in the Multy Site. Tap a profile's Blocked button to resume network access at once, or tap the Quick Block button to pause Internet access for that specific group.
3.12 Check your Multy Device's Configuration Details
After configuring your Multy Device, you can view your Multy Device settings in the Detail screen.
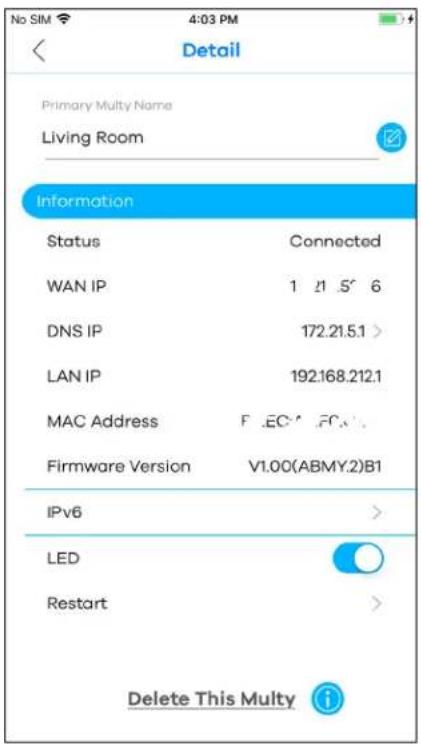
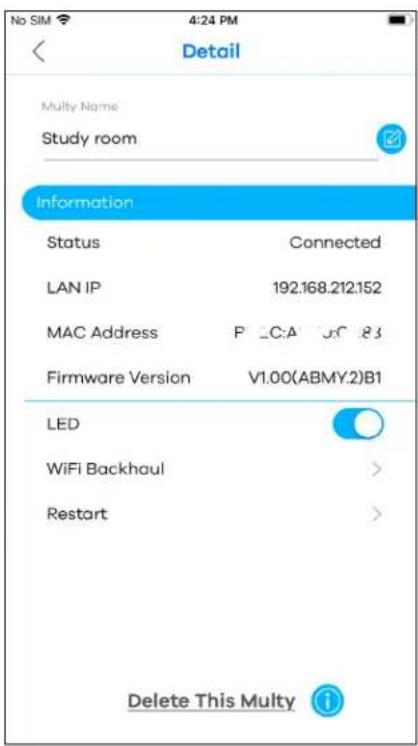
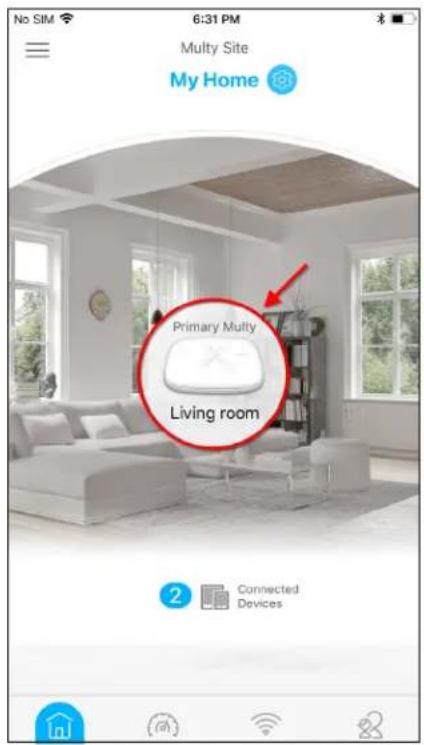
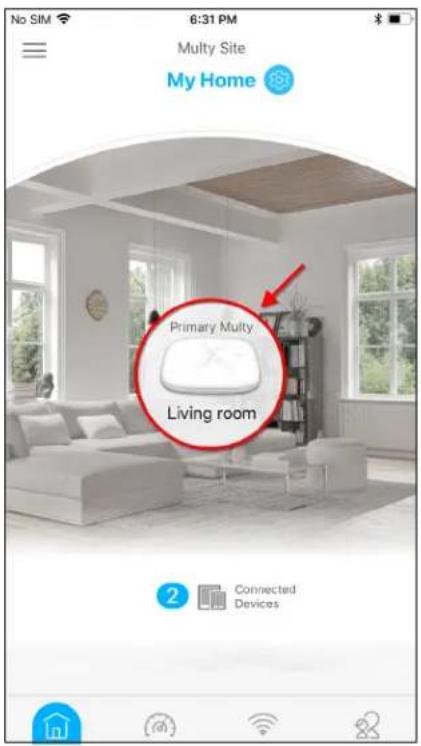
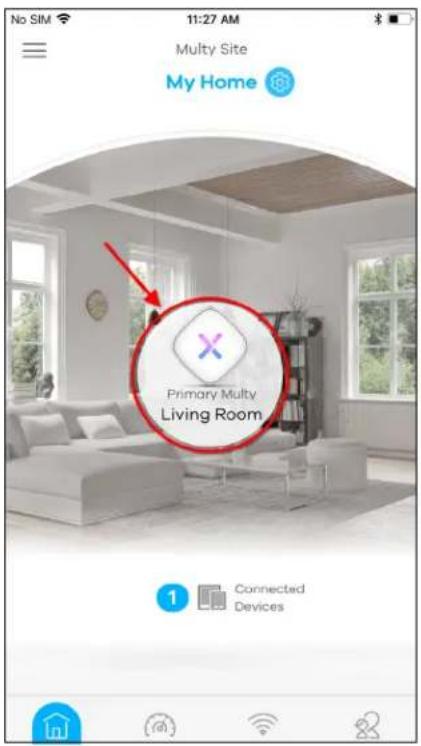
1 Tap a Multy Device in the Multy Site screen to open its Detail screen.
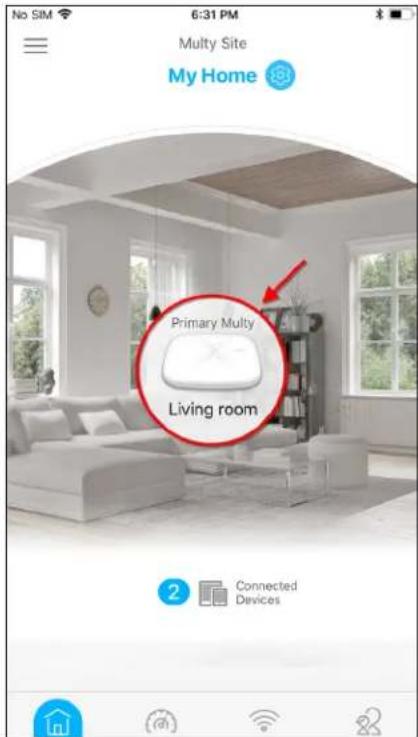
2 The figure on the left appears if you tap on the Multy Device acting as the primary Multy. The figure on the right appears if you tap on an extender Multy. You can configure the DNS IP address and see the IPv6 IP address on a primary Multy.
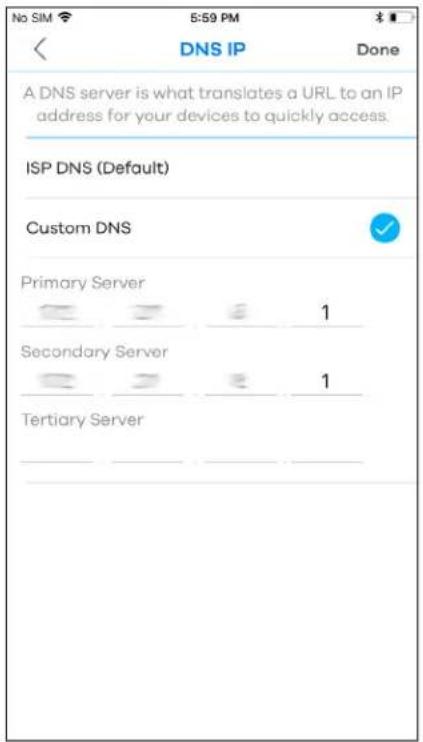
3.13 Use Custom DNS Server
You can choose to specify a DNS server for your Multy Site.
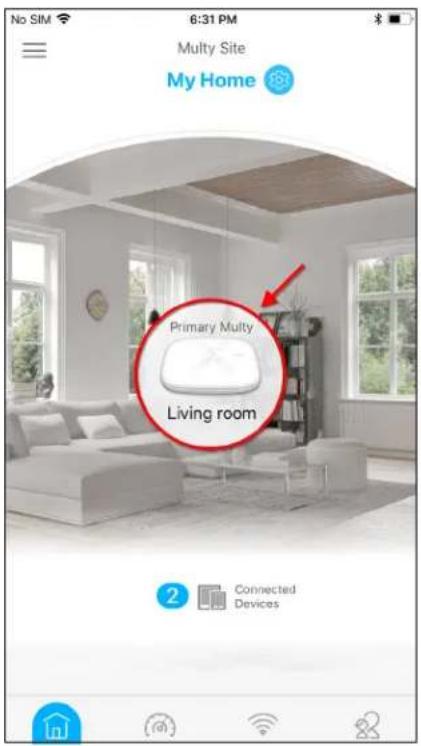
1 Tap the primary Multy in the Multy Site screen to open the Detail screen and then tap DNS IP.
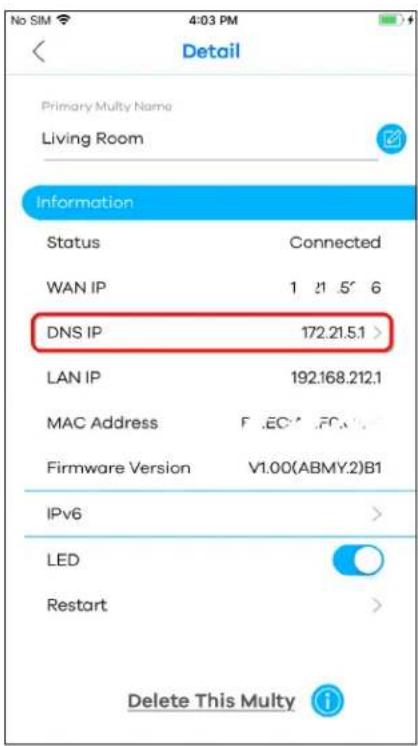
2 Tap Custom DNS and enter a primary, secondary, and tertiary DNS server.
3.14 Turn on or off the Multy Device's LED
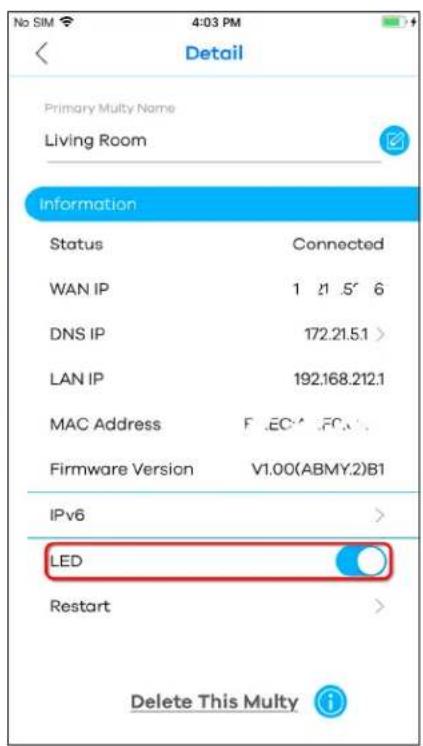
When the Multy Device is installed and ready, you can turn off the device's LED or configure the LED to always stay on.
Tap a Multy Device in the Multy Site screen to open its Detail screen. Tap the LED switch to enable or disable it.
3.15 Check Your Multy-to-Multy Signal Strength
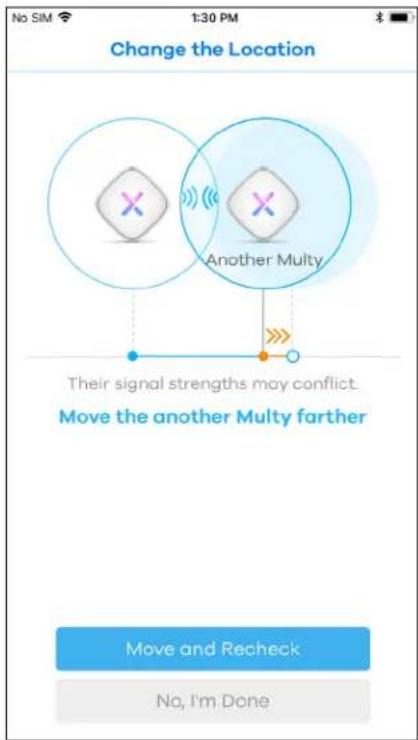
You can always check the signal strength between your extender and primary Multy to see if they need to be moved closer or farther apart.
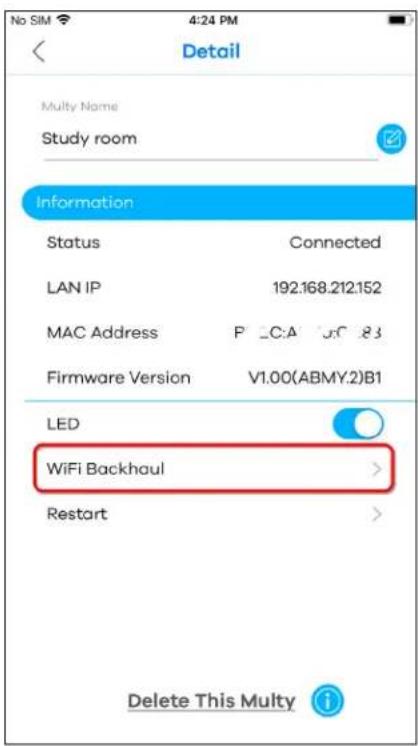
1 From the Multy Site screen, tap the extender Multy you want to check. The Detail screen will be displayed. Tap WiFi Backhaul. The test will then be carried out.
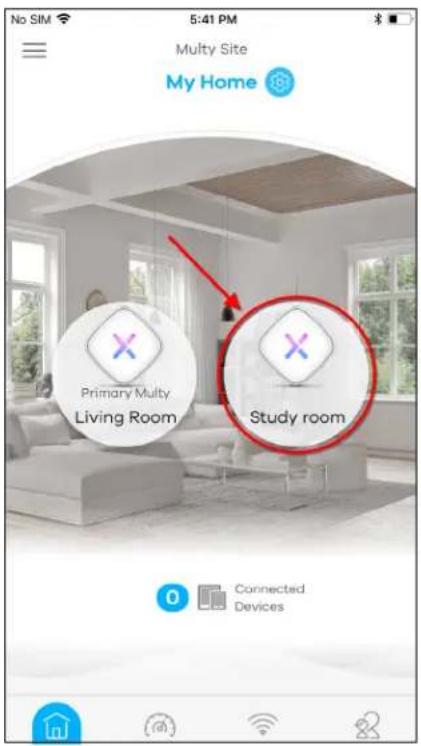
2 Move the extender Multy when prompted to and then tap Move and Recheck.
3.16 Restart Your Multy Device
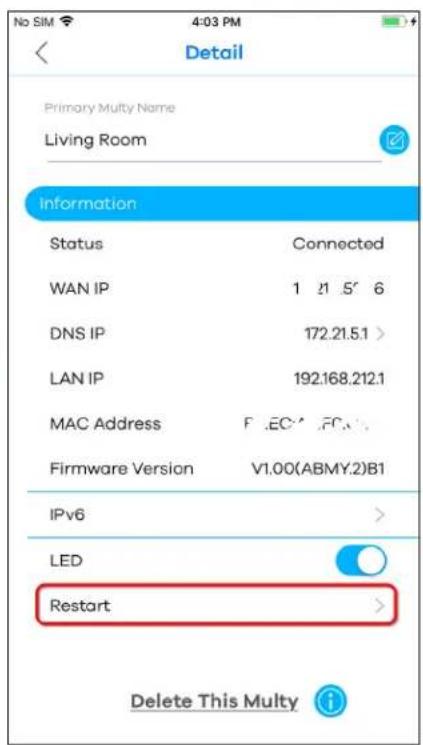
If you need to restart your Multy Device, you can do it remotely using the Detail screen.
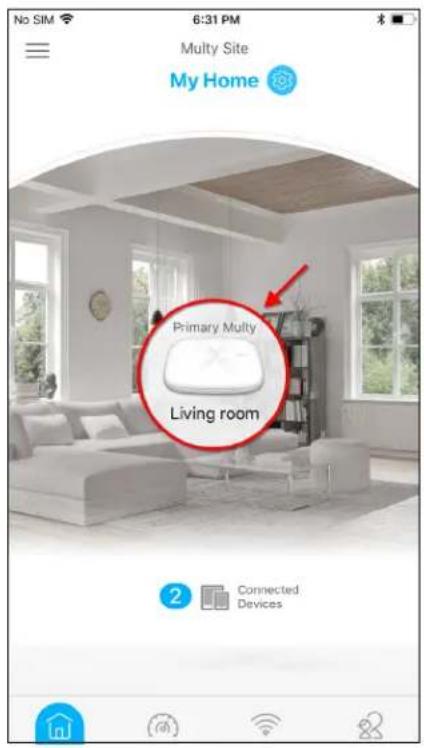
From the Multy Site screen, tap the Multy Device you want to restart. The Detail screen will be displayed. Tap Restart to restart this device.
3.17 Remove a Multy Device
If a Multy Device is no longer in use, you can remove it from the Multy Site.
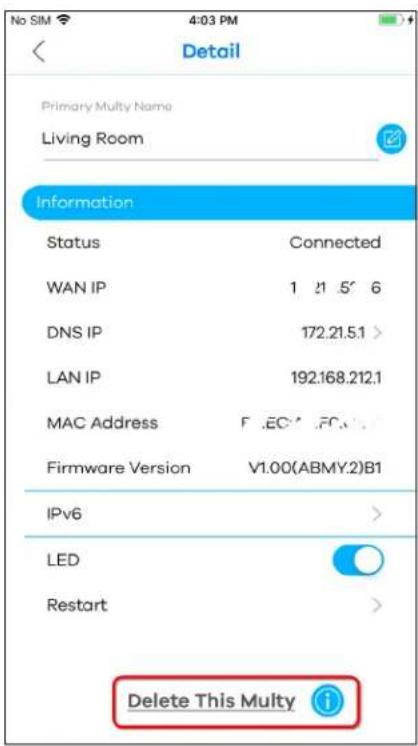
From the Multy Site screen, tap the Multy Device you want to remove. The Detail screen will be displayed. Tap Delete This Multy to remove the device.
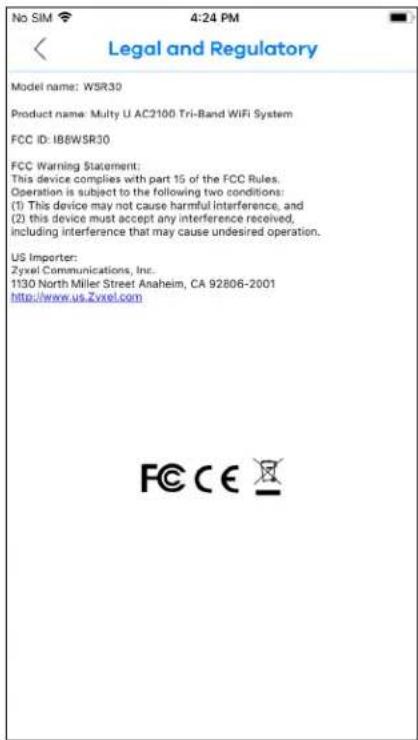
3.18 View Legal and Regulatory Information
Check the e-label if you want to see legal and regulatory information related to your Multy Device.
Note: Not all Multy Devices have an e-label which contains legal and regulatory information in the app (see Table 1 on page 6). For Multy Devices without an e-label, you may check the label printed on the device.
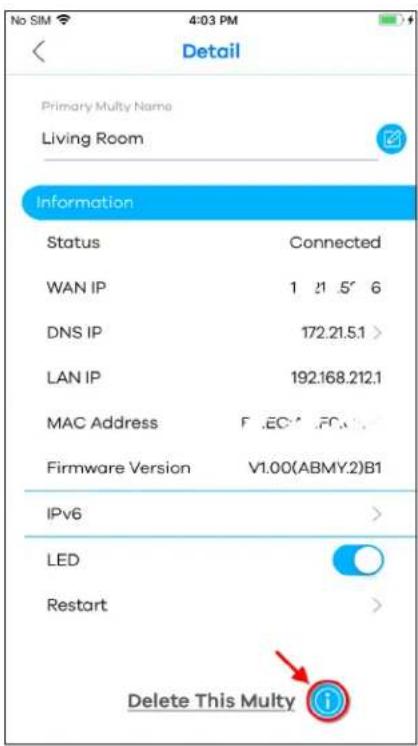
1 From the Multy Site screen, tap the Multy Device you want to check. The Detail screen will be displayed. Tap the Information icon ( ) to view legal and regulatory information.
2 Legal and Regulatory information will be shown as follows:
3.19 Install a Second Multy Site
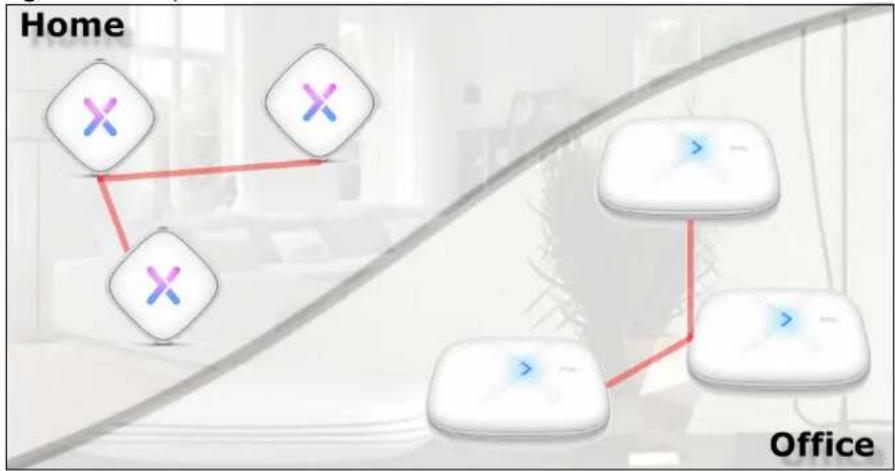
You can manage multiple Multy Sites using the Zyxel Multy app. In the figure below, the app manages two separate Multy Sites with one being installed at home and another in the office.
Figure 16 Multy Sites
flowchart
graph TD
    A["Device X"] --> B["Device X"]
    C["Device X"] --> D["Device X"]
    E["Device X"] --> F["Device X"]
    G["Device X"] --> H["Device X"]
    I["Device X"] --> J["Device X"]
    K["Device X"] --> L["Device X"]
    M["Device X"] --> N["Device X"]
    O["Device X"] --> P["Device X"]
    Q["Device X"] --> R["Device X"]
    S["Device X"] --> T["Device X"]
    U["Device X"] --> V["Device X"]
    W["Device X"] --> X["Device X"]
    Y["Device X"] --> Z["Device X"]
    AA["Device X"] --> AB["Device X"]
    AC["Device X"] --> AD["Device X"]
    AE["Device X"] --> AF["Device X"]
    AG["Device X"] --> AH["Device X"]
    AI["Device X"] --> AJ["Device X"]
    AK["Device X"] --> AL["Device X"]
    AM["Device X"] --> AN["Device X"]
    AO["Device X"] --> AP["Device X"]
    AQ["Device X"] --> AR["Device X"]
    AS["Device X"] --> AT["Device X"]
    AU["Device X"] --> AV["Device X"]
    AW["Device X"] --> AX["Device X"]
    AY["Home"] --> AZ["Home"]
    BA["Office"]
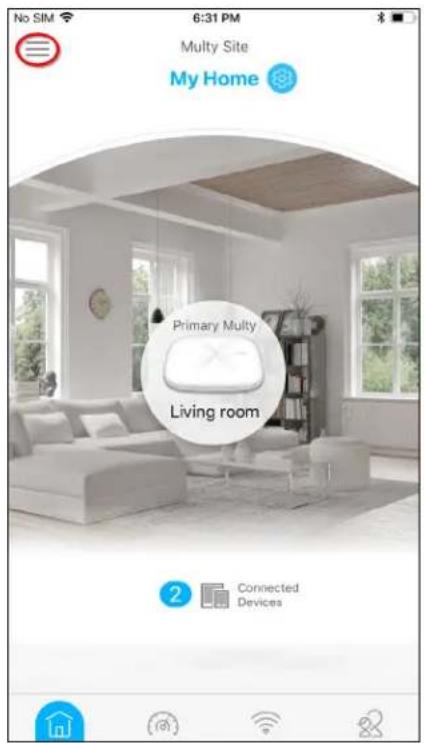
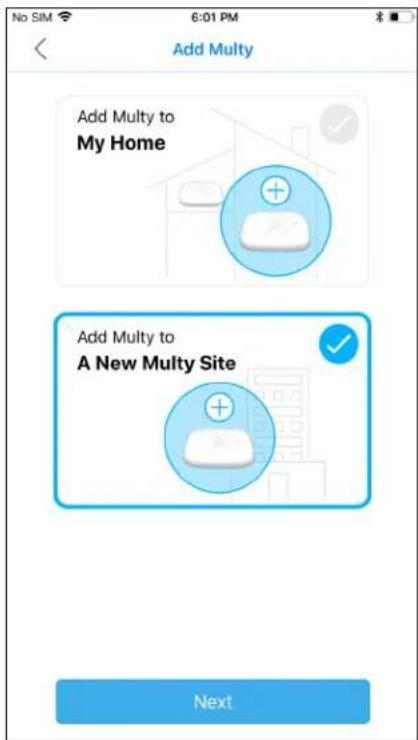
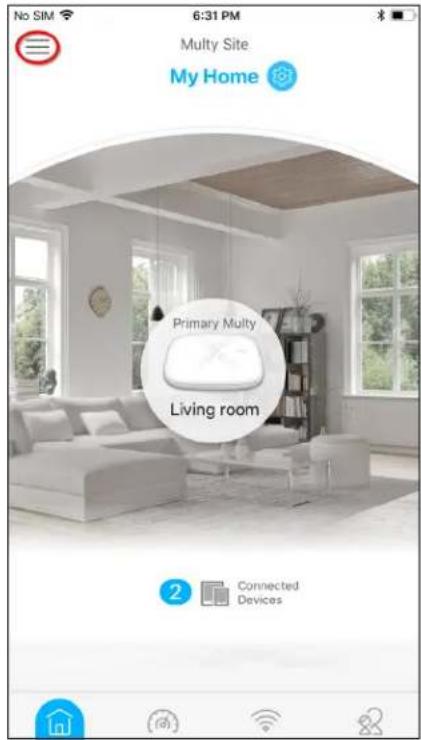
1 Tap the Menu icon in the upper-left corner to open the navigation panel. Tap Add Multy.
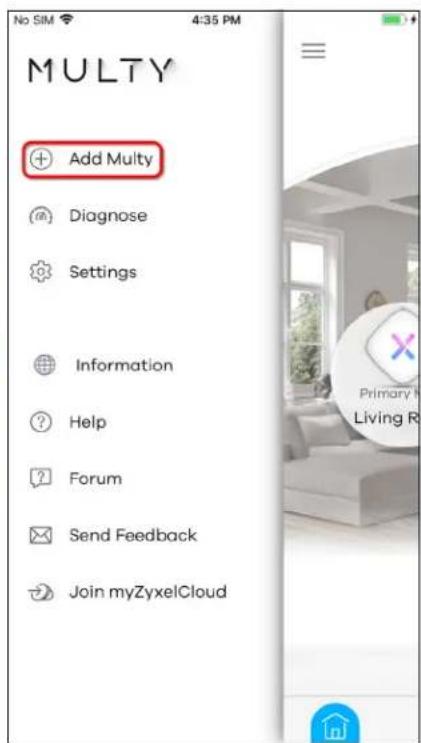
2 Tap A New Multy Site and Next to set up another Multy WiFi System. Follow the instructions in Section 3.3 on page 20 to complete the setup.
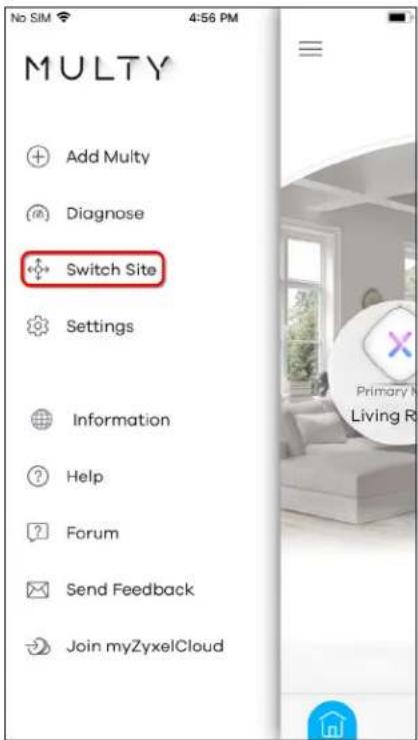
3 To manage a different Multy Site, first tap Switch Site from the navigation panel.
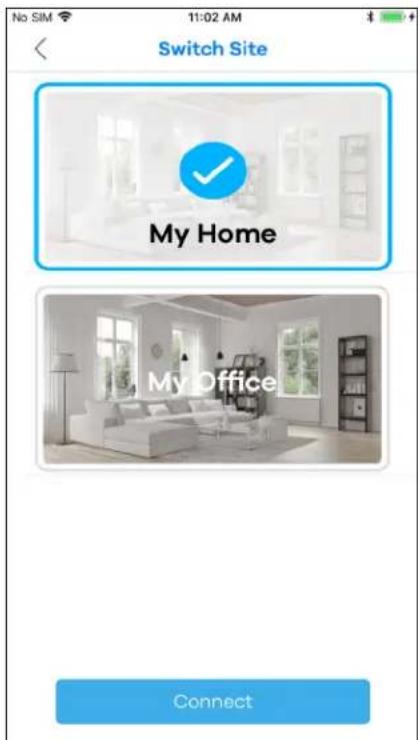
4 Select the Multy Site you want to manage and then tap Connect.
Note: The Switch Site option is available only when you have more than one Multy Site.
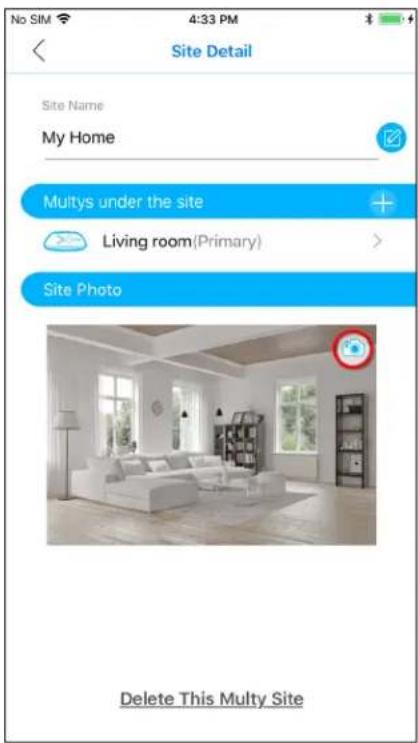
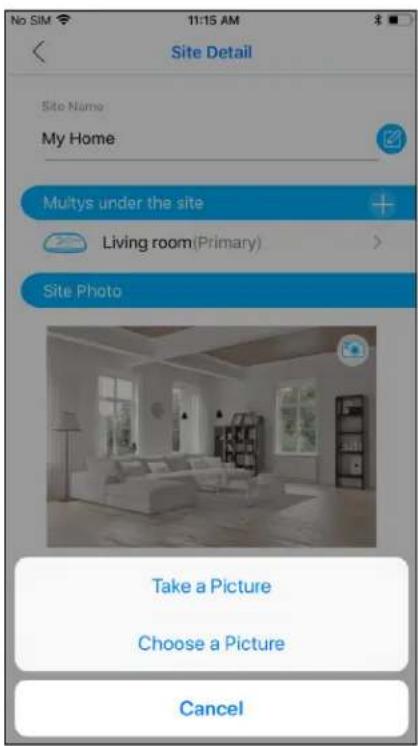
3.20 Change the Name or Picture of a Multy Site
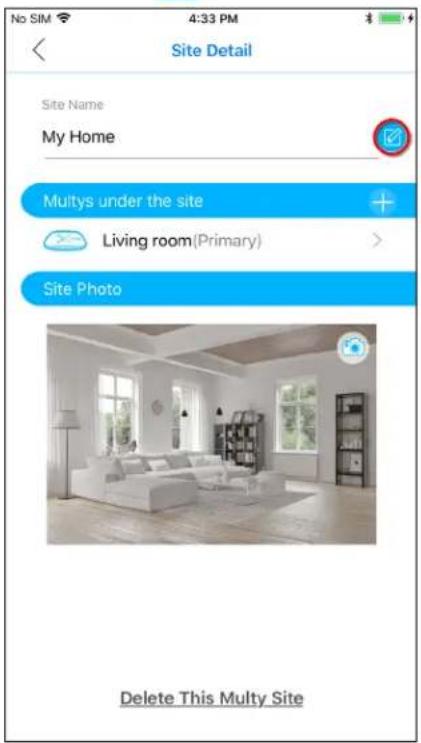
You can rename a Multy Site or change the background picture that is displayed on the Multy Site main screen by following these steps.
1 From the Multy Site screen, tap the Settings icon ( ) to open the Site Detail screen.
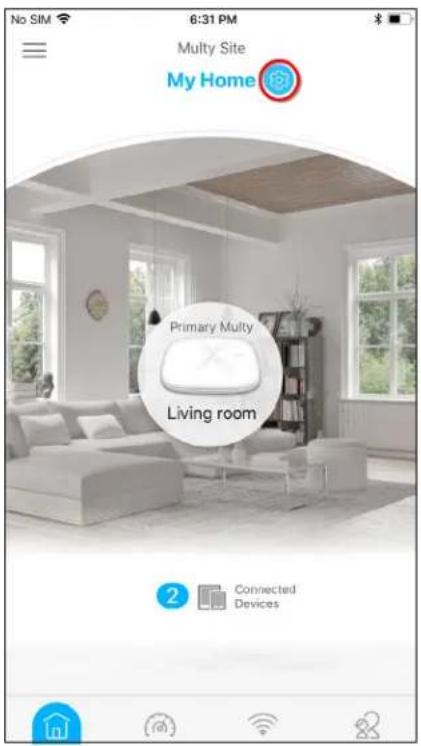
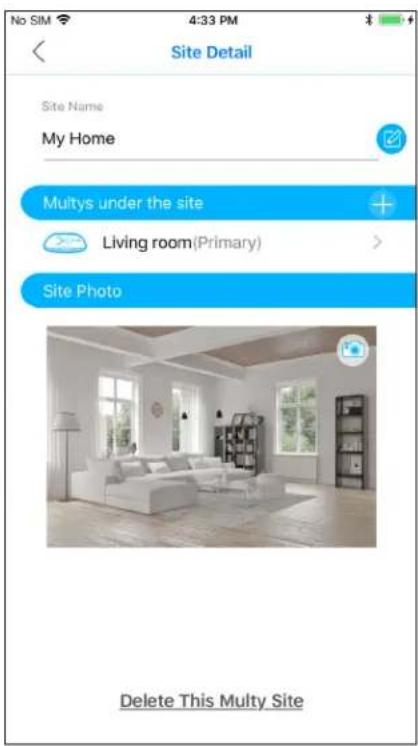
2 Tap the Edit icon ( ) of Site Name to give the Multy Site a new name.
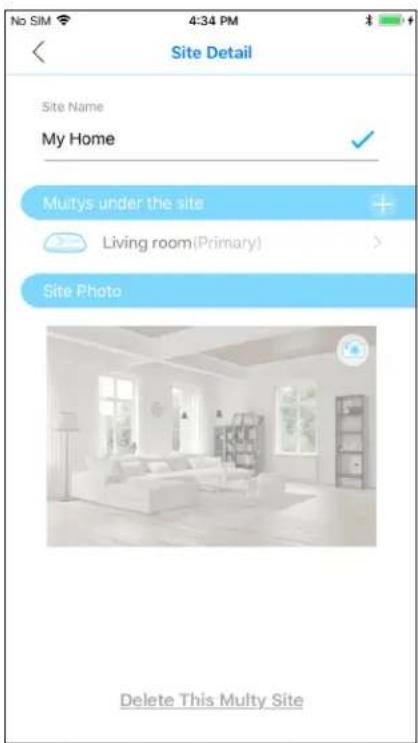
3 Tap the Camera icon (☐) to replace the background picture of the Multy Site.
3.21 Remove a Multy Site
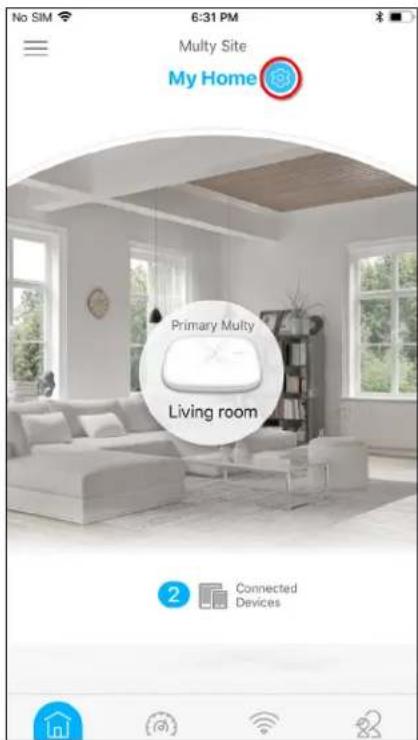
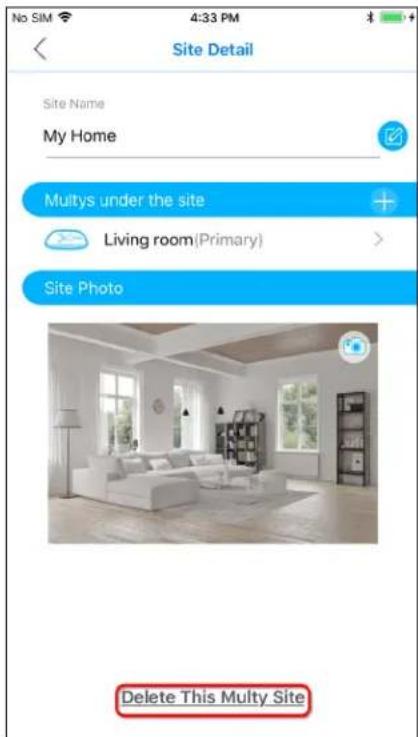
All Multy Devices in the Multy Site will be reset after you delete the Multy Site.
1 From the Multy Site screen, tap the Settings icon (💡) to open the Site Detail screen.
2 Tap Delete This Multy Site to remove the Multy WiFi System.
3.22 Enable or Add Port Forwarding Rules
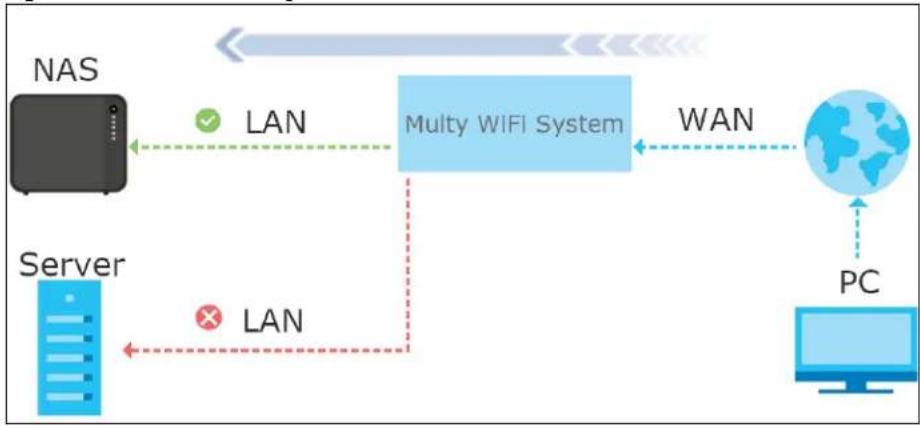
If you want to forward incoming packets to a specific IP address in the private network using ports, set a port forwarding rule. This makes the specified LAN client accessible from the Internet, as shown in the next figure.
Figure 17 Port Forwarding
flowchart
graph TD
    A["NAS Server"] -->|LAN| B["Multy WIFI System"]
    B -->|WAN| C["PC"]
    B -->|LAN| D["Server"]
    D -->|LAN| B
    B -->|LAN| A
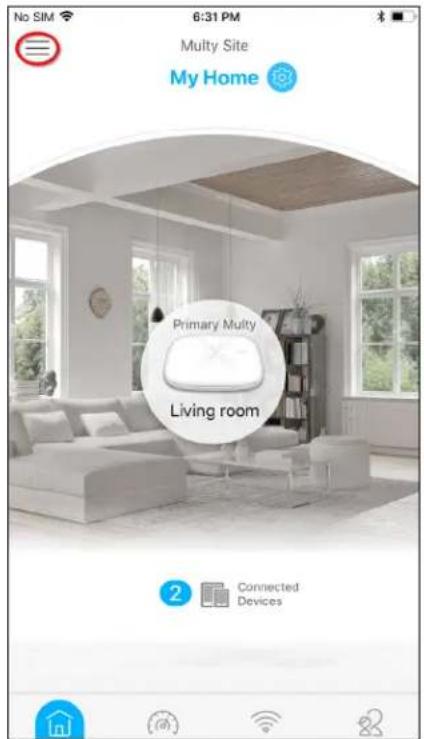
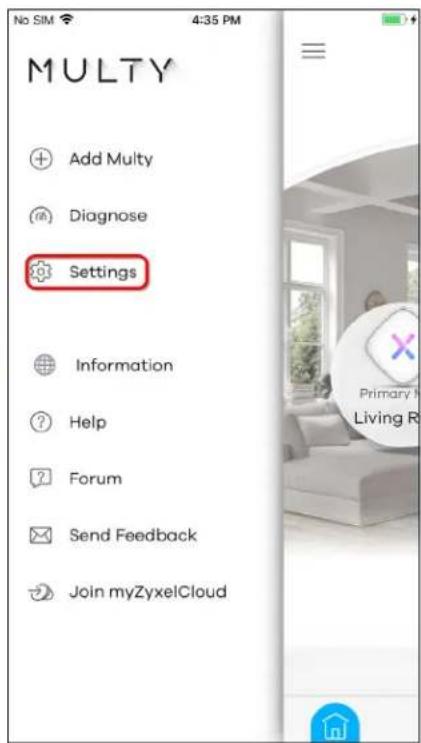
1 Tap the Menu icon in the upper-left corner to open the navigation panel, and then tap Settings.
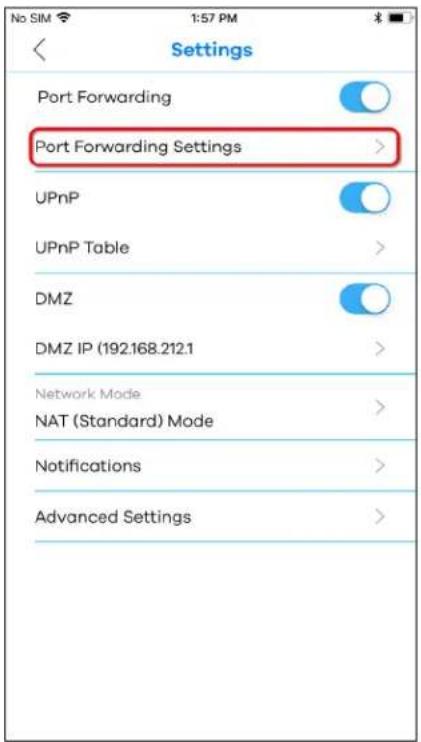
2 Tap Port Forwarding in the Settings screen to enable port forwarding.
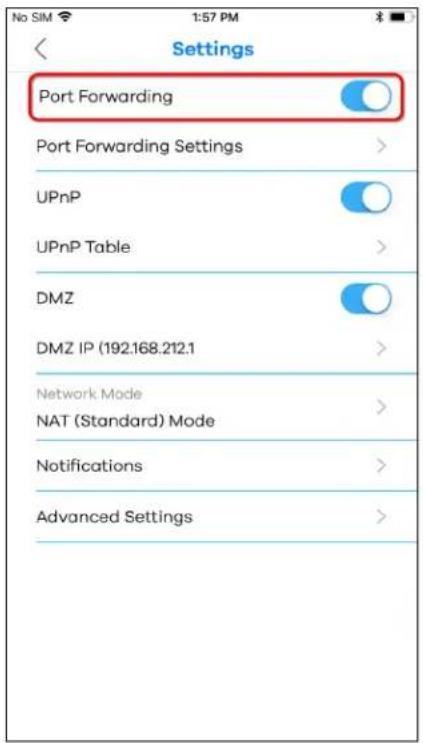
3 Tap Port Forwarding Settings to create or update rules. In the Port Forwarding screen, tap Single Port Setup or Port Range Setup to add a rule.
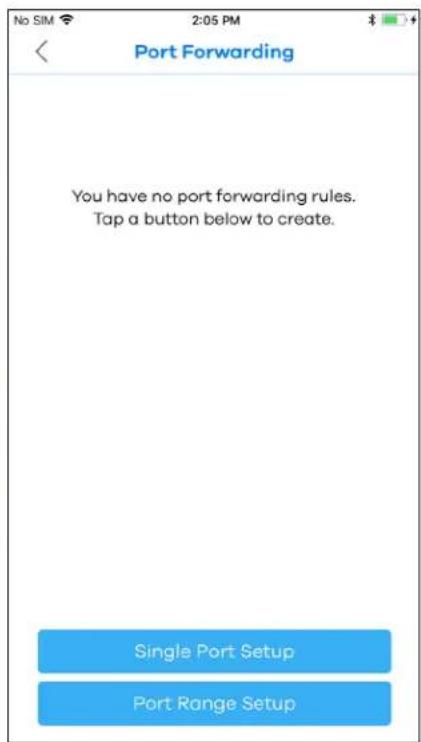
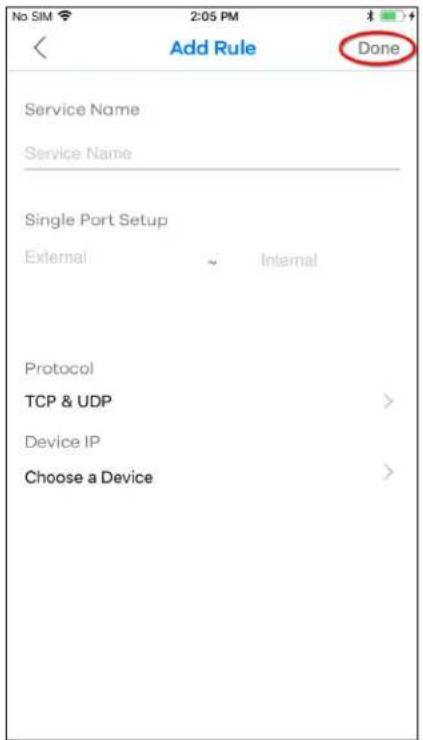
4 Enter a service name and a port number or a range of ports to define the service to be forwarded. Specify the transport layer protocol used for the service. Select a device on your local network that will receive the packets from the port(s). Tap Done once you are finished.
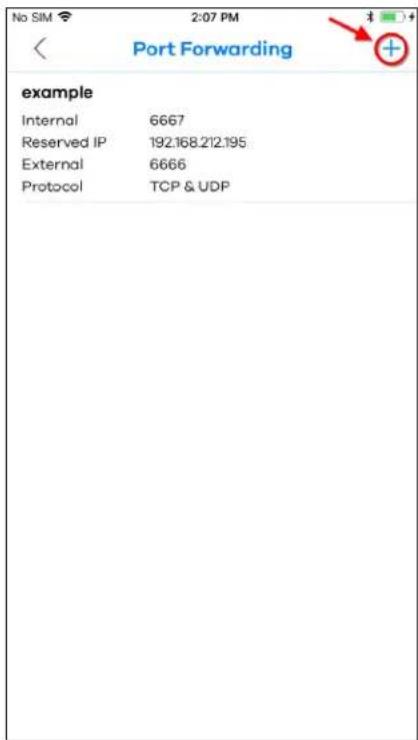
5 A summary of the rule(s) will be displayed. Tap the Add icon (+) if you want to create another rule.
3.23 Enable DMZ
DMZ allows other devices over the Internet to access a DMZ host device within your local network. DMZ, which stands for "DeMilitarized Zone", is a network between the WAN and the LAN that is open to the WAN but still has firewall protection. Devices on the WAN can initiate connections to devices on the DMZ but not to those on the LAN. You could put servers such as mail servers, HTTP/HTTPS web servers and FTP servers on the DMZ to provide services to hosts on the WAN as well as hosts on the LAN. You first need to assign a DMZ host to use DMZ.
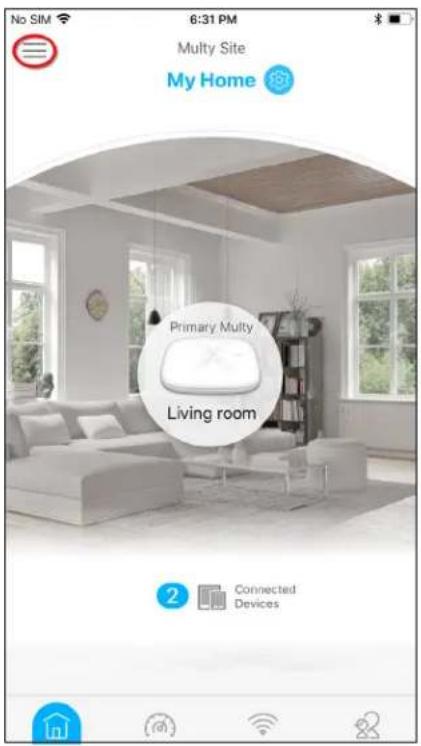
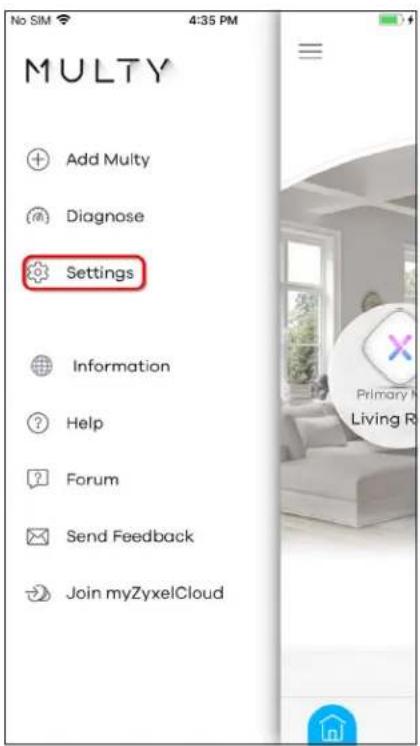
1 Tap the Menu icon in the upper-left corner to open the navigation panel, and then tap Settings.
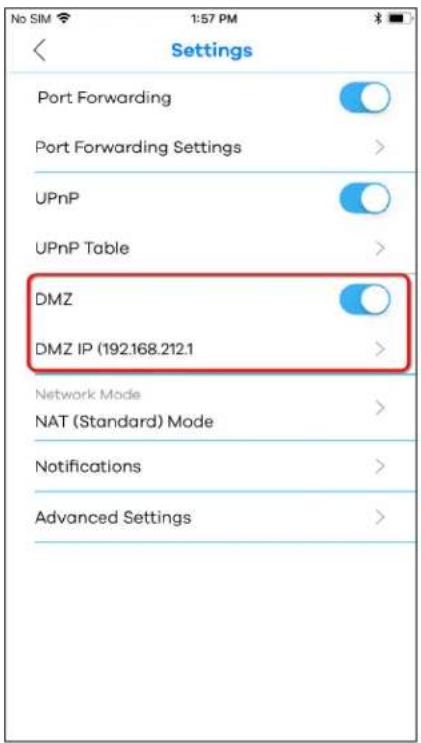
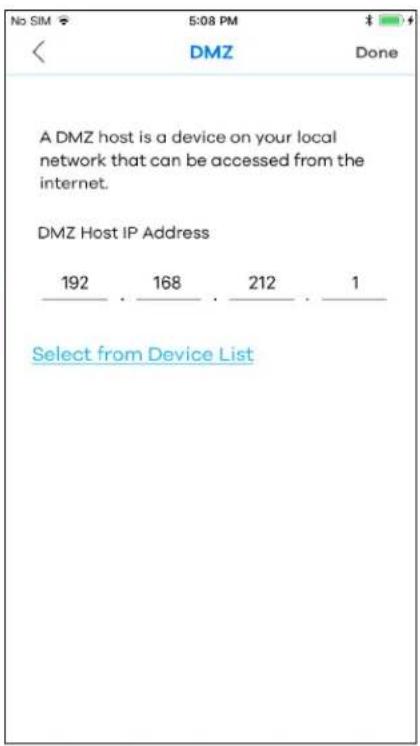
2 Tap DMZ IP in the Settings screen to configure your DMZ host. Enter a device IP Address or tap Select from Device List and choose a device connected to the Multy WiFi network. Make sure DMZ is enabled in the Settings screen to use this feature.
3.24 Switch to NAT/Bridge Mode
In NAT mode, the Multy Device routes traffic between a local network and another network such as the Internet. Choose NAT mode if you want the Multy Device to assign local IP addresses to devices connected to it (DHCP) and use routing features.
In Bridge mode, the Multy Device broadcasts traffic to the local network from the Internet. Choose Bridge mode if you have an existing router in your network and you don't want to reconfigure routing settings.
The following (routing) features are enabled in NAT mode:
- Parental Control
• UPnP
• Reserve IP
• Port Forwarding
• DMZ
Note: These settings apply to the entire Multy Site. By default, your Multy Site is in NAT mode.
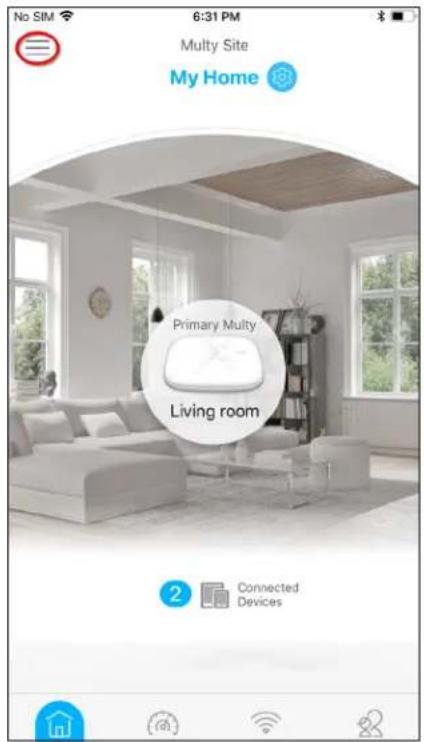
1 To change your network mode, tap the Menu icon in the upper-left corner to open the navigation panel, and then tap Settings.
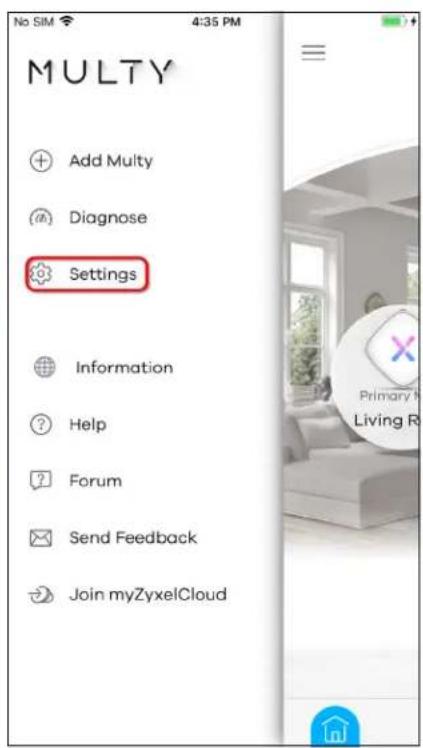
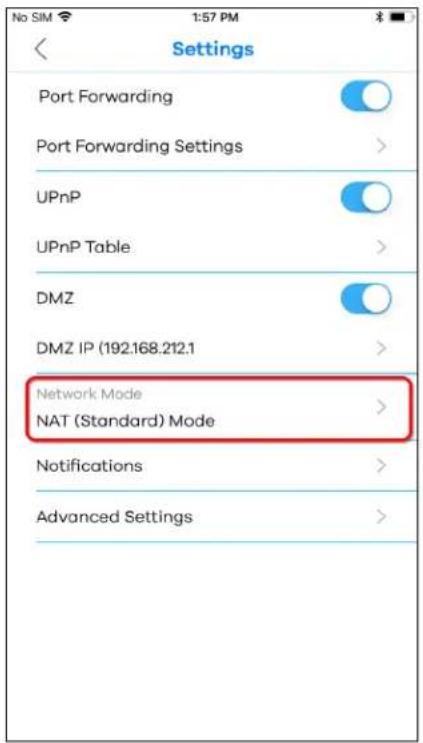
2 Tap Network Mode if you want to switch between NAT and bridge mode.
3.25 Turn Notifications on or off
You can decide whether or not to get updates when new WiFi clients connect to the system, when there are new speed test results, and when firmware updates are available. These updates will show as push notifications on your phone.
Note: You need to have a myZyxelCloud account to use this feature.
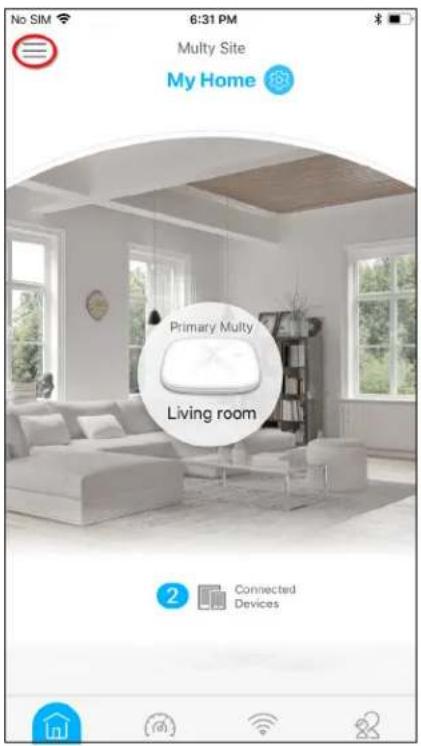
1 Tap the Menu icon in the upper-left corner to open the navigation panel, and then tap Settings.
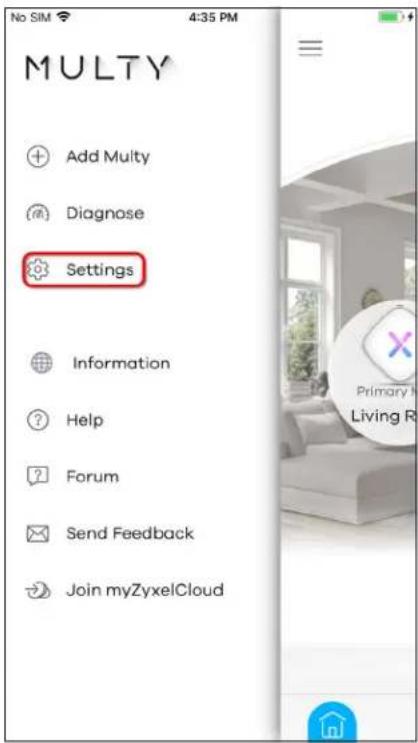
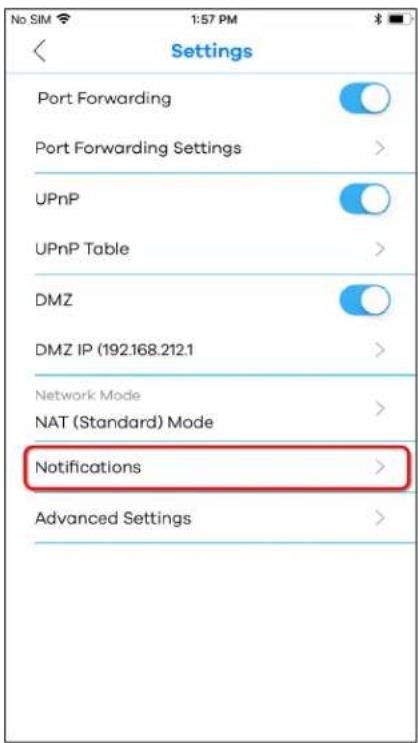
2 Tap Notifications in the Settings screen. Tap to enable and allow the app to send you notifications when there is a new speed test result or new firmware update.
Note: After you turn on notifications for speed test results, you need to use the Alexa voice command "Alexa, ask Zyxel Multy to test Internet speed" to run a speed test to receive the notification. See Section 3.29 on page 71 for more information about how to use the Alexa voice service. This speed test corresponds to Menu > Diagnose > Speed Test, checking the connection between the primary Multy and Internet (see Section 3.5 on page 28).
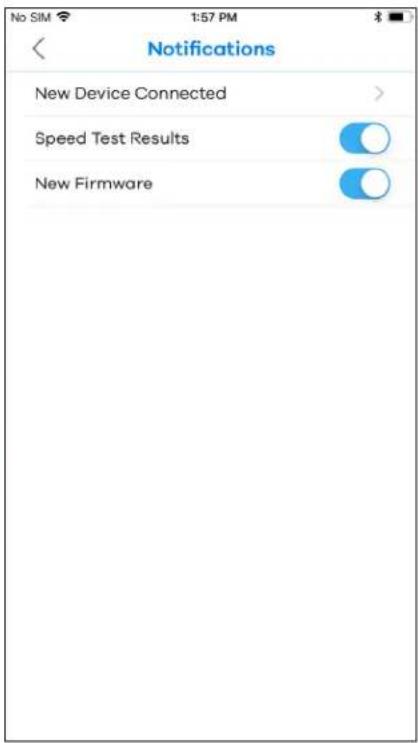
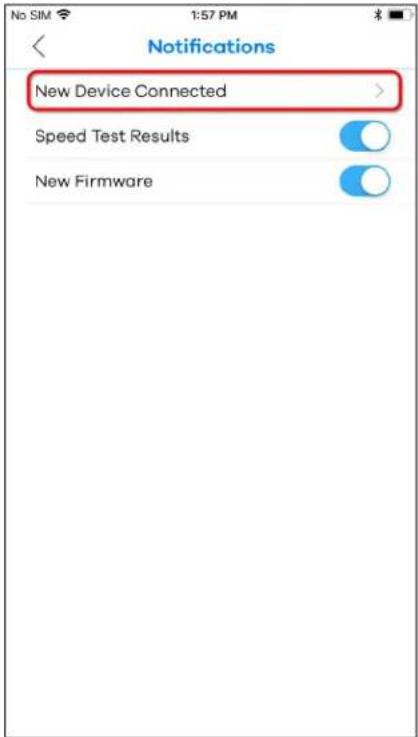
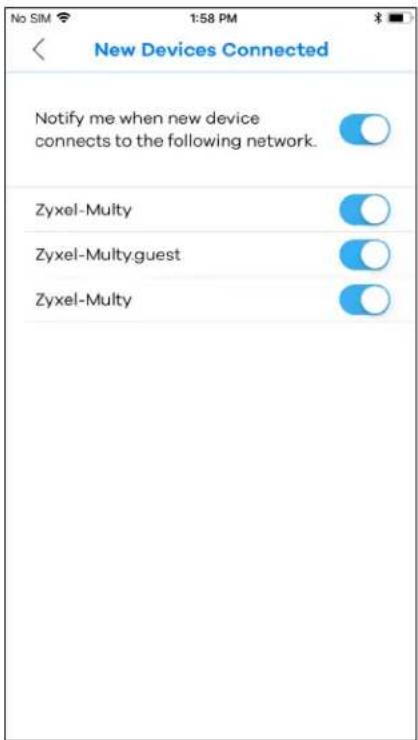
3 If you want to get notifications when there are new client devices connecting to your WiFi network(s), tap New Device Connected and enable notifications for the WiFi network(s).
3.26 Enable or Disable Daisy Chain Network Topology
You can "daisy chain" multiple Multy Devices together to create expansive WiFi coverage for your home.
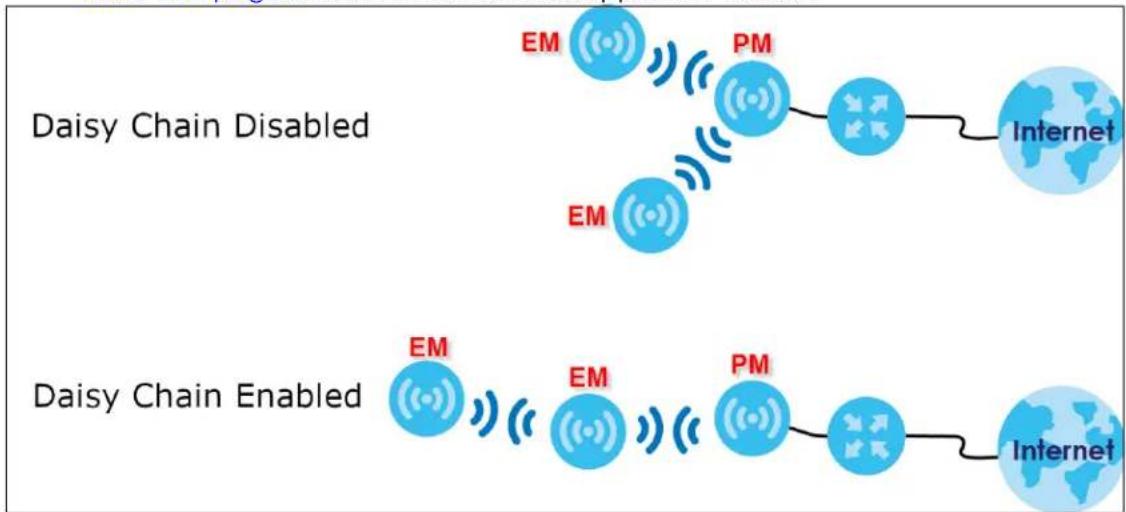
The daisy chain topology is illustrated in the figure below. When daisy chaining is enabled, each extender Multy (EM) can go through another extender Multy with a strong WiFi signal to connect to the primary Multy (PM).
When Multy Devices are daisy-chained, they don't all need to be placed near the primary Multy, which means you can extend your coverage.
Note: This feature is not available on all Multy Devices. The Daisy Chain and Network Topology menus appear only when using a Multy Device that supports Daisy Chain. See Table 1 on page 6 to see which devices support this feature.
flowchart
graph LR
    A["Daisy Chain Disabled"] --> B["EM"]
    A --> C["PM"]
    A --> D["Internet"]
    E["Daisy Chain Enabled"] --> F["EM"]
    E --> G["PM"]
    E --> H["Internet"]
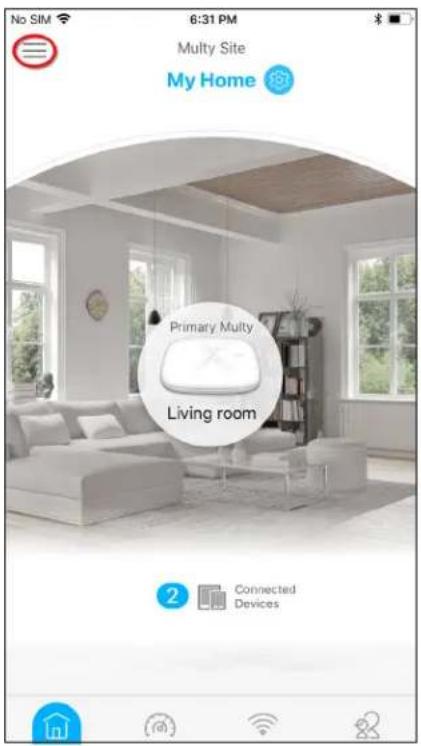
1 Tap the Menu icon in the upper-left corner to open the navigation panel, and then tap Settings.
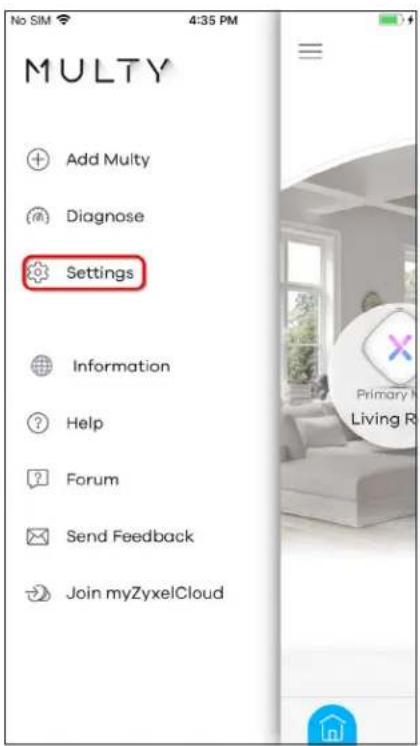
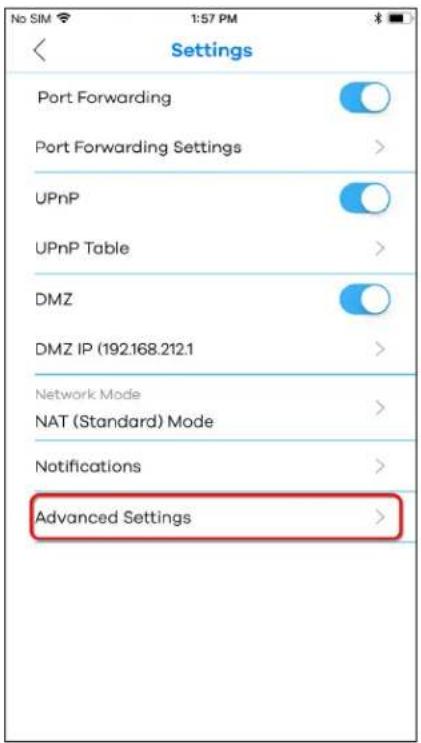
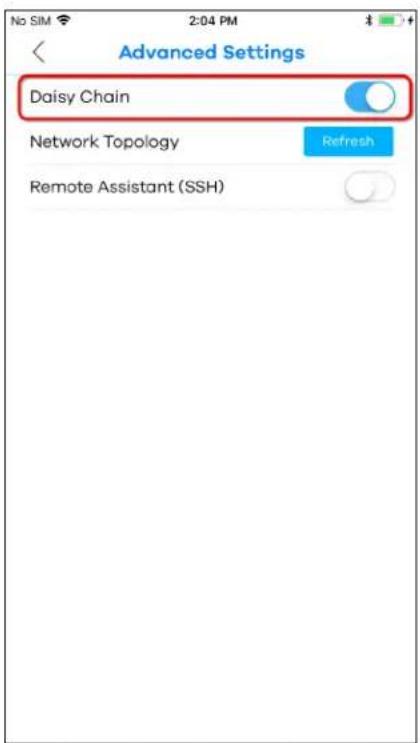
2 Tap Advanced Settings in the Settings screen. Tap Daisy Chain to enable or disable daisy chaining.
3.27 Report a Problem with the Zyxel Multy app
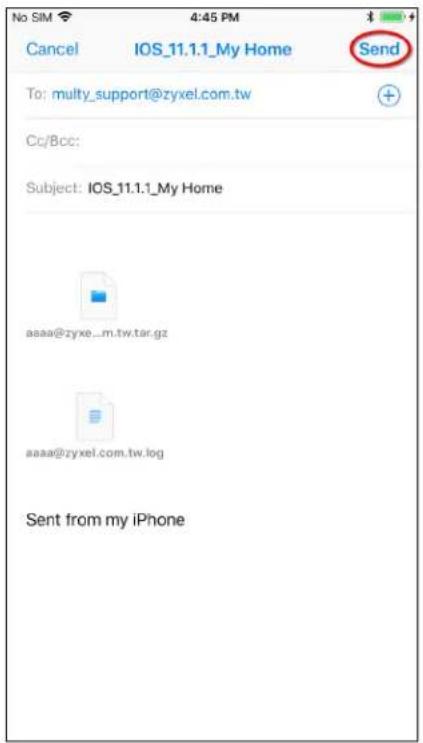
If you encounter problems while using the Zyxel Multy app or want to send us your feedback, you can send an email to customer service.
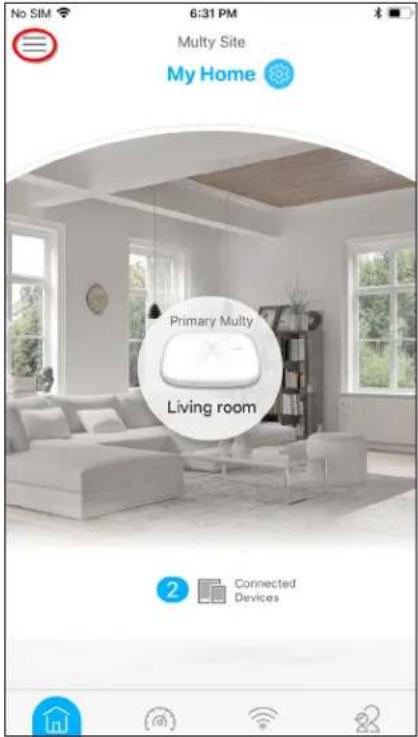
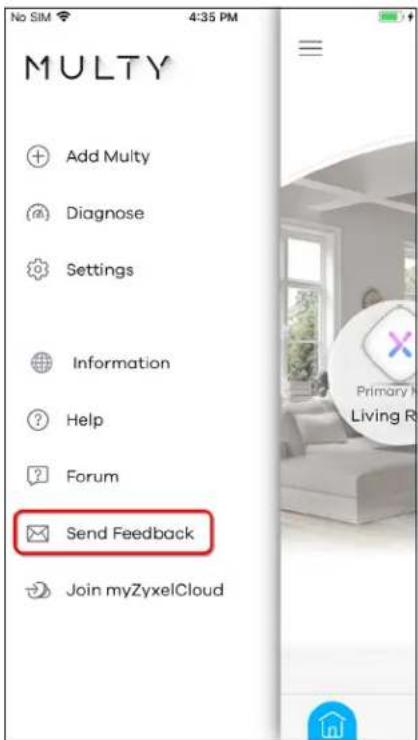
1 Tap the Menu icon in the upper-left corner to open the navigation panel. Tap Send Feedback.
2 Edit the mail and tap Send.
3.28 Log in with a myZyxelCloud Account
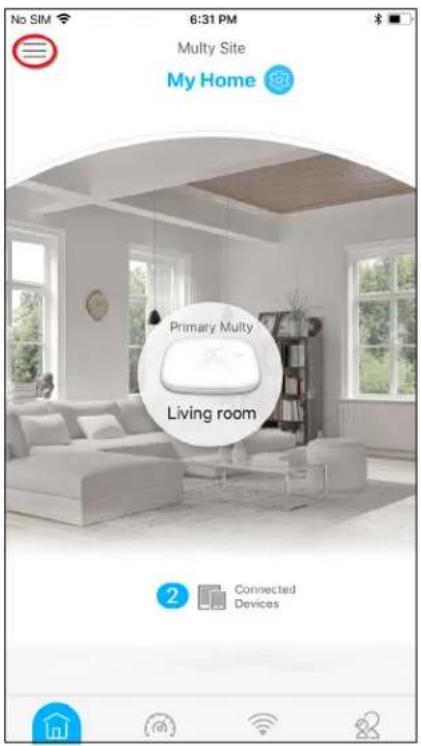
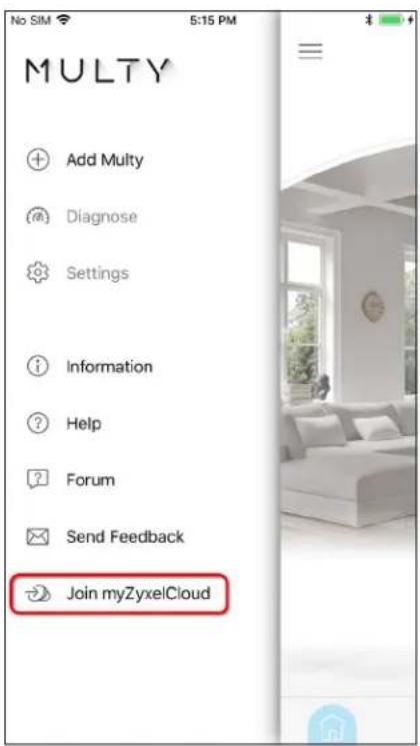
If you didn't log into the Zyxel Multy app with a myZyxelCloud account, you can still log in after your Multy Site has been set up.
1 Tap the Menu icon in the upper-left corner to open the navigation panel. Tap Join myZyxelCloud.
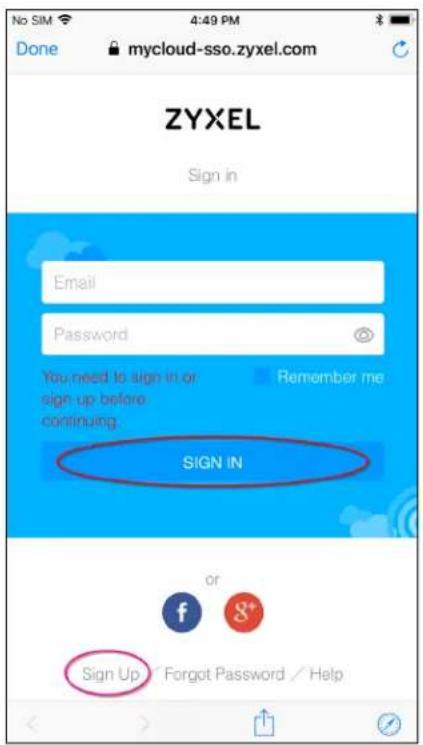
2 Enter your existing account information and tap SIGN IN. If you don't have a myZyxelCloud account, tap Sign Up to create one.
3.29 Manage Your Multy WiFi System with Amazon Alexa
If you have an Alexa-enabled device (Amazon Echo for example), you can use your voice to control the Multy Devices in your Multy Sites. At the time of writing, the available Alexa skill voice commands for Multy Sites are:
• Alexa, ask Zyxel Multy to turn off guest WiFi
• Alexa, ask Zyxel Multy to test Internet speed
• Alexa, ask Zyxel Multy to turn on WiFi light
- Alexa, ask Zyxel Multy to turn off WiFi light
• Alexa, ask Zyxel Multy to pause the Internet
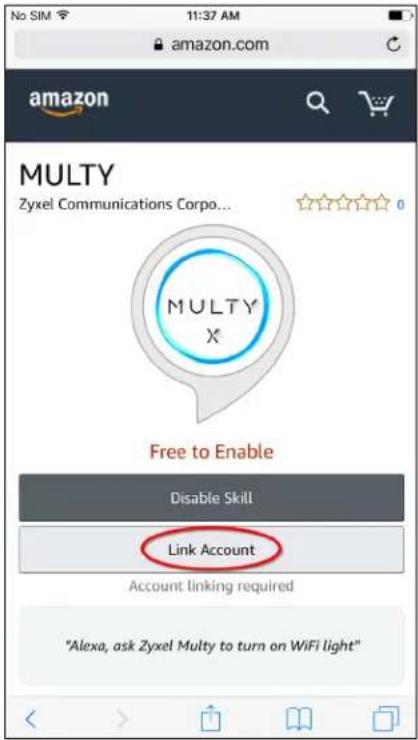
You need to enable the Multy-Alexa skills to enhance the functionality of your Alexa device and allow Alexa to perform the supported tasks.
Note: To use the Alexa voice service, you must have logged into the Zyxel Multy app with a myZyxelCloud account and set up the Multy Device(s).
Both the Multy Devices and Alexa device should be connected to the same WiFi network.
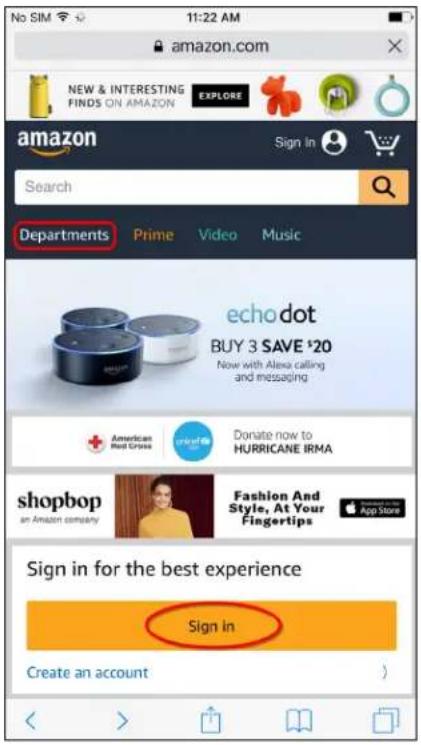
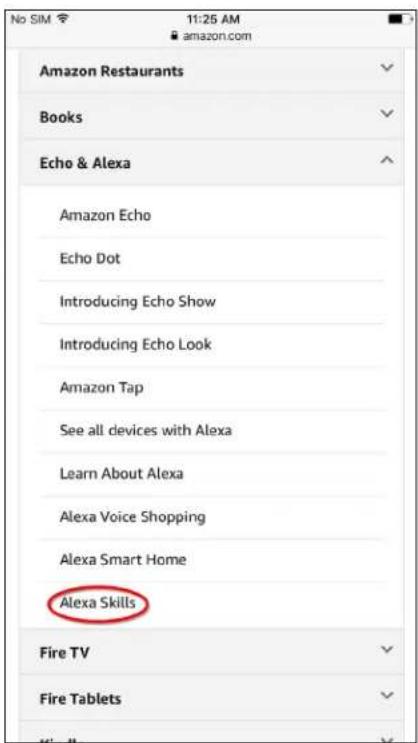
1 Go to Amazon's website (https://www.amazon.com) and sign in with your Amazon account. Tap Departments and select Alexa Skills.
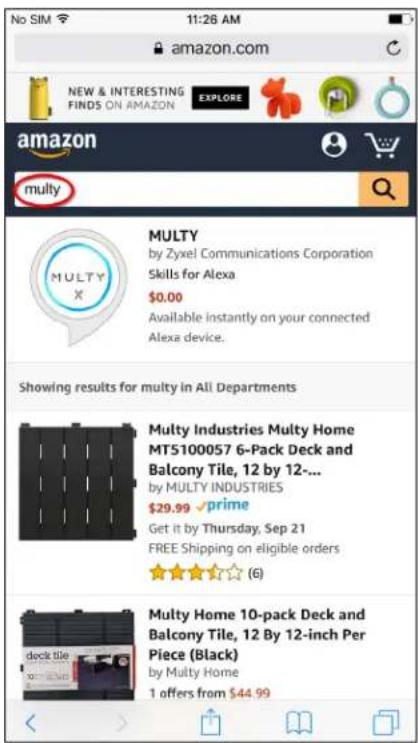
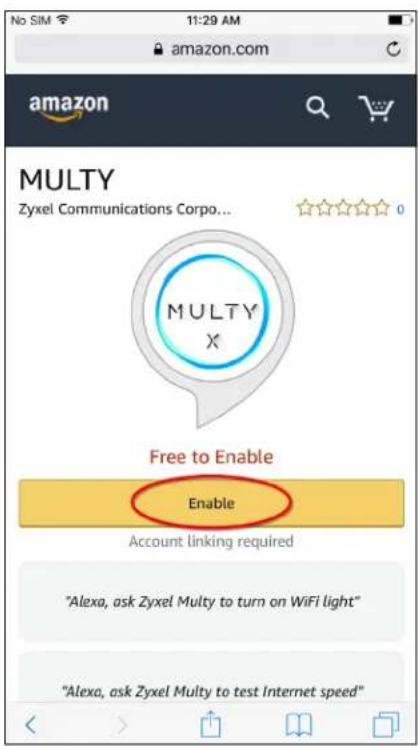
2 Enter the keyword "Zyxel Multy" in the search bar and select "Zyxel Multy" from the list of results. Tap Enable to connect the Multy Site to Alexa.
3 Tap Link Account and enter your myZyxel account information to associate the skill with your account.
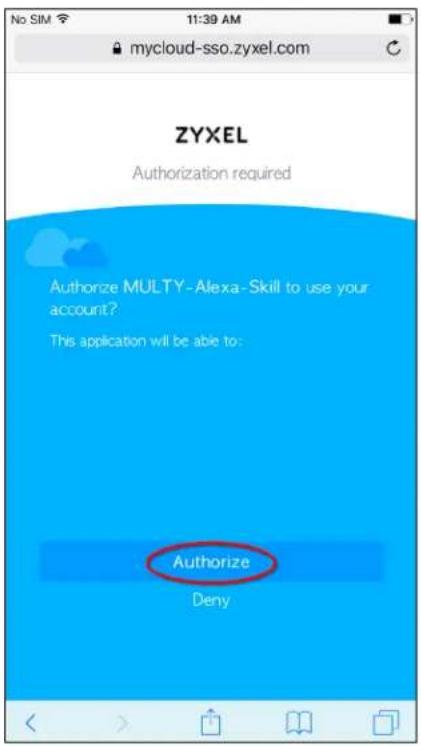
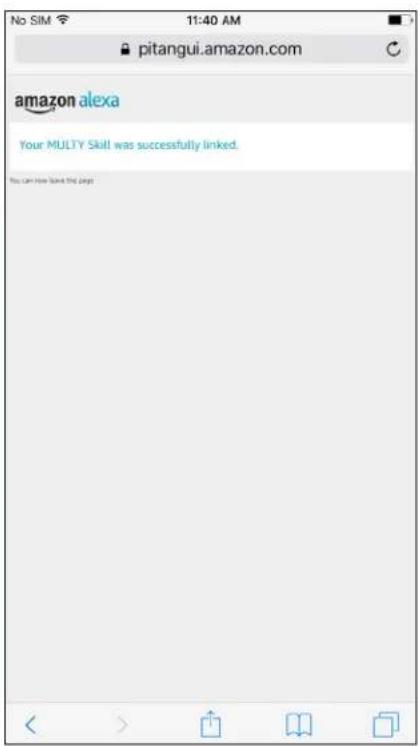
4 Tap Authorize. A screen appears showing that the skill for Multy Sites has been successfully linked.
Use either the Alexa app or the voice command "Discover Devices" to have Alexa discover the Multy Device(s) on the specified myZyxel account. You then can use your voice to control the Multy Device.
APPENDIX A
Customer Support
In the event of problems that cannot be solved by using this manual, you should contact your vendor. If you cannot contact your vendor, then contact a Zyxel office for the region in which you bought the device.
See http://www.zyxel.com/homepage.shtml and also
http://www.zyxel.com/about_zyxel/zyxel_worldwide.shtml for the latest information.
Please have the following information ready when you contact an office.
Required Information
- Product model and serial number.
- Warranty Information.
- Date that you received your device.
- Brief description of the problem and the steps you took to solve it.
Corporate Headquarters (Worldwide)
Taiwan
• Zyxel Communications Corporation
- http://www.zyxel.com
Asia
China
• Zyxel Communications (Shanghai) Corp.
Zyxel Communications (Beijing) Corp.
Zyxel Communications (Tianjin) Corp.
- http://www.zyxel.cn
India
• Zyxel Technology India Pvt Ltd
- http://www.zyxel.in
Kazakhstan
• Zyxel Kazakhstan
- http://www.zyxel.kz
Korea
• Zyxel Korea Corp.
- http://www.zyxel.kr
Malaysia
• Zyxel Malaysia Sdn Bhd.
- http://www.zyxel.com.my
Pakistan
• Zyxel Pakistan (Pvt.) Ltd.
- http://www.zyxel.com.pk
Philippines
• Zyxel Philippines
- http://www.zyxel.com.ph
Singapore
• Zyxel Singapore Pte Ltd.
- http://www.zyxel.com.sg
Taiwan
• Zyxel Communications Corporation
- http://www.zyxel.com/tw/zh/
Thailand
• Zyxel Thailand Co., Ltd
- http://www.zyxel.co.th
Vietnam
• Zyxel Communications Corporation-Vietnam Office
- http://www.zyxel.com/vn/vi
Europe
Austria
• Zyxel Communications Brasil Ltda.
- https://www.zyxel.com/br/pt/
Ecuador
• Zyxel Communication Corporation
- http://www.zyxel.com/ec/es/
Middle East
Israel
• Zyxel Communication Corporation
- http://il.zyxel.com/homepage.shtml
Middle East
• Zyxel Communication Corporation
- http://www.zyxel.com/me/en/
North America
USA
• Zyxel Communications, Inc. - North America Headquarters
- http://www.zyxel.com/us/en/
Oceania
Australia
• Zyxel Communications Corporation
- http://www.zyxel.com/au/en/
Africa
South Africa
• Nology (Pty) Ltd.
- http://www.zyxel.co.za
APPENDIX B
Legal Information
Copyright
Copyright © 2019 by Zyxel Communications Corporation.
The contents of this publication may not be reproduced in any part or as a whole, transcribed, stored in a retrieval system, translated into any language, or transmitted in any form or by any means, electronic, mechanical, magnetic, optical, chemical, photocopying, manual, or otherwise, without the prior written permission of Zyxel Communications Corporation.
Published by Zyxel Communications Corporation. All rights reserved.
Disclaimer
Zyxel does not assume any liability arising out of the application or use of any products, or software described herein. Neither does it convey any license under its patent rights nor the patent rights of others. Zyxel further reserves the right to make changes in any products described herein without notice. This publication is subject to change without notice.
Regulatory Notice and Statement
UNITED STATES of AMERICA

The following information applies if you use the product within USA area.
FCC EMC Statement
• The device complies with Part 15 of FCC rules. Operation is subject to the following two conditions:
(1) This device may not cause harmful interference, and
(2) This device must accept any interference received, including interference that may cause undesired operation.
- Changes or modifications not expressly approved by the party responsible for compliance could void the user's authority to operate the device.
- This product has been tested and complies with the specifications for a Class B digital device, pursuant to Part 15 of the FCC Rules. These limits are designed to provide reasonable protection against harmful interference in a residential installation. This device generates, uses, and can radiate radio frequency energy and, if not installed and used according to the instructions, may cause harmful interference to radio communications. However, there is no guarantee that interference will not occur in a particular installation.
- If this device does cause harmful interference to radio or television reception, which is found by turning the device off and on, the user is encouraged to try to correct the interference by one or more of the following measures:
- Reorient or relocate the receiving antenna
- Increase the separation between the devices
- Connect the equipment to an outlet other than the receiver's
- Consult a dealer or an experienced radio/TV technician for assistance
The following information applies if you use the product with RF function within USA area.
FCC Radiation Exposure Statement
• This device complies with FCC RF radiation exposure limits set forth for an uncontrolled environment.
- This transmitter must be at least 20 cm from the user and must not be co-located or operating in conjunction with any other antenna or transmitter.
• Operation of this device is restricted to indoor use only.
CANADA
The following information applies if you use the product within Canada area.
Innovation, Science and Economic Development Canada ICES Statement
CAN ICES-3 (B)/NMB-3(B)
Innovation, Science and Economic Development Canada RSS-GEN & RSS-247 statement
- This device contains licence-exempt transmitter(s)/receiver(s) that comply with Innovation, Science and Economic Development Canada's licence-exempt RSS(s). Operation is subject to the following two conditions: (1) this device may not cause interference, and (2) this device must accept any interference, including interference that may cause undesired operation of the device.
- This radio transmitter has been approved by Innovation, Science and Economic Development Canada to operate with the antenna types listed below with the maximum permissible gain indicated. Antenna types not included in this list that have a gain greater than the maximum gain indicated for any type listed, are strictly prohibited for use with this device.
If the product with 5G wireless function operating in 5150-5250 MHz and 5725-5850 MHz, the following attention must be paid,
- The device for operation in the band 5150-5250 MHz is only for indoor use to reduce the potential for harmful interference to co-channel mobile satellite systems.
- For devices with detachable antenna(s), the maximum antenna gain permitted for devices in the band 5725-5850 MHz shall be such that the equipment still complies with the e.i.r.p. limits as appropriate; and
- Where applicable, antenna type(s), antenna models(s), and the worst-case tilt angle(s) necessary to remain compliant with the e.i.r.p. elevation mask requirement set forth in Section 6.2.2(3) of RSS 247 shall be clearly indicated.
If the product with 5G wireless function operating in 5250-5350 MHz and 5470-5725 MHz, the following attention must be paid.
- For devices with detachable antenna(s), the maximum antenna gain permitted for devices in the bands 5250-5350 MHz and 5470-5725 MHz shall be such that the equipment still complies with the e.i.r.p. limit.
Industry Canada radiation exposure statement
This device complies with ISED radiation exposure limits set forth for an uncontrolled environment. This device should be installed and operated with a minimum distance of 20 cm between the radiator and your body.
The following information applies if you use the product within the European Union.
Declaration of Conformity with Regard to EU Directive 2014/53/EU (Radio Equipment Directive, RED)
- Compliance information for wireless products relevant to the EU and other Countries following the EU Directive 2014/53/EU (RED). And this product may be used in all EU countries (and other countries following the EU Directive 2014/53/EU) without any limitation except for the countries mentioned below table:
- In the majority of the EU and other European countries, the 5GHz bands have been made available for the use of wireless local area networks (LANs). Later in this document you will find an overview of countries in which additional restrictions or requirements or both are applicable. The requirements for any country may evolve. Zyxel recommends that you check with the local authorities for the latest status of their national regulations for the 5GHz wireless LANs.
- If this device for operation in the band 5150-5350 MHz, it is for indoor use only.
• This equipment should be installed and operated with a minimum distance of 20 cm between the radio equipment and your body.
- The maximum RF power operating for each band is as follows:
WSQ50
• the band 2,400 to 2,483.5 MHz is 97.95 mW (19.91 dBm),
• the bands 5,150 MHz to 5,350 MHz is 182.81 mW (22.62 dBm),
• the band 5,470 MHz to 5,725 MHz is 916.22 mW (29.62 dBm).
• the band 2,400 to 2,483.5 MHz is 88.72 mW (19.48 dBm).
• the bands 5,150 MHz to 5,350 MHz is 173.78 mW (22.4 dBm),
WSQ20
• the band 5,470 MHz to 5,725 MHz is 868.96 mW (29.39 dBm).
WSR30
• the band 2,400 to 2,483.5 MHz is 99.54 mW (19.98 dBm),
• the bands 5,150 MHz to 5,350 MHz is 198.61 mW (22.98 dBm).
• the band 5,470 MHz to 5,725 MHz is 685.49 mW (28.36 dBm).
| Български (Bulgarian) | С настоящото Зyxел декларира, че това оборудване е в съответствие със съществените изисквания и другите приложими разпоредбите на Директива 2014/53/EC.National RestrictionsThe Belgian Institute for Postal Services and Telecommunications (BIPT) must be notified of any outdoor wireless link having a range exceeding 300 meters. Please check http://www.bipt.be for more details.Draadloze verbindingen voor buitengebruik en met een reikwijdte van meer dan 300 meter dienen aangemeld te worden bij het Belgisch Instituut voor postaiensten en telecommunicatie (BIPT). Zie http://www.bipt.be voor meer gegevens.Les liaisons sans fil pour une utilisation en extérieur d'une distance supérieure à 300 mètres doivent être notifiées à l'Institut Belge des services Postaux et des Télécommunications (IBPT). Visitez http://www.ibpt.be pour de plus amples détails. |
| Español (Spanish) | Por medio de la presente Zyxel declara que el equipo cumple con los requisitos esenciales y cualesquiera otras disposiciones aplicables o exigibles de la Directiva 2014/53/UE.. |
| Čeština (Czech) | Zyxel tímto prohiašuje, že tento zařízení je ve shodě se základními požadavky a dalšími příslušnými ustanoveními směrnice 2014/53/EU. |
| Dansk (Danish) | Undertegnede Zyxel erklærer herved, at følgende udstyr udstyr overholder de væsentlige krav og øvrige relevante krav i direktiv 2014/53/EU.National RestrictionsIn Denmark, the band 5150 - 5350 MHz is also allowed for outdoor usage.I Danmark må frekvensbåndet 5150 - 5350 også anvendes udendørs. |
| Deutsch (German) | Hiermit erklärt Zyxel, dass sich das Gerät Ausstattung in Übereinstimmung mit den grundlegenden Anforderungen und den Übrigen einschlägigen Bestimmungen der Richtlinie 2014/53/EU befindet. |
| Eesti keel (Estonian) | Käesolevaga kinnitab Zyxel seadme seadmed vastavust direktivi 2014/53/EU põhinõuetele ja nimetatud direktiivist tulenevatele teistele asjakohastele sätetele. |
| Ελληνικά (Greek) | ΜΕ ΤΗΝ ΠΑΡΟΥΣΑ Ζyxel ΔΗΛΩΝΕΙ ΟΤΙ εξοπλισμός ΣΥΜΜΟΡΦΩΝΕΤΑΙ ΠΡΟΣ ΤΙΣ ΟΥΣΙΩΔΕΙΣ ΑΠΑΙΤΗΣΕΙΣ ΚΑΙ ΤΙΣ ΛΟΙΠΕΣ ΣΧΕΤΙΚΕΣ ΛΙΑΤΑΞΕΙΣ ΤΗΣ ΟΛΗΓΙΑΣ 2014/53/EU. |
| English | Hereby, Zyxel declares that this device is in compliance with the essential requirements and other relevant provisions of Directive 2014/53/EU. |
| Français (French) | Par la présente Zyxel déclare que l'appareil équipements est conforme aux exigences essentielles et aux autres dispositions pertinentes de la directive 2014/53/EU. |
| Hrvatski (Croatian) | Zyxel ovime izjavljuje da je radijska oprema tipa u skladu s Direktivom 2014/53/EU. |
| Íslenska (Icelandic) | Hér með lýsir, Zyxel því yfir að þessi búnaður er í samræmi við grunnkröfur og önnur viðeigandi ákvæði tilskipunar 2014/53/EU. |
| Italiano (Italian) | Con la presente Zyxel dichiara che questo altrezzatura è conforme ai requisiti essenziali ed alle allre disposizioni perlinenti stabilite dalla direttiva 2014/53/EU.National RestrictionsThis product meets the National Radio Interface and the requirements specified in the National Frequency Allocation Table for Italy. Unless this wireless LAN product is operating within the boundaries of the owner's property, its use requires a "general authorization." Please check http://www.sviluppoeconomico.gov.it/ for more details.Questo prodotto è conforme alla specifiche di Interfaccia Radio Nazionali e rispetta il Piano Nazionale di ripartizione delle frequenze in Italia. Se non viene installato all 'interno del proprio fondo, l'utilizzo di prodotti Wireless LAN richiede una "Autorizzazione Generale". Consultare http://www.sviluppoeconomico.gov.it/ per maggiori dettagli. |
| Latviešu valoda (Latvian) | Ar šo Zyxel deklarē, ka lekārtas albilst Direktīvas 2014/53/EU būtiskajām prasībām un citiem ar to saistīrajiem noteikumiem.National RestrictionsThe outdoor usage of the 2.4 GHz band requires an authorization from the Electronic Communications Office. Please check http://www.esd.lv for more details.2.4 GHz frekvenėu joslas izmantoðanai ārpus telpām nepiecieðama afīauja no Elektronisko sakaru direkcijas. Vairāk informácijas: http://www.esd.lv. |
| Lietuviių kalba (Lithuanian) | Šiuo Zyxel deklaruoja, kad šis įranga atitinka esminius reikalavimus ir kitas 2014/53/EU Direktyvos nuostatas. |
| Magyar (Hungarian) | Alulírott, Zyxel nyilatkozom, hogy a berendezés megfelel a vonatkozó alapvető követelményeknek és az 2014/53/EU irányelv egyéb előírásainak. |
| Malti (Maltese) | Hawnhekk, Zyxel, jiddikjara li dan taghmir jikkonforma mal-ħtigljiet essenzjali u ma provvedimenti ohrajn relevanti li hemm fid-Dirrettiva 2014/53/EU. |
| Nederlands (Dutch) | Hierbij verklaart Zyxel dat het loestel uitrusting in overeenstemming is met de essenliële eisen en de andere relevante bepalingen van richtlijn 2014/53/EU. |
| Polski (Polish) | Niniejszym Zyxel oświadcza, że sprzęt jest zgodny z zasadniczymi wymogami oraz pozostałymi stosownymi postanowieniami Dyrektywy 2014/53/EU. |
| Português (Portuguese) | Zyxel declara que este equipamento eslá conforme com os requisitos essenciais e outras disposições da Directiva 2014/53/EU. |
| Română (Romanian) | Prin prezenta, Zyxel declară că acest echipament este în conformitate cu cerintele esentiale și alte prevederi relevante ale Directivei 2014/53/EU. |
| Slovenčina (Slovak) | Zyxel lýmto vyhlasuje, že zariadenia spíňa základné požiadavky a všetky príslušné ustanovenia Smernice 2014/53/EU. |
| Slovenščina (Slovene) | Zyxel izjavlja, da je ta oprema v skladu z bistvenimi zahtevami in ostalimi relevantnimi določili direktive 2014/53/EU. |
| Suomi (Finnish) | Zyxel vakuuttaa täten että laitteet tyyppinen laite on direktlivin 2014/53/EU oleellisten vaatimusten ja sită koskevien direktlivin muiden ehtojen mukainen. |
| Svenska (Swedish) | Härmed intygar Zyxel all denna ultrusning slår I överensstämmelse med de väsentliga egenskapskrav och övriga relevanta bestämmelser som framgår av direktiv 2014/53/EU. |
| Norsk (Norwegian) | Erklaerer herved Zyxel at dette utstyret er I samsvar med de grunnleggende kravene og andre relevante bestemmelser I direktiv 2014/53/EU. |
Notes:
- Although Norway, Switzerland and Liechtenstein are not EU member states, the EU Directive 2014/53/EU has also been implemented in those countries.
- The regulatory limits for maximum output power are specified in EIRP. The EIRP level (in dBm) of a device can be calculated by adding the gain of the antenna used (specified in dBi) to the output power available at the connector (specified in dBm).
List of national codes
| COUNTRY | ISO 3166 2 LETTER CODE | COUNTRY | ISO 3166 2 LETTER CODE |
| Austria AT Liechtenstein LI | |||
| Belgium BE Lithuania LT | |||
| Bulgaria BG Luxembourg LU | |||
| Croatia | HR | Malta | MT |
| Cyprus | CY | Netherlands | NL |
| Czech Republic | CZ | Norway NO | |
| Denmark | DK | Poland | PL |
| Estonia | EE Portugal | PT | |
| Finland | FI | Romania RO | |
| France | FR Serbia | RS | |
| Germany | DE | Slovakia | SK |
| Greece GR Slovenia | SI | ||
| Hungary | HU | Spain | ES |
| Iceland | IS | Switzerland | CH |
| Ireland | IE | Sweden SE | |
| Italy | IT | Turkey | TR |
| Latvia | LV United Kingdom | GB |
Safety Warnings
- Do not use this product near water, for example, in a wet basement or near a swimming pool.
- Do not expose your device to dampness, dust or corrosive liquids.
- Do not store things on the device.
- Do not obstruct the device ventilation slots as insufficient airflow may harm your device. For example, do not place the device in an enclosed space such as a box or on a very soft surface such as a bed or sofa.
- Do not install, use, or service this device during a thunderstorm. There is a remote risk of electric shock from lightning.
- Connect ONLY suitable accessories to the device.
- Do not open the device or unit. Opening or removing covers can expose you to dangerous high voltage points or other risks. ONLY qualified service personnel should service or disassemble this device. Please contact your vendor for further information.
- Make sure to connect the cables to the correct ports.
- Place connecting cables carefully so that no one will step on them or stumble over them.
• Always disconnect all cables from this device before servicing or disassembling. - Do not remove the plug and connect it to a power outlet by itself; always attach the plug to the power adaptor first before connecting it to a power outlet.
-
Do not allow anything to rest on the power adaptor or cord and do NOT place the product where anyone can walk on the power adaptor or cord.
-
Please use the provided or designated connection cables/power cables/ adaptors. Connect it to the right supply voltage (for example, 110V AC in North America or 230V AC in Europe). If the power adaptor or cord is damaged, it might cause electrocution. Remove it from the device and the power source, repairing the power adapter or cord is prohibited. Contact your local vendor to order a new one.
- Do not use the device outside, and make sure all the connections are indoors. There is a remote risk of electric shock from lightning.
- The following warning statements apply, where the disconnect device is not incorporated in the device or where the plug on the power supply cord is intended to serve as the disconnect device.
- For permanently connected devices, a readily accessible disconnect device shall be incorporated external to the device;
- For pluggable devices, the socket-outlet shall be installed near the device and shall be easily accessible.
Environment Statement
ErP (Energy-related Products)
Zyxel products put on the EU market in compliance with the requirement of the European Parliament and the Council published Directive 2009/125/EC establishing a framework for the setting of ecodesign requirements for energy-related products (recast), so called as "ErP Directive (Energy-related Products directive) as well as ecodesign requirement laid down in applicable implementing measures, power consumption has satisfied regulation requirements which are:
• Network standby power consumption < 8W, and/or
- Off mode power consumption < 0.5 W ,and/or
- Standby mode power consumption < 0.5W .
(Wireless settings, please refer to the chapter about wireless settings for more detail.)
European Union - Disposal and Recycling Information
The symbol below means that according to local regulations your product and/or its battery shall be disposed of separately from domestic waste. If this product is end of life, take it to a recycling station designated by local authorities. At the time of disposal, the separate collection of your product and/or its battery will help save natural resources and ensure that the environment is sustainable development.
Various symbols are used in this product to ensure correct usage, to prevent danger to the user and others, and to prevent property damage. The meaning of these symbols are described below. It is important that you read these descriptions thoroughly and fully understand the contents.
Explanation of the Symbols
| SYMBOL EXPLANATION | |
| Alternating current (AC):AC is an electric current in which the flow of electric charge periodically reverses direction. | |
| Direct current (DC):DC if the unidirectional flow or movement of electric charge carriers. | |
| Earth; ground:A wiring terminal intended for connection of a Protective Earthing Conductor. | |
| Class II equipment:The method of protection against electric shock in the case of class II equipment is either double insulation or reinforced insulation. |
Viewing Certifications
Go lo http://www.zyxel.com to view this product's documentation and certifications.
Zyxel Limited Warranty
Zyxel warrants to the original end user (purchaser) that this product is free from any defects in material or workmanship for a specific period (the Warranty Period) from the date of purchase. The Warranty Period varies by region. Check with your vendor and/or the authorized Zyxel local distributor for details about the Warranty Period of this product. During the warranty period, and upon proof of purchase, should the product have indications of failure due to faulty workmanship and/or materials, Zyxel will, at its discretion, repair or replace the defective products or components without charge for either parts or labor, and to whatever extent it shall deem necessary to restore the product or components lo
proper operating condition. Any replacement will consist of a new or re-manufactured functionally equivalent product of equal or higher value, and will be solely at the discretion of Zyxel. This warranty shall not apply if the product has been modified, misused, tampered with, damaged by an act of God, or subjected to abnormal working conditions.
Note
Repair or replacement, as provided under this warranty, is the exclusive remedy of the purchaser. This warranty is in lieu of all other warranties, express or implied, including any implied warranty of merchantability or fitness for a particular use or purpose. Zyxel shall in no event be held liable for indirect or consequential damages of any kind to the purchaser.
To obtain the services of this warranty, contact your vendor. You may also refer to the warranty policy for the region in which you bought the device at http://www.zyxel.com/web/support_warranty_info.php.
Registration
Register your product online to receive e-mail notices of firmware upgrades and information at www.zyxel.com for global products, or at www.us.zyxel.com for North American products.
Open Source Licenses
This product contains in part some free software distributed under GPL license terms and/or GPL like licenses. Open source licenses are provided with the firmware package. You can download the latest firmware at www.zyxel.com. To obtain the source code covered under those Licenses, please contact support@zyxel.com.tw to get it.
- IMPORTANT!
- READ CAREFULLY BEFORE USE.
- KEEP THIS GUIDE FOR FUTURE REFERENCE.
- Related Documentation
- Table of Contents
- Table of Contents....3
- Chapter 1
- Get to Know Your Multy WiFi System ....5
- Chapter 2
- Hardware 8
- Chapter 3
- Set up Your Multy WiFi System ....18
- Get to Know Your Multy WiFi
- System
- Overview
- How to Manage Your Multy Sites
- Zyxel Multy App
- Getting Started
- CHAPTER 2 Hardware
- Hardware Connections
- Hardware Installation
- WSQ50/WSQ20 Installation
- WSR30 Installation
- Reset Button
- Use the Rest Button
- WSQ60/WSQ50/WSQ20:
- LED Light
- Set up Your Multy WiFi
- Introduction
- Compatibility
- Use the Zyxel Multy App
- Add and Install Your First Multy Device
- Test Your Mobile Phone Connection Speed
- Test Your Multy Device Connection Speed
- Measure Your WiFi Signal Strength
- Enable or Disable Guest WiFi
- Share WiFi Name and Password with a QR Code
- Set a WiFi Schedule for Clients
- Pause Internet Access for an Individual Client
- Pause or Resume Internet Access for a Group
- Check your Multy Device's Configuration Details
- Use Custom DNS Server
- Turn on or off the Multy Device's LED
- Check Your Multy-to-Multy Signal Strength
- Restart Your Multy Device
- Remove a Multy Device
- View Legal and Regulatory Information
- Install a Second Multy Site
- Change the Name or Picture of a Multy Site
- Remove a Multy Site
- Enable or Add Port Forwarding Rules
- Enable DMZ
- Switch to NAT/Bridge Mode
- Turn Notifications on or off
- Enable or Disable Daisy Chain Network Topology
- Report a Problem with the Zyxel Multy app
- Log in with a myZyxelCloud Account
- Manage Your Multy WiFi System with Amazon Alexa
- APPENDIX A
- Customer Support
- Required Information
- Corporate Headquarters (Worldwide)
- Taiwan
- Asia
- China
- India
- Kazakhstan
- Korea
- Malaysia
- Pakistan
- Philippines
- Singapore
- Thailand
- Vietnam
- Europe
- Austria
- Ecuador
- Middle East
- Israel
- North America
- USA
- Oceania
- Australia
- Africa
- South Africa
- APPENDIX B
- Legal Information
- Copyright
- Disclaimer
- Regulatory Notice and Statement
- UNITED STATES of AMERICA
- FCC EMC Statement
- FCC Radiation Exposure Statement
- CANADA
- Innovation, Science and Economic Development Canada ICES Statement
- Innovation, Science and Economic Development Canada RSS-GEN & RSS-247 statement
- Industry Canada radiation exposure statement
- Declaration of Conformity with Regard to EU Directive 2014/53/EU (Radio Equipment Directive, RED)
- WSQ50
- WSQ20
- WSR30
- Notes:
- Safety Warnings
- Environment Statement
- ErP (Energy-related Products)
- European Union - Disposal and Recycling Information
- Viewing Certifications
- Zyxel Limited Warranty
- Note
- Registration
- Open Source Licenses
Brand : ZYXEL
Model : Multy Mini WSQ20
Category : Wi-Fi repeater