
MECABLITZ 44 AF-4 M - External Flashes METZ - Free user manual and instructions
Find the device manual for free MECABLITZ 44 AF-4 M METZ in PDF.
User questions about MECABLITZ 44 AF-4 M METZ
0 question about this device. Answer the ones you know or ask your own.
Ask a new question about this device
Download the instructions for your External Flashes in PDF format for free! Find your manual MECABLITZ 44 AF-4 M - METZ and take your electronic device back in hand. On this page are published all the documents necessary for the use of your device. MECABLITZ 44 AF-4 M by METZ.
USER MANUAL MECABLITZ 44 AF-4 M METZ
natural_image
Exterior view of a black Mertz mecablitz 44 AF-4M flash unit (no additional text or symbols visible)MECABLITZ 44 AF-4 M
Bedienungsanleitung
Gebruiksaanwijzing
Manuale istruzioni
Mode d'emploi
Operating instruction
| Dedicated-Funktionen\Kamertype | Dynax 9 / 9 Titan | Dynax 7 | Dynax 5 | Dynax 800si | Dynax 700si | Dynax 650si | Dynax 600si | Dynax 505si super, Maxxum X Tsi | Dynax 505si, Maxxum HTsi | Dynax 500si super, Maxxum 500si | Dynax 500si, Maxxum 400si | Dynax 404si | Dynax 303si | Dynax 9xi | Dynax 7xi | Dynax 5xi | Dynax 3xi / 4 | Dynax Spxi | Dynax 8000i, Maxxum 8700i | Dynax 7000i, Maxxum 7700i | Dynax 5000i, Maxxum 5700i | Dynax 3000i, Maxxum 3700i | Vectis S-1 | Dimage 7, 7i, 7Hi, A1, A2, A200 | Dimage 5, Z1, Z2, Z3, Z5, Z6 | Dimage 7D, 5D, α100 |
| Blitzbereitschaftsanzeige im Kamerasucher | ● | ● | ● | ● | ● | ● | ● | ● | ● | ● | ● | ● | ● | ● | ● | ● | ● | ● | ● | ● | ● | ● | ● | ● | ● | ● |
| Belichtungskontrollanzeige im Kamerasucher | ● | ● | ● | ● | ● | ● | ● | ● | ● | ● | ● | ● | ● | ● | ● | ● | ● | ● | ● | ● | ● | ● | ● | ● | ● | ● |
| Automatische Blitzsynchronzeitsteuerung | ● | ● | ● | ● | ● | ● | ● | ● | ● | ● | ● | ● | ● | ● | ● | ● | ● | ● | ● | ● | ● | ● | ● | ● | ● | |
| TTL-Blitzsteuerung | ● | ● | ● | ● | ● | ● | ● | ● | ● | ● | ● | ● | ● | ● | ● | ● | ● | ● | ● | ● | ● | ● | ● | ● | ||
| TTL-Aufhellblitzsteuerung | ● | ● | ● | ● | ● | ● | ● | ● | ● | ● | ● | ● | ● | ● | ● | ● | ● | ● | ● | ● | ● | ● | ● | ● | ||
| ADI-Blitzsteuerung | ● | ● | ● | |||||||||||||||||||||||
| Mehrzonenblitzbelichtung (Vollblitzmessung) | ● | ● | ● | |||||||||||||||||||||||
| Manuelle TTL-Blitzbelichtungskorrektur | × | × | × | × | × | × | × | × | × | × | ||||||||||||||||
| Synchronisation auf den 2. Verschlussvorhang | × | × | × | × | × | × | × | |||||||||||||||||||
| Automatische Motor-Zoom-Steuerung | ● | ● | ● | ● | ● | ● | ● | ● | ● | ● | ● | ● | ● | ● | ● | ● | ● | ● | ● | ● | ● | ● | ● | ● | ● | ● |
| Autofokus-Messblitz-Steuerung | ● | ● | ● | ● | ● | ● | ● | ● | ● | ● | ● | ● | ● | ● | ● | ● | ● | ● | ● | ● | ● | ● | ● | ● | ||
| Blitzreichweitenanzeige | ● | ● | ● | ● | ● | ● | ● | ● | ● | ● | ● | ● | ● | ● | ● | ● | ● | ● | ● | ● | ● | ● | ● | ● | ● | ● |
| Programmblitzautomatik | ● | ● | ● | ● | ● | ● | ● | ● | ● | ● | ● | ● | ● | ● | ● | ● | ● | ● | ● | ● | ● | ● | ● | ● | ● | ● |
| Zündungssteuerung | ● | ● | ● | ● | ● | ● | ● | ● | ● | ● | ● | ● | ● | ● | ● | ● | ● | ● | ● | ● | ● | ● | ● | |||
| Wake-Up-Funktion | ● | ● | ● | ● | ● | ● | ● | ● | ● | ● | ● | ● | ● | ● | ● | ● | ● | ● | ● | ● | ● | ● | ● | ● | ● | ● |
4.3 ADI-Blitzsteuerung (Advanced Distance Integration)

| Fonctions dédiées | Type d'appareil | Dynax 9 / 9 Titan | Dynax 7 | Dynax 5 | Dynax 800si | Dynax 700si | Dynax 650si | Dynax 600si | Dynax 505si super, Maxxum X1si | Dynax 505si, Maxxum HTsi | Dynax 500si super, Maxxum 500si | Dynax 500si, Maxxum 400si | Dynax 404si | Dynax 303si | Dynax 9xi | Dynax 7xi | Dynax 5xi | Dynax 3xi / 4 | Dynax Spxi | Dynax 8000i, Maxxum 8700i | Dynax 7000i, Maxxum 7700i | Dynax 5000i, Maxxum 5700i | Dynax 3000i, Maxxum 3700i | Vectis S-1 | Dimage 7, 7i, 7Hi, A1, A2, A200 | Dimage 5, Z1, Z2, Z3, Z5, Z6 | Dimage 7D, 5D, α100 |
| Témoin de disponibilité dans le viseur | ● | ● | ● | ● | ● | ● | ● | ● | ● | ● | ● | ● | ● | ● | ● | ● | ● | ● | ● | ● | ● | ● | ● | ● | ● | ● | |
| Témoin de bonne exposition dans le viseur | ● | ● | ● | ● | ● | ● | ● | ● | ● | ● | ● | ● | ● | ● | ● | ● | ● | ● | ● | ● | ● | ● | ● | ● | ● | ● | |
| Vitesse de synchro flash automatique | ● | ● | ● | ● | ● | ● | ● | ● | ● | ● | ● | ● | ● | ● | ● | ● | ● | ● | ● | ● | ● | ● | ● | ● | ● | ||
| Contrôle TTL du flash | ● | ● | ● | ● | ● | ● | ● | ● | ● | ● | ● | ● | ● | ● | ● | ● | ● | ● | ● | ● | ● | ● | ● | ● | |||
| Fill-in automatique au flash TTL | ● | ● | ● | ● | ● | ● | ● | ● | ● | ● | ● | ● | ● | ● | ● | ● | ● | ● | ● | ● | ● | ● | ● | ● | |||
| Contrôle du flash ADI | ● | ● | ● | ||||||||||||||||||||||||
| Mesure au flash multizone (pré-éclairs TTL) | ● | ● | ● | ||||||||||||||||||||||||
| Correction manuelle de l'exposition au flash | × | × | × | × | × | × | × | × | × | × | |||||||||||||||||
| Synchronisation sur le 2ème rideau | × | × | × | × | × | × | × | ||||||||||||||||||||
| Asservissement de la tête zoom motorisée | ● | ● | ● | ● | ● | ● | ● | ● | ● | ● | ● | ● | ● | ● | ● | ● | ● | ● | ● | ● | ● | ● | ● | ● | ● | ● | |
| Commande de l'illuminateur AF | ● | ● | ● | ● | ● | ● | ● | ● | ● | ● | ● | ● | ● | ● | ● | ● | ● | ● | ● | ● | ● | ● | ● | ● | |||
| Affichage de la portée de l'éclair | ● | ● | ● | ● | ● | ● | ● | ● | ● | ● | ● | ● | ● | ● | ● | ● | ● | ● | ● | ● | ● | ● | ● | ● | ● | ● | |
| Flash auto programmé | ● | ● | ● | ● | ● | ● | ● | ● | ● | ● | ● | ● | ● | ● | ● | ● | ● | ● | ● | ● | ● | ● | ● | ● | ● | ● | |
| Inhibition de l'éclair | ● | ● | ● | ● | ● | ● | ● | ● | ● | ● | ● | ● | ● | ● | ● | ● | ● | ● | ● | ● | ● | ● | ● | ||||
| Fonction de réveil | ● | ● | ● | ● | ● | ● | ● | ● | ● | ● | ● | ● | ● | ● | ● | ● | ● | ● | ● | ● | ● | ● | ● | ● | ● | ● |
| Camera-typeDedicated functies | Dynax 9 / 9 Titan | Dynax 7 | Dynax 5 | Dynax 800si | Dynax 700si | Dynax 650si | Dynax 600si | Dynax 505si super, Maxxum XTSi | Dynax 505si, Maxxum HTsi | Dynax 500si super, Maxxum 500si | Dynax 500si, Maxxum 400si | Dynax 404si | Dynax 303si | Dynax 9xi | Dynax 7xi | Dynax 5xi | Dynax 3xi / 4 | Dynax Spxi | Dynax 8000i, Maxxum 8700i | Dynax 7000i, Maxxum 7700i | Dynax 5000i, Maxxum 5700i | Dynax 3000i, Maxxum 3700i | Vectis S-1 | Dimage 7, 7i, 7Hi, A1, A2, A200 | Dimage 5, Z1, Z2, Z3, Z5, Z6 | Dimage 7D, 5D, α100 |
| Aanduiding flitsparaatheid in de zoeker van de camera | ● | ● | ● | ● | ● | ● | ● | ● | ● | ● | ● | ● | ● | ● | ● | ● | ● | ● | ● | ● | ● | ● | ● | ● | ● | ● |
| Aanduiding belichtingscontrole in de zoeker | ● | ● | ● | ● | ● | ● | ● | ● | ● | ● | ● | ● | ● | ● | ● | ● | ● | ● | ● | ● | ● | ● | ● | ● | ● | ● |
| Automat. omschakeling naar de flitssynchronisatietijd | ● | ● | ● | ● | ● | ● | ● | ● | ● | ● | ● | ● | ● | ● | ● | ● | ● | ● | ● | ● | ● | ● | ● | ● | ||
| TTL-flitssturing | ● | ● | ● | ● | ● | ● | ● | ● | ● | ● | ● | ● | ● | ● | ● | ● | ● | ● | ● | ● | ● | ● | ● | |||
| Automatische TTL-invulflitssturing | ● | ● | ● | ● | ● | ● | ● | ● | ● | ● | ● | ● | ● | ● | ● | ● | ● | ● | ● | ● | ● | ● | ● | |||
| ADI-flitsregeling | ● | ● | ● | |||||||||||||||||||||||
| Meerzone-flitsbelichtingsmeting (TTL-via flits vooraf) | ● | ● | ● | |||||||||||||||||||||||
| Met de hand in te stellen correctie op de TTL-flitsbel. | × | × | × | × | × | × | × | × | × | × | ||||||||||||||||
| Synchronisatie bij het dichtgaan van de sluiter | × | × | × | × | × | × | × | |||||||||||||||||||
| Automatische sturing van de zoomreflector | ● | ● | ● | ● | ● | ● | ● | ● | ● | ● | ● | ● | ● | ● | ● | ● | ● | ● | ● | ● | ● | ● | ● | ● | ● | ● |
| Autofocus-meetflitssturing | ● | ● | ● | ● | ● | ● | ● | ● | ● | ● | ● | ● | ● | ● | ● | ● | ● | ● | ● | ● | ● | ● | ● | ● | ||
| Aanduiding flitsreikwijdte | ● | ● | ● | ● | ● | ● | ● | ● | ● | ● | ● | ● | ● | ● | ● | ● | ● | ● | ● | ● | ● | ● | ● | ● | ● | ● |
| Geprogrammeerd automatisch flitsen | ● | ● | ● | ● | ● | ● | ● | ● | ● | ● | ● | ● | ● | ● | ● | ● | ● | ● | ● | ● | ● | ● | ● | ● | ● | ● |
| Ontsteeksturing | ● | ● | ● | ● | ● | ● | ● | ● | ● | ● | ● | ● | ● | ● | ● | ● | ● | ● | ● | ● | ● | ● | ● | |||
| Wake-Up-Functie | ● | ● | ● | ● | ● | ● | ● | ● | ● | ● | ● | ● | ● | ● | ● | ● | ● | ● | ● | ● | ● | ● | ● | ● | ● | ● |
4.3 ADI-flitsregeling (Advanced Distance Integration)
In meters: 44 In feet: 144
Flitsduur:
- Safety instructions ....53
Table 1: Overview of dedicated functions ..... 54
- Preparing the mecablitz for use....55
2.1 Mounting the mecablitz 55
2.1.1 Mounting the mecablitz on the camera 55
2.1.2Removing the mecablitz from the camera 55
2.2 Power supply 55
2.2.1 Suitable batteries....55
2.2.2 Replacing batteries 55
2.3 Switching the flash unit on and off 55
2.4 Auto-OFF for mecablitz 55
-
Programmed Auto Flash Mode ..... 56
-
Operating modes of the mecablitz....56
4.1 TTL flash mode 56
4.1.1 Automatic TTL fill-in flash in daylight....57
4.1.2 Manual TTL flash exposure correction 57
4.1.3 Correct exposure indication in TTL flash mode ..... 57
4.2 Multi-zone flash exposure metering 58
4.3 ADI flash control 58
4.4 Manual flash mode 58
4.4.1 Manual flash mode M with full light output ..... 58
4.4.2 Manual flash mode MLo with partial light output ..... 58
4.5 Flash techniques 59
4.5.1 Bounce flash 59
4.5.2 Close-ups / Macrophotography ..... 59
4.6 Flash synchronisation 59
4.6.1 Normal synchronisation....59
4.6.2 REAR - Second-curtain synchronisation....59
4.6.3 Slow synchronisation / SLOW 60
- mecablitz and camera functions ..... 60
5.1 Flash readiness indication 60
5.2 Automatic flash sync speed control 60
5.3 Displays in the camera's viewfinder or LCD monitor ..... 60
5.3.1 Dynax / Maxxum 60
5.3.2 Dimage 5, 7, 7i 60
5.4 Information in the LC display 61
5.4.1 Maximum flash range indication in TTL flash mode ..... 61
5.4.2 Maximum flash range indication in the manual flash modes M and MLo 61
5.4.3 Exceeding the display range 61
5.4.4 Blanking out the maximum flash range display 61
5.4.5 Meter Feet changeover (m - ft) 61
5.5 LC display illumination....62
5.6 Motor zoom reflector....62
5.6.1 "Auto-Zoom" 62
5.6.2 Manual zoom mode „M.Zoom“ 62
5.6.3 Extended zoom mode 63
5.7 AF measuring beam 63
5.8 Triggering control 64
5.9 Return to basic setting 64
- Special remarks concerning the cameras....64
6.1 Special functions that are not supported in flash mode ..... 64
6.1.1 Creative PA and Ps program control 64
6.1.2 High speed synchronization....64
6.1.3 Cordless REMOTE flash control....64
6.1.4 Preflash function for red-eye reduction 64
-
Optional extras 65
-
Advice in the event of a fault. 65
-
Maintenance and care 65
-
Technical data 66
Guide number table for TTL and full light output M in the imperial system . . 100
Guide number table for partial light output MLo in the imperial system . . . 101
Foreword
We congratulate you on purchasing this flash unit and thank you for your confidence in Metz products.
It is only natural that you should want to use your flash unit straight away. However, we recommend that you study these Operating Instructions beforehand to be able to fully exploit and utilize all the capabilities offered.
This flash unit is compatible with analog Minolta "Dynax" and "Maxxum" cameras and digital "Dimage" cameras (see Table 1). It cannot be used for cameras made by other manufacturers.
Please also open the back cover with the illustrations.
1. Safety instructions
- The flash unit is exclusively intended and approved for photographic use!
- Never fire a flash in the vicinity of flammable gases or liquids (petrol, solvents, etc.)! DANGER OF EXPLOSION!
- Never take flash shots of car, bus or train drivers, or of motorcycle and bicycle riders, whilst they are travelling. They could be blinded by the light and cause an accident!
- Never fire a flash in the immediate vicinity of the eyes! Flash fired directly in front of the eyes of a person or animal can damage the retina and lead to severe visual disorders - even blindness!
- Only use the approved power sources listed in the Operating Instructions!
- Do not expose batteries to excessive heat, sunshine, fire and the like!
- Never throw exhausted batteries on to a fire!
- Exhausted batteries should be immediately removed from the flash unit! Lye leaking out of spent batteries will damage the unit.
-
Never recharge dry-cell batteries!
-
Do not expose the flash unit or battery charger to dripping or splashing water!
- Protect the flash unit from excessive heat and humidity! Do not store the flash unit in the glove compartment of a car!
- Never place material that is impervious to light in front of, or directly on, the reflector screen. The reflector screen must be perfectly clean when a flash is fired. The high energy of the flash light will burn the material or damage the reflector screen if this is not observed.
- Do not touch the reflector screen after a series of flash shots. Danger of burns!
- Never disassemble the flashgun! DANGER: HIGH VOLTAGE! There are no components inside the flashgun that can be repaired by a layman.
- When taking a series of flash shots at full light output and fast recycling times as provided by NiCad battery operation, make sure to observe an interval of at least 10 minutes after 15 flashes, otherwise the flash unit will be overloaded.
- The mecablitz may only be used in combination with a camera's flash unit if the latter can completely be folded out!
- Quick changes in temperature may cause condensation. Therefore give the flashgun time to acclimatize!
| Camera typeDedicated functions | Dynax 9 / 9 Titan | Dynax 7 | Dynax 5 | Dynax 800si | Dynax 700si | Dynax 650si | Dynax 600si | Dynax 505si super, Maxxum X1si | Dynax 505si, Maxxum HTsi | Dynax 500si super, Maxxum 500si | Dynax 500si, Maxxum 400si | Dynax 404si | Dynax 303si | Dynax 9xi | Dynax 7xi | Dynax 5xi | Dynax 3xi / 4 | Dynax Spxi | Dynax 8000i, Maxxum 8700i | Dynax 7000i, Maxxum 7700i | Dynax 5000i, Maxxum 5700i | Dynax 3000i, Maxxum 3700i | Vectis S-1 | Dimage 7, 7i, 7Hi, A1, A2, A200 | Dimage 5, Z1, Z2, Z3, Z5, Z6 | Dimage 7D, 5D, α100 |
| Flash-ready indication in camera viewfinder | ● | ● | ● | ● | ● | ● | ● | ● | ● | ● | ● | ● | ● | ● | ● | ● | ● | ● | ● | ● | ● | ● | ● | ● | ● | ● |
| Correct exposure confirmation in camera viewfinder | ● | ● | ● | ● | ● | ● | ● | ● | ● | ● | ● | ● | ● | ● | ● | ● | ● | ● | ● | ● | ● | ● | ● | ● | ● | ● |
| Automatic flash sync speed control | ● | ● | ● | ● | ● | ● | ● | ● | ● | ● | ● | ● | ● | ● | ● | ● | ● | ● | ● | ● | ● | ● | ● | ● | ||
| TTL flash control | ● | ● | ● | ● | ● | ● | ● | ● | ● | ● | ● | ● | ● | ● | ● | ● | ● | ● | ● | ● | ● | ● | ● | |||
| TTL fill-in flash control | ● | ● | ● | ● | ● | ● | ● | ● | ● | ● | ● | ● | ● | ● | ● | ● | ● | ● | ● | ● | ● | ● | ● | |||
| ADI flash control | ● | ● | ● | |||||||||||||||||||||||
| Multi-zone flash metering (preflash metering) | ● | ● | ● | |||||||||||||||||||||||
| Manual TTL flash exposure correction | × | × | × | × | × | × | × | × | × | × | ||||||||||||||||
| Second curtain synchronization | × | × | × | × | × | × | × | |||||||||||||||||||
| Automatic motor zoom reflector control | ● | ● | ● | ● | ● | ● | ● | ● | ● | ● | ● | ● | ● | ● | ● | ● | ● | ● | ● | ● | ● | ● | ● | ● | ● | ● |
| AF measuring beam control | ● | ● | ● | ● | ● | ● | ● | ● | ● | ● | ● | ● | ● | ● | ● | ● | ● | ● | ● | ● | ● | ● | ● | ● | ||
| Maximum flash range indication | ● | ● | ● | ● | ● | ● | ● | ● | ● | ● | ● | ● | ● | ● | ● | ● | ● | ● | ● | ● | ● | ● | ● | ● | ● | ● |
| Programmed auto flash mode | ● | ● | ● | ● | ● | ● | ● | ● | ● | ● | ● | ● | ● | ● | ● | ● | ● | ● | ● | ● | ● | ● | ● | ● | ● | ● |
| Triggering control | ● | ● | ● | ● | ● | ● | ● | ● | ● | ● | ● | ● | ● | ● | ● | ● | ● | ● | ● | ● | ● | ● | ● | |||
| Wake-up function | ● | ● | ● | ● | ● | ● | ● | ● | ● | ● | ● | ● | ● | ● | ● | ● | ● | ● | ● | ● | ● | ● | ● | ● | ● | ● |
• = Dedicated function is supported
x = Dedicated function is performed by the camera, or must be set on the camera.
Table 1: Overview of dedicated functions
2. Preparing the mecablitz for use
2.1 Mounting the mecablitz
2.1.1 Mounting the mecablitz on the camera
Turn off the camera and the mecablitz by their main switch!
- Turn the knurled nut against the mecablitz housing until the stop point is reached. The locking device in the adapter shoe is now fully retracted into the housing.
- Slide the mecablitz foot completely into the cameras's accessory shoe.
- Turn the knurled nut against the camera body as far as possible, thereby clamping the mecablitz.
2.1.2 Removing the mecablitz from the camera
Turn off the camera and the mecablitz by their main switch!
- Turn the knurled nut against the mecablitz housing until the stop point is reached.
- Withdraw the mecablitz from the camera's accessory shoe.
2.2 Power supply
2.2.1 Suitable batteries
The mecablitz can be operated with any of the following batteries:
- 4 NiCad batteries, type IEC KR 15/51 (KR6, size AA). They permit very fast recycling and are economical in use because they are rechargeable.
- 4 nickel-metal-hydride batteries, type IEC HR6 (size AA). They have a significantly higher capacity than NiCad batteries and are less harmful to the environment (no cadmium).
- 4 alkaline-manganese dry-cell batteries, type IEC LR6 (size AA/AM3). Maintenance-free power source for moderate power requirements.
- 4 lithium batteries, type IEC FR6 L91 (size AA). Maintenance-free high-capacity power source with a low self-discharge rate.
Remove the batteries from the mecablitz if it is not going to be used for an extended period of time.
2.2.2 Replacing batteries (Fig. 1)
The batteries are exhausted if the recycling time (elapsing from the triggering of a full-power flash, e.g. in the M mode, to the moment the flash ready indicator lights up again) exceeds 60 seconds.
- Turn off the mecablitz by its main switch.
- Slide the battery compartment cover in the direction of the arrow and fold open.
- Insert the batteries lengthwise in conformity with the indicated battery symbols and close the battery compartment cover.
When loading batteries ensure correct polarity, as indicated by the symbols in the battery compartment. Mixed up battery poles may destroy the flash unit! Replace all batteries at a time and make sure that the batteries are of the same brand and type and have the same capacity! Exhausted batteries must not be thrown in the dustbin! Help protect the environment and dispose of exhausted batteries at the appropriate collecting points.
2.3 Switching the flash unit on and off
The flash unit is switched on with the main switch on top of the battery compartment cover. In the upper „ON“ position, the mecablitz is on.
To turn off the flash unit push the main switch down to its bottom position.
If your mecablitz is not going to be used for an extended period of time, we recommend to switch it off with the main switch and to remove the power sources (batteries).
2.4 Auto-OFF for mecablitz (Fig. 2)
To save battery power and prevent inadvertent battery discharge, the mecablitz is factory-set to automatically switch-over to standby mode (Auto-OFF), while flash readiness and the LC display are simultaneously switched off, approx. 3 minutes after:
- Switch-on
-
Firing a flash
-
Actuating the shutter release
- Switching off the camera's exposure metering system.
After automatic switch-off the last-used settings are retained and instantly available when the flash unit is switched on again. The flash unit is reactivated merely by depressing the „Mode“ or „Zoom“ key or by touching the shutter release (wake-up function).
The mecablitz should always be turned off by the main switch if it is not going to be used for an extended period!
The Auto-OFF function can be deactivated whenever required:
Turning off the Auto-OFF function
- Turn on the mecablitz by its main switch.
- Continue depressing the key combination „Select“ (= „Mode“ key + „Zoom“ key) until the mecablitz LC display indicates „3m“ (= 3 minutes).
- Continue depressing the „Zoom“ key until „OFF“ flashes on the mecablitz LC display.
- The setting becomes immediately effective. The LC display returns to normal display after approx. 5 sec.
Turning on the Auto-OFF function
- Turn on the mecablitz by its main switch.
- Continue depressing the key combination „Select“ (= „Mode“ key + „Zoom“ key) until the mecablitz LC display indicates „3m“ (= 3 minutes).
- Continue depressing the „Zoom“ key until „ON“ flashes on the mecablitz LC display.
- The setting becomes immediately effective. The LC display returns to its normal state after approx. 5 sec.
3. Programmed Auto Flash Mode (Full Auto Mode)
In Programmed Auto Flash Mode the camera controls the aperture and shutter speed, as well as the mecablitz, automatically so that optimal results are always assured in most photographic situations, including fill-in flash.
Settings on the camera
Set your camera to Program "P" or a Subject Program Mode (such as Landscape, Portrait, Sports, etc.). Select the autofocus mode "Single-AF (S)" on the camera. Please refer to the camera's operating instructions for the setting procedure.
Use a tripod for the „Night Shots Program“ to avoid the danger of camera shake in connection with slow shutter speeds!
Settings on the flash unit
Set the „TTL“ mode on the mecablitz (see 4.1).
Some cameras automatically switch the mecablitz to TTL flash mode when in Program "P" or a Subject Program Mode.
Having completed the above settings, problem-free flash photography can commence as soon as the mecablitz indicates flash readiness (see 5.1).
Please observe the hints given for PA and PS program control in section 6.1.
4. Operating modes of the mecablitz
4.1 TTL flash mode (Fig. 3)
For the digital cameras Dimage 5, 7 and 7i please refer to the hints given in section 4.2 and 4.3.
The TTL flash mode is a very simple way to achieve excellent flash shots. In this mode exposure readings are taken by a sensor built into the camera, which measures the light reaching the film through the camera lens. The electronic control circuit within the camera transmits a stop signal to the mecablitz as soon as the film has been exposed by the correct amount of light, thereby instantly interrupting the flash. The advantage of this flash mode is that all factors influencing correct exposure of the film (filters, change of aperture and focal length with zoom lenses, extensions for close-ups, etc.) are automatically taken into account. You need not worry about the flash, the camera's electronic system automatically determines the correct amount of flash light required. For the maximim flash range please observe the distance given in the LC dis-
play of the mecablitz (see 5.4). If flash exposure was correct, the LC display of the mecablitz indicates „o.k.“ for about 3 sec. (see 4.1.3).
The TTL flash mode is supported by all camera modes (such as Program "P", Aperture Priority Mode "A", Shutter Priority Mode "S", Subject Program Modes, Manual Mode "M", etc.).
To test the TTL function a film must be loaded in the camera. When selecting the film please check whether limits regarding maximum film speed or ISO value (e.g. maximum ISO 1000) are applicable to the given camera when in TTL mode (refer to the camera's operating instructions)!
Setting procedure for TTL mode
Various cameras automatically activate TTL flash operation on the mecablitz when in Program "P" or a Subject Program Mode.
- Turn on the mecablitz by its main switch.
- Continue depressing the „Mode“ key until „TTL“ flashes on the LC display.
- The setting becomes immediately effective. The LC display returns to its normal state after approx. 5 sec.
Pronounced differences in contrast, e.g. a dark subject in snow, may make it necessary to correct the exposure settings (see 4.1.2).
4.1.1 Automatic TTL fill-in flash in daylight (Fig. 5 and 6)
Most cameras automatically activate the fill-in flash mode in daylight (see camera's operating instructions) when in Program "P" or a Subject Program Mode.
Fill-in flash overcomes troublesome dense shadows and produces a more balanced exposure between subject and background with contre-jour shots. The camera's computer-controlled metering system sets the most suitable combination of shutter speed, working aperture and flash output.
Ensure that the contre-jour light source does not shine directly into the lens as this will mislead the camera's TTL metering system!
In this instance there is no setting or display on the mecablitz for TTL fill-in flash.
4.1.2 Manual TTL flash exposure correction
The TTL auto flash mode of most cameras is matched to a 25% degree of light reflection by the subject (average amount of light reflected by flash-shot subjects). Consequently, a dark background that absorbs a great deal of light, or a bright background that reflects a great deal of light, can result in under or over exposure, respectively.
To offset this effect (see Table 1) a correction value can be set on some cameras to manually match the TTL flash exposure with the photographic situation. The actual extent of correction depends on the contrast prevailing between subject and background! The correction value is set on the camera. Please refer to the camera's operating instructions for details concerning settings!
A dark subject in front of a bright background: Positive correction value (approx. 1 to 2 f-stops). Light subject in front of a dark background: Negative correction value (approx. 1 to 2 f-stops). Correction value settings can change the maximum flash range indicated on the mecablitz LC display and match it to the given correction value (depends upon the camera model)!
Exposure correction by changing the lens diaphragm is not possible because the camera's automatic exposure system will automatically regard the changed diaphragm as the normal working aperture.
After the exposure do not forget to reset the TTL flash exposure correction back to the normal value on the camera!
4.1.3 Correct exposure indication in TTL flash mode (Fig. 4)
„o.k.“ correct exposure confirmation only appears on the mecablitz LC display if the shot was correctly exposed in TTL flash mode!
If „o.k.“ is not displayed after the exposure, then this means that the shot was underexposed. The shot will then have to be repeated with the next smaller f-number (e.g. f/8 instead of f/11) or the flash-to-subject distance or reflecting surface must be reduced (e.g. with bounce flash). Please note the maximum flash range indicated on the mecablitz LC display (see 5.4.1).
Also see section 5.3 for the display of exposure symbols in the camera's viewfinder.
4.2 Multi-zone flash exposure metering (preflash metering)
For system-induced reasons only possible with Minolta Dimage 5, Dimage 7 and 7i! Multi-zone flash exposure metering (preflash metering) is a modern variant of TTL flash operation. The cameras do not permit standard TTL flash operation without preflash.
When the camera's shutter release is pressed for picture shooting a preflash is fired to measure the subject's reflection. With the aid of its exposure system and the 14-segment honeycomb pattern multi-zone metering, the camera's electronics captures the light reflected by the subject and determines the optimal weighting for the 4 segments of flash exposure metering on the basis of the measured light distribution and the information given by the AF system. The subsequent main flash and the consequent exposure are performed according to the results obtained by preflash metering.
The mecablitz must be set to TTL mode. Multi-zone flash exposure metering is not specifically set or displayed on the mecablitz. For the setting procedure of multi-zone flash metering on the camera and other details please refer to the camera manual.
4.3 ADI flash control (Advanced Distance Integration)
For system-induced reasons, only possible with Dimage 5, 7 and 7i! ADI flash control is a modern variant of TTL flash operation. The cameras do not permit standard TTL flash operation without preflash.
ADI flash control is a multi-zone flash metering system (preflash metering) expanded by additional guide number control.
The mecablitz must be set to TTL mode. ADI flash control is not specifically displayed on the mecablitz. Please refer to the camera manual for the setting procedure of ADI flash control and other details.
4.4 Manual flash mode
Various cameras automatically switch the mecablitz to TTL flash mode when in Program "P" or in one of the Subject Program Modes. Manual flash operation is then no longer possible. There is no correct exposure confirmation given on the mecablitz LC display in the manual flash mode!
Set „Av“ aperture priority or the „M“ or „X“ manual modes on the camera. Select the aperture and shutter speed (with „M“) on the camera according to the given photographic situation (see the camera's operating instructions).
4.4.1 Manual flash mode M with full light output
In this mode the mecablitz always fires uncontrolled flashes at full light output. Adaptation to the given photographic situation is only by adjusting the aperture setting on the camera accordingly. The mecablitz LC display will indicate the flash-to-subject distance that has to be maintained for a correct exposure (see also 5.4.2).
Setting procedure for the manual flash mode M
- Turn on the mecablitz by its main switch.
- Continue depressing the „Mode“ key until „M“ flashes on the LC display.
- The setting becomes immediately effective. The LC display is returned to its normal state after approx. 5 sec.
4.4.2 Manual flash mode MLo with partial light output
In this mode the flash unit always fires uncontrolled flashes at 1/8th (Low) of full light output. Adaptation to the photographic situation is by selecting a corresponding aperture setting on the camera. The mecablitz LC display will indicate the flash-to-subject distance that must be maintained for correct exposure (see also 5.4.2).
Setting procedure for the manual flash mode MLo
- Turn on the mecablitz by its main switch.
- Continue depressing the „Mode“ key until „MLo“ flashes on the LC display.
- The setting becomes immediately effective. The LC display is returned to its normal state after approx. 5 sec.
4.5 Flash techniques
4.5.1 Bounce flash
Photos shot with full frontal flash are easily recognized by their harsh, dense shadows. This is often associated with a sharp drop in light from the foreground to the background. This phenomenon can be avoided with bounce flash because the diffused light will produce a soft and uniform rendition of both the subject and the background. For this situation the reflector is turned in such a manner that the flash is bounced off a suitable reflective surface (e.g. ceiling or wall of the room).
The reflector can be turned vertically up to 90^ . The reflector head is mechanically interlocked in its basic position. Press the pushbutton to unlock and turn the reflector head.
When turning the reflector vertically, it is essential to ensure that it is moved by a sufficiently wide angle so that direct light can no longer fall on the subject. Consequently, always turn the reflector at least to the 60^ lock-in position. The distance readings on the LC display will disappear. The flash-to-subject distance via the ceiling or wall is an unknown magnitude.
The light bounced off the reflecting surfaces produces a soft and uniform illumination of the subject. The reflecting surface must be white or have a neutral colour, and it must not be structured (e.g. wooden beams in a ceiling) as these might cause shadows. For colour effects just select the reflective surface in the desired colour.
Take into account that the maximum flash range is considerably diminished when bouncing the flash. The following rule of thumb will help you determine the maximum flash range for a room of normal height:
Maximum flash range = numberflash-to-subject distance × 2
4.5.2 Close-ups / Macrophotography
The flash reflector can be swivelled down by an angle of -7^ to compensate for parallax error. For this purpose depress the unlocking button of the reflector and swivel down the reflector.
For close-ups it is necessary to ensure that certain minimum lighting distances are maintained to avoid overexposure.
The minimum lighting distance is approx. 10 per cent of the maximum flash range indicated on the LC display. Since the maximum flash range is not indicated on the LC display when the reflector is swivelled down, then be guided by the maximum flash range indicated by the mecablitz when the reflector is in its normal position!
4.6 Flash synchronisation
4.6.1 Normal synchronisation (Fig. 7)
In normal synchronisation the mecablitz is triggered at the beginning of the shutter time (1st curtain synchronisation). Normal synchronisation is the standard mode on all cameras, and is suitable for most flash shots. Depending upon the given mode, the camera is changed over to the camera's sync speed, the customary ones being between 1/30th sec. and 1/125th sec. (see the camera's operating instructions). No settings have to be made on the mecablitz, nor is there any display for this mode.
4.6.2 REAR - Second-curtain synchronisation (Fig. 8)
Some cameras offer the facility of second-curtain synchronisation (REAR mode) triggering the mecablitz by the end of the exposure time. Second-curtain synchronisation is particularly advantageous when using slow shutter speeds (slower than 1/30 s) or when shooting moving objects that have their own source of light. Second-curtain synchronisation gives a more realistic impression of movement because the light streaks behind the light source instead of building up in front of it, as is the case when the flash is synchronised with the 1st shutter curtain! Depending on its operating mode, the camera uses shutter speeds slower than its sync speed.
The REAR function is set on the camera (see operating instructions of the camera). It is not displayed on the mecablitz.
4.6.3 Slow synchronisation / SLOW
Various cameras feature slow flash synchronisation in certain modes. This setting will give added prominence to the background at lower ambient light levels. This is achieved by matching the shutter speed to the ambient light. Accordingly, shutter speeds that are slower than the camera's sync speed are automatically adjusted by the camera. Some cameras automatically activate SLOW synchronisation in connection with certain camera programs (e.g. "Av" aperture priority, night shots program, etc.). No settings are made on the mecablitz nor is there any display for this mode.
Use a tripod to avoid camera shake with slow shutter speeds!
5. mecablitz and camera functions
5.1 Flash readiness indication
The flash readiness symbol ♦ lights up on the mecablitz when the flash capacitor is charged, thereby indicating that flashes can be fired for the next shot. Flash readiness is also transmitted to the camera for corresponding display in the viewfinder (see 5.3).
If a picture is shot before flash readiness is signalled in the camera's viewfinder, then the flash unit will not be triggered so that the exposure may be incorrect if the camera has changed over to flash sync speed in the meantime (see 5.2).
5.2 Automatic flash sync speed control
Depending upon the camera model and camera mode, the shutter speed is changed to flash sync speed when flash readiness is reached (see camera's operating instructions).
Shutter speeds faster than the camera sync speed cannot be adjusted or they are automatically changed to the camera's sync speed.
Various cameras have a sync speed range, e.g. 1/30th sec. to 1/125th sec. (see the camera's operating instructions). The actual sync speed set by the camera depends upon the camera mode, the ambient light and the focal length of the lens used.
Shutter speeds slower than the flash sync speed can be set, depending upon the given camera model and the selected flash synchronisation (see also 4.6.2 and 4.6.3).
There is no automatic flash sync speed control with the digital cameras Dimage 5, 7 and 7i. These cameras permit flash shots to be taken at all shutter speeds. Shutter speeds faster than 1/125 sec. should not be used for shooting situations where full light output of the mecablitz is required.
5.3 Displays in the camera's viewfinder or LCD monitor
5.3.1 Dynax / Maxxum
Symbols in viewfinder: Meaning:

Flash readiness indication:
Flash symbol lights constantly or flashes slowly: The mecablitz is ready for firing.
A flash is fired when the camera's shutter release is pressed.
Correct exposure confirmation:
Symbol flashes rapidly after shooting:
The picture was correctly exposed.
Symbol flashes:
The existing shooting situation requires the use of flash.
The symbols indicated in your camera's viewfinder may deviate from those given in the above table, since some symbols are only possible on specific cameras. For more details regarding viewfinder information please refer to the operating instructions of your camera.
5.3.2 Dimage 5, 7, 7i
The below symbols are only displayed in the camera's LCD monitor when the shutter release is lightly touched for activation of the camera's metering system. They are not displayed in playback mode (e.g. right after picture shooting).
Please also refer to the hints given in the operating instructions of your camera.
(white) The mecablitz is switched on and ready for firing.
( red ) The mecablitz is switched on but not yet ready for firing.
( blue ) The shot was correctly exposed. This symbol may only briefly be indicated after shooting.
5.4 Information in the LC display
The cameras transmit the ISO sensitivity, the focal length (mm), f-stop and exposure correction to the mecablitz which automatically adapts its settings accordingly. It calculates the maximum flash range on the basis of its guide number and the transmitted values. Flash mode, maximum flash range, aperture and zoom reflector position are all indicated in the mecablitz LC display. If the mecablitz operates without having received data from the camera (e.g. when the camera is switched off), then only the selected flash mode, the reflector position and „M.Zoom“ are indicated. Aperture and maximum flash range are only displayed if the camera transmits the corresponding data to the mecablitz.
Some cameras suppress the maximum flash range indication on the mecablitz LC display in the event of high ISO values (e.g. ISO 6400) or flash exposure corrections. The aperture is not indicated in the LC display of the mecablitz when the digital cameras Dimage 5 and Dimage7, 7i are used.
5.4.1 Maximum flash range indication in TTL flash mode
The mecablitz LC display indicates the maximum flash range. The indicated value relates to a factor of 25 % of light reflection by the subject, which applies to most photographic situations. Pronounced deviations from this reflection factor, e.g. highly reflective or poorly reflecting objects, can influence the maximum flash range of the mecablitz.
Always observe the maximum flash range indicated by the mecablitz LC display. The subject should be within approx. 40 % and 70% of the indicated value. This gives the electronic circuit sufficient scope for compensation. To avoid overexposure, the minimum flash-to-subject distance should not be less than 10 % of the indicated value. Adaptation to the given photographic situation is possible by changing the aperture setting on the lens.
Example:
In this example the maximum flash range extends from 0.6 m to 6.2 m. Ideally, the subject should be located within a distance range of approx. 2.5 m and 4.3 m.
5.4.2 Maximum flash range indication in the manual flash modes M and MLo
The mecablitz LC display indicates the distance to be maintained for correct exposure of the subject. Adaptation to the given photographic situation is achieved by changing the aperture setting on the lens and selecting either „M“ for full light output or „MLo“ for partial light output (see 4.2).
Example:
This example shows that the principal subject should be at a distance of 6.2 m from the mecablitz.
5.4.3 Exceeding the display range
The mecablitz can indicate a maximum range of 199 m or 199 ft. This display range can be exceeded in the event of high ISO values (e.g. ISO 6400) and large aperture openings. An arrow or triangle after the distance value indicates that the display range has been exceeded.
5.4.4 Blanking out the maximum flash range display
The mecablitz LC display does not indicate any distances when the reflector head is swivelled up or down out of its normal position!
5.4.5 Meter-Feet changeover (m - ft)
The maximum flash range indicated by the mecablitz LC display can be either in meter (m) or feet (ft). To change between the two, proceed in the following manner:
- Turn off the mecablitz by its main switch.
-
Keep the „Select“ key combination depressed (= „Mode“ key + „Zoom“ key).
-
Turn on the mecablitz by its main switch.
- Release the „Select“ key combination (= „Mode“ key + „Zoom“ key).
- The flash range indication changes from m to ft or from ft to m.
5.5 LC display illumination
Keep the „Mode“ or „Zoom“ key depressed for approx. 10 sec. to activate the mecablitz LC display illumination. The LC display illumination is switched off when a flash is triggered.
The settings on the mecablitz are not changed when the above keys are pressed for the first time!
If the shot was correctly exposed in TTL flash mode, then the LC display illumination will be activated during „o.k.“ display (see 4.1.3).
5.6 Motor zoom reflector
The reflector of the mecablitz provides full light coverage for lenses of 28 mm focal length and longer (35 mm format).
5.6.1 „Auto-Zoom“
If the mecablitz is operated with a camera that transmits the focal length data to the flash unit, then the zoom reflector position will be automatically adapted to the focal length of the lens. When the mecablitz is turned on, the LC display will indicate „Auto Zoom“ and the current reflector position.
Automatic reflector adaptation commences with lenses of 28 mm focal length. If a focal length shorter than 28 mm is used, then the „28“ indicated on the LC display will start to flash as an indication that the mecablitz cannot fully illuminate the shot right out to the image corners.
A wide-angle diffuser (optional extra, see section 7) can be used for lenses as of 20 mm focal length. In cases where the motor zoom reflector of the mecablitz is automatically controlled by the digital cameras Dimage 5, 7, or 7i, the focal length position of the reflector can deviate from the focal length set on the lens. This is because the camera positions the reflector so that the flash coverage is larger than necessary in order to guarantee a complete illumination of the picture
(comparable to the extended zoom mode described in section 5.6.3). In the wide-angle setting of the zoom lens, this will cause the 28 mm indication to flash in the LC display of the mecablitz because its zoom reflector does not have a 24 mm position. Manual focal length setting on the reflector is not necessary.
5.6.2 Manual zoom mode „M.Zoom“
The position of the zoom reflector can also be manually changed, for instance to achieve specific lighting effects (e.g. hot-spot, etc.). Repeated depression of the „Zoom“ key on the mecablitz will successively select the following reflector positions:
28 mm - 35 mm - 50 mm - 70 mm - 85 mm - 105 mm
The mecablitz LC display indicates „M.Zoom“ for manual zoom setting and the current zoom position (mm). The setting becomes instantly effective. The display is switched back to its normal state after approx. 5 sec.
If manual adjustment of the zoom reflector results in a setting in which the shot will not be fully illuminated right out to the image corners, then the reflector position indicated on the mecablitz display will start to flash as a warning.
Example:
- You are using a lens focal length of 50 mm.
- A reflector position of 70 mm has been manually adjusted on the mecablitz ("M.Zoom" is displayed).
- "70 mm" for zoom position will start to flash on the mecablitz LC display because the shot will not be fully illuminated right out to the image corners.
There are various ways to return to „Auto Zoom“:
- Continue pressing the „Zoom“ key on the mecablitz until „Auto Zoom“ appears on the display. The setting becomes instantly effective. The LC display is switched back to its normal state after approx. 5 sec.
Or:
- Briefly turn off the mecablitz by its main switch. When the flash unit is turned on again the mecablitz display will indicate „Auto Zoom“.
5.6.3 Extended zoom mode
The extended zoom mode (Ex) reduces the focal length setting of the mecablitz by one step compared with the focal length of the camera's lens! The resulting wider light coverage inside rooms provides additional stray light (reflections) to achieve softer flash illumination.
Example of extended zoom mode:
The focal length set on the camera lens is 35 mm. The extended zoom mode sets a 28 mm reflector position on the mecablitz even though 35 mm continues to be indicated on the LC display!
The extended zoom mode is only possible in the „Auto Zoom“ mode with a focal length setting of 35 mm and longer. Since the start position of the zoom reflector is 28 mm, a focal length of less than 35 mm will cause „28“ to flash on the LC display, thereby warning the user that the required 24 mm reflector position for extended zoom mode cannot be set.
Shots with a 28 mm to 35 mm focal length of the lens will be correctly illuminated right out to the image corners by the mecablitz also in extended zoom mode!
Turning on the extended zoom mode
- Continue depressing the „Select“ key combination (= „Mode“ key + „Zoom“ key) until „Ex“ appears on the LC display.
- Continue depressing the „Zoom“ key until „ON“ flashes on the LC display.
- The setting becomes instantly effective. The LC display is switched back to its normal state after approx. 5 sec.
After the setting procedure, the „Ex“ symbol for extended zoom mode will continue to be indicated on the mecablitz LC display!
Please note that the wider illumination coverage in extended zoom mode results in a diminished maximum flash range!
Turning off the extended zoom mode
- Continue depressing the „Select“ key combination (= „Mode“ key + „Zoom“ key) until „Ex“ appears on the LC display.
- Continue depressing the „Zoom“ key until „OFF“ flashes on the LC display.
- The setting becomes instantly effective. The LC display is switched back to its normal state after approx. 5 sec.
After storage in the memory, the „Ex“ symbol for extended zoom mode will no longer be indicated on the mecablitz LC display.
5.7 AF measuring beam
The AF measuring beam is activated by the camera electronics when the ambient lighting conditions are insufficient for automatic focusing. The AF beam projects a striped pattern on to the subject, and the camera uses this pattern to focus automatically. The AF beam has a range of approx. 6 m to 9 m (with a 50 mm/f/1.7 standard lens). Parallax error between lens and AF red light emitter limits the close-up range of the AF measuring beam to approx. 0.7 m - 1 m.
The camera lens must be switched to AF so that the AF measuring beam can be activated by the camera. The AF mode „Single AF“ or „ONE-SHOT AF“ must be set on the camera (see the camera's operating instructions). Zoom lenses with a lower initial aperture can significantly reduce the range of the AF measuring beam!
The striped pattern of the AF measuring beam only supports the camera's central AF sensor. We therefore recommend to activate only the central AF metering area on cameras that feature several AF sensors (please refer to the operating instructions of the given camera).
If a decentral AF sensor is manually selected by the photographer, or automatically by the camera, then the emitter of the AF measuring beam on the mecablitz will not be activated. In such instances some cameras will use their built-in AF illuminator (see camera manual).
5.8 Triggering control
The camera prevents the triggering of a flash if the ambient light level is sufficient for an exposure in the normal mode. The exposure is then completed with the shutter speed given in the display or viewfinder of the camera. The triggering control is activated when the flash-ready signal in the camera's viewfinder is extinguished. In this event no flash is fired when the camera's shutter is tripped.
On various cameras the triggering control only works in the Program "P" Mode and in the Shutter Priority Mode "S" (see operating instructions for the camera). The triggering control can be deactivated on some camera models: To do so, press and hold down the flash button ↓ on the camera during shooting (see camera manual). The flash-ready signal will again be displayed in the camera's viewfinder when the shutter release is lightly touched. The camera selects a suitable shutter speed/aperture combination and a flash is fired when a picture is shot.

On the Dynax 800si, triggering control is activated by the individual function "5" (see camera manual). When a Dynax 7 camera is used, triggering control is only possible in the camera's Full Auto Mode (green P symbol).
5.9 Return to basic setting
The mecablitz is returned to its basic setting when the „Mode“ key is kept depressed for at least three seconds.
The following settings are adjusted:
- The „TTL“ flash mode
- The „Auto-OFF“ (3m ON) function is activated
- The automatic zoom mode „Auto-Zoom“
- The "Ex" extended zoom mode is cancelled.
6. Special remarks concerning the cameras
The multitude of camera models and their peculiarities make it impossible to detail all camera-specific capabilities, settings, displays, etc. For more details concerning the operation of a flash unit please refer to the corresponding chapters in the operating instructions for the given camera!
6.1 Special functions that are not supported in flash mode
6.1.1 Creative PA and Ps program control
Various cameras feature a creative PA and Ps program control (shiftable aperture/shutter program).
- No flash unit can be used in the camera's P_A and P_S modes.
- The creative program control cannot be activated when the flash unit is switched on.

Please refer to the operating instructions of the given camera.
6.1.2 High-speed synchronisation (HSS)
For system-induced reasons, high-speed synchronisation is not supported by the mecablitz.
6.1.3 Cordless REMOTE flash control
For system-induced reasons the cordless REMOTE flash control is not supported by the mecablitz.
6.1.4 Preflash function for red-eye reduction
Various cameras offer the possibility to activate a preflash for red-eye reduction. This function only supports the flash unit integrated in the camera. It does not support external flash units, such as the mecablitz.
7. Optional extras
No guarantee is given for malfunctions and damage to the mecablitz caused by the use of accessories from other manufacturers!
- 24mm wide-angle diffuser
(Item No. 000044217)
For full illumination in conjunction with lenses of 24 mm and up. The range is reduced by the factor 1.4 due to the corresponding loss of light.
- Colour filter set 44-32
(Item No. 00004432A)
Consists of 4 colour filters to achieve special lighting effects, plus a clear filter to hold colour foils in any colour.
- Mecabounce 44-90
(Item No. 000044900)
A diffuser to achieve soft illumination in the simplest possible manner. The effect is very impressive because the pictures are given a very soft atmosphere. Facial colours are rendered more naturally. However, loss of light halves the maximum flash range.
- Bounce diffuser 54-23
(Item No. 000054236)
The soft directed light diminishes dense shadows.
8. Advice in the event of a fault
Should the LC display indicate meaningless information or should the flash unit not work properly in the individual modes, then switch off the flash unit for about 10 seconds by its main switch. Check the camera settings and find out if the flash unit's foot is correctly mounted in the camera's accessory shoe. The flash unit must operate properly when it is switched on again. Contact your local dealer should this not be the case.
9. Maintenance and care
Remove any grime and dust with a soft, dry or silicon-treated cloth. Never use detergents that could damage plastic parts.
Forming the flash capacitor
The flash capacitor incorporated in the flash unit undergoes a physical change when the flash unit is not switched on for prolonged periods of time. For this reason it is necessary to switch on the mecablitz for approx. 10 minutes every 3 months (see 2.4!). The batteries must supply sufficient power for flash readiness to be indicated within 1 minute after the mecablitz was switched on.
10. Technical data
Maximal guide number at ISO 100/21°, 105 mm zoom:
In the metric system: 44; In the imperial system: 144
Flash durations:
Approx. 1/200th to 1/20,000th sec. (in TTL mode)
In M mode approx. 1/200th sec. at full light output
In MLo mode approx. 1/5,000th sec.
Colour temperature:
approx. 5600 K
Film speed:
ISO 6 to ISO 6400
Synchronisation:
Low-voltage ignition
Number of flashes:
approx. 85 with NiCad batteries (600 mAh)
approx. 205 with NiMH batteries (1600 mAh)
approx. 240 with high-capacity alkaline manganese batteries
approx. 370 with lithium batteries
(at full light output)
Recycling time:
approx. 4 s with NiCad batteries
approx. 4 s with NiMH batteries
approx. 5 s with high-capacity alkaline manganese batteries
approx. 6s with lithium batteries
(at full light output)
Swivelling range and locking positions of flash head:
Upwards / downwards: 60^ , 75^ , 90^ / -7^
Dimensions approx. in mm:
75 × 125 × 108 (WxHxD)
Weight:
Flash unit with power sources: approx. 400 g
Included:
Flash unit, Operating Instructions
Disposal of batteries
Do not dispose of spent batteries with domestic rubbish.
Please return spent batteries to collecting points should they exist in your country!
Please return only fully discharged batteries.
Normally, batteries are fully discharged if:
- The device they powered switches itself off and indicates "Spent Batteries".
- They no longer function properly after prolonged use.
To ensure short-circuit safety please cover the battery poles with adhesive tape.
I
4.3 Controllo del flash ADI (Advanced Distance Integration)
Dimensioni in mm (ca.):
75 × 125 × 108 (larg x alt x prof)
Peso:
flash con batterie: ca. 400 grammi
Dotazione standard:
4.3 Control del flash ADI (Advanced Distance Integration)

Guide number table for TTL and full light output M in the imperial system Guide number (ft) = Guide number (m) x 3.3
Guide number table for partial light output MLo in the imperial system
Guide number (ft) = Guide number (m) x 3.3
natural_image
Close-up of a battery pack with four batteries and a labeled 'mecablitz 44 AP' (no additional text or symbols visible)natural_image
Black-and-white photo of two children sitting in a chair outdoors, facing away from a snowy landscape (no text or symbols visible)natural_image
Nighttime street scene with a car driving on a road, illuminated by streetlights and buildings in the background (no visible text or symbols)natural_image
Black-and-white photo of an adult and a child interacting outdoors in snowy terrain (no text or symbols visible)natural_image
Black-and-white photo of a car driving on a city street at night, with illuminated buildings and streetlights in the background (no visible text or symbols)Within the framework of the CE approval symbol, correct exposure was evaluated in the course of the electromagnetic compatibility test.

Do not touch the SCA contacts !
In exceptional cases the unit can be damaged if these contacts are touched.

Avvertenza:
I
natural_image
Aerial view of an industrial complex with multiple factory buildings and surrounding farmland (no visible text or signage)natural_image
Exterior view of a modern office building (no signage)Consumer electronics
natural_image
Exterior view of a modern office building (no signage)Photoelectronics
natural_image
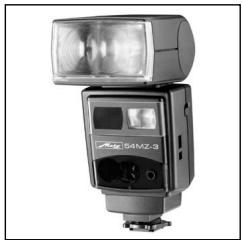
Close-up of a robotic arm connecting wires to a mechanical component (no visible text or symbols)Plastics technology
natural_image
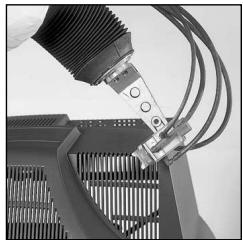
Close-up of a precision machining operation on a circuit board (no visible text or symbols)Industrial electronics
Metz - always first class.

C ∈
703 47 0095.A3
D F NL GB I E