USER MANUAL MECABLITZ 28 C-2 METZ
natural_image
Exterior view of a Mezz 28C-2 optical flash unit (no visible text or symbols on body)
MECABLITZ 28 C-2
Bedienungsanleitung
Operating instructions
Mode d'emploi
Handleiding
Inhaltsverzeichnis
Inhalt: Seite:
natural_image
Simple line drawing of a trash bin with no text or symbols
natural_image
Diagram of a projectile launcher emitting multiple spray beams, with no text or symbols present.

Bild 3: Meßschema
natural_image
Black-and-white photo of two figures in a military setting, one seated at a table with equipment, the other standing behind (no visible text or symbols)
natural_image
Black-and-white photo of an adult and a child outdoors, no visible text or symbols
- Safety instructions .....22
- Preparing the flashgun for use .....23
2.1 Power supply .....23
2.2 Loading and changing batteries .....24
2.3 Battery check .....25
2.4 Mounting the mecablitz on the camera . . .25
2.5 Synchronisation .....25
2.6 Switching the flashgun on and off .....25
2.7 Automatic battery cut-out .....26
- Automatic flash mode .....27
- Manual flash mode .....30
- Illumination and wide-angle diffuser ..31
- Bounced flash 32
6.1 - in automatic mode .....33
6.2 - in manual mode .....33
- Fill-in flash in daylight .....34
- Exposure correction .....36
- Correct exposure indication .....37
-
Care and maintenance .....38
-
Optional extras .....38
- Technical data .....39

1. Safety instructions
- Never fire a flash in the immediate vicinity of the eyes!
Flash fired directly in front of the eyes of a person or animal can damage the retina and lead to severe visual disorders, even blindness!
- Spent batteries must be immediately taken out of the flashgun!
Lye can leak out of spent batteries and damage the flash unit.

2. Preparing the flashgun for use
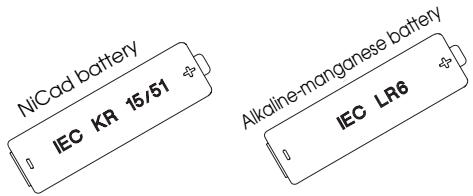
Fig. 1: Batterie used
2.1 Power supply
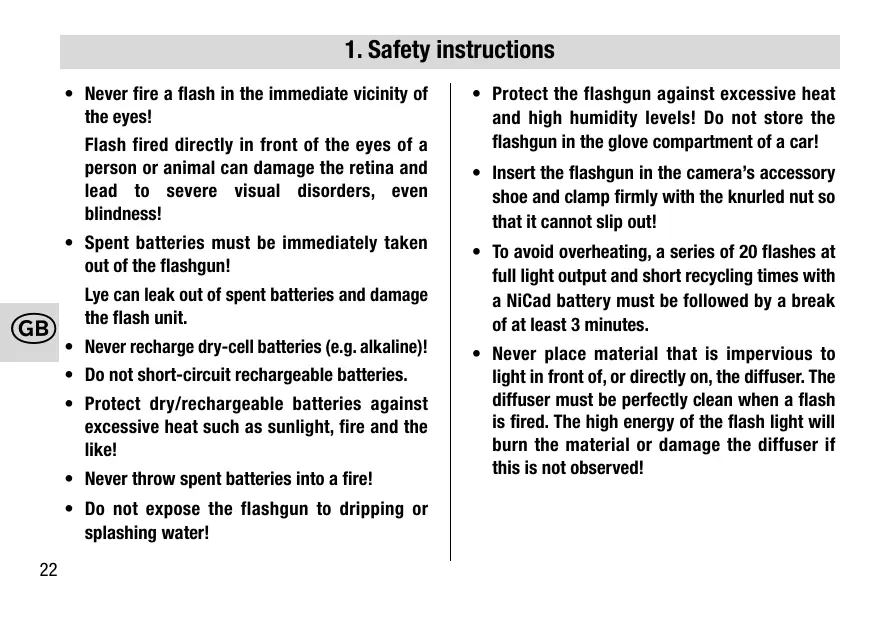
The flashgun can be operated with the following types of batteries:
- 4 NiCad batteries, type IEC KR 15/51, for very short recycling times.
- 4 dry-cell alkaline-manganese batteries, type IEC LR6, for moderate power requirements.
• 4 nickel-metal-hydride batteries (size AA)

Do not use lithium batteries!
We recommend the B 28 charger for NiCad batteries (optional extra).
Batteries are exhausted when the recycling time exceeds 60 seconds.
Batteries should be removed when the mecablitz is not going to be used for a prolonged period.
Disposal of batteries
Do not dispose of spent batteries with domestic rubbish.
Please return spent batteries to collecting points should they exist in your country!

2. Preparing the flashgun for use
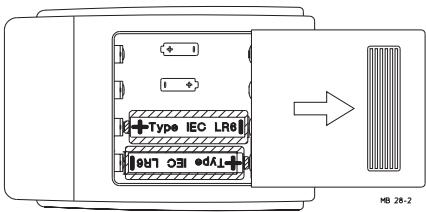
Fig. 2: Exchanging batteries
2.2 Loading and changing batteries
- Switch off the flashgun with the switch.
- Push the battery compartment cover in the direction of the arrow.
- Load the dry-cell or NiCad batteries lengthwise in conformity with the indicated battery symbols.

Ensure correct polarity when loading batteries. Always exchange all 4 batteries. All batteries should have approximately the same charge.
- Reclose the battery compartment cover after the batteries have been loaded.
Spent batteries must not be thrown into the dustbin! Contribute to the protection of the environment and discard spent batteries at the appropriate disposal points!

2. Preparing the flashgun for use
2.3 Battery check
This facility can only be used to test dry-cell alkaline-manganese batteries. The battery indicator lamp lights up when the batteries still have sufficient power. If the indicator lamp does not light up, the batteries contain only a low residual capacity and should be replaced with a new set.
2.4 Mounting the mecablitz on the camera
- Turn the knurled nut of the mecablitz right up against the flashgun.
- Slide the mecablitz into the camera's accessory shoe.
- Turn the knurled nut of the mecablitz right up against the camera, thereby clamping the flash-gun on the camera.
2.5 Synchronisation
The mecablitz is fitted with a hot shoe contact for simple flash synchronisation.
2.6 Switching the flashgun on and off
Switch on the mecablitz with switch I. This causes the green operating light to become illuminated.
Press the O switch to switch off the flashgun. The green operating light is now turned off, but the mecablitz remains ready for operation as long as the orange flash-ready light is on.

2. Preparing the flashgun for use
2.7 Automatic battery cut-out
This circuit prevents accidental battery discharging.
To save power, the charging circuit for the flash capacitor is switched off some 1-2 minutes after the flashgun was switched on or after a flash was triggered. The green operating light goes out, but the mecablitz remains ready for operation as long as the orange flash-ready light is on (approx. 5-10 min).

If no flash is triggered while flash readiness is indicated, then the flash-ready light goes out and the mecablitz is completely switched off.
Complete flashgun switch-off can be avoided for the next 5-10 minutes by firing a flash or by pressing the switch I.
Press switch I to switch the mecablitz on again.
3. Automatic flash mode
natural_image
Diagram of a projector emitting light rays from a speaker, labeled MB 28-4 (no text or symbols on diagram)
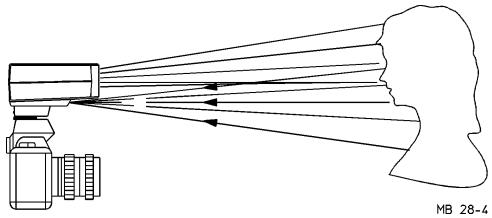
Fig. 3: Measuring procedure
In the automatic flash mode the sensor of the mecablitz measures the light reflected from the subject. The flash is cut off as soon as sufficient light for a correct exposure has been detected.
There is no need to calculate and adjust a new aperture when the distance is changed, provided that the subject remains within the indicated auto flash range.
The sensor must be directed at the subject, regardless of the direction at which the main reflector is pointing.
The sensor has a measuring angle of approx. 25^ , and it only measures the light while flashes are fired with the mecablitz.
Two to three automatic apertures are available to the user in the auto flash mode, depending upon the adjusted ISO film speed.

3. Automatic flash mode
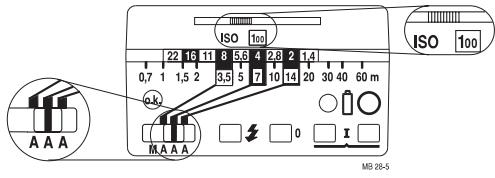
Fig. 4: Setting example for automatic flash mode
Adjusting procedure for work in automatic flash mode:
Example: Lighting distance 5 m.
Film speed ISO 100/21°.
- Adjust the aperture calculator in such a manner that the film speed is indicated in the window. The toggle is locked in when the setting is correct.
The auto apertures f/4 or f/2 will be suitable for a lighting distance of 5 m, provided that the maximum range is observed. The maximum range for the auto aperture f/4 is approx. 7 m. The minimum lighting distance is approx. 10% of the maximum range.
- Set the operating mode switch to the required aperture.
- Switch on the flashgun with the main switch I.
- Set the selected auto aperture on the camera lens, and adjust the camera to flash synch speed or slower.
3. Automatic flash mode
To achieve a shallow depth-of-field (for instance for portraiture) we recommend the auto aperture f/2, whereas the auto aperture f/4 (extended depth-of-field) should be adjusted for group shots where many people are behind each other.
- Await flash readiness - The orange LED lights up.

The subject should be located within the middle third of this distance range to give the electronic control sufficient scope for compensation should this be necessary.
There is a certain measure of overlap between the individual working apertures. As a result of this overlap it is always possible to place the subject within the middle third of the range.

CAUTION with zoom lenses!
Due to their design they can cause a loss of light in the order of up to one f-stop. Furthermore, the effective aperture can also vary, depending upon the adjusted focal length. This must be compensated by manually correcting the aperture setting on the flashgun!

4. Manual flash mode
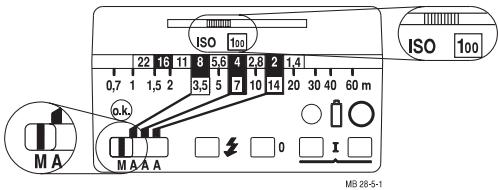
Fig. 5: Setting example for manual flash mode
In this mode the flashgun will always emit its full power. To adapt to the actual picture shooting situation, set the corresponding aperture on the camera.
Example: Lighting distance 5 m.
Film speed ISO 100/21°.
The camera aperture can also be established with the following formula:
$$
\text { Camera aperture } = \frac {\text { guide number }}{\text { lighting distance }}
$$
For the guide number for the given film speed please refer to the table in Chapter 12, "Technical Data".
The lighting distance is the distance between the camera and the subject

5. Illumination and wide-angle diffuser
The mecablitz has a rectangular illumination of approx. 58^ horizontal and approx. 42^ vertical.
This ensures complete illumination of the area covered by a 35 mm lens or longer (24 x 36 mm picture format).
The supplied wide-angle diffuser widens the illumination to the area covered by a 28 mm wide-angle lens.

The following is changed when the wide-angle diffuser is used:
- The actual aperture setting in manual mode. The aperture setting indicated by the aperture calculator is no longer applicable in this instance. The next smaller aperture number must be set on the camera.
- The maximum effective range of the mecablitz in auto mode. It is diminished by approx. one setting on the aperture calculator.
It may be prudent to check prior to the actual exposure whether the light is sufficient for the selected aperture. The procedure for this is described in chapter 9 „Correct-exposure indication“.
The wide-angle diffuser is placed over the reflector and pressed on until it locks in at the sides.
The use of lenses with a focal length shorter than 35 mm will result in shadows on both sides due to declining light. The wide-angle diffuser widens the illumination area to match the coverage of a lens of 28 mm focal length.

6. Bounced flash
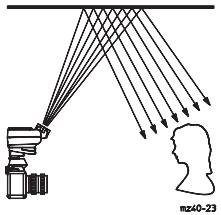
Fig. 6: Bounced flash
Photos shot with full frontal flash are easily recognized by their harsh, dense shadows. This is often associated with a sharp drop of light from the foreground to the background.
This phenomenon can be avoided with bounced flash because the diffused light will produce a soft and uniform rendition of both the subject and the background. For this purpose the reflector is turned vertically by up to approx. 80^ so that the flash is bounced back from a suitable reflective surface (e.g. ceiling or walls of a room). The reflecting surface for colour
shots must be white or have a neutral colour and it must not be structured.
When swivelling the reflector ensure that no direct light from the reflector reaches the subject.

6. Bounced flash
6.1 Bounced flash in automatic flash mode
It is advisable to check prior to the actual exposure whether the light is sufficient for the selected aperture. Please refer to chapter 9 „Correct exposure indication“ for the corresponding procedure.
6.2 Bounced flash in manual flash mode
The required camera aperture in the manual flash mode is best established with an exposure meter. If an exposure meter is not available observe the following rule of thumb:
$$
\text { Camera aperture } = \frac {\text { guide number }}{\text { lighting distance x 2 }}
$$
to establish the f-stop. For added certainty two extra exposures should be shot, one with +1 f-stop and one with -1 f-stop.

This rule of thumb only applies to rooms with a normal ceiling height.
The guide number for the given film speed can be selected from the table in Chapter 12 „Technical Data“.
The lighting distance is the distance between the camera and the subject.
Tilting the reflector:
Hold the mecablitz with one hand and use the other hand to pull the reflector head forward, out of the casing, until the stop point is reached. You can then tilt the reflector vertically upward by about 80^ .

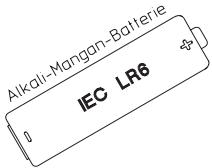
7. Fill-in flash in daylight
natural_image
Black-and-white photo of two figures seated at a table, possibly in a workshop or industrial setting (no visible text or symbols)

natural_image
Two people outdoors, one adult and one child, engaged in a activity with food (no visible text or symbols)
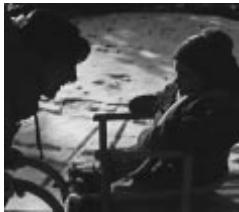
Fig. 7: Fill-in flash in daylight (left without - right with mecablitz
The mecablitz can also be used for fill-in flash in daylight to soften harsh shadows and lower the contrast, thereby producing a more balanced exposure when shooting against the light. Various possibilities are open to the user for this purpose.
Fill-in flash in automatic mode
Use the camera, or a hand-held exposure meter, to establish the required aperture and shutter speed for a normal exposure. Ensure that the shutter speed either equals, or is slower than, the fastest flash synch speed (varies with the given camera model).
Example: Established aperture = f/8; established shutter speed = 1/60th sec. Flash synch speed of the camera, e.g. 1/100th sec. (see operating instructions for the given camera).

7. Fill-in flash in daylight
The two established values for aperture and shutter speed can be adjusted on the camera because the camera's shutter speed is slower than the camera's flash synch speed.
To maintain a balanced range of highlights, for instance in order to retain the character of the shadows, it is advisable to select the automatic aperture on the flashgun one setting lower than the aperture adjusted on the camera. In the above example the camera was adjusted to f/8. Consequently, we advise you to adjust f/5.6 as the aperture setting on the flashgun.
Tip:
Proceed in the following manner if an automatic aperture setting of f/5.6 cannot be used on the flashgun due to the adjusted film speed:
Select the auto aperture f/8 on the mecablitz, and set a shutter speed of 1/30th sec. on the camera at f/11 camera aperture.
If, in this example, the auto aperture f/4 were to be adjusted on the mecablitz, then this would result in a shutter speed of 1/125 sec. at the camera aperture f/5.6. This would then fall short of the camera's synchronisation speed of 1/100th sec.

When shooting into the light, ensure that the backlight does not shine directly onto the sensor as this will confuse the flashgun's electronics.

8. Exposure correction
Automatic exposure systems are adjusted to a subject reflection factor of 25%, this being the average reflection factor for subjects shot with flash. Dark backgrounds that absorb a lot of light, or bright backgrounds that reflect a great deal of light (e.g. backlit scenes), can result in subject overexposure or underexposure, as the case may be.
Exposure corrections in automatic flash mode
To compensate the above described effect, exposure can be corrected by opening or stopping down the camera's aperture. If the background is predominantly bright, the sensor of the flashgun will cut off the flash too soon with the result that the subject will be too dark (underexposed). With a dark background the flash is cut off too late so that the subject looks too bright (overexposed).

Bright background:
Open the camera aperture by 1/2 to 1 f-stop (e.g. from f/5.6 to f/4)
Dark background:
Close the camera aperture by 1/2 to 1 f-stop (e.g. from f/8 to f/11)

9. Correct exposure indication
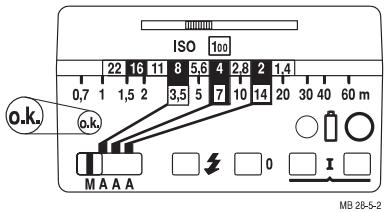
Fig. 8: Correct exposure indicator
The „o.k.“ correct exposure indicator lights up only when the frame will be, or was, correctly exposed in the auto flash mode.
In this manner it is possible to manually trigger a test flash so that the correct aperture can be established beforehand. This is particularly valuable with bounced (indirect) flash when reflection conditions are difficult to judge.
The test flash is triggered with the manual firing button (fig.8). If the „o.k.“ correct exposure indicator
remains dark after the test flash, then adjust the next larger aperture (smaller f-number) or diminish the distance to the reflection surface or subject, and then repeat the test flash.
The f-stop established in this manner must also be set on the camera.

Hold the camera and the flashgun with sensor in the same manner as for the actual shot.


10. Care and maintenance
Remove dust and grime with a soft dry cloth, or a silicone-treated cloth. Do not use detergents as these may damage the plastic parts.
The flash capacitor incorporated in the flashgun undergoes a physical change when the flashgun is not switched on for prolonged periods. For this reason it is necessary to switch on the flashgun for approx. 10 minutes every 3 months. The battery must supply sufficient power to light up the flash-ready light within one minute after the flashgun was switched on.

Malfunctions and damage caused to the mecablitz due to the use of accessories from other manufacturers are not covered by our guarantee!
- B 28 battery charger (Order No. 000100280) To charge NiCad batteries, type IEC KR 15/51
- Mecalux 11 (Order No. 000000112)
Highly sensitive light slave for delay-free remote firing of slave flashguns by a camera-triggered flash. Responds also to infrared light. Does not require batteries.
- Mecalux Holder 60-26 (Order No. 000060264) To mount the Mecalux 11.
- Bounce diffuser 28-23 (Order No. 000028237)
- Bag T33 (Order No. 000006331)
12. Technical data
Guide number with ISO 100/21°: 28 / 22 with wide-angle diffuser.
Focal length coverage:
35 mm; with wide-angle diffuser 28 mm
Colour temperature: approx. 5600 K
Table of guide numbers:
| ISO film speed | guide number |
| Meter system | Feet-system |
| 25 / 15° | 14 | 46 |
| 50 / 18° | 20 | 65 |
| 100 / 21° | 28 | 92 |
| 200 / 24° | 40 | 130 |
| 400 / 27° | 56 | 184 |
| 800 / 30° | 79 | 260 |
| 1600 / 33° | 112 | 368 |
Synchronisation: Low-voltage thyristor ignition
| number offlashes: | Recycletime: |
| NiCad-batteries | approx. 90* ...1200** | approx. 7 s* ...0,3 s** |
| Alkaline-Mn-batteries | approx. 180* ...2500** | approx.10 s* ...0,3 s** |
| Ni metal hydridebatteries | approx. 140* ..1800** | approx. 7 s ...0,3 s** |
Illumination:
Rectangular, horizontal approx. 58°, vertical approx 42°
With wide-angle diffuser, horizontal approx. 68^ , vertical approx. 49^
Flash duration:
automatic flash mode 1/400 s ...1/20.000 s
manual flash mode 1/400 s
Weight: 300 g
Items supplied:
Flashgun, wide-angle diffuser, operating instructions
Auto apertures f/2, f/4 and f/8 at ISO 100/21°
* Manual flash mode ** Automatic flash mode

Table des matières
Sommaire
Page :
natural_image
Diagram of a projectile with multiple spray arms emitting particles from a launch vehicle (no text or symbols)
natural_image
Black-and-white photo of two figures in a military setting, one seated at a table with equipment, the other standing behind (no visible text or symbols)

natural_image
Black-and-white photo of an adult and a child outdoors, no visible text or symbols
natural_image
Diagram of a projectile launcher emitting multiple spray beams, labeled MB 28-4 (no text or symbols on diagram itself)
Afb. 3: Meetschema
Afb. 6: Indirect flitsen
natural_image
Black-and-white photo of two figures seated at a table, possibly in a workshop or industrial setting (no visible text or symbols)

natural_image
Two people outdoors, one adult and one child, engaged in a activity with food (no visible text or symbols)