RC-WGP370 - Washing machine Royal Catering - Free user manual and instructions
Find the device manual for free RC-WGP370 Royal Catering in PDF.



| Product type | Food waste disposer with independent air switch |
| Brand | Royal Catering |
| Model | RC-WGP370 |
| Voltage / frequency | 230 V ~ / 50 Hz |
| Rated power | 375 W |
| Rotation speed | 4000 rpm |
| Chamber capacity | 1000 ml |
| Minimum water flow | 3,7 l/min |
| IP protection rating | IP20 |
| Dimensions (width x depth x height) | 276 x 220 x 379 mm |
| Weight | 4,5 kg |
| Control type | Independent pneumatic air switch |
| Installation | Under sink with Speed Master mounting kit |
| Dishwasher compatibility | Yes, with dishwasher hose inlet |
| Grinding system | Anti-jamming rotor and steel rotating plate |
| Motor protection | Sealed motor with permanent lubrication and reset button |
| Cleaning | Automatic mechanical cleaning with cold water; exterior with a damp cloth |
| Maintenance | No lubrication required; periodically check the condition of the appliance |
| Safety | Disconnect from power before maintenance, residual current circuit breaker recommended |
| Box contents | Disposer, mounting kit, dishwasher hose, pneumatic switch and user manual |
| Intended use | Grinding organic kitchen waste for private domestic use |
| Recycling | Recyclable product; do not dispose of with household waste |
Frequently Asked Questions - RC-WGP370 Royal Catering
User questions about RC-WGP370 Royal Catering
0 question about this device. Answer the ones you know or ask your own.
Ask a new question about this device
Download the instructions for your Washing machine in PDF format for free! Find your manual RC-WGP370 - Royal Catering and take your electronic device back in hand. On this page are published all the documents necessary for the use of your device. RC-WGP370 by Royal Catering.
USER MANUAL RC-WGP370 Royal Catering
Deutsch 3
English 10
Polski 17
Česky 24
Français 31
Italiano 38
Español 45
| PRODUKTNAME | ABFALLMÜHLE MIT UNABHÄNGIGEM LUFTSCHALTER | ABFALLMÜHLE |
| PRODUCT NAME | WASTE GRINDER WITH INDEPENDENT AIR SWITCH | WASTE GRINDER |
| NAZWA PRODUKTU | MŁYNEK DO ODPADÓW Z WŁĄCZNIKIEM ZEWNĘTRZNYM | MŁYNEK DO ODPADÓW |
| NÁZEV VÝROBKU | DRTIĆ ODPADŮ S EXTERNÍM VYPÍNAČEM | DRTIĆ ODPADŮ |
| NOM DU PRODUIT | BROYEUR À DÉCHETS AVEC INTERRUPTEUR INDÉPENDANT POUR L'AIR | BROYEUR À DÉCHETS |
| NOME DEL PRODOTTO | TRITARIFIUTI DISSIPATORE ALIMENTARE CON INTERRUTTORE INDIPENDENTE PER L'ARIA | TRITARIFIUTI DISSIPATORE ALIMENTARE |
| NOMBRE DEL PRODUCTO | TRITURADOR DE DESPERDICIOS CON INTERRUPTOR DE AIRE INDEPENDIENTE | TRITURADOR DE DESPERDICIOS |
| MODELL | ||
| PRODUCT MODEL | RC-WGPS930 | RC-WGP930 |
| MODEL PRODUKTU | RC-WGPS375 | RC-WGP370 |
| MODEL VÝROBKU | ||
| MODÈLE | ||
| MODELLO | ||
| MODELO | ||
| HERSTELLER | ||
| MANUFACTURER | EXPONDO POLSKA SP. Z O.O. SP. K. | |
| PRODUCENT | ||
| VÝROBCE | ||
| FABRICANT | ||
| PRODUTTORE | ||
| FABRICANTE | ||
| ANSCHRIFT DES HERSTELLERS | ||
| MANUFACTURER ADDRESS | UL. NOWY KISIELIN-INNOWACYJNA 7, 66-002 ZIELONA GÓRA | POLAND, EU | |
| ADRES PRODUCENTA | ||
| ADRESA VÝROBCE | ||
| ADRESSE DU FABRICANT | ||
| INDIRIZZO DEL PRODUTTORE | ||
| DIRECCIÓN DEL FABRICANTE | ||
TECHNISCHE DATEN

3.1.6. DEMONTAGE DER MÜHLE
| Parameter description | Parameter value | |
| Product name | WASTE GRINDER WITH INDEPENDENT AIR SWITCH | WASTE GRINDER |
| Model | RC-WGPS930 | RC-WGP930 |
| Rated voltage [V~]/ Frequency [Hz] | 230/50 | |
| Rated power [W] | 930 | |
| Rated current of the independent air switch [A] | 10 | - |
| Minimum water flow rate [L/min] | 3,7 | |
| Capacity [ml] | 1000 | |
| Speed [rpm] | 4000 | |
| IP protection class of the independent air switch | IP20 | - |
| Dimensions [mm] | 276x220x441 | |
| Weight [kg] | 6,5 | |
| Product name | WASTE GRINDER WITH INDEPENDENT AIR SWITCH | WASTE GRINDER |
| Model | RC-WGPS375 | RC-WGP370 |
| Rated voltage [V~]/ Frequency [Hz] | 230/50 | |
| Rated power [W] | 375 | |
| Rated current of the independent air switch [A] | 10 | - |
| Minimum water flow rate [L/min] | 3,7 | |
| Capacity [ml] | 1000 | |
| Speed [rpm] | 2600 | 4000 |
| IP protection class of the independent air switch | IP20 | - |
| Dimensions [mm] | 276x220x379 | |
| Weight [kg] | 4,5 | |
1. GENERAL DESCRIPTION
The user manual is designed to assist in the safe and trouble-free use of the device. The product is designed and manufactured in accordance with strict technical guidelines, using state-of-the-art technologies and components. Additionally, it is produced in compliance with the most stringent quality standards.
DO NOT USE THE DEVICE UNLESS YOU HAVE THOROUGHLY READ AND UNDERSTOOD THIS USER MANUAL.
To increase the product life of the device and to ensure trouble-free operation, use it in accordance with this user manual and regularly perform maintenance tasks. The technical data and specifications in this user manual are up to date. The manufacturer reserves the right to make changes associated with quality improvement.
LEGEND
| [TT5H] | The product satisfies the relevant safety standards. |
 | Read instructions before use. |
| [S238] | The product must be recycled. |
 | WARNING! or CAUTION! or REMEMBER! Applicable to the given situation (general warning sign). |
 | ATTENTION! Electric shock warning! |
 | ATTENTION! Rotating parts, entanglement hazard! |
 | ATTENTION! Hand crush hazard! |
 | Only use indoors. |

PLEASE NOTE! Drawings in this manual are for illustration purposes only and in some details may differ from the actual product.
The original operation manual is written in German. Other language versions are translations from the German.
2. USAGE SAFETY

ATTENTION! Read all safety warnings and all instructions. Failure to follow the warnings and instructions may result in electric shock, fire and/or serious injury or even death.
The terms „device“ or „product“ are used in the warnings and instructions to refer to „WASTE GRINDER WITH INDEPENDENT AIR SWITCH“, “WASTE GRINDER”.
2.1. ELECTRICAL SAFETY
a) The plug must fit the socket. Do not modify the plug in any way. Using original plugs and matching sockets reduces the risk of electric shock.
b) Do not touch the device with wet or damp hands.
c) Use the cable only for its designated use. Never use it to carry the device or to pull the plug out of a socket. Keep the cable away from heat sources, oil, sharp edges or moving parts. Damaged or tangled cables increase the risk of electric shock.
d) If using the device in a damp environment cannot be avoided, a residual current device (RCD) should be applied. The use of an RCD reduces the risk of electric shock.
e) Do not use the device if the power cord is damaged or shows obvious signs of wear. A damaged power cord should be replaced by a qualified electrician or the manufacturer's service centre.
f) To avoid electric shock, do not immerse the cord, plug or device in water or other liquids. Do not use the device on wet surfaces.
g) ATTENTION! DANGER TO LIFE! While cleaning, never immerse the device in water or other liquids.
2.2. SAFETY IN THE WORKPLACE
a) Make sure the workplace is clean and well lit. A messy or poorly lit workplace may lead to accidents. Try to think ahead, observe what is going on and use common sense when working with the device.
b) Do not use the device in a potentially explosive environment, for example in the presence of flammable liquids, gases or dust.
c) If you discover damage or irregular operation, immediately switch the device off and report it to a supervisor without delay.
d) Only the manufacturer's service point may repair the device. Do not attempt any repairs independently!
e) In case of fire, use a powder or carbon dioxide ( CO2 ) fire extinguisher (one intended for use on live electrical devices) to put it out.
f) Children or unauthorised persons are forbidden to enter a work station. (A distraction may result in loss of control over the device).
g) Please keep this manual available for future reference. If this device is passed on to a third party, the manual must be passed on with it.
h) Keep packaging elements and small assembly parts in a place not available to children.
i) Keep the device away from children and animals.
j) If this device is used together with another equipment, the remaining instructions for use shall also be followed.
a) Do not use the device when tired, ill or under the influence of alcohol, narcotics or medication which can significantly impair the ability to operate the device.
b) The device is not designed to be handled by persons (including children) with limited mental and sensory functions or persons lacking relevant experience and/or knowledge unless they are supervised by a person responsible for their safety or they have received instruction on how to operate the device.
c) When working with the device, use common sense and stay alert. Temporary loss of concentration while using the device may lead to serious injuries.
d) To prevent the device from accidentally switching on, make sure the switch is on the OFF position before connecting to a power source.
e) Do not wear loose clothing or jewellery. Keep hair, clothes and gloves away from moving parts. Loose clothing, jewellery or long hair may get caught in moving parts.
f) Remove all adjusting tools or spanners before turning the device on. A tool or spanner left in the revolving part of the device may cause injury.
g) The device is not a toy. Children must be supervised to ensure that they do not play with the device.
2.3. PERSONAL SAFETY
2.4. SAFE DEVICE USE
a) Do not use the device if the ON/OFF switch does not function properly (does not switch the device on and
off). Devices which cannot be switched on and off using the ON/OFF switch are hazardous, should not be operated and must be repaired.
b) Disconnect the device from the power supply before commencement of adjustment, cleaning and maintenance. Such a preventive measure reduces the risk of accidental activation.
c) When not in use, store in a safe place, away from children and people not familiar with the device who have not read the user manual. The device may pose a hazard in the hands of inexperienced users.
d) Keep the device in perfect technical condition. Before each use check for general damage and especially check for cracked parts or elements and for any other conditions which may impact the safe operation of the device. If damage is discovered, hand over the device for repair before use.
e) Keep the device out of the reach of children.
f) Device repair or maintenance should be carried out by qualified persons, only using original spare parts. This will ensure safe use.
g) To ensure the operational integrity of the device, do not remove factory-fitted guards and do not loosen any screws.
h) Avoid situations where the device stops working during use due to excessive loading. This may result in overheating of the drive elements and damage to the device.
i) Do not touch articulated parts or accessories unless the device has been disconnected from the power source.
j) Do not move, adjust or rotate the device in the course of work.
k) Clean the device regularly to prevent stubborn grime from accumulating.
I) The device is not a toy. Cleaning and maintenance may not be carried out by children without supervision by an adult person.
m) It is forbidden to interfere with the structure of the device in order to change its parameters or construction.
n) Keep the device away from sources of fire and heat. o) Do not overload the device.
p) The device should be turned off before attempting to remove the cause of blocking/removing the object from the grinder.
q) Do not try to remove the cause of the device blocking with your hands, use a long wooden object, e.g. a wooden spoon.
r) Use appropriate long-handle pliers to remove objects from the grinder. For magnetically controlled mills, non-magnetized tools should be used.
s) When the machine is not in use, secure the grinder with a plug to prevent unwanted objects from entering.
t) Do not drop/pour into the device:
• Metal, glass, porcelain and plastic items;
• Chemical cleaners, corrosive substances;
• Paper elements (eg. cartons, wipes);
• Large bones;
• Hot fat or other hot liquids;
• Shells, mussels or oysters.
u) Do not dip the independent air switch in any liquid (applies to models: RC-WGPS930, RC-WGPS375).

ATTENTION! Despite the safe design of the device and its protective features, and despite the use of additional elements protecting the operator, there is still a slight risk of accident or injury when using the device. Stay alert and use common sense when using the device.
3. USE GUIDELINES
The product is intended for the grinding of organic waste.
The product is intended for home use only!
The user is liable for any damage resulting from unintended use of the device.
3.1. PREPARING FOR USE
3.1.1. APPLIANCE LOCATION
Keep the product away from hot surfaces. The device should always be used when positioned on an even, stable, clean, fireproof and dry surface, and be out of the reach of children and persons with limited mental and sensory functions. The power cord connected to the appliance must be properly grounded and correspond to the technical details on the product label.
EARTHING THE DEVICE
NOTE: This applies to grinders equipped with an earthed power plug.
The device must be earthed to ensure the path of the least resistance to the electric current in the event of malfunction or failure. Earthing reduces the risk of electric shock. This device is equipped with a cord and an earthed plug. The plug must be connected to a properly installed and earthed outlet that meets all applicable local regulations.
NOTE: Incorrect earthing can lead to an electric shock. In case of doubts as to whether the device is properly connected or if it is working properly, contact the service center or a qualified person.
3.1.2. CONNECTING THE DISHWASHER
When using a dishwasher, perform the following steps. If the dishwasher will not be connected, go to section 3.1.3. INSTALLING THE MOUNTING UNIT.
Use a blunt tool (steel punch or wooden dowel) to knock out the entire hole plug. Do not use a screwdriver or sharp tools. In the event the plug falls into the grinder, it can be removed or pulverized in the grinder. This will not damage the grinder.

Connect the dishwasher hose (B) with the clamp. Check that all connections are tight and in accordance with the regulations. Turn on the water and check that there is no leakage.

NOTE: Air gap (A) is not required for all installations. Check local plumbing codes.
3.1.3. INSTALLING THE MOUNTING UNIT
NOTE: Particular attention should be paid to the order of the parts as they are factory set in the correct order.
NOTE: Also mind the correct position of the sealing ring.

NOTE: It is a good idea to perform a trial assembly before finally installing the mounting unit.
A. Dismantle the mounting unit from the grinder by turning the mounting ring to the left (clockwise) and remove.

- Cover
- Sink flange
- Flange gasket
- Fibre gasket
- Support ring
- Mounting ring
- Sealing ring
SPEED MASTER MOUNTING SYSTEM

- Cover
- Sink flange
- Flange gasket
- Fibre gasket
- Support ring
- Mounting ring
- Sealing ring
- Sink
- Plug
- Ring clamp
- Groove
- Grinder body
- Dishwasher inlet
- Reset buton
- Elbow seal
- Bolts
- Flange
- Elbow
B. Lift the mounting ring towards the sink flange. Remove the sealing ring. Remove the mounting ring. Practice installing the sealing ring before mounting the appliance under the sink.
C. Unscrew the support ring from the flange and remove the fiber gasket. The sink flange and the rubber gasket remains.
D. For stainless steel sinks, a rubber gasket is used instead of putty. Other types of sinks require the use of putty.
E. If you are not using putty, insert the sink flange through the rubber gasket into the sink hole. Do not turn the flange after seating it.
F. If you use putty instead of the gasket, apply a putty ring to the underside of the flange.

G. Insert the flange into the sink hole and press in firmly to remove excess putty. Remove the excess putty from under the sink down to the edge of the sink hole.

H. Under the sink, slide the fiber gasket over the exposed sink flange. Tighten the support ring against the flange according to the arrows until the flange is immobile. At this point, it's a good idea to put the sink plug in and fill the sink with water to check for leaks.
I. Place the sealing ring over the flange and install it (with the larger part down) so that the groove inside the sealing ring matches the flange lip.
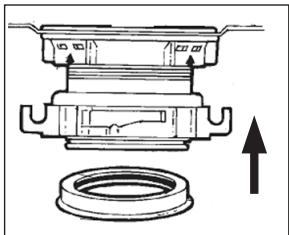

J. If the sealing ring has been installed correctly: the flange lip (A) fits into the groove inside the ring (B), the retaining ring can be pulled down over the washer allowing it to turn freely. The bottom profile (C) of the ring acts as a seal between the flange bottom and the top of the grinder.

K. The grinder must be installed so that the reset button can be accessed.
3.1.4. INSTALLING THE DRAIN ELBOW AND CONNECTING THE GRINDER TO THE MOUNTING UNIT
- Connect the drain elbow to the grinder.

- Place the grinder body under the mounting unit. Align the top of the grinder body with the inside of the mounting ring. Insert the tabs on the upper part of the grinder (B) into the slots of the mounting ring (A). Turn the mounting ring approximately 1/4" clockwise to temporarily support the grinder.

- Turn the mounting ring with the grinder body until the elbow (C) is aligned with the siphon (D).

- Turn the mounting ring clockwise until it seats. Hit the clamps of the mounting ring with a rubber mallet until locked. The tabs on the top of the grinder must be as far left as possible from the slots in the ring.

E. tabs in the supporting position
F. tabs in the locked position.
5. If it is difficult to unscrew the ring, apply a small amount of petroleum jelly or liquid soap to the funnel lugs. Turn on the water and check for leaks.
6. Connect the lower part of the elbow by tightening the nut.

- Make sure that all connections are tight and in accordance with the regulations. Turn on the water and check for leaks.
3.1.5. INSTALLING THE SWITCH (applies to models: RC-WGPS930, RC-WGPS375)
Note: If the countertop or the sink has no place for the switch, prepare a hole.
- Unscrew the bottom nut from the button. Make sure to leave the gasket that will be positioned on the top surface of the countertop to which the button will be attached.

- One end of the enclosed PVC tube should be installed in the button hole.
- Insert the button into the hole.
- Screw the lower nut back onto the button from the bottom of the countertop. Hand tighten it until a slight resistance is felt. Using a wrench or other tools may damage the thread.
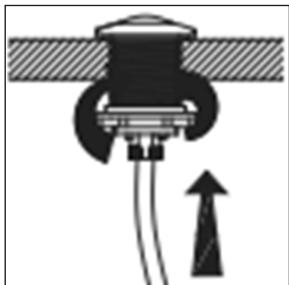
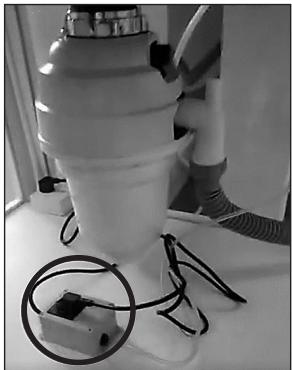
- The other end of the PVC tube should be inserted into the hole in the pneumatic switch.

- Connect the grinder to the pneumatic switch. Then connect the switch to the power supply.
3.1.6. DISMANTLING THE GRINDER
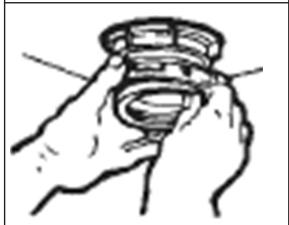
The device must be disconnected from the mains or power must be cut off in the fuse box. Then perform the assembly steps indicated in section 3.1.3. INSTALLING THE MOUNTING UNIT in reverse order.
3.2. DEVICE USE
NOTE: Before using the dishwasher, make sure the grinder is empty to ensure proper drainage of the water in the dishwasher.
NOTE: The anti-jamming rotors may click when position is changed for the first time. This is normal.
NOTE: When the sink is not in use, leave the plug in the drain to prevent kitchen utensils and foreign objects from falling into the grinder.
- Remove the plug from the sink. Run a medium stream of water. Switch on the device, the motor runs at full power and the grinder is ready for use.
- Pour the waste into the grinder (food waste such as peel, seeds, small fruit stones, small bones and coffee grounds). To accelerate shredding waste, larger bones should be cut or broken, peel and corncobs should be cut. It takes more time to break up large bones and fibrous waste so it is easier to throw it away. It is normal for the grinder to slow down. It increases the torque then (grinding power).
- Do not turn off the water jet or the grinder for 15 seconds after grinding is finished. This will ensure the waste is thoroughly flushed out from the siphon and the drain.
- It is better not to turn on hot water while the grinder is working. Cold water will not dissolve waste or grease, making it easy to rinse the grinder off.
3.3. CLEANING AND MAINTENANCE
a) Unplug the mains plug and allow the device to cool completely before each cleaning, adjustment or replacement of accessories, or if the device is not being used.
b) Use only non-corrosive cleaners to clean the surface.
c) After cleaning the device, all parts should be dried completely before using it again.
d) The device must be regularly inspected to check its technical efficiency and spot any damage.
e) Use a soft, damp cloth for cleaning.
f) Do not use sharp and/or metal objects for cleaning (e.g. a wire brush or a metal spatula) because they may damage the surface material of the appliance.
g) Do not clean the device with an acidic substance, agents of medical purposes, thinners, fuel, oils or other chemical substances because it may damage the device.
h) Do not lubricate the grinder because its motor is permanently lubricated. The grinder is cleaned mechanically which means that it cleans itself after each use. NEVER use lye or chemicals designed for sewage pipes. The use of such agents may cause corrosion and will void the warranty. Mineral deposits resembling rust may form on the steel turntable.
DISPOSING OF USED DEVICES
Do not dispose of this device in municipal waste systems. Hand it over to an electric and electrical device recycling and collection point. Check the symbol on the product, instruction manual and packaging. The plastics used to construct the device can be recycled in accordance with their markings. By choosing to recycle you are making a significant contribution to the protection of our environment. Contact local authorities for information on your local recycling facility.
DANE TECHNICZNE

3.1.6. DEMONTAŻ MŁYNKA
3.1.6. DEMONTÁŽ DRTIČKY

3.1.6. DÉMONTAGE DU BROYEUR


3.1.6. SMONTAGGIO DEL TRITARIFIUTI

3.1.6. DESMONTAJE DEL TRITURADOR
NAMEPLATE TRANSLATIONS
| 1 THE DEVICE MUST BE GROUNDED TO AVOID ELECTRICAL SHOCK2 Manufacturer: expondo Polska sp. z o.o. sp. k.ul. Nowy Kisielin-Innowacyjna 7, 66-002 Zielona Góra, Poland, EU | ROYAL®catering | |
| 3 Product Name:4 Model:5 Power:6 Voltage/Frequency:7 Production Year:8 Serial No.: |  CE CE | |
| expondo.com | ||
| 1 | 2 | 3 | 4 | ||
| DE | Eine falsche Erdung kann zu einem elektrischen Schlag führen. | Hersteller | Produktname | Modell | |
| EN | Incorrect earthing can lead to an electric shock. | Manufacturer | Product Name | Model | |
| PL | Nieprawidłowe podłączenie uziemienia może doprowadzić do porażenia elektrycznego. | Producent | Nazwa produktu | Model | |
| CZ | Nesprávné připojení uzemnění může vést k úrazu elektrickým proudem. | Výrobce | Název výrobku | Model | |
| FR | La connexion incorrecte de la terre peut entraîner un choc électrique. | Fabricant | Nom du produit | Modèle | |
| IT | Il collegamento a terra non corretto potrebbe provocare una scossa elettrica. | Produttore | Nome del prodotto | Modello | |
| ES | La conexión incorrecta del dispositivo a tierra puede provocar una descarga eléctrica. | Fabricante | Nombre del producto | Modelo | |
| 5 | 6 | 7 | 8 | ||
| DE | Leistung | Spannung/Frequenz | Produktionsjahr | Ordnungsnummer | |
| EN | Power | Voltage/Frequency | Production Year | Serial No. | |
| PL | Moc | Napięcie znamionowe/Częstotliwość | Rok produkcji | Numer serii | |
| CZ | Jmenovitý výkon | Jmenovité napájecí napětí/Frekvence | Rok výroby | Sériové číslo | |
| FR | Puissance | Tension/Fréquence | Année de production | Numéro de serie | |
| IT | Potenza | Tensione/Frequenza | Anno di produzione | Numero di serie | |
| ES | Potencia | Voltaje/Frecuencia | Año de producción | Número de serie | |
NOTES/NOTZIEN
NOTES/NOTZIEN
NOTES/NOTZIEN
For the disposal of the device please consider and act according to the national and local rules and regulations.
CONTACT
expondo Polska sp. z o.o. sp. k.





- GENERAL DESCRIPTION
- DO NOT USE THE DEVICE UNLESS YOU HAVE THOROUGHLY READ AND UNDERSTOOD THIS USER MANUAL
- USAGE SAFETY
- ELECTRICAL SAFETY
- SAFETY IN THE WORKPLACE
- PERSONAL SAFETY
- SAFE DEVICE USE
- USE GUIDELINES
- PREPARING FOR USE
- APPLIANCE LOCATION
- EARTHING THE DEVICE
- CONNECTING THE DISHWASHER
- INSTALLING THE MOUNTING UNIT
- DISPOSING OF USED DEVICES
- DÉMONTAGE DU BROYEUR
- CONTACT
Brand : Royal Catering
Model : RC-WGP370
Category : Washing machine