
AIRCLEAN 10G - Washing machine Ulsonix - Free user manual and instructions
Find the device manual for free AIRCLEAN 10G Ulsonix in PDF.


| Brand | Ulsonix |
| Model | AIRCLEAN 10G |
| Product type | Ozone generator |
| Power supply | 230 V~ / 50 Hz |
| Rated power | 110 W |
| Ozone generation capacity | 10,000 mg/h |
| Fan airflow | 170 m³/h |
| Display | Digital LCD |
| Remote control | Included |
| Auto programs | 3 (P1, P2, P3) |
| Timer range | 5 minutes to 24 hours |
| Recommended room size (max) | 280 m³ |
| Maximum continuous runtime | 12 hours |
| Required rest time after 12h operation | 12 hours |
| Air filter | Washable |
| Fuse protection | Yes |
| Ozone plate replacement interval | Every 6 months |
| Operating temperature | 0–40°C |
| Operating humidity | Up to 85% RH |
| Post-treatment ventilation time | 15–30 minutes |
| Minimum re-entry delay | 2 hours |
Frequently Asked Questions - AIRCLEAN 10G Ulsonix
User questions about AIRCLEAN 10G Ulsonix
0 question about this device. Answer the ones you know or ask your own.
Ask a new question about this device
Download the instructions for your Washing machine in PDF format for free! Find your manual AIRCLEAN 10G - Ulsonix and take your electronic device back in hand. On this page are published all the documents necessary for the use of your device. AIRCLEAN 10G by Ulsonix.
USER MANUAL AIRCLEAN 10G Ulsonix
1- Luftauslass
1- Luftauslass

1- Luftauslass

1- Griff
This User Manual has been translated using machine translation. We have made every effort to ensure the translation is accurate, but please note that automated translations are not perfect and are not meant to replace human translators. The official version of the User Manual is in English. Any differences between the translated version and the original English are not legally binding. If you have any questions about the accuracy of the translation, please refer to the English version, which is the official reference. More language versions are available upon request via info@expondo.com.
Technical data
| Parameter description | Parameter value | ||||
| Product name | Ozone generator | ||||
| Model | AIRCLEAN 10G | AIRCLEAN 7G | AIRCLEAN 20G-ECO | AIRCLEAN 20G | AIRCLEAN 15G |
| Rated voltage [V~] / Frequency [Hz] | 230/ 50 | ||||
| Rated power [W] | 110 | 98 | 205 | 205 | 160 |
| Ozonisation efficiency [mg/h] | 10000 | 7000 | 20000 | 20000 | 15000 |
| Fan output [m3/h] | 170 | 170 | 170 | 170 | 170 |
| Parameter description | Parameter value | ||||
| Product name | Ozone generator | ||||
| Model | AIRCLEAN 7G-ECO | AIRCLEAN 5GWL | AIRCLEAN 7GWL | AIRCLEAN 10GWL | AIRCLEAN 10G-ECO |
| Rated voltage [V~] / | 230/ 50 | ||||
EN
| Frequency [Hz] | |||||
| Rated power [W] | 98 | 65 | 100 | 100 | 95 |
| Ozonisation efficiency [mg/h] | 7000 | 5000 | 7000 | 10000 | 500 ~ 10000 |
| Fan output [m3/h] | 170 | 100 | 170 | 170 | 170 |
1. General description
The user manual is designed to assist in the safe and trouble-free use of the device. The product is designed and manufactured in accordance with strict technical guidelines, using state-of-the-art technologies and components. Additionally, it is produced in compliance with the most stringent quality standards.
DO NOT USE THE DEVICE UNLESS YOU HAVE THOROUGHLY READ AND UNDERSTOOD THIS USER MANUAL.
To increase the product life of the device and to ensure trouble-free operation, use it in accordance with this user manual and regularly perform maintenance tasks. The technical data and specifications in this user manual are up to date. The manufacturer reserves the right to make changes associated with quality improvement. The device is designed to reduce noise emission risks to a minimum, taking into account technological progress and noise reduction opportunities.
Legend
 | The product satisfies the relevant safety standards. |
 | Read instructions before use. |
EN
 | The product must be recycled. |
 | WARNING! or CAUTION! or REMEMBER! Applicable to the given situation.(general warning sign) |
 | WARNING! Toxic substances, danger of poisoning! |
 | Wear protective gloves. |
 | Wear protective goggles. |
 | Use respiratory tract protection. |
 | Wear protective clothing. |

PLEASE NOTE! Drawings in this manual are for illustration purposes only and in some details may differ from the actual product.
2. Usage safety

ATTENTION! Read all safety warnings and all instructions. Failure to follow the warnings and instructions may result in electric shock, fire and/or serious injury or even death.
The terms "device" or "product" are used in the warnings and instructions to refer to
Do not use in very humid environments or in the direct vicinity of water tanks.
Prevent the device from getting wet. Risk of electric shock!
Do not cover air inlets / outlets!
Do not cover the ventilation openings!
2.1. Electrical safety
a) The plug must fit the socket. Do not modify the plug in any way. Using original plugs and matching sockets reduces the risk of electric shock.
b) Avoid touching earthed elements such as pipes, heaters, boilers and refrigerators. There is an increased risk of electric shock if the earthed device is exposed to rain, comes into direct contact with a wet surface or is operating in a damp environment. Water getting into the device increases the risk of damage to the device and of electric shock.
c) Do not touch the device with wet or damp hands.
d) Use the cable only for its designated use. Never use it to carry the device or to pull the plug out of a socket. Keep the cable away from heat sources, oil, sharp edges or moving parts. Damaged or tangled cables increase the risk of electric shock.
e) If using the device in a damp environment cannot be avoided, a residual current device (RCD) should be applied. The use of an RCD reduces the risk of electric shock.
f) Do not use the device if the power cord is damaged or shows obvious signs of wear. A damaged power cord should be replaced by a qualified electrician or the manufacturer's service centre.
g) To avoid electric shock, do not immerse the cord, plug or device in water or other liquids. Do not use the device on wet surfaces.
2.2. Safety in the workplace
a) Make sure the workplace is clean and well lit. A messy or poorly lit workplace may lead to accidents. Try to think ahead, observe what is going on and use common sense when working with the device.
b) If you discover damage or irregular operation, immediately switch the device off and report it to a supervisor without delay.
c) If there are any doubts as to the correct operation of the device, contact the manufacturer's support service.
EN
d) Only the manufacturer's service point may repair the device. Do not attempt any repairs independently!
e) In case of fire, use a powder or carbon dioxide (CO2) fire extinguisher (one intended for use on live electrical devices) to put it out.
f) Children or unauthorised persons are forbidden to enter a work station. (A distraction may result in loss of control over the device)
g) Regularly inspect the condition of the safety labels. If the labels are illegible, they must be replaced.
h) Please keep this manual available for future reference. If this device is passed on to a third party, the manual must be passed on with it.
i) Keep the device away from children and animals.
j) The room treated with ozone must be sealed (all external doors closed, gaps in windows, doors etc. sealed), mechanical ventilation must be switched off and ventilation grating must be covered. If possible, internal ventilation should be running in order to facilitate the air flow in the room treated with ozone. Open all internal doors in the room treated with ozone (such as bathroom, cabinet etc.).
k) No humans or animals are allowed in the room during ozone treatment. If the room must be entered for any reason, make sure to leave it as quickly as possible and wear protective clothing as well as inhalation mask with appropriate cartridge.
I) Smoking, open flame, using tools generating flame or sparks, using oils or grease or objects contaminated with oil or grease is not allowed in the room treated with ozone.
m) Leave the room immediately after activating the ozone treatment
n) Place the following note or warning plate in front of / on the door of the room treated with ozone

OZONE TREATMENT IN PROGRESS
DO NOT ENTER

Remember! When using the device, protect children and other bystanders.
2.3. Personal safety
a) Do not use the device when tired, ill or under the influence of alcohol, narcotics or medication which can significantly impair the ability to operate the device.
b) The device is not designed to be handled by persons (including children) with limited mental and sensory functions or persons lacking relevant experience and/or knowledge unless they are supervised by a person responsible for their safety or they have received instruction on how to operate the device.
c) The device can be handled only by physically fit persons who are capable of handling it, properly trained, familiar with this manual and trained within the scope of occupational health and safety.
d) When working with the device, use common sense and stay alert. Temporary loss of concentration while using the device may lead to serious injuries.
e) To prevent the device from accidentally switching on, make sure the switch is on the OFF position before connecting to a power source.
f) The device is not a toy. Children must be supervised to ensure that they do not play with the device.
2.4. Safe device use
a) Do not use the device if the ON/OFF switch does not function properly (does not switch the device on and off). Devices which cannot be switched on and off using the ON/OFF switch are hazardous, should not be operated and must be repaired.
b) Make sure the plug is disconnected from the socket before attempting any adjustments, accessory replacements or before putting the device aside. Such precautions will reduce the risk of accidentally activating the device.
c) When not in use, store in a safe place, away from children and people not familiar with the device who have not read the user manual. The device may pose a hazard in the hands of inexperienced users.
d) Keep the device in perfect technical condition. Before each use check for general damage and especially check for cracked parts or elements and for any other conditions which may impact the safe operation of the device. If damage is discovered, hand over the device for repair before use.
e) Keep the device out of the reach of children.
f) Device repair or maintenance should be carried out by qualified persons, only using original spare parts. This will ensure safe use.
g) To ensure the operational integrity of the device, do not remove factory-fitted guards and do not loosen any screws.
h) When transporting and handling the device between the warehouse and the destination, observe the occupational health and safety principles for manual transport operations which apply in the country where the device will be used.
i) Do not move, adjust or rotate the device in the course of work.
j) Clean the device regularly to prevent stubborn grime from accumulating.
k) Do not cover the air intake and outlet.
I) The device is not a toy. Cleaning and maintenance may not be carried out by children without supervision by an adult person.
m) Do not run the device when empty.
n) It is forbidden to interfere with the structure of the device in order to change its parameters or construction.
o) Keep the device away from sources of fire and heat.
p) Persons with impaired sense of smell must not use the device.
q) Provide enough free space around the device before turning it on. Do not obstruct the ozone vent holes.
r) It is strictly forbidden to directly inhale ozone coming out of the outlet holes of the device. Inhalation of high concentrations of ozone over a short period as well as inhalation of low concentrations of ozone over a long period of time may cause serious risk to health or life!

ATTENTION! Despite the safe design of the device and its protective features, and despite the use of additional elements protecting the operator, there is still slight risk of accident or injury when using the device. Stay alert and use common sense when using the device.
When operating an ozone generator and if it's absolutely necessary to be in its vicinity, the type and protection level of Personal Protective Equipment (PPE) required.
a) Respiratory Protection
- Air-Purifying Respirators: Use a respirator equipped with an ozone-specific filter. NIOSH assigns ozone a specific filter designation, such as N, R, or P series filters with a rating of 100 (e.g., N100, R100, P100) for high efficiency. For ozone, a particulate filter is not effective by itself, and the respirator should have a combination chemical cartridge that can absorb ozone, such as an activated carbon filter. The exact type of respirator filter required can depend on the ozone concentration.
- Supplied-Air Respirator (SAR) or Self-Contained Breathing Apparatus (SCBA): For very high concentrations of ozone or for long durations, a more protective approach might be necessary, such as an SAR or SCBA, which provides clean air from a source independent of the surrounding environment.
b) Eye Protection
- Safety Goggles: Closed, air-tight safety goggles are recommended to protect against eye irritation caused by ozone exposure. Ensure they form a seal around the eyes.
c) Skin Protection
- Protective Clothing: Wear long sleeves, long pants, and gloves to minimize skin exposure. Materials that provide a barrier to gases or are less permeable to ozone are preferable. Ozone can degrade certain materials, so it's important to choose protective clothing that is resistant to oxidation.
d) Other Considerations
- Ensure proper fit and training: For respirators, a proper fit test is essential to ensure the effectiveness of the mask. Users should also be trained on the correct use and limitations of their PPE.
- Monitor ozone levels: Use ozone detectors to monitor the concentration of ozone in the area to ensure it does not exceed safe levels as recommended by health and safety guidelines.

Reactivity of Ozone: Ozone is a highly reactive gas. It can react with various substances and materials. Avoid contact with flammable materials, fuels, and reactive chemicals.

Danger of Reaction Products: Ozone reactions can produce potentially harmful by-products. Some of these by-products can be highly reactive or toxic. To minimize risks, ensure proper ventilation to dissipate by-products.

Explosiveness of Ozone: Ozone gas is not inherently explosive, but it can react with certain substances to form explosive mixtures. Avoid mixing ozone with substances that can lead to explosive reactions.

Timers and Automation: Use timers or automation features to control the duration of ozone generation. Set treatment times according to room size and ozone concentration guidelines.

Safety Gear: When entering ozone-treated areas, wear appropriate personal active equipment (PPE) such as full masks, gloves, and eye protection to minimize exposure to ozone and its by-products.
3. Use guidelines
Ozone generator produces ozone from surrounding air.
The user is liable for any damage resulting from unintended use of the device.
3.1. Device description
AIRCLEAN 10G | AIRCLEAN 7G | AIRCLEAN 20G | AIRCLEAN 15G


1- Air outlet
2- Control panel buttons:
- On/Off – main on/off switch
• Auto – auto mode operation - Timer – timer mode operation
- Set – access to parameter setting mode
- Up – increasing parameter values
- Down – decreasing parameter values
3- Display
4- Remote control – description of buttons: same as control panel buttons
5- Filter
6- Fuse socket
AIRCLEAN 20G-ECO | AIRCLEAN 7G-ECO | AIRCLEAN 5G-WL

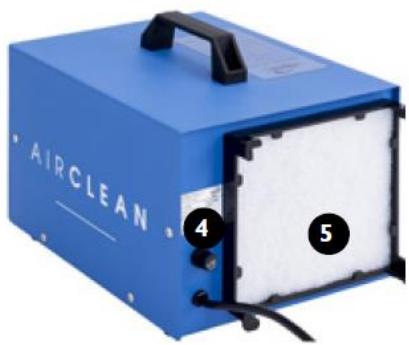
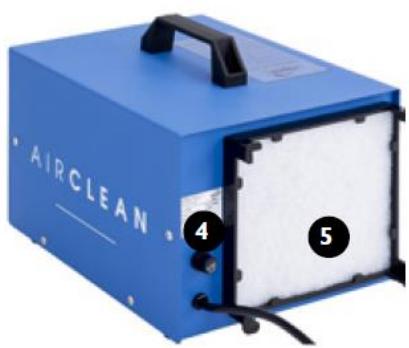
1- Air outlet
2- Operation indicator lamp
3- Operation time selector knob
4- Fuse socket
5- Air filter
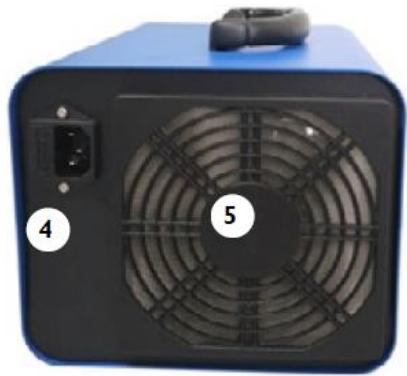
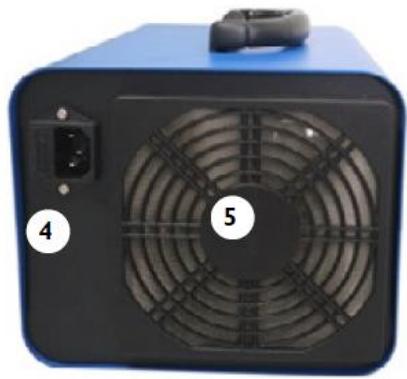
AIRCLEAN 7G-WL | AIRCLEAN 10G-WL


1- Air outlet
2- Operation indicator lamp
3- Operation time selector knob
4- Power cord connection
5- Air filter
AIR CLEAN 10G- ECO


1- Handle
2- A light informing that the device is operating
3- Ozone control knob
4- Time set knob
5- Air filter cover
6- Power socket and fuse socket
7- Air filter
8- Power cord
9- ON/OFF button
3.2. Preparing for use
APPLIANCE LOCATION
The temperature of environment must not be higher than 40° C and the relative humidity should be less than 85%. Ensure good ventilation in the room in which the device is being used. There should be at least 10 cm distance between each side of the device and the wall or other objects. The device should always be used when positioned on an even, stable, clean, fireproof and dry surface, and be out of the reach of children and persons with limited mental and sensory functions. Position the device such that you always have access to the power plug. The power cord connected to the appliance must be properly grounded and correspond to the technical details on the product label.
3.3. Device use
| Model | RECOMMENDED OPERATION DURATION/TREATED AIRSPACE (m3) IN “AUTO” MODE | ||
| P1 | P2 | P3 | |
| 10 minute operation/ 20 minute pause | 20 minute operation/ 20 minute pause | 40 minute operation/ 20 minute pause | |
| AIRCLEAN 7G | <100 | 100~150 | 150~200 |
| AIRCLEAN 10G | <140 | 140~210 | 210~280 |
| AIRCLEAN 15G | <210 | 210~315 | 315~420 |
| AIRCLEAN 20G | <280 | 280~420 | 420~560 |
EN
| Model | RECOMMENDED OPERATION DURATION/TREATED AIRSPACE (m3) | ||||
| 50 | 100 | 150 | 200 | 300 | |
| AIRCLEAN7G-ECO | 10 min | 20 min | 30 min | 40 min | 60 min |
| AIRCLEAN20G-ECO | 4 min | 8 min | 12 min | 15 min | 25 min |
| AIRCLEAN5G-WL | 20 min | 40 min | 60 min | 80 min | 100 min |
| AIRCLEAN7G-WL | 10 min | 20 min | 30 min | 40 min | 60 min |
| AIRCLEAN10G-WL | 8 min | 16 min | 24 min | 32 min | 48 min |
| Model | RECOMMENDED OPERATION DURATION/TREATED AIRSPACE (m3) | ||||
| 50 | 100 | 150 | 200 | 300 | |
| AIRCLEAN10G- ECO | 8 min | 16 min | 24 min | 32 min | 48 min |
NOTE! Do not exceed the “Recommended operation duration” as indicated in the above tables. Max. continuous working time and break time for the ozone generators is: 12 hours of work / 12 hours of break.
NOTE! The device operator takes responsibility for safety measures and operation of the device.
AIRCLEAN 10G | AIRCLEAN 7G | AIRCLEAN 20G | AIRCLEAN 15G
- If the room must be entered to turn off the device, make sure to wear appropriate personal protective equipment (PPE) such as clothing as well as a full mask to protect mucous membranes including the eyes.
- Timer mode operation: activate the device with „Timer” button. The display will show “TIMER OFF UNTIL” as well as time in hours and minutes until deactivation of the device. The time can be freely adjusted in the range between 5 minutes and 24 hours. Timer off modification: upon activating the device with „Timer” button press “Set” button. Preset time will start blinking, use “Up”/“Down” buttons to set the desired time after which the device is to deactivate and then press “Set” again – the modification will be stored in the device and the device will activate.
- Auto mode operation: turn the device on with “Auto” button, the display will show “ON” / device operation time and program reference number P1, P2, or P3 (switch between programs by pushing the “Auto” button in sequence). The device is delivered with three default programs:
P1: 10 minute operation / 20 minute pause / 5 rounds
P2: 20 minute operation / 20 minute pause / 5 rounds
P3: 40 minute operation / 20 minute pause / 5 rounds
Operation times / pause and number of rounds can be freely modified in each of these programs. Modification of operation time, pause and number of rounds: Operation times / pause and number of rounds can be freely modified in each of these programs. To do this press the "Set" button while in the program which you wish to modify (P1, P2 or P3). Starting with P1, press "Set" to move to operation time setting, the display will show "Set Pro. ON" as well as blinking operation time setting – change it to your desired value using "Up"/'Down" buttons. Press "Set" to move to pause time setting, the display will show "Set Pro. OFF" as well as blinking pause time setting – change it to your desired value using "Up"/'Down" buttons. Press "Set" to move to number of rounds setting. The display will show "Set Pro. ON OFF" as well as blinking number of rounds. Use "Up"/'Down" buttons to set your desired value and press "Set" to move to modification of program 2 (P2). Use the same procedure for the remaining programmes. To exit programme modifications, press the "Set" button and hold it until the devices moves to the first value of previously modified programme – the device will be activated in auto mode with programme preset operation and pause time values as well as preset number of rounds.
AIRCLEAN 20G-ECO | AIRCLEAN 5G WL | - AIRCLEAN 7G-ECO | AIRCLEAN 7G-WL | AIRCLEAN 10G-WL
- Use the operation time selector knob to set the desired duration of ozone treatment.
AIRCLEAN 10G- ECO
• Turn the device on using the ON/OFF button located on the rear panel
- Set the desired ozonisation time value using the ozonisation set knob.
- Use the ozone control knob to set the ozone level. The available range is 0-10000mgh.
NOTE! Upon completion of treatment ventilate the room for 15 to 30 minutes. Do not enter the room for at least 2 hours after completion of the ozone treatment. PLEASE NOTE! Use the device only in empty rooms! Ozone is an irritant gas, it may cause damage to biological membranes through radical reactions with their constituents. If the characteristic ozone smell is still present in the room which was treated with ozone, first make sure that the device is switched off then leave the room and/or ventilate it.
3.4. Cleaning and maintenance
a) Always unplug the device before cleaning it.
b) Use only non-corrosive cleaners to clean the surface.
c) Store the unit in a dry, cool place, free from moisture and direct exposure to sunlight.
d) Do not spray the device with a water jet or submerge it in water.
e) Do not allow water to get inside the device through vents in the housing of the device.
f) The device must be regularly inspected to check its technical efficiency and spot any damage.
g) Use a soft, damp cloth for cleaning.
h) For an effective use it is suggested to replace the Ozone Plates every 6 month.
FUSE REPLACEMENT
PLEASE NOTE! The fuse should be replaced by a specialist!
1) Disconnect the device from power supply.
2) Disconnect the power cord and remove the fuse holder.

3) Replace the fuse, making sure that the parameters are the same.
4) Reinstall the fuse socket.
PLEASE NOTE! To avoid damage to the fuse socket, do not use excessive force when removing and installing the fuse socket
1- Wylot powietrza
1- Wylot powietrza

1- Wylot powietrza

1- Uchwyt
1- Vzduchový výstup
1- Vzduchový výstup
2- Kontrolka provozu


1- Držák
1- Sortie d'air
1- Sortie d'air

1- Sortie d'air

1- Poignée
1- Uscita dell'aria
1- Uscita dell'aria

1- Uscita dell'aria

1- Maniglia
1- Salida del aire
2- Botones del panel de control:
1- Salida del aire

1- Salida del aire

1- Agarradero


1- Fogantyú
1- Luftudløb
2- Knapper på kontrolpanelet:
1- Luftudløb

1- Luftudløb

1- Håndtag
APPARATETS PLACERING
1- Ilman ulostulo
1- Ilman ulostulo

1- Ilman ulostulo

1- Kahva
1- Luchtuitlaat


1- Handvat
PLAATS VAN HET APPARAAT
1- Luftutløp
2- Knapper på kontrollpanelet:
• Av/på – hovedbryter for av/på
• Auto – automatisk modusdrift
- Timer – drift av timermodus
- Sett – tilgang til parameterinnstillingsmodus
1- Luftutløp

1- Luftutløp

1- Håndtak
3) Skift sikringen, og sørg for at parametrene er de samme.
1- Luftutlopp
1- Luftutlopp
2- Driftindikatorlampa

1- Luftutlopp
2- Driftindikatorlampa

1- Handtag
APPARATENS PLACERING
1- Saída de ar
1- Saída de ar
2- Lâmpada indicadora de funcionamento

1- Saída de ar
2- Lâmpada indicadora de funcionamento

1- Pega
1- Výstup vzduchu
1- Výstup vzduchu

1- Výstup vzduchu

1- Rukovät'
1- Изход за въздух
1- Изход за въздух
2- Индикаторна лампа за работа

1- Изход за въздух
2- Индикаторна лампа за работа

1- Дръжка

1- Έξοδος αέρα

1- Έξοδος αέρα
1- Έξοδος αέρα

1- Λαβή
1- Izlaz zraka
1- Izlaz zraka
2- Indikatorska lampica rada
1- Izlaz zraka
2- Indikatorska lampica rada

1- Ručka
3) Zamijenite osigurač pazeći da su parametri isti.
4) Ponovno ugradite podnožje osigurača.
NAPOMENA! Kako biste izbjegli oštećenje podnožja osigurača, nemojte koristiti pretjeranu silu prilikom uklanjanja i ugradnje podnožja osigurača


1- Rankena
1- leşire aer
2- Butoane de pe panoul de control:
1- leşire aer

1- leşire aer

1- Mâner
1- Izpust zraka

1- Izpust zraka
2- Indikatorska lučka delovanja

1- Izpust zraka
2- Indikatorska lučka delovanja

1- Ročaj




- LUFTAUSLASS
- GRIFF
- GENERAL DESCRIPTION
- DO NOT USE THE DEVICE UNLESS YOU HAVE THOROUGHLY READ AND UNDERSTOOD THIS USER MANUAL
- USAGE SAFETY
- ELECTRICAL SAFETY
- SAFETY IN THE WORKPLACE
- EN
- PERSONAL SAFETY
- SAFE DEVICE USE
- EYE PROTECTION
- SKIN PROTECTION
- OTHER CONSIDERATIONS
- USE GUIDELINES
- DEVICE DESCRIPTION
- AIR OUTLET
- DISPLAY
- OZONE CONTROL KNOB
- POWER SOCKET AND FUSE SOCKET
- PREPARING FOR USE
- APPLIANCE LOCATION
- DEVICE USE
- AIRCLEAN 10G | AIRCLEAN 7G | AIRCLEAN 20G | AIRCLEAN 15G
- AIRCLEAN 20G-ECO | AIRCLEAN 5G WL | - AIRCLEAN 7G-ECO | AIRCLEAN 7G-WL | AIRCLEAN 10G-WL
- AIRCLEAN 10G- ECO
- CLEANING AND MAINTENANCE
- FUSE REPLACEMENT
- WYLOT POWIETRZA
- VZDUCHOVÝ VÝSTUP
- SORTIE D'AIR
- POIGNÉE
- USCITA DELL'ARIA
- MANIGLIA
- SALIDA DEL AIRE
- BOTONES DEL PANEL DE CONTROL
- AGARRADERO
- FOGANTYÚ
- LUFTUDLØB
- APPARATETS PLACERING
- LUCHTUITLAAT
- LUFTUTLØP
- LUFTUTLOPP
- HANDTAG
- APPARATENS PLACERING
- SAÍDA DE AR
- PEGA
- VÝSTUP VZDUCHU
- RUKOVÄT
- ИЗХОД ЗА ВЪЗДУХ
- ДРЪЖКА
- IZLAZ ZRAKA
- LEŞIRE AER
- IZPUST ZRAKA
Brand : Ulsonix
Model : AIRCLEAN 10G
Category : Washing machine