
HT-HECTOR 420T - Washing machine Hillvert - Free user manual and instructions
Find the device manual for free HT-HECTOR 420T Hillvert in PDF.


| Product type | Petrol garden shredder |
| Brand | Hillvert |
| Model | HT-HECTOR 420T |
| Use | Shredding branches, shrubs, weeds and tall grass |
| Fuel | Unleaded petrol |
| Engine power | 15 hp |
| Engine type | OHV 4-stroke petrol engine, 1 air-cooled cylinder |
| Displacement | 420 cm³ |
| Starting | Electric / recoil |
| Engine speed | 3600 rpm |
| Blade rotation speed | 2200 rpm |
| Maximum shredding diameter | ∅120 mm |
| Fuel tank capacity | 5.5 L |
| Fuel consumption | 1.8 L/h |
| Oil tank capacity | 1.1 L |
| Guaranteed sound level | 109 dB(A) |
| Dimensions (L × W × H) | 2250 x 750 x 1460 mm |
| Weight | 167 kg |
| Battery | 12 V / 9 Ah |
| Transmission | 2 V-belts |
| Double-sided cutting knives | Yes |
| Discharge chute inclination | 90° |
| Maintenance and cleaning | Oil change, air filter cleaning, knife sharpening |
| Safety | Emergency stop button, removable guards, CE compliance |
| Repairability | Repair by approved service, original spare parts |
Frequently Asked Questions - HT-HECTOR 420T Hillvert
User questions about HT-HECTOR 420T Hillvert
0 question about this device. Answer the ones you know or ask your own.
Ask a new question about this device
Download the instructions for your Washing machine in PDF format for free! Find your manual HT-HECTOR 420T - Hillvert and take your electronic device back in hand. On this page are published all the documents necessary for the use of your device. HT-HECTOR 420T by Hillvert.
USER MANUAL HT-HECTOR 420T Hillvert
This User Manual has been translated using machine translation. We have made every effort to ensure the translation is accurate, but please note that automated translations are not perfect and are not meant to replace human translators. The official version of the User Manual is in English. Any differences between the translated version and the original English are not legally binding. If you have any questions about the accuracy of the translation, please refer to the English version, which is the official reference. More language versions are available upon request via
info@expondo.com.
Technical data
| Product name | Petrol wood chipper | |
| Model | HT-HECTOR 212T | HT-HECTOR 420T |
| Battery | 12 V / 9 Ah | |
| Engine power [HP] | 6.5 | 15 |
| Engine type | Gasoline OHV 4-stroke1-cylinder air cooled | |
| Starter | electric / recoil | |
| Engine capacity [cm3] | 196 | 420 |
| Engine speed [rpm] | 3600 | 3600 |
| Blade speed [rpm] | 2200 | 2200 |
| Drive belt type | Single V-profile belt | 2 x V-profile belt |
| Fuel tank capacity [l] | 3.5 | 5.5 |
| Fuel type | Unleaded petrol | |
| Fuel consumption [l/h] | 1.6 | 1.8 |
| Oil tank capacity [l] | 0.6 | 1.1 |
| Maximum diameter of shredded branches in the additional loading hopper[mm] | ∅80 | ∅120 |
| Guaranteed sound level [dB (A)] | 107 | 109 |
| Dimensions [mm] | 1640x450x1160-1220 | 2250x750x1460 |
| Weight [kg] | 82.5 | 167 |
| Double-sided chipping knives | √ | |
| Discharge hopper adjustment [°] | 90 | 90 |
1. General description
The user manual is designed to assist in the safe and trouble-free use of the device. The product is designed and manufactured in accordance with strict technical guidelines, using state-of-the-art technologies and components. Additionally, it is produced in compliance with the most stringent quality standards.
DO NOT USE THE DEVICE UNLESS YOU HAVE THOROUGHLY READ AND UNDERSTOOD THIS USER MANUAL.
To increase the product life of the device and to ensure trouble-free operation, use it in accordance with this user manual and regularly perform maintenance tasks. The technical data and specifications in this user manual are up to date. The manufacturer reserves the right to make changes associated with quality improvement. The device is designed to reduce noise emission risks to a minimum, taking into account technological progress and noise reduction opportunities.
Legend
| CE | The product satisfies the relevant safety standards. |
 | Read instructions before use. |
 | The product must be recycled. |
 | WARNING! or CAUTION! or REMEMBER! Applicable to the given situation.(general warning sign) |
 | Use ear protection. Exposure to loud noise may result in hearing loss. |
 | Wear protective goggles. |
 | Wear a dust mask (respiratory tract protection). |
EN
 | Wear protective gloves. |
 | Wear foot protection. |
 | ATTENTION! Loud noise warning! |
 | ATTENTION! Rotating parts, entanglement hazard! |
 | ATTENTION! Fire hazard - flammable materials! |
 | WARNING! Toxic substances, danger of poisoning! |
 | Emergency stop! |
 | ATTENTION! Hot surface, risk of burns! |
 | CAUTION: Observe a safe distance from nearby bystanders. |
 | CAUTION: There is the risk of ejection of objects from the machine! |
 | CAUTION! Sharp elements. Limb cut hazard. |
 | Keep hands or any body part away from the hopper, funnel and outlet chute when the machine is in operation. |
 | Always stand away from the discharge zone when operating the machine. |
 | Do not smoke near the device. The device contains flammable substances. |

PLEASE NOTE! Drawings in this manual are for illustration purposes only and in some details may differ from the actual product.
2. Usage safety
ATTENTION! Read all safety warnings and all instructions. Failure to follow the warnings and instructions may result in electric shock, fire and/or serious injury or even death.
The terms "device" or "product" are used in the warnings and instructions to refer to the:
Petrol wood chipper.
2.1. Safety in the workplace
a) Make sure the workplace is clean and well lit. A messy or poorly lit workplace may lead to accidents. Try to think ahead, observe what is going on and use common sense when working with the device.
b) Do not use the device in a potentially explosive environment, for example in the presence of flammable liquids, gases or dust. The device generates sparks which may ignite dust or fumes.
c) If you discover damage or irregular operation, immediately switch the device off and report it to a supervisor without delay.
d) If there are any doubts as to the correct operation of the device, contact the manufacturer's support service.
e) Only the manufacturer's service point may repair the device. Do not attempt any repairs independently!
f) In case of fire, use a powder or carbon dioxide (CO2) fire extinguisher (one intended for use on live electrical devices) to put it out.
g) Children or unauthorised persons are forbidden to enter a work station. (A distraction may result in loss of control over the device).
h) The device produces dust and debris during operation. It is important to protect bystanders from their harmful effects.
i) Use the EMERGENCY STOP if there is a risk of injury or death, accident or damage.
j) Regularly inspect the condition of the safety labels. If the labels are illegible, they must be replaced.
k) Please keep this manual available for future reference. If this device is passed on to a third party, the manual must be passed on with it.
I) Keep packaging elements and small assembly parts in a place not available to children.
m) Keep the device away from children and animals.

Remember! When using the device, protect children and other bystanders.
2.2. Personal safety
a) Do not use the device when tired, ill or under the influence of alcohol, narcotics or medication which can significantly impair the ability to operate the device.
b) The machine may be operated by physically fit persons who are able to handle the machine, are properly trained, who have reviewed this operating manual and have received training in occupational health and safety.
c) The machine is not designed to be handled by persons (including children) with limited mental and sensory functions or persons lacking relevant experience and/ or knowledge unless they are supervised by a person responsible for their safety or they have received instruction on how to operate the machine.
d) When working with the device, use common sense and stay alert. Temporary loss of concentration while using the device may lead to serious injuries.
e) Use personal protective equipment as required for working with the device, specified in section 1 (Legend).
The use of correct and approved personal protective equipment reduces the risk of injury.
f) Do not overestimate your abilities. When using the device, keep your balance and remain stable at all times. This will ensure better control over the device in unexpected situations.
g) Do not wear loose clothing or jewellery. Keep hair, clothes and gloves away from moving parts. Loose clothing, jewellery or long hair may get caught in moving parts.
h) Remove all adjusting tools or spanners before turning the device on. A tool or spanner left in the revolving part of the device may cause injury.
i) The device is not a toy. Children must be supervised to ensure that they do not play with the device.
2.3. Safe device use
a) Do not overload the device. Use the appropriate tools for the given task. A correctly-selected device will perform the task for which it was designed better and in a safer manner.
b) Do not use the device if the ON/OFF switch does not function properly (does not switch the device on and off). Devices which cannot be switched on and off using the ON/OFF switch are hazardous, should not be operated and must be repaired.
c) When not in use, store in a safe place, away from children and people not familiar with the device who have not read the user manual. The device may pose a hazard in the hands of inexperienced users.
d) Keep the device in perfect technical condition. Before each use check for general damage and especially check for cracked parts or elements and for any other conditions which may impact the safe operation of the device. If damage is discovered, hand over the device for repair before use.
e) Keep the device out of the reach of children.
f) Device repair or maintenance should be carried out by qualified persons, only using original spare parts. This will ensure safe use.
g) To ensure the operational integrity of the device, do not remove factory-fitted guards and do not loosen any screws.
h) When transporting and handling the device between the warehouse and the destination, observe the occupational health and safety principles for manual transport operations which apply in the country where the device will be used.
i) Avoid situations where the device stops working during use due to excessive loading. This may result in overheating of the drive elements and damage to the device.
j) Do not touch articulated parts or accessories unless the device has been disconnected from the power source.
k) Do not move, adjust or rotate the device in the course of work.
I) Clean the device regularly to prevent stubborn grime from accumulating.
m) Do not cover the air intake and outlet.
n) The device is not a toy. Cleaning and maintenance may not be carried out by children without supervision by an adult person.
o) It is forbidden to interfere with the structure of the device in order to change its parameters or construction.
p) Keep the device away from sources of fire and heat.
q) Do not overload the device.
r) Do not install, remove, adjust or service the discharge screen of any other parts while the engine is running.
s) When the engine is running, keep all body parts and heavy objects away from the loading hopper and the outlet chute.
t) Do not insert the limbs into the loading hopper and the chip outlet while the machine is running. It may result in pulling in and/or cutting the limbs.
u) Do not feed metal, rocks, bottles, cans on any other non-botanical objects into the machine.
v) Rotating cutting blades inside these openings will cause serious personal injury if touched.
w) Be careful while working. The machine can eject fragments of processed material from the loading hopper or outlet chute.
x) The engine gets very hot during operation. Do not touch the hot engine because it may cause burns.
y) In order to avoid fire hazard, keep leaves, grass and other combustible materials away from the hot engine and muffler.
z) Do not operate on pavement, gravel or other hard surfaces since objects might ricochet and cause injury.
aa) Some tree species may cause an allergic reaction. Dust coming out during branch processing may be harmful, appropriate protective measures should be taken.
bb) Do not operate on uneven ground or in case the unit is unstable.
cc) Please note! The processed material may bounce off the loading hopper or be ejected from the outlet chute.
dd) If the chipped shredder jams or becomes clogged, shut off the engine immediately and wait for all moving parts to stop completely before clearing.
ee) Do not insert branches larger than those specified in the technical data into the machine.
ff) Make sure that the loading hopper is empty before starting the machine.
gg) Add oil till the full marking before start using the device. If the oil level is low, engine will not start or it might shut down.
hh) Oil leaking from the machine should be reported to the appropriate services or comply with legal requirements applicable in the area of use.
ii) Danger! Danger to health and the risk of explosion of the internal combustion engine.
jj) Poisonous carbon monoxide is present in the engine exhaust. Remaining in a carbon monoxide environment may lead to losing consciousness or even death. Do not run the engine in a closed space.
kk) Protect the engine from heat, sparks and flame. Do not smoke in the vicinity of the chipper!
II) Petrol is flammable and explosive. Before refueling the engine should be turned off and cooled down.
mm) Warning! Risk of engine damage due to wrong fuel.
nn) The battery is live. Do not touch the terminals and battery connectors. Disconnecting the battery connectors should be carried out in the correct order.
oo) Do not use the machine for grinding construction debris, plastics, paper products, ropes or string or any material which may contain metal. PLEASE NOTE: Remove all nails, ropes, string or stones which can be embedded in parts of the plant (e.g. in the roots, etc.) before feeding the material into the machine.
pp) If the machine starts making unusual noise or vibrates, turn off the engine, disconnect the spark plug cable and keep it away from the spark plug to prevent accidental starting. Then wait 5 minutes for the engine to cool and check for damage.

ATTENTION! Despite the safe design of the device and its protective features, and despite the use of additional elements protecting the operator, there is still a slight risk of accident or injury when using the device. Stay alert and use common sense when using the device.
3. Use guidelines
The machine is designed for grinding branches, shrubs, weeds, shoots and long grass with a diameter not exceeding the value given in the technical data table. The user is liable for any damage resulting from unintended use of the device.
3.1. Device description
HT-HECTOR 212T
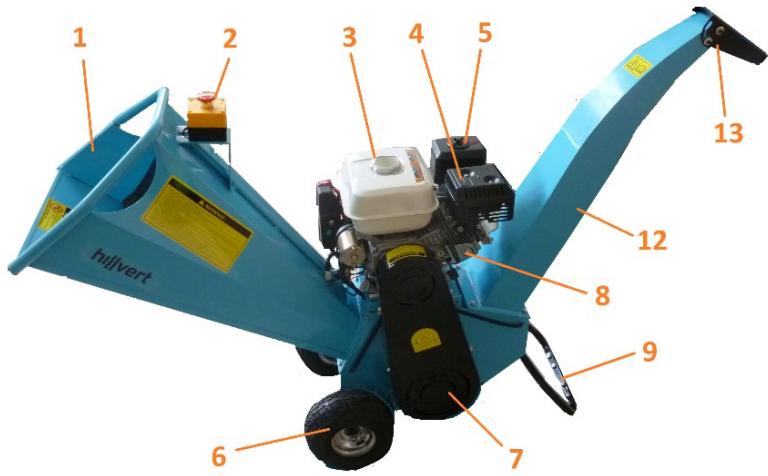
HT-HECTOR 420T

- Loading hole
- Emergency stop button
- Fuel tank
- Muffler
- Air filter
-
Wheel
-
Transmission belt cover
- Cylinder housing (block)
- Support
- Transport handle
- Transport handle joint
- Outlet chute
- Spout with adjustable angle
- Loading hopper
3.2. Preparing for use
APPLIANCE LOCATION
The machine should be used outside closed spaces, on a stable, level surface, preferably on grass or on the ground. Do not place the machine on concrete, tarmac on other hard surfaces, because chips and other residue ejected by the machine may bounce off and cause a hazard.
Work conditions
Inspect the material which is to be shredded and make sure there is enough space above the machine to load the material. It is recommended to choose a place of work as close as possible to the place where the chips are used. This will reduce the need to carry the processed material to a minimum.
Keep a safe distance from the chip discharge area. Ensure which all bystanders, children, animals or valuables are also at a safe distance from the chip discharge area.
ASSEMBLING THE APPLIANCE

| Part number | Description | Part number | Description |
| 1 | Base | 29 | Lower blade |
| 2 | Wheel axel | 31 | Engine |
| 3 | Knife | 38 | M10x24 hex bolt |
| 4 | Wheel | 39 | ∅25 washer |
| 5 | Inner protection plate of belt | 40 | M25 open nut |
| 6 | Coupling | 41 | Pin |
| 7 | Bearing | 42 | M10 locking nut |
| 8 | Roller | 43 | M10x8 hex bolt |
| 9 | 42x9x5 spacer | 44 | Emergency stop |
| 10 | Belt shield | 45 | Switch cover |
| 11 | Bearing mounting frame | 46 | M6x60 socket head screw |
| 12 | Cylinder/roller | 47 | Switch frame |
| 13 | Rubber washer | 48 | Protective cover |
| 14 | Support foot | 49 | Rubber connector |
| 15 | Bolt | 50 | M6x16 hex bolt |
| 16 | B-bolt | 51 | ∅12 washer |
| 17 | Transport handle mounting | 52 | ∅16x80x1.5 spring |
| 18 | Transport handle | 53 | M12 nut |
| 19 | Transport handle joint | 54 | M8x12 hex bolt |
| 20 | Outlet chute | 55 | Adjustment knob |
| 21 | Adjustable end of outletchute | 58 | Outlet chute rubbercomponent |
| 22 | Engine mounting | 59 | Loading hopper rubber component |
| 23 | Loading hopper | 60 | Bearing |
| 24 | Belt | 61 | Flange |
| 28 | Chain | 62 | Bearing cup |
PLEASE NOTE! Before starting the machine, fill the oil and fuel tanks according to the operating instructions.
Adding engine oil to the crankcase.
Place the machine on a flat surface and unscrew the oil tank cap. Refill the engine oil up to the top level on the dipstick.
Refueling
The machine is driven by a four-stroke engine powered by unleaded petrol. Unscrew the fuel tank cap and pour the petrol (use a funnel), taking care not to spill the liquid or exceed the maximum petrol level. The tank should be filled to a level not blocking the fuel filter visibility.
3.3. Device use
PLEASE NOTE! Before starting the machine, pour motor oil and fuel. The The machine is delivered without engine oil or fuel.
Starting and stopping
- Place the product on a flat, dry surface, stop the front wheels with the brake and make sure that the machine cannot be moved.
- Ensure that the fuel supply valve is in the "ON" position.
- Move the choke control handle to the "CHOKE" position (only with cold engine).
- Move the throttle control handle to the "FAST" position.
- Starting: set the ignition switch to the "ON" position. Take hold of the starter handle and slowly pull until it stops. Wait for the cable to pull in slightly, then quickly pull the cable to start the engine.
- Electric start: Turn and hold the key in the starting position until the engine starts. Then allow the key to return to its idle position.
- When the engine starts and is running smoothly, move the choke lever to the "RUN" position.
-
If the chipper was started on a cold engine, warm up the engine by setting the throttle lever to half position and increase the speed after about 3-4 minutes.
-
To finish work, set the throttle to "IDLE" and set the ignition switch to "OFF". For electric start, turn the key to "OFF" position.
Shredding
PLEASE NOTE! Before starting work with the machine, it is necessary to test its operation without the ground material. If the machine does not make any suspicious sounds and there are no leaks, you can continue working.
- Slowly insert the material into the loading hopper. Do not put too much at the same time. If necessary, use a long piece of shredded material to push the batch.
- PLEASE NOTE! Do not put your hands or other parts of your body into the hopper.
ATTENTION: as the wood can recoil, load the chipper while standing on the side of the device.
View from above:

A - engine
B - loading hopper
C - recoil zone
D - operator zone
Directions for use:
- Load the material slowly. If the engine makes an unusual noise, it means which the material is loaded too quickly.
-
Roots and other dirty materials will dull and damage the knives.
-
Remember to frequently remove chips from the machine. Otherwise they can cause a blockage.
- Avoid grinding wet material as it may clog the machine. If grinding the wet material is necessary, it should be separated from the dry material.
- Do not insert material with a diameter larger than the one given in the technical data table.
- It is better to shred crush fresh green wood. The knives will stay sharp longer.
3.4. Cleaning and maintenance
a) Make sure the machine has stopped completely and disconnect the spark plug wire, before letting free a jam or clog, emptying the bag, filling the gas tank or performing any maintenance or repairs.
b) Use only non-corrosive cleaners to clean the surface.
c) After cleaning the device, all parts should be dried completely before using it again.
d) Store the unit in a dry, cool place, free from moisture and direct exposure to sunlight.
e) Do not spray the device with a water jet or submerge it in water.
f) Do not allow water to get inside the device through vents in the housing of the device.
g) The device must be regularly inspected to check its technical efficiency and spot any damage.
h) Do not use sharp and/or metal objects for cleaning (e.g. a wire brush or a metal spatula) because they may damage the surface material of the appliance.
i) Do not clean the device with an acidic substance, agents of medical purposes, thinners, fuel, oils or other chemical substances because it may damage the device.
j) In case of deterioration of the efficiency of grinding, the blades should be rotated, sharpened or replaced.
k) Clean the chips which have accumulated on the machine and around the motor with a brush or vacuum cleaner.
I) When you have finished work, always remove all leftovers from loading hoppers and outlet chute.
Frequency of basic maintenance work :
| Procedure | Before each use | After every 25 hours of operation | After every 100 hours of operation |
| Check the oil level | O | ||
| Check the general technical condition of the device | O | ||
| Check the technical condition of the knives | O | ||
| Check the belts | O | ||
| Check the tyre pressure | O | ||
| Clean the outside of the engine and cool it down | O | ||
| Change engine oil | First time after 5 hours of work | O | |
| Replace the air filter | O | ||
| Replace the spark plugs | O |
Engine maintenance
The spark plug should undergo a technical inspection after every 50 hours of operation. Check the color of the deposit at the end of the spark plug. The color should be brown. Remove the residue using a hard brush. Check the distance between the electrodes and adjust it if necessary. The correct electrode gap is 0.7 to 0.8 mm.
Changing the engine oil
Place the machine on a flat surface, switch it on and warm up the engine for a few minutes. Unscrew the oil tank cap. Unscrew the oil tank cap. Place a container to collect the waste oil underneath the engine. Remove the oil drain screw and drain all the oil. To protect against oil dripping into the frame of the machine, it is recommended to use a pipe to bring the oil directly into the waste oil container. Check the drain screw, gasket, oil plug and ring. If these parts are damaged or worn,
they must be replaced. Replace and tighten the drain screw. After this operation, add fresh oil to the upper level on the dipstick.
WARNING! Hot surfaces! Wear protective gloves!
Air filter
The air filter should be inspected for technical condition. It should be unscrewed and cleaned or replaced with a new one. The filter should be washed with water and a mild detergent, dried and replaced. Do not start the engine with the air filter disassembled.
Fuel filter
The fuel filter should be inspected after every 150 hours of operation or after 3 months of use. Remove and clean the fuel filter. Unscrew the fuel tank cap, clean it in water with a mild detergent, dry and replace it.
Battery maintenance
Batteries installed in the machines do not require refilling or special maintenance. Make sure that the terminals are not covered with dust and rust. Corrosion can cause improper battery operation and may be dangerous. If you notice any signs of corrosion, disconnect terminals and remove the rust cleaning the terminals and connectors with lye – a solution of baking soda and water (sodium bicarbonate). Cover the terminals with antioxidant grease before reconnecting and tightening them.
Storage
Before storing the machine, remember to do the following.
- Disconnect the spark plug wire to prevent accidental start.
- Clean the machine and dispose of the chips.
- Leave the machine on a flat surface in a well-ventilated room out of reach of direct sunlight.
- Do not store the machine with ignition sources present, such as a stove, gas or electric heater, etc.
- Do not store the machine in places where exhaust or toxic gases can enter the living quarters.
-
Put the covers on the loading hopper and outlet chute.
-
If the machine is not to be used for more than 30 days, drain the tank and the carburetor. Unscrew the spark plug and pour approximately 5 ml of engine oil through the cylinder plug hole. With the switch in the OFF position, gently pull the starter cord several times. Screw back the spark plug and pull the starter cord until you feel resistance, and do not pull any more.
Transport
During transport:
- switch off the machine, close the fuel valve and disconnect the spark plug wire
- drain the fuel tank
■ put the covers on the loading hopper and outlet chute
■ transport the machine in the working position
■ transport the machine across small distances holding it by the handle, slightly tilting the machine and resting its weight on the wheels.
SAFE REMOVAL OF BATTERIES AND RECHARGEABLE BATTERIES
12 V/9 Ah battery is installed in the devices.
Remove used batteries from the device using the same procedure by which you installed them.
Recycle batteries with the appropriate organisation or company.
DISPOSING OF USED DEVICES
Do not dispose of this device in municipal waste systems. Hand it over to an electric and electrical device recycling and collection point. Check the symbol on the product, instruction manual and packaging. The plastics used to construct the device can be recycled in accordance with their markings. By choosing to recycle you are making a significant contribution to the protection of our environment.
Contact local authorities for information on your local recycling facility.

APPARATETS PLACERING
SAMLING AF APPARATET

PLAATS VAN HET APPARAAT
HET APPARAAT MONTEREN

| Artikkelnummer | Beskrivelse | Artikkelnummer | Beskrivelse |
| 1 | Ramme | 29 | Nedre blad |
| 2 | Hjulaksel | 31 | Motor |
| 3 | Kniv | 38 | M10x24sekskantbolt |
| 4 | Hjul | 39 | ∅25 skive |
| 5 | Innvendig beskyttelsesplate av beltet | 40 | M25 åpen mutter |
| 6 | Kobling | 41 | Pin |
| 7 | Peiling | 42 | M10 låsemutter |
| 8 | Aksel | 43 | M10x8sekskantbolt |
| 9 | 42x9x5 avstandsstykke | 44 | Nødstopp |
| 10 | Belteskjold | 45 | Bryterdeksel |
| 11 | Lager monteringsramme | 46 | M6x60hodeskrue |
| 12 | Sylinder/rulle | 47 | Bytt ramme |
| 13 | Gummi skive | 48 | Beskyttende deksel |
| 14 | Støttefot | 49 | Gummikobling |
| 15 | Bolt | 50 | M6x16sekskantbolt |
| 16 | B-bolt | 51 | ∅12 skive |
| 17 | Transporthåndtaksmontering | 52 | ∅16x80x1,5 fjær |
| 18 | Transporthåndtak | 53 | M12 mutter |
| 19 | Transporthåndtaksledd | 54 | M8x12sekskantbolt |
| 20 | Utløpsrenne | 55 | Justeringsknapp |
| 21 | Justerbar ende av utløpsrenne | 58 | Utløpssjaktgummikomponent |
| 22 | Motorfeste | 59 | Lastebeholdergummikomponent |
| 23 | Lastebeholder | 60 | Peiling |
| 24 | Reim | 61 | Flens |
| 28 | Kjetting | 62 | Lagerkopp |
OBS! Før du starter maskinen, fyll olje- og drivstofftankene i henhold til bruksanvisningen.
APPARATENS PLACERING
| Broj dijela | Opis | Broj dijela | Opis |
| 1 | Baza | 29 | Donja oštrica |
| 2 | Osovina kotača | 31 | Motor |
| 3 | Nož | 38 | M10x24 šesterokutni vijak |
| 4 | Kotač | 39 | Podloška 25 |
| 5 | Unutarnja zaštitna ploča remena | 40 | M25 otvorena matica |
| 6 | Spojnica | 41 | Pin |
| 7 | Ležaj | 42 | M10 sigurnosna matica |
| 8 | Valjak | 43 | M10x8 šesterokutni vijak |
| 9 | 42x9x5 odstojnik | 44 | Zaustavljanje u nuždi |
| 10 | Štitnik za pojas | 45 | Poklopac prekidača |
| 11 | Okvir za montažu ležaja | 46 | M6x60 vijak s utičnicom |
| 12 | Cilindar/valjak | 47 | Okvir prekidača |
| 13 | Gumena podloška | 48 | Zaštitni poklopac |
| 14 | Potporno stopalo | 49 | Gumeni konektor |
| 15 | Vijak | 50 | M6x16 šesterokutni vijak |
| 16 | B-vijak | 51 | 12 podloška |
| 17 | Montaža transportne ručke | 52 | 16 × 80 × 1,5 opruga |
| 18 | Ručka za transport | 53 | Matica M12 |
| 19 | Spoj transportne ručke | 54 | M8x12 šesterokutni vijak |
| 20 | Odvodni žlijeb | 55 | Gumb za podešavanje |
| 21 | Podesivi kraj izlaznog žlijeba | 58 | Gumeni dio izlaznog žlijeba |
| 22 | Montaža motora | 59 | Gumena komponenta spremnika za utovar |
| 23 | Lijevka za utovar | 60 | Ležaj |
| 24 | Pojas | 61 | Prirubnica |
| 28 | Lanac | 62 | Čašica ležaja |
NAPOMENA! Prije pokretanja stroja, napunite spremnike ulja i goriva prema uputama za uporabu.
Dodavanje motornog ulja u kućište radilice.
Postavite stroj na ravnu površinu i odvrnite čep spremnika za ulje. Dopunite motorno ulje do gornje razine na mjernoj šipki.
Punjenje goriva
Stroj pokreće četverotaktni motor na bezolovni benzin. Odvijte čep spremnika goriva i ulijte benzin (upotrijebite lijevak), pazeći da ne prolijete tekućinu ili da ne prekoračite maksimalnu razinu benzina. Spremnik treba biti napunjen do razine koja ne blokira vidljivost filtra goriva.
3.3. Upotreba uređaja
NAPOMENA! Prije pokretanja stroja ulijte motorno ulje i gorivo. Stroj se isporučuje bez motornog ulja ili goriva.
Pokretanje i zaustavljanje
-
Postavite proizvod na ravnu, suhu površinu, zaustavite prednje kotače kočnicom i osigurajte da se stroj ne može pomaknuti.
-
Uvjerite se da je ventil za dovod goriva u položaju "ON".
- Pomaknite ručicu za upravljanje čokom u položaj "CHOKE" (samo s hladnim motorom).
- Pomaknite ručicu za kontrolu gasa u položaj "FAST".
- Pokretanje: postavite prekidač paljenja u položaj "ON". Uhvatite ručicu startera i polako povlačite dok se ne zaustavi. Pričekajte da se sajla malo uvuče, zatim brzo povucite sajlu da pokrenete motor.
- Električni start: Okrenite i držite ključ u početnom položaju dok se motor ne pokrene. Zatim pustite ključ da se vrati u položaj mirovanja.
- Kada se motor pokrene i radi glatko, pomaknite polugu čoka u položaj "RAD".
- Ako je sjekač pokrenut na hladnom motoru, zagrijte motor postavljanjem poluge gasa na pola položaja i povećajte brzinu nakon otprilike 3-4 minute.
- Za završetak rada, postavite gas na "PRIZAN hod" i postavite prekidač paljenja na "OFF". Za električno pokretanje, okrenite ključ u položaj "OFF".
Usitnjavanje
NAPOMENA! Prije početka rada sa strojem potrebno je isprobati njegov rad bez brušenog materijala. Ako stroj ne proizvodi sumnjive zvukove i nema curenja, možete nastaviti s radom.
- Polako umetnite materijal u spremnik za utovar. Nemojte stavljati previše u isto vrijeme. Ako je potrebno, upotrijebite dugačak komad usitnjenog materijala za guranje šarže.
- NAPOMENA! Ne stavljajte ruke ili druge dijelove tijela u spremnik.
PAŽNJA: budući da se drvo može povući, punite sjekač stojeći sa strane uređaja.
Pogled odozgo:
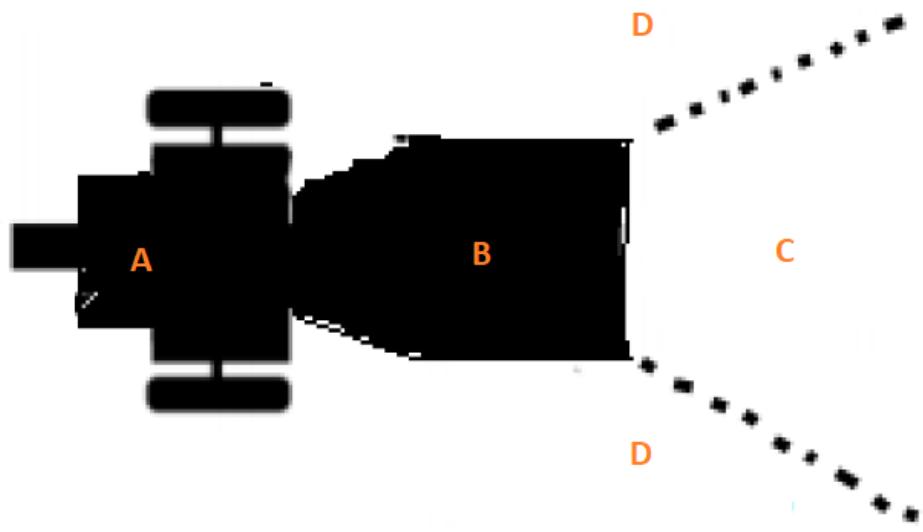
A - motor
B - spremnik za utovar
C - zona trzaja
D - operaterska zona
Upute za upotrebu:
- Polako utovarujte materijal. Ako motor proizvodi neuobičajenu buku, to znači da se materijal prebrzo utovaruje.
- Korijenje i drugi prljavi materijali će otupiti i oštetiti noževe.
- Ne zaboravite često uklanjati strugotine iz stroja. Inače mogu izazvati začepljenje.
- Izbjegavajte mljevenje mokrog materijala jer može začepiti stroj. Ako je potrebno mljevenje mokrog materijala, potrebno ga je odvojiti od suhog materijala.
- Nemojte umetati materijal promjera većeg od onog navedenog u tablici tehničkih podataka.
- Bolje je usitniti slomiti svježe zeleno drvo. Noževi će duže ostati oštri.
For the disposal of the device please consider and act according to the national and local rules and regulations.
CONTACT
expondo Polska sp. z o.o. sp. k.


- GENERAL DESCRIPTION
- DO NOT USE THE DEVICE UNLESS YOU HAVE THOROUGHLY READ AND UNDERSTOOD THIS USER MANUAL
- USAGE SAFETY
- SAFETY IN THE WORKPLACE
- PERSONAL SAFETY
- SAFE DEVICE USE
- USE GUIDELINES
- DEVICE DESCRIPTION
- PREPARING FOR USE
- APPLIANCE LOCATION
- WORK CONDITIONS
- ASSEMBLING THE APPLIANCE
- ADDING ENGINE OIL TO THE CRANKCASE
- REFUELING
- DEVICE USE
- STARTING AND STOPPING
- SHREDDING
- CLEANING AND MAINTENANCE
- ENGINE MAINTENANCE
- CHANGING THE ENGINE OIL
- WARNING! HOT SURFACES! WEAR PROTECTIVE GLOVES
- AIR FILTER
- FUEL FILTER
- BATTERY MAINTENANCE
- STORAGE
- TRANSPORT
- DURING TRANSPORT
- DISPOSING OF USED DEVICES
- APPARATETS PLACERING
- SAMLING AF APPARATET
- PLAATS VAN HET APPARAAT
- HET APPARAAT MONTEREN
- APPARATENS PLACERING
- DODAVANJE MOTORNOG ULJA U KUĆIŠTE RADILICE
- PUNJENJE GORIVA
- UPOTREBA UREĐAJA
- POKRETANJE I ZAUSTAVLJANJE
- USITNJAVANJE
- UPUTE ZA UPOTREBU
- CONTACT
Brand : Hillvert
Model : HT-HECTOR 420T
Category : Washing machine